Difference between revisions of "Chi-To"
(→Machine guns) (Tag: Visual edit) |
(Edits) |
||
| Line 1: | Line 1: | ||
{{Specs-Card|code=jp_type_4_chi_to}} | {{Specs-Card|code=jp_type_4_chi_to}} | ||
| − | {{ | + | {{About |
| + | | about = Japanese medium tank '''{{PAGENAME}}''' | ||
| + | | usage = late version | ||
| + | | link = Chi-To Late | ||
| + | }} | ||
== Description == | == Description == | ||
| − | <!--''In the description, the first part | + | <!-- ''In the description, the first part should be about the history of the creation and combat usage of the vehicle, as well as its key features. In the second part, tell the reader about the ground vehicle in the game. Insert a screenshot of the vehicle, so that if the novice player does not remember the vehicle by name, he will immediately understand what kind of vehicle the article is talking about.'' --> |
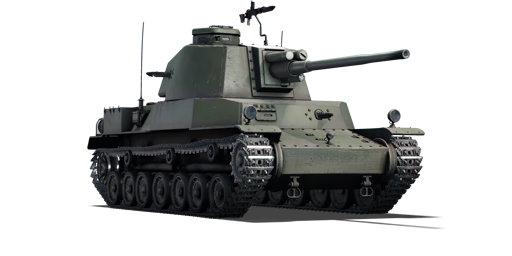
[[File:GarageImage_Type4Chi-To.jpg|420px|thumb|left]] | [[File:GarageImage_Type4Chi-To.jpg|420px|thumb|left]] | ||
| − | {{ | + | {{Break}} |
| − | The '''{{Specs|name}}''' is a | + | The '''{{Specs|name}}''' is a rank {{Specs|rank}} Japanese medium tank {{Battle-rating}}. It was introduced along with the initial Japanese Ground Forces tree in [[Update 1.65 "Way of the Samurai"]]. |
The Type 4 Chi-To looks similar to the [[Chi-Nu|Type 3 Chi-Nu]], though with a longer chassis with an extra wheel. Turret is also similar in look, though the turret side is more smooth and has a machine gun sticking out the right side. The big differences on the turret is the gun barrel. The gun barrel has no muzzle brake in its design and the recoil tube has been moved from a single tube on the bottom to two tubes on top. | The Type 4 Chi-To looks similar to the [[Chi-Nu|Type 3 Chi-Nu]], though with a longer chassis with an extra wheel. Turret is also similar in look, though the turret side is more smooth and has a machine gun sticking out the right side. The big differences on the turret is the gun barrel. The gun barrel has no muzzle brake in its design and the recoil tube has been moved from a single tube on the bottom to two tubes on top. | ||
| Line 14: | Line 18: | ||
== General info == | == General info == | ||
=== Survivability and armour === | === Survivability and armour === | ||
| − | <!--''Describe armour protection. Note the most well protected and key weak areas. Appreciate the layout of modules as well as the number and location of crew members. Is the level of armour protection sufficient, is the placement of modules | + | <!-- ''Describe armour protection. Note the most well protected and key weak areas. Appreciate the layout of modules as well as the number and location of crew members. Is the level of armour protection sufficient, is the placement of modules helpful for survival in combat? If necessary use a visual template to indicate the most secure and weak zones of the armour.'' --> |
| − | |||
| − | |||
'''Armour type:''' | '''Armour type:''' | ||
| Line 30: | Line 32: | ||
| Turret || 75 mm (16°) ''Turret front'' <br> 50-75 mm (10°) ''Gun mantlet'' || 50 mm (15-16°) <br> 50 mm (0-65°) ''Right machine gun port'' || 50 mm (15-50°) ''Turret rear'' <br> 10 mm ''Turret rear underside'' || 20 mm | | Turret || 75 mm (16°) ''Turret front'' <br> 50-75 mm (10°) ''Gun mantlet'' || 50 mm (15-16°) <br> 50 mm (0-65°) ''Right machine gun port'' || 50 mm (15-50°) ''Turret rear'' <br> 10 mm ''Turret rear underside'' || 20 mm | ||
|- | |- | ||
| − | ! Armour !! Sides !! Roof | + | ! Armour !! Sides !! Roof |
|- | |- | ||
| Cupola || 75 mm || 20 mm | | Cupola || 75 mm || 20 mm | ||
| Line 44: | Line 46: | ||
<!-- ''Write about the mobility of the ground vehicle. Estimate the specific power and manoeuvrability, as well as the maximum speed forwards and backwards.'' --> | <!-- ''Write about the mobility of the ground vehicle. Estimate the specific power and manoeuvrability, as well as the maximum speed forwards and backwards.'' --> | ||
| − | {{tankMobility|abMinHp= 620|rbMinHp= 354}} | + | {{tankMobility|abMinHp=620|rbMinHp=354}} |
== Armaments == | == Armaments == | ||
=== Main armament === | === Main armament === | ||
| − | <!--''Give the reader information about the characteristics of the main gun. Assess its effectiveness in a battle based on the reloading speed, ballistics and the power of shells. Do not forget about the | + | <!-- ''Give the reader information about the characteristics of the main gun. Assess its effectiveness in a battle based on the reloading speed, ballistics and the power of shells. Do not forget about the flexibility of the fire, that is how quickly the cannon can be aimed at the target, open fire on it and aim at another enemy. Add a link to the main article on the gun: <code><nowiki>{{main|Name of the weapon}}</nowiki></code>. Describe in general terms the ammunition available for the main gun. Give advice on how to use them and how to fill the ammunition storage.'' --> |
{{main|Type II Model II (75 mm)}} | {{main|Type II Model II (75 mm)}} | ||
| − | {| class="wikitable" style="text-align:center | + | {| class="wikitable" style="text-align:center" width="100%" |
| − | |||
| − | |||
| − | |||
| − | |||
| − | |||
| − | |||
| − | |||
| − | |||
| − | |||
| − | |||
| − | |||
| − | |||
| − | |||
| − | |||
| − | |||
| − | |||
| − | |||
| − | |||
|- | |- | ||
| − | | | + | ! colspan="5" | [[Type II Model II (75 mm)|75 mm Type II Model II]] || colspan="5" | Turret rotation speed (°/s) || colspan="4" | Reloading rate (seconds) |
|- | |- | ||
| − | + | ! Mode !! Capacity !! Vertical !! Horizontal !! Stabilizer | |
| + | ! Stock !! Upgraded !! Full !! Expert !! Aced | ||
| + | ! Stock !! Full !! Expert !! Aced | ||
|- | |- | ||
| − | ! | + | ! ''Arcade'' |
| + | | rowspan="2" | 55 || rowspan="2" | -10°/+20° || rowspan="2" | ±180° || rowspan="2" | N/A || 12.09 || 16.73 || 20.32 || 22.47 || 23.91 || rowspan="2" | 10.01 || rowspan="2" | 8.85 || rowspan="2" | 8.16 || rowspan="2" | 7.70 | ||
|- | |- | ||
| − | ! | + | ! ''Realistic'' |
| − | + | | 7.56 || 8.89 || 10.79 || 11.94 || 12.70 | |
| − | |||
| − | |||
| − | | | ||
| − | | 10. | ||
|- | |- | ||
|} | |} | ||
| − | + | ==== Ammunition ==== | |
{| class="wikitable sortable" style="text-align:center" width="100%" | {| class="wikitable sortable" style="text-align:center" width="100%" | ||
! colspan="8" | Penetration statistics | ! colspan="8" | Penetration statistics | ||
|- | |- | ||
! rowspan="2" data-sort-type="text" | Ammunition | ! rowspan="2" data-sort-type="text" | Ammunition | ||
| − | ! rowspan="2 | + | ! rowspan="2" | Type of<br>warhead |
| − | ! colspan="6" | '''Penetration | + | ! colspan="6" | '''Penetration @ 0° Angle of Attack (mm)''' |
|- | |- | ||
| − | ! | + | ! 10 m !! 100 m !! 500 m !! 1,000 m !! 1,500 m !! 2,000 m |
| − | ! | ||
| − | ! | ||
| − | ! | ||
| − | ! | ||
| − | ! | ||
|- | |- | ||
| − | | Type 1 APHE || APHE || | + | | Type 1 APHE || APHE || 149 || 146 || 133 || 118 || 105 || 93 |
|- | |- | ||
| − | | Type 4 Kou || APHE || | + | | Type 4 Kou || APHE || 151 || 148 || 137 || 124 || 112 || 101 |
|- | |- | ||
| − | | Type 90 HE || HE || 8 || 8 || 8 || 8 || 8 || 8 | + | | Type 90 HE || HE || 8 || 8 || 8 || 8 || 8 || 8 |
|- | |- | ||
|} | |} | ||
{| class="wikitable sortable" style="text-align:center" width="100%" | {| class="wikitable sortable" style="text-align:center" width="100%" | ||
| − | ! colspan=" | + | ! colspan="10" | Shell details |
|- | |- | ||
! rowspan="2" data-sort-type="text" | Ammunition | ! rowspan="2" data-sort-type="text" | Ammunition | ||
| − | ! rowspan="2 | + | ! rowspan="2" | Type of<br>warhead |
| − | ! rowspan="2" |Velocity <br | + | ! rowspan="2" | Velocity<br>(m/s) |
| − | ! rowspan="2" |Projectile<br | + | ! rowspan="2" | Projectile<br>Mass (kg) |
| − | ! rowspan="2" | | + | ! rowspan="2" | Fuse delay<br>(m) |
| − | + | ! rowspan="2" | Fuse sensitivity<br>(mm) | |
| − | ! rowspan="2" | | + | ! rowspan="2" | Explosive Mass<br>(TNT equivalent) (g) |
| − | + | ! colspan="3" | Ricochet | |
| − | ! rowspan="2" | | ||
| − | |||
| − | ! colspan="3" | | ||
|- | |- | ||
| − | ! 0% | + | ! 0% !! 50% !! 100% |
| − | ! 50% | ||
| − | ! 100% | ||
|- | |- | ||
| − | | Type 1 APHE || APHE || 865 || 6. | + | | Type 1 APHE || APHE || 865 || 6.56 || 1.3 || 15 || 84.8 || 47° || 60° || 65° |
|- | |- | ||
| − | | Type 4 Kou || APHE || 865 || 6. | + | | Type 4 Kou || APHE || 865 || 6.75 || 1.2 || 14 || 80.64 || 47° || 60° || 65° |
|- | |- | ||
| − | | Type 90 HE || HE || 830 || 6. | + | | Type 90 HE || HE || 830 || 6.17 || 0.1 || 0.1 || 490 || 79° || 80° || 81° |
|- | |- | ||
|} | |} | ||
| − | + | ==== [[Ammo racks]] ==== | |
| − | [[File: | + | [[File:Ammoracks_{{PAGENAME}}.png|right|thumb|x300px|[[Ammo racks]] of the {{PAGENAME}}]] |
| − | {| class="wikitable | + | '''Last updated: 1.101.0.53''' |
| + | {| class="wikitable" style="text-align:center" | ||
|- | |- | ||
| − | ! | + | ! Full<br>ammo |
| − | ! | + | ! 1st<br>rack empty |
| − | ! | + | ! 2nd<br>rack empty |
| − | ! | + | ! 3rd<br>rack empty |
| − | ! | + | ! 4th<br>rack empty |
| − | ! | + | ! 5th<br>rack empty |
| − | ! | + | ! 6th<br>rack empty |
| − | ! | + | ! Visual<br>discrepancy |
| − | |||
| − | |||
|- | |- | ||
| − | + | | '''55''' || 40 ''(+15)'' || 34 ''(+21)'' || 28 ''(+27)'' || 22 ''(+33)'' || 10 ''(+45)'' || 0 ''(+55)'' || No | |
|- | |- | ||
|} | |} | ||
| − | Turret empty: | + | |
| + | Turret and hull sides empty: 22 ''(+33)'' | ||
=== Machine guns === | === Machine guns === | ||
| − | <!--''Offensive and anti-aircraft machine guns not only allow you to fight some aircraft | + | <!-- ''Offensive and anti-aircraft machine guns not only allow you to fight some aircraft but also are effective against lightly armoured vehicles. Evaluate machine guns and give recommendations on its use.'' --> |
| − | {{main|Type 97 | + | {{main|Type 97 (7.7 mm)}} |
| − | {| class="wikitable" style="text-align:center" | + | {| class="wikitable" style="text-align:center" width="50%" |
|- | |- | ||
| − | ! colspan="5" |[[Type 97 | + | ! colspan="5" | [[Type 97 (7.7 mm)|7.7 mm Type 97]] |
|- | |- | ||
| − | !Mount | + | ! Mount !! Capacity (Belt) !! Fire rate !! Vertical !! Horizontal |
| − | ! | ||
| − | ! | ||
| − | ! | ||
| − | ! | ||
|- | |- | ||
| − | |Pintle | + | | Pintle || 1,000 (20) || 499 || -10°/+70° || ±60° |
| − | | 1,000 (20) || 499 || -10°/+70° || ±60° | ||
|- | |- | ||
| − | |Hull | + | | Hull || 3,000 (20) || 499 || ±8° || ±8° |
| − | | 3,000 (20) || 499 || ±8° || ±8° | ||
|- | |- | ||
|} | |} | ||
== Usage in battles == | == Usage in battles == | ||
| − | <!--''Describe the tactics of playing in the vehicle, the features of using vehicles in the team and advice on tactics. Refrain from creating a "guide" - do not impose a single point of view but give the reader food for thought. Describe the most dangerous enemies and give recommendations on fighting them. If necessary, note the specifics of the game in different modes (AB, RB, SB).''--> | + | <!-- ''Describe the tactics of playing in the vehicle, the features of using vehicles in the team and advice on tactics. Refrain from creating a "guide" - do not impose a single point of view but instead give the reader food for thought. Describe the most dangerous enemies and give recommendations on fighting them. If necessary, note the specifics of the game in different modes (AB, RB, SB).'' --> |
As previously stated, the Chi-To best performs in the role of sniper, engaging hulldown at medium to long range against opposing medium tanks. The good gun depression, average mobility, and good reverse speed allow you to make it to good positions at an average pace and allow you to reverse back into cover when reloading. | As previously stated, the Chi-To best performs in the role of sniper, engaging hulldown at medium to long range against opposing medium tanks. The good gun depression, average mobility, and good reverse speed allow you to make it to good positions at an average pace and allow you to reverse back into cover when reloading. | ||
| Line 191: | Line 158: | ||
As for some other enemies: | As for some other enemies: | ||
| − | + | [[Churchill VII]]: do not engage from the front '''at all'''. Sneak around to the side and shoot there. | |
| + | |||
| + | [[ARL-44]]: shoot the sides. It's not worth facing this tank head on, it's too much of a risk. | ||
| + | |||
| + | [[ARL-44 (ACL-1)]]: aim for the turret if you face this tank from the front, then finish it from the sides. Be careful not to get shot. | ||
| + | |||
| + | [[M6A1]]: the frontal armour on this thing can be a bit fiddly. Aim for a spot that doesn't seem to have more than one armour plate layered on it. | ||
Most tanks you face can penetrate you frontally if they shoot your frontal plate when it is not angled. It is recommended to get the first shot off and then retreat, and make a second surprise attack. Most of the time, a penetration results in a one-shot with this tank. You can penetrate pretty much any medium or light tank frontally by shooting the upper front plate, so use that to your advantage. | Most tanks you face can penetrate you frontally if they shoot your frontal plate when it is not angled. It is recommended to get the first shot off and then retreat, and make a second surprise attack. Most of the time, a penetration results in a one-shot with this tank. You can penetrate pretty much any medium or light tank frontally by shooting the upper front plate, so use that to your advantage. | ||
| − | ===Modules=== | + | |
| + | === Modules === | ||
{| class="wikitable" | {| class="wikitable" | ||
| − | !Tier | + | ! Tier |
| − | ! colspan="2" |Mobility | + | ! colspan="2" | Mobility |
| − | !Protection | + | ! Protection |
| − | ! colspan="2" |Firepower | + | ! colspan="2" | Firepower |
|- | |- | ||
| − | |I | + | | I |
| − | |Tracks | + | | Tracks |
| − | |Parts | + | | |
| − | |Horizontal Drive | + | | Parts |
| + | | Horizontal Drive | ||
| | | | ||
|- | |- | ||
| − | |II | + | | II |
| − | |Suspension | + | | Suspension |
| − | |FPE | + | | Brake System |
| − | |Adjustment of Fire | + | | FPE |
| − | |Type 4 Kou | + | | Adjustment of Fire |
| + | | Type 4 Kou | ||
|- | |- | ||
| − | |III | + | | III |
| − | |Filters | + | | Filters |
| − | |Crew Replenishment | + | | |
| − | |Elevation Mechanism | + | | Crew Replenishment |
| + | | Elevation Mechanism | ||
| | | | ||
|- | |- | ||
| − | |IV | + | | IV |
| − | |Transmission | + | | Transmission |
| + | | Engine | ||
| | | | ||
| − | |Artillery Support | + | | Artillery Support |
| | | | ||
|- | |- | ||
|} | |} | ||
| + | |||
=== Pros and cons === | === Pros and cons === | ||
| − | <!--'' | + | <!-- ''Summarise and briefly evaluate the vehicle in terms of its characteristics and combat effectiveness. Mark its pros and cons in a bulleted list. Try not to use more than 6 points for each of the characteristics. Avoid using categorical definitions such as "bad", "good" and the like - use substitutions with softer forms such as "inadequate" and "effective".'' --> |
| + | |||
'''Pros:''' | '''Pros:''' | ||
| Line 241: | Line 221: | ||
* Armour is average and mostly flat and unangled, like the Panzer IV. | * Armour is average and mostly flat and unangled, like the Panzer IV. | ||
| − | * The Chi-To is asymmetric and is a large tank, it is difficult to hide from enemies. | + | * The Chi-To is asymmetric and is a large tank, it is difficult to hide from enemies. |
* Reload rate quite slow. | * Reload rate quite slow. | ||
* Angling front armour can expose the 50 mm hull cheek armour. | * Angling front armour can expose the 50 mm hull cheek armour. | ||
| Line 247: | Line 227: | ||
== History == | == History == | ||
| − | <!--''Describe the history of the creation and combat usage of the | + | <!-- ''Describe the history of the creation and combat usage of the vehicle in more detail than in the introduction. If the historical reference turns out to be too long, take it to a separate article, taking a link to the article about the vehicle and adding a block "/History" (example: <nowiki>https://wiki.warthunder.com/(Vehicle-name)/History</nowiki>) and add a link to it here using the <code>main</code> template. Be sure to reference text and sources by using <code><nowiki><ref></ref></nowiki></code>, as well as adding them at the end of the article with <code><nowiki><references /></nowiki></code>. This section may also include the vehicle's dev blog entry (if applicable) and the in-game encyclopedia description (under <code><nowiki>=== In-game description ===</nowiki></code>, also if applicable).'' --> |
===Development=== | ===Development=== | ||
| − | The lackluster performance of Japanese tanks in World War II called for the development of newer medium tanks in the Imperial Japanese Army. The standard tank of the time was the [[Chi-Ha|Type 97 Chi-Ha]], which has its chassis used in many expedient models to provide a bigger gun for the Japanese inventory such as the [[Chi-Ha Kai|Chi-Ha Kai]], [[Chi-He|Type 1 Chi-He]], [[Ho-I|Type 2 Ho-I]], and [[Chi-Nu|Type 3 Chi-Nu]]. By the time of Chi-Nu, however, the Chi-Ha chassis was becoming outdated and so a new tank design using an improved chassis was needed for future development.<ref name="ZalogaJapaneseTank">Zaloga 2007</ref> | + | The lackluster performance of Japanese tanks in World War II called for the development of newer medium tanks in the Imperial Japanese Army. The standard tank of the time was the [[Chi-Ha|Type 97 Chi-Ha]], which has its chassis used in many expedient models to provide a bigger gun for the Japanese inventory such as the [[Chi-Ha Kai|Chi-Ha Kai]], [[Chi-He|Type 1 Chi-He]], [[Ho-I|Type 2 Ho-I]], and [[Chi-Nu|Type 3 Chi-Nu]]. By the time of Chi-Nu, however, the Chi-Ha chassis was becoming outdated and so a new tank design using an improved chassis was needed for future development.<ref name="ZalogaJapaneseTank">Zaloga Steven. ''Japanese Tanks 1939-1945'' Great Britain: Osprey Publishing Ltd., 2007</ref> |
In 1943, development started of the '''Chi-To''' tank, which features a new chassis and more powerful engine. Its armament is a 75 mm gun based off the Type 88 anti-aircraft gun, giving it a high-velocity weapon. Armour on the tank was welded and was quite thick in comparison to its predecessor at 75 mm thick. The tank was accepted for service in 1944 and was expected to enter mass production with 20 per month at Mitsubishi and 5 per month at Kobe-Seiko. In terms of Japanese armour development, the Chi-To was the most sophisticated tank to enter production levels.<ref name="ZalogaJapaneseTank" /> | In 1943, development started of the '''Chi-To''' tank, which features a new chassis and more powerful engine. Its armament is a 75 mm gun based off the Type 88 anti-aircraft gun, giving it a high-velocity weapon. Armour on the tank was welded and was quite thick in comparison to its predecessor at 75 mm thick. The tank was accepted for service in 1944 and was expected to enter mass production with 20 per month at Mitsubishi and 5 per month at Kobe-Seiko. In terms of Japanese armour development, the Chi-To was the most sophisticated tank to enter production levels.<ref name="ZalogaJapaneseTank" /> | ||
===War's End=== | ===War's End=== | ||
| − | Despite its potential, the Type 4 Chi-To was never made in large numbers. At the war's end, only six chassis were made, with only two of those made into tanks. | + | Despite its potential, the Type 4 Chi-To was never made in large numbers. At the war's end, only six chassis were made, with only two of those made into tanks. |
| − | The two Type 4 produced were cast into Lake Hamana between the 23 and the 28 August 1945 to avoid their capture. One was found by the U.S. occupation forces following Japan's surrender in World War II. The tank was then transported to Aberdeen Proving Grounds for tests and would eventually scrap them in October 1952.<ref name="MaiScrapping">Sun 2017</ref> | + | The two Type 4 produced were cast into Lake Hamana between the 23 and the 28 August 1945 to avoid their capture. One was found by the U.S. occupation forces following Japan's surrender in World War II. The tank was then transported to Aberdeen Proving Grounds for tests and would eventually scrap them in October 1952.<ref name="MaiScrapping">Sun, Eun Ae. ''Chi-Ri & Chi-To: Aberdeen Tank Scrapping.'' YouTube, YouTube, 7 Aug. 2017, [https://www.youtube.com/watch?v=4mkS8EodQbA Video]</ref> |
The second tank is still believed to be at the bottom of the lake. A project to find it was launched in 2013 by SM@Pe, a group of people from Hamamatsu. Inhabitants, volunteers, divers and the Windy Network Corp ( a marine studies company from Tôkyô who founded a trainning plane of the Japanese imperial army in the lake Towada in 2010) participated to research, supported by the use of a sonar and testimonials, including former soldiers who allegedly participated in the launching operation. The research did not give anything. | The second tank is still believed to be at the bottom of the lake. A project to find it was launched in 2013 by SM@Pe, a group of people from Hamamatsu. Inhabitants, volunteers, divers and the Windy Network Corp ( a marine studies company from Tôkyô who founded a trainning plane of the Japanese imperial army in the lake Towada in 2010) participated to research, supported by the use of a sonar and testimonials, including former soldiers who allegedly participated in the launching operation. The research did not give anything. | ||
== Media == | == Media == | ||
| − | '' | + | ''Excellent additions to the article would be video guides, screenshots from the game, and photos.'' |
| − | |||
| − | |||
| − | |||
| − | |||
| − | |||
| − | |||
| + | == See also == | ||
| + | ''Links to the articles on the War Thunder Wiki that you think will be useful for the reader, for example:'' | ||
* ''reference to the series of the vehicles;'' | * ''reference to the series of the vehicles;'' | ||
* ''links to approximate analogues of other nations and research trees.'' | * ''links to approximate analogues of other nations and research trees.'' | ||
| − | '' | + | == External links == |
| + | <!-- ''Paste links to sources and external resources, such as:'' | ||
| + | * ''topic on the official game forum;'' | ||
| + | * ''encyclopedia page on the tank;'' | ||
| + | * ''other literature.'' --> | ||
| − | == | + | ===References=== |
| − | + | <references /> | |
| − | |||
| − | |||
{{Japan medium tanks}} | {{Japan medium tanks}} | ||
Revision as of 10:08, 10 September 2020
Contents
| This page is about the Japanese medium tank Chi-To. For late version, see Chi-To Late. |
Description

The Type 4 Chi-To is a rank III Japanese medium tank
with a battle rating of 4.7 (AB/RB/SB). It was introduced along with the initial Japanese Ground Forces tree in Update 1.65 "Way of the Samurai".
The Type 4 Chi-To looks similar to the Type 3 Chi-Nu, though with a longer chassis with an extra wheel. Turret is also similar in look, though the turret side is more smooth and has a machine gun sticking out the right side. The big differences on the turret is the gun barrel. The gun barrel has no muzzle brake in its design and the recoil tube has been moved from a single tube on the bottom to two tubes on top.
Playing the Type 4 Chi-To can give the player a new impression of the Japanese tree line and a lasting one considering many of the Japanese tanks after it follow the same pattern. A tank with a very powerful cannon, decent mobility, but rather terrible armour. The terrible armour plus the tank's rather long reload means that the Chi-To is meant more for a long-distance shoot out than a close encounter.
General info
Survivability and armour
Armour type:
- Rolled homogeneous armour
- Cast homogeneous armour (Gun mantlet, Machine gun port)
| Armour | Front | Sides | Rear | Roof |
|---|---|---|---|---|
| Hull | 75 mm (17°) Front plate 20 mm (76°) Front glacis 75 mm (16°), 20 mm (58°) Lower glacis 50 mm (12°) Front cheeks 50 mm (0-66°) Machine gun port |
35 mm (12-30°) Top 35 mm Bottom |
20 mm (73°) Top 35 mm Center 20 mm (48°) Bottom |
20 mm |
| Turret | 75 mm (16°) Turret front 50-75 mm (10°) Gun mantlet |
50 mm (15-16°) 50 mm (0-65°) Right machine gun port |
50 mm (15-50°) Turret rear 10 mm Turret rear underside |
20 mm |
| Armour | Sides | Roof | ||
| Cupola | 75 mm | 20 mm |
Notes:
- Suspension wheels are 15 mm thick while tracks are 20 mm thick.
- 10 mm RHA plates are scattered on the lower side hull.
- Turret ring is 20 mm thick.
Mobility
| Game Mode | Max Speed (km/h) | Weight (tons) | Engine power (horsepower) | Power-to-weight ratio (hp/ton) | |||
|---|---|---|---|---|---|---|---|
| Forward | Reverse | Stock | Upgraded | Stock | Upgraded | ||
| Arcade | 50 | 10 | 30.5 | 620 | 954 | 20.33 | 31.28 |
| Realistic | 45 | 9 | 354 | 500 | 11.61 | 16.39 | |
Armaments
Main armament
| 75 mm Type II Model II | Turret rotation speed (°/s) | Reloading rate (seconds) | |||||||||||
|---|---|---|---|---|---|---|---|---|---|---|---|---|---|
| Mode | Capacity | Vertical | Horizontal | Stabilizer | Stock | Upgraded | Full | Expert | Aced | Stock | Full | Expert | Aced |
| Arcade | 55 | -10°/+20° | ±180° | N/A | 12.09 | 16.73 | 20.32 | 22.47 | 23.91 | 10.01 | 8.85 | 8.16 | 7.70 |
| Realistic | 7.56 | 8.89 | 10.79 | 11.94 | 12.70 | ||||||||
Ammunition
| Penetration statistics | |||||||
|---|---|---|---|---|---|---|---|
| Ammunition | Type of warhead |
Penetration @ 0° Angle of Attack (mm) | |||||
| 10 m | 100 m | 500 m | 1,000 m | 1,500 m | 2,000 m | ||
| Type 1 APHE | APHE | 149 | 146 | 133 | 118 | 105 | 93 |
| Type 4 Kou | APHE | 151 | 148 | 137 | 124 | 112 | 101 |
| Type 90 HE | HE | 8 | 8 | 8 | 8 | 8 | 8 |
| Shell details | |||||||||
|---|---|---|---|---|---|---|---|---|---|
| Ammunition | Type of warhead |
Velocity (m/s) |
Projectile Mass (kg) |
Fuse delay (m) |
Fuse sensitivity (mm) |
Explosive Mass (TNT equivalent) (g) |
Ricochet | ||
| 0% | 50% | 100% | |||||||
| Type 1 APHE | APHE | 865 | 6.56 | 1.3 | 15 | 84.8 | 47° | 60° | 65° |
| Type 4 Kou | APHE | 865 | 6.75 | 1.2 | 14 | 80.64 | 47° | 60° | 65° |
| Type 90 HE | HE | 830 | 6.17 | 0.1 | 0.1 | 490 | 79° | 80° | 81° |
Ammo racks

Last updated: 1.101.0.53
| Full ammo |
1st rack empty |
2nd rack empty |
3rd rack empty |
4th rack empty |
5th rack empty |
6th rack empty |
Visual discrepancy |
|---|---|---|---|---|---|---|---|
| 55 | 40 (+15) | 34 (+21) | 28 (+27) | 22 (+33) | 10 (+45) | 0 (+55) | No |
Turret and hull sides empty: 22 (+33)
Machine guns
| 7.7 mm Type 97 | ||||
|---|---|---|---|---|
| Mount | Capacity (Belt) | Fire rate | Vertical | Horizontal |
| Pintle | 1,000 (20) | 499 | -10°/+70° | ±60° |
| Hull | 3,000 (20) | 499 | ±8° | ±8° |
Usage in battles
As previously stated, the Chi-To best performs in the role of sniper, engaging hulldown at medium to long range against opposing medium tanks. The good gun depression, average mobility, and good reverse speed allow you to make it to good positions at an average pace and allow you to reverse back into cover when reloading.
Against most heavies such as the IS-1/2, Tiger, or Panther, it is only worthwhile to engage if you are already entrenched in a solid defensive position. Your gun's lack of APCBC gives you poor performance against slopes and rounded armour on the IS, Panther, and angled Tigers, making any ranged engagement near useless. Against tanks such as the Jumbo 75 or 76, it is best to disengage and flank them or have teammates flank them. Against all other medium tanks, shots to the hull will suffice at most range.
The M4A3E2 Jumbo could be a menace if not handled properly as they are nigh impenetrable from the front due to its thick armour. Either try for a very precise shot through the MG port in the front or shoot the armour behind the tracks if they are angled. The best way to deal with a Sherman Jumbo is to shoot it through the side or between the side plate and the tracks. There is a small gap between the top of the tracks and the bottom of the side plate that can be easily penetrated by the Chi-To Late, and a successful penetration here usually results in a one-shot, or a destroyed/alight engine. This weak spot is relatively easy to exploit as most Jumbo drivers make the mistake of angling their armour, which gives you full view of this weak spot. If you are struggling to hit it, then a shot through the drive wheel at an angle of 45º or more usually works quite well also. You should feel no pressure to get this right the first time, as a well-angled Chi-To Late can reliably bounce the Jumbo's shells, unless the Jumbo in question happens to be sporting the 76mm M1A1 cannon.
The IS series of tanks can also be a bit of a bother to deal with. At this battle rating, you may find the IS-1, IS-2 or IS-2 mod. 1944 (rare). However, they can be defeated by exploiting the shot trap on the turret front (requires some luck), shooting the driver's hatch on the front or the gun mantlet (requires extreme precision and luck), shooting the lower frontal plate (the most reliable way to kill an IS) or shooting the frontal armour plate from a 90º angle. That being said, your tank can still one-shot the IS series you'll face by shooting directly beneath the turret ring.
You may encounter the German "Big Cat" tanks (Tiger H1, Tiger E, Panther D, Panther A) if you get seriously up tiered. In this case the best thing you can do is hit them from the side, which usually results in a one-shot. If facing a Tiger (or any German Big Cat for that matter) from the front, you should retreat. However, if his frontal plate is not angled, then it might be worth a shot to shoot between the machine gun port and driver's hatch, which will result in a one-shot. As for the panther, try to exploit the shot trap on the turret, but only as a last resort. Your first port of call should be to shoot the drive wheel, basically following the same tactics you'd use for dealing with a Sherman Jumbo.
As for some other enemies:
Churchill VII: do not engage from the front at all. Sneak around to the side and shoot there.
ARL-44: shoot the sides. It's not worth facing this tank head on, it's too much of a risk.
ARL-44 (ACL-1): aim for the turret if you face this tank from the front, then finish it from the sides. Be careful not to get shot.
M6A1: the frontal armour on this thing can be a bit fiddly. Aim for a spot that doesn't seem to have more than one armour plate layered on it.
Most tanks you face can penetrate you frontally if they shoot your frontal plate when it is not angled. It is recommended to get the first shot off and then retreat, and make a second surprise attack. Most of the time, a penetration results in a one-shot with this tank. You can penetrate pretty much any medium or light tank frontally by shooting the upper front plate, so use that to your advantage.
Modules
| Tier | Mobility | Protection | Firepower | ||
|---|---|---|---|---|---|
| I | Tracks | Parts | Horizontal Drive | ||
| II | Suspension | Brake System | FPE | Adjustment of Fire | Type 4 Kou |
| III | Filters | Crew Replenishment | Elevation Mechanism | ||
| IV | Transmission | Engine | Artillery Support | ||
Pros and cons
Pros:
- Powerful 75 mm cannon rivaling the T-34-85's, good penetration and very low shell drop-off.
- APHE round can easily defeat enemy tanks.
- A very powerful tank at 4.3, can tackle all foes at its BR bracket.
- Decent gun depression of -11°
- Ammo in the turret can be emptied by carrying 15 less ammo.
- Very powerful Type 4 Kou shell with more penetration and more explosive filler.
- Decent top armour, enough to resist strafing aircraft weapons.
Cons:
- Armour is average and mostly flat and unangled, like the Panzer IV.
- The Chi-To is asymmetric and is a large tank, it is difficult to hide from enemies.
- Reload rate quite slow.
- Angling front armour can expose the 50 mm hull cheek armour.
- Very hard to turn on the spot, especially when stock.
History
Development
The lackluster performance of Japanese tanks in World War II called for the development of newer medium tanks in the Imperial Japanese Army. The standard tank of the time was the Type 97 Chi-Ha, which has its chassis used in many expedient models to provide a bigger gun for the Japanese inventory such as the Chi-Ha Kai, Type 1 Chi-He, Type 2 Ho-I, and Type 3 Chi-Nu. By the time of Chi-Nu, however, the Chi-Ha chassis was becoming outdated and so a new tank design using an improved chassis was needed for future development.[1]
In 1943, development started of the Chi-To tank, which features a new chassis and more powerful engine. Its armament is a 75 mm gun based off the Type 88 anti-aircraft gun, giving it a high-velocity weapon. Armour on the tank was welded and was quite thick in comparison to its predecessor at 75 mm thick. The tank was accepted for service in 1944 and was expected to enter mass production with 20 per month at Mitsubishi and 5 per month at Kobe-Seiko. In terms of Japanese armour development, the Chi-To was the most sophisticated tank to enter production levels.[1]
War's End
Despite its potential, the Type 4 Chi-To was never made in large numbers. At the war's end, only six chassis were made, with only two of those made into tanks.
The two Type 4 produced were cast into Lake Hamana between the 23 and the 28 August 1945 to avoid their capture. One was found by the U.S. occupation forces following Japan's surrender in World War II. The tank was then transported to Aberdeen Proving Grounds for tests and would eventually scrap them in October 1952.[2]
The second tank is still believed to be at the bottom of the lake. A project to find it was launched in 2013 by SM@Pe, a group of people from Hamamatsu. Inhabitants, volunteers, divers and the Windy Network Corp ( a marine studies company from Tôkyô who founded a trainning plane of the Japanese imperial army in the lake Towada in 2010) participated to research, supported by the use of a sonar and testimonials, including former soldiers who allegedly participated in the launching operation. The research did not give anything.
Media
Excellent additions to the article would be video guides, screenshots from the game, and photos.
See also
Links to the articles on the War Thunder Wiki that you think will be useful for the reader, for example:
- reference to the series of the vehicles;
- links to approximate analogues of other nations and research trees.
External links
References
| Japan medium tanks | |
|---|---|
| Type 97 | Chi-Ha · Chi-Ha Kai · Chi-Ha Kai TD · Chi-Ha Short Gun |
| Type 1 | Chi-He · Chi-He (5th Regiment) · Ho-I |
| Type 3 | Chi-Nu · Chi-Nu II |
| Type 4 | Chi-To · Chi-To Late |
| Type 5 | Chi-Ri II |
| Type 61 MBT | ST-A1* · ST-A2* · ST-A3* · Type 61 |
| Type 74 MBT | ST-B2* · Type 74 (C) · Type 74 (E) · Type 74 (F) · Type 74 (G) |
| Type 90 MBT | Type 90 · Type 90 (B) · Type 90B "Fuji" |
| Type 10 MBT | TKX (P)* · TKX* · Type 10 |
| Other | Ka-Chi |
| USA | ▅M4A3 (76) W · ▅M47 |
| *Prototype | |
