Difference between revisions of "Challenger 2 TES"
Colok76286 (talk | contribs) (Undo revision 120983 by U118625207 (talk) Plagiarism from Wikipedia: Challenger 3) |
Inceptor57 (talk | contribs) m |
||
| (28 intermediate revisions by 11 users not shown) | |||
| Line 1: | Line 1: | ||
| + | {{About | ||
| + | | about = British medium tank '''{{PAGENAME}}''' | ||
| + | | usage = other versions | ||
| + | | link = Challenger 2 (Family) | ||
| + | }} | ||
{{Specs-Card | {{Specs-Card | ||
|code=uk_challenger_2_tes | |code=uk_challenger_2_tes | ||
| Line 6: | Line 11: | ||
== Description == | == Description == | ||
<!-- ''In the description, the first part should be about the history of the creation and combat usage of the vehicle, as well as its key features. In the second part, tell the reader about the ground vehicle in the game. Insert a screenshot of the vehicle, so that if the novice player does not remember the vehicle by name, he will immediately understand what kind of vehicle the article is talking about.'' --> | <!-- ''In the description, the first part should be about the history of the creation and combat usage of the vehicle, as well as its key features. In the second part, tell the reader about the ground vehicle in the game. Insert a screenshot of the vehicle, so that if the novice player does not remember the vehicle by name, he will immediately understand what kind of vehicle the article is talking about.'' --> | ||
| − | The ''' | + | The '''FV4034 Challenger 2 (Theatre Entry Standard – TES)''' is a high-intensity battlefield modification of the standard variant of the [[Challenger 2 (Family)|FV4034 Challenger 2 main battle tank family]]. In terms of protection, the Challenger 2 TES is extremely similar to the [[M1A2 SEP|M1 Abrams TUSK]] (Tank Urban Survival Kit). The TES system was designed to protect the tank from various threats, such as tandem warheads and improvised explosive devices (IEDs). The public first saw the technology demonstrator of the Challenger 2 TES (nicknamed "Megatron") in June 2013 during the DVD defence event in Millbrook, United Kingdom. In July 2016, at the Tank Fest in Bovington, a revised modification of the Challenger 2 TES was presented, complete with a new armour design. It is outfitted with a unique combination of reactive, composite, and slat armour to provide unparalleled protection against modern warfare threats. Depending on the nature of the threats and the type of battlefield where the tank must be deployed, the Challenger 2 TES can be outfitted with changeable and modular armour packages. The mobile camouflage system (MCS) is also installed on the hull and turret to reduce the vehicle's heat signature when observed by thermal imaging equipment. The TES counter IED technology is installed on the Challenger 2 TES, as demonstrated by the array of standard and "Bird Table" antennas positioned at the upper rear of the turret. The system is used to disrupt radio or telephone signals that could be used to trigger improvised explosive devices (IEDs). |
| + | |||
| + | Introduced in [[Update "Winged Lions"]], the Challenger 2 TES is one of the most advanced modifications to the [[Challenger 2|standard Challenger 2]] in response to the increasing challenges of a modern battlefield. The Challenger 2 TES, equipped with a multitude of cutting-edge technology, provides players with the finest possible protection during conflicts. This tank, however, will be easy to spot and recognize during combat owing to the well-known jammer plate affixed to the roof. Flanking and sneaking up on opponents will be exceedingly difficult, as the distinctive jammer plate will easily disclose the player's location. Although the TES modification offers more protection than the standard Challenger 2, using the same engine without any improvements makes the Challenger 2 TES considerably slower to accelerate and turn. | ||
== General info == | == General info == | ||
| Line 12: | Line 19: | ||
{{Specs-Tank-Armour}} | {{Specs-Tank-Armour}} | ||
<!-- ''Describe armour protection. Note the most well protected and key weak areas. Appreciate the layout of modules as well as the number and location of crew members. Is the level of armour protection sufficient, is the placement of modules helpful for survival in combat? If necessary use a visual template to indicate the most secure and weak zones of the armour.'' --> | <!-- ''Describe armour protection. Note the most well protected and key weak areas. Appreciate the layout of modules as well as the number and location of crew members. Is the level of armour protection sufficient, is the placement of modules helpful for survival in combat? If necessary use a visual template to indicate the most secure and weak zones of the armour.'' --> | ||
| − | The Challenger 2 TES has the armour that would be expected of the name (TES - Theatre Entry Standard). The tank has been updated to meet the modern theatres of war, including streetfighting and more effective chemical munitions and kinetic weapons. The ERA on the sides displays this exact line of thought. The tank | + | The Challenger 2 TES has the armour that would be expected of the name (TES - Theatre Entry Standard). The tank has been updated to meet the modern theatres of war, including streetfighting and more effective chemical munitions and kinetic weapons. The ERA on the sides displays this exact line of thought. In-game, the combined ERA and composite screen add ~240 mm of effective protection against shaped charges and about 46 mm protection against KE rounds at 0 degrees. |
| + | |||
| + | Equipped with the iconic jammer plate mounted to the roof, this tank will be easy to spot and identify, so one should take care to cover their weak points with extra care, as many will know where the weaknesses are, and feel pressured to shoot them due to the increased armour elsewhere. The tank retains the same weakspots: the gun mantlet, driver's port, and the lower frontal plate, though unlike the [[Challenger 2 (2F)]] you get the LFP composite block (and the rest of the add-on) stock, which does help with the chemical protection. The gun breech will most likely block spalling from any penetrating round, allowing TES players to retreat and repair their breech, should they be far enough away from danger. | ||
| − | + | When opposing enemy tanks, commanders should attempt to angle their tank slightly, as the side add-on will be more effective against HEAT-FS and ATGMs (so long as they don't have tandem charge warheads), though this won't prevent any darts you meet from going through - M735 and DM23 can make it through 3 ERA blocks and still have enough energy to take out the engine. Angling has the added bonus of making the driver's port less effective as a means of knocking out the tank's crew. | |
| − | + | '''Armour type:''' | |
| − | + | * Rolled homogeneous armour | |
| − | |||
| − | |||
{| class="wikitable" | {| class="wikitable" | ||
| Line 26: | Line 33: | ||
! Armour !! Front !! Sides !! Rear !! Roof | ! Armour !! Front !! Sides !! Rear !! Roof | ||
|- | |- | ||
| − | | Hull || 38-50 mm (56-83°) ''Upper | + | | Hull || 38-50 mm (56-83°) ''Upper plate'' <br> 70 mm (31-34°) ''Lower glacis'' <br> 60 mm (0-80°) ''Driver's port'' || 25 mm (70°) Top <br> 25 mm ''Middle'' <br> 38 mm ''Bottom'' || 25 mm (32°) || 10-20 mm |
| − | 70 mm (31-34°) ''Lower | ||
| − | | 25 mm | ||
| − | 25 mm Middle | ||
| − | | 25 mm (32°) || 10-20 mm | ||
|- | |- | ||
| − | | Turret || 38 - 50 mm (56-82°) ''Turret | + | | Turret || 38 - 50 mm (56-82°) ''Turret front'' <br> 30 mm (3-82°) ''Gun mantlet'' || 20-25 mm (8-10°) || 20 mm (18°) || 10-38 mm |
|- | |- | ||
| Cupola || 8 mm (3-78°) || 8 mm (9-60°) || 8 mm (1-80°) || 44-60 mm | | Cupola || 8 mm (3-78°) || 8 mm (9-60°) || 8 mm (1-80°) || 44-60 mm | ||
|- | |- | ||
| − | + | |} | |
| − | + | '''Notes:''' | |
| − | + | ||
| + | * ''Upper front plate'' has additional 6.35 mm external structural steel plate. | ||
| + | * ''Lower front plate'' has additional composite with NERA elements, which is very effective against chemical munitions. | ||
| + | * Tracks and suspension wheels are 20 mm thick. | ||
| + | |||
| + | {| class="wikitable" | ||
| + | |- | ||
| + | ! Composite armour | ||
| + | ! Frontal effective protection !! Sides | ||
|- | |- | ||
| − | |Hull | + | | Hull || '''Upper''' <br> Kinetic: 420-700 mm <br> Chemical: 800-1100 mm <br> '''Lower''' <br> Kinetic: 100-270 mm <br> Chemical: 130-800 mm || '''Ext. Composite Screen with ERA:'''<br> Kinetic: 90-120 mm <br> Chemical: 560-680 mm |
| − | |'''Upper'''<br>Kinetic: 420-700 mm<br>Chemical: 800-1100 mm<br>'''Lower'''<br>Kinetic: 100-270 mm<br>Chemical: 130-800 mm | ||
| − | | | ||
|- | |- | ||
| − | |Turret | + | | Turret || '''Turret Cheeks''' <br> Kinetic: 440-720 mm <br> Chemical: 780-1000 mm || '''Internal Composite''' <br> Kinetic: 190 mm <br> Chemical: 324 mm <br> '''External NERA''': <br> Kinetic: 15 mm <br> Chemical: 280 mm |
| − | |'''Turret Cheeks'''<br>Kinetic: 440-720 mm<br>Chemical: 780-1000 mm | ||
| − | | | ||
| − | ''' | ||
| − | |||
| − | Kinetic: | ||
| − | |||
| − | Chemical: | ||
|- | |- | ||
|} | |} | ||
| − | |||
| − | |||
| − | |||
| − | |||
| − | |||
=== Mobility === | === Mobility === | ||
{{Specs-Tank-Mobility}} | {{Specs-Tank-Mobility}} | ||
<!-- ''Write about the mobility of the ground vehicle. Estimate the specific power and manoeuvrability, as well as the maximum speed forwards and backwards.'' --> | <!-- ''Write about the mobility of the ground vehicle. Estimate the specific power and manoeuvrability, as well as the maximum speed forwards and backwards.'' --> | ||
| − | + | The mobility of the TES is poor, even by Challenger 2 standards. The drastic increase in weight over the [[Challenger 2 (2F)]] makes the already below average power-to-weight ratio even worse, and getting the add-on stock ironically makes the situation worse: other Challenger 2s allow you to go for mobility upgrades before the add-on packages, making mobility through the stock grind more bearable as you decide when the extra weight is added, whereas with the TES you start out at 75t and 1076 hp. Even with all the mobility upgrades, the TES is slow to turn and slow to accelerate, and on some dirt roads it may struggle to reach 25 km/h. The neutral steering is unaffected by the increase in weight, completing a 360 traverse in the same amount of time as a 62.5t Challenger 2 (~14.5s). | |
{{tankMobility|abMinHp=1886|rbMinHp=1076}} | {{tankMobility|abMinHp=1886|rbMinHp=1076}} | ||
| Line 94: | Line 91: | ||
==== Ammunition ==== | ==== Ammunition ==== | ||
| − | { | + | {{:L30A1 (120 mm)/Ammunition|Shot L23A1, L34, Shell L31A7, L26, L27A1}} |
| − | |||
| − | |||
| − | |||
| − | |||
| − | |||
| − | |||
| − | |||
| − | |||
| − | |||
| − | |||
| − | |||
| − | |||
| − | |||
| − | |||
| − | |||
| − | |||
| − | |||
| − | |||
| − | |||
| − | |||
| − | |||
| − | |||
| − | |||
| − | |||
| − | |||
| − | |||
| − | |||
| − | |||
| − | |||
| − | |||
| − | |||
| − | | Shot L23A1 | ||
| − | |||
| − | |||
| − | |||
| − | |||
| − | |||
| − | |||
| − | |||
| − | |||
| − | |||
| − | |||
| − | |||
| − | |||
| − | |||
| − | |||
| − | |||
| − | |||
| − | |||
| − | |||
| − | |||
| − | |||
| − | |||
| − | |||
==== [[Ammo racks]] ==== | ==== [[Ammo racks]] ==== | ||
| − | + | [[File:Ammoracks_Challenger_2.png|right|thumb|x350px|[[Ammo racks]] of the Challenger 2]] | |
| − | <!-- '''Last updated:''' --> | + | <!-- '''Last updated: 2.19.0.76''' --> |
{| class="wikitable" style="text-align:center" | {| class="wikitable" style="text-align:center" | ||
|- | |- | ||
! Full<br>ammo | ! Full<br>ammo | ||
| + | ! Ammo<br>part | ||
! 1st<br>rack empty | ! 1st<br>rack empty | ||
! 2nd<br>rack empty | ! 2nd<br>rack empty | ||
! 3rd<br>rack empty | ! 3rd<br>rack empty | ||
! 4th<br>rack empty | ! 4th<br>rack empty | ||
| + | |- | ||
| + | | '''50''' ||''Projectiles''<br>''Propellants'' || 48 ''(+2)''<br>45 ''(+5)'' || 45 ''(+5)''<br>39 ''(+11)'' || 43 ''(+7)''<br>31 ''(+19)'' || 41 ''(+9)''<br>22 ''(+28)'' | ||
| + | |- | ||
! 5th<br>rack empty | ! 5th<br>rack empty | ||
! 6th<br>rack empty | ! 6th<br>rack empty | ||
| + | ! 7th<br>rack empty | ||
| + | ! 8th<br>rack empty | ||
| + | ! 9th<br>rack empty | ||
! Visual<br>discrepancy | ! Visual<br>discrepancy | ||
|- | |- | ||
| − | | ''' | + | | 34 ''(+16)''<br>14 ''(+36)'' || 29 ''(+21)''<br>5 ''(+45)'' || 5 ''(+45)''<br>1 ''(+49)'' || 4 ''(+46)''<br>N/A || 1 ''(+49)''<br>N/A || No |
|- | |- | ||
|} | |} | ||
| + | '''Notes''': | ||
| + | |||
| + | * Projectile racks 8 and 9, and propellant rack 7, are first-stage ammo racks. | ||
| + | * Hull front empty: 39 ''(+11)'' shells. | ||
| + | {{Clear}} | ||
=== Machine guns === | === Machine guns === | ||
| Line 189: | Line 144: | ||
! Mount !! Capacity (Belt) !! Fire rate !! Vertical !! Horizontal | ! Mount !! Capacity (Belt) !! Fire rate !! Vertical !! Horizontal | ||
|- | |- | ||
| − | | Coaxial || | + | | Coaxial || 4,000 (2,000) || 600 || N/A || N/A |
|- | |- | ||
|} | |} | ||
| Line 195: | Line 150: | ||
== Usage in battles == | == Usage in battles == | ||
<!-- ''Describe the tactics of playing in the vehicle, the features of using vehicles in the team and advice on tactics. Refrain from creating a "guide" - do not impose a single point of view but instead give the reader food for thought. Describe the most dangerous enemies and give recommendations on fighting them. If necessary, note the specifics of the game in different modes (AB, RB, SB).'' --> | <!-- ''Describe the tactics of playing in the vehicle, the features of using vehicles in the team and advice on tactics. Refrain from creating a "guide" - do not impose a single point of view but instead give the reader food for thought. Describe the most dangerous enemies and give recommendations on fighting them. If necessary, note the specifics of the game in different modes (AB, RB, SB).'' --> | ||
| − | + | With the Challenger 2 TES, the addon armour protection comes as standard and leaves the vehicle more protected than the base Challenger 2. However, this add-on armour has the downside of making the TES rather sluggish at accelerating and turning. | |
| + | |||
| + | As with all the Challenger 2's, the ideal playstyle is to be at long range, utilising hull down positions to protect the hull and use the gunners thermal sight and laser range finder to return fire with good effectiveness. The TES retains the option of carrying smoke or HESH shells. Smoke can be used to fire at enemy positions to obscure their view while either the TES is repositioned or teammates are advancing. HESH can be used against light vehicles to overpressure them in situations where getting a killing blow with APFSDS would be difficult. | ||
| + | |||
| + | Where close range combat is required, ensure that the hull remains protected as much as possible by using terrain features. Take the time to ensure that when pushing into a location that it is clear of threats, as pushing round corners of buildings will leave the hull exposed without the chance to return fire. | ||
| + | |||
| + | Brawling is an option, however, the TES is rather sluggish and will not last long against fast or experienced opponents when the range is very short. Try to get the enemy to shoot the turret cheeks, as shots to the hull or gun breech will render the TES combat ineffective. Using the Challenger 2's impressive reload will give the TES an upper hand in brawls, as if both the Challenger and the opponent fire at the same time, the Challenger will typically reload first. | ||
=== Pros and cons === | === Pros and cons === | ||
| Line 202: | Line 163: | ||
'''Pros:''' | '''Pros:''' | ||
| − | * Impressive chemical protection on the front and sides | + | * Retains pros from previous Challenger 2: |
| − | * Maintains the kinetic protection from previous variants, with improvements in places | + | ** Impressive chemical protection on the front and sides |
| − | * Very accurate | + | ** Maintains the kinetic protection from previous variants, with improvements in places |
| − | * Fast reload | + | ** Very accurate 120 mm L30A1 gun |
| + | ** Fast reload | ||
| + | * Roof mounted machine gun has access to thermal and can be used as a makeshift CITV for scouting (but not firing, unfortunately) | ||
'''Cons:''' | '''Cons:''' | ||
| − | * No composite plates behind the ERA panels on the turret sides | + | * No composite plates behind the ERA panels on the turret sides like with 2F model, and since ERA is useless against tandem-charge warheads it is bad to not have full coverage to at least be safe from normal tanks |
| − | * Heaviest MBT in the game with a very poor hp/ton ratio; very poor acceleration | + | * The jammer is useless in-game and begs other tanks to scout it out or use HE on it |
| − | * Same ammunition options as the previous | + | * Also retains weaknesses of previous Challenger 2 models: |
| − | * Maintains the same | + | ** Heaviest MBT in the game with a very poor hp/ton ratio; very poor acceleration |
| − | * | + | ** Same ammunition options as the previous Challengers |
| − | * L27A1 has low penetration compared to other top rank NATO ammunition | + | ** Maintains the same weak spots from previous variants |
| + | ** L27A1 has low penetration compared to other top rank NATO ammunition and armour cannot compensate for it against high ground | ||
| + | ** Cannot maintain the short reload time after the first-stage ammo rack (4 rounds) has been depleted | ||
== History == | == History == | ||
<!-- ''Describe the history of the creation and combat usage of the vehicle in more detail than in the introduction. If the historical reference turns out to be too long, take it to a separate article, taking a link to the article about the vehicle and adding a block "/History" (example: <nowiki>https://wiki.warthunder.com/(Vehicle-name)/History</nowiki>) and add a link to it here using the <code>main</code> template. Be sure to reference text and sources by using <code><nowiki><ref></ref></nowiki></code>, as well as adding them at the end of the article with <code><nowiki><references /></nowiki></code>. This section may also include the vehicle's dev blog entry (if applicable) and the in-game encyclopedia description (under <code><nowiki>=== In-game description ===</nowiki></code>, also if applicable).'' --> | <!-- ''Describe the history of the creation and combat usage of the vehicle in more detail than in the introduction. If the historical reference turns out to be too long, take it to a separate article, taking a link to the article about the vehicle and adding a block "/History" (example: <nowiki>https://wiki.warthunder.com/(Vehicle-name)/History</nowiki>) and add a link to it here using the <code>main</code> template. Be sure to reference text and sources by using <code><nowiki><ref></ref></nowiki></code>, as well as adding them at the end of the article with <code><nowiki><references /></nowiki></code>. This section may also include the vehicle's dev blog entry (if applicable) and the in-game encyclopedia description (under <code><nowiki>=== In-game description ===</nowiki></code>, also if applicable).'' --> | ||
| − | + | A modification of the British Challenger 2 main battle tank with Dorchester Level 2 armour set has been used by the British Army in the operation in Iraq since 2002. At the end of 2004, these tanks were additionally equipped with combined turret side shields, as well as grilles covering rear parts of the hull and turret for protection against shape-charged anti-tank weapons - this configuration received the designation Dorchester Level 2F (DL2F). The next modernization, also aimed at improving the protection, took place in 2008. The tanks received hull skirts made of combined armour, NERA blocks on the hull sides were replaced with ERA containers manufactured by the Israeli company Rafael Advanced Defense Systems Limited. This variant of the Challenger 2 was designated TES (Theatre Entry Standard). | |
| + | |||
| + | ''- From [[wt:en/news/7438-development-challenger-2-tes-a-new-perspective-en|Devblog]]'' | ||
== Media == | == Media == | ||
<!-- ''Excellent additions to the article would be video guides, screenshots from the game, and photos.'' --> | <!-- ''Excellent additions to the article would be video guides, screenshots from the game, and photos.'' --> | ||
| − | '' | + | |
| + | ;Skins | ||
| + | |||
| + | * [https://live.warthunder.com/feed/camouflages/?vehicle=uk_challenger_2_tes Skins and camouflages for the {{PAGENAME}} from live.warthunder.com.] | ||
| + | |||
| + | ;Videos | ||
| + | {{Youtube-gallery|LufGqZTfvoI|'''MBTs with Best Armor''' discusses the {{PAGENAME}} at 03:52 - ''War Thunder Official Channel''}} | ||
== See also == | == See also == | ||
| Line 237: | Line 210: | ||
* ''topic on the official game forum;'' | * ''topic on the official game forum;'' | ||
* ''other literature.'' --> | * ''other literature.'' --> | ||
| − | |||
| − | * | + | * [[wt:en/news/7438-development-challenger-2-tes-a-new-perspective-en|[Devblog] Challenger 2 TES: a new perspective]] |
| − | |||
{{Britain medium tanks}} | {{Britain medium tanks}} | ||
Latest revision as of 02:46, 5 February 2024
| This page is about the British medium tank Challenger 2 TES. For other versions, see Challenger 2 (Family). |

Contents
Description
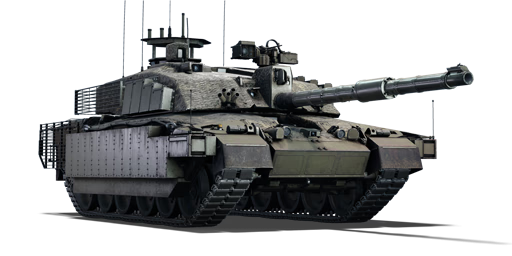
The FV4034 Challenger 2 (Theatre Entry Standard – TES) is a high-intensity battlefield modification of the standard variant of the FV4034 Challenger 2 main battle tank family. In terms of protection, the Challenger 2 TES is extremely similar to the M1 Abrams TUSK (Tank Urban Survival Kit). The TES system was designed to protect the tank from various threats, such as tandem warheads and improvised explosive devices (IEDs). The public first saw the technology demonstrator of the Challenger 2 TES (nicknamed "Megatron") in June 2013 during the DVD defence event in Millbrook, United Kingdom. In July 2016, at the Tank Fest in Bovington, a revised modification of the Challenger 2 TES was presented, complete with a new armour design. It is outfitted with a unique combination of reactive, composite, and slat armour to provide unparalleled protection against modern warfare threats. Depending on the nature of the threats and the type of battlefield where the tank must be deployed, the Challenger 2 TES can be outfitted with changeable and modular armour packages. The mobile camouflage system (MCS) is also installed on the hull and turret to reduce the vehicle's heat signature when observed by thermal imaging equipment. The TES counter IED technology is installed on the Challenger 2 TES, as demonstrated by the array of standard and "Bird Table" antennas positioned at the upper rear of the turret. The system is used to disrupt radio or telephone signals that could be used to trigger improvised explosive devices (IEDs).
Introduced in Update "Winged Lions", the Challenger 2 TES is one of the most advanced modifications to the standard Challenger 2 in response to the increasing challenges of a modern battlefield. The Challenger 2 TES, equipped with a multitude of cutting-edge technology, provides players with the finest possible protection during conflicts. This tank, however, will be easy to spot and recognize during combat owing to the well-known jammer plate affixed to the roof. Flanking and sneaking up on opponents will be exceedingly difficult, as the distinctive jammer plate will easily disclose the player's location. Although the TES modification offers more protection than the standard Challenger 2, using the same engine without any improvements makes the Challenger 2 TES considerably slower to accelerate and turn.
General info
Survivability and armour
The Challenger 2 TES has the armour that would be expected of the name (TES - Theatre Entry Standard). The tank has been updated to meet the modern theatres of war, including streetfighting and more effective chemical munitions and kinetic weapons. The ERA on the sides displays this exact line of thought. In-game, the combined ERA and composite screen add ~240 mm of effective protection against shaped charges and about 46 mm protection against KE rounds at 0 degrees.
Equipped with the iconic jammer plate mounted to the roof, this tank will be easy to spot and identify, so one should take care to cover their weak points with extra care, as many will know where the weaknesses are, and feel pressured to shoot them due to the increased armour elsewhere. The tank retains the same weakspots: the gun mantlet, driver's port, and the lower frontal plate, though unlike the Challenger 2 (2F) you get the LFP composite block (and the rest of the add-on) stock, which does help with the chemical protection. The gun breech will most likely block spalling from any penetrating round, allowing TES players to retreat and repair their breech, should they be far enough away from danger.
When opposing enemy tanks, commanders should attempt to angle their tank slightly, as the side add-on will be more effective against HEAT-FS and ATGMs (so long as they don't have tandem charge warheads), though this won't prevent any darts you meet from going through - M735 and DM23 can make it through 3 ERA blocks and still have enough energy to take out the engine. Angling has the added bonus of making the driver's port less effective as a means of knocking out the tank's crew.
Armour type:
- Rolled homogeneous armour
| Armour | Front | Sides | Rear | Roof |
|---|---|---|---|---|
| Hull | 38-50 mm (56-83°) Upper plate 70 mm (31-34°) Lower glacis 60 mm (0-80°) Driver's port |
25 mm (70°) Top 25 mm Middle 38 mm Bottom |
25 mm (32°) | 10-20 mm |
| Turret | 38 - 50 mm (56-82°) Turret front 30 mm (3-82°) Gun mantlet |
20-25 mm (8-10°) | 20 mm (18°) | 10-38 mm |
| Cupola | 8 mm (3-78°) | 8 mm (9-60°) | 8 mm (1-80°) | 44-60 mm |
Notes:
- Upper front plate has additional 6.35 mm external structural steel plate.
- Lower front plate has additional composite with NERA elements, which is very effective against chemical munitions.
- Tracks and suspension wheels are 20 mm thick.
| Composite armour | Frontal effective protection | Sides |
|---|---|---|
| Hull | Upper Kinetic: 420-700 mm Chemical: 800-1100 mm Lower Kinetic: 100-270 mm Chemical: 130-800 mm |
Ext. Composite Screen with ERA: Kinetic: 90-120 mm Chemical: 560-680 mm |
| Turret | Turret Cheeks Kinetic: 440-720 mm Chemical: 780-1000 mm |
Internal Composite Kinetic: 190 mm Chemical: 324 mm External NERA: Kinetic: 15 mm Chemical: 280 mm |
Mobility
The mobility of the TES is poor, even by Challenger 2 standards. The drastic increase in weight over the Challenger 2 (2F) makes the already below average power-to-weight ratio even worse, and getting the add-on stock ironically makes the situation worse: other Challenger 2s allow you to go for mobility upgrades before the add-on packages, making mobility through the stock grind more bearable as you decide when the extra weight is added, whereas with the TES you start out at 75t and 1076 hp. Even with all the mobility upgrades, the TES is slow to turn and slow to accelerate, and on some dirt roads it may struggle to reach 25 km/h. The neutral steering is unaffected by the increase in weight, completing a 360 traverse in the same amount of time as a 62.5t Challenger 2 (~14.5s).
| Game Mode | Max Speed (km/h) | Weight (tons) | Engine power (horsepower) | Power-to-weight ratio (hp/ton) | |||
|---|---|---|---|---|---|---|---|
| Forward | Reverse | Stock | Upgraded | Stock | Upgraded | ||
| Arcade | 66 | 42 | 74.8 | 1886 | 2,322 | 25.21 | 31.04 |
| Realistic | 60 | 38 | 1076 | 1,217 | 14.39 | 16.27 | |
Modifications and economy
| Mobility | Protection | Firepower | ||||||||||||||||||||||||
|---|---|---|---|---|---|---|---|---|---|---|---|---|---|---|---|---|---|---|---|---|---|---|---|---|---|---|
|
|
|
Armaments
Main armament
| 120 mm L30A1 | Turret rotation speed (°/s) | Reloading rate (seconds) | |||||||||||
|---|---|---|---|---|---|---|---|---|---|---|---|---|---|
| Mode | Capacity | Vertical | Horizontal | Stabilizer | Stock | Upgraded | Full | Expert | Aced | Stock | Full | Expert | Aced |
| Arcade | 50 | -10°/+20° | ±180° | Two-plane | 29.5 | 40.8 | 49.6 | 54.8 | 58.4 | 6.50 | 5.75 | 5.30 | 5.00 |
| Realistic | 18.4 | 21.7 | 26.4 | 29.1 | 31.0 | ||||||||
Ammunition
| Penetration statistics | |||||||
|---|---|---|---|---|---|---|---|
| Ammunition | Type of warhead |
Penetration @ 0° Angle of Attack (mm) | |||||
| 10 m | 100 m | 500 m | 1,000 m | 1,500 m | 2,000 m | ||
| Shot L23A1 | APFSDS | 396 | 394 | 387 | 376 | 367 | 357 |
| Shell L31A7 | HESH | 152 | 152 | 152 | 152 | 152 | 152 |
| L26 | APFSDS | 493 | 491 | 487 | 481 | 474 | 468 |
| L27A1 | APFSDS | 564 | 562 | 557 | 551 | 545 | 538 |
| Shell details | ||||||||||||
|---|---|---|---|---|---|---|---|---|---|---|---|---|
| Ammunition | Type of warhead |
Velocity (m/s) |
Projectile mass (kg) |
Fuse delay (m) |
Fuse sensitivity (mm) |
Explosive mass (TNT equivalent) (kg) |
Ricochet | |||||
| 0% | 50% | 100% | ||||||||||
| Shot L23A1 | APFSDS | 1,535 | 3.89 | - | - | - | 78° | 80° | 81° | |||
| Shell L31A7 | HESH | 670 | 17.34 | 0.1 | 4 | 6.53 | 73° | 77° | 80° | |||
| L26 | APFSDS | 1,650 | 4.3 | - | - | - | 78° | 80° | 81° | |||
| L27A1 | APFSDS | 1,650 | 4.3 | - | - | - | 78° | 80° | 81° | |||
| Smoke shell characteristics | ||||||
|---|---|---|---|---|---|---|
| Ammunition | Velocity (m/s) |
Projectile mass (kg) |
Screen radius (m) |
Screen deploy time (s) |
Screen hold time (s) |
Explosive mass (TNT equivalent) (g) |
| L34 | 670 | 17.1 | 20 | 5 | 25 | 50 |
Ammo racks

| Full ammo |
Ammo part |
1st rack empty |
2nd rack empty |
3rd rack empty |
4th rack empty |
|---|---|---|---|---|---|
| 50 | Projectiles Propellants |
48 (+2) 45 (+5) |
45 (+5) 39 (+11) |
43 (+7) 31 (+19) |
41 (+9) 22 (+28) |
| 5th rack empty |
6th rack empty |
7th rack empty |
8th rack empty |
9th rack empty |
Visual discrepancy |
| 34 (+16) 14 (+36) |
29 (+21) 5 (+45) |
5 (+45) 1 (+49) |
4 (+46) N/A |
1 (+49) N/A |
No |
Notes:
- Projectile racks 8 and 9, and propellant rack 7, are first-stage ammo racks.
- Hull front empty: 39 (+11) shells.
Machine guns
| 7.62 mm L37A2 | ||||
|---|---|---|---|---|
| Mount | Capacity (Belt) | Fire rate | Vertical | Horizontal |
| Pintle | 1,700 (100) | 650 | -10°/+50° | ±180° |
| 7.62 mm L94A1 | ||||
|---|---|---|---|---|
| Mount | Capacity (Belt) | Fire rate | Vertical | Horizontal |
| Coaxial | 4,000 (2,000) | 600 | N/A | N/A |
Usage in battles
With the Challenger 2 TES, the addon armour protection comes as standard and leaves the vehicle more protected than the base Challenger 2. However, this add-on armour has the downside of making the TES rather sluggish at accelerating and turning.
As with all the Challenger 2's, the ideal playstyle is to be at long range, utilising hull down positions to protect the hull and use the gunners thermal sight and laser range finder to return fire with good effectiveness. The TES retains the option of carrying smoke or HESH shells. Smoke can be used to fire at enemy positions to obscure their view while either the TES is repositioned or teammates are advancing. HESH can be used against light vehicles to overpressure them in situations where getting a killing blow with APFSDS would be difficult.
Where close range combat is required, ensure that the hull remains protected as much as possible by using terrain features. Take the time to ensure that when pushing into a location that it is clear of threats, as pushing round corners of buildings will leave the hull exposed without the chance to return fire.
Brawling is an option, however, the TES is rather sluggish and will not last long against fast or experienced opponents when the range is very short. Try to get the enemy to shoot the turret cheeks, as shots to the hull or gun breech will render the TES combat ineffective. Using the Challenger 2's impressive reload will give the TES an upper hand in brawls, as if both the Challenger and the opponent fire at the same time, the Challenger will typically reload first.
Pros and cons
Pros:
- Retains pros from previous Challenger 2:
- Impressive chemical protection on the front and sides
- Maintains the kinetic protection from previous variants, with improvements in places
- Very accurate 120 mm L30A1 gun
- Fast reload
- Roof mounted machine gun has access to thermal and can be used as a makeshift CITV for scouting (but not firing, unfortunately)
Cons:
- No composite plates behind the ERA panels on the turret sides like with 2F model, and since ERA is useless against tandem-charge warheads it is bad to not have full coverage to at least be safe from normal tanks
- The jammer is useless in-game and begs other tanks to scout it out or use HE on it
- Also retains weaknesses of previous Challenger 2 models:
- Heaviest MBT in the game with a very poor hp/ton ratio; very poor acceleration
- Same ammunition options as the previous Challengers
- Maintains the same weak spots from previous variants
- L27A1 has low penetration compared to other top rank NATO ammunition and armour cannot compensate for it against high ground
- Cannot maintain the short reload time after the first-stage ammo rack (4 rounds) has been depleted
History
A modification of the British Challenger 2 main battle tank with Dorchester Level 2 armour set has been used by the British Army in the operation in Iraq since 2002. At the end of 2004, these tanks were additionally equipped with combined turret side shields, as well as grilles covering rear parts of the hull and turret for protection against shape-charged anti-tank weapons - this configuration received the designation Dorchester Level 2F (DL2F). The next modernization, also aimed at improving the protection, took place in 2008. The tanks received hull skirts made of combined armour, NERA blocks on the hull sides were replaced with ERA containers manufactured by the Israeli company Rafael Advanced Defense Systems Limited. This variant of the Challenger 2 was designated TES (Theatre Entry Standard).
- From Devblog
Media
- Skins
- Videos
See also
Links to the articles on the War Thunder Wiki that you think will be useful for the reader, for example:
- reference to the series of the vehicles;
- links to approximate analogues of other nations and research trees.
External links
| Britain medium tanks | |
|---|---|
| Valentine | Valentine I · Valentine IX · Valentine XI |
| Cromwell | Cromwell I · Cromwell V · Cromwell V (RP-3) |
| Cromwell derivatives | Challenger · Avenger · Comet I · Comet I "Iron Duke IV" · Charioteer Mk VII |
| Centurion | Centurion Mk 1 · Centurion Mk.2 · Centurion Mk 3 · Centurion Mk.5 AVRE · Centurion Mk 10 · Centurion Action X · FV4202 |
| Vickers MBT | Vickers Mk.1 · Vickers Mk.3 · Vickers Mk.7 |
| Chieftain | Chieftain Mk 3 · Chieftain Mk 5 · Chieftain Mk 10 |
| Challenger 1 | Challenger Mk.2 · Challenger Mk.3 · Challenger DS |
| Challenger 2 | Challenger 2 · Challenger 2 (2F) · Challenger 2 TES · Challenger 2 OES · Challenger 2E · Challenger 2 Black Night |
| Challenger 3 | Challenger 3 TD |
| Australia | A.C.I · A.C.IV · Centurion Mk.5/1 |
| South Africa | Olifant Mk.1A · Olifant Mk.2 · TTD |
| India | Vijayanta · Bhishma TWMP |
| Israel | ▄Sho't Kal Dalet |
| Jordan | Khalid |
| Sweden | ▄Strv 81 (RB 52) |
| USA | Grant I · Sherman II · Sherman Firefly · Sherman IC "Trzyniec" |
- Ground vehicles
- Britain ground vehicles
- Seventh rank ground vehicles
- Medium tanks
- Ground vehicles with explosive reactive armour
- Ground vehicles with composite armour
- Ground vehicles with smoke grenades
- Ground vehicles with engine smoke generating system
- Ground vehicles with night vision device
- Ground vehicles with thermal sight
- Ground vehicles with gun stabilizer
