Difference between revisions of "Challenger"
(→Usage in battles) |
m (→Pros and cons) (Tag: Visual edit) |
||
| Line 19: | Line 19: | ||
''If necessary use a visual template to indicate the most secure and weak zones of the armour.''--> | ''If necessary use a visual template to indicate the most secure and weak zones of the armour.''--> | ||
'''Armour type:''' | '''Armour type:''' | ||
| + | |||
* Rolled homogeneous armour | * Rolled homogeneous armour | ||
| + | |||
{| class="wikitable" style="text-align:center" | {| class="wikitable" style="text-align:center" | ||
| − | | | + | | colspan="6" align="center" | '''Tank Armour Table''' |
|- | |- | ||
! Armour !! Front !! Sides !! Rear !! Roof | ! Armour !! Front !! Sides !! Rear !! Roof | ||
|- | |- | ||
| − | | Hull || 63.5 mm (1°) ''Front plate'' <br> 30 mm (73°) ''Front glacis'' <br> 57.15 mm (19-35°) ''Joint plate'' <br> 25 mm (65°) ''Lower glacis'' || 29-50.8 mm ''Top hull'' <br/> 14 + 14 mm ''Lower Hull'' || 51 mm ''Turret base'' <br> 38 mm ''Top hull'' <br> 38 mm (19°), 20 mm (57°) ''Lower Hull'' || 20 mm ''Front'' <br> 14 mm ''Engine deck'' | + | | Hull || 63.5 mm (1°) ''Front plate'' <br> 30 mm (73°) ''Front glacis'' <br> 57.15 mm (19-35°) ''Joint plate'' <br> 25 mm (65°) ''Lower glacis'' || 29-50.8 mm ''Top hull'' <br /> 14 + 14 mm ''Lower Hull'' || 51 mm ''Turret base'' <br> 38 mm ''Top hull'' <br> 38 mm (19°), 20 mm (57°) ''Lower Hull'' || 20 mm ''Front'' <br> 14 mm ''Engine deck'' |
|- | |- | ||
| Turret || 63-102 mm (0-1°) ''Turret front'' <br> 102 mm (4-12°) ''Gun mantlet'' || 40 mm || 40 mm (1°) || 20 mm | | Turret || 63-102 mm (0-1°) ''Turret front'' <br> 102 mm (4-12°) ''Gun mantlet'' || 40 mm || 40 mm (1°) || 20 mm | ||
| Line 31: | Line 33: | ||
|} | |} | ||
'''Notes:''' | '''Notes:''' | ||
| + | |||
* Suspension wheels are 15 mm thick, suspension bars are 10 mm thick, while tracks are 20 mm thick. | * Suspension wheels are 15 mm thick, suspension bars are 10 mm thick, while tracks are 20 mm thick. | ||
* 5 mm RHA plates between the engine compartment and crew, as well as separating driver from turret and ammunition. | * 5 mm RHA plates between the engine compartment and crew, as well as separating driver from turret and ammunition. | ||
| Line 63: | Line 66: | ||
==== Ammunition ==== | ==== Ammunition ==== | ||
| + | |||
* '''Shot Mk.6:''' {{Annotation|AP|Armour-piercing}} - Standard penetrating round, use until better rounds are unlocked. | * '''Shot Mk.6:''' {{Annotation|AP|Armour-piercing}} - Standard penetrating round, use until better rounds are unlocked. | ||
* '''Shell Mk.1:''' {{Annotation|HE|High-explosive}} - It is ideal for destroying SPAA and lightly armoured tanks, but useless against anything else. | * '''Shell Mk.1:''' {{Annotation|HE|High-explosive}} - It is ideal for destroying SPAA and lightly armoured tanks, but useless against anything else. | ||
| Line 68: | Line 72: | ||
* '''Shot Mk.8:''' {{Annotation|APCBC|Armour-piercing capped ballistic capped}} - Like Shot Mk.4 but with a ballistic cap for improved flight path, as well as better penetration. | * '''Shot Mk.8:''' {{Annotation|APCBC|Armour-piercing capped ballistic capped}} - Like Shot Mk.4 but with a ballistic cap for improved flight path, as well as better penetration. | ||
* '''Shot SV Mk.1:''' {{Annotation|APDS|Armour-piercing discarding sabot}} - Highest armour penetration of any shot, but has worse spalling effect. | * '''Shot SV Mk.1:''' {{Annotation|APDS|Armour-piercing discarding sabot}} - Highest armour penetration of any shot, but has worse spalling effect. | ||
| + | |||
{| class="wikitable sortable" style="text-align:center" width="100%" | {| class="wikitable sortable" style="text-align:center" width="100%" | ||
! colspan="8" | Penetration statistics | ! colspan="8" | Penetration statistics | ||
| Line 234: | Line 239: | ||
<!--''Summarize and briefly evaluate the vehicle in terms of its characteristics and combat effectiveness. Mark its pros and cons in a bulleted list. Try not to use more than 6 points for each of the characteristics. Avoid using categorical definitions such as "bad", "good" and the like - they have a substitution in the form of softer "inadequate", "effective".''--> | <!--''Summarize and briefly evaluate the vehicle in terms of its characteristics and combat effectiveness. Mark its pros and cons in a bulleted list. Try not to use more than 6 points for each of the characteristics. Avoid using categorical definitions such as "bad", "good" and the like - they have a substitution in the form of softer "inadequate", "effective".''--> | ||
'''Pros:''' | '''Pros:''' | ||
| + | |||
* Armed with the 17-pounder with APDS rounds available. | * Armed with the 17-pounder with APDS rounds available. | ||
* The Challenger has the fastest reload speed from all tanks armed with the 17-pounder. | * The Challenger has the fastest reload speed from all tanks armed with the 17-pounder. | ||
| Line 244: | Line 250: | ||
* Ammo is stored in a strategic location, lowering the risk of ammo detonation. | * Ammo is stored in a strategic location, lowering the risk of ammo detonation. | ||
* Very low risk of fire due to rear mounted transmission and fuel tanks. | * Very low risk of fire due to rear mounted transmission and fuel tanks. | ||
| + | |||
'''Cons:''' | '''Cons:''' | ||
| + | |||
* Paper thin hull armour (glass cannon). | * Paper thin hull armour (glass cannon). | ||
* No explosive filler in any AP shells. | * No explosive filler in any AP shells. | ||
| Line 252: | Line 260: | ||
* Four man in the turret, an APHE shot will disable the tank for good. | * Four man in the turret, an APHE shot will disable the tank for good. | ||
* The Challenger requires a very high skill cap to perform adequately. | * The Challenger requires a very high skill cap to perform adequately. | ||
| + | * Traversing the hull, especially on sloped angles, might be hard due to its long hull | ||
== History == | == History == | ||
| Line 285: | Line 294: | ||
* ''reference to the series of the vehicles;'' | * ''reference to the series of the vehicles;'' | ||
* ''links to approximate analogues of other nations and research trees.''--> | * ''links to approximate analogues of other nations and research trees.''--> | ||
| + | |||
* [[Avenger]] - Tank destroyer spin-off also using the Cromwell chassis to carry the 17-pdr. | * [[Avenger]] - Tank destroyer spin-off also using the Cromwell chassis to carry the 17-pdr. | ||
| Line 292: | Line 302: | ||
* ''encyclopedia page on tank;'' | * ''encyclopedia page on tank;'' | ||
* ''other literature.''--> | * ''other literature.''--> | ||
| + | |||
* [https://warthunder.com/en/devblog/current/852/ [Devblog<nowiki>]</nowiki> A34 Comet I and A30 Challenger] | * [https://warthunder.com/en/devblog/current/852/ [Devblog<nowiki>]</nowiki> A34 Comet I and A30 Challenger] | ||
{{Britain medium tanks}} | {{Britain medium tanks}} | ||
Revision as of 10:07, 26 September 2020
Contents
| This page is about the British medium tank A30 Challenger. For other uses, see Challenger (Disambiguation). |
Description

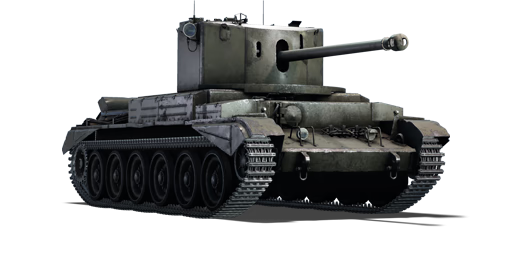
The Tank, Cruiser, Challenger (A30) is a Rank III British medium tank
with a battle rating of 5.0 (AB) and 5.3 (RB/SB). It was introduced in Update 1.55 "Royal Armour" alongside the rest of the British Ground Forces Tree. Taking the outdated Cromwell chassis, extending it and adding a new turret, it gave life to this improved variant with the much powerful 17-pounder anti-tank gun.
General info
Survivability and armour
Armour type:
- Rolled homogeneous armour
| Tank Armour Table | |||||
| Armour | Front | Sides | Rear | Roof | |
|---|---|---|---|---|---|
| Hull | 63.5 mm (1°) Front plate 30 mm (73°) Front glacis 57.15 mm (19-35°) Joint plate 25 mm (65°) Lower glacis |
29-50.8 mm Top hull 14 + 14 mm Lower Hull |
51 mm Turret base 38 mm Top hull 38 mm (19°), 20 mm (57°) Lower Hull |
20 mm Front 14 mm Engine deck | |
| Turret | 63-102 mm (0-1°) Turret front 102 mm (4-12°) Gun mantlet |
40 mm | 40 mm (1°) | 20 mm | |
Notes:
- Suspension wheels are 15 mm thick, suspension bars are 10 mm thick, while tracks are 20 mm thick.
- 5 mm RHA plates between the engine compartment and crew, as well as separating driver from turret and ammunition.
- Lower side hulls are spaced with the suspension springs lined up in between.
- A 25 mm RHA bar line up in front of the turret to protect the turret ring.
Mobility
| Game Mode | Max Speed (km/h) | Weight (tons) | Engine power (horsepower) | Power-to-weight ratio (hp/ton) | |||
|---|---|---|---|---|---|---|---|
| Forward | Reverse | Stock | Upgraded | Stock | Upgraded | ||
| Arcade | 58 | 4 | 31.5 | 930 | 1,145 | 29.52 | 36.35 |
| Realistic | 52 | 4 | 531 | 600 | 16.86 | 19.05 | |
Armaments
Main armament
| 76 mm QF 17-pounder | Turret rotation speed (°/s) | Reloading rate (seconds) | |||||||||||
|---|---|---|---|---|---|---|---|---|---|---|---|---|---|
| Mode | Capacity | Vertical | Horizontal | Stabilizer | Stock | Upgraded | Full | Expert | Aced | Stock | Full | Expert | Aced |
| Arcade | 48 | -10°/+20° | ±180° | N/A | 31.42 | 43.48 | 52.80 | 58.39 | 62.12 | 6.63 | 5.87 | 5.41 | 5.10 |
| Realistic | 19.64 | 23.10 | 28.05 | 31.02 | 33.00 | ||||||||
Ammunition
- Shot Mk.6: AP - Standard penetrating round, use until better rounds are unlocked.
- Shell Mk.1: HE - It is ideal for destroying SPAA and lightly armoured tanks, but useless against anything else.
- Shot Mk.4: APC - Cap for better grip against sloped armour.
- Shot Mk.8: APCBC - Like Shot Mk.4 but with a ballistic cap for improved flight path, as well as better penetration.
- Shot SV Mk.1: APDS - Highest armour penetration of any shot, but has worse spalling effect.
| Penetration statistics | |||||||
|---|---|---|---|---|---|---|---|
| Ammunition | Type of warhead |
Penetration @ 0° Angle of Attack (mm) | |||||
| 10 m | 100 m | 500 m | 1,000 m | 1,500 m | 2,000 m | ||
| Shot Mk.6 | AP | 171 | 168 | 155 | 139 | 126 | 113 |
| Shell Mk.1 | HE | 9 | 9 | 9 | 9 | 9 | 9 |
| Shot Mk.4 | APC | 171 | 168 | 155 | 139 | 126 | 113 |
| Shot Mk.8 | APCBC | 190 | 187 | 172 | 155 | 140 | 126 |
| Shot SV Mk.1 | APDS | 228 | 226 | 207 | 189 | 159 | 134 |
| Shell details | |||||||||
|---|---|---|---|---|---|---|---|---|---|
| Ammunition | Type of warhead |
Velocity (m/s) |
Projectile Mass (kg) |
Fuse delay (m) |
Fuse sensitivity (mm) |
Explosive Mass (TNT equivalent) (g) |
Ricochet | ||
| 0% | 50% | 100% | |||||||
| Shot Mk.6 | AP | 883 | 7.71 | N/A | N/A | N/A | 47° | 60° | 65° |
| Shell Mk.1 | HE | 883 | 6.98 | 0.4 | 0.5 | 580 | 79° | 80° | 81° |
| Shot Mk.4 | APC | 883 | 7.71 | N/A | N/A | N/A | 48° | 63° | 71° |
| Shot Mk.8 | APCBC | 883 | 7.71 | N/A | N/A | N/A | 48° | 63° | 71° |
| Shot SV Mk.1 | APDS | 1,203 | 1.73 | N/A | N/A | N/A | 75° | 78° | 80° |
| Smoke shell characteristics | ||||||
|---|---|---|---|---|---|---|
| Ammunition | Velocity (m/s) |
Projectile Mass (kg) |
Screen radius (m) |
Screen deploy time (s) |
Screen hold time (s) |
Explosive Mass (TNT equivalent) (g) |
| 17pdr Shell SS Mk.1 | 754 | 8.44 | 13 | 5 | 20 | 50 |
Ammo racks

| Full ammo |
1st rack empty |
2nd rack empty |
3rd rack empty |
Visual discrepancy |
|---|---|---|---|---|
| 48 | 37 (+11) | 25 (+23) | 1 (+47) | Yes |
Turret empty: 25 (+23)
Optics
| Challenger Optics | ||
|---|---|---|
| Which ones | Default magnification | Maximum magnification |
| Main Gun optics | x3 | x6 |
| Comparable optics | VFW | |
Uses now default x6 scope of the British. As of rank III, this scope is slightly or moderately superior to most medium and heavy tanks, but do not expect to outsnipe German SPG as they have same optics or even better.
With Challenger being on the edge in between rank III and IV it is possible to get into rank IV battle with full up-tier. In that case, the tank optics are no longer superior to most opponents.
In particular, do not let Japanese medium tanks ST-A1 get an upper hand at all costs, as they have optics eclipsing these of Challenger at long ranges and might as well snipe Challenger from 2 km away, if they have accuracy modifications.
Machine guns
| 7.62 mm M1919A4 | ||||
|---|---|---|---|---|
| Mount | Capacity (Belt) | Fire rate | Vertical | Horizontal |
| Coaxial | 3,750 (250) | 500 | N/A | N/A |
Usage in battles
This tank has a high penetration gun (with APDS), great maneuverability, and good speed. However, it has extremely weak armour, terrible reverse, and quite a high profile. As such it requires some skill to use. It excels as a sniper or an ambushing tank destroyer, waiting for the enemy to come into its sights and firing from a point of advantage. It is also a good flanker due to its speed and maneuverability, getting around the enemy and hitting them from the side or back.
Do not attempt to brawl or use this vehicle as a front line tank. The Challenger cannot afford to take even a single hit from enemy tanks, and it will be up against German 88 mm and Russian 85/122 mm guns which will easily take it out in one shot. The poor reverse speed also makes hit and run tactics a bad choice.
When in its stock form, this tank will be quite frustrating to play. The stock AP round bounces often and does very little damage, it is also quite hard to aim at range. The first aim upon getting this tank should be to unlock APDS as soon as possible. With this round, the Challenger can easily penetrate most of the tanks that it faces. Hitting ammo racks often equals a detonation and it performs well at long range.
Modules
| Tier | Mobility | Protection | Firepower | |||
|---|---|---|---|---|---|---|
| I | Tracks | Parts | Shot Mk.4 | Horizontal Drive | ||
| II | Suspension | Brake System | FPE | Shot Mk.8 | Adjustment of Fire | |
| III | Filters | Crew Replenishment | Shot SV Mk.1 | Elevation Mechanism | Smoke Grenade | |
| IV | Transmission | Engine | Artillery Support | 17pdr Shell SS Mk.1 | ||
Pros and cons
Pros:
- Armed with the 17-pounder with APDS rounds available.
- The Challenger has the fastest reload speed from all tanks armed with the 17-pounder.
- Able to deal a lot of damage in a very short amount of time.
- Fast tank that is capable of reaching 50km/h on even ground.
- Fast turret traverse.
- Wide gun depression and elevation.
- Plays similarly to the Comet I and Avenger, albeit with a higher profile and less armour on the turret.
- Turret armour is still about 102 mm thick in certain areas.
- Ammo is stored in a strategic location, lowering the risk of ammo detonation.
- Very low risk of fire due to rear mounted transmission and fuel tanks.
Cons:
- Paper thin hull armour (glass cannon).
- No explosive filler in any AP shells.
- APDS shot causes only punctual damage (aim carefully).
- Turret is very tall compared to hull profile, making it hard to hide behind obstacles.
- Suffers from an awful reverse speed.
- Four man in the turret, an APHE shot will disable the tank for good.
- The Challenger requires a very high skill cap to perform adequately.
- Traversing the hull, especially on sloped angles, might be hard due to its long hull
History
Development
The development of the Cromwell tank due to the implementation of the Rolls-Royce Meteor engine helped Roy Robotham from Rolls to become the Minstry of Supply on the Tank Board, despite his lack of experience around the development of tanks. With the Cromwell in service with the British military, attempts were made to upgrade the armament on the tank from its 6-pounder and 75 mm gun. The first attempt was by Vickers with a "high-velocity" 75 mm gun, but the Cromwell turret ring proved too small for the adaption. While these attempts were made to upgun the Cromwell, improved tanks to replace the Cromwell was underway as the Comet and the Centurion tank. The General Staff specification for a 17-pounder armed cruiser tank was A29, but this was changed to A30 for any 17-pounder tank. The first order for such a tank came in 1942 to the Birmingham Railway Carriage & Wagon Company to build the 17-pounder tank from the components of the A27M Cromwell tank. While responsibility of the turret and gun mounting went to Stothert & Pitt, Birmingham was responsible for modifying the Cromwell hull for the new turret.
The resulting tank from the design team was completed in 1942. Compared to the Cromwell, the hull machine gun was removed for more stowage space for the longer 17-pounder ammunition. However, the stowage location and ammo size facilitated the need for two loaders in the tank to keep the firing rate stable. A larger turret was needed for this requirement, the larger turret thus caused the Cromwell hull to be lengthened with another road wheel on the suspension, but the track width was not modified to fit this so the tank's mobility was reduced. The total armour is reduced to save on weight, especially the turret area, which gave the crew inside the turret a sense of vulnerability. The turret ring of the turret was unprotected and was thus given a jacking feature to clear any jams that forms from combat situations.
The tank, named the A30 Challenger, was tested at Lulworth and was criticized for having a slow firing rate and thin armour, but its long range effectiveness against German tanks was satisfactory. An order for 200 Challengers was made in February 1943. The order was finished, but it was announced that no more were to be ordered on November the same year.
Combat usage
The Challenger was criticized and generally unpopular in its service, the crews complain that the tank throws its track, the armour was too thin, and the profile was too tall. The Challenger had no provisions for deep wading and was thus unable to participate during the D-day landings during Operation Overlord, thus the Challenger deployment was delayed until the artificial mulberry harbors and ports were captured before able to be delivered.
Though the Challenger saw some modifications to fix the track throwing issue, it was found that the equipping of the 17-pounder onto the American M4 Sherman tank into the Firefly was faster and easier than the production of the Challenger, thus production lines were stopped after the initial orders. Both tanks saw use in the same role in the British tank forces, accompanying the tank squadrons into enemy territory and firing at enemy armour from a long distance. The Challenger saw more use with Cromwell units due to interchangeability in parts. Some perks of the Challenger was its speed and agility compared to the Firefly, but the vehicle's initial bad reputation still struggled due to the low number produced in the war.
An attempt to improve on the Challenger was the A30 SP Avenger, which used a different open-topped turret to save weight on the tank design. However, due to priorities on the Comet tank in the Vauxhall Motors plant, they were not being built until 1945 and weren't used until after the war in Europe is over. 250 unit were built and formed part of the British Army of the Rhine stationed in Germany after the war.
The Challenger saw use with other Allied forces as well, with the 1st Czechoslovak Armoured Brigade using the tank during the assault on Dunkirk and the 1st Polish Armoured Division receiving them by mid-1945. After the war, Czechoslovakia wanted to buy 22 Challengers to equip its army, which it did until 1959.
Survivors
Two Challenger survive in intact condition today. One is at the Overloon War Museum in the Netherlands and the other is currently in storage at the Isle of Wight Military Museum to be restored, when it will then be displayed at the Bovington Tank Museum.
Media
References
See also
- Avenger - Tank destroyer spin-off also using the Cromwell chassis to carry the 17-pdr.
External links
| Britain medium tanks | |
|---|---|
| Valentine | Valentine I · Valentine IX · Valentine XI |
| Cromwell | Cromwell I · Cromwell V · Cromwell V (RP-3) |
| Cromwell derivatives | Challenger · Avenger · Comet I · Comet I "Iron Duke IV" · Charioteer Mk VII |
| Centurion | Centurion Mk 1 · Centurion Mk.2 · Centurion Mk 3 · Centurion Mk.5 AVRE · Centurion Mk 10 · Centurion Action X · FV4202 |
| Vickers MBT | Vickers Mk.1 · Vickers Mk.3 · Vickers Mk.7 |
| Chieftain | Chieftain Mk 3 · Chieftain Mk 5 · Chieftain Mk 10 |
| Challenger 1 | Challenger Mk.2 · Challenger Mk.3 · Challenger DS |
| Challenger 2 | Challenger 2 · Challenger 2 (2F) · Challenger 2 TES · Challenger 2 OES · Challenger 2E · Challenger 2 Black Night |
| Challenger 3 | Challenger 3 TD |
| Australia | A.C.I · A.C.IV · Centurion Mk.5/1 |
| South Africa | Olifant Mk.1A · Olifant Mk.2 · TTD |
| India | Vijayanta · Bhishma TWMP |
| Israel | ▄Sho't Kal Dalet |
| Jordan | Khalid |
| Sweden | ▄Strv 81 (RB 52) |
| USA | Grant I · Sherman II · Sherman Firefly · Sherman IC "Trzyniec" |
