Difference between revisions of "Centurion Mk 1"
m (Tag: Visual edit) |
|||
| (14 intermediate revisions by 8 users not shown) | |||
| Line 1: | Line 1: | ||
{{Specs-Card|code=uk_centurion_mk_1}} | {{Specs-Card|code=uk_centurion_mk_1}} | ||
| + | {{About | ||
| + | | about = British medium tank '''{{PAGENAME}}''' | ||
| + | | usage = other versions | ||
| + | | link = Centurion (Family) | ||
| + | }} | ||
== Description == | == Description == | ||
| − | ''In the description, the first part needs to be about the history of the creation and combat usage of the vehicle, as well as its key features. In the second part, tell the reader about the ground vehicle in the game. Insert the screenshot of the vehicle. If the novice player does not remember the vehicle by name, they will immediately understand what kind of vehicle it is talking about.'' | + | <!--''In the description, the first part needs to be about the history of the creation and combat usage of the vehicle, as well as its key features. In the second part, tell the reader about the ground vehicle in the game. Insert the screenshot of the vehicle. If the novice player does not remember the vehicle by name, they will immediately understand what kind of vehicle it is talking about.''--> |
| + | [[File:GarageImage_Centurion Mk 1.jpg|420px|thumb|left]] | ||
| + | {{break}} | ||
| + | The '''{{Specs|name}}''' is a rank {{Specs|rank}} British medium tank {{Battle-rating}}. It was introduced in [[Update 1.67 "Assault"]]. It is equipped with the well-known British [[Ordnance QF 17-pounder (76 mm)|QF 17-pounder]] mounted on a new hull that definitively makes the Cromwell chassis outdated. | ||
| + | |||
| + | This tank does not play like any of the preceding British vehicles: while its mobility is below average for a rank IV medium, it compensates with armour, meaning that you will actually be able to withstand frontal combat and return fire, even if you get hit. It is the first medium to feature the late-game British armour pattern: a strong turret, thick and well-angled upper-glacis, weak lower glacis and thin sides. British tankers must get used to this configuration since it is found on every following medium tank. | ||
| + | |||
| + | The Centurion Mk.1 moves away from the familiar Cromwell chassis. While not being as fast or manoeuvrable, It does have sloped frontal armour, a strongly armoured turret, and a good QF 17-pounder gun with access to APDS. | ||
== General info == | == General info == | ||
=== Survivability and armour === | === Survivability and armour === | ||
| − | ''Describe armour protection. Note the most well protected and key weak areas. Appreciate the layout of modules as well as the number and location of crew members. Is the level of armour protection sufficient, is the placement of modules | + | <!--''Describe armour protection. Note the most well protected and key weak areas. Appreciate the layout of modules as well as the number and location of crew members. Is the level of armour protection sufficient, is the placement of modules helpful for survival in combat?'' |
| + | |||
| + | ''If necessary use a visual template to indicate the most secure and weak zones of the armour.''-->The Centurion Mk 1 is the first tank players will encounter in the British tech tree that sports a sloped hull front similar to the Panther, which with a thickness of 76.2 mm provides great protection for its battle rating, especially when the hull is angled slightly. Turret armour features 127 mm thickness throughout the front but features many flat areas that cannons of sufficient power will exploit to destroy the tank, especially since 3 out of the 4 crew members are located in the turret. Side armour can withstand auto-cannon fire with exceptions for HVAP rounds, so don't rely on it outside of that. If the situation becomes sticky and a tactical retreat is required, a single wide volley of smoke grenades launched from the turret can cover you from the line-of-sight. | ||
| + | |||
| + | '''''Armour'''''<br> | ||
| + | The main improvement from previous British mediums is its thick and sloped armour. Reaching 152 mm on the turret and a good 76 mm angled at 58° on the front hull, this tanks can actually block point-blank shots from most cannons it will face like the Russian [[D-5T (85 mm)|D-5T]], the Japanese [[Type II Model II (75 mm)|Type II 75 mm]] and even some German guns at 500 m. This tank can actually expose its upper glacis since it will bounce most shots. This tank still has weak spots though: gun and MG mantlet are "only" 127 mm thick, barely angled and lower glacis are 76 mm at 44°, meaning close-range shots will eventually penetrate. It also has thin side armour, meaning that the tank is vulnerable to flank attacks and compound angling cannot be done effectively without exposing the sides. These traits mean that the Centurion Mk.1 can happily stand up most frontal shots at this rank. | ||
| + | |||
| + | '''Armour type:''' | ||
| + | |||
| + | * Rolled homogeneous armour (Hull, Turret sides, Turret roof) | ||
| + | * Cast homogeneous armour (Turret front, Gun mantlet, Cupola) | ||
| + | |||
| + | {| class="wikitable" style="text-align:center" | ||
| + | | colspan="6" align="center" | '''Tank Armour Table''' | ||
| + | |- | ||
| + | ! Armour !! Front !! Sides !! Rear !! Roof | ||
| + | |- | ||
| + | | Hull || 76.2 mm (58°) ''Front glacis'' <br> 76.2 mm (44°) ''Lower glacis'' || 51 (12°) + 6 mm || 38 mm (7°) ''Top'' <br> 38 mm (18°) ''Bottom'' || 29 mm <br> 8-14 mm ''Engine deck'' | ||
| + | |- | ||
| + | | Turret || 127 mm (2-58°) ''Turret front'' <br> 127 mm (6-40°) ''Gun mantlet'' || 76 mm (9-11°) || 76 mm (1°) <br> 38 mm (89°) ''Turret underside'' || 25 mm | ||
| + | |- | ||
| + | ! Armour !! Sides !! Roof | ||
| + | |- | ||
| + | | Cupola || 90 mm || 19 mm | ||
| + | |- | ||
| + | |} | ||
| + | '''Notes:''' | ||
| − | + | *Tracks and suspension wheels are both 20 mm thick. | |
| + | *The steel boxes around the turret and hull give a 4 mm additional protection, though this seems to be a negligible addition. | ||
| + | *Skirting are placed on the sides of the Centurion, giving an additional 6 mm of side protection and can act as spaced armour. | ||
| + | *An internal structural plate of 17mm thickness separates the forward ammo rack from the driver as seen in X-ray mode. | ||
| + | *Another internal 17mm structural plate with large openings separates the driving compartment from the fighting compartment. | ||
=== Mobility === | === Mobility === | ||
| − | ''Write about the mobility of the ground vehicle. Estimate the specific power and | + | <!-- ''Write about the mobility of the ground vehicle. Estimate the specific power and manoeuvrability, as well as the maximum speed forwards and backwards.'' --> |
| + | |||
| + | {{tankMobility|abMinHp= 984|rbMinHp= 562}} | ||
| + | |||
| + | The Centurion easily reaches its top speed of 39 km/h on almost any ground, due to its wide tracks and a good engine, even at stock performances. It also has a refreshingly good reverse speed (~13 km/h) (compared to the dreadful reverse speed of tanks on the Cromwell chassis) and can turn on the spot quite fast. | ||
| + | |||
| + | Compared to the many Cromwell based tanks before the Centurion, it does lose out on a great forward speed, only being able to reach 41 km/h (AB) / 37 km/h (RB) maximum, but in return it does receive great reverse speed of 13.4 km/h (AB)/12.1 km/h (RB), allowing for tactics that would not be recommended with the Cromwell like "Peek-a-boos". It also retains good maneuverability, effective neutral steering, and a very acceptable acceleration due to good power-to-weight ratio. | ||
== Armaments == | == Armaments == | ||
=== Main armament === | === Main armament === | ||
| − | ''Give the reader information about the characteristics of the main gun. Assess its effectiveness in a battle based on the reloading speed, ballistics and the power of shells. Do not forget about the | + | <!--''Give the reader information about the characteristics of the main gun. Assess its effectiveness in a battle based on the reloading speed, ballistics and the power of shells. Do not forget about the flexibility of the fire, that is how quickly the cannon can be aimed at the target, open fire on it and aim at another enemy. Add a link to the main article on the gun: <code><nowiki>{{main|Name of the weapon}}</nowiki></code>. Describe in general terms the ammunition available for the main gun. Give advice on how to use them and how to fill the ammunition storage.''--> |
| + | {{main|Ordnance QF 17-pounder (76 mm)}}<br> | ||
| + | The gun does not fire any shells with explosive filler, meaning that pinpoint accuracy is needed to get reliable kills (aiming for important modules, crew, or ammo racks). This canon's reload rate is faster than average at this BR, meaning you will be able to land 2 shots before your enemy can even fire. As any other tanks equipped with the [[Ordnance QF 17-pounder (76 mm)|QF 17-pounder]], you will have to grind through subpar AP, APBC and APCBC shells before getting APDS. This last type of shell helps make accuracy quite easy and remains effective at long ranges while not being too costly in terms of silver lions. | ||
| + | |||
| + | A minor issue to notice is that the machine gun has very poor elevation and is loader-controlled, meaning that it cannot target even low flying aircraft and that it will be disabled once you lose two or more crew members. | ||
| − | === | + | {| class="wikitable" style="text-align:center" |
| − | '' | + | |- |
| + | ! colspan="6" | [[Ordnance QF 17-pounder (76 mm)|76 mm OQF 17-pounder]] | ||
| + | |- | ||
| + | ! colspan="3" rowspan="1" style="width:5em" |Capacity | ||
| + | ! rowspan="1" | Vertical <br> guidance | ||
| + | ! rowspan="1" | Horizontal <br> guidance | ||
| + | ! rowspan="1" | Stabilizer | ||
| + | |- | ||
| + | | colspan="3" | 74 || -12°/+20° || ±180° || N/A | ||
| + | |- | ||
| + | ! colspan="6" | Turret rotation speed (°/s) | ||
| + | |- | ||
| + | ! style="width:4em" |Mode | ||
| + | ! style="width:4em" |Stock | ||
| + | ! style="width:4em" |Upgraded | ||
| + | ! style="width:4em" |Prior + Full crew | ||
| + | ! style="width:4em" |Prior + Expert qualif. | ||
| + | ! style="width:4em" |Prior + Ace qualif. | ||
| + | |- | ||
| + | | ''Arcade'' || 17.14 || 23.72 || 28.80 || 31.84 || 33.88 | ||
| + | |- | ||
| + | | ''Realistic'' || 10.70 || 12.60 || 15.30 || 16.92 || 18.00 | ||
| + | |- | ||
| + | ! colspan="4" | Reloading rate (seconds) | ||
| + | |- | ||
| + | ! colspan="1" style="width:4em" |Stock | ||
| + | ! colspan="1" style="width:4em" |Prior + Full crew | ||
| + | ! colspan="1" style="width:4em" |Prior + Expert qualif. | ||
| + | ! colspan="1" style="width:4em" |Prior + Ace qualif. | ||
| + | |- | ||
| + | | 7.67 || 6.79 || 6.25 || 5.90 | ||
| + | |- | ||
| + | |} | ||
| + | |||
| + | ===== Ammunition ===== | ||
| + | {| class="wikitable sortable" style="text-align:center" width="100%" | ||
| + | ! colspan="8" | Penetration statistics | ||
| + | |- | ||
| + | ! rowspan="2" data-sort-type="text" | Ammunition | ||
| + | ! rowspan="2" class="unsortable" | Type of <br /> warhead | ||
| + | ! colspan="6" | '''Penetration''' '''''in mm''''' '''@ 90°''' | ||
| + | |- | ||
| + | ! 10m | ||
| + | ! 100m | ||
| + | ! 500m | ||
| + | ! 1000m | ||
| + | ! 1500m | ||
| + | ! 2000m | ||
| + | |- | ||
| + | | Shot Mk.6 || AP || 171 || 168 || 155 || 139 || 126 || 113 | ||
| + | |- | ||
| + | | Shell Mk.1 || HE || 9 || 9 || 9 || 9 || 9 || 9 | ||
| + | |- | ||
| + | | Shot Mk.4 || APC || 171 || 168 || 155 || 139 || 126 || 113 | ||
| + | |- | ||
| + | | Shot Mk.8 || APCBC || 190 || 187 || 172 || 155 || 140 || 126 | ||
| + | |- | ||
| + | | Shot SV Mk.1 || APDS || 228 || 226 || 207 || 189 || 159 || 134 | ||
| + | |- | ||
| + | |} | ||
| + | {| class="wikitable sortable" style="text-align:center" width="100%" | ||
| + | ! colspan="11" | Shell details | ||
| + | |- | ||
| + | ! rowspan="2" data-sort-type="text" | Ammunition | ||
| + | ! rowspan="2" class="unsortable" | Type of <br /> warhead | ||
| + | ! rowspan="2" |Velocity <br /> in m/s | ||
| + | ! rowspan="2" |Projectile<br />Mass in kg | ||
| + | ! rowspan="2" | ''Fuse delay'' | ||
| + | ''in m:'' | ||
| + | ! rowspan="2" | ''Fuse sensitivity'' | ||
| + | ''in mm:'' | ||
| + | ! rowspan="2" | ''Explosive Mass in g<br /> (TNT equivalent):'' | ||
| + | ! rowspan="2" | ''Normalization At 30° <br> from horizontal:'' | ||
| + | ! colspan="3" | ''Ricochet:'' | ||
| + | |- | ||
| + | ! 0% | ||
| + | ! 50% | ||
| + | ! 100% | ||
| + | |- | ||
| + | | Shot Mk.6 || AP || 883 || 7.71 || N/A || N/A || N/A || -1° || 47° || 60° || 65° | ||
| + | |- | ||
| + | | Shell Mk.1 || HE || 883 || 6.98 || 0.4 || 0.5 || 883 || +0° || 79° || 80° || 81° | ||
| + | |- | ||
| + | | Shot Mk.4 || APC || 883 || 7.71 || N/A || N/A || N/A || -1° || 48° || 63° || 71° | ||
| + | |- | ||
| + | | Shot Mk.8 || APCBC || 883 || 7.71 || N/A || N/A || N/A || +4° || 48° || 63° || 71° | ||
| + | |- | ||
| + | | Shot SV Mk.1 || APDS || 1203 || 1.73 || N/A || N/A || N/A || +1.5° || 75° || 78° || 80° | ||
| + | |- | ||
| + | |} | ||
| + | {| class="wikitable sortable" style="text-align:center" | ||
| + | ! colspan="7" | Smoke characteristic | ||
| + | |- | ||
| + | ! Ammunition | ||
| + | ! Velocity <br /> in m/s | ||
| + | ! Projectile<br />Mass in kg | ||
| + | ! ''Screen radius <br /> in m'' | ||
| + | ! ''Screen time <br /> in s'' | ||
| + | ! ''Screen hold time <br /> in s:'' | ||
| + | ! ''Explosive Mass in g<br /> (TNT equivalent):'' | ||
| + | |- | ||
| + | | 17pdr Shell SS Mk.1 || 754 || 8.4 || 13 || 5 || 20 || 50 | ||
| + | |- | ||
| + | |} | ||
| + | |||
| + | ===== [[Ammo racks|Ammo racks]] ===== | ||
| + | [[File:Ammoracks_Centurion Mk 1.png|right|x250px|thumbnail|[[Ammo racks|Ammo racks]] of the Centurion Mk.1]]The QF 17-pounder cannon fires single-piece ammunition stored in stowage racks in the hull floor and the hull front next to the driver. There are 11 rounds stored in 3 small ready racks located in the turret basket inside the hull for quick reloading by the loader. The time it takes the loader to load one round into the ready rack from the stowage racks is about 17 seconds. | ||
| + | {| class="wikitable" style="text-align:center" | ||
| + | |- | ||
| + | ! class="wikitable unsortable" |Full<br />ammo | ||
| + | ! class="wikitable unsortable" |1st<br /> rack empty | ||
| + | ! class="wikitable unsortable" |2nd<br /> rack empty | ||
| + | ! class="wikitable unsortable" |3rd<br /> rack empty | ||
| + | ! class="wikitable unsortable" |4th<br /> rack empty | ||
| + | !5th | ||
| + | rack empty | ||
| + | !6th rack empty | ||
| + | !7th rack empty | ||
| + | ! class="wikitable unsortable" |Visual discrepancy | ||
| + | |- | ||
| + | || '''74''' || 71 ''(+3)'' || 67 ''(+7)'' || 64 ''(+10)'' || 62 ''(+12)'' | ||
| + | |46 ''(+28)'' | ||
| + | |30 ''(+44)'' | ||
| + | |1 ''(+73)''|| style="text-align:left" | Yes | ||
| + | |- | ||
| + | |} | ||
| + | |||
| + | Notes: | ||
| + | |||
| + | * Recommended ammo load is 30 to remove from ammo from the hull floor and half of rack 7. | ||
| + | * Ammo rack 1, 2, and 3 are ready racks, and takes priority in being filled at the beginning of the battle, then fills racks 7 through 4. | ||
| + | * Full reload speed will be realized as long as ammo exists in the ready racks. If all three ready racks are empty, a penalty to reload speed will occur. | ||
| + | * Simply not firing when the gun is loaded will load ammo from racks 4-7 into rack 3, 2, and 1, as long as there is ammo in racks 4-7. Firing will interrupt the loading of the ready racks. | ||
=== Machine guns === | === Machine guns === | ||
| − | ''Offensive and anti-aircraft machine guns not only allow you to fight some aircraft | + | <!--''Offensive and anti-aircraft machine guns not only allow you to fight some aircraft but also are effective against lightly armoured vehicles. Evaluate machine guns and give recommendations on its use.''--> |
| + | {{main|BESA (7.92 mm)}} | ||
| + | |||
| + | Unlike many turret-mounted machine guns that are co-axial, this machine gun is mounted in pintle mount similar to hull-mounted machine guns, so it is able to independently traverse on its own to a degree, a trait that is shared with the Soviet T-28. This can provide a slight advantage when the turret ring is disabled, as it can allow more accurate fire without the need to move the turret/hull. | ||
| + | |||
| + | {| class="wikitable" style="text-align:center" | ||
| + | |- | ||
| + | ! colspan="7" | [[BESA (7.92 mm)|7.92 mm BESA]] | ||
| + | |- | ||
| + | ! colspan="7" | ''Coaxial mount'' | ||
| + | |- | ||
| + | ! colspan="4" rowspan="1" style="width:5em" |Capacity (Belt capacity) | ||
| + | ! rowspan="1" | Fire rate <br> (shots/minute) | ||
| + | ! rowspan="1" | Vertical <br> guidance | ||
| + | ! rowspan="1" | Horizontal <br> guidance | ||
| + | |- | ||
| + | | colspan="4" | 3,375 (225) || 600 || ±7° || ±7° | ||
| + | |- | ||
| + | |} | ||
== Usage in the battles == | == Usage in the battles == | ||
| − | ''Describe the tactics of playing in the vehicle, the features of using vehicles in the team and advice on tactics. Refrain from creating a "guide" - do not impose a single point of view but give the reader food for thought. Describe the most dangerous enemies and give recommendations on fighting them. If necessary, note the specifics of the game in different modes (AB, RB, SB).'' | + | <!--''Describe the tactics of playing in the vehicle, the features of using vehicles in the team and advice on tactics. Refrain from creating a "guide" - do not impose a single point of view but give the reader food for thought. Describe the most dangerous enemies and give recommendations on fighting them. If necessary, note the specifics of the game in different modes (AB, RB, SB).''--> |
| + | '''Overview:''' | ||
| + | |||
| + | The Centurion Mk 1 is widely considered as the first Main Battle Tank, and plays in the role of a medium/heavy. The armor is satisfactory against most enemy weapons, although it should not be relied upon. The 17 pounder cannon is very effective against enemy armor, although its post penetration damage is lackluster. The tank is not particularly fast, but is mobile, especially in reverse. | ||
| + | |||
| + | '''Strategies:''' | ||
| + | |||
| + | Centurion tank commanders should use cover and be careful for the majority of the time. When the opportunity arises, the Centurion can help lead the charge against enemy medium and heavy tanks. Centurion commanders should keep in mind that the APDS ammunition is unlikely to destroy enemy vehicles in one shot, so they may need to expose themselves to enemy fire for extended periods of time in order to secure a kill. Generally, the Centurion plays similarly to other medium tanks of the tier. It is best practice to angle the turret, but the hull should not be angled due to the thin side armor. | ||
| + | |||
| + | In terms of engagement ranges, the Centurion works well at both long and short ranges. The issue with sniping in the centurion is that it is very difficult to secure kills with the lackluster post penetration damage. Because of this, medium and short range engagements are preferable. | ||
| + | |||
| + | '''Notable Enemies:''' | ||
| + | |||
| + | Fighting at 5.7 BR tank battles, the Centurion faces many iconic German big cats like the Tiger I and Panther. The Centurion is capable of going head to head with the big cats. The APDS rounds will slice through the Tiger at most angles, and can even penetrate the upper front plate of a Panther at close ranges. This round can even penetrate the Jagdpanther. It can also easily penetrate the hull of the IS-1 and early IS-2. Generally when firing at enemies, be careful to aim for the flat parts of the armor. APDS ammunition does not handle angled armor very well. | ||
| + | |||
| + | === Modules === | ||
| + | {| class="wikitable" | ||
| + | ! Tier | ||
| + | ! colspan="2" | Mobility | ||
| + | ! Protection | ||
| + | ! colspan="3" | Firepower | ||
| + | |- | ||
| + | | I | ||
| + | | Tracks | ||
| + | | | ||
| + | | Parts | ||
| + | | Shot Mk.4 | ||
| + | | Horizontal Drive | ||
| + | | | ||
| + | |- | ||
| + | | II | ||
| + | | Suspension | ||
| + | | Brake System | ||
| + | | FPE | ||
| + | | Shot Mk.8 | ||
| + | | Adjustment of fire | ||
| + | | | ||
| + | |- | ||
| + | | III | ||
| + | | Filters | ||
| + | | | ||
| + | | Crew Replenishment | ||
| + | | Shot SV Mk.1 | ||
| + | | Elevation Mechanism | ||
| + | | Smoke Grenade | ||
| + | |- | ||
| + | | IV | ||
| + | | Transmission | ||
| + | | Engine | ||
| + | | | ||
| + | | Artillery Support | ||
| + | | 17pdr Shell SS Mk.1 | ||
| + | | | ||
| + | |- | ||
| + | |} | ||
=== Pros and cons === | === Pros and cons === | ||
| − | ''Summarize and briefly evaluate the vehicle in terms of its characteristics and combat effectiveness. Mark its pros and cons in a bulleted list. Do not use more than 6 points for each of the characteristics. Avoid using categorical definitions such as "bad", "good" and the like - they have a substitution in the form of softer "inadequate", "effective".'' | + | <!--''Summarize and briefly evaluate the vehicle in terms of its characteristics and combat effectiveness. Mark its pros and cons in a bulleted list. Do not use more than 6 points for each of the characteristics. Avoid using categorical definitions such as "bad", "good" and the like - they have a substitution in the form of softer "inadequate", "effective".''--> |
| + | '''Pros:''' | ||
| − | ' | + | * Fast firing 17-pounder armament with APDS rounds |
| − | * | + | * Good gun depression of -12° |
| + | * Tough round and sloped armour that is quite resistant to the 85mm, 76mm and even the German 88 mm (KwK 36) guns at medium/long range | ||
| + | * Turret's top armour is thick, can resist most aircraft guns | ||
| + | * Average mobility and decent manoeuvrability | ||
| + | * Good reverse speed and neutral steering | ||
| + | * Benefits greatly from the learning curve of the Comet I and Challenger, their players will find themselves at home when playing the Centurion | ||
| + | * Mastering this tank will provide a good learning curve for the next Centurion variants | ||
'''Cons:''' | '''Cons:''' | ||
| − | * | + | |
| + | * Precision and knowledge of enemy tanks are required, because APDS localized damage | ||
| + | * Large tank size, especially length | ||
| + | * Weak side armour, angling the armour too much will result in the side armour being penetrated | ||
| + | * Centurion Mk 1 is slow for a medium tank | ||
| + | * Unlike its later iterations, no [[Gun stabilizer|gun stabilizer]] | ||
| + | * Weak Lower Frontal Plate (LFP) ammo rack also present there, a weakness carried over to all British tanks onward | ||
| + | * Top armour covering the engine is poor, only 8 mm | ||
== History == | == History == | ||
| − | ''Describe the history of the creation and combat usage of the ground vehicle in more detail than in the introduction. If the historical reference turns out to be too big, take it to a separate article, taking a link to an article about the vehicle and adding a block "/historical reference" (example: https://wiki.warthunder.com/Name-vehicles/historical reference) and add a link to it here using the <code>main</code> template. Be sure to include links to sources at the end of the article.'' | + | <!--''Describe the history of the creation and combat usage of the ground vehicle in more detail than in the introduction. If the historical reference turns out to be too big, take it to a separate article, taking a link to an article about the vehicle and adding a block "/historical reference" (example: https://wiki.warthunder.com/Name-vehicles/historical reference) and add a link to it here using the <code>main</code> template. Be sure to include links to sources at the end of the article.''-->Designated as A41, The Centurion MK.1 armed with the 17-pdr is the first production variant of the highly regarded Cent tanks. 6 tanks were made at the end of WWII and were sent to 5th Royal Inniskilling Dragoon Guards, 22nd Armoured Brigade at Gribbohm, in Germany, May 1945. |
== Media == | == Media == | ||
| Line 42: | Line 312: | ||
== Read also == | == Read also == | ||
| − | + | [https://warthunder.com/en/news/4515-development-centurion-mk-i-a-tank-for-a-new-era-en/ [Devblog<nowiki>]</nowiki> Centurion Mk I: A Tank for a New Era] | |
| − | |||
| − | |||
| − | |||
== Sources == | == Sources == | ||
''Paste links to sources and external resources, such as:'' | ''Paste links to sources and external resources, such as:'' | ||
| + | |||
* ''topic on the official game forum;'' | * ''topic on the official game forum;'' | ||
* ''other literature.'' | * ''other literature.'' | ||
| + | |||
| + | {{Britain medium tanks}} | ||
Revision as of 08:19, 1 June 2020
Contents
| This page is about the British medium tank Centurion Mk 1. For other versions, see Centurion (Family). |
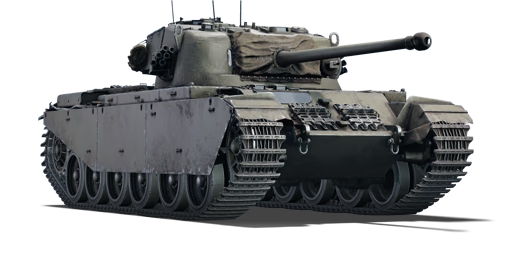
Description

The Centurion Mk 1 is a rank IV British medium tank
with a battle rating of 6.0 (AB/RB/SB). It was introduced in Update 1.67 "Assault". It is equipped with the well-known British QF 17-pounder mounted on a new hull that definitively makes the Cromwell chassis outdated.
This tank does not play like any of the preceding British vehicles: while its mobility is below average for a rank IV medium, it compensates with armour, meaning that you will actually be able to withstand frontal combat and return fire, even if you get hit. It is the first medium to feature the late-game British armour pattern: a strong turret, thick and well-angled upper-glacis, weak lower glacis and thin sides. British tankers must get used to this configuration since it is found on every following medium tank.
The Centurion Mk.1 moves away from the familiar Cromwell chassis. While not being as fast or manoeuvrable, It does have sloped frontal armour, a strongly armoured turret, and a good QF 17-pounder gun with access to APDS.
General info
Survivability and armour
The Centurion Mk 1 is the first tank players will encounter in the British tech tree that sports a sloped hull front similar to the Panther, which with a thickness of 76.2 mm provides great protection for its battle rating, especially when the hull is angled slightly. Turret armour features 127 mm thickness throughout the front but features many flat areas that cannons of sufficient power will exploit to destroy the tank, especially since 3 out of the 4 crew members are located in the turret. Side armour can withstand auto-cannon fire with exceptions for HVAP rounds, so don't rely on it outside of that. If the situation becomes sticky and a tactical retreat is required, a single wide volley of smoke grenades launched from the turret can cover you from the line-of-sight.
Armour
The main improvement from previous British mediums is its thick and sloped armour. Reaching 152 mm on the turret and a good 76 mm angled at 58° on the front hull, this tanks can actually block point-blank shots from most cannons it will face like the Russian D-5T, the Japanese Type II 75 mm and even some German guns at 500 m. This tank can actually expose its upper glacis since it will bounce most shots. This tank still has weak spots though: gun and MG mantlet are "only" 127 mm thick, barely angled and lower glacis are 76 mm at 44°, meaning close-range shots will eventually penetrate. It also has thin side armour, meaning that the tank is vulnerable to flank attacks and compound angling cannot be done effectively without exposing the sides. These traits mean that the Centurion Mk.1 can happily stand up most frontal shots at this rank.
Armour type:
- Rolled homogeneous armour (Hull, Turret sides, Turret roof)
- Cast homogeneous armour (Turret front, Gun mantlet, Cupola)
| Tank Armour Table | |||||
| Armour | Front | Sides | Rear | Roof | |
|---|---|---|---|---|---|
| Hull | 76.2 mm (58°) Front glacis 76.2 mm (44°) Lower glacis |
51 (12°) + 6 mm | 38 mm (7°) Top 38 mm (18°) Bottom |
29 mm 8-14 mm Engine deck | |
| Turret | 127 mm (2-58°) Turret front 127 mm (6-40°) Gun mantlet |
76 mm (9-11°) | 76 mm (1°) 38 mm (89°) Turret underside |
25 mm | |
| Armour | Sides | Roof | |||
| Cupola | 90 mm | 19 mm | |||
Notes:
- Tracks and suspension wheels are both 20 mm thick.
- The steel boxes around the turret and hull give a 4 mm additional protection, though this seems to be a negligible addition.
- Skirting are placed on the sides of the Centurion, giving an additional 6 mm of side protection and can act as spaced armour.
- An internal structural plate of 17mm thickness separates the forward ammo rack from the driver as seen in X-ray mode.
- Another internal 17mm structural plate with large openings separates the driving compartment from the fighting compartment.
Mobility
| Game Mode | Max Speed (km/h) | Weight (tons) | Engine power (horsepower) | Power-to-weight ratio (hp/ton) | |||
|---|---|---|---|---|---|---|---|
| Forward | Reverse | Stock | Upgraded | Stock | Upgraded | ||
| Arcade | 43 | 15 | 46.9 | 984 | 1,221 | 20.98 | 26.03 |
| Realistic | 39 | 13 | 562 | 640 | 11.98 | 13.65 | |
The Centurion easily reaches its top speed of 39 km/h on almost any ground, due to its wide tracks and a good engine, even at stock performances. It also has a refreshingly good reverse speed (~13 km/h) (compared to the dreadful reverse speed of tanks on the Cromwell chassis) and can turn on the spot quite fast.
Compared to the many Cromwell based tanks before the Centurion, it does lose out on a great forward speed, only being able to reach 41 km/h (AB) / 37 km/h (RB) maximum, but in return it does receive great reverse speed of 13.4 km/h (AB)/12.1 km/h (RB), allowing for tactics that would not be recommended with the Cromwell like "Peek-a-boos". It also retains good maneuverability, effective neutral steering, and a very acceptable acceleration due to good power-to-weight ratio.
Armaments
Main armament
The gun does not fire any shells with explosive filler, meaning that pinpoint accuracy is needed to get reliable kills (aiming for important modules, crew, or ammo racks). This canon's reload rate is faster than average at this BR, meaning you will be able to land 2 shots before your enemy can even fire. As any other tanks equipped with the QF 17-pounder, you will have to grind through subpar AP, APBC and APCBC shells before getting APDS. This last type of shell helps make accuracy quite easy and remains effective at long ranges while not being too costly in terms of silver lions.
A minor issue to notice is that the machine gun has very poor elevation and is loader-controlled, meaning that it cannot target even low flying aircraft and that it will be disabled once you lose two or more crew members.
| 76 mm OQF 17-pounder | |||||
|---|---|---|---|---|---|
| Capacity | Vertical guidance |
Horizontal guidance |
Stabilizer | ||
| 74 | -12°/+20° | ±180° | N/A | ||
| Turret rotation speed (°/s) | |||||
| Mode | Stock | Upgraded | Prior + Full crew | Prior + Expert qualif. | Prior + Ace qualif. |
| Arcade | 17.14 | 23.72 | 28.80 | 31.84 | 33.88 |
| Realistic | 10.70 | 12.60 | 15.30 | 16.92 | 18.00 |
| Reloading rate (seconds) | |||||
| Stock | Prior + Full crew | Prior + Expert qualif. | Prior + Ace qualif. | ||
| 7.67 | 6.79 | 6.25 | 5.90 | ||
Ammunition
| Penetration statistics | |||||||
|---|---|---|---|---|---|---|---|
| Ammunition | Type of warhead |
Penetration in mm @ 90° | |||||
| 10m | 100m | 500m | 1000m | 1500m | 2000m | ||
| Shot Mk.6 | AP | 171 | 168 | 155 | 139 | 126 | 113 |
| Shell Mk.1 | HE | 9 | 9 | 9 | 9 | 9 | 9 |
| Shot Mk.4 | APC | 171 | 168 | 155 | 139 | 126 | 113 |
| Shot Mk.8 | APCBC | 190 | 187 | 172 | 155 | 140 | 126 |
| Shot SV Mk.1 | APDS | 228 | 226 | 207 | 189 | 159 | 134 |
| Shell details | ||||||||||
|---|---|---|---|---|---|---|---|---|---|---|
| Ammunition | Type of warhead |
Velocity in m/s |
Projectile Mass in kg |
Fuse delay
in m: |
Fuse sensitivity
in mm: |
Explosive Mass in g (TNT equivalent): |
Normalization At 30° from horizontal: |
Ricochet: | ||
| 0% | 50% | 100% | ||||||||
| Shot Mk.6 | AP | 883 | 7.71 | N/A | N/A | N/A | -1° | 47° | 60° | 65° |
| Shell Mk.1 | HE | 883 | 6.98 | 0.4 | 0.5 | 883 | +0° | 79° | 80° | 81° |
| Shot Mk.4 | APC | 883 | 7.71 | N/A | N/A | N/A | -1° | 48° | 63° | 71° |
| Shot Mk.8 | APCBC | 883 | 7.71 | N/A | N/A | N/A | +4° | 48° | 63° | 71° |
| Shot SV Mk.1 | APDS | 1203 | 1.73 | N/A | N/A | N/A | +1.5° | 75° | 78° | 80° |
| Smoke characteristic | ||||||
|---|---|---|---|---|---|---|
| Ammunition | Velocity in m/s |
Projectile Mass in kg |
Screen radius in m |
Screen time in s |
Screen hold time in s: |
Explosive Mass in g (TNT equivalent): |
| 17pdr Shell SS Mk.1 | 754 | 8.4 | 13 | 5 | 20 | 50 |
Ammo racks

| Full ammo |
1st rack empty |
2nd rack empty |
3rd rack empty |
4th rack empty |
5th
rack empty |
6th rack empty | 7th rack empty | Visual discrepancy |
|---|---|---|---|---|---|---|---|---|
| 74 | 71 (+3) | 67 (+7) | 64 (+10) | 62 (+12) | 46 (+28) | 30 (+44) | 1 (+73) | Yes |
Notes:
- Recommended ammo load is 30 to remove from ammo from the hull floor and half of rack 7.
- Ammo rack 1, 2, and 3 are ready racks, and takes priority in being filled at the beginning of the battle, then fills racks 7 through 4.
- Full reload speed will be realized as long as ammo exists in the ready racks. If all three ready racks are empty, a penalty to reload speed will occur.
- Simply not firing when the gun is loaded will load ammo from racks 4-7 into rack 3, 2, and 1, as long as there is ammo in racks 4-7. Firing will interrupt the loading of the ready racks.
Machine guns
Unlike many turret-mounted machine guns that are co-axial, this machine gun is mounted in pintle mount similar to hull-mounted machine guns, so it is able to independently traverse on its own to a degree, a trait that is shared with the Soviet T-28. This can provide a slight advantage when the turret ring is disabled, as it can allow more accurate fire without the need to move the turret/hull.
| 7.92 mm BESA | ||||||
|---|---|---|---|---|---|---|
| Coaxial mount | ||||||
| Capacity (Belt capacity) | Fire rate (shots/minute) |
Vertical guidance |
Horizontal guidance | |||
| 3,375 (225) | 600 | ±7° | ±7° | |||
Usage in the battles
Overview:
The Centurion Mk 1 is widely considered as the first Main Battle Tank, and plays in the role of a medium/heavy. The armor is satisfactory against most enemy weapons, although it should not be relied upon. The 17 pounder cannon is very effective against enemy armor, although its post penetration damage is lackluster. The tank is not particularly fast, but is mobile, especially in reverse.
Strategies:
Centurion tank commanders should use cover and be careful for the majority of the time. When the opportunity arises, the Centurion can help lead the charge against enemy medium and heavy tanks. Centurion commanders should keep in mind that the APDS ammunition is unlikely to destroy enemy vehicles in one shot, so they may need to expose themselves to enemy fire for extended periods of time in order to secure a kill. Generally, the Centurion plays similarly to other medium tanks of the tier. It is best practice to angle the turret, but the hull should not be angled due to the thin side armor.
In terms of engagement ranges, the Centurion works well at both long and short ranges. The issue with sniping in the centurion is that it is very difficult to secure kills with the lackluster post penetration damage. Because of this, medium and short range engagements are preferable.
Notable Enemies:
Fighting at 5.7 BR tank battles, the Centurion faces many iconic German big cats like the Tiger I and Panther. The Centurion is capable of going head to head with the big cats. The APDS rounds will slice through the Tiger at most angles, and can even penetrate the upper front plate of a Panther at close ranges. This round can even penetrate the Jagdpanther. It can also easily penetrate the hull of the IS-1 and early IS-2. Generally when firing at enemies, be careful to aim for the flat parts of the armor. APDS ammunition does not handle angled armor very well.
Modules
| Tier | Mobility | Protection | Firepower | |||
|---|---|---|---|---|---|---|
| I | Tracks | Parts | Shot Mk.4 | Horizontal Drive | ||
| II | Suspension | Brake System | FPE | Shot Mk.8 | Adjustment of fire | |
| III | Filters | Crew Replenishment | Shot SV Mk.1 | Elevation Mechanism | Smoke Grenade | |
| IV | Transmission | Engine | Artillery Support | 17pdr Shell SS Mk.1 | ||
Pros and cons
Pros:
- Fast firing 17-pounder armament with APDS rounds
- Good gun depression of -12°
- Tough round and sloped armour that is quite resistant to the 85mm, 76mm and even the German 88 mm (KwK 36) guns at medium/long range
- Turret's top armour is thick, can resist most aircraft guns
- Average mobility and decent manoeuvrability
- Good reverse speed and neutral steering
- Benefits greatly from the learning curve of the Comet I and Challenger, their players will find themselves at home when playing the Centurion
- Mastering this tank will provide a good learning curve for the next Centurion variants
Cons:
- Precision and knowledge of enemy tanks are required, because APDS localized damage
- Large tank size, especially length
- Weak side armour, angling the armour too much will result in the side armour being penetrated
- Centurion Mk 1 is slow for a medium tank
- Unlike its later iterations, no gun stabilizer
- Weak Lower Frontal Plate (LFP) ammo rack also present there, a weakness carried over to all British tanks onward
- Top armour covering the engine is poor, only 8 mm
History
Designated as A41, The Centurion MK.1 armed with the 17-pdr is the first production variant of the highly regarded Cent tanks. 6 tanks were made at the end of WWII and were sent to 5th Royal Inniskilling Dragoon Guards, 22nd Armoured Brigade at Gribbohm, in Germany, May 1945.
Media
An excellent addition to the article will be video guides, as well as screenshots from the game and photos.
Read also
[Devblog] Centurion Mk I: A Tank for a New Era
Sources
Paste links to sources and external resources, such as:
- topic on the official game forum;
- other literature.
| Britain medium tanks | |
|---|---|
| Valentine | Valentine I · Valentine IX · Valentine XI |
| Cromwell | Cromwell I · Cromwell V · Cromwell V (RP-3) |
| Cromwell derivatives | Challenger · Avenger · Comet I · Comet I "Iron Duke IV" · Charioteer Mk VII |
| Centurion | Centurion Mk 1 · Centurion Mk.2 · Centurion Mk 3 · Centurion Mk.5 AVRE · Centurion Mk 10 · Centurion Action X · FV4202 |
| Vickers MBT | Vickers Mk.1 · Vickers Mk.3 · Vickers Mk.7 |
| Chieftain | Chieftain Mk 3 · Chieftain Mk 5 · Chieftain Mk 10 |
| Challenger 1 | Challenger Mk.2 · Challenger Mk.3 · Challenger DS |
| Challenger 2 | Challenger 2 · Challenger 2 (2F) · Challenger 2 TES · Challenger 2 OES · Challenger 2E · Challenger 2 Black Night |
| Challenger 3 | Challenger 3 TD |
| Australia | A.C.I · A.C.IV · Centurion Mk.5/1 |
| South Africa | Olifant Mk.1A · Olifant Mk.2 · TTD |
| India | Vijayanta · Bhishma TWMP |
| Israel | ▄Sho't Kal Dalet |
| Jordan | Khalid |
| Sweden | ▄Strv 81 (RB 52) |
| USA | Grant I · Sherman II · Sherman Firefly · Sherman IC "Trzyniec" |
