Difference between pages "Phòng không T-34" and "KW I C 756 (r) (Germany)"
(→Usage in battles) (Tag: Visual edit) |
phish_phood (talk | contribs) (Lots of grammatical edits, re-writing for clarity and removal of duplicate information. Some typo correction.) (Tag: Visual edit) |
||
| Line 1: | Line 1: | ||
| − | {{Specs-Card|code= | + | {{Specs-Card|code=germ_kv_1_kwk_40}} |
{{About | {{About | ||
| − | | about = | + | |about=heavy tank '''{{PAGENAME}}''' |
| − | + | |usage=other uses | |
| − | + | |link=KV-1 (Family) | |
| − | |||
| − | | usage | ||
| − | | link | ||
}} | }} | ||
== Description == | == Description == | ||
| − | <!-- | + | <!--In the description, the first part should be about the history of the creation and combat usage of the vehicle, as well as its key features. In the second part, tell the reader about the ground vehicle in the game. Insert a screenshot of the vehicle, so that if the novice player does not remember the vehicle by name, he will immediately understand what kind of vehicle the article is talking about.--> |
| − | [[File: | + | [[File:GarageImage_KV-IB756(r)(Germany).jpg|420px|thumb|left]] |
| − | {{ | + | {{break}} |
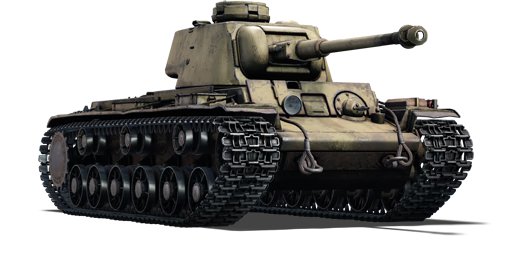
| − | The '''{{Specs|name}}''' is a | + | The '''{{Specs|name}}''' is a premium Rank {{Specs|rank}} German heavy tank {{Battle-rating}}. It was introduced in [[Update 1.43]]. A heavily modified [[KV-1 (ZiS-5)|KV-1]] heavy tank, the most glaring change is the gun. Modified to carry the [[KwK 40 (75 mm)|7.5 cm KwK 40]] gun, this change offers the KV-1 a very noticeable improvement in firepower by comparison to the "normal" Russian armament. |
| − | The | + | The KV I C 756(r)'s German made 75mm gun is very effective at 4.7. Known as the KwK 40 with barrel length L/48, players have four different ammunition types to choose from: APCBC, APCR, HEAT and HE. As is common with German 75mm guns it features dependable accuracy and formidable muzzle velocity: from 990m/s for APCR to 450m/s for HEAT. The reload time in game is 7.6s, giving the KV I C 756(r) the potential to fire eight rounds per minute. The gun allows the KV I C 756(r) to be quite strong in long-range engagements, especially in BR 4.7, where you will face many easy to penetrate medium tanks. In higher ranks it will benefit from a superior fire rate when compared to most higher caliber guns. |
| − | + | [[File:DamageModel KV-IB756(r) SideWeakpoints.jpg|thumbnail|left|Weakspots: Side Armour profile]] | |
| − | + | AP ammo has decent armour penetration and APCR will penetrate the frontal armour of anything up to around 500m with the exception of the Sherman Jumbo, though give a higher tendency to bounce at extreme angles. Thanks to the aforementioned muzzle velocity, shells fly in a nice flat trajectory making aiming easier in RB and SB. German 75mm guns have good post-pen fragmentation characteristics, causing predictable damage to crew and modules inside the tank. It will most likely take two APCBC shells to knock out the crew, more or less depending on the enemy tank. The total ammo capacity is 80 rounds. It is recommended to carry mostly APCBC, relying only on APCR when facing otherwise impenetrable targets. HEAT rounds sound good in theory since they retain penetration over any distance, but the arching trajectory and low velocity makes it impossible to hit moving or even stationary vehicles at a great distances. There are four ammo racks in total: two on the sides of the turret (5 rounds each), one to the right of the driver (18 rounds) and the largest directly below the turret. The chance of an ammo explosion from a hit to the front is slim however if hit at the side and low there will most likely be an explosion. The only real way to reduce the risk of an ammo explosion is to take out 10 shells so that the two ammo racks in the turret will be empty. | |
| + | |||
| + | [[File:DamageModel KV-IB756(r) RearWeakpoints.jpg|thumbnail|left|Weakspots: Rear turret Armour profile]] | ||
| + | |||
| + | The armour on the KV I C 756(r) is fantastic at 4.7. Frontal hull armour is up to 100mm thick, slopped at 30 degrees -- on par with a Tiger's armour. If the hull is angled correctly (around 40 degrees) that number can increase up to 145mm of effective protection. With that kind of armour the only tanks that can penetrate the KV I C 756(r) are the Panther, IS-2 and Panzer IV/70(V) with AP ammo, though several more tanks can shoot APCR rounds and successfully penetrate. The side also has additional protection because of the infamous Russian wheels and tracks. All that said the KV I C 756(r) has its drawbacks with regard to survivability. The front hull has several weak points which are protected by 75mm of armour, penetrable by most enemy AP shells. The turrets mantlet and surrounding armour is only 50mm and poorly slopped making it extremely easy to penetrate. If the side is exposed there is a high likelihood that the fuel tanks or the ammo rack will explode from a direct impact. Always attempt to angle the hull when facing an enemy. When reloading the gun swing the turret to the side so that the mantlet is protected by the strong side armour. | ||
| + | |||
| + | [[File:DamageModel KV-IB756(r) FrontWeakpoints.jpg|thumbnail|right|Weakspots: Frontal Armour profile]] | ||
| + | |||
| + | The tank's mobility is serviceable at best. It has a decent top speed but off-road the tank will slow down to a crawl. The acceleration is poor and a lot of speed is lost when turning. Taking long routes to the objective is not recommended. Flanking and maneuvering is next to impossible. Reverse speed is very sluggish as well. Because the tank is so inherently slow it’s best to avoid hills, slopes and mud. Do not over-extend or you will find yourself unable to reverse out of a bad situation quickly. The KV I C 756(r) can be effective in close quarters but always be one step back from the front to avoid being flanked by faster tanks. Going into a wide open area can be very dangerous. If the enemy has any positions that will allow side shots or access to un-angled sections of the tank, pushing is not recommended. On the other hand, positioning the KV I C 756(r) in advantageous positions overlooking long-range environments (where the additional armour protection will be even more effective) is a decent strategy. | ||
| + | |||
| + | All in all the KV I C 756(r) has a good gun and strong amour but suffers in maneuverability and speed (forward and reverse). It is best to control the engagement, either by maintaining distance or using effective cover to protect your flanks and allow angling. Be mindful of the weak spots on the front hull and the mantlet. Do not expose the side of the tank. The KV I C 756(r) isn’t a medium tank, so be cautious when extending in towns or other close quarters locations. | ||
== General info == | == General info == | ||
=== Survivability and armour === | === Survivability and armour === | ||
| − | <!-- | + | <!--Describe armour protection. Note the most well protected and key weak areas. Appreciate the layout of modules as well as the number and location of crew members. Is the level of armour protection sufficient, is the placement of modules helpful for survival in combat? |
| − | |||
| − | + | If necessary use a visual template to indicate the most secure and weak zones of the armour.--> | |
| + | '''Armour type:''' | ||
| + | |||
| + | * Rolled homogeneous armour (Hull) | ||
| + | * Cast homogeneous armour (Turret) | ||
| + | |||
| + | {| class="wikitable" | ||
| + | |- | ||
| + | ! Armour !! Front !! Sides !! Rear !! Roof | ||
| + | |- | ||
| + | | Hull || 75 + 25 mm (30-31°) ''Front plate'' <br> 40 mm (72°) ''Front glacis'' <br> 75 + 25 mm (26-51°) ''Lower glacis'' || 75 mm || 60 mm (31°) ''Top'' <br /> 70 mm (14-54°) ''Bottom'' || 30 mm | ||
| + | |- | ||
| + | | Turret || 105 mm (11-79°) ''Turret front'' <br> 50 mm (25-41°) ''Gun mantlet'' || 105 mm (1-16°) || 105 mm (6-14°) || 40 mm | ||
| + | |- | ||
| + | ! Armour !! Sides !! Roof | ||
| + | |- | ||
| + | | Cupola || 50 mm || 40 mm | ||
| + | |- | ||
| + | |} | ||
| + | '''Notes:''' | ||
| + | |||
| + | * Suspension wheels are 20 mm thick and tracks are 30 mm thick. | ||
| + | * The front hull is 75 mm thick, but an extra 25 mm armour is welded onto that plate, increasing its armour thickness. | ||
| + | * Turret ring is protected by 25 mm thick armour at front and sides. | ||
| + | * 105 mm cast armour are present above and below the 50 mm gun mantlet. | ||
| + | |||
| + | <gallery> | ||
| + | DamageModel KV-IB756(r) FrontArmour.jpg| Front | ||
| + | DamageModel KV-IB756(r) SideArmour.jpg| Side | ||
| + | DamageModel KV-IB756(r) RearArmour.jpg| Rear | ||
| + | DamageModel KV-IB756(r) RoofArmour.jpg| Roof | ||
| + | </gallery> | ||
| + | |||
| + | When trying to engage a KV I C 756(r), it's a good idea to close the distance. Already very strong for 4.7, the armour is even tougher to penetrate at long ranges, becoming outright impossible for some tanks. If given no other choice, try shooting for the mantlet. Considering the area is small, it will not be easy to hit. Shells may bounce off the gun given its size. Still, considering the strength of the KV I C 756(r) at long range, advancing to get a better shot is not recommended if in its field of fire. | ||
| + | |||
| + | [[File:DamageModel KV-IB756(r) CrewSpots.jpg|thumbnail|right|Crew Layout of the Pz.Kpfw. KV I C 756(r)]] | ||
| + | |||
| + | When up close there are multiple places on the tank where massive damage can be dealt. When facing the front of the KV I C 756(r) there are 3 distinct weakspots: the drivers view port, the hull machine gunners port and the mantle of the gun. Most tanks shouldn't have a problem penetrating these spots with AP ammunition. At the side there is a chance to shoot one of the ammo racks. The ammo racks are located directly below the turret and just above the lower wheels, directly to the right of the driver and on either side of the turret. The turrets side and back armour is uniform thickness and it can be pretty tough to penetrate it when its angled. It's best to aim just below the turret and shoot the the hull (note that there is a small strip or additional 25mm armour just below the turret so avoid shooting that spot) to knock out the crew in the turret. Also watch out for the track and wheels on the side, they can add enough armour to prevent penetration. When firing at the back of the tank it's best to shoot the turret because there aren't any fuel tanks near the engine. There isn't much use of taking out the engine because of the fact that the KV I C 756(r) is inherently slow and most likely won't run away. | ||
=== Mobility === | === Mobility === | ||
<!-- ''Write about the mobility of the ground vehicle. Estimate the specific power and manoeuvrability, as well as the maximum speed forwards and backwards.'' --> | <!-- ''Write about the mobility of the ground vehicle. Estimate the specific power and manoeuvrability, as well as the maximum speed forwards and backwards.'' --> | ||
| − | {{tankMobility|abMinHp= | + | {{tankMobility|abMinHp= 775|rbMinHp= 531|<!--AoAweight=(optional) -->}} |
| − | |||
| − | |||
== Armaments == | == Armaments == | ||
=== Main armament === | === Main armament === | ||
| − | <!-- | + | <!--Give the reader information about the characteristics of the main gun. Assess its effectiveness in a battle based on the reloading speed, ballistics and the power of shells. Do not forget about the flexibility of the fire, that is how quickly the cannon can be aimed at the target, open fire on it and aim at another enemy. Add a link to the main article on the gun: <code><nowiki>{{main|Name of the weapon}}</nowiki></code>. Describe in general terms the ammunition available for the main gun. Give advice on how to use them and how to fill the ammunition storage.--> |
| − | {{main| | + | {{main|KwK 40 (75 mm)}} |
| − | + | {| class="wikitable" style="text-align:center" | |
| − | + | |- | |
| − | + | ! colspan="6" | [[KwK 40 (75 mm)|75 mm KwK 40 L/48]] | |
| − | + | |- | |
| − | + | ! colspan="3" rowspan="1" style="width:5em" |Capacity | |
| − | + | ! rowspan="1" | Vertical <br> guidance | |
| − | + | ! rowspan="1" | Horizontal <br> guidance | |
| + | ! rowspan="1" | Stabilizer | ||
| + | |- | ||
| + | | colspan="3" | 80 || -6°/+25° || ±180° || N/A | ||
| + | |- | ||
| + | ! colspan="6" | Turret rotation speed (°/s) | ||
| + | |- | ||
| + | ! style="width:4em" |Mode | ||
| + | ! style="width:4em" |Stock | ||
| + | ! style="width:4em" |Upgraded | ||
| + | ! style="width:4em" |Prior + Full crew | ||
| + | ! style="width:4em" |Prior + Expert qualif. | ||
| + | ! style="width:4em" |Prior + Ace qualif. | ||
| + | |- | ||
| + | | ''Arcade'' || 7.1 || 9.9 || __.__ || __.__ || __.__ | ||
|- | |- | ||
| − | + | | ''Realistic'' || 7.1 || 8.4 || __.__ || __.__ || __.__ | |
|- | |- | ||
| − | ! | + | ! colspan="4" | Reloading rate (seconds) |
| − | |||
| − | |||
|- | |- | ||
| − | ! | + | ! colspan="1" style="width:4em" |Stock |
| − | + | ! colspan="1" style="width:4em" |Prior + Full crew | |
| + | ! colspan="1" style="width:4em" |Prior + Expert qualif. | ||
| + | ! colspan="1" style="width:4em" |Prior + Ace qualif. | ||
|- | |- | ||
| − | + | | 7.6 || __.__ || __.__ || __.__ | |
| − | | | ||
|- | |- | ||
|} | |} | ||
| − | ==== Ammunition ==== | + | ===== Ammunition ===== |
| − | {| class="wikitable sortable | + | {| class="wikitable sortable" style="text-align:center" width="100%" |
! colspan="8" | Penetration statistics | ! colspan="8" | Penetration statistics | ||
|- | |- | ||
! rowspan="2" data-sort-type="text" | Ammunition | ! rowspan="2" data-sort-type="text" | Ammunition | ||
| − | ! rowspan="2" | Type of<br>warhead | + | ! rowspan="2" class="unsortable" | Type of <br /> warhead |
| − | ! colspan="6" | '''Penetration @ 90° | + | ! colspan="6" | '''Penetration''' '''''in mm''''' '''@ 90°''' |
|- | |- | ||
| − | ! | + | ! 10m |
| + | ! 100m | ||
| + | ! 500m | ||
| + | ! 1000m | ||
| + | ! 1500m | ||
| + | ! 2000m | ||
|- | |- | ||
| − | | | + | | PzGr 39 || APCBC ||140||137||125||112||100||89 |
|- | |- | ||
| − | | | + | | PzGr 40 || APCR || 177 || 176 || 154 || 130 || 109 || 92 |
|- | |- | ||
| − | | | + | | Hl.Gr 38B || HEAT || 80 || 80 || 80 || 80 || 80 || 80 |
| + | |- | ||
| + | | Sprgr. 34 || HE || 10 || 10 || 10 || 10 || 10 || 10 | ||
|- | |- | ||
|} | |} | ||
| − | {| class="wikitable sortable | + | {| class="wikitable sortable" style="text-align:center" width="100%" |
! colspan="11" | Shell details | ! colspan="11" | Shell details | ||
|- | |- | ||
! rowspan="2" data-sort-type="text" | Ammunition | ! rowspan="2" data-sort-type="text" | Ammunition | ||
| − | ! rowspan="2" | Type of<br>warhead | + | ! rowspan="2" class="unsortable" | Type of <br /> warhead |
| − | ! rowspan="2" | Velocity<br> | + | ! rowspan="2" |Velocity <br /> in m/s |
| − | ! rowspan="2" | Projectile<br>Mass | + | ! rowspan="2" |Projectile<br />Mass in kg |
| − | ! rowspan="2" | Fuse delay | + | ! rowspan="2" | ''Fuse delay'' |
| − | ! rowspan="2" | Fuse sensitivity | + | ''in m:'' |
| − | ! rowspan="2" | Explosive Mass<br>(TNT equivalent) | + | ! rowspan="2" | ''Fuse sensitivity'' |
| − | ! rowspan="2" | | + | ''in mm:'' |
| − | ! colspan="3" | Ricochet | + | ! rowspan="2" | ''Explosive Mass in g<br /> (TNT equivalent):'' |
| + | ! rowspan="2" | ''Normalization At 30° <br> from horizontal:'' | ||
| + | ! colspan="3" | ''Ricochet:'' | ||
|- | |- | ||
| − | ! 0% | + | ! 0% |
| + | ! 50% | ||
| + | ! 100% | ||
|- | |- | ||
| − | | | + | | PzGr 39 || APCBC || 750 || 6.8 || 1.3 || 15.0 || 28.9 || +4° || 48° || 63° || 71° |
|- | |- | ||
| − | | | + | | PzGr 40 || APCR || 930 || 4.2 || N/A || N/A || N/A || +1.5° || 66° || 70° || 72° |
|- | |- | ||
| − | | | + | | Hl.Gr 38B || HEAT || 450 || 4.4 || 0.0 || 0.1 || 872.1 || +0° || 62° || 69° || 73° |
| + | |- | ||
| + | | Sprgr. 34 || HE || 570 || 5.7 || 0.1 || 0.1 || 686 || +0° || 79° || 80° || 81° | ||
|- | |- | ||
|} | |} | ||
| − | ==== [[Ammo racks]] ==== | + | =====Shell types===== |
| − | [[File: | + | |
| + | *'''PzGr 39''' - Armour Piercing Ballistic Cap shell - This is your main ammo type, always use this if you think it can penetrate enemy armour. It deals the most damage because of its explosive filler. | ||
| + | *'''PzGr 40''' - Armour Piercing Composite Rigid shell - It is highly advised to take at least 15-20 of these rounds. The shell has enough penetration to deal with any tank (except the Sherman Jumbo) from the front up to 500m but lacks the necessary damage. Use this shell to exploit weaknesses in the enemies tank by targeting ammunition racks, fuel tanks, the engine and any other weak points. When facing slopped armour at or close to 60 degrees use APCBC. It's best used against Panthers, Tigers, IS tanks and SU-85Ms. Has a good flat flying trajectory. | ||
| + | *'''Hl.Gr. 38B''' - Cumulative Anti-armour shell - it is recommended to completely avoid this kind of shell as its performance is vastly inferior in all aspects compared to APCBC or APCR ammo used by this tank. | ||
| + | *'''SprGr. 34''' - High Explosive shell - You should carry only very few of these. They are useless against anything other than unarmoured AA vehicles, to which it is lethal. | ||
| + | |||
| + | ===== [[Ammo racks]] ===== | ||
| + | [[File:Ammoracks_KV-IB756(r)(Germany).png|right|thumb|x250px|[[Ammo racks]] of the {{PAGENAME}}]] | ||
{| class="wikitable" style="text-align:center" | {| class="wikitable" style="text-align:center" | ||
|- | |- | ||
| Line 110: | Line 184: | ||
! 2nd<br>rack empty | ! 2nd<br>rack empty | ||
! 3rd<br>rack empty | ! 3rd<br>rack empty | ||
| + | ! 4th<br>rack empty | ||
| + | ! 5th<br>rack empty | ||
! Visual<br>discrepancy | ! Visual<br>discrepancy | ||
|- | |- | ||
| − | | ''' | + | | '''80''' || 76 ''(+4)'' || 71 ''(+9)'' || 53 ''(+27)'' || 27 ''(+53)'' || 1 ''(+79)'' || No |
|- | |- | ||
|} | |} | ||
| − | === | + | Turret empty: 71 ''(+9)'' |
| + | |||
| + | === Machine guns === | ||
| + | <!--Offensive and anti-aircraft machine guns not only allow you to fight some aircraft but also are effective against lightly armoured vehicles. Evaluate machine guns and give recommendations on its use.--> | ||
| + | {{main|MG 34 (7.92 mm)}} | ||
| + | |||
{| class="wikitable" style="text-align:center" | {| class="wikitable" style="text-align:center" | ||
| − | |||
|- | |- | ||
| − | ! | + | ! colspan="7" | [[MG 34 (7.92 mm)|7.92 mm MG 34]] |
| − | |||
| − | |||
|- | |- | ||
| − | ! | + | ! colspan="7" | ''Coaxial mount'' |
| − | | | ||
|- | |- | ||
| − | ! | + | ! colspan="4" rowspan="1" style="width:5em" |Capacity (Belt capacity) |
| − | | colspan=" | + | ! rowspan="1" | Fire rate <br> (shots/minute) |
| + | ! rowspan="1" | Vertical <br> guidance | ||
| + | ! rowspan="1" | Horizontal <br> guidance | ||
| + | |- | ||
| + | | colspan="4" | 4,350 (150) || 900 || N/A || N/A | ||
|- | |- | ||
|} | |} | ||
== Usage in battles == | == Usage in battles == | ||
| − | <!-- ''Describe the tactics of playing in the vehicle, the features of using vehicles in the team and advice on tactics. Refrain from creating a "guide" - do not impose a single point of view but instead give the reader food for thought. Describe the most dangerous enemies and give recommendations on fighting them. If necessary, note the specifics of the game in different modes (AB, RB, SB).'' --> | + | <!--''Describe the tactics of playing in the vehicle, the features of using vehicles in the team and advice on tactics. Refrain from creating a "guide" - do not impose a single point of view but instead give the reader food for thought. Describe the most dangerous enemies and give recommendations on fighting them. If necessary, note the specifics of the game in different modes (AB, RB, SB).''--> |
| − | The {{PAGENAME}} is | + | The {{PAGENAME}} is a potent vehicle when angled (preferably 30 to 45 degrees to the left or right). The long 75 mm is a deadly weapon as well. You have average mobility at best, but this is a great vehicle if you know how to use it effectively. |
| − | |||
| − | The | ||
| − | |||
| − | |||
| − | |||
| − | |||
| − | |||
| − | |||
| − | |||
| − | |||
=== Modules === | === Modules === | ||
| Line 158: | Line 229: | ||
| | | | ||
|Parts | |Parts | ||
| − | |||
|Horizontal Drive | |Horizontal Drive | ||
| + | | | ||
|- | |- | ||
|II | |II | ||
| Line 165: | Line 236: | ||
|Brake System | |Brake System | ||
|FPE | |FPE | ||
| − | | | + | |Hl.Gr 38B |
|Adjustment of Fire | |Adjustment of Fire | ||
|- | |- | ||
| Line 172: | Line 243: | ||
| | | | ||
|Crew Replenishment | |Crew Replenishment | ||
| − | | | + | |PzGr 40 |
|Elevation Mechanism | |Elevation Mechanism | ||
|- | |- | ||
| Line 179: | Line 250: | ||
|Engine | |Engine | ||
| | | | ||
| − | |||
| | | | ||
| + | | | ||
| + | |- | ||
| + | ! colspan="6" |This is a premium vehicle: all modifications are unlocked on purchase | ||
| + | |- | ||
|} | |} | ||
=== Pros and cons === | === Pros and cons === | ||
| − | <!-- | + | <!--Summarise and briefly evaluate the vehicle in terms of its characteristics and combat effectiveness. Mark its pros and cons in a bulleted list. Try not to use more than 6 points for each of the characteristics. Avoid using categorical definitions such as "bad", "good" and the like - use substitutions with softer forms such as "inadequate" and "effective".--> |
| − | |||
'''Pros:''' | '''Pros:''' | ||
| − | * | + | * Powerful main gun with good penetration and damage |
| − | * | + | * Well armoured to resist most shells |
| − | * | + | * Somehow more mobile and faster than the regular KV-1 |
| − | * | + | * Good acceleration up until 20 km/h |
| − | * | + | * APCR shell can penetrate almost all tanks it faces |
| − | * | + | * Rear transmission means frontal hits are unlikely to render the tank immobile |
| − | + | * Since it is based on a "Russian" tank, you can trick ''some'' enemies into thinking you're a friendly in [[Simulator Battles|SB]] battles. However, a skilled opponent will know | |
| + | * Premium RP/SL bonuses | ||
'''Cons:''' | '''Cons:''' | ||
| − | * | + | * Several weak points on the front armour, especially the weak mantlet |
| − | + | * Cupola on turret top is very prominent and can compromise position over ridge lines, even be hit with careful shell placement | |
| − | * | + | * The sides are lined with fuel tanks, giving high chance of fire or fuel explosion |
| − | * | + | * Concentrated ammo rack at the hull bottom, low side shots have a high chance of striking and causing an ammo rack detonation |
| − | * | + | * Small turret space, a single shot can knock out every turret crew member |
| + | * Bad gun depression (-6°) | ||
| + | * Poor turning ability, turning will bleed speed very quickly | ||
| + | * Slow reverse of -6 km/h | ||
| + | * Since it is based on a "Russian" tank, unknowing teammates may shoot/destroy you in SB battles | ||
== History == | == History == | ||
| − | <!-- | + | <!--Describe the history of the creation and combat usage of the ground vehicle in more detail than in the introduction. If the historical reference turns out to be too long, take it to a separate article, taking a link to the article about the vehicle and adding a block "/ History" (example: <nowiki>https://wiki.warthunder.com/(Vehicle-name)/History</nowiki>) and add a link to it here using the <code>main</code> template. Be sure to reference text and sources by using <code><nowiki><ref></nowiki></code>, as well as adding them at the end of the article. This section may also include the vehicle's dev blog entry (if applicable) and the in-game encyclopedia description (under <code><nowiki>=== In-game description ===</nowiki></code>, also if applicable).--> |
| − | |||
| − | + | ===The KV-1=== | |
| + | The appearance of the [[KV-1 (ZiS-5)|KV-1]] during the German invasion of the Soviet Union came as a huge surprise. No German anti-tank weapon, bar the 88mm flak was able to penetrate easily. However, as the war progressed, Germany began to build a better tank and anti-tank guns in response to the KV-1 and [[T-34 (1942)|T-34]]. The Soviets in turn also modified the KV-1s in order to adapt them to the changing battlegrounds, but they were eventually phased out in favor of the newer [[IS-1|IS]] heavy tank series. | ||
| − | + | ===Captured KV-1 by the Germans=== | |
| + | During the battles that raged on the Eastern Front, a few KV-1s were captured by the German due to the crew abandoning them from mechanical failures or combat damages. The Germans recovered and repaired these tanks, using them against their former owners under their designation ''Pz.Kpfw. KV-1 A 753(r)'' for the 1941 model (KV-1B) and the ''Pz.Kpfw. KV-1B 755(r)'' for the 1942 model (KV-1C). While these tanks were adequate by German standards, the decision was made to modify the captured KV-1 tanks, giving them better guns and armour. This modified tank was to be designated the '''Pz.Kpfw. KV I C 756(r)''' and was based on KV-1C model with applique armour and a cast turret. The first major change to the vehicle was the removal of the old 76.2 mm gun with the 75 mm KwK 40 seen on the newer [[Pz.IV F2|Panzer IVs]] on a new mantlet design derived from the [[Pz.IV G|Ausf. G]] model. The commander's cupola on the KV-1 was also replaced with the Panzer IV's with the two-part hatch. The ventilator on the turret was taken from a T-34 and installed and utility baskets were added on the rear deck of the tank. | ||
| − | + | Only one KV-1 was modified into the KV-1B 765(r), despite the significant improvements afforded by the modifications. This KV-1 was attached to the 204th Panzer Regiment, a part of the 22nd Panzer Division, and saw action in the Battle of Kursk in 1943. Today, its fate is unknown, but it is presumed to have been destroyed in the heavy fighting. | |
| + | |||
| + | == Media == | ||
| + | <!--Excellent additions to the article would be video guides, screenshots from the game, and photos.--> | ||
| − | + | [http://live.warthunder.com/feed/camouflages/?q=%23kv1b '''Skins''' and '''camouflages''' for the KV I C 756(r) from live.warthunder.com.] | |
| − | + | ===Sights=== | |
| − | + | * [https://live.warthunder.com/post/675135/en/ RideR2's Realistic gunsight (TZF4a, TZF 5a/b/d/e/f/f2, TZF 9b/b1/c/d, TZF 12/a) for Pzkpfw II, Pzkpfw III, Pzkpfw IV, Pzkpfw V, Pzkpfw VI] | |
| − | == | + | ===Images=== |
| − | + | [[File:Kv1-beute-pzkw7561-1.jpg|x300px|thumbnail|none|Historical photo of the KV I C 756(r)]] | |
== See also == | == See also == | ||
| Line 230: | Line 312: | ||
== External links == | == External links == | ||
| − | + | <!--Paste links to sources and external resources, such as: | |
| − | |||
* ''topic on the official game forum;'' | * ''topic on the official game forum;'' | ||
* ''encyclopedia page on the tank;'' | * ''encyclopedia page on the tank;'' | ||
| − | * ''other literature.'' | + | * ''other literature.''--> |
| + | |||
| + | * [[wt:en/news/3183/current/|[Vehicle Profile] PzKpfw KV I C 756(r)]] | ||
| + | * [[wt:en/devblog/current/659|[Development] Captured KV-1 with Kw.K. 40]] | ||
| − | {{ | + | {{Germany heavy tanks}} |
| + | {{Germany premium ground vehicles}} | ||
Revision as of 04:23, 10 July 2020
Contents
| This page is about the heavy tank KW I C 756 (r) (Germany). For other uses, see KV-1 (Family). |
Description
_(Germany).jpg)
The ▀Pz.Kpfw. KW I C 756 (r) is a premium Rank III German heavy tank
with a battle rating of 5.0 (AB/RB/SB). It was introduced in Update 1.43. A heavily modified KV-1 heavy tank, the most glaring change is the gun. Modified to carry the 7.5 cm KwK 40 gun, this change offers the KV-1 a very noticeable improvement in firepower by comparison to the "normal" Russian armament.
The KV I C 756(r)'s German made 75mm gun is very effective at 4.7. Known as the KwK 40 with barrel length L/48, players have four different ammunition types to choose from: APCBC, APCR, HEAT and HE. As is common with German 75mm guns it features dependable accuracy and formidable muzzle velocity: from 990m/s for APCR to 450m/s for HEAT. The reload time in game is 7.6s, giving the KV I C 756(r) the potential to fire eight rounds per minute. The gun allows the KV I C 756(r) to be quite strong in long-range engagements, especially in BR 4.7, where you will face many easy to penetrate medium tanks. In higher ranks it will benefit from a superior fire rate when compared to most higher caliber guns.
_SideWeakpoints.jpg)
AP ammo has decent armour penetration and APCR will penetrate the frontal armour of anything up to around 500m with the exception of the Sherman Jumbo, though give a higher tendency to bounce at extreme angles. Thanks to the aforementioned muzzle velocity, shells fly in a nice flat trajectory making aiming easier in RB and SB. German 75mm guns have good post-pen fragmentation characteristics, causing predictable damage to crew and modules inside the tank. It will most likely take two APCBC shells to knock out the crew, more or less depending on the enemy tank. The total ammo capacity is 80 rounds. It is recommended to carry mostly APCBC, relying only on APCR when facing otherwise impenetrable targets. HEAT rounds sound good in theory since they retain penetration over any distance, but the arching trajectory and low velocity makes it impossible to hit moving or even stationary vehicles at a great distances. There are four ammo racks in total: two on the sides of the turret (5 rounds each), one to the right of the driver (18 rounds) and the largest directly below the turret. The chance of an ammo explosion from a hit to the front is slim however if hit at the side and low there will most likely be an explosion. The only real way to reduce the risk of an ammo explosion is to take out 10 shells so that the two ammo racks in the turret will be empty.
_RearWeakpoints.jpg)
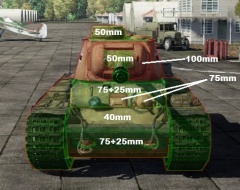
The armour on the KV I C 756(r) is fantastic at 4.7. Frontal hull armour is up to 100mm thick, slopped at 30 degrees -- on par with a Tiger's armour. If the hull is angled correctly (around 40 degrees) that number can increase up to 145mm of effective protection. With that kind of armour the only tanks that can penetrate the KV I C 756(r) are the Panther, IS-2 and Panzer IV/70(V) with AP ammo, though several more tanks can shoot APCR rounds and successfully penetrate. The side also has additional protection because of the infamous Russian wheels and tracks. All that said the KV I C 756(r) has its drawbacks with regard to survivability. The front hull has several weak points which are protected by 75mm of armour, penetrable by most enemy AP shells. The turrets mantlet and surrounding armour is only 50mm and poorly slopped making it extremely easy to penetrate. If the side is exposed there is a high likelihood that the fuel tanks or the ammo rack will explode from a direct impact. Always attempt to angle the hull when facing an enemy. When reloading the gun swing the turret to the side so that the mantlet is protected by the strong side armour.
_FrontWeakpoints.jpg)
The tank's mobility is serviceable at best. It has a decent top speed but off-road the tank will slow down to a crawl. The acceleration is poor and a lot of speed is lost when turning. Taking long routes to the objective is not recommended. Flanking and maneuvering is next to impossible. Reverse speed is very sluggish as well. Because the tank is so inherently slow it’s best to avoid hills, slopes and mud. Do not over-extend or you will find yourself unable to reverse out of a bad situation quickly. The KV I C 756(r) can be effective in close quarters but always be one step back from the front to avoid being flanked by faster tanks. Going into a wide open area can be very dangerous. If the enemy has any positions that will allow side shots or access to un-angled sections of the tank, pushing is not recommended. On the other hand, positioning the KV I C 756(r) in advantageous positions overlooking long-range environments (where the additional armour protection will be even more effective) is a decent strategy.
All in all the KV I C 756(r) has a good gun and strong amour but suffers in maneuverability and speed (forward and reverse). It is best to control the engagement, either by maintaining distance or using effective cover to protect your flanks and allow angling. Be mindful of the weak spots on the front hull and the mantlet. Do not expose the side of the tank. The KV I C 756(r) isn’t a medium tank, so be cautious when extending in towns or other close quarters locations.
General info
Survivability and armour
Armour type:
- Rolled homogeneous armour (Hull)
- Cast homogeneous armour (Turret)
| Armour | Front | Sides | Rear | Roof |
|---|---|---|---|---|
| Hull | 75 + 25 mm (30-31°) Front plate 40 mm (72°) Front glacis 75 + 25 mm (26-51°) Lower glacis |
75 mm | 60 mm (31°) Top 70 mm (14-54°) Bottom |
30 mm |
| Turret | 105 mm (11-79°) Turret front 50 mm (25-41°) Gun mantlet |
105 mm (1-16°) | 105 mm (6-14°) | 40 mm |
| Armour | Sides | Roof | ||
| Cupola | 50 mm | 40 mm |
Notes:
- Suspension wheels are 20 mm thick and tracks are 30 mm thick.
- The front hull is 75 mm thick, but an extra 25 mm armour is welded onto that plate, increasing its armour thickness.
- Turret ring is protected by 25 mm thick armour at front and sides.
- 105 mm cast armour are present above and below the 50 mm gun mantlet.
Front

Side

Rear
Roof
_FrontArmour.jpg)
_SideArmour.jpg)
_RearArmour.jpg)
_RoofArmour.jpg)
When trying to engage a KV I C 756(r), it's a good idea to close the distance. Already very strong for 4.7, the armour is even tougher to penetrate at long ranges, becoming outright impossible for some tanks. If given no other choice, try shooting for the mantlet. Considering the area is small, it will not be easy to hit. Shells may bounce off the gun given its size. Still, considering the strength of the KV I C 756(r) at long range, advancing to get a better shot is not recommended if in its field of fire.
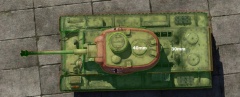
_CrewSpots.jpg)
When up close there are multiple places on the tank where massive damage can be dealt. When facing the front of the KV I C 756(r) there are 3 distinct weakspots: the drivers view port, the hull machine gunners port and the mantle of the gun. Most tanks shouldn't have a problem penetrating these spots with AP ammunition. At the side there is a chance to shoot one of the ammo racks. The ammo racks are located directly below the turret and just above the lower wheels, directly to the right of the driver and on either side of the turret. The turrets side and back armour is uniform thickness and it can be pretty tough to penetrate it when its angled. It's best to aim just below the turret and shoot the the hull (note that there is a small strip or additional 25mm armour just below the turret so avoid shooting that spot) to knock out the crew in the turret. Also watch out for the track and wheels on the side, they can add enough armour to prevent penetration. When firing at the back of the tank it's best to shoot the turret because there aren't any fuel tanks near the engine. There isn't much use of taking out the engine because of the fact that the KV I C 756(r) is inherently slow and most likely won't run away.
Mobility
| Game Mode | Max Speed (km/h) | Weight (tons) | Engine power (horsepower) | Power-to-weight ratio (hp/ton) | |||
|---|---|---|---|---|---|---|---|
| Forward | Reverse | Stock | Upgraded | Stock | Upgraded | ||
| Arcade | 37 | 7 | 47.5 | 775 | 1,145 | 16.32 | 24.11 |
| Realistic | 35 | 7 | 531 | 600 | 11.18 | 12.63 | |
Armaments
Main armament
| 75 mm KwK 40 L/48 | |||||
|---|---|---|---|---|---|
| Capacity | Vertical guidance |
Horizontal guidance |
Stabilizer | ||
| 80 | -6°/+25° | ±180° | N/A | ||
| Turret rotation speed (°/s) | |||||
| Mode | Stock | Upgraded | Prior + Full crew | Prior + Expert qualif. | Prior + Ace qualif. |
| Arcade | 7.1 | 9.9 | __.__ | __.__ | __.__ |
| Realistic | 7.1 | 8.4 | __.__ | __.__ | __.__ |
| Reloading rate (seconds) | |||||
| Stock | Prior + Full crew | Prior + Expert qualif. | Prior + Ace qualif. | ||
| 7.6 | __.__ | __.__ | __.__ | ||
Ammunition
| Penetration statistics | |||||||
|---|---|---|---|---|---|---|---|
| Ammunition | Type of warhead |
Penetration in mm @ 90° | |||||
| 10m | 100m | 500m | 1000m | 1500m | 2000m | ||
| PzGr 39 | APCBC | 140 | 137 | 125 | 112 | 100 | 89 |
| PzGr 40 | APCR | 177 | 176 | 154 | 130 | 109 | 92 |
| Hl.Gr 38B | HEAT | 80 | 80 | 80 | 80 | 80 | 80 |
| Sprgr. 34 | HE | 10 | 10 | 10 | 10 | 10 | 10 |
| Shell details | ||||||||||
|---|---|---|---|---|---|---|---|---|---|---|
| Ammunition | Type of warhead |
Velocity in m/s |
Projectile Mass in kg |
Fuse delay
in m: |
Fuse sensitivity
in mm: |
Explosive Mass in g (TNT equivalent): |
Normalization At 30° from horizontal: |
Ricochet: | ||
| 0% | 50% | 100% | ||||||||
| PzGr 39 | APCBC | 750 | 6.8 | 1.3 | 15.0 | 28.9 | +4° | 48° | 63° | 71° |
| PzGr 40 | APCR | 930 | 4.2 | N/A | N/A | N/A | +1.5° | 66° | 70° | 72° |
| Hl.Gr 38B | HEAT | 450 | 4.4 | 0.0 | 0.1 | 872.1 | +0° | 62° | 69° | 73° |
| Sprgr. 34 | HE | 570 | 5.7 | 0.1 | 0.1 | 686 | +0° | 79° | 80° | 81° |
Shell types
- PzGr 39 - Armour Piercing Ballistic Cap shell - This is your main ammo type, always use this if you think it can penetrate enemy armour. It deals the most damage because of its explosive filler.
- PzGr 40 - Armour Piercing Composite Rigid shell - It is highly advised to take at least 15-20 of these rounds. The shell has enough penetration to deal with any tank (except the Sherman Jumbo) from the front up to 500m but lacks the necessary damage. Use this shell to exploit weaknesses in the enemies tank by targeting ammunition racks, fuel tanks, the engine and any other weak points. When facing slopped armour at or close to 60 degrees use APCBC. It's best used against Panthers, Tigers, IS tanks and SU-85Ms. Has a good flat flying trajectory.
- Hl.Gr. 38B - Cumulative Anti-armour shell - it is recommended to completely avoid this kind of shell as its performance is vastly inferior in all aspects compared to APCBC or APCR ammo used by this tank.
- SprGr. 34 - High Explosive shell - You should carry only very few of these. They are useless against anything other than unarmoured AA vehicles, to which it is lethal.
Ammo racks
_(Germany).png)
| Full ammo |
1st rack empty |
2nd rack empty |
3rd rack empty |
4th rack empty |
5th rack empty |
Visual discrepancy |
|---|---|---|---|---|---|---|
| 80 | 76 (+4) | 71 (+9) | 53 (+27) | 27 (+53) | 1 (+79) | No |
Turret empty: 71 (+9)
Machine guns
| 7.92 mm MG 34 | ||||||
|---|---|---|---|---|---|---|
| Coaxial mount | ||||||
| Capacity (Belt capacity) | Fire rate (shots/minute) |
Vertical guidance |
Horizontal guidance | |||
| 4,350 (150) | 900 | N/A | N/A | |||
Usage in battles
The KW I C 756 (r) (Germany) is a potent vehicle when angled (preferably 30 to 45 degrees to the left or right). The long 75 mm is a deadly weapon as well. You have average mobility at best, but this is a great vehicle if you know how to use it effectively.
Modules
| Tier | Mobility | Protection | Firepower | ||
|---|---|---|---|---|---|
| I | Tracks | Parts | Horizontal Drive | ||
| II | Suspension | Brake System | FPE | Hl.Gr 38B | Adjustment of Fire |
| III | Filters | Crew Replenishment | PzGr 40 | Elevation Mechanism | |
| IV | Transmission | Engine | |||
| This is a premium vehicle: all modifications are unlocked on purchase | |||||
Pros and cons
Pros:
- Powerful main gun with good penetration and damage
- Well armoured to resist most shells
- Somehow more mobile and faster than the regular KV-1
- Good acceleration up until 20 km/h
- APCR shell can penetrate almost all tanks it faces
- Rear transmission means frontal hits are unlikely to render the tank immobile
- Since it is based on a "Russian" tank, you can trick some enemies into thinking you're a friendly in SB battles. However, a skilled opponent will know
- Premium RP/SL bonuses
Cons:
- Several weak points on the front armour, especially the weak mantlet
- Cupola on turret top is very prominent and can compromise position over ridge lines, even be hit with careful shell placement
- The sides are lined with fuel tanks, giving high chance of fire or fuel explosion
- Concentrated ammo rack at the hull bottom, low side shots have a high chance of striking and causing an ammo rack detonation
- Small turret space, a single shot can knock out every turret crew member
- Bad gun depression (-6°)
- Poor turning ability, turning will bleed speed very quickly
- Slow reverse of -6 km/h
- Since it is based on a "Russian" tank, unknowing teammates may shoot/destroy you in SB battles
History
The KV-1
The appearance of the KV-1 during the German invasion of the Soviet Union came as a huge surprise. No German anti-tank weapon, bar the 88mm flak was able to penetrate easily. However, as the war progressed, Germany began to build a better tank and anti-tank guns in response to the KV-1 and T-34. The Soviets in turn also modified the KV-1s in order to adapt them to the changing battlegrounds, but they were eventually phased out in favor of the newer IS heavy tank series.
Captured KV-1 by the Germans
During the battles that raged on the Eastern Front, a few KV-1s were captured by the German due to the crew abandoning them from mechanical failures or combat damages. The Germans recovered and repaired these tanks, using them against their former owners under their designation Pz.Kpfw. KV-1 A 753(r) for the 1941 model (KV-1B) and the Pz.Kpfw. KV-1B 755(r) for the 1942 model (KV-1C). While these tanks were adequate by German standards, the decision was made to modify the captured KV-1 tanks, giving them better guns and armour. This modified tank was to be designated the Pz.Kpfw. KV I C 756(r) and was based on KV-1C model with applique armour and a cast turret. The first major change to the vehicle was the removal of the old 76.2 mm gun with the 75 mm KwK 40 seen on the newer Panzer IVs on a new mantlet design derived from the Ausf. G model. The commander's cupola on the KV-1 was also replaced with the Panzer IV's with the two-part hatch. The ventilator on the turret was taken from a T-34 and installed and utility baskets were added on the rear deck of the tank.
Only one KV-1 was modified into the KV-1B 765(r), despite the significant improvements afforded by the modifications. This KV-1 was attached to the 204th Panzer Regiment, a part of the 22nd Panzer Division, and saw action in the Battle of Kursk in 1943. Today, its fate is unknown, but it is presumed to have been destroyed in the heavy fighting.
Media
Skins and camouflages for the KV I C 756(r) from live.warthunder.com.
Sights
Images

See also
Links to the articles on the War Thunder Wiki that you think will be useful for the reader, for example:
- reference to the series of the vehicles;
- links to approximate analogues of other nations and research trees.
External links
| Germany heavy tanks | |
|---|---|
| Tiger 1 (Henschel) | Tiger H1 · Tiger E · ␠Tiger |
| Tiger 1 (Porsche) | VK 45.01 (P) · Pz.Bef.Wg.VI P |
| Tiger 2 | Tiger II (P) · Tiger II (H) · Tiger II (H) Sla.16 · Tiger II (10.5 cm Kw.K) |
| Super heavy tanks | Maus · E-100 |
| Trophies | |
| Great Britain | ▀Pz.Kpfw. Churchill |
| USSR | ▀KV-IB · ▀KW I C 756 (r) · ▀KW II 754 (r) |
| Germany premium ground vehicles | |
|---|---|
| Light tanks | Pz.II C (DAK) · Pz.Sfl.Ic · Pz.Sp.Wg.P204(f) KwK · Sd.Kfz. 140/1 · Sd.Kfz.234/1 · Ru 251 · SPz 12-3 LGS · TAM 2IP |
| Medium tanks | Nb.Fz. · Pz.III N · Pz.Bef.Wg.IV J · ▀M4 748 (a) · ▀T 34 747 (r) · Ersatz M10 |
| mKPz M47 G · Turm III · Leopard A1A1 (L/44) · Leopard 2 (PzBtl 123) | |
| Heavy tanks | ▀Pz.Kpfw. Churchill · ▀KV-IB · ▀KW I C 756 (r) · ▀KW II 754 (r) |
| VK 45.01 (P) · ␠Tiger · Pz.Bef.Wg.VI P · Tiger II (H) Sla.16 | |
| Tank destroyers | Sd.Kfz.234/3 · Sd.Kfz.234/4 · Sd.Kfz.251/10 · Sd.Kfz.251/22 · 15 cm Pz.W.42 |
| Brummbär · Panzer IV/70(A) · VFW · Bfw. Jagdpanther G1 · Elefant · 38 cm Sturmmörser | |
