Difference between revisions of "Caernarvon"
m (→Pros and cons: Made letter capitalization consistent) (Tag: Visual edit) |
|||
| (One intermediate revision by one other user not shown) | |||
| Line 2: | Line 2: | ||
== Description == | == Description == | ||
| − | ''In the description, the first part needs to be about the history of the creation and combat usage of the vehicle, as well as its key features. In the second part, tell the reader about the ground vehicle in the game. Insert the screenshot of the vehicle. If the novice player does not remember the vehicle by name, they will immediately understand what kind of vehicle it is talking about.'' | + | <!--''In the description, the first part needs to be about the history of the creation and combat usage of the vehicle, as well as its key features. In the second part, tell the reader about the ground vehicle in the game. Insert the screenshot of the vehicle. If the novice player does not remember the vehicle by name, they will immediately understand what kind of vehicle it is talking about.''--> |
| + | [[File:GarageImage_{{PAGENAME}}.jpg|420px|thumb|left]] | ||
| + | {{break}} | ||
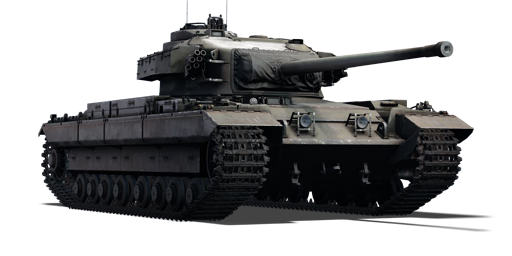
| + | The '''{{Specs|name}}''' is a Rank {{Specs|rank}} British heavy tank {{Battle-rating|3}}. It was introduced along with the initial British tree line in [[Update_1.55_"Royal_Armour"|Update 1.55 "Royal Armour"]]. Featuring heavy armour on the hull with a [[Centurion Mk 3]] turret, the Caernarvon provides adequate armour, mobility with the bite of a 20-pounder. The variant featured in the game is the ''Mark II'', the experimental series with the 20-pounder whereas the ''Mark I'' was the initial prototype with a 17-pounder instead. | ||
== General info == | == General info == | ||
=== Survivability and armour === | === Survivability and armour === | ||
| − | ''Describe armour protection. Note the most well protected and key weak areas. Appreciate the layout of modules as well as the number and location of crew members. Is the level of armour protection sufficient, is the placement of modules helpfull for survival in combat?'' | + | <!--''Describe armour protection. Note the most well protected and key weak areas. Appreciate the layout of modules as well as the number and location of crew members. Is the level of armour protection sufficient, is the placement of modules helpfull for survival in combat?'' |
| − | ''If necessary use a visual template to indicate the most secure and weak zones of the armour.'' | + | ''If necessary use a visual template to indicate the most secure and weak zones of the armour.''--> |
| + | '''Armour type:''' | ||
| + | |||
| + | * Rolled homogeneous armour (Hull, Turret roof) | ||
| + | * Cast homogeneous armour (Turret) | ||
| + | * Structural steel (Side skirts) | ||
| + | |||
| + | {| class="wikitable" style="text-align:center" | ||
| + | | colspan="6" align="center" | '''Tank Armour Table''' | ||
| + | |- | ||
| + | ! Armour !! Front !! Sides !! Rear !! Roof | ||
| + | |- | ||
| + | | Hull || 127 mm (60°) ''Front glacis'' <br> 76.2 mm (44°) ''Lower glacis'' || 50.8 + 4 mm || 50.8 mm (1°) || 50.8 mm ''Front'' <br /> 18 + 8 mm ''Rear'' | ||
| + | |- | ||
| + | | Turret || 152 mm (5-25°) ''Turret front'' <br> 152 + 20 mm (5-52°) ''Gun mantlet'' || 89 mm (5-26°) || 89 mm (0-20°) || 50.8 mm ''Turret boundary'' <br /> 29 mm ''Center of turret'' | ||
| + | |- | ||
| + | ! Armour !! Front !! Rear !! Roof | ||
| + | |- | ||
| + | | Cupola || 152 mm || 90 mm || 29 mm | ||
| + | |- | ||
| + | |} | ||
| + | '''Notes:''' | ||
| + | |||
| + | * Suspension wheels and bogies are 20 mm thick while tracks are 30 mm thick. | ||
| + | * Steel boxes scattered on the hull and turret sides add 4 mm of armour at their placement. | ||
=== Mobility === | === Mobility === | ||
| − | ''Write about the mobility of the ground vehicle. Estimate the specific power and maneuverability as well as the maximum speed forward and backward.'' | + | <!--''Write about the mobility of the ground vehicle. Estimate the specific power and maneuverability as well as the maximum speed forward and backward.''--> |
| + | {| class="wikitable" style="text-align:center" | ||
| + | |- | ||
| + | ! colspan="3" | Mobility characteristic | ||
| + | |- | ||
| + | ! Weight (tons) | ||
| + | ! colspan="1" | Add-on Armour<br>weight (tons) | ||
| + | ! colspan="1" | Max speed (km/h) | ||
| + | |- | ||
| + | | rowspan="2" | 50.0 || colspan="1" rowspan="2" | N/A || colspan="1" | 36 (AB) | ||
| + | |- | ||
| + | |34 (RB/SB) | ||
| + | |- | ||
| + | ! colspan="3" | Engine power (horsepower) | ||
| + | |- | ||
| + | ! colspan="1" | Mode | ||
| + | !Stock | ||
| + | !Upgraded | ||
| + | |- | ||
| + | |''Arcade'' | ||
| + | |1,046 | ||
| + | |___ | ||
| + | |- | ||
| + | |''Realistic/Simulator'' | ||
| + | |716 | ||
| + | |___ | ||
| + | |- | ||
| + | ! colspan="3" | Power-to-weight ratio (hp/ton) | ||
| + | |- | ||
| + | ! colspan="1" | Mode | ||
| + | !Stock | ||
| + | !Upgraded | ||
| + | |- | ||
| + | |''Arcade'' | ||
| + | |20.92 | ||
| + | |__.__ | ||
| + | |- | ||
| + | |''Realistic/Simulator'' | ||
| + | |14.32 | ||
| + | |__.__ | ||
| + | |- | ||
| + | |} | ||
== Armaments == | == Armaments == | ||
=== Main armament === | === Main armament === | ||
| − | ''Give the reader information about the characteristics of the main gun. Assess its effectiveness in a battle based on the reloading speed, ballistics and the power of shells. Do not forget about the flexibilty of the fire, that is how quickly the cannon can be aimed at the target, open fire on it and aim at another enemy. Add a link to the main article on the gun: <code><nowiki>{{main|Name of the weapon}}</nowiki></code>. Describe in general terms the ammunition available for the main gun. Give advice on how to use them and how to fill the ammunition storage.'' | + | <!--''Give the reader information about the characteristics of the main gun. Assess its effectiveness in a battle based on the reloading speed, ballistics and the power of shells. Do not forget about the flexibilty of the fire, that is how quickly the cannon can be aimed at the target, open fire on it and aim at another enemy. Add a link to the main article on the gun: <code><nowiki>{{main|Name of the weapon}}</nowiki></code>. Describe in general terms the ammunition available for the main gun. Give advice on how to use them and how to fill the ammunition storage.''--> |
| + | {{main|Ordnance QF 20-pounder Mk.I (84 mm)}} | ||
| + | |||
| + | {| class="wikitable" style="text-align:center" | ||
| + | |- | ||
| + | ! colspan="6" | [[Ordnance QF 20-pounder Mk.I (84 mm)|84 mm 20pdr OQF Mk.I]] | ||
| + | |- | ||
| + | ! colspan="3" rowspan="1" style="width:5em" |Capacity | ||
| + | ! rowspan="1" | Vertical <br> guidance | ||
| + | ! rowspan="1" | Horizontal <br> guidance | ||
| + | ! rowspan="1" | Stabilizer | ||
| + | |- | ||
| + | | colspan="3" | 65 || -10°/+20° || ±180° || Two-plane | ||
| + | |- | ||
| + | ! colspan="6" | Turret rotation speed (°/s) | ||
| + | |- | ||
| + | ! style="width:4em" |Mode | ||
| + | ! style="width:4em" |Stock | ||
| + | ! style="width:4em" |Upgraded | ||
| + | ! style="width:4em" |Prior + Full crew | ||
| + | ! style="width:4em" |Prior + Expert qualif. | ||
| + | ! style="width:4em" |Prior + Ace qualif. | ||
| + | |- | ||
| + | | ''Arcade'' || 14.6 || __.__ || __.__ || __.__ || __.__ | ||
| + | |- | ||
| + | | ''Realistic'' || 10.7 || __.__ || __.__ || __.__ || __.__ | ||
| + | |- | ||
| + | ! colspan="4" | Reloading rate (seconds) | ||
| + | |- | ||
| + | ! colspan="1" style="width:4em" |Stock | ||
| + | ! colspan="1" style="width:4em" |Prior + Full crew | ||
| + | ! colspan="1" style="width:4em" |Prior + Expert qualif. | ||
| + | ! colspan="1" style="width:4em" |Prior + Ace qualif. | ||
| + | |- | ||
| + | | 8.1 || __.__ || __.__ || __.__ | ||
| + | |- | ||
| + | |} | ||
| + | |||
| + | ===== Ammunition ===== | ||
| + | {| class="wikitable sortable" style="text-align:center" width="100%" | ||
| + | ! colspan="8" | Penetration statistics | ||
| + | |- | ||
| + | ! rowspan="2" data-sort-type="text" | Ammunition | ||
| + | ! rowspan="2" class="unsortable" | Type of <br /> warhead | ||
| + | ! colspan="6" | '''Penetration''' '''''in mm''''' '''@ 90°''' | ||
| + | |- | ||
| + | ! 10m | ||
| + | ! 100m | ||
| + | ! 500m | ||
| + | ! 1000m | ||
| + | ! 1500m | ||
| + | ! 2000m | ||
| + | |- | ||
| + | | Shot Mk.1 || APCBC || 218 || 215 || 203 || 189 || 176 || 163 | ||
| + | |- | ||
| + | | Shell Mk.1 || HE || 9 || 9 || 9 || 9 || 9 || 9 | ||
| + | |- | ||
| + | | Shot Mk.3 || APDS || 285 || 283 || 262 || 239 || 218 || 198 | ||
| + | |- | ||
| + | |} | ||
| + | {| class="wikitable sortable" style="text-align:center" width="100%" | ||
| + | ! colspan="11" | Shell details | ||
| + | |- | ||
| + | ! rowspan="2" data-sort-type="text" | Ammunition | ||
| + | ! rowspan="2" class="unsortable" | Type of <br /> warhead | ||
| + | ! rowspan="2" |Velocity <br /> in m/s | ||
| + | ! rowspan="2" |Projectile<br />Mass in kg | ||
| + | ! rowspan="2" | ''Fuse delay'' | ||
| + | ''in m:'' | ||
| + | ! rowspan="2" | ''Fuse sensitivity'' | ||
| + | ''in mm:'' | ||
| + | ! rowspan="2" | ''Explosive Mass in g<br /> (TNT equivalent):'' | ||
| + | ! rowspan="2" | ''Normalization At 30° <br> from horizontal:'' | ||
| + | ! colspan="3" | ''Ricochet:'' | ||
| + | |- | ||
| + | ! 0% | ||
| + | ! 50% | ||
| + | ! 100% | ||
| + | |- | ||
| + | | Shot Mk.1 || APCBC || 1019 || 9.1 || N/A || N/A || N/A || +4° || 48° || 63° || 71° | ||
| + | |- | ||
| + | | Shell Mk.1 || HE || 1019 || 7.8 || 0.4 || 0.5 || 586 || +0° || 79° || 80° || 81° | ||
| + | |- | ||
| + | | Shot Mk.3 || APDS || 1430 || 4.0 || N/A || N/A || N/A || +1.5° || 75° || 78° || 80° | ||
| + | |- | ||
| + | |} | ||
| + | {| class="wikitable sortable" style="text-align:center" | ||
| + | ! colspan="7" | Smoke characteristic | ||
| + | |- | ||
| + | ! Ammunition | ||
| + | ! Velocity <br /> in m/s | ||
| + | ! Projectile<br />Mass in kg | ||
| + | ! ''Screen radius <br /> in m'' | ||
| + | ! ''Screen time <br /> in s'' | ||
| + | ! ''Screen hold time <br /> in s:'' | ||
| + | ! ''Explosive Mass in g<br /> (TNT equivalent):'' | ||
| + | |- | ||
| + | | 20pdr Shell SS Mk.1 || 650 || 10 || 13 || 5 || 20 || 50 | ||
| + | |- | ||
| + | |} | ||
| + | |||
| + | ===== [[Ammo racks|Ammo racks]] ===== | ||
| + | [[File:Ammoracks_{{PAGENAME}}.png|right|thumbnail|x250px|[[Ammo racks|Ammo rack]] of the Caernarvon (May be outdated)]] | ||
| + | {| class="wikitable sortable" style="text-align:center" | ||
| + | |- | ||
| + | ! class="wikitable unsortable" |Full<br /> ammo | ||
| + | ! class="wikitable unsortable" |1st<br /> rack empty | ||
| + | ! class="wikitable unsortable" |2nd<br /> rack empty | ||
| + | ! class="wikitable unsortable" |3rd<br /> rack empty | ||
| + | ! class="wikitable unsortable" |4th<br /> rack empty | ||
| + | ! class="wikitable unsortable" |5th<br /> rack empty | ||
| + | ! class="wikitable unsortable" |6th<br /> rack empty | ||
| + | ! class="wikitable unsortable" |Visual<br /> discrepancy | ||
| + | |- | ||
| + | || '''65''' || 61 ''(+4)'' || 57 ''(+8)'' || 33 ''(+32)'' || 22 ''(+43)'' || 11 ''(+54)'' || 1 ''(+64)'' || style="text-align:center" | Yes | ||
| + | |- | ||
| + | |} | ||
| − | + | Front and Turret empty: 33 ''(+32)'' | |
| − | '' | ||
=== Machine guns === | === Machine guns === | ||
| − | ''Offensive and anti-aircraft machine guns not only allow you to fight some aircraft, but also are effective against lightly armoured vehicles. Evaluate machine guns and give recommendations on its use.'' | + | <!--''Offensive and anti-aircraft machine guns not only allow you to fight some aircraft, but also are effective against lightly armoured vehicles. Evaluate machine guns and give recommendations on its use.''--> |
| + | {{main|BESA (7.92 mm)}} | ||
| + | |||
| + | {| class="wikitable" style="text-align:center" | ||
| + | |- | ||
| + | ! colspan="7" | [[BESA (7.92 mm)|7.92 mm BESA]] | ||
| + | |- | ||
| + | ! colspan="7" | ''Coaxial mount'' | ||
| + | |- | ||
| + | ! colspan="4" rowspan="1" style="width:5em" |Capacity (Belt capacity) | ||
| + | ! rowspan="1" | Fire rate <br> (shots/minute) | ||
| + | ! rowspan="1" | Vertical <br> guidance | ||
| + | ! rowspan="1" | Horizontal <br> guidance | ||
| + | |- | ||
| + | | colspan="4" | 3,600 (225) || 600 || N/A || N/A | ||
| + | |- | ||
| + | |} | ||
== Usage in the battles == | == Usage in the battles == | ||
| Line 27: | Line 226: | ||
=== Pros and cons === | === Pros and cons === | ||
| − | ''Summarize and briefly evaluate the vehicle in terms of its characteristics and combat effectiveness. Mark its pros and cons in a bulleted list. Do not use more than 6 points for each of the characteristics. Avoid using categorical definitions such as "bad", "good" and the like - they have a substitution in the form of softer "inadequate", "effective".'' | + | <!--''Summarize and briefly evaluate the vehicle in terms of its characteristics and combat effectiveness. Mark its pros and cons in a bulleted list. Do not use more than 6 points for each of the characteristics. Avoid using categorical definitions such as "bad", "good" and the like - they have a substitution in the form of softer "inadequate", "effective".''--> |
| + | '''Pros:''' | ||
| − | + | * Same armament as the Centurion Mk 3, has a very good stock round and access to APDS | |
| − | * | + | * Very fast reload for a large calibre |
| + | * Fast turret and hull traverse | ||
| + | * Good acceleration | ||
| + | * The Caernarvon plays like a beefed up Centurion Mk 3 | ||
| + | * Brake system is very responsive | ||
| + | * Access to gun stabilizer | ||
| + | * Wider tracks enables the Caernarvon to navigate through bad terrain much better than the Centurion Mk 3 | ||
'''Cons:''' | '''Cons:''' | ||
| − | * | + | |
| + | * Lower glacis is still a weak spot | ||
| + | * Large ammo rack behind LFP (Can be removed by bringing less than 34 shells) | ||
| + | * APDS shot does punctual damage | ||
| + | * No explosive filler in any shells | ||
| + | * Weak side armour, should not be exposed in any way when engaging an enemy | ||
| + | * Top armour covering the engine is still only 8mm | ||
== History == | == History == | ||
| − | ''Describe the history of the creation and combat usage of the ground vehicle in more detail than in the introduction. If the historical reference turns out to be too big, take it to a separate article, taking a link to an article about the vehicle and adding a block "/historical reference" (example: https://wiki.warthunder.com/Name-vehicles/historical reference) and add a link to it here using the <code>main</code> template. Be sure to include links to sources at the end of the article.'' | + | <!--''Describe the history of the creation and combat usage of the ground vehicle in more detail than in the introduction. If the historical reference turns out to be too big, take it to a separate article, taking a link to an article about the vehicle and adding a block "/historical reference" (example: https://wiki.warthunder.com/Name-vehicles/historical reference) and add a link to it here using the <code>main</code> template. Be sure to include links to sources at the end of the article.''--> |
| + | ===Development=== | ||
| + | In 1944, General Staff started a project called ''A45 Infantry Support Tank'', which started around the same time as the development of the [[Centurion Mk 3|A41 Centurion]] cruiser tank. This project, after the war, was redesignated from a typical "Infantry Tank" and instead focused on a new role of a "Universal Tank" design in the form of the FV 200 series. The "Universal Tank" concept was to design a vehicle that would have a mobility comparable to that of cruiser tanks, but with the armour and firepower of heavy tanks. The FV 200 series designation was adopted and was to serve as a line of vehicles that used the same hull and chassis in different roles like armour recovery vehicles and self-propelled guns. The first tank of this series was to be the FV 201, which would be 55 tons and had the 20-pounder gun. | ||
| + | |||
| + | In 1949, a new requirement for the project called for the use of a 120 mm gun, possibly in response to the reveal of the Soviet [[IS-3]] heavy tank in the Berlin Victory Parade in 1945. This new requirement would delay the initial deadlines for the tank as no gun of that caliber had been developed yet. As a interim development before such a gun could be made, the FV 201 hull was mounted with a turret from a Centurion Mk.2, which had a 17-pounder gun. This Centurion turret mated FV 201 tank was designated the '''FV 221 Caernavon''', with a ''Mark I'' for the 17-pounder. The later combination of the [[Centurion Mk 3]] turret instead of the Mk.2 upped the armament of the tank to the more powerful 20-pounder gun, this version named the ''Mark II''. About 21 units of the Caernarvon Mark II was made in this method. | ||
| + | |||
| + | ===Successor=== | ||
| + | The Caernarvon, powerful as it was at the time period, was intended to fulfill the role of the new "Main Battle Tank" concept in the FV 200 series. However, the success of the lighter Centurion cruiser tank made it apparent that the Centurion was more capable in that role than the heavier and less mobile Caernarvon. Thus, this role was not given to the Caernarvon and its design was used instead for further chassis development for future tank development. In 1955, the basis of the Caernarvon was built into the first [[Conqueror|Conqueror]] tank. Several Caernarvon Mk.II's were rebuilt into Conqueror Mk. 2 standards in between 1958 and 1959. | ||
== Media == | == Media == | ||
| Line 43: | Line 262: | ||
== Read also == | == Read also == | ||
''Links to the articles on the War Thunder Wiki that you think will be useful for the reader, for example,'' | ''Links to the articles on the War Thunder Wiki that you think will be useful for the reader, for example,'' | ||
| + | |||
* ''reference to the series of the vehicles;'' | * ''reference to the series of the vehicles;'' | ||
* ''links to approximate analogues of other nations and research trees.'' | * ''links to approximate analogues of other nations and research trees.'' | ||
| + | |||
''ETC.'' | ''ETC.'' | ||
== Sources == | == Sources == | ||
''Paste links to sources and external resources, such as:'' | ''Paste links to sources and external resources, such as:'' | ||
| + | |||
* ''topic on the official game forum;'' | * ''topic on the official game forum;'' | ||
* ''other literature.'' | * ''other literature.'' | ||
| + | |||
| + | {{Britain heavy tanks}} | ||
Revision as of 15:10, 10 February 2019
Contents
Description

The FV 221 Caernarvon is a Rank V British heavy tank
with a battle rating of 7.7 (AB/RB/SB). It was introduced along with the initial British tree line in Update 1.55 "Royal Armour". Featuring heavy armour on the hull with a Centurion Mk 3 turret, the Caernarvon provides adequate armour, mobility with the bite of a 20-pounder. The variant featured in the game is the Mark II, the experimental series with the 20-pounder whereas the Mark I was the initial prototype with a 17-pounder instead.
General info
Survivability and armour
Armour type:
- Rolled homogeneous armour (Hull, Turret roof)
- Cast homogeneous armour (Turret)
- Structural steel (Side skirts)
| Tank Armour Table | |||||
| Armour | Front | Sides | Rear | Roof | |
|---|---|---|---|---|---|
| Hull | 127 mm (60°) Front glacis 76.2 mm (44°) Lower glacis |
50.8 + 4 mm | 50.8 mm (1°) | 50.8 mm Front 18 + 8 mm Rear | |
| Turret | 152 mm (5-25°) Turret front 152 + 20 mm (5-52°) Gun mantlet |
89 mm (5-26°) | 89 mm (0-20°) | 50.8 mm Turret boundary 29 mm Center of turret | |
| Armour | Front | Rear | Roof | ||
| Cupola | 152 mm | 90 mm | 29 mm | ||
Notes:
- Suspension wheels and bogies are 20 mm thick while tracks are 30 mm thick.
- Steel boxes scattered on the hull and turret sides add 4 mm of armour at their placement.
Mobility
| Mobility characteristic | ||
|---|---|---|
| Weight (tons) | Add-on Armour weight (tons) |
Max speed (km/h) |
| 50.0 | N/A | 36 (AB) |
| 34 (RB/SB) | ||
| Engine power (horsepower) | ||
| Mode | Stock | Upgraded |
| Arcade | 1,046 | ___ |
| Realistic/Simulator | 716 | ___ |
| Power-to-weight ratio (hp/ton) | ||
| Mode | Stock | Upgraded |
| Arcade | 20.92 | __.__ |
| Realistic/Simulator | 14.32 | __.__ |
Armaments
Main armament
| 84 mm 20pdr OQF Mk.I | |||||
|---|---|---|---|---|---|
| Capacity | Vertical guidance |
Horizontal guidance |
Stabilizer | ||
| 65 | -10°/+20° | ±180° | Two-plane | ||
| Turret rotation speed (°/s) | |||||
| Mode | Stock | Upgraded | Prior + Full crew | Prior + Expert qualif. | Prior + Ace qualif. |
| Arcade | 14.6 | __.__ | __.__ | __.__ | __.__ |
| Realistic | 10.7 | __.__ | __.__ | __.__ | __.__ |
| Reloading rate (seconds) | |||||
| Stock | Prior + Full crew | Prior + Expert qualif. | Prior + Ace qualif. | ||
| 8.1 | __.__ | __.__ | __.__ | ||
Ammunition
| Penetration statistics | |||||||
|---|---|---|---|---|---|---|---|
| Ammunition | Type of warhead |
Penetration in mm @ 90° | |||||
| 10m | 100m | 500m | 1000m | 1500m | 2000m | ||
| Shot Mk.1 | APCBC | 218 | 215 | 203 | 189 | 176 | 163 |
| Shell Mk.1 | HE | 9 | 9 | 9 | 9 | 9 | 9 |
| Shot Mk.3 | APDS | 285 | 283 | 262 | 239 | 218 | 198 |
| Shell details | ||||||||||
|---|---|---|---|---|---|---|---|---|---|---|
| Ammunition | Type of warhead |
Velocity in m/s |
Projectile Mass in kg |
Fuse delay
in m: |
Fuse sensitivity
in mm: |
Explosive Mass in g (TNT equivalent): |
Normalization At 30° from horizontal: |
Ricochet: | ||
| 0% | 50% | 100% | ||||||||
| Shot Mk.1 | APCBC | 1019 | 9.1 | N/A | N/A | N/A | +4° | 48° | 63° | 71° |
| Shell Mk.1 | HE | 1019 | 7.8 | 0.4 | 0.5 | 586 | +0° | 79° | 80° | 81° |
| Shot Mk.3 | APDS | 1430 | 4.0 | N/A | N/A | N/A | +1.5° | 75° | 78° | 80° |
| Smoke characteristic | ||||||
|---|---|---|---|---|---|---|
| Ammunition | Velocity in m/s |
Projectile Mass in kg |
Screen radius in m |
Screen time in s |
Screen hold time in s: |
Explosive Mass in g (TNT equivalent): |
| 20pdr Shell SS Mk.1 | 650 | 10 | 13 | 5 | 20 | 50 |
Ammo racks

| Full ammo |
1st rack empty |
2nd rack empty |
3rd rack empty |
4th rack empty |
5th rack empty |
6th rack empty |
Visual discrepancy |
|---|---|---|---|---|---|---|---|
| 65 | 61 (+4) | 57 (+8) | 33 (+32) | 22 (+43) | 11 (+54) | 1 (+64) | Yes |
Front and Turret empty: 33 (+32)
Machine guns
| 7.92 mm BESA | ||||||
|---|---|---|---|---|---|---|
| Coaxial mount | ||||||
| Capacity (Belt capacity) | Fire rate (shots/minute) |
Vertical guidance |
Horizontal guidance | |||
| 3,600 (225) | 600 | N/A | N/A | |||
Usage in the battles
Describe the tactics of playing in the vehicle, the features of using vehicles in the team and advice on tactics. Refrain from creating a "guide" - do not impose a single point of view but give the reader food for thought. Describe the most dangerous enemies and give recommendations on fighting them. If necessary, note the specifics of the game in different modes (AB, RB, SB).
Pros and cons
Pros:
- Same armament as the Centurion Mk 3, has a very good stock round and access to APDS
- Very fast reload for a large calibre
- Fast turret and hull traverse
- Good acceleration
- The Caernarvon plays like a beefed up Centurion Mk 3
- Brake system is very responsive
- Access to gun stabilizer
- Wider tracks enables the Caernarvon to navigate through bad terrain much better than the Centurion Mk 3
Cons:
- Lower glacis is still a weak spot
- Large ammo rack behind LFP (Can be removed by bringing less than 34 shells)
- APDS shot does punctual damage
- No explosive filler in any shells
- Weak side armour, should not be exposed in any way when engaging an enemy
- Top armour covering the engine is still only 8mm
History
Development
In 1944, General Staff started a project called A45 Infantry Support Tank, which started around the same time as the development of the A41 Centurion cruiser tank. This project, after the war, was redesignated from a typical "Infantry Tank" and instead focused on a new role of a "Universal Tank" design in the form of the FV 200 series. The "Universal Tank" concept was to design a vehicle that would have a mobility comparable to that of cruiser tanks, but with the armour and firepower of heavy tanks. The FV 200 series designation was adopted and was to serve as a line of vehicles that used the same hull and chassis in different roles like armour recovery vehicles and self-propelled guns. The first tank of this series was to be the FV 201, which would be 55 tons and had the 20-pounder gun.
In 1949, a new requirement for the project called for the use of a 120 mm gun, possibly in response to the reveal of the Soviet IS-3 heavy tank in the Berlin Victory Parade in 1945. This new requirement would delay the initial deadlines for the tank as no gun of that caliber had been developed yet. As a interim development before such a gun could be made, the FV 201 hull was mounted with a turret from a Centurion Mk.2, which had a 17-pounder gun. This Centurion turret mated FV 201 tank was designated the FV 221 Caernavon, with a Mark I for the 17-pounder. The later combination of the Centurion Mk 3 turret instead of the Mk.2 upped the armament of the tank to the more powerful 20-pounder gun, this version named the Mark II. About 21 units of the Caernarvon Mark II was made in this method.
Successor
The Caernarvon, powerful as it was at the time period, was intended to fulfill the role of the new "Main Battle Tank" concept in the FV 200 series. However, the success of the lighter Centurion cruiser tank made it apparent that the Centurion was more capable in that role than the heavier and less mobile Caernarvon. Thus, this role was not given to the Caernarvon and its design was used instead for further chassis development for future tank development. In 1955, the basis of the Caernarvon was built into the first Conqueror tank. Several Caernarvon Mk.II's were rebuilt into Conqueror Mk. 2 standards in between 1958 and 1959.
Media
An excellent addition to the article will be video guides, as well as screenshots from the game and photos.
Read also
Links to the articles on the War Thunder Wiki that you think will be useful for the reader, for example,
- reference to the series of the vehicles;
- links to approximate analogues of other nations and research trees.
ETC.
Sources
Paste links to sources and external resources, such as:
- topic on the official game forum;
- other literature.
| Britain heavy tanks | |
|---|---|
| Matilda | Matilda III · Matilda Hedgehog |
| Churchill | Churchill I · Churchill III · Churchill VII · Churchill Crocodile · Churchill NA75 · Black Prince |
| Post-war | Caernarvon · Conqueror |
| Other | Independent · Excelsior · TOG II |
