Difference between revisions of "Bf 110 C-7"
Inceptor57 (talk | contribs) |
|||
| Line 2: | Line 2: | ||
== Description == | == Description == | ||
| − | ''In the description, the first part needs to be about the history of and the creation and combat usage of the aircraft, as well as its key features. In the second part, tell the reader about the aircraft in the game. Insert screenshot of the vehicle. If the novice player does not remember the vehicle by name, he will immediately understand what kind of vehicle it is talking about.'' | + | <!--''In the description, the first part needs to be about the history of and the creation and combat usage of the aircraft, as well as its key features. In the second part, tell the reader about the aircraft in the game. Insert screenshot of the vehicle. If the novice player does not remember the vehicle by name, he will immediately understand what kind of vehicle it is talking about.''--> |
| + | [[File:GarageImage_Bf110C-7.jpg|450px|thumbnail|left]] | ||
| + | {{break}} | ||
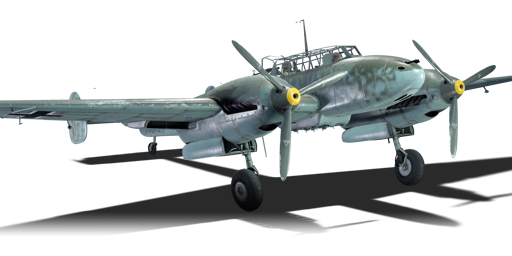
| + | The '''Bf 110 C-7''' is a Rank II German twin-engine fighter with a battle rating of 3.0 (AB/RB/SB). It was in the game since the start of the Open Beta Test prior to Update 1.29. Originally modeled as the ''Bf 110 C-4'', the vehicle was renamed and remodeled into the C-7 in [[Update 1.79 "Project X"]]. | ||
| + | |||
| + | In game it is ''one'' of the fastest aircraft at its battle rating with a speed of 582/560 km/h ([[Arcade|AB]]/[[RB]] as of 1.79) and a [[BR]] of 3.0. It packs incredible firepower with 4 x 7.92 mm MG 17s and 2 x 20 mm cannons with a copious 360 rounds all in a centreline mount, a hard hitting package that will reach out and swat aircraft far away. | ||
| + | |||
| + | The Bf-110 C-7's armament is completely center-mounted on the front of the fuselage, resulting in little to no-one convergence, and results in a dense fire group. Keep in mind however that the 7.92 mm bullets are somewhat faster and lighter than the 20 mm's fired from the MG FF/M cannons, and as such will require slightly less leading. While not much of an issue within close range (approximately <300 m), at longer distance it will result in the 7.92 mm's missing if fired simultaneously with the 20 mm's. However, being a pure boom and zoom fighter, it is generally recommended to fire both guns when attacking enemies in order to maximize hit probability when making a high speed pass. | ||
| + | |||
| + | The MG FF/M 20mm cannons should generally be considered the BF-110 C-7's primary armament, as they will be responsible for the majority of the damage dealing, being able to down enemy aircraft in just a few shots if a high explosive shell hits in the right spot. Keep mind however, that the 20 mm shells have fairly poor ballistic coefficient and tends to drop a lot more than the 7.92 mm's at range. The 20 mm shells' lethality is significantly enhanced, if the air targets belt is used, since it contains a much higher amount of HEI/HEI-T minengeschoß shells than other belts. While the ammo pool of 360 rounds in total may seem low at a first glance, the destructive power of the shells and the MG FF/M's relatively slow rate of fire more than makes up for it. | ||
| + | |||
| + | The nose mounted MG 17 machine guns are pretty standard, and are identical to the ones carried on biplanes and early BF-109's. They have a high rate of fire and high precision but a low damage output. Equip either tracers or stealth belts in order to maximize damage output, and remember to aim for weak spots on planes like fuel cells and engines. | ||
| + | |||
| + | The defensive armament consisting of a single MG 15 is effectively useless for the far majority of the time. It will not be able to dish out enough damage, and arguably even worse it will only be able to return fire at chasing planes that fly behind and above the BF-110 C-7. Do '''not''' under any circumstance rely on it as an effective mean to fend off chasing planes as it's cone of coverage and damage output is too small to make any impact. It is much better to perform evasive manuevers and rely on the BF-110 C-7's sturdy air frame in order to make it back to base or allies than for the gunner to shoot the plane down. | ||
== General info == | == General info == | ||
=== Flight Performance === | === Flight Performance === | ||
| − | ''Describe how the aircraft behaves in the air. Maximum speed, maneuverability, speed and allowable loads - these are the most important characteristics of the vehicle.'' | + | <!--''Describe how the aircraft behaves in the air. Maximum speed, maneuverability, speed and allowable loads - these are the most important characteristics of the vehicle.''--> |
| + | ====Stat card==== | ||
| + | {| class="wikitable" style="text-align:center" | ||
| + | |- | ||
| + | ! colspan="8" | Characteristics | ||
| + | |- | ||
| + | ! colspan="8" | ''Stock'' | ||
| + | |- | ||
| + | ! colspan="2" | Max Speed<br>(km/h at 5,000 m) | ||
| + | ! rowspan="2" | Max altitude<br>(meters) | ||
| + | ! colspan="2" | Turn time<br>(seconds) | ||
| + | ! colspan="2" | Rate of climb<br>(meters/second) | ||
| + | ! rowspan="2" |Take-off run<br>(meters) | ||
| + | |- | ||
| + | ! AB | ||
| + | ! RB | ||
| + | ! AB | ||
| + | ! RB | ||
| + | ! AB | ||
| + | ! RB | ||
| + | |- | ||
| + | | 515 || 505 || 10,000 || 32.4 || 33.0 || 7.1 || 8.5 || 444 | ||
| + | |- | ||
| + | ! colspan="8" | ''Upgraded'' | ||
| + | |- | ||
| + | ! colspan="2" | Max Speed<br>(km/h at 5,000 m) | ||
| + | ! rowspan="2" | Max altitude<br>(meters) | ||
| + | ! colspan="2" | Turn time<br>(seconds) | ||
| + | ! colspan="2" | Rate of climb<br>(meters/second) | ||
| + | ! rowspan="2" |Take-off run<br>(meters) | ||
| + | |- | ||
| + | ! AB | ||
| + | ! RB | ||
| + | ! AB | ||
| + | ! RB | ||
| + | ! AB | ||
| + | ! RB | ||
| + | |- | ||
| + | | 560 || 538 || 10,000 || 29.2 || 30.7 || 16.4 || 11.0 || 444 | ||
| + | |- | ||
| + | |} | ||
| + | |||
| + | ====Details==== | ||
| + | {| class="wikitable" style="text-align:center" | ||
| + | |- | ||
| + | ! colspan="5" | Features | ||
| + | |- | ||
| + | ! Combat flap | ||
| + | ! Take-off flap | ||
| + | ! Landing flap | ||
| + | ! Air brakes | ||
| + | ! Arrestor gear | ||
| + | |- | ||
| + | | ✓ || ✓ || ✓ || X || X | ||
| + | |- | ||
| + | |} | ||
| + | |||
| + | {| class="wikitable" style="text-align:center" | ||
| + | |- | ||
| + | ! colspan="5" | Limits | ||
| + | |- | ||
| + | ! rowspan="2" | Wing-break speed<br>(km/h) | ||
| + | ! rowspan="2" | Gear limit<br>(km/h) | ||
| + | ! rowspan="2" | Combat flap<br> (km/h) | ||
| + | ! colspan="2" | Max Static G | ||
| + | |- | ||
| + | ! + | ||
| + | ! - | ||
| + | |- | ||
| + | | 700 || 320 || 490 || ~11 || ~4 | ||
| + | |- | ||
| + | |} | ||
| + | |||
| + | {| class="wikitable" style="text-align:center" | ||
| + | |- | ||
| + | ! colspan="4" | Optimal velocities | ||
| + | |- | ||
| + | ! Ailerons<br>(km/h) | ||
| + | ! Rudder<br>(km/h) | ||
| + | ! Elevators<br>(km/h) | ||
| + | ! Radiator<br>(km/h) | ||
| + | |- | ||
| + | | < 360 || < 360 || < 400 || > 240 | ||
| + | |- | ||
| + | |} | ||
| + | |||
| + | {| class="wikitable" style="text-align:center" | ||
| + | |- | ||
| + | ! colspan="3" | Compressor (RB/SB) | ||
| + | |- | ||
| + | ! colspan="3" | Setting 1 | ||
| + | |- | ||
| + | ! Optimal altitude | ||
| + | ! 100% Engine power | ||
| + | ! WEP Engine power | ||
| + | |- | ||
| + | | 3,800 m || 2,100 hp || 2,243 hp | ||
| + | |- | ||
| + | |} | ||
| + | |||
| + | ====Engine performance==== | ||
| + | {| class="wikitable" style="text-align:center" | ||
| + | |- | ||
| + | ! colspan="4" | Engine | ||
| + | |- | ||
| + | ! colspan="3" | Engine Name | ||
| + | ! colspan="3" | Number present | ||
| + | |- | ||
| + | | colspan="3" | Daimler-Benz DB-601A 12-cylinder || colspan="1" | 2 | ||
| + | |- | ||
| + | ! colspan="4" | Engine characteristics | ||
| + | |- | ||
| + | ! colspan="2" | Weight (each) | ||
| + | ! colspan="1" | Type | ||
| + | ! colspan="1" | Cooling | ||
| + | |- | ||
| + | | colspan="2" | 590 kg || Inline || Water | ||
| + | |- | ||
| + | ! colspan="4" | Engine power (Stock) | ||
| + | |- | ||
| + | ! colspan="1" | Mode | ||
| + | ! colspan="2" | Max | ||
| + | ! colspan="2" | Take-off | ||
| + | |- | ||
| + | | ''Arcade'' || colspan="2" | 939 hp || colspan="2" | 1,009 hp | ||
| + | |- | ||
| + | | ''Realistic/Simulator'' || colspan="2" | 929 hp || colspan="2" | 999 hp | ||
| + | |- | ||
| + | ! colspan="4" | Engine power (Upgraded) | ||
| + | |- | ||
| + | ! Mode | ||
| + | ! colspan="2" | Max | ||
| + | ! colspan="2" | Take-off | ||
| + | |- | ||
| + | | ''Arcade'' || colspan="2" | 1,096 hp || colspan="2" | 1,166 hp | ||
| + | |- | ||
| + | | ''Realistic/Simulator'' || colspan="2" | 1,010 hp || colspan="2" | 1,080 hp | ||
| + | |- | ||
| + | |} | ||
| + | |||
| + | {| class="wikitable" style="text-align:center" | ||
| + | |- | ||
| + | ! colspan="4" | WEP Duration | ||
| + | |- | ||
| + | ! colspan="2" | Arcade | ||
| + | ! colspan="2" | Realistic/Simulator | ||
| + | |- | ||
| + | | colspan="2" | 25 seconds || colspan="2" | Infinite | ||
| + | |- | ||
| + | |} | ||
=== Survivability and armour === | === Survivability and armour === | ||
| Line 13: | Line 175: | ||
== Armaments == | == Armaments == | ||
=== Offensive armament === | === Offensive armament === | ||
| − | ''Describe the offensive armament of the aircraft, if any. Describe how effective the cannons and machine guns are in a battle, and also what belts or drums are better to use. If there is no offensive weaponry, delete this subsection.'' | + | <!--''Describe the offensive armament of the aircraft, if any. Describe how effective the cannons and machine guns are in a battle, and also what belts or drums are better to use. If there is no offensive weaponry, delete this subsection.''--> |
| + | {{main|MG FF/M (20 mm)|MG 17 (7.92 mm)}} | ||
| + | |||
| + | The Bf 110 C-7 is armed with: | ||
| + | |||
| + | * 2 x 20 mm [[MG FF/M (20 mm)|MG FF/M]] cannon, chin-mounted (180 rpg = 360 total) | ||
| + | * 4 x 7.92 mm [[MG 17 (7.92 mm)|MG 17]] machine gun, nose-mounted (1,000 rpg = 4,000 total) | ||
=== Suspended armament === | === Suspended armament === | ||
| − | ''Describe the aircraft's suspended armament: additional cannons under the wings, bombs, rockets and torpedoes. This section is especially important for bombers and attackers. If there is no suspended weaponry remove this subsection.'' | + | <!--''Describe the aircraft's suspended armament: additional cannons under the wings, bombs, rockets and torpedoes. This section is especially important for bombers and attackers. If there is no suspended weaponry remove this subsection.''--> |
| + | {{main|Bombs}} | ||
| + | |||
| + | The options available for the Bf 110 C-7 are: | ||
| + | |||
| + | * 12 x 50 kg SC50JA [[bombs]] | ||
| + | * 2 x 250 kg SC250JA bombs | ||
| + | * 1 x 500 kg SC500K bomb | ||
| + | * 2 x 500 kg SC500K bombs | ||
| + | * 1 x 1000 kg SC1000L2 bomb | ||
| + | * 1 x 1000 kg SC1000L2 bomb + 1 x 250 kg SC250JA bomb | ||
=== Defensive armament === | === Defensive armament === | ||
| − | ''Defensive armament with turret machine guns or cannons, crewed by gunners. Examine the number of gunners and what belts or drums are better to use. If defensive weaponry is not available remove this subsection.'' | + | <!--''Defensive armament with turret machine guns or cannons, crewed by gunners. Examine the number of gunners and what belts or drums are better to use. If defensive weaponry is not available remove this subsection.''--> |
| + | {{main|MG 15 (7.92 mm)}} | ||
| + | |||
| + | The Bf 110 C-7 is armed with: | ||
| + | |||
| + | * 1 x 7.92 mm [[MG 15 (7.92 mm)|MG 15]] machine gun, dorsal turret (750 rpg) | ||
== Usage in the battles == | == Usage in the battles == | ||
| − | ''Describe the tactics of playing in an aircraft, the features of using vehicles in a team and advice on tactics. Refrain from creating a "guide" - do not impose a single point of view but give the reader food for thought. Examine the most dangerous enemies and give recommendations on fighting them. If necessary, note the specifics of the game in different modes (AB, RB, SB).'' | + | <!--''Describe the tactics of playing in an aircraft, the features of using vehicles in a team and advice on tactics. Refrain from creating a "guide" - do not impose a single point of view but give the reader food for thought. Examine the most dangerous enemies and give recommendations on fighting them. If necessary, note the specifics of the game in different modes (AB, RB, SB).''--> |
| + | [[File:Cockpits Bf110.jpg|thumbnail|right|Cockpit features great side & forward visibilty despite the struts. Although tail section is obscured by the armoured backrest, the gunner will function as a good warning indicator, sometimes.]] | ||
| + | What it cannot do is turn fight, and this is where a lot of players make a fatal mistake. Heavy fighters cannot maneuver like a single engine fighter, it has an unusually poor roll rate and loses energy fast, and can unexpectedly snap-roll: rudder control is critical. It is a pure “[[Boom and Zoom]]” fighter and like others of its ilk, live by 2 rules: “Speed is Life, Altitude is Life Insurance”, and “Turn to engage (fire at), not follow”. Maneuvers that retain your energy are key, keep your speed and/or altitude up. The 110 really shines in bomber attack or bomber escort where you will have positional advantage and gun solution first. | ||
| + | When engaging a target only turn to shoot (less than 60 degree turn), the moment you realize you cannot get a firing solution perform other maneuvers to keep the advantage. For instance if your target turns hard, pull up trading airspeed for altitude while watching what your target does. As you slow in climb you can turn tighter (even use flaps briefly) and position yourself for another intercept. If you find yourself under threat, an unloaded extension (slow pushover) can be employed to efficiently gain speed. The Bf 110 can dive very fast to rejoin friendlies if needed. A team with bomber smacking Zerstörers and maneuverable fighters will decimate the attacking force in Arcade Battles. If you pick up a tail, just remember to maneuver yourself to give your teammate the best chance to taking out your pursuer, and do not count on the gunner. | ||
| + | |||
| + | ===Modules=== | ||
| + | When you first purchase the Bf 110 C-7 make sure you research the machine gun and cannon belts first; those are vital for success. Consider tracers [[:Category:Ammunition|ammo]] for the machine gun and stealth or air targets for the cannon. It is excellent at ground attack as well with guns and bomb selection, but remember that outside of AB, you still start on the ground and have no bombing reticule. | ||
| + | |||
| + | ===Manual Engine Control=== | ||
| + | {| class="wikitable" style="text-align:center" | ||
| + | |- | ||
| + | ! colspan="7" | MEC elements | ||
| + | |- | ||
| + | ! rowspan="2" |Mixer | ||
| + | ! rowspan="2" |Pitch | ||
| + | ! colspan="3" | Radiator | ||
| + | ! rowspan="2" |Supercharger | ||
| + | ! rowspan="2" |Turbocharger | ||
| + | |- | ||
| + | ! Oil | ||
| + | ! Water | ||
| + | ! Type | ||
| + | |- | ||
| + | | Not controllable || rowspan="2" | Controllable<br>Not automatic pitch || rowspan="2" | Controllable || rowspan="2" | Not controllable || rowspan="2" | Combined || rowspan="2" | Not controllable || rowspan="2" | Not controllable | ||
| + | |- | ||
| + | |} | ||
=== Pros and cons === | === Pros and cons === | ||
| − | ''Summarize and briefly evaluate the vehicle in terms of its characteristics and combat effectiveness. Mark its pros and cons in the bulleted list. Do not use more than 6 points for each of the characteristics. Avoid using categorical definitions such as "bad", "good" and the like - they have a substitution in the form of softer "inadequate", "effective".'' | + | <!--''Summarize and briefly evaluate the vehicle in terms of its characteristics and combat effectiveness. Mark its pros and cons in the bulleted list. Do not use more than 6 points for each of the characteristics. Avoid using categorical definitions such as "bad", "good" and the like - they have a substitution in the form of softer "inadequate", "effective".''--> |
| − | |||
'''Pros:''' | '''Pros:''' | ||
| − | * | + | * Heavy armament consisting of 2 cannons (MG FF/M) and 4 machine guns (MG 17s) |
| − | + | * Plenty of ammo available for the armament, some RB matches you'll finish with <1000 rounds of MG ammo left | |
| + | * Very maneuverable for a [[:Category:Heavy fighters|heavy fighter]] | ||
| + | * Can carry quite a payload, can double as an attacker or intruder | ||
| + | * 500 kg payload is sufficient to damage and destroy bombing points and other targets | ||
| + | * Centrally mounted armament allows a denser cone of fire, making it perfect for long range shooting or head-ons | ||
| + | * Exceptionally heavy burst mass for its rank (2.80 kg/s) with large amounts of it consisting of minengeschoß | ||
| + | * Can turn quite well at high speeds | ||
| + | * Extremely deadly opponent at head-ons, never let this aircraft get a good deflection at you | ||
| + | * Sturdy airframe allows for surviving ramming attacks or executing one, though it is generally advised as a last resort | ||
| + | * Climbs generally well, though it cannot match single engined fighters of its tier, excluding bi-planes | ||
| + | * Tail gunner is hard to hit from a level flight of both the enemy aircraft and the defending aircraft | ||
| + | * Airframe is capable of eating insane amounts of ammunition. It is not uncommon for opponents to empty every round they have into you and still not kill you, even when using cannons. | ||
'''Cons:''' | '''Cons:''' | ||
| − | * | + | * Inferior maneuverability than single-engine fighters, especially those at its tier |
| + | * Slow acceleration | ||
| + | * Loses speed easily in maneuvers | ||
| + | * Poor energy retention | ||
| + | * Big target | ||
| + | * Only a single 7.92mm machine gun as defensive armament | ||
| + | * Rear gunner can only do his best to hit targets with his limited cone of fire | ||
| + | * Turret has a major blind spot during level flight as it is unable to fire at enemy aircraft directly level with your aircraft, since the tail boom is blocking the depression of the rear gun | ||
| + | * Elevator is prone to damage, may shear off when hit by cannon rounds | ||
| + | * Flight performance on one engine is very poor, only being able to just exceed stall speed in level flight, and thats assuming nothing else took damage | ||
== History == | == History == | ||
| − | ''Describe the history of the creation and combat usage of the aircraft in more detail than in the introduction. If the historical reference turns out to be too big, take it to a separate article, taking a link to an article about the vehicle and adding a block "/ historical reference" (example: https://wiki.warthunder.com/Name-vehicles/historical reference) and add a link to it here using the <code>main</code> template. Be sure to include links to sources at the end of the article.'' | + | <!--''Describe the history of the creation and combat usage of the aircraft in more detail than in the introduction. If the historical reference turns out to be too big, take it to a separate article, taking a link to an article about the vehicle and adding a block "/ historical reference" (example: https://wiki.warthunder.com/Name-vehicles/historical reference) and add a link to it here using the <code>main</code> template. Be sure to include links to sources at the end of the article.''--> |
| + | Named the ''“Zerstörer”'' (“Destroyer” in English), a very appropriate name for its mission, to destroy anything that is in front of it. In the early days of World War 2 the Bf 110 did very well in roaming wolfpacks, being superior to the opposition in the skies over Poland and France, but that changed drastically in the Battle of Britain. Mounting bomber losses resulted in the fateful decision to force the 110’s to stay very close to bomber formations, losing position and speed advantages over the RAF fighters. Not surprisingly it resulted in a drastic increase in losses. Faced with faster fighters and more maneuverable like the Spitfire it was pulled from front line, only to return in new roles like the ''“Jabo”'' fighter bomber and the ''"Nachtjäger"'' night fighter. The most successful role of the aircraft was performing night interdiction duties, where its task was to seek out and destroy enemy aircraft, most notably British bombers participating in night raids. In the ''"Nachtjäger"'' role, the plane was equipped with FuG 220 and FuG 202 ''Lichtenstein'' radar, optionally equipped with a ''"Schräge Musik"'' installation consisting of 2 X 20 mm MG FF/M cannons mounted at a 60 degree angle, and a third crewmember seated behind the pilot to assist in the duties with spotting targets, as well as performing the duties of as a radar operator. | ||
== Media == | == Media == | ||
| − | + | [http://live.warthunder.com/feed/camouflages/?q=%23Bf110 Skins for the Bf 110C on WT:Live] | |
== Read also == | == Read also == | ||
| Line 50: | Line 278: | ||
* ''page on aircraft encyclopedia;'' | * ''page on aircraft encyclopedia;'' | ||
* ''other literature.'' | * ''other literature.'' | ||
| + | |||
| + | {{Germany twin-engine fighters}} | ||
Revision as of 03:18, 11 November 2018
Contents
Description

The Bf 110 C-7 is a Rank II German twin-engine fighter with a battle rating of 3.0 (AB/RB/SB). It was in the game since the start of the Open Beta Test prior to Update 1.29. Originally modeled as the Bf 110 C-4, the vehicle was renamed and remodeled into the C-7 in Update 1.79 "Project X".
In game it is one of the fastest aircraft at its battle rating with a speed of 582/560 km/h (AB/RB as of 1.79) and a BR of 3.0. It packs incredible firepower with 4 x 7.92 mm MG 17s and 2 x 20 mm cannons with a copious 360 rounds all in a centreline mount, a hard hitting package that will reach out and swat aircraft far away.
The Bf-110 C-7's armament is completely center-mounted on the front of the fuselage, resulting in little to no-one convergence, and results in a dense fire group. Keep in mind however that the 7.92 mm bullets are somewhat faster and lighter than the 20 mm's fired from the MG FF/M cannons, and as such will require slightly less leading. While not much of an issue within close range (approximately <300 m), at longer distance it will result in the 7.92 mm's missing if fired simultaneously with the 20 mm's. However, being a pure boom and zoom fighter, it is generally recommended to fire both guns when attacking enemies in order to maximize hit probability when making a high speed pass.
The MG FF/M 20mm cannons should generally be considered the BF-110 C-7's primary armament, as they will be responsible for the majority of the damage dealing, being able to down enemy aircraft in just a few shots if a high explosive shell hits in the right spot. Keep mind however, that the 20 mm shells have fairly poor ballistic coefficient and tends to drop a lot more than the 7.92 mm's at range. The 20 mm shells' lethality is significantly enhanced, if the air targets belt is used, since it contains a much higher amount of HEI/HEI-T minengeschoß shells than other belts. While the ammo pool of 360 rounds in total may seem low at a first glance, the destructive power of the shells and the MG FF/M's relatively slow rate of fire more than makes up for it.
The nose mounted MG 17 machine guns are pretty standard, and are identical to the ones carried on biplanes and early BF-109's. They have a high rate of fire and high precision but a low damage output. Equip either tracers or stealth belts in order to maximize damage output, and remember to aim for weak spots on planes like fuel cells and engines.
The defensive armament consisting of a single MG 15 is effectively useless for the far majority of the time. It will not be able to dish out enough damage, and arguably even worse it will only be able to return fire at chasing planes that fly behind and above the BF-110 C-7. Do not under any circumstance rely on it as an effective mean to fend off chasing planes as it's cone of coverage and damage output is too small to make any impact. It is much better to perform evasive manuevers and rely on the BF-110 C-7's sturdy air frame in order to make it back to base or allies than for the gunner to shoot the plane down.
General info
Flight Performance
Stat card
| Characteristics | |||||||
|---|---|---|---|---|---|---|---|
| Stock | |||||||
| Max Speed (km/h at 5,000 m) |
Max altitude (meters) |
Turn time (seconds) |
Rate of climb (meters/second) |
Take-off run (meters) | |||
| AB | RB | AB | RB | AB | RB | ||
| 515 | 505 | 10,000 | 32.4 | 33.0 | 7.1 | 8.5 | 444 |
| Upgraded | |||||||
| Max Speed (km/h at 5,000 m) |
Max altitude (meters) |
Turn time (seconds) |
Rate of climb (meters/second) |
Take-off run (meters) | |||
| AB | RB | AB | RB | AB | RB | ||
| 560 | 538 | 10,000 | 29.2 | 30.7 | 16.4 | 11.0 | 444 |
Details
| Features | ||||
|---|---|---|---|---|
| Combat flap | Take-off flap | Landing flap | Air brakes | Arrestor gear |
| ✓ | ✓ | ✓ | X | X |
| Limits | ||||
|---|---|---|---|---|
| Wing-break speed (km/h) |
Gear limit (km/h) |
Combat flap (km/h) |
Max Static G | |
| + | - | |||
| 700 | 320 | 490 | ~11 | ~4 |
| Optimal velocities | |||
|---|---|---|---|
| Ailerons (km/h) |
Rudder (km/h) |
Elevators (km/h) |
Radiator (km/h) |
| < 360 | < 360 | < 400 | > 240 |
| Compressor (RB/SB) | ||
|---|---|---|
| Setting 1 | ||
| Optimal altitude | 100% Engine power | WEP Engine power |
| 3,800 m | 2,100 hp | 2,243 hp |
Engine performance
| Engine | |||||
|---|---|---|---|---|---|
| Engine Name | Number present | ||||
| Daimler-Benz DB-601A 12-cylinder | 2 | ||||
| Engine characteristics | |||||
| Weight (each) | Type | Cooling | |||
| 590 kg | Inline | Water | |||
| Engine power (Stock) | |||||
| Mode | Max | Take-off | |||
| Arcade | 939 hp | 1,009 hp | |||
| Realistic/Simulator | 929 hp | 999 hp | |||
| Engine power (Upgraded) | |||||
| Mode | Max | Take-off | |||
| Arcade | 1,096 hp | 1,166 hp | |||
| Realistic/Simulator | 1,010 hp | 1,080 hp | |||
| WEP Duration | |||
|---|---|---|---|
| Arcade | Realistic/Simulator | ||
| 25 seconds | Infinite | ||
Survivability and armour
Examine the survivability of the aircraft. Note how vulnerable the structure is and how secure the pilot is, whether the fuel tanks are armoured. Describe the armour, if there is any, also mention the vulnerability of other critical aircraft systems.
Armaments
Offensive armament
The Bf 110 C-7 is armed with:
- 2 x 20 mm MG FF/M cannon, chin-mounted (180 rpg = 360 total)
- 4 x 7.92 mm MG 17 machine gun, nose-mounted (1,000 rpg = 4,000 total)
Suspended armament
The options available for the Bf 110 C-7 are:
- 12 x 50 kg SC50JA bombs
- 2 x 250 kg SC250JA bombs
- 1 x 500 kg SC500K bomb
- 2 x 500 kg SC500K bombs
- 1 x 1000 kg SC1000L2 bomb
- 1 x 1000 kg SC1000L2 bomb + 1 x 250 kg SC250JA bomb
Defensive armament
The Bf 110 C-7 is armed with:
- 1 x 7.92 mm MG 15 machine gun, dorsal turret (750 rpg)
Usage in the battles

What it cannot do is turn fight, and this is where a lot of players make a fatal mistake. Heavy fighters cannot maneuver like a single engine fighter, it has an unusually poor roll rate and loses energy fast, and can unexpectedly snap-roll: rudder control is critical. It is a pure “Boom and Zoom” fighter and like others of its ilk, live by 2 rules: “Speed is Life, Altitude is Life Insurance”, and “Turn to engage (fire at), not follow”. Maneuvers that retain your energy are key, keep your speed and/or altitude up. The 110 really shines in bomber attack or bomber escort where you will have positional advantage and gun solution first. When engaging a target only turn to shoot (less than 60 degree turn), the moment you realize you cannot get a firing solution perform other maneuvers to keep the advantage. For instance if your target turns hard, pull up trading airspeed for altitude while watching what your target does. As you slow in climb you can turn tighter (even use flaps briefly) and position yourself for another intercept. If you find yourself under threat, an unloaded extension (slow pushover) can be employed to efficiently gain speed. The Bf 110 can dive very fast to rejoin friendlies if needed. A team with bomber smacking Zerstörers and maneuverable fighters will decimate the attacking force in Arcade Battles. If you pick up a tail, just remember to maneuver yourself to give your teammate the best chance to taking out your pursuer, and do not count on the gunner.
Modules
When you first purchase the Bf 110 C-7 make sure you research the machine gun and cannon belts first; those are vital for success. Consider tracers ammo for the machine gun and stealth or air targets for the cannon. It is excellent at ground attack as well with guns and bomb selection, but remember that outside of AB, you still start on the ground and have no bombing reticule.
Manual Engine Control
| MEC elements | ||||||
|---|---|---|---|---|---|---|
| Mixer | Pitch | Radiator | Supercharger | Turbocharger | ||
| Oil | Water | Type | ||||
| Not controllable | Controllable Not automatic pitch |
Controllable | Not controllable | Combined | Not controllable | Not controllable |
Pros and cons
Pros:
- Heavy armament consisting of 2 cannons (MG FF/M) and 4 machine guns (MG 17s)
- Plenty of ammo available for the armament, some RB matches you'll finish with <1000 rounds of MG ammo left
- Very maneuverable for a heavy fighter
- Can carry quite a payload, can double as an attacker or intruder
- 500 kg payload is sufficient to damage and destroy bombing points and other targets
- Centrally mounted armament allows a denser cone of fire, making it perfect for long range shooting or head-ons
- Exceptionally heavy burst mass for its rank (2.80 kg/s) with large amounts of it consisting of minengeschoß
- Can turn quite well at high speeds
- Extremely deadly opponent at head-ons, never let this aircraft get a good deflection at you
- Sturdy airframe allows for surviving ramming attacks or executing one, though it is generally advised as a last resort
- Climbs generally well, though it cannot match single engined fighters of its tier, excluding bi-planes
- Tail gunner is hard to hit from a level flight of both the enemy aircraft and the defending aircraft
- Airframe is capable of eating insane amounts of ammunition. It is not uncommon for opponents to empty every round they have into you and still not kill you, even when using cannons.
Cons:
- Inferior maneuverability than single-engine fighters, especially those at its tier
- Slow acceleration
- Loses speed easily in maneuvers
- Poor energy retention
- Big target
- Only a single 7.92mm machine gun as defensive armament
- Rear gunner can only do his best to hit targets with his limited cone of fire
- Turret has a major blind spot during level flight as it is unable to fire at enemy aircraft directly level with your aircraft, since the tail boom is blocking the depression of the rear gun
- Elevator is prone to damage, may shear off when hit by cannon rounds
- Flight performance on one engine is very poor, only being able to just exceed stall speed in level flight, and thats assuming nothing else took damage
History
Named the “Zerstörer” (“Destroyer” in English), a very appropriate name for its mission, to destroy anything that is in front of it. In the early days of World War 2 the Bf 110 did very well in roaming wolfpacks, being superior to the opposition in the skies over Poland and France, but that changed drastically in the Battle of Britain. Mounting bomber losses resulted in the fateful decision to force the 110’s to stay very close to bomber formations, losing position and speed advantages over the RAF fighters. Not surprisingly it resulted in a drastic increase in losses. Faced with faster fighters and more maneuverable like the Spitfire it was pulled from front line, only to return in new roles like the “Jabo” fighter bomber and the "Nachtjäger" night fighter. The most successful role of the aircraft was performing night interdiction duties, where its task was to seek out and destroy enemy aircraft, most notably British bombers participating in night raids. In the "Nachtjäger" role, the plane was equipped with FuG 220 and FuG 202 Lichtenstein radar, optionally equipped with a "Schräge Musik" installation consisting of 2 X 20 mm MG FF/M cannons mounted at a 60 degree angle, and a third crewmember seated behind the pilot to assist in the duties with spotting targets, as well as performing the duties of as a radar operator.
Media
Skins for the Bf 110C on WT:Live
Read also
Links to the articles on the War Thunder Wiki that you think will be useful for the reader, for example,
- reference to the series of the aircraft;
- links to approximate analogues of other nations and research trees.
ETC.
Sources
Paste links to sources and external resources, such as:
- topic on the official game forum;
- page on aircraft encyclopedia;
- other literature.
| Germany twin-engine fighters | |
|---|---|
| Messerschmitt | Bf 109 Z-1 |
| Me 410 A-1/U2 · Me 410 B-1/U2 | |
| Dornier | Do 17 Z-7 · Do 217 J-1 · Do 217 J-2 · Do 217 N-1 · Do 217 N-2 |
| Focke-Wulf | Ta 154 A-1 |
| Junkers | Ju 88 C-6 · Ju 388 J |
