Difference between revisions of "BMP-2"
bangerland (talk | contribs) (Info fill is incomplete, since i'm not writing it with game client at hand, and i haven't used it personally. I'll try to fill it in more later, unless someone takes over before that.) |
m (fix some typo apds->hvap) (Tag: Visual edit) |
||
| (20 intermediate revisions by 5 users not shown) | |||
| Line 14: | Line 14: | ||
== General info == | == General info == | ||
=== Survivability and armour === | === Survivability and armour === | ||
| − | <!-- | + | <!--Describe armour protection. Note the most well protected and key weak areas. Appreciate the layout of modules as well as the number and location of crew members. Is the level of armour protection sufficient, is the placement of modules helpful for survival in combat? |
| − | + | If necessary use a visual template to indicate the most secure and weak zones of the armour.-->Similarly to its predecessor, the BMP-2 relies on its low profile, decent mobility and spaced out modules as defensive features. The vehicle's internal modules often absorb shots unexpectedly, saving the crew and allowing the BMP to return fire or escape significant harm. | |
| − | BMP-2 | + | The BMP-2 has optional add-on armour which improves its resistance to heavy machine gun and some light cannon fire from the sides, at the cost of losing its amphibious ability. |
| − | |||
| − | |||
| − | |||
| − | |||
| − | |||
=== Mobility === | === Mobility === | ||
| − | <!-- | + | <!--Write about the mobility of the ground vehicle. Estimate the specific power and manoeuvrability as well as the maximum speed forward and backward.--> |
| − | + | The BMP-2's mobility is reasonable, albeit not excellent, at a maximum of 72/65 km/h (AB\RB) on-road, however, the vehicle's acceleration and off-road performance leave something to be desired. | |
| − | BMP | + | The BMP can swim at 7 kph. |
== Armaments == | == Armaments == | ||
=== Main armament === | === Main armament === | ||
| − | <!-- | + | <!--Give the reader information about the characteristics of the main gun. Assess its effectiveness in a battle based on the reloading speed, ballistics and the power of shells. Do not forget about the flexibility of the fire, that is how quickly the cannon can be aimed at the target, open fire on it and aim at another enemy. Add a link to the main article on the gun: <code><nowiki>{{main|Name of the weapon}}</nowiki></code>. Describe in general terms the ammunition available for the main gun. Give advice on how to use them and how to fill the ammunition storage.--> |
{{main|2A42 (30 mm)}} | {{main|2A42 (30 mm)}} | ||
| − | The Shipunov 2A42 30 mm Autocannon is a very effective | + | The Shipunov 2A42 30 mm Autocannon is a very versatile weapon - it is possible to change its fire rate based on the situation and it has vertical guidance of +74 degrees, which makes it effective not only against tanks but for planes and helicopters as well. |
| + | |||
| + | The main concern with this powerful main weapon is the ammo capacity. The gun has two firing modes - relatively slow (~200/minute) and extremely fast (~550/minute), while your ammo capacity is 500. To not run out of ammo during the battle, one should use full auto mode only when facing certain doom, or when sitting in an ambush position against an unknown enemy. | ||
| − | + | Its reload rate for the belts is quite fast at 1.15 seconds and it gets a choice of HEF-T, AP-T, and HVAP in belts. Every belt is universal and has at least 1 AP and 1 HE in them, HE belt carrying 2 of HEF-T for 1 AP-T per cycle. | |
| − | + | The HVAP belts have enough penetration to obliterate lighter tanks such as [[Leopard A1A1|Leopard A1A1s]], [[AMX-30B2 BRENUS]] and [[Warrior]] frontally, however, when engaging other larger targets it's only possible to completely defeat them from the side, though you can still cripple enemy tanks frontally by shooting cannon barrels and tracks. | |
| − | The main | + | The main difference of the HVAP compared to the APDS of other autocannon-equipped vehicles is that it is '''very''' bad against angled tanks and when attacking tanks on high ground (Refer to the table, to see how bad it can get). Because of that, targets usually easily dealt with such as the [[Striker]] may deflect fire from your main gun when heavily angled. When facing something the main gun cannot deal with, you'll need to use the secondary weapon: |
=== Additional armament === | === Additional armament === | ||
| − | <!-- | + | <!--Some tanks are armed with several guns in one or more turrets. Evaluate the additional weaponry and give advice on its use. Describe the ammunition available for additional weaponry. Give advice on how to use them and how to fill the ammunition storage. If there is no additional weaponry remove this subsection.--> |
| − | BMP-2 also has ATGM launcher. | + | |
| − | ATGM is able to penetrate most tanks BMP-2 | + | BMP-2 also has an ATGM launcher. Its guidance system is semi-automatic, so it's easier to use in RB. It is a default modification on the vehicle, unlike the BMP-1, so doesn't need to be researched. |
| + | |||
| + | The ATGM is able to penetrate most tanks BMP-2 will face at its BR and often above when aimed well. The 9M113 is also fairly useable at range, although it generally won't reach sniping helicopters. The BMP only has 4 ATGMs, so it's a good idea to be stringent with them. | ||
| + | |||
| + | 4 x 9M113 ATGM | ||
| + | |||
| + | * Guidance type: SACLOS | ||
| + | * Firing range: 3 km | ||
| + | |||
| + | === Ammunition === | ||
| + | Main gun belts: | ||
| + | {| class="wikitable sortable" style="text-align:center" width="100%" | ||
| + | ! colspan="8" |Penetration statistics | ||
| + | |- | ||
| + | ! rowspan="2" data-sort-type="text" |Ammunition | ||
| + | ! rowspan="2" class="unsortable" |Type of | ||
| + | warhead | ||
| + | ! colspan="6" |'''Penetration''' '''''in mm''''' '''@ 0° / 60°''' | ||
| + | |- | ||
| + | !10 m | ||
| + | !100 m | ||
| + | !500 m | ||
| + | !1,000 m | ||
| + | !1,500 m | ||
| + | !2,000 m | ||
| + | |- | ||
| + | |Default||HEF-I, AP-T, HEF-I, AP-T,||64/ 24||61/ 23||49 / 19||37/ 14||28 / 11||22/ 8 | ||
| + | |- | ||
| + | |30mm HE||HEF-I, AP-T, HEF-T, HEF-I||64/ 24||61/ 23||49 / 19||37/ 14||28 / 11||22/ 8 | ||
| + | |- | ||
| + | |30mm APT | ||
| + | |AP-T, AP-T, AP-T, HEF-T | ||
| + | |64/ 24 | ||
| + | |61/ 23 | ||
| + | |49 / 19 | ||
| + | |37/ 14 | ||
| + | |28 / 11 | ||
| + | |22/ 8 | ||
| + | |- | ||
| + | |30mm HVAP | ||
| + | |HVAP,HVAP,HVAP,HVAP, HEF-T | ||
| + | |100 / 41 | ||
| + | |95 / 39 | ||
| + | |80 / 33 | ||
| + | |72 / 29 | ||
| + | |62 / 25 | ||
| + | |50 / 20 | ||
| + | |} | ||
| + | ATGM: | ||
| + | {| class="wikitable sortable" style="text-align:center" width="100%" | ||
| + | ! colspan="8" |Penetration statistics | ||
| + | |- | ||
| + | ! rowspan="2" data-sort-type="text" |Ammunition | ||
| + | ! rowspan="2" class="unsortable" |Type of | ||
| + | warhead | ||
| + | ! colspan="6" |'''Penetration''' '''''in mm''''' '''@ 90°''' | ||
| + | |- | ||
| + | !10 m | ||
| + | !100 m | ||
| + | !500 m | ||
| + | !1,000 m | ||
| + | !1,500 m | ||
| + | !2,000 m | ||
| + | |- | ||
| + | |9M113||AGTM||600||600||600||600||600||600 | ||
| + | |} | ||
| + | {| class="wikitable sortable" style="text-align:center" width="100%" | ||
| + | ! colspan="12" |Shell details | ||
| + | |- | ||
| + | ! rowspan="2" data-sort-type="text" |Ammunition | ||
| + | ! rowspan="2" class="unsortable" |Type of | ||
| + | warhead | ||
| + | ! rowspan="2" |Maximum Velocity | ||
| + | in m/s | ||
| + | ! rowspan="2" |Projectile | ||
| + | Mass in kg | ||
| + | ! rowspan="2" |Range (m) | ||
| + | ! rowspan="2" |''Fuse delay'' | ||
| + | ''in m:'' | ||
| + | ! rowspan="2" |''Fuse sensitivity'' | ||
| + | ''in mm:'' | ||
| + | ! rowspan="2" |''Explosive Mass in g'' ''(TNT equivalent):'' | ||
| + | ! rowspan="2" |''Normalization At 30°'' | ||
| + | ''from horizontal:'' | ||
| + | ! colspan="3" |''Ricochet:'' | ||
| + | |- | ||
| + | !0% | ||
| + | !50% | ||
| + | !100% | ||
| + | |- | ||
| + | |9M113||AGTM||205||14.5||3.000||0.0||0.1||2.750||+0°||80°||82°||90° | ||
| + | |} | ||
| + | |||
| + | === Optics and night vision === | ||
| + | |||
| + | ''Try to fill in the specifications of the tank optics. If you are having problems with it, refer to the optics gallery or Night vision pages for examples. Remember, not every tank has optic magnification specified in X-ray and each NVD can only be used from their designated point of view.'' | ||
| + | |||
| + | ''Try to explain how optics affect your gameplay on a tank. A comparison to rival tanks of the rank is welcome. If the vehicle optic devices are unique in some way, or the way the optics are placed on a tank is affecting the gameplay in a meaningful way, or damage to optics can disable some features or weapons of a tank, specify it here as well.'' | ||
| + | |||
| + | {| class="wikitable" style="text-align:center" | ||
| + | ! colspan="7" | {{PAGENAME}} [[Optics]] | ||
| + | |- | ||
| + | ! rowspan="3" |Type of optic | ||
| + | ! rowspan="3" |Magnification | ||
| + | ! colspan="5" |[[Night Vision Devices]] | ||
| + | |- | ||
| + | ! colspan="3" |Image Intensifier | ||
| + | ! rowspan="2" |{{Annotation|Thermal Imager<br>Resolution|The higher the resolution the clearer and more detailed the image is}} | ||
| + | ! rowspan="2" |Notes | ||
| + | |- | ||
| + | ! {{Annotation|Resolution|The higher the resolution the clearer and more detailed the image is}} | ||
| + | ! {{Annotation|Light Mult|By how much the image intensifier amplifies the existing light, primarily useful for comparing image intensifiers}} | ||
| + | ! {{Annotation|Noise Level|How much noise is present in the image (how grainy the image is)}} | ||
| + | |- | ||
| + | ! Gunner's Sight | ||
| + | | X5.2 - X5.6 || 800X600 || ? || high || Not Fitted || Only useable with tier 2 upgrade | ||
| + | |- | ||
| + | ! Commander's View | ||
| + | | X6 || 800X600 || ? || high || Not Fitted || Only useable with tier 2 upgrade | ||
| + | |- | ||
| + | ! Driver's View | ||
| + | | X1 / 3PV || 800X600 || ? || high || Not Fitted || Only useable with tier 2 upgrade | ||
| + | |- | ||
| + | |} | ||
| + | |||
| + | *Maximum zoom level specified in X-ray. | ||
| + | |||
=== Machine guns === | === Machine guns === | ||
| − | <!-- | + | <!--Offensive and anti-aircraft machine guns not only allow you to fight some aircraft but also are effective against lightly armoured vehicles. Evaluate machine guns and give recommendations on its use.--> |
| − | 7.62 mm PKT is only | + | 7.62 mm PKT is only useful for destroying light obstacles to avoid losing momentum. Alternatively, it can be used to mark the enemy in Realistic battle. Using it for anything else is pointless, as your 30mm is far more effective otherwise, and the 7.62mm won't cause damage to anything but early aircraft or open-top vehicles with exposed crew. |
== Usage in battles == | == Usage in battles == | ||
| − | + | <!-- Describe the tactics of playing in the vehicle, the features of using vehicles in the team and advice on tactics. Refrain from creating a "guide" - do not impose a single point of view but give the reader food for thought. Describe the most dangerous enemies and give recommendations on fighting them. If necessary, note the specifics of the game in different modes (AB, RB, SB). --> | |
| + | The BMP-2 is best played as a light support vehicle, avoiding being a primary target. Where possible, spot opposing vehicles for teammates while staying near heavier friendly vehicles, helping repair and support them as necessary. By staying mostly in cover and near more threatening targets, you'll avoid being a target yourself. | ||
| + | |||
| + | The BMP isn't particularly fast for a light tank, but if you are able to move into a position that enemy tanks will be passing you'll be able to make quick work of them with the 30mm gun. | ||
| + | |||
| + | The BMP is somewhat vulnerable to aircraft fire, particularly larger cannons will make quick work of the vehicle through its near non-existent top armour. Where possible, find positions with good overhead cover or minimal visibility for overhead aircraft (beneath over-arching rocks, near or in buildings, under dense tree cover). If for any reason you do become the target of a strafing run, don't be afraid to fire back - the 30mm will make quick work of most aircraft, and in head-on engagements is particularly easy to get on target. | ||
=== Pros and cons === | === Pros and cons === | ||
| − | <!-- | + | <!--Summarize and briefly evaluate the vehicle in terms of its characteristics and combat effectiveness. Mark its pros and cons in a bulleted list. Try not to use more than 6 points for each of the characteristics. Avoid using categorical definitions such as "bad", "good" and the like - they have a substitution in the form of softer "inadequate", "effective".--> |
'''Pros:''' | '''Pros:''' | ||
| − | * | + | *Can easily destroy other light vehicles with both its main gun and its ATGM launcher |
| − | *Can get | + | *At times is surprisingly survivable, the vehicle's internals are largely non-critical components |
| − | * | + | *Can ford rivers/canals to get to locations that are normally difficult or sometimes impossible to reach |
| − | + | *Somewhat effective as an AA with fast-firing 30 mm | |
| + | *ATGMs will comfortably destroy almost any vehicle with a well placed missile | ||
| + | *30 mm HVAP can quickly disable tracks/gun barrel on any target | ||
'''Cons:''' | '''Cons:''' | ||
| − | * | + | *The 30 mm HVAP is not as powerful as APDS on other AFVs |
| − | * | + | *30 mm HVAP has extremely bad angled performance |
| − | * | + | *Small maximum ammo load, can only take a single HVAP belt |
| − | * | + | *Can hull break, although some modules can prevent it |
| + | *Vulnerable to HMGs and light cannons at close ranges, particularly without add-on armour | ||
== History == | == History == | ||
Revision as of 22:41, 26 November 2019
Contents
| This page is about the Soviet light tank BMP-2. For the version equipped with a 73 mm cannon, see BMP-1. |
Description

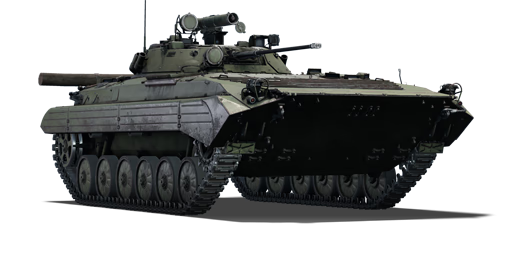
The BMP-2 is a Rank VI Soviet light tank
with a battle rating of 8.7 (AB/RB/SB). It was introduced in Update 1.81 "The Valkyries".
General info
Survivability and armour
Similarly to its predecessor, the BMP-2 relies on its low profile, decent mobility and spaced out modules as defensive features. The vehicle's internal modules often absorb shots unexpectedly, saving the crew and allowing the BMP to return fire or escape significant harm.
The BMP-2 has optional add-on armour which improves its resistance to heavy machine gun and some light cannon fire from the sides, at the cost of losing its amphibious ability.
Mobility
The BMP-2's mobility is reasonable, albeit not excellent, at a maximum of 72/65 km/h (AB\RB) on-road, however, the vehicle's acceleration and off-road performance leave something to be desired.
The BMP can swim at 7 kph.
Armaments
Main armament
The Shipunov 2A42 30 mm Autocannon is a very versatile weapon - it is possible to change its fire rate based on the situation and it has vertical guidance of +74 degrees, which makes it effective not only against tanks but for planes and helicopters as well.
The main concern with this powerful main weapon is the ammo capacity. The gun has two firing modes - relatively slow (~200/minute) and extremely fast (~550/minute), while your ammo capacity is 500. To not run out of ammo during the battle, one should use full auto mode only when facing certain doom, or when sitting in an ambush position against an unknown enemy.
Its reload rate for the belts is quite fast at 1.15 seconds and it gets a choice of HEF-T, AP-T, and HVAP in belts. Every belt is universal and has at least 1 AP and 1 HE in them, HE belt carrying 2 of HEF-T for 1 AP-T per cycle.
The HVAP belts have enough penetration to obliterate lighter tanks such as Leopard A1A1s, AMX-30B2 BRENUS and Warrior frontally, however, when engaging other larger targets it's only possible to completely defeat them from the side, though you can still cripple enemy tanks frontally by shooting cannon barrels and tracks.
The main difference of the HVAP compared to the APDS of other autocannon-equipped vehicles is that it is very bad against angled tanks and when attacking tanks on high ground (Refer to the table, to see how bad it can get). Because of that, targets usually easily dealt with such as the Striker may deflect fire from your main gun when heavily angled. When facing something the main gun cannot deal with, you'll need to use the secondary weapon:
Additional armament
BMP-2 also has an ATGM launcher. Its guidance system is semi-automatic, so it's easier to use in RB. It is a default modification on the vehicle, unlike the BMP-1, so doesn't need to be researched.
The ATGM is able to penetrate most tanks BMP-2 will face at its BR and often above when aimed well. The 9M113 is also fairly useable at range, although it generally won't reach sniping helicopters. The BMP only has 4 ATGMs, so it's a good idea to be stringent with them.
4 x 9M113 ATGM
- Guidance type: SACLOS
- Firing range: 3 km
Ammunition
Main gun belts:
| Penetration statistics | |||||||
|---|---|---|---|---|---|---|---|
| Ammunition | Type of
warhead |
Penetration in mm @ 0° / 60° | |||||
| 10 m | 100 m | 500 m | 1,000 m | 1,500 m | 2,000 m | ||
| Default | HEF-I, AP-T, HEF-I, AP-T, | 64/ 24 | 61/ 23 | 49 / 19 | 37/ 14 | 28 / 11 | 22/ 8 |
| 30mm HE | HEF-I, AP-T, HEF-T, HEF-I | 64/ 24 | 61/ 23 | 49 / 19 | 37/ 14 | 28 / 11 | 22/ 8 |
| 30mm APT | AP-T, AP-T, AP-T, HEF-T | 64/ 24 | 61/ 23 | 49 / 19 | 37/ 14 | 28 / 11 | 22/ 8 |
| 30mm HVAP | HVAP,HVAP,HVAP,HVAP, HEF-T | 100 / 41 | 95 / 39 | 80 / 33 | 72 / 29 | 62 / 25 | 50 / 20 |
ATGM:
| Penetration statistics | |||||||
|---|---|---|---|---|---|---|---|
| Ammunition | Type of
warhead |
Penetration in mm @ 90° | |||||
| 10 m | 100 m | 500 m | 1,000 m | 1,500 m | 2,000 m | ||
| 9M113 | AGTM | 600 | 600 | 600 | 600 | 600 | 600 |
| Shell details | |||||||||||
|---|---|---|---|---|---|---|---|---|---|---|---|
| Ammunition | Type of
warhead |
Maximum Velocity
in m/s |
Projectile
Mass in kg |
Range (m) | Fuse delay
in m: |
Fuse sensitivity
in mm: |
Explosive Mass in g (TNT equivalent): | Normalization At 30°
from horizontal: |
Ricochet: | ||
| 0% | 50% | 100% | |||||||||
| 9M113 | AGTM | 205 | 14.5 | 3.000 | 0.0 | 0.1 | 2.750 | +0° | 80° | 82° | 90° |
Optics and night vision
Try to fill in the specifications of the tank optics. If you are having problems with it, refer to the optics gallery or Night vision pages for examples. Remember, not every tank has optic magnification specified in X-ray and each NVD can only be used from their designated point of view.
Try to explain how optics affect your gameplay on a tank. A comparison to rival tanks of the rank is welcome. If the vehicle optic devices are unique in some way, or the way the optics are placed on a tank is affecting the gameplay in a meaningful way, or damage to optics can disable some features or weapons of a tank, specify it here as well.
| BMP-2 Optics | ||||||
|---|---|---|---|---|---|---|
| Type of optic | Magnification | Night Vision Devices | ||||
| Image Intensifier | Thermal Imager Resolution |
Notes | ||||
| Resolution | Light Mult | Noise Level | ||||
| Gunner's Sight | X5.2 - X5.6 | 800X600 | ? | high | Not Fitted | Only useable with tier 2 upgrade |
| Commander's View | X6 | 800X600 | ? | high | Not Fitted | Only useable with tier 2 upgrade |
| Driver's View | X1 / 3PV | 800X600 | ? | high | Not Fitted | Only useable with tier 2 upgrade |
- Maximum zoom level specified in X-ray.
Machine guns
7.62 mm PKT is only useful for destroying light obstacles to avoid losing momentum. Alternatively, it can be used to mark the enemy in Realistic battle. Using it for anything else is pointless, as your 30mm is far more effective otherwise, and the 7.62mm won't cause damage to anything but early aircraft or open-top vehicles with exposed crew.
Usage in battles
The BMP-2 is best played as a light support vehicle, avoiding being a primary target. Where possible, spot opposing vehicles for teammates while staying near heavier friendly vehicles, helping repair and support them as necessary. By staying mostly in cover and near more threatening targets, you'll avoid being a target yourself.
The BMP isn't particularly fast for a light tank, but if you are able to move into a position that enemy tanks will be passing you'll be able to make quick work of them with the 30mm gun.
The BMP is somewhat vulnerable to aircraft fire, particularly larger cannons will make quick work of the vehicle through its near non-existent top armour. Where possible, find positions with good overhead cover or minimal visibility for overhead aircraft (beneath over-arching rocks, near or in buildings, under dense tree cover). If for any reason you do become the target of a strafing run, don't be afraid to fire back - the 30mm will make quick work of most aircraft, and in head-on engagements is particularly easy to get on target.
Pros and cons
Pros:
- Can easily destroy other light vehicles with both its main gun and its ATGM launcher
- At times is surprisingly survivable, the vehicle's internals are largely non-critical components
- Can ford rivers/canals to get to locations that are normally difficult or sometimes impossible to reach
- Somewhat effective as an AA with fast-firing 30 mm
- ATGMs will comfortably destroy almost any vehicle with a well placed missile
- 30 mm HVAP can quickly disable tracks/gun barrel on any target
Cons:
- The 30 mm HVAP is not as powerful as APDS on other AFVs
- 30 mm HVAP has extremely bad angled performance
- Small maximum ammo load, can only take a single HVAP belt
- Can hull break, although some modules can prevent it
- Vulnerable to HMGs and light cannons at close ranges, particularly without add-on armour
History
The arrival of the BMP-1 infantry combat vehicle in the Soviet Army greatly increased the firepower and mobility of infantry formations on the battlefield. However, there were also significant shortcomings, mainly in the armament department. The 73 mm Grom gun, which was installed on the BMP-1 wasn't particularly efficient against infantry units, tanks and low flying air targets. In addition to this, the flight of the trajectory became impossible to predict if even a small crosswind was present. To account for these issues, a decision was made to create a new vehicle based on the BMP-1 with the automatic rifled gun. Among the several projects carried out, the vehicle designed by Kurganmashzavod engineers was acknowledged to be superior to the rest. The BMP-2, which was put into service in 1977, had a similar design to the BMP-1 in terms of the layout and general configuration. However, the turret underwent significant changes. It now had space for two crew members – the gunner and the commander, and the automatic 30 mm 2A42 gun became its primary armament. Just like its predecessor, the BMP-2 was fitted with a launcher capable of firing either the Konkurs or Fagot anti-tank guided missiles, which the vehicle could deploy when engaging tank units. The vehicle was regarded as fairly successful, and over the years of its service, the BMP-2 underwent a series of modernizations and modifications directed at improving the vehicle’s defences and increasing its destructive capability. The BMP-2 remains in service till now and is in great demand abroad.
- From Devblog
Media
Skins and camouflages for the BMP-2 from live.warthunder.com.
See also
Links to the articles on the War Thunder Wiki that you think will be useful for the reader, for example:
- reference to the series of the vehicles;
- links to approximate analogues of other nations and research trees.
External links
| USSR light tanks | |
|---|---|
| T-26 | T-26 · T-26 (1st Gv.T.Br.) · T-26-4 · T-26E |
| BT | BT-5 · RBT-5 · BT-7 · BT-7 TD · BT-7M · BT-7A (F-32) |
| T-50 | T-126 · T-50 |
| T-70 | T-70 · T-80 |
| PT-76 | PT-76B · PT-76-57 · Object 906 |
| BMP | BMP-1 · BMP-2 · BMP-2M · BMP-3 |
| BMD | BMD-4 |
| 2S25 | 2S25 · 2S25M |
| Wheeled | BA-11 · BTR-80A |
| Other | T-60 · Object 685 · 2S38 |
| China | ▂Type 62 |
