Difference between revisions of "BMO"
Inceptor57 (talk | contribs) (Edits, Readded section descriptions as comments) |
(Filled out armament section, except for the special armament. // Wrote a short guide on the use of the ship. // Pros and Cons.) (Tag: Visual edit) |
||
| Line 26: | Line 26: | ||
=== Secondary armament === | === Secondary armament === | ||
| − | + | The 45mm secondary armament on the BMO is slightly more powerful than the primary 37mm, although it should only be used against the toughest opponents, hence its secondary nature. The rate of fire is slow, so it is advised to use this weapon at longer ranges. However, that also means that you shouldn't worry about ammo running out, and you can keep holding down the fire button, as the weapon doesn't overheat. | |
| − | |||
| − | ' | ||
=== Anti-aircraft armament === | === Anti-aircraft armament === | ||
| − | + | The anti-air armaments consist of a total of four 12.7mm machine guns (2x AN-M2; 2x DShK). These guns should be primarily against the aircraft, which are relatively easy to take down at BR 2.0, but they can also be used against the light-armored boats that are still present at this BR (such as the LS 3). The guns are positioned in the middle section of the ship, on top of the bridge and on the stern, which should pose no problems against aircraft, because you will be able to get at least 2 guns onto the enemy, but it can be hard to attack boats directly in-front of the ship. | |
| − | |||
| − | |||
=== Special armament === | === Special armament === | ||
| Line 39: | Line 35: | ||
== Usage in battles == | == Usage in battles == | ||
| − | + | The BMO is one of the first Russian boats that has a large variety of armament. At this stage, you may need to assign new buttons to be able to select your primary/secondary/anti-aircraft armaments, because the BMO works best when all of its weapons are used. Generally, the BMO should be played like a slower Motor Torpedo Boat that can stand its own ground. For example, in the beginning of match around its own BR (1.7-2.3), it can rush a cap point and decimate the oncoming light boats with its 37mm primary (which is comfortably positioned in the bow). When the cap is clear, the BMO can take on a defensive role behind some cover. | |
| + | |||
| + | The 45mm secondary armament should mostly be used in an uptier (BR 2.7-3.0) against the larger American and German ships (Elco 80ft / S-100), but you still need to be careful, because those ships can easily take out your guns, and the BMO itself. If you're unsure whether it's best to use the 45mm or the 37mm, always go with the 37mm, because it is much more forgiving. | ||
| + | |||
| + | As for the playstyle, when you get into BR 2.0 or below you can get away with almost everything. Simply use your 37mm to obliterate any threats coming from the front, and if you're flanked or in a messy fight, switch to your anti-air armaments and continue obliterating everything. Your AI gunners can be set to both surface and air threats, but if you are more experienced, you can change them based on the situation (more planes - focus on air threats; in a messy fight - focus on surface threats). | ||
| + | |||
| + | Now, if you get into BR 2.3-3.0, you need to play safer. Don't rush for caps alone, because ships of higher BRs can easily kill you. You should flank your enemies where possible, and unload your 37mm (or even the 45mm) into the exposed sides. The anti-air weaponry will be mostly useless against ships at this BR, so you can just set your AI gunners to air threats and focus on the ships. | ||
=== Pros and cons === | === Pros and cons === | ||
| Line 45: | Line 47: | ||
'''Pros:''' | '''Pros:''' | ||
| + | |||
| + | * Great variety of armaments, which should be used interchangeably to increase your chances of escaping difficult situations. | ||
| + | * A lot of ammunition | ||
| + | * Decent speed | ||
* | * | ||
'''Cons:''' | '''Cons:''' | ||
| + | |||
| + | * Negligible armour on the armaments, making them very easy to knock out. | ||
| + | * No torpedoes | ||
| + | * The 37mm primary armament can overheat (and the AI gunners always overheat the weapon when the player is using another one). | ||
* | * | ||
Revision as of 12:20, 11 April 2019
Contents
Description

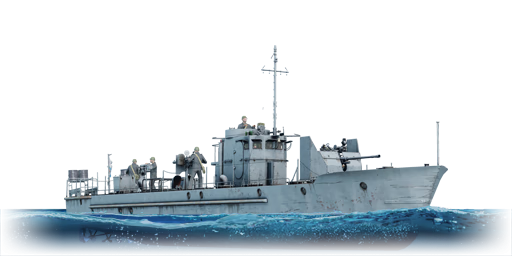
The BMO pr 194 is a rank IV Soviet armoured sub-chaser
with a battle rating of 3.0 (AB/RB/SB). It was introduced during Update 1.79 "Project X" when the Soviet fleet was implemented into the game.
General info
Survivability and armour
The mid-section of the hull and the bridge are the most well armoured places on the BMO. The main 37mm can be knocked out very easily as so can the 45mm. Fires are very frequent, but don't expect much from small arms fire.
Mobility
Write about the ship’s mobility. Evaluate its power and manoeuvrability, rudder rerouting speed, stopping speed at full tilt, with its maximum forward speed and reverse speed.
Armament
Primary armament
The 37mm main armament on the BMO is very powerful in the fact that it is very rapid fire and can obliterate small boats with its HE belt rounds. However, anything larger than a Submarine-chaser won't take much damage from your fire and it is recommended to steer clear. The ammo capacity is quite unusually large at 500 per belt, with a capacity of 2 belts. You won't be reloading or running out of ammo quickly. The clip reload is unbelievably fast, which makes from changing from HE to AP a breeze. It is hard to overheat the weapon, but just keep in mind not to hold down for too long. Aiming is also a breeze, you don't have to worry about your ammo so carefully leading shots is not recommended.
Secondary armament
The 45mm secondary armament on the BMO is slightly more powerful than the primary 37mm, although it should only be used against the toughest opponents, hence its secondary nature. The rate of fire is slow, so it is advised to use this weapon at longer ranges. However, that also means that you shouldn't worry about ammo running out, and you can keep holding down the fire button, as the weapon doesn't overheat.
Anti-aircraft armament
The anti-air armaments consist of a total of four 12.7mm machine guns (2x AN-M2; 2x DShK). These guns should be primarily against the aircraft, which are relatively easy to take down at BR 2.0, but they can also be used against the light-armored boats that are still present at this BR (such as the LS 3). The guns are positioned in the middle section of the ship, on top of the bridge and on the stern, which should pose no problems against aircraft, because you will be able to get at least 2 guns onto the enemy, but it can be hard to attack boats directly in-front of the ship.
Special armament
Depth charges, mines, rocket launchers and missiles are also effective in skilled hands and can be an unexpected surprise for an opponent. Evaluate the ammunition of this type of armament and rate its performance in combat.
Usage in battles
The BMO is one of the first Russian boats that has a large variety of armament. At this stage, you may need to assign new buttons to be able to select your primary/secondary/anti-aircraft armaments, because the BMO works best when all of its weapons are used. Generally, the BMO should be played like a slower Motor Torpedo Boat that can stand its own ground. For example, in the beginning of match around its own BR (1.7-2.3), it can rush a cap point and decimate the oncoming light boats with its 37mm primary (which is comfortably positioned in the bow). When the cap is clear, the BMO can take on a defensive role behind some cover.
The 45mm secondary armament should mostly be used in an uptier (BR 2.7-3.0) against the larger American and German ships (Elco 80ft / S-100), but you still need to be careful, because those ships can easily take out your guns, and the BMO itself. If you're unsure whether it's best to use the 45mm or the 37mm, always go with the 37mm, because it is much more forgiving.
As for the playstyle, when you get into BR 2.0 or below you can get away with almost everything. Simply use your 37mm to obliterate any threats coming from the front, and if you're flanked or in a messy fight, switch to your anti-air armaments and continue obliterating everything. Your AI gunners can be set to both surface and air threats, but if you are more experienced, you can change them based on the situation (more planes - focus on air threats; in a messy fight - focus on surface threats).
Now, if you get into BR 2.3-3.0, you need to play safer. Don't rush for caps alone, because ships of higher BRs can easily kill you. You should flank your enemies where possible, and unload your 37mm (or even the 45mm) into the exposed sides. The anti-air weaponry will be mostly useless against ships at this BR, so you can just set your AI gunners to air threats and focus on the ships.
Pros and cons
Summarize and briefly evaluate the vehicle in terms of its characteristics and combat effectiveness. Mark its pros and cons in the bulleted list. Try not to use more than 6 points for each of the characteristics. Avoid using categorical definitions such as "bad", "good" and the like - they have a substitution in the form of softer "inadequate", "effective".
Pros:
- Great variety of armaments, which should be used interchangeably to increase your chances of escaping difficult situations.
- A lot of ammunition
- Decent speed
Cons:
- Negligible armour on the armaments, making them very easy to knock out.
- No torpedoes
- The 37mm primary armament can overheat (and the AI gunners always overheat the weapon when the player is using another one).
History
Describe the history of the creation and combat usage of the ship in more detail than in the introduction. If the historical reference turns out to be too big, take it to a separate article, taking a link to an article about the vehicle and adding a block "/ History" (example: https://wiki.warthunder.com/(Vehicle-name)/History) and add a link to it here using the main template. Be sure to reference text and sources by using <ref>, as well as adding them at the end of the article.
Media
An excellent addition to the article will be video guides, as well as screenshots from the game and photos.
See also
Links to the articles on the War Thunder Wiki that you think will be useful for the reader, for example:
- reference to the series of the ship;
- links to approximate analogues of other nations and research trees.
External links
Paste links to sources and external resources, such as:
- topic on the official game forum;
- encyclopedia page on ship;
- other literature.
| USSR sub-chasers | |
|---|---|
| Pr. 122 | MPK pr.122A · MPK Pr.122bis |
| Pr. 163 | MPK-163 |
| Pr. 201 | MPK Pr.201K · MPK Pr.201M |
| Pr. 204 | MPK Pr.204 |
