Difference between revisions of "B6N1 Model 11"
(→Usage in battles: Edits) |
m (→Description) |
||
| (25 intermediate revisions by 7 users not shown) | |||
| Line 1: | Line 1: | ||
| − | {{Specs-Card|code=b6n1}} | + | {{About |
| + | | about = Japanese bomber '''{{PAGENAME}}''' | ||
| + | | usage = other versions | ||
| + | | link = B6N (Family) | ||
| + | }} | ||
| + | {{Specs-Card | ||
| + | |code=b6n1 | ||
| + | |images={{Specs-Card-Image|GarageImage_{{PAGENAME}}.jpg|ArtImage_{{PAGENAME}}.jpg}} | ||
| + | }} | ||
== Description == | == Description == | ||
<!-- ''In the description, the first part should be about the history of and the creation and combat usage of the aircraft, as well as its key features. In the second part, tell the reader about the aircraft in the game. Insert a screenshot of the vehicle, so that if the novice player does not remember the vehicle by name, he will immediately understand what kind of vehicle the article is talking about.'' --> | <!-- ''In the description, the first part should be about the history of and the creation and combat usage of the aircraft, as well as its key features. In the second part, tell the reader about the aircraft in the game. Insert a screenshot of the vehicle, so that if the novice player does not remember the vehicle by name, he will immediately understand what kind of vehicle the article is talking about.'' --> | ||
| − | + | The '''B6N1 mod. 11''', designated as '''Tenzan 11 ({{Annotation|天山一一型|Heavenly Mountain, Model 11}})''', was a carrier-based torpedo bomber developed by the Imperial Japanese Navy during World War II. It was intended to replace the [[B5N2|B5N]], but faced several delays due to engine problems and stability issues. The first prototype flew in March 1941, but the production did not enter service until August 1943. The B6N1 was powered by the Nakajima Mamoru 11 engine and could carry up to 800 kg of bombs or 1,800 kg of torpedoes. It had a top speed of 481 km/h and a range of over 3,000 km. It was armed with two 7.7 mm machine guns, one in the dorsal turret and one in the ventral position. It was used in various operations, such as the Battle of the Philippine Sea and the Battle of Leyte Gulf, but it could not fully demonstrate its potential due to the lack of experienced pilots and the air superiority of the US Navy. | |
| − | |||
| − | |||
| − | It | + | It was introduced in [[Update "Starfighters"]]. As the successor of the [[B5N2]], it offers a longer range and better speed, but it still performs the same role with the same total tonnage of ordnance, carrying a single 800 kg bomb or torpedo, two 250 kg bombs or a rack holding six 60 kg bombs. It had an additional rear machine gun in a ventral position compared to the B5N, making it less vulnerable to attacks coming from below, but with the machine guns only being [[Type 92 (7.7 mm)]] LMGs, they do not cause any significant damage and are effectively only a deterrent with the off-chance of damaging enemy chasers' engines or hitting their cockpit. One unusual feature about the early production Tenzan as a torpedo bomber was the mounting of a single 7.7 mm offensive machine gun in the left wing, intended as an attempt to suppress naval targets' AA batteries. It can be used to fire enough bullets into a plane to shoot it down by utilizing the excellent manoeuvrability. |
| − | [[ | + | ;Nicknames: |
| + | * [[Abbreviations#.28IJN.29_Official_name_designation|Official Designation]]: ''天山 (Tenzan, "Heavenly Mountain")'' | ||
| + | * Allied reporting name: Jill | ||
== General info == | == General info == | ||
=== Flight performance === | === Flight performance === | ||
| + | [[File:B6N1 firing turret.png|thumb|The B6N1 in flight]] | ||
| + | {{Specs-Avia-Flight}} | ||
<!-- ''Describe how the aircraft behaves in the air. Speed, manoeuvrability, acceleration and allowable loads - these are the most important characteristics of the vehicle.'' --> | <!-- ''Describe how the aircraft behaves in the air. Speed, manoeuvrability, acceleration and allowable loads - these are the most important characteristics of the vehicle.'' --> | ||
Great rudder responsiveness, good roll rate, and surprisingly good energy retention! The {{PAGENAME}} is capable of turnfighting with its humble frontal machine gun, and if they get on your 6, your turrets will offer some protection. | Great rudder responsiveness, good roll rate, and surprisingly good energy retention! The {{PAGENAME}} is capable of turnfighting with its humble frontal machine gun, and if they get on your 6, your turrets will offer some protection. | ||
| Line 56: | Line 66: | ||
! Combat !! Take-off !! Landing !! + !! - | ! Combat !! Take-off !! Landing !! + !! - | ||
|- | |- | ||
| − | | {{Specs|destruction|body}} || {{Specs|destruction|gear}} || | + | | 650 <!-- {{Specs|destruction|body}} --> || {{Specs|destruction|gear}} || 368 || 354 || 280 || ~11 || ~3 |
|- | |- | ||
|} | |} | ||
| Line 69: | Line 79: | ||
|- | |- | ||
|} | |} | ||
| + | |||
| + | [[File:B6Ncockpit.png|thumb|The new cockpit of the B6N1]] | ||
=== Survivability and armour === | === Survivability and armour === | ||
| + | {{Specs-Avia-Armour}} | ||
<!-- ''Examine the survivability of the aircraft. Note how vulnerable the structure is and how secure the pilot is, whether the fuel tanks are armoured, etc. Describe the armour, if there is any, and also mention the vulnerability of other critical aircraft systems.'' --> | <!-- ''Examine the survivability of the aircraft. Note how vulnerable the structure is and how secure the pilot is, whether the fuel tanks are armoured, etc. Describe the armour, if there is any, and also mention the vulnerability of other critical aircraft systems.'' --> | ||
| − | + | ||
| + | * No armour | ||
| + | * Non-self sealing fuel tanks (3 in each wing) | ||
| + | |||
| + | === Modifications and economy === | ||
| + | {{Specs-Economy}} | ||
== Armaments == | == Armaments == | ||
| + | {{Specs-Avia-Armaments}} | ||
=== Offensive armament === | === Offensive armament === | ||
| + | {{Specs-Avia-Offensive}} | ||
<!-- ''Describe the offensive armament of the aircraft, if any. Describe how effective the cannons and machine guns are in a battle, and also what belts or drums are better to use. If there is no offensive weaponry, delete this subsection.'' --> | <!-- ''Describe the offensive armament of the aircraft, if any. Describe how effective the cannons and machine guns are in a battle, and also what belts or drums are better to use. If there is no offensive weaponry, delete this subsection.'' --> | ||
{{main|Type 97 navy (7.7 mm)}} | {{main|Type 97 navy (7.7 mm)}} | ||
| Line 81: | Line 101: | ||
The '''''{{PAGENAME}}''''' is armed with: | The '''''{{PAGENAME}}''''' is armed with: | ||
| − | * 1 x 7.7 mm Type 97 navy machine gun, wing-mounted (400 rpg) | + | * 1 x 7.7 mm Type 97 navy machine gun, wing-mounted (400 rpg)[[File:B6N1GrayCamo.png|thumb|B6N1 in Gray camouflage, available on WT Live ]] |
Choose your rounds wisely. The Stealth belt is a great pick because it has two incendiary bullets, and lots of armour-piercing rounds. Universal is a great pick if you need a tracer or two to guide your shots. Don't use the Tracers belt, it won't do much. Default isn't really good, the ball bullets hinder performance. | Choose your rounds wisely. The Stealth belt is a great pick because it has two incendiary bullets, and lots of armour-piercing rounds. Universal is a great pick if you need a tracer or two to guide your shots. Don't use the Tracers belt, it won't do much. Default isn't really good, the ball bullets hinder performance. | ||
=== Suspended armament === | === Suspended armament === | ||
| + | {{Specs-Avia-Suspended}} | ||
<!-- ''Describe the aircraft's suspended armament: additional cannons under the wings, bombs, rockets and torpedoes. This section is especially important for bombers and attackers. If there is no suspended weaponry remove this subsection.'' --> | <!-- ''Describe the aircraft's suspended armament: additional cannons under the wings, bombs, rockets and torpedoes. This section is especially important for bombers and attackers. If there is no suspended weaponry remove this subsection.'' --> | ||
{{main|Navy Type 97 Number 6 (60 kg)|Navy Type Number 25 Model 2 (250 kg)|Navy Type Number 80 Model 1 (800 kg)|Type 91 Model 2 (835 kg)|Type 91 Model 3 (850 kg)}} | {{main|Navy Type 97 Number 6 (60 kg)|Navy Type Number 25 Model 2 (250 kg)|Navy Type Number 80 Model 1 (800 kg)|Type 91 Model 2 (835 kg)|Type 91 Model 3 (850 kg)}} | ||
| Line 98: | Line 119: | ||
The 800 kg bomb will destroy 1 base, it's a good pick for maps with few ground targets! The 250 kg bombs are great for destroying pillboxes and tanks, but you can only have two of them. Make sure to use a slight dive when bombing and use the bombsight for increased accuracy! The 6 x 60 kg bombs are a great option for this plane. Since they weigh so little, you can be super accurate with these bombs, just aim the crosshair where you want the bomb to drop, and pull up. No need for a bomb sight!!! Use these bombs for light targets such as AAA, Vehicles, Armoured Cars, Artillery, Howitzers, Machine Guns, and Bridges. The torpedoes are not really useful for this plane in air battles, as ships only spawn in pacific maps, and this plane is at too low of a BR to be put in a Pacific Theater battle. | The 800 kg bomb will destroy 1 base, it's a good pick for maps with few ground targets! The 250 kg bombs are great for destroying pillboxes and tanks, but you can only have two of them. Make sure to use a slight dive when bombing and use the bombsight for increased accuracy! The 6 x 60 kg bombs are a great option for this plane. Since they weigh so little, you can be super accurate with these bombs, just aim the crosshair where you want the bomb to drop, and pull up. No need for a bomb sight!!! Use these bombs for light targets such as AAA, Vehicles, Armoured Cars, Artillery, Howitzers, Machine Guns, and Bridges. The torpedoes are not really useful for this plane in air battles, as ships only spawn in pacific maps, and this plane is at too low of a BR to be put in a Pacific Theater battle. | ||
| + | |||
| + | [[File:B6N1GrayCamo2.png|thumb|B6N1 showing off its large wings. These wings give the plane a great speed and turning ability]] | ||
=== Defensive armament === | === Defensive armament === | ||
| + | {{Specs-Avia-Defensive}} | ||
<!-- ''Defensive armament with turret machine guns or cannons, crewed by gunners. Examine the number of gunners and what belts or drums are better to use. If defensive weaponry is not available, remove this subsection.'' --> | <!-- ''Defensive armament with turret machine guns or cannons, crewed by gunners. Examine the number of gunners and what belts or drums are better to use. If defensive weaponry is not available, remove this subsection.'' --> | ||
{{main|Type 92 (7.7 mm)}} | {{main|Type 92 (7.7 mm)}} | ||
| Line 110: | Line 134: | ||
The Type 92 turrets are absolutely horrible at dealing with higher BR planes, but it works wonders on biplanes. You will often face certain biplanes at this BR, and since they are slow, you can often get good shots on them. Use the Default belt and shoot into the engine to start an inextinguishable engine fire. This works quite often with the Default belt. The AP-T round is a good pick if you aren't a good gunner, because the extra tracers will scare the enemy off. Most biplanes don't want to get too close when they see a wave of tracers appear from your turrets. | The Type 92 turrets are absolutely horrible at dealing with higher BR planes, but it works wonders on biplanes. You will often face certain biplanes at this BR, and since they are slow, you can often get good shots on them. Use the Default belt and shoot into the engine to start an inextinguishable engine fire. This works quite often with the Default belt. The AP-T round is a good pick if you aren't a good gunner, because the extra tracers will scare the enemy off. Most biplanes don't want to get too close when they see a wave of tracers appear from your turrets. | ||
| − | [[File: | + | [[File:B6N1 diving.png|thumb|The B6N1 diving on an unsuspecting target]] |
== Usage in battles == | == Usage in battles == | ||
<!-- ''Describe the tactics of playing in the aircraft, the features of using aircraft in a team and advice on tactics. Refrain from creating a "guide" - do not impose a single point of view, but instead, give the reader food for thought. Examine the most dangerous enemies and give recommendations on fighting them. If necessary, note the specifics of the game in different modes (AB, RB, SB).'' --> | <!-- ''Describe the tactics of playing in the aircraft, the features of using aircraft in a team and advice on tactics. Refrain from creating a "guide" - do not impose a single point of view, but instead, give the reader food for thought. Examine the most dangerous enemies and give recommendations on fighting them. If necessary, note the specifics of the game in different modes (AB, RB, SB).'' --> | ||
| − | + | This plane is great for bombing medium tanks, light pillboxes, howitzers, and vehicles. Since it is so fast, it can make multiple trips to the airfield if a resupply of bombs is needed. | |
| + | |||
| + | For naval maps and naval gamemode it's best advised to bring the torpedo and hit ships in a quick, close, hit and run style torpedo run, the engine allows for high speeds and Japanese torpedoes are among the highest speed resistant torpedoes in-game at the cost of range of only 2 km. It is also a possibility of squading up with friends / other torpedo carrying planes to dispose of the enemy carriers / battleships in a multiple hit torpedo strike. | ||
| − | Your frontal machine gun is your biggest asset. Unlike other B6Ns | + | Your frontal machine gun is your biggest asset. Unlike the B5N2 or other B6Ns, the B6N1 carries a frontal machine gun that can destroy light AAA trucks or Armoured cars. Or even enemy planes in uptiers, as the B6N has an amazing turn rate for a monoplane, but will have issues trying to out-turn biplanes. |
=== Manual Engine Control === | === Manual Engine Control === | ||
| Line 132: | Line 158: | ||
|- | |- | ||
| Controllable || Controllable<br>Not auto controlled || Controllable<br>Not auto controlled || Controllable<br>Not auto controlled || Separate || Controllable<br>2 gears || Not controllable | | Controllable || Controllable<br>Not auto controlled || Controllable<br>Not auto controlled || Controllable<br>Not auto controlled || Separate || Controllable<br>2 gears || Not controllable | ||
| − | |||
| − | |||
| − | |||
| − | |||
| − | |||
| − | |||
| − | |||
| − | |||
| − | |||
| − | |||
| − | |||
| − | |||
| − | |||
| − | |||
| − | |||
| − | |||
| − | |||
| − | |||
| − | |||
| − | |||
| − | |||
| − | |||
| − | |||
| − | |||
| − | |||
| − | |||
| − | |||
| − | |||
| − | |||
| − | |||
| − | |||
| − | |||
| − | |||
| − | |||
| − | |||
| − | |||
| − | |||
| − | |||
| − | |||
| − | |||
| − | |||
|- | |- | ||
|} | |} | ||
| Line 178: | Line 163: | ||
=== Pros and cons === | === Pros and cons === | ||
<!-- ''Summarise and briefly evaluate the vehicle in terms of its characteristics and combat effectiveness. Mark its pros and cons in the bulleted list. Try not to use more than 6 points for each of the characteristics. Avoid using categorical definitions such as "bad", "good" and the like - use substitutions with softer forms such as "inadequate" and "effective".'' --> | <!-- ''Summarise and briefly evaluate the vehicle in terms of its characteristics and combat effectiveness. Mark its pros and cons in the bulleted list. Try not to use more than 6 points for each of the characteristics. Avoid using categorical definitions such as "bad", "good" and the like - use substitutions with softer forms such as "inadequate" and "effective".'' --> | ||
| − | + | [[File:B6N1 Torpedo.png|thumb|B6N1 trying to torpedo the USS Sims]] | |
'''Pros:''' | '''Pros:''' | ||
| − | + | * '''B'''6N for Carrier-based torpedo bomber | |
| − | * | + | ** Bomber spawn |
| − | * | + | ** 1x [[Type 91 Model 3 (850 kg)|Type 91 Aerial Torpedo]] |
| − | * | + | *** Torpedo has the highest drop speed in the game at {{Annotation|580 km/h|350 mph}} and is one of the most feared torpedoes in Naval Battles |
| − | * | + | ** 6x [[Navy Type 97 Number 6 (60 kg)|Type 97 No.6 Land Bomb (60kg)]] |
| − | * Great engine power, produces 1660 hp | + | *** Gets a bomb rack of 6 x 60 kg bombs which can be used to hit multiple targets |
| − | * | + | ** 1x [[Navy Type Number 80 Model 1 (800 kg)|No.80 Land Bomb (800kg)]] |
| + | *** Heaviest bomb Japanese Navy can offer | ||
| + | * Common Navy plane construction: | ||
| + | ** Excellent manoeuvrability | ||
| + | * '''B6N''' Specific: | ||
| + | ** Great engine power, produces 1660 hp | ||
| + | ** High top speed for a torpedo bomber (464 km/h) | ||
| + | ** Ventral gunner | ||
| + | * '''Model 11''' Specific: | ||
| + | ** Has offensive capabilities | ||
'''Cons:''' | '''Cons:''' | ||
| − | * Single 7.7 mm in the left wing | + | * '''B'''6N for Carrier-based torpedo bomber |
| − | + | ** No airbrakes | |
| + | ** Relatively Large target | ||
| + | * Common Navy plane construction: | ||
| + | ** Poor offensive armament: [[Type 97 navy (7.7 mm)|7.7 mm Type 97 MG]] | ||
| + | ** Poor defensive armament: [[Type 92 (7.7 mm)|7.7 mm Type 92 MG]] | ||
| + | ** Fragile, little armour, and no self-sealing fuel tanks | ||
| + | ** Exposed tail gunner | ||
| + | * '''B6N''' Specific: | ||
| + | ** Dead zones directly behind the aircraft, you are better off turn fighting and using your turrets while they struggle to complete the turn | ||
| + | * '''{{PAGENAME}}''' Specific: | ||
| + | ** Single 7.7 mm in the left wing | ||
== History == | == History == | ||
<!-- ''Describe the history of the creation and combat usage of the aircraft in more detail than in the introduction. If the historical reference turns out to be too long, take it to a separate article, taking a link to the article about the vehicle and adding a block "/History" (example: <nowiki>https://wiki.warthunder.com/(Vehicle-name)/History</nowiki>) and add a link to it here using the <code>main</code> template. Be sure to reference text and sources by using <code><nowiki><ref></ref></nowiki></code>, as well as adding them at the end of the article with <code><nowiki><references /></nowiki></code>. This section may also include the vehicle's dev blog entry (if applicable) and the in-game encyclopedia description (under <code><nowiki>=== In-game description ===</nowiki></code>, also if applicable).'' --> | <!-- ''Describe the history of the creation and combat usage of the aircraft in more detail than in the introduction. If the historical reference turns out to be too long, take it to a separate article, taking a link to the article about the vehicle and adding a block "/History" (example: <nowiki>https://wiki.warthunder.com/(Vehicle-name)/History</nowiki>) and add a link to it here using the <code>main</code> template. Be sure to reference text and sources by using <code><nowiki><ref></ref></nowiki></code>, as well as adding them at the end of the article with <code><nowiki><references /></nowiki></code>. This section may also include the vehicle's dev blog entry (if applicable) and the in-game encyclopedia description (under <code><nowiki>=== In-game description ===</nowiki></code>, also if applicable).'' --> | ||
| + | {{main|B6N (Family)#History|l1=History of the B6N}} | ||
| + | |||
An excellent replacement for the Nakajima B5N in the role of on-board torpedo aircraft, the B6N Tenzan entered service very late, after more than two years of testing. Named JILL in the Allied code, this large single-engine plane appeared as a prototype in spring 1941. The first tests revealed serious steering stability problems. Subsequently, there were difficulties in developing the engine and the need to reinforce the landing gear. After 133 units of the first version of the B6N1 were built, the second production model began to be delivered towards the end of 1943. A total of 1,268 units were built. | An excellent replacement for the Nakajima B5N in the role of on-board torpedo aircraft, the B6N Tenzan entered service very late, after more than two years of testing. Named JILL in the Allied code, this large single-engine plane appeared as a prototype in spring 1941. The first tests revealed serious steering stability problems. Subsequently, there were difficulties in developing the engine and the need to reinforce the landing gear. After 133 units of the first version of the B6N1 were built, the second production model began to be delivered towards the end of 1943. A total of 1,268 units were built. | ||
| + | |||
| + | The B6N1 was the first stage of the B6N series, and was fitted with a Nakajima NK7A Mamoru engine in favor by Nakajima instead of the more readily and proved Mitsubishi Kasei engine the Navy suggested. | ||
| + | |||
| + | After 2 prototypes of the B6N1, 133 B6N1s were manufactured and immediately issued to the last remaining aircraft carrier groups such as on the Japanese carrier Zuikaku. | ||
| + | |||
| + | Due the slow and costy production of the NK7A engine, the B6N1 was halted in production in favor of the [[B6N2 Model 12|B6N2]] with Mitsubishi MK4T Kasei 25 engine. | ||
== Media == | == Media == | ||
| − | <!-- ''Excellent additions to the article would be video guides, screenshots from the game, and photos.'' -->[ | + | <!-- ''Excellent additions to the article would be video guides, screenshots from the game, and photos.'' --> |
| + | |||
| + | ;Skins | ||
| + | * [https://live.warthunder.com/feed/camouflages/?vehicle=b6n1 Skins and camouflages for the {{PAGENAME}} from live.warthunder.com.] | ||
== See also == | == See also == | ||
| Line 204: | Line 219: | ||
* ''reference to the series of the aircraft;'' | * ''reference to the series of the aircraft;'' | ||
* ''links to approximate analogues of other nations and research trees.'' --> | * ''links to approximate analogues of other nations and research trees.'' --> | ||
| + | [[File:B6N1 fighting P-26.png|thumb|right|The B6N1 using its turrets to damage the Peashooter]] | ||
| + | ;Related Development | ||
| + | {{main|B6N (Family)}} | ||
| − | + | * [[B5N2|B5N]] <small>- (predecessor)</small> | |
| − | + | * [[B6N1 Model 11|B6N1 mod. 11]] <small>- (base model)</small> | |
| − | * [[B6N2 Model 12]] | + | * [[B6N2 Model 12|B6N2 mod. 12]] <small>- (main production model)</small> |
| − | * [[B6N2a Model 12Ko]] | + | * [[B6N2a Model 12Ko|B6N2a mod. 12A]] <small>- (revised tail armament)</small> |
| − | ;Similar aircraft of comparable role, | + | ;Similar aircraft of comparable role, configuration and era |
| + | {{main|:Category:Torpedo_bombers|l1=Torpedo bombers}} | ||
| − | * [[ | + | * [[B5N2]] |
| − | * [[ | + | * [[TBD-1]] |
| − | * [[ | + | * [[TBF-1C]] |
== External links == | == External links == | ||
<!-- ''Paste links to sources and external resources, such as:'' | <!-- ''Paste links to sources and external resources, such as:'' | ||
* ''topic on the official game forum;'' | * ''topic on the official game forum;'' | ||
| − | |||
* ''other literature.'' --> | * ''other literature.'' --> | ||
* [https://forum.warthunder.com/index.php?/topic/421216-nakajima-b6n-tenzan-improved-torpedo-bomber/&ct=1594313939 <nowiki>[Forum]</nowiki> Nakajima B6N Tenzan: Improved Torpedo Bomber] | * [https://forum.warthunder.com/index.php?/topic/421216-nakajima-b6n-tenzan-improved-torpedo-bomber/&ct=1594313939 <nowiki>[Forum]</nowiki> Nakajima B6N Tenzan: Improved Torpedo Bomber] | ||
| + | * [https://forum.warthunder.com/index.php?/topic/488113-b6n1/ Official data sheet - more details about the performance] | ||
{{AirManufacturer Nakajima}} | {{AirManufacturer Nakajima}} | ||
{{Japan bombers}} | {{Japan bombers}} | ||
Latest revision as of 09:51, 12 April 2024
| This page is about the Japanese bomber B6N1 Model 11. For other versions, see B6N (Family). |


Contents
Description
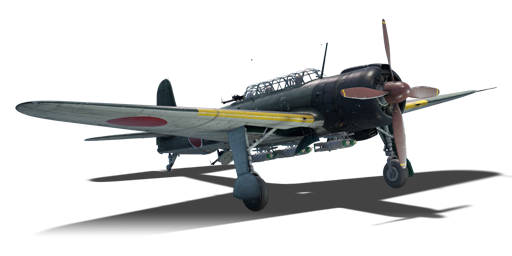
The B6N1 mod. 11, designated as Tenzan 11 (天山一一型), was a carrier-based torpedo bomber developed by the Imperial Japanese Navy during World War II. It was intended to replace the B5N, but faced several delays due to engine problems and stability issues. The first prototype flew in March 1941, but the production did not enter service until August 1943. The B6N1 was powered by the Nakajima Mamoru 11 engine and could carry up to 800 kg of bombs or 1,800 kg of torpedoes. It had a top speed of 481 km/h and a range of over 3,000 km. It was armed with two 7.7 mm machine guns, one in the dorsal turret and one in the ventral position. It was used in various operations, such as the Battle of the Philippine Sea and the Battle of Leyte Gulf, but it could not fully demonstrate its potential due to the lack of experienced pilots and the air superiority of the US Navy.
It was introduced in Update "Starfighters". As the successor of the B5N2, it offers a longer range and better speed, but it still performs the same role with the same total tonnage of ordnance, carrying a single 800 kg bomb or torpedo, two 250 kg bombs or a rack holding six 60 kg bombs. It had an additional rear machine gun in a ventral position compared to the B5N, making it less vulnerable to attacks coming from below, but with the machine guns only being Type 92 (7.7 mm) LMGs, they do not cause any significant damage and are effectively only a deterrent with the off-chance of damaging enemy chasers' engines or hitting their cockpit. One unusual feature about the early production Tenzan as a torpedo bomber was the mounting of a single 7.7 mm offensive machine gun in the left wing, intended as an attempt to suppress naval targets' AA batteries. It can be used to fire enough bullets into a plane to shoot it down by utilizing the excellent manoeuvrability.
- Nicknames
- Official Designation: 天山 (Tenzan, "Heavenly Mountain")
- Allied reporting name: Jill
General info
Flight performance

Great rudder responsiveness, good roll rate, and surprisingly good energy retention! The B6N1 Model 11 is capable of turnfighting with its humble frontal machine gun, and if they get on your 6, your turrets will offer some protection.
| Characteristics | Max Speed (km/h at 4,800 m) |
Max altitude (metres) |
Turn time (seconds) |
Rate of climb (metres/second) |
Take-off run (metres) | |||
|---|---|---|---|---|---|---|---|---|
| AB | RB | AB | RB | AB | RB | |||
| Stock | 445 | 428 | 9400 | 21.4 | 22.3 | 7.7 | 7.7 | 270 |
| Upgraded | 484 | 464 | 20.8 | 21.0 | 15.3 | 11.1 | ||
Details
| Features | ||||
|---|---|---|---|---|
| Combat flaps | Take-off flaps | Landing flaps | Air brakes | Arrestor gear |
| ✓ | ✓ | ✓ | X | ✓ |
| Limits | ||||||
|---|---|---|---|---|---|---|
| Wings (km/h) | Gear (km/h) | Flaps (km/h) | Max Static G | |||
| Combat | Take-off | Landing | + | - | ||
| 650 | 310 | 368 | 354 | 280 | ~11 | ~3 |
| Optimal velocities (km/h) | |||
|---|---|---|---|
| Ailerons | Rudder | Elevators | Radiator |
| < 300 | < 300 | < 310 | > 300 |

Survivability and armour
- No armour
- Non-self sealing fuel tanks (3 in each wing)
Modifications and economy
| Flight performance | Survivability | Weaponry | ||||||||||||||||||||||||
|---|---|---|---|---|---|---|---|---|---|---|---|---|---|---|---|---|---|---|---|---|---|---|---|---|---|---|
|
|
|
Armaments
Offensive armament
The B6N1 Model 11 is armed with:
- 1 x 7.7 mm Type 97 navy machine gun, wing-mounted (400 rpg)

Choose your rounds wisely. The Stealth belt is a great pick because it has two incendiary bullets, and lots of armour-piercing rounds. Universal is a great pick if you need a tracer or two to guide your shots. Don't use the Tracers belt, it won't do much. Default isn't really good, the ball bullets hinder performance.
Suspended armament
The B6N1 Model 11 can be outfitted with the following ordnance:
- 6 x 60 kg Navy Type 97 Number 6 bombs (360 kg total)
- 2 x 250 kg Navy Type Number 25 Model 2 bombs (500 kg total)
- 1 x 800 kg Navy Type Number 80 Model 1 bomb (800 kg total)
- 1 x 835 kg Type 91 Model 2 torpedo
- 1 x 850 kg Type 91 Model 3 torpedo
The 800 kg bomb will destroy 1 base, it's a good pick for maps with few ground targets! The 250 kg bombs are great for destroying pillboxes and tanks, but you can only have two of them. Make sure to use a slight dive when bombing and use the bombsight for increased accuracy! The 6 x 60 kg bombs are a great option for this plane. Since they weigh so little, you can be super accurate with these bombs, just aim the crosshair where you want the bomb to drop, and pull up. No need for a bomb sight!!! Use these bombs for light targets such as AAA, Vehicles, Armoured Cars, Artillery, Howitzers, Machine Guns, and Bridges. The torpedoes are not really useful for this plane in air battles, as ships only spawn in pacific maps, and this plane is at too low of a BR to be put in a Pacific Theater battle.

Defensive armament
The B6N1 Model 11 is defended by:
- 1 x 7.7 mm Type 92 machine gun, dorsal turret (679 rpg)
- 1 x 7.7 mm Type 92 machine gun, ventral turret (679 rpg)
The Type 92 turrets are absolutely horrible at dealing with higher BR planes, but it works wonders on biplanes. You will often face certain biplanes at this BR, and since they are slow, you can often get good shots on them. Use the Default belt and shoot into the engine to start an inextinguishable engine fire. This works quite often with the Default belt. The AP-T round is a good pick if you aren't a good gunner, because the extra tracers will scare the enemy off. Most biplanes don't want to get too close when they see a wave of tracers appear from your turrets.

Usage in battles
This plane is great for bombing medium tanks, light pillboxes, howitzers, and vehicles. Since it is so fast, it can make multiple trips to the airfield if a resupply of bombs is needed.
For naval maps and naval gamemode it's best advised to bring the torpedo and hit ships in a quick, close, hit and run style torpedo run, the engine allows for high speeds and Japanese torpedoes are among the highest speed resistant torpedoes in-game at the cost of range of only 2 km. It is also a possibility of squading up with friends / other torpedo carrying planes to dispose of the enemy carriers / battleships in a multiple hit torpedo strike.
Your frontal machine gun is your biggest asset. Unlike the B5N2 or other B6Ns, the B6N1 carries a frontal machine gun that can destroy light AAA trucks or Armoured cars. Or even enemy planes in uptiers, as the B6N has an amazing turn rate for a monoplane, but will have issues trying to out-turn biplanes.
Manual Engine Control
| MEC elements | ||||||
|---|---|---|---|---|---|---|
| Mixer | Pitch | Radiator | Supercharger | Turbocharger | ||
| Oil | Water | Type | ||||
| Controllable | Controllable Not auto controlled |
Controllable Not auto controlled |
Controllable Not auto controlled |
Separate | Controllable 2 gears |
Not controllable |
Pros and cons

Pros:
- B6N for Carrier-based torpedo bomber
- Bomber spawn
- 1x Type 91 Aerial Torpedo
- Torpedo has the highest drop speed in the game at 580 km/h and is one of the most feared torpedoes in Naval Battles
- 6x Type 97 No.6 Land Bomb (60kg)
- Gets a bomb rack of 6 x 60 kg bombs which can be used to hit multiple targets
- 1x No.80 Land Bomb (800kg)
- Heaviest bomb Japanese Navy can offer
- Common Navy plane construction:
- Excellent manoeuvrability
- B6N Specific:
- Great engine power, produces 1660 hp
- High top speed for a torpedo bomber (464 km/h)
- Ventral gunner
- Model 11 Specific:
- Has offensive capabilities
Cons:
- B6N for Carrier-based torpedo bomber
- No airbrakes
- Relatively Large target
- Common Navy plane construction:
- Poor offensive armament: 7.7 mm Type 97 MG
- Poor defensive armament: 7.7 mm Type 92 MG
- Fragile, little armour, and no self-sealing fuel tanks
- Exposed tail gunner
- B6N Specific:
- Dead zones directly behind the aircraft, you are better off turn fighting and using your turrets while they struggle to complete the turn
- B6N1 Model 11 Specific:
- Single 7.7 mm in the left wing
History
An excellent replacement for the Nakajima B5N in the role of on-board torpedo aircraft, the B6N Tenzan entered service very late, after more than two years of testing. Named JILL in the Allied code, this large single-engine plane appeared as a prototype in spring 1941. The first tests revealed serious steering stability problems. Subsequently, there were difficulties in developing the engine and the need to reinforce the landing gear. After 133 units of the first version of the B6N1 were built, the second production model began to be delivered towards the end of 1943. A total of 1,268 units were built.
The B6N1 was the first stage of the B6N series, and was fitted with a Nakajima NK7A Mamoru engine in favor by Nakajima instead of the more readily and proved Mitsubishi Kasei engine the Navy suggested.
After 2 prototypes of the B6N1, 133 B6N1s were manufactured and immediately issued to the last remaining aircraft carrier groups such as on the Japanese carrier Zuikaku.
Due the slow and costy production of the NK7A engine, the B6N1 was halted in production in favor of the B6N2 with Mitsubishi MK4T Kasei 25 engine.
Media
- Skins
See also

- Related Development
- B5N - (predecessor)
- B6N1 mod. 11 - (base model)
- B6N2 mod. 12 - (main production model)
- B6N2a mod. 12A - (revised tail armament)
- Similar aircraft of comparable role, configuration and era
External links
- [Forum] Nakajima B6N Tenzan: Improved Torpedo Bomber
- Official data sheet - more details about the performance
| Nakajima Aircraft Company (中島飛行機株式会社 ) | |
|---|---|
| Fighters | Ki-27 otsu · Ki-27 otsu Tachiarai |
| Ki-43-I · Ki-43-II · Ki-43-III otsu | |
| Ki-44-I · Ki-44-I 34 · Ki-44-II otsu · Ki-44-II hei | |
| Ki-84 ko · Ki-84 otsu · Ki-84 hei | |
| Ki-87 | |
| Hydroplanes | A6M2-N* |
| Interceptors | J1N1 · J5N1 |
| Bombers | B5N2 |
| B6N1 Model 11 · B6N2 Model 12 · B6N2a Model 12Ko | |
| G5N1 · G8N1 | |
| Ki-49-I · Ki-49-IIa · Ki-49-IIb · Ki-49-IIb/L | |
| Recon | E8N2 |
| Jet Fighters | Kikka |
| Captured | ␗Ki-27 otsu · ▃Ki-43-II · ␗Ki-43-III ko · ␗Ki-44-II hei · ␗Ki-84 ko |
| *Refit of the Mitsubishi A6M2 mod. 11 | |
| See also | Fuji Heavy Industries (1957-2017) |
| Japan bombers | |
|---|---|
| Navy | |
| Carrier-based attack bomber | |
| B5N | B5N2 |
| B6N | B6N1 · B6N2 · B6N2a |
| B7A | B7A2 · B7A2 (Homare 23) |
| Carrier-based dive bomber | |
| D3A | D3A1 |
| D4Y | D4Y1 · D4Y2 · D4Y3 Ko |
| Shipboard Observation seaplane | |
| F1M | F1M2 |
| Land-based Attack bomber | |
| G4M | G4M1 |
| G5N | G5N1 |
| G8N | G8N1 |
| Flying boat | |
| H6K | H6K4 |
| H8K | H8K2 · H8K3 |
| Land-based Bomber | |
| P1Y | P1Y1 |
| Army | |
| Light | Ki-32 |
| Ki-48-II otsu | |
| Heavy | Ki-21-Ia · Ki-21-I hei |
| Ki-49-I · Ki-49-IIa · Ki-49-IIb · Ki-49-IIb/L | |
| Ki-67-I Ko · Ki-67-I otsu | |
| Other countries | ▅B-17E |
