Difference between revisions of "B-34"
(Updated as of 1.89.1.185) |
(Edits) |
||
| (9 intermediate revisions by 6 users not shown) | |||
| Line 9: | Line 9: | ||
<!-- ''In the description, the first part should be about the history of and the creation and combat usage of the aircraft, as well as its key features. In the second part, tell the reader about the aircraft in the game. Insert a screenshot of the vehicle, so that if the novice player does not remember the vehicle by name, he will immediately understand what kind of vehicle the article is talking about.'' --> | <!-- ''In the description, the first part should be about the history of and the creation and combat usage of the aircraft, as well as its key features. In the second part, tell the reader about the aircraft in the game. Insert a screenshot of the vehicle, so that if the novice player does not remember the vehicle by name, he will immediately understand what kind of vehicle the article is talking about.'' --> | ||
[[File:GarageImage_{{PAGENAME}}.jpg|420px|thumb|left]] | [[File:GarageImage_{{PAGENAME}}.jpg|420px|thumb|left]] | ||
| − | {{ | + | {{Break}} |
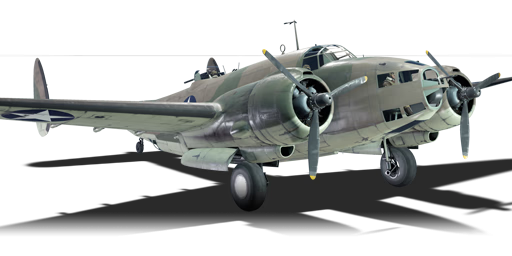
The '''{{Specs|name}}''' is a rank {{Specs|rank}} American bomber {{Battle-rating}}. It was introduced in [[Update 1.65 "Way of the Samurai"]]. | The '''{{Specs|name}}''' is a rank {{Specs|rank}} American bomber {{Battle-rating}}. It was introduced in [[Update 1.65 "Way of the Samurai"]]. | ||
| − | The B-34 is a typical American bomber in the sense that its decent payload is outdone by its defensive armament. While its maximum payload and the ability to carry a torpedo is nice, it's not necessarily as good as its ability to take and give out damage to other aircraft. Start with base/pillbox bombing, and should an enemy fighter come to engage, give him hell with your turrets. Do slight | + | The B-34 is a typical American bomber in the sense that its decent payload is outdone by its defensive armament. While its maximum payload and the ability to carry a torpedo is nice, it's not necessarily as good as its ability to take and give out damage to other aircraft. Start with base/pillbox bombing, and should an enemy fighter come to engage, give him hell with your turrets. Do slight ''maneuver''s constantly to throw off his shots while trying to put as many shells into his engine/pilot as possible. With any luck he will fall out of the sky in no time. |
== General info == | == General info == | ||
=== Flight performance === | === Flight performance === | ||
| − | ''Describe how the aircraft behaves in the air. Speed, manoeuvrability, acceleration and allowable loads - these are the most important characteristics of the vehicle.'' | + | <!-- ''Describe how the aircraft behaves in the air. Speed, manoeuvrability, acceleration and allowable loads - these are the most important characteristics of the vehicle.'' --> |
| − | {| class="wikitable" style="text-align:center" | + | While flying the B-34 you can expect maneuverability and speed like few other bombers. Considering you are just a [[:Category:Second rank aircraft|Rank II]] aircraft you have a good acceleration and max speed, which will allow you to get out of difficult situations, even being able to outrun some lower BR fighters, although never forget to use your turrets to shake enemies off your tail. |
| − | + | ||
| − | + | Your speed and climb ratio will be superior to most enemy bombers you face, therefore making it an easy task to intercept them. Although try to always keep it under 4500m as your engines aren´t meant for high altitudes, and you will become a big and sluggish target for any fighter around. As a last defensive maneuver in this bomber it is possible to trade some altitude for speed in order to escape from a threat, however keep it at a max speed of 610 km/h IAS since going faster than that will completely lock your surface controls and eventually get you killed. | |
| − | + | ||
| − | ! | + | Given its surprising turn rate and speed for a bomber, mixed with a good offensive power, when used wisely you can successfully intercept enemy aircrafts that aren't yet aware of your position, as well as support your allies if you see an enemy tunnel vision-ed on them, however don't fool yourself into a dogfight since every fighter will outturn you sooner than later. |
| − | + | ||
| + | {| class="wikitable" style="text-align:center" width="70%" | ||
| + | ! rowspan="2" | Characteristics | ||
! colspan="2" | Max Speed<br>(km/h at 4,572 m) | ! colspan="2" | Max Speed<br>(km/h at 4,572 m) | ||
| − | ! rowspan="2" | Max altitude<br>( | + | ! rowspan="2" | Max altitude<br>(metres) |
! colspan="2" | Turn time<br>(seconds) | ! colspan="2" | Turn time<br>(seconds) | ||
| − | ! colspan="2" | Rate of climb<br>( | + | ! colspan="2" | Rate of climb<br>(metres/second) |
| − | ! rowspan="2" | Take-off run<br>( | + | ! rowspan="2" | Take-off run<br>(metres) |
|- | |- | ||
! AB !! RB !! AB !! RB !! AB !! RB | ! AB !! RB !! AB !! RB !! AB !! RB | ||
|- | |- | ||
| − | | | + | ! Stock |
| − | + | | 509 || 496 || rowspan="2" | {{Specs|ceiling}} || 28.3 || 29.3 || 8.5 || 8.5 || rowspan="2" | 480 | |
| − | |||
|- | |- | ||
| − | ! | + | ! Upgraded |
| − | + | | 572 || 539 || 25.8 || 27.0 || 16.7 || 12.0 | |
| − | |||
| − | |||
| − | |||
| − | |||
| − | |||
| − | |||
| − | |||
|- | |- | ||
|} | |} | ||
==== Details ==== | ==== Details ==== | ||
| − | {| class="wikitable" style="text-align:center" | + | {| class="wikitable" style="text-align:center" width="50%" |
|- | |- | ||
! colspan="5" | Features | ! colspan="5" | Features | ||
| Line 59: | Line 53: | ||
|} | |} | ||
| − | {| class="wikitable" style="text-align:center" | + | {| class="wikitable" style="text-align:center" width="50%" |
|- | |- | ||
| − | ! colspan=" | + | ! colspan="7" | Limits |
|- | |- | ||
| − | ! rowspan="2" | | + | ! rowspan="2" | Wings (km/h) |
| − | ! rowspan="2" | Gear | + | ! rowspan="2" | Gear (km/h) |
| − | ! | + | ! colspan="3" | Flaps (km/h) |
! colspan="2" | Max Static G | ! colspan="2" | Max Static G | ||
|- | |- | ||
| − | ! + !! - | + | ! Combat !! Take-off !! Landing !! + !! - |
|- | |- | ||
| − | | {{Specs|destruction| | + | | {{Specs|destruction|body}} || {{Specs|destruction|gear}} || 340 || 340 || 235 || ~6 || ~3 |
|- | |- | ||
|} | |} | ||
| Line 76: | Line 70: | ||
{| class="wikitable" style="text-align:center" | {| class="wikitable" style="text-align:center" | ||
|- | |- | ||
| − | ! colspan="4" | Optimal velocities | + | ! colspan="4" | Optimal velocities (km/h) |
|- | |- | ||
| − | ! Ailerons | + | ! Ailerons !! Rudder !! Elevators !! Radiator |
| − | ! Rudder | ||
| − | ! Elevators | ||
| − | ! Radiator | ||
|- | |- | ||
| < 260 || < 290 || < 320 || > 337 | | < 260 || < 290 || < 320 || > 337 | ||
| Line 111: | Line 102: | ||
=== Survivability and armour === | === Survivability and armour === | ||
<!-- ''Examine the survivability of the aircraft. Note how vulnerable the structure is and how secure the pilot is, whether the fuel tanks are armoured, etc. Describe the armour, if there is any, and also mention the vulnerability of other critical aircraft systems.'' --> | <!-- ''Examine the survivability of the aircraft. Note how vulnerable the structure is and how secure the pilot is, whether the fuel tanks are armoured, etc. Describe the armour, if there is any, and also mention the vulnerability of other critical aircraft systems.'' --> | ||
| + | |||
* 12 mm steel - in front of pilot | * 12 mm steel - in front of pilot | ||
* 12 mm steel - behind pilot | * 12 mm steel - behind pilot | ||
| Line 120: | Line 112: | ||
=== Offensive armament === | === Offensive armament === | ||
<!-- ''Describe the offensive armament of the aircraft, if any. Describe how effective the cannons and machine guns are in a battle, and also what belts or drums are better to use. If there is no offensive weaponry, delete this subsection.'' --> | <!-- ''Describe the offensive armament of the aircraft, if any. Describe how effective the cannons and machine guns are in a battle, and also what belts or drums are better to use. If there is no offensive weaponry, delete this subsection.'' --> | ||
| − | {{main|Browning | + | {{main|M2 Browning (12.7 mm)|Browning (7.62 mm)}} |
The '''''{{PAGENAME}}''''' is armed with: | The '''''{{PAGENAME}}''''' is armed with: | ||
| − | * 2 x 12.7 mm Browning | + | |
| + | * 2 x 12.7 mm M2 Browning machine guns, nose-mounted (250 rpg = 500 total) | ||
* 2 x 7.62 mm Browning machine guns, nose-mounted (375 rpg = 750 total) | * 2 x 7.62 mm Browning machine guns, nose-mounted (375 rpg = 750 total) | ||
=== Suspended armament === | === Suspended armament === | ||
<!-- ''Describe the aircraft's suspended armament: additional cannons under the wings, bombs, rockets and torpedoes. This section is especially important for bombers and attackers. If there is no suspended weaponry remove this subsection.'' --> | <!-- ''Describe the aircraft's suspended armament: additional cannons under the wings, bombs, rockets and torpedoes. This section is especially important for bombers and attackers. If there is no suspended weaponry remove this subsection.'' --> | ||
| − | {{main|AN-M57 (250 lb)|AN-M64A1 (500 lb)|Mk.13 | + | {{main|AN-M57 (250 lb)|AN-M64A1 (500 lb)|Mk.13-1 Case (1,927 lb)}} |
The '''''{{PAGENAME}}''''' can be outfitted with the following ordnance: | The '''''{{PAGENAME}}''''' can be outfitted with the following ordnance: | ||
| + | |||
* 7 x 250 lb AN-M57 bombs (1,750 lb total) | * 7 x 250 lb AN-M57 bombs (1,750 lb total) | ||
* 3 x 500 lb AN-M64A1 bombs + 4 x 250 lb AN-M57 bombs (2,500 lb total) | * 3 x 500 lb AN-M64A1 bombs + 4 x 250 lb AN-M57 bombs (2,500 lb total) | ||
| − | * 1 x Mk.13 | + | * 1 x 1,927 lb Mk.13-1 Case torpedo |
=== Defensive armament === | === Defensive armament === | ||
<!-- ''Defensive armament with turret machine guns or cannons, crewed by gunners. Examine the number of gunners and what belts or drums are better to use. If defensive weaponry is not available, remove this subsection.'' --> | <!-- ''Defensive armament with turret machine guns or cannons, crewed by gunners. Examine the number of gunners and what belts or drums are better to use. If defensive weaponry is not available, remove this subsection.'' --> | ||
| − | {{main|Browning | + | {{main|M2 Browning (12.7 mm)|Browning (7.62 mm)}} |
The '''''{{PAGENAME}}''''' is defended by: | The '''''{{PAGENAME}}''''' is defended by: | ||
| − | * 2 x 12.7 mm Browning | + | |
| + | * 2 x 12.7 mm M2 Browning machine guns, dorsal turret (400 rpg = 800 total) | ||
* 2 x 7.62 mm Browning machine guns, ventral turret (1,000 rpg = 2,000 total) | * 2 x 7.62 mm Browning machine guns, ventral turret (1,000 rpg = 2,000 total) | ||
== Usage in battles == | == Usage in battles == | ||
| − | ''Describe the tactics of playing in | + | <!-- ''Describe the tactics of playing in the aircraft, the features of using aircraft in a team and advice on tactics. Refrain from creating a "guide" - do not impose a single point of view, but instead, give the reader food for thought. Examine the most dangerous enemies and give recommendations on fighting them. If necessary, note the specifics of the game in different modes (AB, RB, SB).'' --> |
| + | |||
| + | In the hands of an experienced player, the B-34 can be one of, if not the deadliest aircraft of its tier. While being in the bomber line of the tech tree, the B-34 is better suited for use as a frontine bomber, bomber interceptor, and even a heavy fighter in some situations. If played in a bombing role, try to get in low and entice enemy fighters into chasing you while you go for your bombing targets; your powerful 12.7 mm turret will make quick work of most enemy's you'll encounter at its tier. If played as a bomber interceptor, aiming for crucial parts of the target's aircraft (Engine, wings, cockpit, Etc.) with your robust offensive armament will take down enemy bombers quickly and efficiently. Using the B-34 in a heavy fighter role will require the use of your flaps, so make sure to use them when appropriate; as the B-34 has poor energy retention. Head-on's with enemy fighters are ill-advised, as your pilot is quite susceptible to frontal enemy fire as well as your engines that will take damage quite easily. | ||
| + | |||
| + | Your deadliest enemies will be aircraft with heavy machine gun or cannon armament (P-400, LaGG-3-8, Spitfire Mk IIb, Etc.) It is advised to get familiar with using the 12.7 mm dorsal turret while doing evasive maneuvers using flaps for dealing with them quickly before they can do major damage to your aircraft. If they dive on you and fly in front of you for a bit, try to damage them with your frontal armament. Do not let anyone get under your belly, as it is a huge weak spot that knowledgeable players will exploit. In the hands of a skilled pilot, however, you will have no problem going for engine shutdowns or pilot snipes that will quickly send your foes back to the hangar. | ||
=== Manual Engine Control === | === Manual Engine Control === | ||
| Line 208: | Line 207: | ||
'''Pros:''' | '''Pros:''' | ||
| + | |||
* Reasonably effective armament consisting of 2 x 7.62 mm Brownings and 2 x 12.7 mm Brownings that are nose mounted | * Reasonably effective armament consisting of 2 x 7.62 mm Brownings and 2 x 12.7 mm Brownings that are nose mounted | ||
* Durable air frame for its BR | * Durable air frame for its BR | ||
| Line 217: | Line 217: | ||
'''Cons:''' | '''Cons:''' | ||
| + | |||
* The belly of the aircraft is a massive blind spot in the aircraft's defence | * The belly of the aircraft is a massive blind spot in the aircraft's defence | ||
* Poor climb rate and energy retention | * Poor climb rate and energy retention | ||
| Line 222: | Line 223: | ||
* Steel construction makes this plane particularly heavy, and a small payload limits this plane's ability to be used as a tactical or strategic bomber. | * Steel construction makes this plane particularly heavy, and a small payload limits this plane's ability to be used as a tactical or strategic bomber. | ||
* The elevator can be shot off by an enemy plane easily. This can cause it to become uncontrollable in certain situations. However, it can still be controlled by operating flaps or adjusting engine power. | * The elevator can be shot off by an enemy plane easily. This can cause it to become uncontrollable in certain situations. However, it can still be controlled by operating flaps or adjusting engine power. | ||
| − | * Poor | + | * Poor maneuverability |
== History == | == History == | ||
| Line 229: | Line 230: | ||
== Media == | == Media == | ||
| − | ''Excellent additions to the article would be video guides, screenshots from the game, and photos.'' | + | <!-- ''Excellent additions to the article would be video guides, screenshots from the game, and photos.'' --> |
| + | ;Images | ||
| + | [[File:Ventura LOC 8e01506u.jpg|none|232x232px]] | ||
| + | |||
| + | ;Videos | ||
| + | {{Youtube-gallery|fF2VBZIVaHQ|'''B-34 Ventura "Operation Christmas Tree Is Officially Dead!"''' - ''Bo Time Gaming''}} | ||
== See also == | == See also == | ||
| − | ''Links to the articles on the War Thunder Wiki that you think will be useful for the reader, for example:'' | + | <!-- ''Links to the articles on the War Thunder Wiki that you think will be useful for the reader, for example:'' |
* ''reference to the series of the aircraft;'' | * ''reference to the series of the aircraft;'' | ||
| − | * ''links to approximate analogues of other nations and research trees.'' | + | * ''links to approximate analogues of other nations and research trees.'' --> |
| + | |||
| + | '''Related development''' | ||
| + | |||
| + | * Other Lockheed Ventura variants on the game: | ||
| + | ** [[PV-2D]] Major redesign with increased load capacity | ||
== External links == | == External links == | ||
| − | ''Paste links to sources and external resources, such as:'' | + | <!-- ''Paste links to sources and external resources, such as:'' |
* ''topic on the official game forum;'' | * ''topic on the official game forum;'' | ||
* ''encyclopedia page on the aircraft;'' | * ''encyclopedia page on the aircraft;'' | ||
| − | * ''other literature.'' | + | * ''other literature.'' --> |
| + | |||
| + | * [[wikipedia:Lockheed_Ventura|[Wikipedia] Lockheed Ventura]] | ||
| + | * [https://www.airforce.gov.au/sites/default/files/minisite/static/7522/RAAFmuseum/research/aircraft/series2/A59.htm <nowiki>[RAAF Museum] TECHNICAL DATA: Lockheed-Vega Ventura</nowiki>] | ||
| + | * [https://www.pacificwrecks.com/aircraft/pv-1/tech.html <nowiki>[Pacific Wrecks] Lockheed PV-1 Ventura Technical Information</nowiki>] | ||
| + | {{AirManufacturer Lockheed}} | ||
{{USA bombers}} | {{USA bombers}} | ||
Revision as of 22:10, 27 September 2020
Contents
| This page is about the American bomber B-34. For the navalised gift version, see PV-2D. |
Description

The B-34 is a rank II American bomber
with a battle rating of 2.7 (AB/SB) and 3.3 (RB). It was introduced in Update 1.65 "Way of the Samurai".
The B-34 is a typical American bomber in the sense that its decent payload is outdone by its defensive armament. While its maximum payload and the ability to carry a torpedo is nice, it's not necessarily as good as its ability to take and give out damage to other aircraft. Start with base/pillbox bombing, and should an enemy fighter come to engage, give him hell with your turrets. Do slight maneuvers constantly to throw off his shots while trying to put as many shells into his engine/pilot as possible. With any luck he will fall out of the sky in no time.
General info
Flight performance
While flying the B-34 you can expect maneuverability and speed like few other bombers. Considering you are just a Rank II aircraft you have a good acceleration and max speed, which will allow you to get out of difficult situations, even being able to outrun some lower BR fighters, although never forget to use your turrets to shake enemies off your tail.
Your speed and climb ratio will be superior to most enemy bombers you face, therefore making it an easy task to intercept them. Although try to always keep it under 4500m as your engines aren´t meant for high altitudes, and you will become a big and sluggish target for any fighter around. As a last defensive maneuver in this bomber it is possible to trade some altitude for speed in order to escape from a threat, however keep it at a max speed of 610 km/h IAS since going faster than that will completely lock your surface controls and eventually get you killed.
Given its surprising turn rate and speed for a bomber, mixed with a good offensive power, when used wisely you can successfully intercept enemy aircrafts that aren't yet aware of your position, as well as support your allies if you see an enemy tunnel vision-ed on them, however don't fool yourself into a dogfight since every fighter will outturn you sooner than later.
| Characteristics | Max Speed (km/h at 4,572 m) |
Max altitude (metres) |
Turn time (seconds) |
Rate of climb (metres/second) |
Take-off run (metres) | |||
|---|---|---|---|---|---|---|---|---|
| AB | RB | AB | RB | AB | RB | |||
| Stock | 509 | 496 | 9500 | 28.3 | 29.3 | 8.5 | 8.5 | 480 |
| Upgraded | 572 | 539 | 25.8 | 27.0 | 16.7 | 12.0 | ||
Details
| Features | ||||
|---|---|---|---|---|
| Combat flaps | Take-off flaps | Landing flaps | Air brakes | Arrestor gear |
| ✓ | ✓ | ✓ | X | X |
| Limits | ||||||
|---|---|---|---|---|---|---|
| Wings (km/h) | Gear (km/h) | Flaps (km/h) | Max Static G | |||
| Combat | Take-off | Landing | + | - | ||
| 0 | 235 | 340 | 340 | 235 | ~6 | ~3 |
| Optimal velocities (km/h) | |||
|---|---|---|---|
| Ailerons | Rudder | Elevators | Radiator |
| < 260 | < 290 | < 320 | > 337 |
| Compressor (RB/SB) | ||
|---|---|---|
| Setting 1 | ||
| Optimal altitude | 100% Engine power | WEP Engine power |
| 1,615 m | 1,600 hp | 1,984 hp |
| Setting 2 | ||
| Optimal altitude | 100% Engine power | WEP Engine power |
| 4,023 m | 1,450 hp | 1,798 hp |
Survivability and armour
- 12 mm steel - in front of pilot
- 12 mm steel - behind pilot
- 12 mm steel - bulkhead behind cockpit
- 12 mm steel - tail bulkhead
- 20 mm steel - front of dorsal turret
Armaments
Offensive armament
The B-34 is armed with:
- 2 x 12.7 mm M2 Browning machine guns, nose-mounted (250 rpg = 500 total)
- 2 x 7.62 mm Browning machine guns, nose-mounted (375 rpg = 750 total)
Suspended armament
The B-34 can be outfitted with the following ordnance:
- 7 x 250 lb AN-M57 bombs (1,750 lb total)
- 3 x 500 lb AN-M64A1 bombs + 4 x 250 lb AN-M57 bombs (2,500 lb total)
- 1 x 1,927 lb Mk.13-1 Case torpedo
Defensive armament
The B-34 is defended by:
- 2 x 12.7 mm M2 Browning machine guns, dorsal turret (400 rpg = 800 total)
- 2 x 7.62 mm Browning machine guns, ventral turret (1,000 rpg = 2,000 total)
Usage in battles
In the hands of an experienced player, the B-34 can be one of, if not the deadliest aircraft of its tier. While being in the bomber line of the tech tree, the B-34 is better suited for use as a frontine bomber, bomber interceptor, and even a heavy fighter in some situations. If played in a bombing role, try to get in low and entice enemy fighters into chasing you while you go for your bombing targets; your powerful 12.7 mm turret will make quick work of most enemy's you'll encounter at its tier. If played as a bomber interceptor, aiming for crucial parts of the target's aircraft (Engine, wings, cockpit, Etc.) with your robust offensive armament will take down enemy bombers quickly and efficiently. Using the B-34 in a heavy fighter role will require the use of your flaps, so make sure to use them when appropriate; as the B-34 has poor energy retention. Head-on's with enemy fighters are ill-advised, as your pilot is quite susceptible to frontal enemy fire as well as your engines that will take damage quite easily.
Your deadliest enemies will be aircraft with heavy machine gun or cannon armament (P-400, LaGG-3-8, Spitfire Mk IIb, Etc.) It is advised to get familiar with using the 12.7 mm dorsal turret while doing evasive maneuvers using flaps for dealing with them quickly before they can do major damage to your aircraft. If they dive on you and fly in front of you for a bit, try to damage them with your frontal armament. Do not let anyone get under your belly, as it is a huge weak spot that knowledgeable players will exploit. In the hands of a skilled pilot, however, you will have no problem going for engine shutdowns or pilot snipes that will quickly send your foes back to the hangar.
Manual Engine Control
| MEC elements | ||||||
|---|---|---|---|---|---|---|
| Mixer | Pitch | Radiator | Supercharger | Turbocharger | ||
| Oil | Water | Type | ||||
| Controllable | Controllable Not auto controlled |
Controllable Not auto controlled |
Controllable Not auto controlled |
Separate | Controllable 2 gears |
Not controllable |
Modules
| Tier | Flight performance | Survivability | Weaponry | |||
|---|---|---|---|---|---|---|
| I | Fuselage repair | Radiator | Turret 7 mm | Offensive 7 mm | ||
| II | Compressor | Airframe | New 7 mm MGs (turret) | ITC mk.III | New 7 mm MGs | |
| III | Wings repair | Engine | Turret 12 mm | Offensive 12 mm | ||
| IV | Engine injection | Cover | New 12 mm MGs (turret) | SBC-17 | New 12 mm MGs | |
Pros and cons
Pros:
- Reasonably effective armament consisting of 2 x 7.62 mm Brownings and 2 x 12.7 mm Brownings that are nose mounted
- Durable air frame for its BR
- Reasonably effective defensive armament with good coverage on the rear section of the plane.
- The dorsal turret can swivel 360 degrees and even fire at targets the nose of the plane
- Can provide initial cover for other bombers until fighters reach their altitude.
- Blazing fast top speed compared to other medium bombers
- Reasonably large payload capacity.
Cons:
- The belly of the aircraft is a massive blind spot in the aircraft's defence
- Poor climb rate and energy retention
- For the most part, the offensive armament will only be useful in attacking enemy bombers, ground targets, or engaging fighters head-on, as the plane is too unmanoeuvrable for any real dog fighting of any kind.
- Steel construction makes this plane particularly heavy, and a small payload limits this plane's ability to be used as a tactical or strategic bomber.
- The elevator can be shot off by an enemy plane easily. This can cause it to become uncontrollable in certain situations. However, it can still be controlled by operating flaps or adjusting engine power.
- Poor maneuverability
History
In the beginning of the war, the British were looking for a medium-ranged anti-submarine warfare and patrol aircraft to support the existing Avro Anson. The Lockheed company sent a drawing of their model 144 civilian airliner. The British Purchasing Commission saw the design and asked Lockheed to make modifications to the model 14, also known as the Lockheed Super Electra. Modifications include two fixed forward-firing Browning 7.7 mm machine guns in the nose. There was also the installation of Boulton Paul dorsal gun turrets with two Browning machine guns. Some models had beam guns installed, other had different engines or propellers. They called it the Hudson, eventually it needed a replacement. So Lockheed made it bigger and heavier and introduced it as the B-34 Lexington. It went under the US Army as the B-34, and the Navy as the PV-2 Harpoon (V because Vega aircraft division of Lockheed made the Harpoon). In British service it was simply called the Lockheed Ventura.
Media
- Images
- Videos
See also
Related development
- Other Lockheed Ventura variants on the game:
- PV-2D Major redesign with increased load capacity
External links
- [Wikipedia] Lockheed Ventura
- [RAAF Museum] TECHNICAL DATA: Lockheed-Vega Ventura
- [Pacific Wrecks] Lockheed PV-1 Ventura Technical Information
| Lockheed Corporation | |
|---|---|
| Fighters | XP-38G · P-38E · P-38G-1 · P-38J-15 · Bong's P-38J-15 · P-38K · P-38L-5-LO · YP-38 |
| Bombers | B-34 · PV-2D |
| Jet Fighters | F-80A-5 · F-80C-10 |
| F-104A · F-104C | |
| Export / License | A-29 · ▄Hudson Mk V |
| ␗P-38L-1 | |
| ␗F-104A · ▀F-104G · ␗F-104G · ▅F-104J · ▄F-104S | |
| See Also | Mitsubishi Heavy Industries · Fiat Aviation |
| USA bombers | |
|---|---|
| Dive | SB2U-2 · SB2U-3 · SBD-3 · SB2C-1C · SB2C-4 |
| Torpedo | TBD-1 · PBY-5 Catalina · PBY-5A Catalina · TBF-1C · BTD-1 |
| Medium | B-10B · B-18A · B-34 · PV-2D · B-25J-1 · B-25J-20 · A-26C-45 · A-26C-45DT · B-26B |
| Heavy | B-17E · B-17E/L · B-17G-60-VE · PB4Y-2 · B-24D-25-CO · B-29A-BN |
| Hydroplanes | OS2U-1 · OS2U-3 · PBM-1 "Mariner" · PBM-3 "Mariner" |
