Difference between revisions of "B-25J-1"
Inceptor57 (talk | contribs) (Updated template w/ new design) |
(Updated as of 1.89.2.25) |
||
| Line 2: | Line 2: | ||
{{About | {{About | ||
| about = American medium bomber '''{{PAGENAME}}''' | | about = American medium bomber '''{{PAGENAME}}''' | ||
| − | | usage = | + | | usage = other versions |
| link = B-25 (Family) | | link = B-25 (Family) | ||
}} | }} | ||
== Description == | == Description == | ||
| − | <!--In the description, the first part should be about the history of and the creation and combat usage of the aircraft, as well as its key features. In the second part, tell the reader about the aircraft in the game. Insert a screenshot of the vehicle, so that if the novice player does not remember the vehicle by name, he will immediately understand what kind of vehicle the article is talking about.--> | + | <!-- ''In the description, the first part should be about the history of and the creation and combat usage of the aircraft, as well as its key features. In the second part, tell the reader about the aircraft in the game. Insert a screenshot of the vehicle, so that if the novice player does not remember the vehicle by name, he will immediately understand what kind of vehicle the article is talking about.'' --> |
| − | |||
[[File:GarageImage_{{PAGENAME}}.jpg|420px|thumb|left]] | [[File:GarageImage_{{PAGENAME}}.jpg|420px|thumb|left]] | ||
{{break}} | {{break}} | ||
| − | The '''{{Specs|name}}''' is a rank {{Specs|rank}} | + | The '''{{Specs|name}}''' is a rank {{Specs|rank}} American bomber {{Battle-rating}}. It was introduced in [[Update 1.29]]. |
| − | Simply put, the archetype of the medium bomber is the B-25. It has versatile payloads (4 x 500 lb or 3 x 1,000 lb). It is faster than heavy bombers which can achieve over 340 mph in a dive to attack ground targets and as a bonus has offensive armament that allows it to fulfil the role of an air superiority bomber. Defensive | + | Simply put, the archetype of the medium bomber is the B-25. It has versatile payloads (4 x 500 lb or 3 x 1,000 lb). It is faster than heavy bombers which can achieve over 340 mph in a dive to attack ground targets and as a bonus has offensive armament that allows it to fulfil the role of an air superiority bomber. Defensive gun placements include turrets & gunner stations. The B-25J sports heavy armament to include seven 12.7 mm Browning M2 machine guns. Also, this aircraft is durable, however, if the aircraft happens to sustain a direct hit to the fuel tank, there is a good chance of a fire followed by an explosion. |
When flown properly, the B-25 Mitchell is among the best medium bombers in the game, with one of the most potent defensive armaments at its tier. If you enjoy strafing ground targets with the B-25, then consider researching the [[PBJ-1H]] with 8 forward facing .50 cal Browning M2 machine guns and a 75 mm cannon or the [[PBJ-1J]] sporting an impressive 12 forward facing Browning M2 machine guns, both of which are Marine versions of the B-25 airframe and possess all the facets that make the B-25 Mitchell such a legendary aircraft. | When flown properly, the B-25 Mitchell is among the best medium bombers in the game, with one of the most potent defensive armaments at its tier. If you enjoy strafing ground targets with the B-25, then consider researching the [[PBJ-1H]] with 8 forward facing .50 cal Browning M2 machine guns and a 75 mm cannon or the [[PBJ-1J]] sporting an impressive 12 forward facing Browning M2 machine guns, both of which are Marine versions of the B-25 airframe and possess all the facets that make the B-25 Mitchell such a legendary aircraft. | ||
== General info == | == General info == | ||
| − | === Flight | + | === Flight performance === |
''Describe how the aircraft behaves in the air. Speed, manoeuvrability, acceleration and allowable loads - these are the most important characteristics of the vehicle.'' | ''Describe how the aircraft behaves in the air. Speed, manoeuvrability, acceleration and allowable loads - these are the most important characteristics of the vehicle.'' | ||
| Line 31: | Line 30: | ||
! colspan="2" | Turn time<br>(seconds) | ! colspan="2" | Turn time<br>(seconds) | ||
! colspan="2" | Rate of climb<br>(meters/second) | ! colspan="2" | Rate of climb<br>(meters/second) | ||
| − | ! rowspan="2" |Take-off run<br>(meters) | + | ! rowspan="2" | Take-off run<br>(meters) |
|- | |- | ||
| − | ! AB | + | ! AB !! RB !! AB !! RB !! AB !! RB |
| − | ! RB | ||
| − | ! AB | ||
| − | ! RB | ||
| − | ! AB | ||
| − | ! RB | ||
|- | |- | ||
| − | | | + | | 420 || 407 || {{Specs|ceiling}} || 32.4 || 33.8 || 5.4 || 5.3 || 750 |
|- | |- | ||
! colspan="8" | ''Upgraded'' | ! colspan="8" | ''Upgraded'' | ||
|- | |- | ||
! colspan="2" | Max Speed<br>(km/h at 3,049 m) | ! colspan="2" | Max Speed<br>(km/h at 3,049 m) | ||
| − | ! rowspan="2" |Max altitude (meters) | + | ! rowspan="2" | Max altitude<br>(meters) |
| − | ! colspan="2" | Turn time (seconds) | + | ! colspan="2" | Turn time<br>(seconds) |
! colspan="2" | Rate of climb<br>(meters/second) | ! colspan="2" | Rate of climb<br>(meters/second) | ||
| − | ! rowspan="2" |Take-off run (meters) | + | ! rowspan="2" | Take-off run<br>(meters) |
|- | |- | ||
| − | ! AB | + | ! AB !! RB !! AB !! RB !! AB !! RB |
| − | ! RB | ||
| − | ! AB | ||
| − | ! RB | ||
| − | ! AB | ||
| − | ! RB | ||
|- | |- | ||
| − | | 472 || 444 || | + | | 472 || 444 || {{Specs|ceiling}} || 29.7 || 31.0 || 10.6 || 7.7 || 750 |
|- | |- | ||
|} | |} | ||
| − | ====Details==== | + | ==== Details ==== |
{| class="wikitable" style="text-align:center" | {| class="wikitable" style="text-align:center" | ||
|- | |- | ||
! colspan="5" | Features | ! colspan="5" | Features | ||
|- | |- | ||
| − | ! Combat | + | ! Combat flaps !! Take-off flaps !! Landing flaps !! Air brakes !! Arrestor gear |
| − | ! Take-off | ||
| − | ! Landing | ||
| − | ! Air brakes | ||
| − | ! Arrestor gear | ||
|- | |- | ||
| ✓ || ✓ || ✓ || X || X <!-- ✓ --> | | ✓ || ✓ || ✓ || X || X <!-- ✓ --> | ||
| Line 82: | Line 67: | ||
! rowspan="2" | Wing-break speed<br>(km/h) | ! rowspan="2" | Wing-break speed<br>(km/h) | ||
! rowspan="2" | Gear limit<br>(km/h) | ! rowspan="2" | Gear limit<br>(km/h) | ||
| − | ! rowspan="2" | Combat | + | ! rowspan="2" | Combat flaps<br>(km/h) |
! colspan="2" | Max Static G | ! colspan="2" | Max Static G | ||
|- | |- | ||
| − | ! + | + | ! + !! - |
| − | ! - | ||
|- | |- | ||
| − | | | + | | {{Specs|destruction|constructions}} || {{Specs|destruction|chassis}} || 340 || ~6 || ~2 |
|- | |- | ||
|} | |} | ||
| Line 101: | Line 85: | ||
! Radiator<br>(km/h) | ! Radiator<br>(km/h) | ||
|- | |- | ||
| − | | < 300 || < 270 || < 350 || > | + | | < 300 || < 270 || < 350 || > 330 |
|- | |- | ||
|} | |} | ||
| Line 115: | Line 99: | ||
! WEP Engine power | ! WEP Engine power | ||
|- | |- | ||
| − | | 524 m || | + | | 524 m || 1,500 hp || 1,669 hp |
|- | |- | ||
| − | + | ! colspan="3" | Setting 2 | |
|- | |- | ||
! Optimal altitude | ! Optimal altitude | ||
| Line 123: | Line 107: | ||
! WEP Engine power | ! WEP Engine power | ||
|- | |- | ||
| − | | 3,700 m || | + | | 3,700 m || 1,350 hp || 1,502 hp |
|- | |- | ||
| − | |||
| − | |||
| − | |||
| − | |||
| − | |||
| − | |||
| − | |||
| − | |||
|} | |} | ||
=== Survivability and armour === | === Survivability and armour === | ||
| − | <!--Examine the survivability of the aircraft. Note how vulnerable the structure is and how secure the pilot is, whether the fuel tanks are armoured, etc. Describe the armour, if there is any, and also mention the vulnerability of other critical aircraft systems.--> | + | <!-- ''Examine the survivability of the aircraft. Note how vulnerable the structure is and how secure the pilot is, whether the fuel tanks are armoured, etc. Describe the armour, if there is any, and also mention the vulnerability of other critical aircraft systems.'' --> |
| − | |||
* 9.5 mm Steel plates throughout the cockpit | * 9.5 mm Steel plates throughout the cockpit | ||
* 8 mm Steel plate behind the pilot | * 8 mm Steel plate behind the pilot | ||
| Line 148: | Line 123: | ||
== Armaments == | == Armaments == | ||
=== Offensive armament === | === Offensive armament === | ||
| − | <!--Describe the offensive armament of the aircraft, if any. Describe how effective the cannons and machine guns are in a battle, and also what belts or drums are better to use. If there is no offensive weaponry, delete this subsection.--> | + | <!-- ''Describe the offensive armament of the aircraft, if any. Describe how effective the cannons and machine guns are in a battle, and also what belts or drums are better to use. If there is no offensive weaponry, delete this subsection.'' --> |
{{main|Browning M2 (12.7 mm)}} | {{main|Browning M2 (12.7 mm)}} | ||
The '''''{{PAGENAME}}''''' is armed with: | The '''''{{PAGENAME}}''''' is armed with: | ||
| − | + | * 1 x 12.7 mm Browning M2 machine gun, nose-mounted (400 rpg) | |
| − | * 1 | + | * 4 x 12.7 mm Browning M2 machine guns, cheek-mounted (400 rpg = 1,600 total) |
| − | * 4 | ||
=== Suspended armament === | === Suspended armament === | ||
| − | <!--Describe the aircraft's suspended armament: additional cannons under the wings, bombs, rockets and torpedoes. This section is especially important for bombers and attackers. If there is no suspended weaponry remove this subsection.--> | + | <!-- ''Describe the aircraft's suspended armament: additional cannons under the wings, bombs, rockets and torpedoes. This section is especially important for bombers and attackers. If there is no suspended weaponry remove this subsection.'' --> |
| − | {{main| | + | {{main|AN-M30A1 (100 lb)|AN-M57 (250 lb)|AN-M64A1 (500 lb)|AN-M65A1 (1,000 lb)}} |
| − | |||
| − | |||
| + | The '''''{{PAGENAME}}''''' can be outfitted with the following ordnance: | ||
* 12 x 100 lb AN-M30A1 bombs (1,200 lb total) | * 12 x 100 lb AN-M30A1 bombs (1,200 lb total) | ||
* 4 x 250 lb AN-M57 bombs (1,000 lb total) | * 4 x 250 lb AN-M57 bombs (1,000 lb total) | ||
| Line 168: | Line 141: | ||
* 2 x 500 lb AN-M64A1 bombs + 8 x 100 lb AN-M30A1 bombs (1,800 lb total) | * 2 x 500 lb AN-M64A1 bombs + 8 x 100 lb AN-M30A1 bombs (1,800 lb total) | ||
* 4 x 500 lb AN-M64A1 bombs (2,000 lb total) | * 4 x 500 lb AN-M64A1 bombs (2,000 lb total) | ||
| − | * 10 x 100 lb AN-M30A1 bombs | + | * 1 x 1,000 lb AN-M65A1 bomb + 10 x 100 lb AN-M30A1 bombs (2,000 lb total) |
| − | * 3 x | + | * 3 x 1,000 lb AN-M65A1 bombs (3,000 lb total) |
=== Defensive armament === | === Defensive armament === | ||
| − | <!--Defensive armament with turret machine guns or cannons, crewed by gunners. Examine the number of gunners and what belts or drums are better to use. If defensive weaponry is not available, remove this subsection.--> | + | <!-- ''Defensive armament with turret machine guns or cannons, crewed by gunners. Examine the number of gunners and what belts or drums are better to use. If defensive weaponry is not available, remove this subsection.'' --> |
{{main|Browning M2 (12.7 mm)}} | {{main|Browning M2 (12.7 mm)}} | ||
The '''''{{PAGENAME}}''''' is defended by: | The '''''{{PAGENAME}}''''' is defended by: | ||
| − | |||
* 1 x 12.7 mm Browning M2 machine gun, nose turret (300 rpg) | * 1 x 12.7 mm Browning M2 machine gun, nose turret (300 rpg) | ||
| − | * 2 x 12.7 mm Browning M2 machine | + | * 2 x 12.7 mm Browning M2 machine guns, dorsal turret (400 rpg = 800 total) |
| − | * | + | * 1 x 12.7 mm Browning M2 machine gun, 2 x beam turrets (250 rpg) |
| − | * | + | * 2 x 12.7 mm Browning M2 machine guns, tail turret (600 rpg = 1,200 total) |
== Usage in battles == | == Usage in battles == | ||
| − | <!--Describe the tactics of playing in an aircraft, the features of using | + | <!-- ''Describe the tactics of playing in an aircraft, the features of using aircraft in a team and advice on tactics. Refrain from creating a "guide" - do not impose a single point of view, but instead, give the reader food for thought. Examine the most dangerous enemies and give recommendations on fighting them. If necessary, note the specifics of the game in different modes (AB, RB, SB).'' --> |
| − | + | In Realistic battles (and Arcade to an extent), it is highly recommended against exclusively bombing strategic bases and in general to not bomb from high altitudes. It was rarely used this way in combat, and it makes it very easy for enemy fighters to approach and attack you from your defenceless belly. Also, the bomber's maximum payload of 3 x 1,000 lb of bombs is not enough to destroy an enemy base in Realistic battles, which is useless in regards to decreasing ticket count and, most importantly, does not help your team. Thus, leave base bombing to the British heavy bombers you will likely also encounter on your team, whose payloads vastly outclass yours, and instead - if you wish to help your team as much as possible - use your five nose-mounted Browning machine guns on ground targets. Ground target strafing is not only infinitely more exciting than base bombing, but it can also lower the enemy's ticket count drastically, therefore helping your team win. Fly at low altitudes and attack light pillboxes and soft targets with your guns. If you fail to destroy a target, then pitch up and use your turrets to finish it off. Save your bombs for targets your guns cannot kill, such as heavy tanks and heavy pillboxes; the bombsight is very helpful in doing this (something which the dedicated strafing variants such as the [[PBJ-1J]] lack). Make sure to use a fuse timer, 3 seconds should be enough when bombing at treetop level with 1,000 lb bombs. | |
| − | In | ||
| − | When strafing, be sure to watch your | + | When strafing, be sure to watch your minimap at all times for any incoming enemies so you can adequately prepare for an attack. When being attacked, fly away from the assailant and try to get them on your tail, and manually open fire with your defensive guns, making sure to watch your tracers and adjust the direction of fire, so they hit the target. Remember that turret guns will jam if fired for a long duration, requiring them to be reloaded, which usually takes almost twenty seconds, during which an attacker will most certainly kill you. If the reticle starts blinking, the guns are very close to jamming, so immediately stop firing and wait for the weapons to cool down. Many experienced players will attempt to utilise the dead zones on your belly and the arcs beyond your twin rudders in their attack. If you find an enemy doing this to you, then switch back to flight view and manoeuvre so that they are in the firing arcs of your guns again and try as much as possible to keep them out of your dead zones and, mostly, make their attack as difficult as possible. The attacker will then either eventually lose patience and try for a head-on, or you will get a successful snipe on their aircraft. It is also very advantageous to use the keyboard controls for pitch, roll, and yaw in the gunner view as it will allow you to make small manoeuvres while still concentrating on defending yourself, letting you, for example, dodge fire or roll/pitch/yaw and shoot someone in your dead zones. Also, use ''Universal'' belts for your turrets as they will do the most damage to enemies and cause devastating fires. |
If you lose tail control for whatever reason, then immediately turn back to the airfield and use combat flaps to keep your nose up. Make a landing by alternating between takeoff and combat flaps and, if needed, landing flaps. Make sure that your speed does not go too low; if you start nosing down with takeoff flaps then do not use landing flaps (unless in an emergency) as you'll lose speed and potentially crash. Instead, engage WEP and wait for your nose to rise. There is no set method for doing this and it takes lots of practice, but making these daring landings is very rewarding. If you lose an engine, '''do not''' engage flaps as you will lose speed, end up in a stall and will die, fly straight and slowly make your way back to base, using WEP if needed. If using manual engine controls, close the radiator of the dead engine, feather it, and open the radiator of the working engine to allow you to use WEP all the way back to the airfield without overheating. | If you lose tail control for whatever reason, then immediately turn back to the airfield and use combat flaps to keep your nose up. Make a landing by alternating between takeoff and combat flaps and, if needed, landing flaps. Make sure that your speed does not go too low; if you start nosing down with takeoff flaps then do not use landing flaps (unless in an emergency) as you'll lose speed and potentially crash. Instead, engage WEP and wait for your nose to rise. There is no set method for doing this and it takes lots of practice, but making these daring landings is very rewarding. If you lose an engine, '''do not''' engage flaps as you will lose speed, end up in a stall and will die, fly straight and slowly make your way back to base, using WEP if needed. If using manual engine controls, close the radiator of the dead engine, feather it, and open the radiator of the working engine to allow you to use WEP all the way back to the airfield without overheating. | ||
| − | ===Manual Engine Control=== | + | === Manual Engine Control === |
{| class="wikitable" style="text-align:center" | {| class="wikitable" style="text-align:center" | ||
|- | |- | ||
! colspan="7" | MEC elements | ! colspan="7" | MEC elements | ||
|- | |- | ||
| − | ! rowspan="2" |Mixer | + | ! rowspan="2" | Mixer |
| − | ! rowspan="2" |Pitch | + | ! rowspan="2" | Pitch |
| − | ! colspan="3" |Radiator | + | ! colspan="3" | Radiator |
| − | ! rowspan="2" |Supercharger | + | ! rowspan="2" | Supercharger |
| − | ! rowspan="2" |Turbocharger | + | ! rowspan="2" | Turbocharger |
|- | |- | ||
| − | ! Oil | + | ! Oil !! Water !! Type |
| − | ! Water | ||
| − | ! Type | ||
|- | |- | ||
| − | | Controllable || | + | | Controllable || Controllable<br>Not auto controlled || Not controllable<br>Not auto controlled || Controllable<br>Auto control available || Separate || Controllable<br>2 gears || Not controllable |
|- | |- | ||
|} | |} | ||
| − | ===Modules=== | + | === Modules === |
{| class="wikitable" | {| class="wikitable" | ||
| − | ! | + | ! Tier |
! colspan="2" | Flight performance | ! colspan="2" | Flight performance | ||
| − | ! | + | ! Survivability |
! colspan="2" | Weaponry | ! colspan="2" | Weaponry | ||
|- | |- | ||
| I | | I | ||
| − | | Fuselage | + | | Fuselage repair |
| Radiator | | Radiator | ||
| − | | Protective | + | | Protective vest |
| Offensive 12 mm | | Offensive 12 mm | ||
| SBC-25 | | SBC-25 | ||
|- | |- | ||
| II | | II | ||
| − | | | + | | |
| Compressor | | Compressor | ||
| Airframe | | Airframe | ||
| Line 232: | Line 201: | ||
|- | |- | ||
| III | | III | ||
| − | | Wings | + | | Wings repair |
| Engine | | Engine | ||
| + | | | ||
| Turret 12 mm | | Turret 12 mm | ||
| − | + | | | |
| − | | | ||
|- | |- | ||
| IV | | IV | ||
| − | | | + | | |
| − | | Engine | + | | Engine injection |
| Cover | | Cover | ||
| New 12 mm MGs (turret) | | New 12 mm MGs (turret) | ||
| Line 248: | Line 217: | ||
=== Pros and cons === | === Pros and cons === | ||
| − | <!--Summarise and briefly evaluate the vehicle in terms of its characteristics and combat effectiveness. Mark its pros and cons in the bulleted list. Try not to use more than 6 points for each of the characteristics. Avoid using categorical definitions such as "bad", "good" and the like - use substitutions with softer forms such as "inadequate" and "effective".--> | + | <!-- ''Summarise and briefly evaluate the vehicle in terms of its characteristics and combat effectiveness. Mark its pros and cons in the bulleted list. Try not to use more than 6 points for each of the characteristics. Avoid using categorical definitions such as "bad", "good" and the like - use substitutions with softer forms such as "inadequate" and "effective".'' --> |
'''Pros:''' | '''Pros:''' | ||
* Can take a beating | * Can take a beating | ||
| − | * Strong defensive guns | + | * Strong defensive guns |
| − | * Versatile bomb load | + | * Versatile bomb load |
* Decent speed for a bomber | * Decent speed for a bomber | ||
* A multi-use aircraft | * A multi-use aircraft | ||
* Forward facing gunner automatically starts firing approx 1,000 m from the target, use as a range finder | * Forward facing gunner automatically starts firing approx 1,000 m from the target, use as a range finder | ||
| − | * Has forward facing 50 cal. MGs which are very useful for strafing | + | * Has forward facing 50 cal. MGs which are very useful for strafing |
| − | '''Cons:''' | + | '''Cons:''' |
| − | * | + | * Manoeuvres stiffly |
* Stiff elevators | * Stiff elevators | ||
* Difficult to pull out of a dive | * Difficult to pull out of a dive | ||
| Line 271: | Line 240: | ||
== History == | == History == | ||
| − | ''Describe the history of the creation and combat usage of the aircraft in more detail than in the introduction. If the historical reference turns out to be too long, take it to a separate article, taking a link to the article about the vehicle and adding a block "/ History" (example: <nowiki>https://wiki.warthunder.com/(Vehicle-name)/History</nowiki>) and add a link to it here using the <code>main</code> template. Be sure to reference text and sources by using <code><nowiki><ref></nowiki></code>, as well as adding them at the end of the article. This section may also include the vehicle's dev blog entry (if applicable) and the in-game encyclopedia description (under <code><nowiki>=== In-game description ===</nowiki></code>, also if applicable).'' | + | ''Describe the history of the creation and combat usage of the aircraft in more detail than in the introduction. If the historical reference turns out to be too long, take it to a separate article, taking a link to the article about the vehicle and adding a block "/History" (example: <nowiki>https://wiki.warthunder.com/(Vehicle-name)/History</nowiki>) and add a link to it here using the <code>main</code> template. Be sure to reference text and sources by using <code><nowiki><ref></ref></nowiki></code>, as well as adding them at the end of the article with <code><nowiki><references /></nowiki></code>. This section may also include the vehicle's dev blog entry (if applicable) and the in-game encyclopedia description (under <code><nowiki>=== In-game description ===</nowiki></code>, also if applicable).'' |
=== In-game description === | === In-game description === | ||
| Line 282: | Line 251: | ||
One feature of this variant was that it could be used both as a bomber and as a ground-attack aircraft. | One feature of this variant was that it could be used both as a bomber and as a ground-attack aircraft. | ||
| − | When used as a bomber, the B-25J-1's armament was: one fixed front machine gun (with 400 rounds) and one mobile machine gun (with 300 rounds) mounted on the navigator's cockpit in the forward fuselage; four front machine guns, with 400 rounds each, mounted in pairs on both sides of the lower fuselage section, near the pilot's cockpit; a Bendix A-9 upper turret housing twin machine guns, with 400 rounds each; a twin Bell M-7 rear mount, with 600 rounds each; and two machine guns, with 600 rounds each, in the fuselage blisters on the starboard and port sides. | + | When used as a bomber, the B-25J-1's armament was: one fixed front machine gun (with 400 rounds) and one mobile machine gun (with 300 rounds) mounted on the navigator's cockpit in the forward fuselage; four front machine guns, with 400 rounds each, mounted in pairs on both sides of the lower fuselage section, near the pilot's cockpit; a Bendix A-9 upper turret housing twin machine guns, with 400 rounds each; a twin Bell M-7 rear mount, with 600 rounds each; and two machine guns, with 600 rounds each, in the fuselage blisters on the starboard and port sides. All gun emplacements had 12.7 mm Colt-Browning ANM2.5 machine guns. The total number of machine guns was 12. |
| − | |||
| − | All gun emplacements had 12.7 mm Colt-Browning ANM2.5 machine guns. The total number of machine guns was 12. | ||
Thus, the B-25J was practically as good in its armament as heavy bombers like the B-17 or the B-24, except for coverage from below. | Thus, the B-25J was practically as good in its armament as heavy bombers like the B-17 or the B-24, except for coverage from below. | ||
| Line 296: | Line 263: | ||
When used as a bomber, the aircraft had a crew of six people: two pilots, a navigator/bombardier/gunner, a turret gunner/engineer, a radio operator/waist gunner, and a tail gunner. When used as a ground-attack aircraft, the crew consisted of five people, excluding the navigator/bombardier. | When used as a bomber, the aircraft had a crew of six people: two pilots, a navigator/bombardier/gunner, a turret gunner/engineer, a radio operator/waist gunner, and a tail gunner. When used as a ground-attack aircraft, the crew consisted of five people, excluding the navigator/bombardier. | ||
| − | Both pilot seats were equipped with an | + | Both pilot seats were equipped with an armoured backrest. One armour plate was located behind the instrument panel, and the second was under the cockpit windshield. Two armour sheets were fixed outside to the sides. Armour protection was provided for all gunners. |
== Media == | == Media == | ||
| Line 307: | Line 274: | ||
== External links == | == External links == | ||
| − | <!--Paste links to sources and external resources, such as: | + | <!-- ''Paste links to sources and external resources, such as:'' |
* ''topic on the official game forum;'' | * ''topic on the official game forum;'' | ||
* ''encyclopedia page on the aircraft;'' | * ''encyclopedia page on the aircraft;'' | ||
| − | * ''other literature.''--> | + | * ''other literature.'' --> |
* [http://forum.warthunder.com/index.php?/topic/22479-b-25j-mitchell-official-thread/ [Forums] B-25J Mitchell, Official Thread] | * [http://forum.warthunder.com/index.php?/topic/22479-b-25j-mitchell-official-thread/ [Forums] B-25J Mitchell, Official Thread] | ||
{{USA bombers}} | {{USA bombers}} | ||
Revision as of 09:58, 6 September 2019
Contents
| This page is about the American medium bomber B-25J-1. For other versions, see B-25 (Family). |
Description

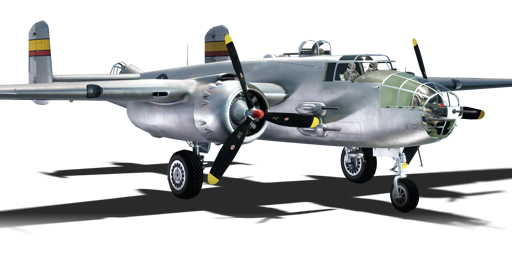
The B-25J-1 Mitchell is a rank II American bomber
with a battle rating of 3.7 (AB/SB) and 4.0 (RB). It was introduced in Update 1.29.
Simply put, the archetype of the medium bomber is the B-25. It has versatile payloads (4 x 500 lb or 3 x 1,000 lb). It is faster than heavy bombers which can achieve over 340 mph in a dive to attack ground targets and as a bonus has offensive armament that allows it to fulfil the role of an air superiority bomber. Defensive gun placements include turrets & gunner stations. The B-25J sports heavy armament to include seven 12.7 mm Browning M2 machine guns. Also, this aircraft is durable, however, if the aircraft happens to sustain a direct hit to the fuel tank, there is a good chance of a fire followed by an explosion.
When flown properly, the B-25 Mitchell is among the best medium bombers in the game, with one of the most potent defensive armaments at its tier. If you enjoy strafing ground targets with the B-25, then consider researching the PBJ-1H with 8 forward facing .50 cal Browning M2 machine guns and a 75 mm cannon or the PBJ-1J sporting an impressive 12 forward facing Browning M2 machine guns, both of which are Marine versions of the B-25 airframe and possess all the facets that make the B-25 Mitchell such a legendary aircraft.
General info
Flight performance
Describe how the aircraft behaves in the air. Speed, manoeuvrability, acceleration and allowable loads - these are the most important characteristics of the vehicle.
| Characteristics | |||||||
|---|---|---|---|---|---|---|---|
| Stock | |||||||
| Max Speed (km/h at 3,049 m) |
Max altitude (meters) |
Turn time (seconds) |
Rate of climb (meters/second) |
Take-off run (meters) | |||
| AB | RB | AB | RB | AB | RB | ||
| 420 | 407 | 7500 | 32.4 | 33.8 | 5.4 | 5.3 | 750 |
| Upgraded | |||||||
| Max Speed (km/h at 3,049 m) |
Max altitude (meters) |
Turn time (seconds) |
Rate of climb (meters/second) |
Take-off run (meters) | |||
| AB | RB | AB | RB | AB | RB | ||
| 472 | 444 | 7500 | 29.7 | 31.0 | 10.6 | 7.7 | 750 |
Details
| Features | ||||
|---|---|---|---|---|
| Combat flaps | Take-off flaps | Landing flaps | Air brakes | Arrestor gear |
| ✓ | ✓ | ✓ | X | X |
| Limits | ||||
|---|---|---|---|---|
| Wing-break speed (km/h) |
Gear limit (km/h) |
Combat flaps (km/h) |
Max Static G | |
| + | - | |||
| 340 | ~6 | ~2 | ||
| Optimal velocities | |||
|---|---|---|---|
| Ailerons (km/h) |
Rudder (km/h) |
Elevators (km/h) |
Radiator (km/h) |
| < 300 | < 270 | < 350 | > 330 |
| Compressor (RB/SB) | ||
|---|---|---|
| Setting 1 | ||
| Optimal altitude | 100% Engine power | WEP Engine power |
| 524 m | 1,500 hp | 1,669 hp |
| Setting 2 | ||
| Optimal altitude | 100% Engine power | WEP Engine power |
| 3,700 m | 1,350 hp | 1,502 hp |
Survivability and armour
- 9.5 mm Steel plates throughout the cockpit
- 8 mm Steel plate behind the pilot
- 8 mm Steel plate under nose gunner
- 9.5 mm Steel plate behind the dorsal gunner
- 6.35 mm Steel plate behind beam gunners
- 38 mm Bulletproof glass in front of the tail gunner
- 9.5 mm Steel plates in front of the tail gunner
Armaments
Offensive armament
The B-25J-1 is armed with:
- 1 x 12.7 mm Browning M2 machine gun, nose-mounted (400 rpg)
- 4 x 12.7 mm Browning M2 machine guns, cheek-mounted (400 rpg = 1,600 total)
Suspended armament
The B-25J-1 can be outfitted with the following ordnance:
- 12 x 100 lb AN-M30A1 bombs (1,200 lb total)
- 4 x 250 lb AN-M57 bombs (1,000 lb total)
- 4 x 250 lb AN-M57 bombs + 8 x 100 lb AN-M30A1 bombs (1,800 lb total)
- 8 x 250 lb AN-M57 bombs (2,000 lb total)
- 2 x 500 lb AN-M64A1 bombs + 8 x 100 lb AN-M30A1 bombs (1,800 lb total)
- 4 x 500 lb AN-M64A1 bombs (2,000 lb total)
- 1 x 1,000 lb AN-M65A1 bomb + 10 x 100 lb AN-M30A1 bombs (2,000 lb total)
- 3 x 1,000 lb AN-M65A1 bombs (3,000 lb total)
Defensive armament
The B-25J-1 is defended by:
- 1 x 12.7 mm Browning M2 machine gun, nose turret (300 rpg)
- 2 x 12.7 mm Browning M2 machine guns, dorsal turret (400 rpg = 800 total)
- 1 x 12.7 mm Browning M2 machine gun, 2 x beam turrets (250 rpg)
- 2 x 12.7 mm Browning M2 machine guns, tail turret (600 rpg = 1,200 total)
Usage in battles
In Realistic battles (and Arcade to an extent), it is highly recommended against exclusively bombing strategic bases and in general to not bomb from high altitudes. It was rarely used this way in combat, and it makes it very easy for enemy fighters to approach and attack you from your defenceless belly. Also, the bomber's maximum payload of 3 x 1,000 lb of bombs is not enough to destroy an enemy base in Realistic battles, which is useless in regards to decreasing ticket count and, most importantly, does not help your team. Thus, leave base bombing to the British heavy bombers you will likely also encounter on your team, whose payloads vastly outclass yours, and instead - if you wish to help your team as much as possible - use your five nose-mounted Browning machine guns on ground targets. Ground target strafing is not only infinitely more exciting than base bombing, but it can also lower the enemy's ticket count drastically, therefore helping your team win. Fly at low altitudes and attack light pillboxes and soft targets with your guns. If you fail to destroy a target, then pitch up and use your turrets to finish it off. Save your bombs for targets your guns cannot kill, such as heavy tanks and heavy pillboxes; the bombsight is very helpful in doing this (something which the dedicated strafing variants such as the PBJ-1J lack). Make sure to use a fuse timer, 3 seconds should be enough when bombing at treetop level with 1,000 lb bombs.
When strafing, be sure to watch your minimap at all times for any incoming enemies so you can adequately prepare for an attack. When being attacked, fly away from the assailant and try to get them on your tail, and manually open fire with your defensive guns, making sure to watch your tracers and adjust the direction of fire, so they hit the target. Remember that turret guns will jam if fired for a long duration, requiring them to be reloaded, which usually takes almost twenty seconds, during which an attacker will most certainly kill you. If the reticle starts blinking, the guns are very close to jamming, so immediately stop firing and wait for the weapons to cool down. Many experienced players will attempt to utilise the dead zones on your belly and the arcs beyond your twin rudders in their attack. If you find an enemy doing this to you, then switch back to flight view and manoeuvre so that they are in the firing arcs of your guns again and try as much as possible to keep them out of your dead zones and, mostly, make their attack as difficult as possible. The attacker will then either eventually lose patience and try for a head-on, or you will get a successful snipe on their aircraft. It is also very advantageous to use the keyboard controls for pitch, roll, and yaw in the gunner view as it will allow you to make small manoeuvres while still concentrating on defending yourself, letting you, for example, dodge fire or roll/pitch/yaw and shoot someone in your dead zones. Also, use Universal belts for your turrets as they will do the most damage to enemies and cause devastating fires.
If you lose tail control for whatever reason, then immediately turn back to the airfield and use combat flaps to keep your nose up. Make a landing by alternating between takeoff and combat flaps and, if needed, landing flaps. Make sure that your speed does not go too low; if you start nosing down with takeoff flaps then do not use landing flaps (unless in an emergency) as you'll lose speed and potentially crash. Instead, engage WEP and wait for your nose to rise. There is no set method for doing this and it takes lots of practice, but making these daring landings is very rewarding. If you lose an engine, do not engage flaps as you will lose speed, end up in a stall and will die, fly straight and slowly make your way back to base, using WEP if needed. If using manual engine controls, close the radiator of the dead engine, feather it, and open the radiator of the working engine to allow you to use WEP all the way back to the airfield without overheating.
Manual Engine Control
| MEC elements | ||||||
|---|---|---|---|---|---|---|
| Mixer | Pitch | Radiator | Supercharger | Turbocharger | ||
| Oil | Water | Type | ||||
| Controllable | Controllable Not auto controlled |
Not controllable Not auto controlled |
Controllable Auto control available |
Separate | Controllable 2 gears |
Not controllable |
Modules
| Tier | Flight performance | Survivability | Weaponry | ||
|---|---|---|---|---|---|
| I | Fuselage repair | Radiator | Protective vest | Offensive 12 mm | SBC-25 |
| II | Compressor | Airframe | New 12 mm MGs | MBC-25 | |
| III | Wings repair | Engine | Turret 12 mm | ||
| IV | Engine injection | Cover | New 12 mm MGs (turret) | LBC-25 | |
Pros and cons
Pros:
- Can take a beating
- Strong defensive guns
- Versatile bomb load
- Decent speed for a bomber
- A multi-use aircraft
- Forward facing gunner automatically starts firing approx 1,000 m from the target, use as a range finder
- Has forward facing 50 cal. MGs which are very useful for strafing
Cons:
- Manoeuvres stiffly
- Stiff elevators
- Difficult to pull out of a dive
- Often the B-25 will catch on fire
- No downward-facing defensive armament
- If tail control is damaged, return to base and land utilizing flaps and engine throttling
- Relatively low payload compared to a heavy bomber
- Forward facing gunner will automatically fire at approx 1,000 m, alerting your target
- Low energy retention; any attacks that require manoeuvring will cost speed and altitude
History
Describe the history of the creation and combat usage of the aircraft in more detail than in the introduction. If the historical reference turns out to be too long, take it to a separate article, taking a link to the article about the vehicle and adding a block "/History" (example: https://wiki.warthunder.com/(Vehicle-name)/History) and add a link to it here using the main template. Be sure to reference text and sources by using <ref></ref>, as well as adding them at the end of the article with <references />. This section may also include the vehicle's dev blog entry (if applicable) and the in-game encyclopedia description (under === In-game description ===, also if applicable).
In-game description
North American B-25J-1 Mitchell twin-engine medium bomber/ground-attack aircraft
The B-25J (NA-108) was the most largely produced Mitchell variant. The first aircraft of this type left the factory floor in December 1943, and the variant drove the B-25C and B-25D completely out of production by March of the next year.
B-25J bombers had two 1,700 hp Wright R-2600-29 fourteen-cylinder, double-row, radial air-cooled engines with Hamilton Standard Hydromatic 23E50 three-bladed automatic metal propellers.
One feature of this variant was that it could be used both as a bomber and as a ground-attack aircraft.
When used as a bomber, the B-25J-1's armament was: one fixed front machine gun (with 400 rounds) and one mobile machine gun (with 300 rounds) mounted on the navigator's cockpit in the forward fuselage; four front machine guns, with 400 rounds each, mounted in pairs on both sides of the lower fuselage section, near the pilot's cockpit; a Bendix A-9 upper turret housing twin machine guns, with 400 rounds each; a twin Bell M-7 rear mount, with 600 rounds each; and two machine guns, with 600 rounds each, in the fuselage blisters on the starboard and port sides. All gun emplacements had 12.7 mm Colt-Browning ANM2.5 machine guns. The total number of machine guns was 12.
Thus, the B-25J was practically as good in its armament as heavy bombers like the B-17 or the B-24, except for coverage from below.
To use the B-25J-1 as a ground-attack aircraft, the nose section with the navigator/bombardier's cockpit could be easily removed and replaced by a solid unglazed nose with a battery of eight 12.7 mm Colt-Browning ANM2.5 machine guns, with 400 rounds each. Thus the number of front machine guns was increased to 12, and the total number of guns to 18.
The B-25J-1's maximum bomb capacity was 4,000 lb (1,815 kg). Starting with the 151st machine, one bomb rack, meant to suspend a 2,000 lb (908 kg) bomb, was removed from production B-25J-1 bombers, since it was almost never used in combat units and did nothing but take up a lot of space in the bomb bay.
The aircraft usually carried three 1,000 lb (454 kg) or two 1,600 lb (726 kg) bombs. Different combinations of bombs of smaller sizes were also used. 10 kg parachute bombs were used, as well. The B-25J could carry a Mk.13 torpedo weighing 907 kg. In addition, removable bomb racks for bombs up to 250 kg could be mounted under the wing panels.
When used as a bomber, the aircraft had a crew of six people: two pilots, a navigator/bombardier/gunner, a turret gunner/engineer, a radio operator/waist gunner, and a tail gunner. When used as a ground-attack aircraft, the crew consisted of five people, excluding the navigator/bombardier.
Both pilot seats were equipped with an armoured backrest. One armour plate was located behind the instrument panel, and the second was under the cockpit windshield. Two armour sheets were fixed outside to the sides. Armour protection was provided for all gunners.
Media
Excellent additions to the article would be video guides, screenshots from the game, and photos.
See also
Links to the articles on the War Thunder Wiki that you think will be useful for the reader, for example:
- reference to the series of the aircraft;
- links to approximate analogues of other nations and research trees.
External links
- [Forums B-25J Mitchell, Official Thread]
| USA bombers | |
|---|---|
| Dive | SB2U-2 · SB2U-3 · SBD-3 · SB2C-1C · SB2C-4 |
| Torpedo | TBD-1 · PBY-5 Catalina · PBY-5A Catalina · TBF-1C · BTD-1 |
| Medium | B-10B · B-18A · B-34 · PV-2D · B-25J-1 · B-25J-20 · A-26C-45 · A-26C-45DT · B-26B |
| Heavy | B-17E · B-17E/L · B-17G-60-VE · PB4Y-2 · B-24D-25-CO · B-29A-BN |
| Hydroplanes | OS2U-1 · OS2U-3 · PBM-1 "Mariner" · PBM-3 "Mariner" |
