Difference between revisions of "B-17E/L"
(Added tables and basic info.) |
|||
| Line 2: | Line 2: | ||
== Description == | == Description == | ||
| − | ''In the description, the first part needs to be about the history of and the creation and combat usage of the aircraft, as well as its key features. In the second part, tell the reader about the aircraft in the game. Insert screenshot of the vehicle. If the novice player does not remember the vehicle by name, he will immediately understand what kind of vehicle it is talking about.'' | + | <!--''In the description, the first part needs to be about the history of and the creation and combat usage of the aircraft, as well as its key features. In the second part, tell the reader about the aircraft in the game. Insert screenshot of the vehicle. If the novice player does not remember the vehicle by name, he will immediately understand what kind of vehicle it is talking about.''--> |
| + | [[File:GarageImage_B-17EL.jpg|420px|thumb|left]] | ||
| + | {{break}} | ||
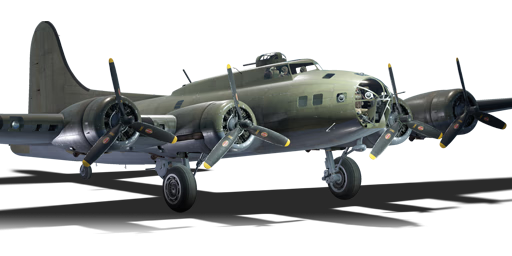
| + | The '''B-17E Flying Fortress /Late''' is a Rank III American heavy bomber with a battle rating of 5.3 (AB) and 5.7 (RB/SB). It was in the game since the start of the Open Beta Test prior to Update 1.29. | ||
| + | |||
| + | The B-17 Flying Fortress has the sole purpose of being a high-altitude bomber targeting land fortifications, airfields and bases. Despite its impressive bomb capacity, it is not recommended to target moving ground units, such as tanks or armoured cars, especially when they are travelling in tight columns due to the inaccuracy of your bombs at high altitudes and the ability for the AI on the ground to perform evasive maneuvers when bombs are falling onto their position. When you first spawn in a game using the B-17, it is best if you find a formation of friendly bombers to maximize your chances of survival. | ||
| + | |||
| + | Unlike the preceding variant of the B-17, the B-17E/Late sports the Sperry Ball turret on the belly of the aircraft, thus ensuring complete protection of the belly of the aircraft. However, it is important to note that you still have the main drawback as the preceding B-17E - the lack of nose defenses. While you do have .30 Caliber guns on the nose, it is relatively inadequate at Battle Rating 5.7, and nearly worthless at Battle Rating 6.7. On the contrary, you are a later model B-17E, which grants you more armour than your predecessor. | ||
== General info == | == General info == | ||
=== Flight Performance === | === Flight Performance === | ||
| − | ''Describe how the aircraft behaves in the air. Maximum speed, maneuverability, speed and allowable loads - these are the most important characteristics of the vehicle.'' | + | <!--''Describe how the aircraft behaves in the air. Maximum speed, maneuverability, speed and allowable loads - these are the most important characteristics of the vehicle.''--> |
| + | {| class="wikitable" style="text-align:center" | ||
| + | |- | ||
| + | ! colspan="8" | Characteristics | ||
| + | |- | ||
| + | ! colspan="8" | ''Stock'' | ||
| + | |- | ||
| + | ! colspan="2" | Max Speed<br>(km/h at 7,680 m) | ||
| + | ! rowspan="2" | Max altitude<br>(meters) | ||
| + | ! colspan="2" | Turn time<br>(seconds) | ||
| + | ! colspan="2" | Rate of climb<br>(meters/second) | ||
| + | ! rowspan="2" |Take-off run<br>(meters) | ||
| + | |- | ||
| + | ! AB | ||
| + | ! RB | ||
| + | ! AB | ||
| + | ! RB | ||
| + | ! AB | ||
| + | ! RB | ||
| + | |- | ||
| + | | 496 || 484 || 11,156 || 36.8 || 37.9 || 5.7 || 5.6 || 600 | ||
| + | |- | ||
| + | ! colspan="8" | ''Upgraded'' | ||
| + | |- | ||
| + | ! colspan="2" | Max Speed<br>(km/h at 7,680 m) | ||
| + | ! rowspan="2" |Max altitude (meters) | ||
| + | ! colspan="2" | Turn time (seconds) | ||
| + | ! colspan="2" | Rate of climb<br>(meters/second) | ||
| + | ! rowspan="2" |Take-off run (meters) | ||
| + | |- | ||
| + | ! AB | ||
| + | ! RB | ||
| + | ! AB | ||
| + | ! RB | ||
| + | ! AB | ||
| + | ! RB | ||
| + | |- | ||
| + | | ? || ? || 11,156 || ??.? || ??.? || ?.? || ?.? || ? | ||
| + | |- | ||
| + | |} | ||
| + | |||
| + | ====Details==== | ||
| + | {| class="wikitable" style="text-align:center" | ||
| + | |- | ||
| + | ! colspan="5" | Features | ||
| + | |- | ||
| + | ! Combat flap | ||
| + | ! Take-off flap | ||
| + | ! Landing flap | ||
| + | ! Air brakes | ||
| + | ! Arrestor gear | ||
| + | |- | ||
| + | | ✓ || ✓ || ✓ || X || X <!-- ✓ --> | ||
| + | |- | ||
| + | |} | ||
| + | |||
| + | {| class="wikitable" style="text-align:center" | ||
| + | |- | ||
| + | ! colspan="5" | Limits | ||
| + | |- | ||
| + | ! rowspan="2" | Wing-break speed<br>(km/h) | ||
| + | ! rowspan="2" | Gear limit<br>(km/h) | ||
| + | ! rowspan="2" | Combat flap<br> (km/h) | ||
| + | ! colspan="2" | Max Static G | ||
| + | |- | ||
| + | ! + | ||
| + | ! - | ||
| + | |- | ||
| + | | 516 || 300 || ??? || ~1 || ~1 | ||
| + | |- | ||
| + | |} | ||
| + | |||
| + | {| class="wikitable" style="text-align:center" | ||
| + | |- | ||
| + | ! colspan="4" | Optimal velocities | ||
| + | |- | ||
| + | ! Ailerons<br>(km/h) | ||
| + | ! Rudder<br>(km/h) | ||
| + | ! Elevators<br>(km/h) | ||
| + | ! Radiator<br>(km/h) | ||
| + | |- | ||
| + | | < 360 || < 300 || < 323 || > 110 | ||
| + | |- | ||
| + | |} | ||
| + | |||
| + | {| class="wikitable" style="text-align:center" | ||
| + | |- | ||
| + | ! colspan="3" | Compressor (RB/SB) | ||
| + | |- | ||
| + | ! colspan="3" | Setting 1 | ||
| + | |- | ||
| + | ! Optimal altitude | ||
| + | ! 100% Engine power | ||
| + | ! WEP Engine power | ||
| + | |- | ||
| + | | 6,180 m || 4,000 hp || 4,708 hp | ||
| + | |- | ||
| + | <!--! colspan="3" | Setting 2 | ||
| + | |- | ||
| + | ! Optimal altitude | ||
| + | ! 100% Engine power | ||
| + | ! WEP Engine power | ||
| + | |- | ||
| + | | ?,??? m || ?,??? hp || ?,??? hp | ||
| + | |- | ||
| + | ! colspan="3" | Setting 3 | ||
| + | |- | ||
| + | ! Optimal altitude | ||
| + | ! 100% Engine power | ||
| + | ! WEP Engine power | ||
| + | |- | ||
| + | | ?,??? m || ?,??? hp || ?,??? hp | ||
| + | |- --> | ||
| + | |} | ||
=== Survivability and armour === | === Survivability and armour === | ||
| − | ''Examine the survivability of the aircraft. Note how vulnerable the structure is and how secure the pilot is, whether the fuel tanks are armoured. Describe the armour, if there is any, also mention the vulnerability of other critical aircraft systems.'' | + | <!--''Examine the survivability of the aircraft. Note how vulnerable the structure is and how secure the pilot is, whether the fuel tanks are armoured. Describe the armour, if there is any, also mention the vulnerability of other critical aircraft systems.''--> |
| + | * 6.35 mm Steel plate behind nose gunner. | ||
| + | * 6.35 mm Steel plates behind pilots. | ||
| + | * 6.35 mm Steel plates behind dorsal gunners. | ||
| + | * 6.35 mm Steel plates in front of beam gunners. | ||
| + | * 6.35 mm Steel plates in front of tail gunner. | ||
| + | * 38 mm Bulletproof glass in front of tail gunner. | ||
| + | * 38 mm Bulletproof glass behind the ventral gunner. | ||
== Armaments == | == Armaments == | ||
| − | === Offensive armament === | + | <!--=== Offensive armament === |
''Describe the offensive armament of the aircraft, if any. Describe how effective the cannons and machine guns are in a battle, and also what belts or drums are better to use. If there is no offensive weaponry, delete this subsection.'' | ''Describe the offensive armament of the aircraft, if any. Describe how effective the cannons and machine guns are in a battle, and also what belts or drums are better to use. If there is no offensive weaponry, delete this subsection.'' | ||
| + | {{main|MAC 1934 (7.5 mm)}} | ||
| + | The '''''{{PAGENAME}}''''' is armed with: | ||
| + | |||
| + | * 4 x 7.5 mm [[MAC 1934 (7.5 mm)|MAC 1934]] machine guns (300 rpg = 1,200 total) | ||
| + | |||
| + | The four machine guns are arranged in bundles of two mounted on the underside of the upper wing. Each are armed with the same amount of ammunition, which means that all guns will fire with each other until empty.--> | ||
=== Suspended armament === | === Suspended armament === | ||
| − | ''Describe the aircraft's suspended armament: additional cannons under the wings, bombs, rockets and torpedoes. This section is especially important for bombers and attackers. If there is no suspended weaponry remove this subsection.'' | + | <!--''Describe the aircraft's suspended armament: additional cannons under the wings, bombs, rockets and torpedoes. This section is especially important for bombers and attackers. If there is no suspended weaponry remove this subsection.''--< |
| + | {{main|Bombs}} | ||
| + | |||
| + | The '''''{{PAGENAME}}''''' can be outfitted with the following ordinance: | ||
| + | |||
| + | * 8 x 500 lb AN-M64A1 bombs (4,000 lb total) | ||
| + | * 12 x 500 lb AN-M64A1 bombs (6,000 lb total) | ||
| + | * 6 x 1000 lb AN-M65A1 bombs (6,000 lb total) | ||
| + | * 2 x 2000 lb AN-M66A2 bombs (4,000 lb total) | ||
=== Defensive armament === | === Defensive armament === | ||
| − | ''Defensive armament with turret machine guns or cannons, crewed by gunners. Examine the number of gunners and what belts or drums are better to use. If defensive weaponry is not available remove this subsection.'' | + | <!--''Defensive armament with turret machine guns or cannons, crewed by gunners. Examine the number of gunners and what belts or drums are better to use. If defensive weaponry is not available remove this subsection.''--> |
| + | {{main|Browning (7.62 mm)|Browning M2 (12.7 mm)}} | ||
| + | |||
| + | The '''''{{PAGENAME}}''''' is defended by: | ||
| + | |||
| + | * 2 x 7.62 mm Browning machine gun, nose turret, 500 rpg | ||
| + | * 2 x 12.7 mm Browning M2 machine gun, tail turret, 575 rpg | ||
| + | * 2 x 12.7 mm Browning M2 machine gun, front dorsal turret, 500 rpg | ||
| + | * 1 x 12.7 mm Browning M2 machine gun, rear dorsal turret, 500 rpg | ||
| + | * 2 x 12.7 mm Browning M2 machine gun, ventral turret, 500 rpg | ||
| + | * 1 x 12.7 mm Browning M2 machine gun, 2 x beam turret, 400 rpg | ||
== Usage in the battles == | == Usage in the battles == | ||
| − | ''Describe the tactics of playing in an aircraft, the features of using vehicles in a team and advice on tactics. Refrain from creating a "guide" - do not impose a single point of view but give the reader food for thought. Examine the most dangerous enemies and give recommendations on fighting them. If necessary, note the specifics of the game in different modes (AB, RB, SB).'' | + | <!--''Describe the tactics of playing in an aircraft, the features of using vehicles in a team and advice on tactics. Refrain from creating a "guide" - do not impose a single point of view but give the reader food for thought. Examine the most dangerous enemies and give recommendations on fighting them. If necessary, note the specifics of the game in different modes (AB, RB, SB).''--> |
| + | When using the B-17E/Late Flying Fortress, it is important to note that you are '''not''' invincible, but the B-17 is notorious for being able to take one serious punch and still get you home. However, at your Battle Rating of 5.7, you aren't going to have too much room for error. Nonetheless, as mentioned earlier, you have minimal nose defenses which leaves the pilot and co-pilot dangerously exposed. | ||
| + | |||
| + | If you have the payload capability to destroy multiple bases, the first part to enhance your survival is one word: '''climb.''' You already start at the "Long Range Bombers" spawn, which is roughly at 4,500 meters (14,763 feet). A sustained climb can put you at nearly 5,500 meters (18,044 feet) in a matter of around a minute and a half. From there, maintain speed and a sustained climb to help put you out of reach of interceptors to buy you some time. | ||
| + | |||
| + | Do not try and bomb small targets such as pillboxes and moving armour. It is 1) Largely inaccurate due to the time it takes to reach the target from high altitude, and 2) not worth it as a whole, as moving armour columns can disperse after a bomb drop has been detected. | ||
| + | |||
| + | If you are under attack from enemy fighters / interceptors, '''Do not''' attempt to use evasive maneuvers - you are mainly unmaneuverable to begin with and trying to pull evasive maneuvers will kill your speed, throw off your gunner's aim and possibly increase your chances of losing a vital control component. | ||
| + | |||
| + | Another method of reaching your targets is to side-climb / plotting a course that is furthest away from the action. | ||
| + | |||
| + | At your Battle Rating of 5.7, it is very possible that you will be up-tiered to Battle Rating 6.7 matches, which almost any plane will tear you to shreds. | ||
| + | |||
| + | '''German Aircraft''' | ||
| + | When facing the Germans, especially at Battle Rating 6.7, you will be vulnerable to the "Minengeschoß" rounds, which will punch through your armour, and explode inside the aircraft. The most dangerous opponents are going to be the Fw-190 D and any of the Focke Wulf Ta-152s, mainly due to their heavy-hitting weaponry. In addition, you also are confronted by the [[Bf109K-4|Bf 109 K-4]], which has a 30 mm cannon through the propeller hub, which can make short work of you with a number of well-placed hits. | ||
| + | |||
| + | '''Russian Aircraft''' | ||
| + | When facing the Russians, you have to pay close attention to any plane bearing the prefix "Yak," for rather obvious reasons at 5.7 and 6.7 battles. You especially need to pay attention to the [[Yak-9P]] and the [[Yak-9UT]], which have a mix of 20 mm cannons and a combination of either a 37 mm cannon or a 45 mm cannon. The shear size of the cannons they wield can obliterate the B-17 with just one or two well-placed hits. Another aircraft to pay attention to is the [[La-11]], which has three 23 mm cannons that can land serious damage if the hits are placed well. | ||
| + | |||
| + | '''British Aircraft''' | ||
| + | While it is mainly uncommon to see one at high altitude, a [[Wyvern|Wyvern S4]] has the capability to intercept you thanks to its extremely powerful engine. In addition, a Wvyern will cut you to shreds as a result of the four 20 mm Mk.V Hispano cannons. In addition, the Hornet will also have the capability to intercept you. Perhaps the biggest threats lie with the Griffon Spitfires, especially the Mk. 22 and Mk. 24 variants. Also keep your eyes peeled for the Tempest fighters. | ||
| + | |||
| + | '''Japanese Aircraft''' | ||
| + | The Ki-87 is probably the single greatest threat to you at mid-tier battles due to the hard-hitting weaponry and its turboprop engine. In addition, (unlikely as it could be), the J7W will obliterate your plane due to the four 30 mm cannons in the nose. If not taken care of quickly, later models of the A7M "Reppu" can dispatch you if they have a good enough aim. | ||
| + | |||
| + | ====Counter-tactics==== | ||
| + | <!--What to expect, if it would be in command of the enemy and how to counter it. (i.e. They will most likely BnZ, etc.)--> | ||
| + | Repeat after me and take the time to memorize the following text: '''"Do not tail a B-17,"''' even if you are flying something as heavily armed as a Messerschmitt 410 or a later Focke Wulf 190 model. This just warrants either an engine fire, your aircraft being critically damaged, or even your pilot being killed. If you have the altitude advantage over a B-17, try to hit it from an angle, which can increase your chances of survival. The weakest point on a B-17E from a defensive standpoint is from the nose of the aircraft. This is due to only a .30 Caliber machine gun defending the pilot and the co-pilot. If you do not have the capability to engage the B-17E from the nose, and you find yourself tailing a B-17E, aim for the wings of the bomber. This may allow you to set some of the fuel tanks on fire or even better yet shear one off. | ||
| + | |||
| + | For German planes, your Minengeschoß rounds give you a slight advantage, given your shells' ability to explode inside the bomber causing more extensive damage to the control surfaces. If a B-17E is present in a Battle Rating 6.7 match, they pose a lesser threat than something like the [[B-17G]], which has only .50 Cals, but try not to tail a B-17E, as they still can punch through you if the .50 Cals have the "Armored Target" rounds. | ||
| + | |||
| + | ===Manual Engine Control=== | ||
| + | {| class="wikitable" style="text-align:center" | ||
| + | |- | ||
| + | ! colspan="7" | MEC elements | ||
| + | |- | ||
| + | ! rowspan="2" |Mixer | ||
| + | ! rowspan="2" |Pitch | ||
| + | ! colspan="3" |Radiator | ||
| + | ! rowspan="2" |Supercharger | ||
| + | ! rowspan="2" |Turbocharger | ||
| + | |- | ||
| + | ! Oil | ||
| + | ! Water | ||
| + | ! Type | ||
| + | |- | ||
| + | | Controllable || rowspan="2" | Not controllable || rowspan="2" | Not controllable || rowspan="2" | Not controllable || rowspan="2" | Separate || rowspan="2" | Not ontrollable || rowspan="2" | Not controllable | ||
| + | |- | ||
| + | |} | ||
| + | |||
| + | ===Modules=== | ||
| + | {| class="wikitable" | ||
| + | !colspan = "1"| Tier | ||
| + | !colspan = "2"| Flight performance | ||
| + | !colspan = "1"| Survivability | ||
| + | !colspan = "2"| Weaponry | ||
| + | |- | ||
| + | | I | ||
| + | | Fuselage Repair | ||
| + | | Raidator | ||
| + | | | ||
| + | | | ||
| + | |- | ||
| + | | II | ||
| + | | | ||
| + | | Compressor | ||
| + | | Airframe | ||
| + | | | ||
| + | |- | ||
| + | | III | ||
| + | | Wings Repair | ||
| + | | Engine | ||
| + | | | ||
| + | | | ||
| + | |- | ||
| + | | IV | ||
| + | | | ||
| + | | Engine Injection | ||
| + | | Cover | ||
| + | | | ||
| + | |- | ||
| + | |} | ||
=== Pros and cons === | === Pros and cons === | ||
| − | ''Summarize and briefly evaluate the vehicle in terms of its characteristics and combat effectiveness. Mark its pros and cons in the bulleted list. Do not use more than 6 points for each of the characteristics. Avoid using categorical definitions such as "bad", "good" and the like - they have a substitution in the form of softer "inadequate", "effective".'' | + | <!--''Summarize and briefly evaluate the vehicle in terms of its characteristics and combat effectiveness. Mark its pros and cons in the bulleted list. Do not use more than 6 points for each of the characteristics. Avoid using categorical definitions such as "bad", "good" and the like - they have a substitution in the form of softer "inadequate", "effective".''--> |
'''Pros:''' | '''Pros:''' | ||
| − | * | + | * Large bomb-load |
| + | * Powerful air defence capabilities | ||
| + | * Multiple engines, can fly on one if necessary (But with a great loss in altitude and speed) | ||
| + | * Rugged design allows for soaking up damage | ||
| + | * Mostly unaffected by light machine gun fire, and to an extent, heavy machine guns | ||
| + | * Good speed for a bomber of its peers | ||
| + | * Multiple turrets covering almost all angles | ||
| + | * Can quite often return to base with extensive damage | ||
| + | * Pilot and co-pilot, if one of them is knocked out, you can still fly on | ||
| + | * The original pivoting belly gun turret has been replaced with a Sperry Ball turret | ||
'''Cons:''' | '''Cons:''' | ||
| − | * | + | * Very large target |
| + | * Quite slow when compared to fighters, and will always be outrun in level flight. | ||
| + | * Nose is extremely vulnerable, the only armour on the front is the front bulkhead, covering only the pilot and copilot's torso | ||
| + | * The front of the aircraft is only covered by 2 x 7.62 mm browning machine guns, which have different coverage areas | ||
| + | * Vulnerable to German "Minengeschoß" and > 20 mm gunfire | ||
| + | * Engine fires are common | ||
| + | * Very unmanuverable and effectively a sitting duck as all fighters at equivalent BR will be able to catch up to it with ease | ||
| + | * Wings are big and thus commonly torn off by gunfire, in addition to being loaded with all of the planes fuel, making fires extremely common as soon as the shooting begins | ||
| + | * Nose protection is extremely limited, try to avoid frontal attacks as much as possible | ||
== History == | == History == | ||
| Line 43: | Line 292: | ||
* ''reference to the series of the aircraft;'' | * ''reference to the series of the aircraft;'' | ||
* ''links to approximate analogues of other nations and research trees.'' | * ''links to approximate analogues of other nations and research trees.'' | ||
| − | ''ETC.'' | + | <!--''ETC.''--> |
== Sources == | == Sources == | ||
| Line 50: | Line 299: | ||
* ''page on aircraft encyclopedia;'' | * ''page on aircraft encyclopedia;'' | ||
* ''other literature.'' | * ''other literature.'' | ||
| + | |||
| + | {{USA bombers}} | ||
Revision as of 18:44, 27 November 2018
Contents
Description

The B-17E Flying Fortress /Late is a Rank III American heavy bomber with a battle rating of 5.3 (AB) and 5.7 (RB/SB). It was in the game since the start of the Open Beta Test prior to Update 1.29.
The B-17 Flying Fortress has the sole purpose of being a high-altitude bomber targeting land fortifications, airfields and bases. Despite its impressive bomb capacity, it is not recommended to target moving ground units, such as tanks or armoured cars, especially when they are travelling in tight columns due to the inaccuracy of your bombs at high altitudes and the ability for the AI on the ground to perform evasive maneuvers when bombs are falling onto their position. When you first spawn in a game using the B-17, it is best if you find a formation of friendly bombers to maximize your chances of survival.
Unlike the preceding variant of the B-17, the B-17E/Late sports the Sperry Ball turret on the belly of the aircraft, thus ensuring complete protection of the belly of the aircraft. However, it is important to note that you still have the main drawback as the preceding B-17E - the lack of nose defenses. While you do have .30 Caliber guns on the nose, it is relatively inadequate at Battle Rating 5.7, and nearly worthless at Battle Rating 6.7. On the contrary, you are a later model B-17E, which grants you more armour than your predecessor.
General info
Flight Performance
| Characteristics | |||||||
|---|---|---|---|---|---|---|---|
| Stock | |||||||
| Max Speed (km/h at 7,680 m) |
Max altitude (meters) |
Turn time (seconds) |
Rate of climb (meters/second) |
Take-off run (meters) | |||
| AB | RB | AB | RB | AB | RB | ||
| 496 | 484 | 11,156 | 36.8 | 37.9 | 5.7 | 5.6 | 600 |
| Upgraded | |||||||
| Max Speed (km/h at 7,680 m) |
Max altitude (meters) | Turn time (seconds) | Rate of climb (meters/second) |
Take-off run (meters) | |||
| AB | RB | AB | RB | AB | RB | ||
| ? | ? | 11,156 | ??.? | ??.? | ?.? | ?.? | ? |
Details
| Features | ||||
|---|---|---|---|---|
| Combat flap | Take-off flap | Landing flap | Air brakes | Arrestor gear |
| ✓ | ✓ | ✓ | X | X |
| Limits | ||||
|---|---|---|---|---|
| Wing-break speed (km/h) |
Gear limit (km/h) |
Combat flap (km/h) |
Max Static G | |
| + | - | |||
| 516 | 300 | ??? | ~1 | ~1 |
| Optimal velocities | |||
|---|---|---|---|
| Ailerons (km/h) |
Rudder (km/h) |
Elevators (km/h) |
Radiator (km/h) |
| < 360 | < 300 | < 323 | > 110 |
| Compressor (RB/SB) | ||
|---|---|---|
| Setting 1 | ||
| Optimal altitude | 100% Engine power | WEP Engine power |
| 6,180 m | 4,000 hp | 4,708 hp |
Survivability and armour
- 6.35 mm Steel plate behind nose gunner.
- 6.35 mm Steel plates behind pilots.
- 6.35 mm Steel plates behind dorsal gunners.
- 6.35 mm Steel plates in front of beam gunners.
- 6.35 mm Steel plates in front of tail gunner.
- 38 mm Bulletproof glass in front of tail gunner.
- 38 mm Bulletproof glass behind the ventral gunner.
Armaments
Suspended armament
The B-17E/L is defended by:
- 2 x 7.62 mm Browning machine gun, nose turret, 500 rpg
- 2 x 12.7 mm Browning M2 machine gun, tail turret, 575 rpg
- 2 x 12.7 mm Browning M2 machine gun, front dorsal turret, 500 rpg
- 1 x 12.7 mm Browning M2 machine gun, rear dorsal turret, 500 rpg
- 2 x 12.7 mm Browning M2 machine gun, ventral turret, 500 rpg
- 1 x 12.7 mm Browning M2 machine gun, 2 x beam turret, 400 rpg
Usage in the battles
When using the B-17E/Late Flying Fortress, it is important to note that you are not invincible, but the B-17 is notorious for being able to take one serious punch and still get you home. However, at your Battle Rating of 5.7, you aren't going to have too much room for error. Nonetheless, as mentioned earlier, you have minimal nose defenses which leaves the pilot and co-pilot dangerously exposed.
If you have the payload capability to destroy multiple bases, the first part to enhance your survival is one word: climb. You already start at the "Long Range Bombers" spawn, which is roughly at 4,500 meters (14,763 feet). A sustained climb can put you at nearly 5,500 meters (18,044 feet) in a matter of around a minute and a half. From there, maintain speed and a sustained climb to help put you out of reach of interceptors to buy you some time.
Do not try and bomb small targets such as pillboxes and moving armour. It is 1) Largely inaccurate due to the time it takes to reach the target from high altitude, and 2) not worth it as a whole, as moving armour columns can disperse after a bomb drop has been detected.
If you are under attack from enemy fighters / interceptors, Do not attempt to use evasive maneuvers - you are mainly unmaneuverable to begin with and trying to pull evasive maneuvers will kill your speed, throw off your gunner's aim and possibly increase your chances of losing a vital control component.
Another method of reaching your targets is to side-climb / plotting a course that is furthest away from the action.
At your Battle Rating of 5.7, it is very possible that you will be up-tiered to Battle Rating 6.7 matches, which almost any plane will tear you to shreds.
German Aircraft When facing the Germans, especially at Battle Rating 6.7, you will be vulnerable to the "Minengeschoß" rounds, which will punch through your armour, and explode inside the aircraft. The most dangerous opponents are going to be the Fw-190 D and any of the Focke Wulf Ta-152s, mainly due to their heavy-hitting weaponry. In addition, you also are confronted by the Bf 109 K-4, which has a 30 mm cannon through the propeller hub, which can make short work of you with a number of well-placed hits.
Russian Aircraft When facing the Russians, you have to pay close attention to any plane bearing the prefix "Yak," for rather obvious reasons at 5.7 and 6.7 battles. You especially need to pay attention to the Yak-9P and the Yak-9UT, which have a mix of 20 mm cannons and a combination of either a 37 mm cannon or a 45 mm cannon. The shear size of the cannons they wield can obliterate the B-17 with just one or two well-placed hits. Another aircraft to pay attention to is the La-11, which has three 23 mm cannons that can land serious damage if the hits are placed well.
British Aircraft While it is mainly uncommon to see one at high altitude, a Wyvern S4 has the capability to intercept you thanks to its extremely powerful engine. In addition, a Wvyern will cut you to shreds as a result of the four 20 mm Mk.V Hispano cannons. In addition, the Hornet will also have the capability to intercept you. Perhaps the biggest threats lie with the Griffon Spitfires, especially the Mk. 22 and Mk. 24 variants. Also keep your eyes peeled for the Tempest fighters.
Japanese Aircraft The Ki-87 is probably the single greatest threat to you at mid-tier battles due to the hard-hitting weaponry and its turboprop engine. In addition, (unlikely as it could be), the J7W will obliterate your plane due to the four 30 mm cannons in the nose. If not taken care of quickly, later models of the A7M "Reppu" can dispatch you if they have a good enough aim.
Counter-tactics
Repeat after me and take the time to memorize the following text: "Do not tail a B-17," even if you are flying something as heavily armed as a Messerschmitt 410 or a later Focke Wulf 190 model. This just warrants either an engine fire, your aircraft being critically damaged, or even your pilot being killed. If you have the altitude advantage over a B-17, try to hit it from an angle, which can increase your chances of survival. The weakest point on a B-17E from a defensive standpoint is from the nose of the aircraft. This is due to only a .30 Caliber machine gun defending the pilot and the co-pilot. If you do not have the capability to engage the B-17E from the nose, and you find yourself tailing a B-17E, aim for the wings of the bomber. This may allow you to set some of the fuel tanks on fire or even better yet shear one off.
For German planes, your Minengeschoß rounds give you a slight advantage, given your shells' ability to explode inside the bomber causing more extensive damage to the control surfaces. If a B-17E is present in a Battle Rating 6.7 match, they pose a lesser threat than something like the B-17G, which has only .50 Cals, but try not to tail a B-17E, as they still can punch through you if the .50 Cals have the "Armored Target" rounds.
Manual Engine Control
| MEC elements | ||||||
|---|---|---|---|---|---|---|
| Mixer | Pitch | Radiator | Supercharger | Turbocharger | ||
| Oil | Water | Type | ||||
| Controllable | Not controllable | Not controllable | Not controllable | Separate | Not ontrollable | Not controllable |
Modules
| Tier | Flight performance | Survivability | Weaponry | ||
|---|---|---|---|---|---|
| I | Fuselage Repair | Raidator | |||
| II | Compressor | Airframe | |||
| III | Wings Repair | Engine | |||
| IV | Engine Injection | Cover | |||
Pros and cons
Pros:
- Large bomb-load
- Powerful air defence capabilities
- Multiple engines, can fly on one if necessary (But with a great loss in altitude and speed)
- Rugged design allows for soaking up damage
- Mostly unaffected by light machine gun fire, and to an extent, heavy machine guns
- Good speed for a bomber of its peers
- Multiple turrets covering almost all angles
- Can quite often return to base with extensive damage
- Pilot and co-pilot, if one of them is knocked out, you can still fly on
- The original pivoting belly gun turret has been replaced with a Sperry Ball turret
Cons:
- Very large target
- Quite slow when compared to fighters, and will always be outrun in level flight.
- Nose is extremely vulnerable, the only armour on the front is the front bulkhead, covering only the pilot and copilot's torso
- The front of the aircraft is only covered by 2 x 7.62 mm browning machine guns, which have different coverage areas
- Vulnerable to German "Minengeschoß" and > 20 mm gunfire
- Engine fires are common
- Very unmanuverable and effectively a sitting duck as all fighters at equivalent BR will be able to catch up to it with ease
- Wings are big and thus commonly torn off by gunfire, in addition to being loaded with all of the planes fuel, making fires extremely common as soon as the shooting begins
- Nose protection is extremely limited, try to avoid frontal attacks as much as possible
History
Describe the history of the creation and combat usage of the aircraft in more detail than in the introduction. If the historical reference turns out to be too big, take it to a separate article, taking a link to an article about the vehicle and adding a block "/ historical reference" (example: https://wiki.warthunder.com/Name-vehicles/historical reference) and add a link to it here using the main template. Be sure to include links to sources at the end of the article.
Media
An excellent addition to the article will be video guides, as well as screenshots from the game and photos.
Read also
Links to the articles on the War Thunder Wiki that you think will be useful for the reader, for example,
- reference to the series of the aircraft;
- links to approximate analogues of other nations and research trees.
Sources
Paste links to sources and external resources, such as:
- topic on the official game forum;
- page on aircraft encyclopedia;
- other literature.
| USA bombers | |
|---|---|
| Dive | SB2U-2 · SB2U-3 · SBD-3 · SB2C-1C · SB2C-4 |
| Torpedo | TBD-1 · PBY-5 Catalina · PBY-5A Catalina · TBF-1C · BTD-1 |
| Medium | B-10B · B-18A · B-34 · PV-2D · B-25J-1 · B-25J-20 · A-26C-45 · A-26C-45DT · B-26B |
| Heavy | B-17E · B-17E/L · B-17G-60-VE · PB4Y-2 · B-24D-25-CO · B-29A-BN |
| Hydroplanes | OS2U-1 · OS2U-3 · PBM-1 "Mariner" · PBM-3 "Mariner" |
