Difference between revisions of "AMX-30 (1972)"
(Filled : Description, General Information, Armament, pros&cons with knowledge obtained from : wikipedia, memory, personal experience) (Tag: Visual edit) |
Inceptor57 (talk | contribs) (Major edits - Removed 1st person references, Added standardized intro, Restored page tables for specifications, Moved small history section to appropriate location, plus other formatting fixes) |
||
| Line 2: | Line 2: | ||
== Description == | == Description == | ||
| − | The | + | [[File:GarageImage_{{PAGENAME}}.jpg|420px|thumb|left]] |
| + | {{break}} | ||
| + | The '''{{Specs|name}}''' is a Rank {{Specs|rank}} French medium tank {{Battle-rating|1}}. It was introduced in [[Update 1.75 "La Résistance"]]. | ||
| − | the AMX- | + | The [[AMX-30]] was first issued in August 1966, with the first 5 units being assigned to 501''e Régiment de Chars de Combat'' (Combat Tank Regiment). The AMX-30 is the first tank to use France's very own 105mm gun, the [[CN-105-F1 (105 mm)|CN-105-F1]] designed in tandem with the Obus G spin stabilized High Explosive Anti-Tank round; a [[Browning M2HB (12.7 mm)|12.7mm M2HB]] heavy machine gun for a co-axial, and a [[AAN-F1 (7.62 mm)|7.62 mm]] machine gun on the cupola. At the time, it weighed a light 36 tons (metric) compared to the [[Leopard I|Leopard's]] 40 tons, but overall has a lower hp/ton ratio due to usage of a weaker engine. The AMX-30 mod. 1972 saw the replacement of the [[Browning M2HB (12.7 mm)|M2HB]] co-axial machine gun with a [[M693 (20 mm)|20mm M693 autocannon]] with the ability to elevate from -8° to 40° (20° higher than the main gun) in order to target light armoured Vehicles and helicopters |
| − | + | As previously mentioned, the 105mm gun on the AMX-30 is France's own, and designed with a particular shell in mind, the OCC 105 "Obus G". This shell works by having the HEAT warhead mounted on bearings to and outer shell by bearings, thus keeping the accuracy of a normal rotating HEAT shell with the penetrative power of non-rotating HEAT Fin Stabilized shell, supposedly making the shot more accurate at longer ranges. This shell and the revision from a .50 cal to a 20mm autocannon suggest this tank was modernized for long range combat in a highly mobile package which could be a reflection of the French's army exceptions, possibly that fighting over the fields of France . | |
| − | |||
| − | |||
== General info == | == General info == | ||
=== Survivability and armour === | === Survivability and armour === | ||
| − | + | Being a derivative of the Euro-panzer project (like the Leopard) and that mobility and firepower were placed above almost all else, the AMX-30 was not built to get shot at by main battle tanks, or tanks for that matter. | |
| − | <u>'''Hull | + | <u>'''Hull armour :'''</u> |
| − | + | The lower front plate is 79 mm thick at 39° (which is not a lot at 7.3) while the upper front plate is (again) 79mm, this time at 68°. In other words, the hull will not defend the AMX-30 against anything heavier than an auto-cannon, although it could bounce some AP and APHE rounds when using the 8° of gun depression to its fullest, though to be safer, don't expose the front of the hull. | |
| − | + | The side/rear of the hull are also lackluster, with 30mm side and rear protection and the the only "strong point" being the sponsons with 35mm, expect most rounds larger than heavy machine guns to pass through. The sponsons themselves have only a 57mm plate covering the front, not to mention it is angled up and to the side, it could potentially be a weakspot for anti-aircraft vehicles if they are at an angle compared to you. | |
| − | <u>'''Turret | + | <u>'''Turret armour:'''</u> |
| − | Much like the Hull, the turret isn't really meant to protect against much | + | Much like the Hull, the turret isn't really meant to protect against much. The turret is 80mm thick around the gun (not counting the 150 mm gun ring since it's too small a target). The rest are mostly 60mm thick apart from a 50mm autocannon mantlet and a 35mm plate for the view port. The top and bottom of the mantlet is 30mm thick, but it's at 78°, meaning it might be the toughest part yet, particularly since shot traps from the bottom of the mantlet don't seem common. |
| − | + | The turret cheeks maybe only 41.5mm thick, but from the front, the angle makes the shot risky, though be aware it is still a potential target. If the tank is played using its mobility and peeking over ridges, the cupola is 60mm and rather big, so be wary of APHE shells because if they penetrate there, you might lose the turret crew if not the entire tank. | |
| − | + | The most likely target on the turret (maybe even the whole tank) is the turret top and "forehead", the armour plate directly above the mantlet is 30mm thick with an angle of 71°, it might bounce ''some'' shells, but most APDS and HEAT will still go through. The problem being that sitting at the rear of the turret is the ready rack, which will most likely detonate if hit. | |
| − | + | The turret side armour has nothing much speaking for it that the front armour has, as much like the hull, it isn't well armored. Ricochets and bounces off this sector is quite rare and should be unexpected. Just make sure to keep your head on a swivel and have that turret hidden or pointing at your foe. | |
'''<u>Modules and crew placement:</u>''' | '''<u>Modules and crew placement:</u>''' | ||
| − | + | A particularity in the AMX-30's survivability is the placement of modules and crew. On the Leopard, shooting the left side of the upper front plate of the hull would knock out the driver, gunner, and commander all at once, thus completely neutralizing the tank and requiring a replacement crew to be deployed, and shooting the right side would detonate the ammo rack which holds 90% of the Leopard's ammo capacity | |
| − | + | This problem doesn't happen as much on an AMX-30 however, because of the tank's fuel tank being in front and beside the ammo rack, shots to the left side of the hull might not detonate the ammo rack there and (if you lucky) might not even hit the gunner. As for the right side, the only crewman behind the driver is the loader. | |
| − | + | In other words, whereas it would take one shot to disable or destroy a Leopard 1 through the hull, it may take more than one to defeat an AMX-30 this way. | |
| − | + | The downside of course is that you have 22 rounds of ammunition in a ready rack that will constantly fill itself, which means that 40% of your munitions is sitting behind the gunner and commander, making shots at the turret the enemy's priority | |
| − | final note will be on the | + | A final note will be on the smoke shells and smoke grenades available on the AMX-30: use these without moderation! If targeted and multiple enemies are pointing/firing upon you, use the smoke grenades and relocate; if an enemy is keeping you pinned, try to catch him off guard and throw a smoke shell in his face then proceed. |
| + | |||
| + | '''Armour type:''' | ||
| + | * Cast homogeneous armour | ||
| + | * Rolled homogeneous armour (Hull roof, Hull sides) | ||
| + | {| class="wikitable" | ||
| + | |- | ||
| + | ! Armour !! Front (Slope angle) !! Sides !! Rear !! Roof | ||
| + | |- | ||
| + | | Hull || 79 mm (57-68°), 50 mm (52-76°) ''Front glacis'' <br> 79 mm (0-57°), 30 mm (75°) ''Lower glacis'' || 35-57 mm (0-35) <br> 30 mm ''Bottom'' <br> 25 mm (70°) ''Belly'' || 30 mm (10°) ''Top'' <br> 30 mm ''Center'' <br> 25 mm (70°) ''Bottom'' || 15 mm <br> 8 mm ''Engine grille'' | ||
| + | |- | ||
| + | | Turret || 30-150 mm (0-79°) ''Gun mantlet'' <br> 30 mm (61-75°) ''Turret front top'' || 41.5 mm (19-47°) || 30 mm (1-64°) <br> 20 mm (54-64°) ''Turret underside'' || 20 mm | ||
| + | |- | ||
| + | ! Armour !! Sides !! Roof | ||
| + | |- | ||
| + | | Cupola || 80 mm || 20 mm | ||
| + | |} | ||
=== Mobility === | === Mobility === | ||
| − | The | + | The mobility of the AMX-30 is great in almost every respect. It has slightly lower acceleration than a Leopard or [[STB-1]], but it still gets the job done about as well. It doesn't struggle much off road, but do remind yourself that the gun is not stabilized. Firing on the move might hit occasionally and might scare them off, but shooting straight means stopping, something you should '''never''' do when targeted by enemy tanks. |
| + | |||
| + | Reminder that the tank as -8° elevation to the front of the tank, and (like the Leopard) cannot depress over the back, so don't get flanked, ever (considering the mobility of this tank, if your outflanked, you either stayed still too long, took the unfortunate path, or didn't pay enough attention). | ||
| − | + | {| class="wikitable" style="text-align:center" | |
| + | |- | ||
| + | !colspan="3" | Mobility characteristic | ||
| + | |- | ||
| + | ! Weight (tons) | ||
| + | !colspan="1" | Add-on Armor<br>weight (tons) | ||
| + | !colspan="1" | Max speed (km/h) | ||
| + | |- | ||
| + | |rowspan="2" | 36.0 || colspan="1" rowspan="2" | N/A || colspan="1" | 72 (AB) | ||
| + | |- | ||
| + | |65 (RB/SB) | ||
| + | |- | ||
| + | !colspan="3" | Engine power (horsepower) | ||
| + | |- | ||
| + | !colspan="1" | Mode | ||
| + | !Stock | ||
| + | !Upgraded | ||
| + | |- | ||
| + | |''Arcade'' | ||
| + | |1,116 | ||
| + | |____ | ||
| + | |- | ||
| + | |''Realistic/Simulator'' | ||
| + | |637 | ||
| + | |720 | ||
| + | |- | ||
| + | !colspan="3" | Power-to-weight ratio (hp/ton) | ||
| + | |- | ||
| + | !colspan="1" | Mode | ||
| + | !Stock | ||
| + | !Upgraded | ||
| + | |- | ||
| + | |''Arcade'' | ||
| + | |31.00 | ||
| + | |__.__ | ||
| + | |- | ||
| + | |''Realistic/Simulator'' | ||
| + | |17.69 | ||
| + | |20.00 | ||
| + | |- | ||
| + | |} | ||
== Armaments == | == Armaments == | ||
=== Main armament === | === Main armament === | ||
| − | + | {{main|CN-105-F1 (105 mm)}} | |
| + | The main armament on the AMX-30 (1972) is the [[CN-105-F1 (105 mm)|CN-105-F1]]. This gun was specifically designed for the use of the tank's OCC-105 spin stabilized HEAT shell, which works by spinning an outer shell using the gun's rifling in order to provide aerodynamic stability while the inner shell (the actual warhead) is suspended by bearings in order to minimize rotation, which would reduce the penetrative power of said shell. It is for all intents and purposes a slightly different HEAT-FS shell. | ||
| − | + | The main concern is that HEAT shells, particularly modern ones, are <u>sensitive to impact</u>, they might fly through some foliage and some fences, but it is best to <u>destroy the destructible terrain first</u> before firing (where the 20mm comes in handy, more on that later), though you must remember that on maps like [[Sinai|Sinai]] where houses can be shot through without being shot down, you are at a disadvantage because if you are seen, enemies with AP shells of any sort can and will be able to shoot through the building and hit you, while chemical shells (including HE, HEAT, and HEAT-FS) can't. | |
| − | + | But do not underestimate the power of its HEAT shell, it still is quite deadly, harder to bounce, and it keeps penetration over range, not to mention you get similar performance to a Leopard's HEAT-FS from stock and thus without the associated price. All in all, firepower-wise, the tank is not bad. | |
| − | + | The shrapnel of the round in post-penetration damage might not be as plentiful as APHE rounds, but with a <u>reload speed of 8.7 seconds stock</u>, provided you aim for crew and modules, you can spit out about 7 <u>HEAT shells penetrating anything from 200mm at 60° to 400mm at 90°</u> every minute. Once fully upgraded, you go from 8.7 seconds reload for about 7 shots per minute to 6.7 seconds reload for about 9 shots a minute. It isn't the best out there, but <u>it does fire fast</u>. | |
| − | + | A word of warning before talking of the gun's flexibility though, knowing your enemy's tank is crucial, but most importantly you must know and <u>remember the location of: A) the gunner</u>, in order to prevent him from firing, and <u>B) the ammo racks</u>, in order to one shot the enemy, should you catch him off guard or incapacitate his gunner. | |
| − | + | As for the gun handling, its quite exceptional. The <u>turret rotation</u> is okay <u>stock at 36°/s</u> and is fast once you get the "horizontal turret drive" module unlocked at <u>50°/s</u>. The turret elevation isn't slow either, meaning that acquiring, tracking, and changing targets is relatively easy on this tank, you can even track some propeller driven aircraft (more on that later). | |
| − | + | The elevation angles aren't too bad, though could be better considering the high roof and aforementioned "forehead" of the turret, the <u>gun only goes 8° down when fully depressed</u>, it is worse than tanks like the Leopard and Centurions that can depress 9° and 10° respectively, but do remember it is still better than the Vickers' 7° and the T-54's 4° of depression so <u>don't be too afraid of peeking</u> over small hills and ridges, just <u>be quick to pop up and back down</u> when necessary. | |
| − | |||
| − | + | {| class="wikitable" style="text-align:center" | |
| + | |- | ||
| + | ! colspan="6" | [[CN-105-F1 (105 mm)|105 mm CN-105-F1]] | ||
| + | |- | ||
| + | ! colspan="3" rowspan="1" style="width:5em" |Capacity | ||
| + | ! rowspan="1" | Vertical <br> guidance | ||
| + | ! rowspan="1" | Horizontal <br> guidance | ||
| + | ! rowspan="1" | Stabilizer | ||
| + | |- | ||
| + | | colspan="3" | 50 || -8°/+20° || ±180° || N/A | ||
| + | |- | ||
| + | ! colspan="6" | Turret rotation speed (°/s) | ||
| + | |- | ||
| + | ! style="width:4em" |Mode | ||
| + | ! style="width:4em" |Stock | ||
| + | ! style="width:4em" |Upgraded | ||
| + | ! style="width:4em" |Prior + Full crew | ||
| + | ! style="width:4em" |Prior + Expert qualif. | ||
| + | ! style="width:4em" |Prior + Ace qualif. | ||
| + | |- | ||
| + | | ''Arcade'' || 28.6 || __.__ || __.__ || __.__ || __.__ | ||
| + | |- | ||
| + | | ''Realistic'' || 17.9 || 22.1 || 25.7 || 28.4 || 30.0 | ||
| + | |- | ||
| + | ! colspan="4" | Reloading rate (seconds) | ||
| + | |- | ||
| + | ! colspan="1" style="width:4em" |Stock | ||
| + | ! colspan="1" style="width:4em" |Prior + Full crew | ||
| + | ! colspan="1" style="width:4em" |Prior + Expert qualif. | ||
| + | ! colspan="1" style="width:4em" |Prior + Ace qualif. | ||
| + | |- | ||
| + | | 8.7 || 7.7 || 7.1 || 6.7 | ||
| + | |- | ||
| + | |} | ||
| − | + | ===== Ammunition ===== | |
| + | {| class="wikitable sortable" style="text-align:center" width="100%" | ||
| + | ! colspan="8" | Penetration statistics | ||
| + | |- | ||
| + | ! rowspan="2" data-sort-type="text" | Ammunition | ||
| + | ! rowspan="2" class="unsortable" | Type of <br /> warhead | ||
| + | ! colspan="6" | '''Penetration''' '''''in mm''''' '''@ 90°''' | ||
| + | |- | ||
| + | ! 10m | ||
| + | ! 100m | ||
| + | ! 500m | ||
| + | ! 1000m | ||
| + | ! 1500m | ||
| + | ! 2000m | ||
| + | |- | ||
| + | | OCC 105 F1 || HEAT || 400 || 400 || 400 || 400 || 400 || 400 | ||
| + | |- | ||
| + | | OE 105 F1 Mle.60 || HE || 25 || 25 || 25 || 25 || 25 || 25 | ||
| + | |- | ||
| + | |} | ||
| + | {| class="wikitable sortable" style="text-align:center" width="100%" | ||
| + | ! colspan="11" | Shell details | ||
| + | |- | ||
| + | ! rowspan="2" data-sort-type="text" | Ammunition | ||
| + | ! rowspan="2" class="unsortable" | Type of <br /> warhead | ||
| + | ! rowspan="2" |Velocity <br /> in m/s | ||
| + | ! rowspan="2" |Projectile<br />Mass in kg | ||
| + | ! rowspan="2" | ''Fuse delay'' | ||
| + | ''in m:'' | ||
| + | ! rowspan="2" | ''Fuse sensitivity'' | ||
| + | ''in mm:'' | ||
| + | ! rowspan="2" | ''Explosive Mass in g<br /> (TNT equivalent):'' | ||
| + | ! rowspan="2" | ''Normalization At 30° <br> from horizontal:'' | ||
| + | ! colspan="3" | ''Ricochet:'' | ||
| + | |- | ||
| + | ! 0% | ||
| + | ! 50% | ||
| + | ! 100% | ||
| + | |- | ||
| + | | OCC 105 F1 || HEAT || 1,000 || 11 || 0.0 || 0.1 || 1,020 || +0° || 62° || 69° || 73° | ||
| + | |- | ||
| + | | OE 105 F1 Mle.60 || HE || 700 || 12 || 0.1 || 0.1 || 2,000 || +0° || 79° || 80° || 81° | ||
| + | |- | ||
| + | |} | ||
| + | {| class="wikitable sortable" style="text-align:center" | ||
| + | ! colspan="7" | Smoke characteristic | ||
| + | |- | ||
| + | ! Ammunition | ||
| + | ! Velocity <br /> in m/s | ||
| + | ! Projectile<br />Mass in kg | ||
| + | ! ''Screen radius <br /> in m'' | ||
| + | ! ''Screen time <br /> in s'' | ||
| + | ! ''Screen hold time <br /> in s:'' | ||
| + | ! ''Explosive Mass in g<br /> (TNT equivalent):'' | ||
| + | |- | ||
| + | | OFPH 105 F1 || 700 || 11 || 20 || 5 || 25 || 50 | ||
| + | |- | ||
| + | |} | ||
| − | the | + | ===== [[Ammo racks|Ammo racks]] ===== |
| + | [[File:Ammoracks_AMX-30.png|right|thumbnail|x250px|Ammo racks of the AMX-30 (identical to AMX-30 (1972).]] | ||
| + | {| class="wikitable sortable" style="text-align:center" | ||
| + | |- | ||
| + | ! class="wikitable unsortable" |Full<br /> ammo | ||
| + | ! class="wikitable unsortable" |1st<br /> rack empty | ||
| + | ! class="wikitable unsortable" |2nd<br /> rack empty | ||
| + | ! class="wikitable unsortable" |3rd<br /> rack empty | ||
| + | ! class="wikitable unsortable" |4th<br /> rack empty | ||
| + | ! class="wikitable unsortable" |5th<br /> rack empty | ||
| + | ! class="wikitable unsortable" |6th<br /> rack empty | ||
| + | ! class="wikitable unsortable" |Visual<br /> discrepancy | ||
| + | |- | ||
| + | || '''50''' || XX ''(X+)'' || ''(+)'' || ''(+)'' || ''(+)'' || ''(+)'' || ''(+)'' || style="text-align:left" | no | ||
| + | |- | ||
| + | |} | ||
| − | + | For ammo loadouts, it is suggested to bring 20-25 rounds of HEAT, 3-6 rounds of Smoke, and no HE rounds. That is because despite of the 50 rounds capacity, in a normal game you won't fire that many HEAT rounds, thus 20 shells for the more ammo conserving folk or 25 rounds for the more trigger happy is recommend. You may take more if you really need to, but you can get away with just that many if you make a stop by a capture zone to replenish. | |
| − | |||
| − | + | The smoke rounds, depending on your play-style, you might not need often, but when you do, they are life saving as they can allow you to lay a smoke screen right in front of you or your team when you're out of smoke grenades (or if you've yet to unlock them yet) and they can blind snipers allowing you and your team to move up. | |
| − | + | The HE shells are very situational, since the 20mm is almost always a better alternative. You don't need it to hull break light vehicles since the HEAT shell already does that, the only use would be for a target that is too far to hit effectively with the 20mm, but where a HEAT shell might be unnecessary. | |
| − | 1) | + | === Additional armament === |
| + | {{main|M693 (20 mm)}} | ||
| + | The secondary on the AMX-30 is not a machine gun, but an auto-cannon. It fires a belt with a composition of of 1 High Explosive Fragmentation (HEF) round, followed by one Armour Piercing round (AP) with both of these rounds being incendiary tracer rounds (I-T). Alternating between explosive rounds that are great from helicopters, planes and exposed crew, whilst burning and tracing the round; and an armour piercing round for light armored targets, whilst burning and tracing the round. | ||
| − | 2) | + | The only times where you would not be firing your 20mm gun is either: 1) there are no targets, 2) it would give your sniping position or your flanking attack away, 3) you are too far away to hit/damage anything, 4) you are trying to cool the weapon down (yes it can overheat) 5) you're reloading/un-jamming it. |
| − | + | In almost every other circumstance, firing the 20mm is preferably though some times more than others, because this secondary is useful at four things in particular : | |
| − | + | # destroying fences, walls, trees, bushes, ... and any other destructible environment your HEAT shell would detonate upon before reaching your target | |
| + | # destroying light vehicles, exposed crew and even other tanks should you have the side or rear of the target to shoot at | ||
| + | # shooting down planes, as they are preparing or exiting an attack run | ||
| + | # and lastly, destroying the exposed modules (canons, guns, tracks, ERA blocks) of an any tank if you can't kill it outright | ||
| − | + | There is only one belt to use, so make use of the HE-AP combination in the belt. The autocannon gets one thousand rounds to use, which means 500 rounds of crew-injuring HE and 500 rounds of tank damaging AP, with a fire rate not too slow nor too fast that allows for sustained suppressive fire. | |
| + | |||
| + | {| class="wikitable" style="text-align:center" | ||
| + | |- | ||
| + | ! colspan="7" | [[M693 (20 mm)|20 mm M693]] | ||
| + | |- | ||
| + | ! colspan="7" | ''Coaxial mount'' | ||
| + | |- | ||
| + | ! colspan="4" rowspan="1" style="width:5em" |Capacity (Belt capacity) | ||
| + | ! rowspan="1" | Fire rate <br> (shots/minute) | ||
| + | ! rowspan="1" | Vertical <br> guidance | ||
| + | ! rowspan="1" | Horizontal <br> guidance | ||
| + | |- | ||
| + | | colspan="4" | 1,000 (500) || 740 || -0°/+20° || N/A | ||
| + | |- | ||
| + | |} | ||
=== Machine guns === | === Machine guns === | ||
| − | + | {{main|AAN-F1 (7.62 mm)}} | |
| + | Considering the fact that the 20mm co-axial is not only powerful enough, but flexible enough to shoot down planes with, the AAN-F1 machine gun just seems like an outlier in terms of providing firepower. It could be useful to attack exposed crew members, but this is very rare with the type of enemy vehicles seen in matches. The best use of this machine gun would probably to annoy the enemy, or draw their attention without using the valuable 20 mm autocannon shells. | ||
| + | |||
| + | {| class="wikitable" style="text-align:center" | ||
| + | |- | ||
| + | ! colspan="7" | [[AAN-F1 (7.62 mm)|7.62 mm AAN-F1]] | ||
| + | |- | ||
| + | ! colspan="7" | ''Pintle mount'' | ||
| + | |- | ||
| + | ! colspan="4" rowspan="1" style="width:5em" |Capacity (Belt capacity) | ||
| + | ! rowspan="1" | Fire rate <br> (shots/minute) | ||
| + | ! rowspan="1" | Vertical <br> guidance | ||
| + | ! rowspan="1" | Horizontal <br> guidance | ||
| + | |- | ||
| + | | colspan="4" | 2,000 (100) || 900 || -10°/+45° || ±120° | ||
| + | |- | ||
| + | |} | ||
== Usage in the battles == | == Usage in the battles == | ||
| Line 95: | Line 293: | ||
=== Pros and cons === | === Pros and cons === | ||
| − | ''Summarize and briefly evaluate the vehicle in terms of its characteristics and combat effectiveness. Mark its pros and cons in a bulleted list. Do not use more than 6 points for each of the characteristics. Avoid using categorical definitions such as "bad", "good" and the like - they have a substitution in the form of softer "inadequate", "effective".'' | + | <!--''Summarize and briefly evaluate the vehicle in terms of its characteristics and combat effectiveness. Mark its pros and cons in a bulleted list. Do not use more than 6 points for each of the characteristics. Avoid using categorical definitions such as "bad", "good" and the like - they have a substitution in the form of softer "inadequate", "effective".''--> |
| − | |||
'''Pros:''' | '''Pros:''' | ||
* Tank is relatively fast and mobile | * Tank is relatively fast and mobile | ||
* Turret rotation and elevation is fast | * Turret rotation and elevation is fast | ||
| − | * 20mm auto- | + | * 20mm auto-cannon is good against light tanks, planes, and obstacles |
* HEAT shells have good penetration | * HEAT shells have good penetration | ||
| − | * | + | * Has access to smoke shells and smoke grenades |
| − | * | + | * Gunner and driver are not aligned means tank is harder to disable in one shot |
* Hull ammo rack surrounded by fuel tank | * Hull ammo rack surrounded by fuel tank | ||
| − | |||
| − | |||
'''Cons:''' | '''Cons:''' | ||
| − | * | + | * Armour is unsatisfactory against enemy armaments |
| − | * | + | * Only 8° of gun depression |
| − | * | + | * Cannot depress the gun over the engine deck |
| − | * HEAT can't go through obstacles | + | * HEAT shell can't go through obstacles |
| − | * | + | * Ready-rack at turret rear is prone to getting shot, even from the front |
| − | * | + | * High cupola design makes it easier to spot |
| − | |||
| − | |||
== History == | == History == | ||
| Line 139: | Line 332: | ||
* ''topic on the official game forum;'' | * ''topic on the official game forum;'' | ||
* ''other literature.'' | * ''other literature.'' | ||
| + | |||
| + | {{France medium tanks}} | ||
Revision as of 17:24, 20 February 2019
Contents
Description
.jpg)
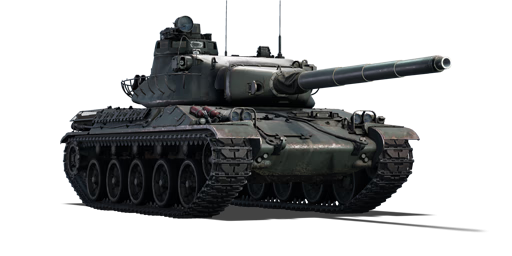
The AMX-30 (1972) is a Rank V French medium tank
with a battle rating of 8.0 (AB/RB/SB). It was introduced in Update 1.75 "La Résistance".
The AMX-30 was first issued in August 1966, with the first 5 units being assigned to 501e Régiment de Chars de Combat (Combat Tank Regiment). The AMX-30 is the first tank to use France's very own 105mm gun, the CN-105-F1 designed in tandem with the Obus G spin stabilized High Explosive Anti-Tank round; a 12.7mm M2HB heavy machine gun for a co-axial, and a 7.62 mm machine gun on the cupola. At the time, it weighed a light 36 tons (metric) compared to the Leopard's 40 tons, but overall has a lower hp/ton ratio due to usage of a weaker engine. The AMX-30 mod. 1972 saw the replacement of the M2HB co-axial machine gun with a 20mm M693 autocannon with the ability to elevate from -8° to 40° (20° higher than the main gun) in order to target light armoured Vehicles and helicopters
As previously mentioned, the 105mm gun on the AMX-30 is France's own, and designed with a particular shell in mind, the OCC 105 "Obus G". This shell works by having the HEAT warhead mounted on bearings to and outer shell by bearings, thus keeping the accuracy of a normal rotating HEAT shell with the penetrative power of non-rotating HEAT Fin Stabilized shell, supposedly making the shot more accurate at longer ranges. This shell and the revision from a .50 cal to a 20mm autocannon suggest this tank was modernized for long range combat in a highly mobile package which could be a reflection of the French's army exceptions, possibly that fighting over the fields of France .
General info
Survivability and armour
Being a derivative of the Euro-panzer project (like the Leopard) and that mobility and firepower were placed above almost all else, the AMX-30 was not built to get shot at by main battle tanks, or tanks for that matter.
Hull armour :
The lower front plate is 79 mm thick at 39° (which is not a lot at 7.3) while the upper front plate is (again) 79mm, this time at 68°. In other words, the hull will not defend the AMX-30 against anything heavier than an auto-cannon, although it could bounce some AP and APHE rounds when using the 8° of gun depression to its fullest, though to be safer, don't expose the front of the hull.
The side/rear of the hull are also lackluster, with 30mm side and rear protection and the the only "strong point" being the sponsons with 35mm, expect most rounds larger than heavy machine guns to pass through. The sponsons themselves have only a 57mm plate covering the front, not to mention it is angled up and to the side, it could potentially be a weakspot for anti-aircraft vehicles if they are at an angle compared to you.
Turret armour:
Much like the Hull, the turret isn't really meant to protect against much. The turret is 80mm thick around the gun (not counting the 150 mm gun ring since it's too small a target). The rest are mostly 60mm thick apart from a 50mm autocannon mantlet and a 35mm plate for the view port. The top and bottom of the mantlet is 30mm thick, but it's at 78°, meaning it might be the toughest part yet, particularly since shot traps from the bottom of the mantlet don't seem common.
The turret cheeks maybe only 41.5mm thick, but from the front, the angle makes the shot risky, though be aware it is still a potential target. If the tank is played using its mobility and peeking over ridges, the cupola is 60mm and rather big, so be wary of APHE shells because if they penetrate there, you might lose the turret crew if not the entire tank.
The most likely target on the turret (maybe even the whole tank) is the turret top and "forehead", the armour plate directly above the mantlet is 30mm thick with an angle of 71°, it might bounce some shells, but most APDS and HEAT will still go through. The problem being that sitting at the rear of the turret is the ready rack, which will most likely detonate if hit.
The turret side armour has nothing much speaking for it that the front armour has, as much like the hull, it isn't well armored. Ricochets and bounces off this sector is quite rare and should be unexpected. Just make sure to keep your head on a swivel and have that turret hidden or pointing at your foe.
Modules and crew placement:
A particularity in the AMX-30's survivability is the placement of modules and crew. On the Leopard, shooting the left side of the upper front plate of the hull would knock out the driver, gunner, and commander all at once, thus completely neutralizing the tank and requiring a replacement crew to be deployed, and shooting the right side would detonate the ammo rack which holds 90% of the Leopard's ammo capacity
This problem doesn't happen as much on an AMX-30 however, because of the tank's fuel tank being in front and beside the ammo rack, shots to the left side of the hull might not detonate the ammo rack there and (if you lucky) might not even hit the gunner. As for the right side, the only crewman behind the driver is the loader.
In other words, whereas it would take one shot to disable or destroy a Leopard 1 through the hull, it may take more than one to defeat an AMX-30 this way.
The downside of course is that you have 22 rounds of ammunition in a ready rack that will constantly fill itself, which means that 40% of your munitions is sitting behind the gunner and commander, making shots at the turret the enemy's priority
A final note will be on the smoke shells and smoke grenades available on the AMX-30: use these without moderation! If targeted and multiple enemies are pointing/firing upon you, use the smoke grenades and relocate; if an enemy is keeping you pinned, try to catch him off guard and throw a smoke shell in his face then proceed.
Armour type:
- Cast homogeneous armour
- Rolled homogeneous armour (Hull roof, Hull sides)
| Armour | Front (Slope angle) | Sides | Rear | Roof |
|---|---|---|---|---|
| Hull | 79 mm (57-68°), 50 mm (52-76°) Front glacis 79 mm (0-57°), 30 mm (75°) Lower glacis |
35-57 mm (0-35) 30 mm Bottom 25 mm (70°) Belly |
30 mm (10°) Top 30 mm Center 25 mm (70°) Bottom |
15 mm 8 mm Engine grille |
| Turret | 30-150 mm (0-79°) Gun mantlet 30 mm (61-75°) Turret front top |
41.5 mm (19-47°) | 30 mm (1-64°) 20 mm (54-64°) Turret underside |
20 mm |
| Armour | Sides | Roof | ||
| Cupola | 80 mm | 20 mm |
Mobility
The mobility of the AMX-30 is great in almost every respect. It has slightly lower acceleration than a Leopard or STB-1, but it still gets the job done about as well. It doesn't struggle much off road, but do remind yourself that the gun is not stabilized. Firing on the move might hit occasionally and might scare them off, but shooting straight means stopping, something you should never do when targeted by enemy tanks.
Reminder that the tank as -8° elevation to the front of the tank, and (like the Leopard) cannot depress over the back, so don't get flanked, ever (considering the mobility of this tank, if your outflanked, you either stayed still too long, took the unfortunate path, or didn't pay enough attention).
| Mobility characteristic | ||
|---|---|---|
| Weight (tons) | Add-on Armor weight (tons) |
Max speed (km/h) |
| 36.0 | N/A | 72 (AB) |
| 65 (RB/SB) | ||
| Engine power (horsepower) | ||
| Mode | Stock | Upgraded |
| Arcade | 1,116 | ____ |
| Realistic/Simulator | 637 | 720 |
| Power-to-weight ratio (hp/ton) | ||
| Mode | Stock | Upgraded |
| Arcade | 31.00 | __.__ |
| Realistic/Simulator | 17.69 | 20.00 |
Armaments
Main armament
The main armament on the AMX-30 (1972) is the CN-105-F1. This gun was specifically designed for the use of the tank's OCC-105 spin stabilized HEAT shell, which works by spinning an outer shell using the gun's rifling in order to provide aerodynamic stability while the inner shell (the actual warhead) is suspended by bearings in order to minimize rotation, which would reduce the penetrative power of said shell. It is for all intents and purposes a slightly different HEAT-FS shell.
The main concern is that HEAT shells, particularly modern ones, are sensitive to impact, they might fly through some foliage and some fences, but it is best to destroy the destructible terrain first before firing (where the 20mm comes in handy, more on that later), though you must remember that on maps like Sinai where houses can be shot through without being shot down, you are at a disadvantage because if you are seen, enemies with AP shells of any sort can and will be able to shoot through the building and hit you, while chemical shells (including HE, HEAT, and HEAT-FS) can't.
But do not underestimate the power of its HEAT shell, it still is quite deadly, harder to bounce, and it keeps penetration over range, not to mention you get similar performance to a Leopard's HEAT-FS from stock and thus without the associated price. All in all, firepower-wise, the tank is not bad.
The shrapnel of the round in post-penetration damage might not be as plentiful as APHE rounds, but with a reload speed of 8.7 seconds stock, provided you aim for crew and modules, you can spit out about 7 HEAT shells penetrating anything from 200mm at 60° to 400mm at 90° every minute. Once fully upgraded, you go from 8.7 seconds reload for about 7 shots per minute to 6.7 seconds reload for about 9 shots a minute. It isn't the best out there, but it does fire fast.
A word of warning before talking of the gun's flexibility though, knowing your enemy's tank is crucial, but most importantly you must know and remember the location of: A) the gunner, in order to prevent him from firing, and B) the ammo racks, in order to one shot the enemy, should you catch him off guard or incapacitate his gunner.
As for the gun handling, its quite exceptional. The turret rotation is okay stock at 36°/s and is fast once you get the "horizontal turret drive" module unlocked at 50°/s. The turret elevation isn't slow either, meaning that acquiring, tracking, and changing targets is relatively easy on this tank, you can even track some propeller driven aircraft (more on that later).
The elevation angles aren't too bad, though could be better considering the high roof and aforementioned "forehead" of the turret, the gun only goes 8° down when fully depressed, it is worse than tanks like the Leopard and Centurions that can depress 9° and 10° respectively, but do remember it is still better than the Vickers' 7° and the T-54's 4° of depression so don't be too afraid of peeking over small hills and ridges, just be quick to pop up and back down when necessary.
| 105 mm CN-105-F1 | |||||
|---|---|---|---|---|---|
| Capacity | Vertical guidance |
Horizontal guidance |
Stabilizer | ||
| 50 | -8°/+20° | ±180° | N/A | ||
| Turret rotation speed (°/s) | |||||
| Mode | Stock | Upgraded | Prior + Full crew | Prior + Expert qualif. | Prior + Ace qualif. |
| Arcade | 28.6 | __.__ | __.__ | __.__ | __.__ |
| Realistic | 17.9 | 22.1 | 25.7 | 28.4 | 30.0 |
| Reloading rate (seconds) | |||||
| Stock | Prior + Full crew | Prior + Expert qualif. | Prior + Ace qualif. | ||
| 8.7 | 7.7 | 7.1 | 6.7 | ||
Ammunition
| Penetration statistics | |||||||
|---|---|---|---|---|---|---|---|
| Ammunition | Type of warhead |
Penetration in mm @ 90° | |||||
| 10m | 100m | 500m | 1000m | 1500m | 2000m | ||
| OCC 105 F1 | HEAT | 400 | 400 | 400 | 400 | 400 | 400 |
| OE 105 F1 Mle.60 | HE | 25 | 25 | 25 | 25 | 25 | 25 |
| Shell details | ||||||||||
|---|---|---|---|---|---|---|---|---|---|---|
| Ammunition | Type of warhead |
Velocity in m/s |
Projectile Mass in kg |
Fuse delay
in m: |
Fuse sensitivity
in mm: |
Explosive Mass in g (TNT equivalent): |
Normalization At 30° from horizontal: |
Ricochet: | ||
| 0% | 50% | 100% | ||||||||
| OCC 105 F1 | HEAT | 1,000 | 11 | 0.0 | 0.1 | 1,020 | +0° | 62° | 69° | 73° |
| OE 105 F1 Mle.60 | HE | 700 | 12 | 0.1 | 0.1 | 2,000 | +0° | 79° | 80° | 81° |
| Smoke characteristic | ||||||
|---|---|---|---|---|---|---|
| Ammunition | Velocity in m/s |
Projectile Mass in kg |
Screen radius in m |
Screen time in s |
Screen hold time in s: |
Explosive Mass in g (TNT equivalent): |
| OFPH 105 F1 | 700 | 11 | 20 | 5 | 25 | 50 |
Ammo racks

| Full ammo |
1st rack empty |
2nd rack empty |
3rd rack empty |
4th rack empty |
5th rack empty |
6th rack empty |
Visual discrepancy |
|---|---|---|---|---|---|---|---|
| 50 | XX (X+) | (+) | (+) | (+) | (+) | (+) | no |
For ammo loadouts, it is suggested to bring 20-25 rounds of HEAT, 3-6 rounds of Smoke, and no HE rounds. That is because despite of the 50 rounds capacity, in a normal game you won't fire that many HEAT rounds, thus 20 shells for the more ammo conserving folk or 25 rounds for the more trigger happy is recommend. You may take more if you really need to, but you can get away with just that many if you make a stop by a capture zone to replenish.
The smoke rounds, depending on your play-style, you might not need often, but when you do, they are life saving as they can allow you to lay a smoke screen right in front of you or your team when you're out of smoke grenades (or if you've yet to unlock them yet) and they can blind snipers allowing you and your team to move up.
The HE shells are very situational, since the 20mm is almost always a better alternative. You don't need it to hull break light vehicles since the HEAT shell already does that, the only use would be for a target that is too far to hit effectively with the 20mm, but where a HEAT shell might be unnecessary.
Additional armament
The secondary on the AMX-30 is not a machine gun, but an auto-cannon. It fires a belt with a composition of of 1 High Explosive Fragmentation (HEF) round, followed by one Armour Piercing round (AP) with both of these rounds being incendiary tracer rounds (I-T). Alternating between explosive rounds that are great from helicopters, planes and exposed crew, whilst burning and tracing the round; and an armour piercing round for light armored targets, whilst burning and tracing the round.
The only times where you would not be firing your 20mm gun is either: 1) there are no targets, 2) it would give your sniping position or your flanking attack away, 3) you are too far away to hit/damage anything, 4) you are trying to cool the weapon down (yes it can overheat) 5) you're reloading/un-jamming it.
In almost every other circumstance, firing the 20mm is preferably though some times more than others, because this secondary is useful at four things in particular :
- destroying fences, walls, trees, bushes, ... and any other destructible environment your HEAT shell would detonate upon before reaching your target
- destroying light vehicles, exposed crew and even other tanks should you have the side or rear of the target to shoot at
- shooting down planes, as they are preparing or exiting an attack run
- and lastly, destroying the exposed modules (canons, guns, tracks, ERA blocks) of an any tank if you can't kill it outright
There is only one belt to use, so make use of the HE-AP combination in the belt. The autocannon gets one thousand rounds to use, which means 500 rounds of crew-injuring HE and 500 rounds of tank damaging AP, with a fire rate not too slow nor too fast that allows for sustained suppressive fire.
| 20 mm M693 | ||||||
|---|---|---|---|---|---|---|
| Coaxial mount | ||||||
| Capacity (Belt capacity) | Fire rate (shots/minute) |
Vertical guidance |
Horizontal guidance | |||
| 1,000 (500) | 740 | -0°/+20° | N/A | |||
Machine guns
Considering the fact that the 20mm co-axial is not only powerful enough, but flexible enough to shoot down planes with, the AAN-F1 machine gun just seems like an outlier in terms of providing firepower. It could be useful to attack exposed crew members, but this is very rare with the type of enemy vehicles seen in matches. The best use of this machine gun would probably to annoy the enemy, or draw their attention without using the valuable 20 mm autocannon shells.
| 7.62 mm AAN-F1 | ||||||
|---|---|---|---|---|---|---|
| Pintle mount | ||||||
| Capacity (Belt capacity) | Fire rate (shots/minute) |
Vertical guidance |
Horizontal guidance | |||
| 2,000 (100) | 900 | -10°/+45° | ±120° | |||
Usage in the battles
Describe the tactics of playing in the vehicle, the features of using vehicles in the team and advice on tactics. Refrain from creating a "guide" - do not impose a single point of view but give the reader food for thought. Describe the most dangerous enemies and give recommendations on fighting them. If necessary, note the specifics of the game in different modes (AB, RB, SB).
Pros and cons
Pros:
- Tank is relatively fast and mobile
- Turret rotation and elevation is fast
- 20mm auto-cannon is good against light tanks, planes, and obstacles
- HEAT shells have good penetration
- Has access to smoke shells and smoke grenades
- Gunner and driver are not aligned means tank is harder to disable in one shot
- Hull ammo rack surrounded by fuel tank
Cons:
- Armour is unsatisfactory against enemy armaments
- Only 8° of gun depression
- Cannot depress the gun over the engine deck
- HEAT shell can't go through obstacles
- Ready-rack at turret rear is prone to getting shot, even from the front
- High cupola design makes it easier to spot
History
Describe the history of the creation and combat usage of the ground vehicle in more detail than in the introduction. If the historical reference turns out to be too big, take it to a separate article, taking a link to an article about the vehicle and adding a block "/historical reference" (example: https://wiki.warthunder.com/Name-vehicles/historical reference) and add a link to it here using the main template. Be sure to include links to sources at the end of the article.
Media
An excellent addition to the article will be video guides, as well as screenshots from the game and photos.
Read also
Links to the articles on the War Thunder Wiki that you think will be useful for the reader, for example,
- reference to the series of the vehicles;
- links to approximate analogues of other nations and research trees.
ETC.
Sources
Paste links to sources and external resources, such as:
- topic on the official game forum;
- other literature.
| France medium tanks | |
|---|---|
| M4 Derivatives | M4A1 (FL10) · M4A4 (SA50) |
| AMX-50 | AMX M4 · AMX-50 (TOA100) · AMX-50 (TO90/930) |
| AMX-30 | AMX-30 · AMX-30 (1972) · AMX-30B2 · AMX-30B2 BRENUS · AMX-30 ACRA · AMX-30 Super |
| AMX-32/40 | AMX-32 · AMX-32 (105) · AMX-40 |
| Leclerc | Leclerc · Leclerc S2 · Leclerc SXXI · Leclerc AZUR |
| Other | D2 · S.35 · Lorraine 40t |
| Germany | Panther "Dauphiné" |
| USA | ▄M4A1 · ▄M4A3 (105) · ▄M4A4 · ▄M26 |
