Difference between revisions of "AMX-13"
Matsuri4life (talk | contribs) m (→Main armament: Autoloader) (Tag: Visual edit) |
Inceptor57 (talk | contribs) m |
||
| (45 intermediate revisions by 14 users not shown) | |||
| Line 1: | Line 1: | ||
| + | {{Specs-Card|code=fr_amx_13_75}} | ||
{{About | {{About | ||
| − | | about = | + | |about=light tank '''{{PAGENAME}}''' |
| − | | usage = other | + | |usage=other uses |
| − | | link = AMX-13 (Family) | + | |link=AMX-13 (Family) |
| − | |||
| − | |||
| − | |||
| − | |||
}} | }} | ||
== Description == | == Description == | ||
| − | <!-- ''In the description, the first part should be about the history of the creation and combat usage of the vehicle, as well as its key features. In the second part, tell the reader about the ground vehicle in the game. Insert a screenshot of the vehicle, so that if the novice player does not remember the vehicle by name, he will immediately understand what kind of vehicle the article is talking about.'' --> | + | <!--''In the description, the first part should be about the history of the creation and combat usage of the vehicle, as well as its key features. In the second part, tell the reader about the ground vehicle in the game. Insert a screenshot of the vehicle, so that if the novice player does not remember the vehicle by name, he will immediately understand what kind of vehicle the article is talking about.''--> |
| − | The ''' | + | [[File:GarageImage_{{PAGENAME}}.jpg|420px|thumb|left]] |
| + | {{break}} | ||
| + | The '''{{specs|name}}''' is a Rank {{specs|rank}} French light tank {{Battle-rating}}. It was introduced in [[Update 1.75 "La Résistance"]]. The AMX-13's chassis is the mainstay of France's light tank technology for the post-war period and this one is its most iconic iteration as it is mounted with the FL10 turret. This vehicle is one of the best light tank at its BR, capable of fulfilling many roles on the battlefield. | ||
| − | + | The AMX-13 series has one of the most distinctive looks of all armoured warfare's history as it combines many unusual design choices. First, this tank does not feature a "classical" layout: engine deck is next to the driver and the turret ring is at the rear of the tank's hull. Speaking of turrets, this tank has an oscillating one, which means that both gun and turret armour are welded together and that the whole assembly has to rotate to elevate the gun. This way of mounting allows the placement of an autoloader mechanism in the ''long'' turret bulge. As for its size, it is very small. | |
== General info == | == General info == | ||
=== Survivability and armour === | === Survivability and armour === | ||
| − | + | <!--''Describe armour protection. Note the most well protected and key weak areas. Appreciate the layout of modules as well as the number and location of crew members. Is the level of armour protection sufficient, is the placement of modules helpful for survival in combat?'' | |
| − | <!-- ''Describe armour protection. Note the most well protected and key weak areas. Appreciate the layout of modules as well as the number and location of crew members. Is the level of armour protection sufficient, is the placement of modules helpful for survival in combat? | ||
| − | Even though this tank has unimpressive armour values, its sloped profile will protect it from autocannon fire (with some distance, even the [[Bofors | + | ''If necessary use a visual template to indicate the most secure and weak zones of the armour.''--> |
| + | Even though this tank has unimpressive armour values, its sloped profile will protect it from autocannon fire (with some distance, even the [[Bofors (40 mm)|Bofors]] can't go through this tank). Any dedicated antitank gun/missile/contraption will go right through this tank's armour. While this may sound a bit bad "getting easily pierced" also has its advantages: some APHE rounds will not detonate upon impact, which will minimise the damage done. If you happen to get shot at, the best way to survive is by showing your right front corner towards the enemy, this way, the engine deck may catch some shells. Don't ever rely on this tank's armour, take every shot you survive as a second chance. | ||
'''Armour type:''' | '''Armour type:''' | ||
| − | * | + | * Cast homogeneous armour (Turret base, Turret front) |
| − | * | + | * Rolled homogeneous armour |
{| class="wikitable" | {| class="wikitable" | ||
| Line 31: | Line 30: | ||
! Armour !! Front (Slope angle) !! Sides !! Rear !! Roof | ! Armour !! Front (Slope angle) !! Sides !! Rear !! Roof | ||
|- | |- | ||
| − | | Hull || | + | | Hull || 20 mm (67°) ''Front glacis'' <br> 20-40 mm (5-50°) ''Lower glacis'' || 20 mm || 15 mm ''Top'' <br> 15 mm (45°) ''Bottom'' || 10 mm <br> 5 mm ''Engine grille'' |
|- | |- | ||
| − | | Turret || 40 mm (32-47°) ''Turret front'' <br> | + | | Turret || 40 mm (32-47°) ''Turret front'' <br> 40 mm (12-41°) ''Turret base'' <br> 40 mm (15-75°) ''Barrel shroud'' || 20 mm (0-30°) ''Turret'' <br> 20 mm (12-14°) ''Turret base'' || 20 mm ''Turret bustle'' <br> 20 mm (17-22°) ''Pivot ball'' <br> 10 mm (77-90°) ''Turret underside'' || 10 mm |
|- | |- | ||
| − | | Cupola | | + | ! Armour !! Sides !! Roof |
| + | |- | ||
| + | | Cupola || 20 mm || 10 mm | ||
|- | |- | ||
|} | |} | ||
| Line 42: | Line 43: | ||
* Suspension wheels and tracks are 15 mm thick. | * Suspension wheels and tracks are 15 mm thick. | ||
* Belly armour is 10 mm thick. | * Belly armour is 10 mm thick. | ||
| − | * | + | * 8 mm Structural steel firewall separates the driver from the engine. |
| + | * The track and wheel on the front glacis offer about 15 mm structural steel thickness. | ||
=== Mobility === | === Mobility === | ||
| − | + | <!--''Write about the mobility of the ground vehicle. Estimate the specific power and manoeuvrability, as well as the maximum speed forwards and backwards.''--> | |
| − | <!-- ''Write about the mobility of the ground vehicle. Estimate the specific power and manoeuvrability, as well as the maximum speed forwards and backwards.'' --> | + | This vehicle can carry you wherever you want as long as you do not give yourself up. With 28 HP/ton, this tank's engine allows for fast accelerations and good, sustained, top speed, it will never let you down. Run this vehicle around the battlefield as you wish, deserting points to find other ones to fire from. |
| − | { | + | {| class="wikitable" style="text-align:center" |
| − | + | |- | |
| − | + | ! colspan="3" | Mobility characteristic | |
| − | + | |- | |
| − | === | + | ! Weight (tons) |
| − | + | ! colspan="1" | Add-on Armor<br>weight (tons) | |
| + | ! colspan="1" | Max speed (km/h) | ||
| + | |- | ||
| + | | rowspan="2" | 14.7 || colspan="1" rowspan="2" | N/A || colspan="1" | 67 (AB) | ||
| + | |- | ||
| + | |60 (RB/SB) | ||
| + | |- | ||
| + | ! colspan="3" | Engine power (horsepower) | ||
| + | |- | ||
| + | ! colspan="1" | Mode | ||
| + | !Stock | ||
| + | !Upgraded | ||
| + | |- | ||
| + | |''Arcade'' | ||
| + | |418 | ||
| + | |515 | ||
| + | |- | ||
| + | |''Realistic/Simulator'' | ||
| + | |239 | ||
| + | |270 | ||
| + | |- | ||
| + | ! colspan="3" | Power-to-weight ratio (hp/ton) | ||
| + | |- | ||
| + | ! colspan="1" | Mode | ||
| + | !Stock | ||
| + | !Upgraded | ||
| + | |- | ||
| + | |''Arcade'' | ||
| + | |28.43 | ||
| + | |35.03 | ||
| + | |- | ||
| + | |''Realistic/Simulator'' | ||
| + | |16.26 | ||
| + | |18.37 | ||
| + | |- | ||
| + | |} | ||
== Armaments == | == Armaments == | ||
| − | |||
=== Main armament === | === Main armament === | ||
| − | + | <!--''Give the reader information about the characteristics of the main gun. Assess its effectiveness in a battle based on the reloading speed, ballistics and the power of shells. Do not forget about the flexibility of the fire, that is how quickly the cannon can be aimed at the target, open fire on it and aim at another enemy. Add a link to the main article on the gun: <code><nowiki>{{main|Name of the weapon}}</nowiki></code>. Describe in general terms the ammunition available for the main gun. Give advice on how to use them and how to fill the ammunition storage.''--> | |
| − | <!-- ''Give the reader information about the characteristics of the main gun. Assess its effectiveness in a battle based on the reloading speed, ballistics and the power of shells. Do not forget about the flexibility of the fire, that is how quickly the cannon can be aimed at the target, open fire on it and aim at another enemy. Add a link to the main article on the gun: <code><nowiki>{{main|Name of the weapon}}</nowiki></code>. Describe in general terms the ammunition available for the main gun. Give advice on how to use them and how to fill the ammunition storage.'' --> | + | {{main|SA50 (75 mm)}} |
| − | {{main|SA50 | ||
| − | Well-positioned, this gun can make your enemies cry: with | + | Well-positioned, this gun can make your enemies cry: with its quick firing rate it is "one-two, goodbye" for any foe caught from the sides/rear. In usual one-on-one engagements, foes usually exchange shots but, with the AMX-13, this is a lie: it can fire ''twice'' before its foe can reload, this can hurt very much. This high rate of fire makes it very efficient at long-distance sniping: it can adjust fire faster than its foes. |
High gun placement and good gun depression angles make this tank very efficient at keeping low behind hills while showing very little of itself. Said shortly, this tank's armament is amazing. | High gun placement and good gun depression angles make this tank very efficient at keeping low behind hills while showing very little of itself. Said shortly, this tank's armament is amazing. | ||
| − | {| class="wikitable" style="text-align:center | + | {| class="wikitable" style="text-align:center" |
|- | |- | ||
| − | ! colspan=" | + | ! colspan="6" | [[SA50 (75 mm)|75 mm SA50 L/57]] |
|- | |- | ||
| − | ! | + | ! colspan="3" rowspan="1" style="width:5em" |Capacity |
| − | + | ! rowspan="1" | Vertical <br> guidance | |
| − | + | ! rowspan="1" | Horizontal <br> guidance | |
| + | ! rowspan="1" | Stabilizer | ||
|- | |- | ||
| − | + | | colspan="3" | 36 || -6°/+13° || ±180° || N/A | |
| − | | | ||
|- | |- | ||
| − | ! ''Realistic'' | + | ! colspan="6" | Turret rotation speed (°/s) |
| − | | 17.9 || | + | |- |
| + | ! style="width:4em" |Mode | ||
| + | ! style="width:4em" |Stock | ||
| + | ! style="width:4em" |Upgraded | ||
| + | ! style="width:4em" |Prior + Full crew | ||
| + | ! style="width:4em" |Prior + Expert qualif. | ||
| + | ! style="width:4em" |Prior + Ace qualif. | ||
| + | |- | ||
| + | | ''Arcade'' || 17.9 || _.__ || _.__ || _.__ || _.__ | ||
| + | |- | ||
| + | | ''Realistic'' || 17.9 || _.__ || _.__ || _.__ || _.__ | ||
| + | |- | ||
| + | ! colspan="4" | Reloading rate (seconds) | ||
| + | |- | ||
| + | ! colspan="1" style="width:4em" |Stock | ||
| + | ! colspan="1" style="width:4em" |Prior + Full crew | ||
| + | ! colspan="1" style="width:4em" |Prior + Expert qualif. | ||
| + | ! colspan="1" style="width:4em" |Prior + Ace qualif. | ||
| + | |- | ||
| + | | 45.0 || _.__ || _.__ || _.__ | ||
|- | |- | ||
|} | |} | ||
| − | ==== Ammunition ==== | + | ===== Ammunition ===== |
| − | {{: | + | {| class="wikitable sortable" style="text-align:center" width="100%" |
| + | ! colspan="8" | Penetration statistics | ||
| + | |- | ||
| + | ! rowspan="2" data-sort-type="text" | Ammunition | ||
| + | ! rowspan="2" class="unsortable" | Type of <br /> warhead | ||
| + | ! colspan="6" | '''Penetration''' '''''in mm''''' '''@ 0° Angle of Attack''' | ||
| + | |- | ||
| + | ! 10m | ||
| + | ! 100m | ||
| + | ! 500m | ||
| + | ! 1000m | ||
| + | ! 1500m | ||
| + | ! 2000m | ||
| + | |- | ||
| + | | POT-51A || APC || 168 || 163 || 140 || 110 || 95 || 82 | ||
| + | |- | ||
| + | | 75mm HE || HE || 10 || 10 || 10 || 10 || 10 || 10 | ||
| + | |- | ||
| + | | PCOT-51P || APCBC || 180 || 176 || 163 || 150 || 136 || 126 | ||
| + | |- | ||
| + | |} | ||
| + | {| class="wikitable sortable" style="text-align:center" width="100%" | ||
| + | ! colspan="11" | Shell details | ||
| + | |- | ||
| + | ! rowspan="2" data-sort-type="text" | Ammunition | ||
| + | ! rowspan="2" class="unsortable" | Type of <br /> warhead | ||
| + | ! rowspan="2" |Velocity <br /> in m/s | ||
| + | ! rowspan="2" |Projectile<br />Mass in kg | ||
| + | ! rowspan="2" | ''Fuse delay'' | ||
| + | ''in m:'' | ||
| + | ! rowspan="2" | ''Fuse sensitivity'' | ||
| + | ''in mm:'' | ||
| + | ! rowspan="2" | ''Explosive Mass in g<br /> (TNT equivalent):'' | ||
| + | ! rowspan="2" | ''Normalization At 30° <br> from horizontal:'' | ||
| + | ! colspan="3" | ''Ricochet:'' | ||
| + | |- | ||
| + | ! 0% | ||
| + | ! 50% | ||
| + | ! 100% | ||
| + | |- | ||
| + | | POT-51A || APC || 1,000 || 6.4 || N/A || N/A || N/A || ° || 48° || 63° || 71° | ||
| + | |- | ||
| + | | 75mm HE || HE || 753 || 6.2 || 0.4 || 0.1 || 675 || +0° || 79° || 80° || 81° | ||
| + | |- | ||
| + | | PCOT-51P || APCBC || 1,000 || 6.4 || N/A || N/A || N/A || ° || 48° || 63° || 71° | ||
| + | |- | ||
| + | |} | ||
| − | ==== [[Ammo racks]] ==== | + | ===== [[Ammo racks|Ammo racks]] ===== |
| − | [[File:Ammoracks_{{PAGENAME}}.png|right| | + | [[File:Ammoracks_{{PAGENAME}}.png|right|thumbnail|250px|[[Ammo racks|Ammo racks]] of the {{PAGENAME}}.]] |
| − | + | {| class="wikitable sortable" style="text-align:center" | |
| − | {| class="wikitable" style="text-align:center" | ||
|- | |- | ||
| − | ! Full<br>ammo | + | ! class="wikitable unsortable" |Full<br /> ammo |
| − | ! 1st<br>rack empty | + | ! class="wikitable unsortable" |1st<br /> rack empty |
| − | ! 2nd<br>rack empty | + | ! class="wikitable unsortable" |2nd<br /> rack empty |
| − | ! 3rd<br>rack empty | + | ! class="wikitable unsortable" |3rd<br /> rack empty |
| − | ! 4th<br>rack empty | + | ! class="wikitable unsortable" |4th<br /> rack empty |
| − | ! 5th<br>rack empty | + | ! class="wikitable unsortable" |5th<br /> rack empty |
| − | ! 6th<br>rack empty | + | ! class="wikitable unsortable" |6th<br /> rack empty |
| − | ! 7th<br>rack empty | + | ! class="wikitable unsortable" |7th<br /> rack empty |
| − | ! Visual<br>discrepancy | + | ! class="wikitable unsortable" |Visual<br /> discrepancy |
|- | |- | ||
| − | | '''36''' || | + | || '''36''' || 31 ''(+5)'' || 27 ''(+9)'' || 22 ''(+14)'' || 17 ''(+19)'' || 12 ''(+24)'' || 6 ''(+30)'' || 1 ''(+35)'' || style="text-align:left" | no |
|- | |- | ||
|} | |} | ||
| − | |||
| − | |||
| − | |||
| − | |||
| − | |||
| − | |||
| − | |||
| − | |||
| − | |||
=== Machine guns === | === Machine guns === | ||
| − | + | <!--''Offensive and anti-aircraft machine guns not only allow you to fight some aircraft but also are effective against lightly armoured vehicles. Evaluate machine guns and give recommendations on its use.''--> | |
| − | <!-- ''Offensive and anti-aircraft machine guns not only allow you to fight some aircraft but also are effective against lightly armoured vehicles. Evaluate machine guns and give recommendations on its use.'' --> | ||
{{main|MAC 31 (7.5 mm)}} | {{main|MAC 31 (7.5 mm)}} | ||
| − | {| class="wikitable" style="text-align:center | + | {| class="wikitable" style="text-align:center" |
|- | |- | ||
| − | ! colspan=" | + | ! colspan="7" | [[MAC 31 (7.5 mm)|7.5 mm MAC 31]] |
|- | |- | ||
| − | ! | + | ! colspan="7" | ''Coaxial mount'' |
|- | |- | ||
| − | | | + | ! colspan="4" rowspan="1" style="width:5em" |Capacity (Belt capacity) |
| + | ! rowspan="1" | Fire rate <br> (shots/minute) | ||
| + | ! rowspan="1" | Vertical <br> guidance | ||
| + | ! rowspan="1" | Horizontal <br> guidance | ||
| + | |- | ||
| + | | colspan="4" | 4,950 (150) || 1,350 || N/A || N/A | ||
|- | |- | ||
|} | |} | ||
| − | |||
== Usage in battles == | == Usage in battles == | ||
| − | <!-- ''Describe the tactics of playing in the vehicle, the features of using vehicles in the team and advice on tactics. Refrain from creating a "guide" - do not impose a single point of view but instead give the reader food for thought. Describe the most dangerous enemies and give recommendations on fighting them. If necessary, note the specifics of the game in different modes (AB, RB, SB).'' --> | + | <!--''Describe the tactics of playing in the vehicle, the features of using vehicles in the team and advice on tactics. Refrain from creating a "guide" - do not impose a single point of view but instead give the reader food for thought. Describe the most dangerous enemies and give recommendations on fighting them. If necessary, note the specifics of the game in different modes (AB, RB, SB).''--> |
| − | The AMX-13 is a very competitive tank as it can reach tricky positions quite fast on the battlefield. Its low profile allows it to hide behind many obstacles, serving as armour for this light vehicle. Keeping hull-down, behind a hill on the border of the map is the best way to use this tank: frontal engagements are a no-go with such little armour. AMX-13 commanders will be surprised to be able to shoot ''1 round every | + | The AMX-13 is a very competitive tank as it can reach tricky positions quite fast on the battlefield. Its low profile allows it to hide behind many obstacles, serving as armour for this light vehicle. Keeping hull-down, behind a hill on the border of the map is the best way to use this tank: frontal engagements are a no-go with such little armour. AMX-13 commanders will be surprised to be able to shoot ''1 round every 6 seconds'' with such accuracy and power at this BR. |
| − | + | '''Long range sniper/flanker:''' | |
| + | Stay low and scout targets for your team. When spotting a vulnerable enemy, shoot its engine/transmission/driver, '''don't get back into cover''' and finish it off 6 second later, only then, fade back into the shadows. Do not get out of cover too often as enemies too much aware of your position may destroy you easily. If spotted, stay ''as far as possible'' from enemy fire: this tank's small size can avoid a lot of shots since it takes some serious gunnery skills to hit such a fast ''and'' small target from a distance (1000+ m). | ||
| − | + | '''Brawler:''' | |
| − | + | Even though this is not recommended usage, this can tank actually be taken in close quarter combat. In this role, it behaves much like any SPAA in the same context: flanking and surprising its foes from the sides with an hailstorm of bullets. Use smoke launchers in order to secure roads and advance concealed towards unsuspecting foes. | |
| − | |||
| − | |||
| − | |||
=== Pros and cons === | === Pros and cons === | ||
| − | <!-- '' | + | <!--''Summarize and briefly evaluate the vehicle in terms of its characteristics and combat effectiveness. Mark its pros and cons in a bulleted list. Try not to use more than 6 points for each of the characteristics. Avoid using categorical definitions such as "bad", "good" and the like - use substitutions with softer forms such as "inadequate" and "effective".''--> |
| − | |||
'''Pros:''' | '''Pros:''' | ||
| − | |||
| − | |||
| − | |||
| − | |||
| − | |||
* Can reach its top speed quite fast | * Can reach its top speed quite fast | ||
| − | * Gun performance is comparable to the British [[Ordnance QF 17-pounder (76 mm)|QF 17-pounder]]'s | + | * '''Awesome''' reload rate: '''1 shot every 5 seconds''', comparable to most ''rank 1'' reload times |
| + | * Gun performance is comparable to the British [[Ordnance QF 17-pounder (76 mm)|QF 17-pounder]]'s solid shots. | ||
| + | * '''12 round''' autoloader mechanism. | ||
| + | * Has smoke launchers (high ark of fire) | ||
| + | * Good gun depression value | ||
* Fast turret rotation | * Fast turret rotation | ||
| + | * Thin armour will often not detonate APHE ammo | ||
| + | * Low profile | ||
| + | * High gun placement make hull-down positions very efficient | ||
* Stock shell is quite good, although the upgraded shell is a strict improvement | * Stock shell is quite good, although the upgraded shell is a strict improvement | ||
| − | * | + | * Frontally resistant to some SPAA fire (Ostwind and M19) |
| − | * Has | + | * Has '''Scouting''' ability |
'''Cons:''' | '''Cons:''' | ||
| + | * Bad reverse speed for a light tank | ||
| + | * Gun penetration subpar in uptiers: relies heavily on flanking maneuvers | ||
| + | * Thin sides will get shredded by SPAAs and HMGs | ||
| + | * Poor gun elevation value | ||
| + | * Lacks defensive armament against aircraft | ||
* Thin top armour: vulnerable to strafing planes (can be penetrated by .50 cals with ground target belts at typical strafing ranges) | * Thin top armour: vulnerable to strafing planes (can be penetrated by .50 cals with ground target belts at typical strafing ranges) | ||
| − | * | + | * Bad at stop-and-shoot due to oscillating turret design |
* Only 3 crew members | * Only 3 crew members | ||
| − | |||
| − | |||
| − | |||
| − | |||
| − | |||
| − | |||
== History == | == History == | ||
| − | + | ''Describe the history of the creation and combat usage of the ground vehicle in more detail than in the introduction. If the historical reference turns out to be too big, take it to a separate article, taking a link to the article about the vehicle and adding a block "/ History" (example: <nowiki>https://wiki.warthunder.com/(Vehicle-name)/History</nowiki>) and add a link to it here using the <code>main</code> template. Be sure to reference text and sources by using <code><nowiki><ref></nowiki></code>, as well as adding them at the end of the article. This section may also include the vehicle's dev blog entry (if applicable) and the in-game encyclopedia description (under <code><nowiki>=== Encyclopedia Info ===</nowiki></code>, also if applicable).'' | |
| − | |||
| − | |||
| − | |||
| − | |||
| − | |||
| − | |||
| − | |||
| − | |||
| − | |||
| − | |||
| − | |||
| − | |||
| − | |||
| − | |||
| − | |||
| − | |||
| − | |||
| − | |||
| − | |||
| − | |||
| − | |||
| − | |||
| − | |||
| − | |||
== Media == | == Media == | ||
| − | + | ''Excellent additions to the article would be video guides, screenshots from the game, and photos.'' | |
| − | + | == See also == | |
| − | + | ''Links to the articles on the War Thunder Wiki that you think will be useful for the reader, for example:'' | |
| − | |||
| − | |||
| − | |||
| − | |||
| − | |||
| − | |||
* ''reference to the series of the vehicles;'' | * ''reference to the series of the vehicles;'' | ||
| − | * ''links to approximate analogues of other nations and research trees.'' | + | * ''links to approximate analogues of other nations and research trees.'' |
| − | + | == External links == | |
| + | ''Paste links to sources and external resources, such as:'' | ||
| − | |||
| − | |||
| − | |||
| − | |||
| − | |||
| − | |||
| − | |||
| − | |||
* ''topic on the official game forum;'' | * ''topic on the official game forum;'' | ||
| − | * ''other literature.'' | + | * ''encyclopedia page on the tank;'' |
| − | + | * ''other literature.'' | |
| − | |||
| − | |||
| − | |||
| − | |||
{{France light tanks}} | {{France light tanks}} | ||
Revision as of 15:27, 8 June 2019
Contents
| This page is about the light tank AMX-13. For other uses, see AMX-13 (Family). |
Description

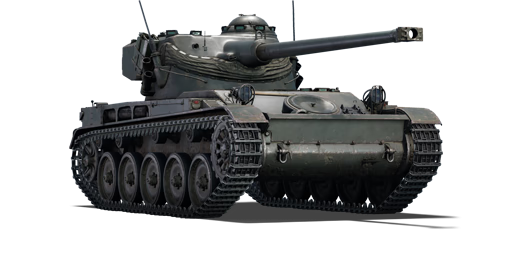
The AMX-13 is a Rank IV French light tank
with a battle rating of 6.3 (AB) and 6.7 (RB/SB). It was introduced in Update 1.75 "La Résistance". The AMX-13's chassis is the mainstay of France's light tank technology for the post-war period and this one is its most iconic iteration as it is mounted with the FL10 turret. This vehicle is one of the best light tank at its BR, capable of fulfilling many roles on the battlefield.
The AMX-13 series has one of the most distinctive looks of all armoured warfare's history as it combines many unusual design choices. First, this tank does not feature a "classical" layout: engine deck is next to the driver and the turret ring is at the rear of the tank's hull. Speaking of turrets, this tank has an oscillating one, which means that both gun and turret armour are welded together and that the whole assembly has to rotate to elevate the gun. This way of mounting allows the placement of an autoloader mechanism in the long turret bulge. As for its size, it is very small.
General info
Survivability and armour
Even though this tank has unimpressive armour values, its sloped profile will protect it from autocannon fire (with some distance, even the Bofors can't go through this tank). Any dedicated antitank gun/missile/contraption will go right through this tank's armour. While this may sound a bit bad "getting easily pierced" also has its advantages: some APHE rounds will not detonate upon impact, which will minimise the damage done. If you happen to get shot at, the best way to survive is by showing your right front corner towards the enemy, this way, the engine deck may catch some shells. Don't ever rely on this tank's armour, take every shot you survive as a second chance.
Armour type:
- Cast homogeneous armour (Turret base, Turret front)
- Rolled homogeneous armour
| Armour | Front (Slope angle) | Sides | Rear | Roof |
|---|---|---|---|---|
| Hull | 20 mm (67°) Front glacis 20-40 mm (5-50°) Lower glacis |
20 mm | 15 mm Top 15 mm (45°) Bottom |
10 mm 5 mm Engine grille |
| Turret | 40 mm (32-47°) Turret front 40 mm (12-41°) Turret base 40 mm (15-75°) Barrel shroud |
20 mm (0-30°) Turret 20 mm (12-14°) Turret base |
20 mm Turret bustle 20 mm (17-22°) Pivot ball 10 mm (77-90°) Turret underside |
10 mm |
| Armour | Sides | Roof | ||
| Cupola | 20 mm | 10 mm |
Notes:
- Suspension wheels and tracks are 15 mm thick.
- Belly armour is 10 mm thick.
- 8 mm Structural steel firewall separates the driver from the engine.
- The track and wheel on the front glacis offer about 15 mm structural steel thickness.
Mobility
This vehicle can carry you wherever you want as long as you do not give yourself up. With 28 HP/ton, this tank's engine allows for fast accelerations and good, sustained, top speed, it will never let you down. Run this vehicle around the battlefield as you wish, deserting points to find other ones to fire from.
| Mobility characteristic | ||
|---|---|---|
| Weight (tons) | Add-on Armor weight (tons) |
Max speed (km/h) |
| 14.7 | N/A | 67 (AB) |
| 60 (RB/SB) | ||
| Engine power (horsepower) | ||
| Mode | Stock | Upgraded |
| Arcade | 418 | 515 |
| Realistic/Simulator | 239 | 270 |
| Power-to-weight ratio (hp/ton) | ||
| Mode | Stock | Upgraded |
| Arcade | 28.43 | 35.03 |
| Realistic/Simulator | 16.26 | 18.37 |
Armaments
Main armament
Well-positioned, this gun can make your enemies cry: with its quick firing rate it is "one-two, goodbye" for any foe caught from the sides/rear. In usual one-on-one engagements, foes usually exchange shots but, with the AMX-13, this is a lie: it can fire twice before its foe can reload, this can hurt very much. This high rate of fire makes it very efficient at long-distance sniping: it can adjust fire faster than its foes.
High gun placement and good gun depression angles make this tank very efficient at keeping low behind hills while showing very little of itself. Said shortly, this tank's armament is amazing.
| 75 mm SA50 L/57 | |||||
|---|---|---|---|---|---|
| Capacity | Vertical guidance |
Horizontal guidance |
Stabilizer | ||
| 36 | -6°/+13° | ±180° | N/A | ||
| Turret rotation speed (°/s) | |||||
| Mode | Stock | Upgraded | Prior + Full crew | Prior + Expert qualif. | Prior + Ace qualif. |
| Arcade | 17.9 | _.__ | _.__ | _.__ | _.__ |
| Realistic | 17.9 | _.__ | _.__ | _.__ | _.__ |
| Reloading rate (seconds) | |||||
| Stock | Prior + Full crew | Prior + Expert qualif. | Prior + Ace qualif. | ||
| 45.0 | _.__ | _.__ | _.__ | ||
Ammunition
| Penetration statistics | |||||||
|---|---|---|---|---|---|---|---|
| Ammunition | Type of warhead |
Penetration in mm @ 0° Angle of Attack | |||||
| 10m | 100m | 500m | 1000m | 1500m | 2000m | ||
| POT-51A | APC | 168 | 163 | 140 | 110 | 95 | 82 |
| 75mm HE | HE | 10 | 10 | 10 | 10 | 10 | 10 |
| PCOT-51P | APCBC | 180 | 176 | 163 | 150 | 136 | 126 |
| Shell details | ||||||||||
|---|---|---|---|---|---|---|---|---|---|---|
| Ammunition | Type of warhead |
Velocity in m/s |
Projectile Mass in kg |
Fuse delay
in m: |
Fuse sensitivity
in mm: |
Explosive Mass in g (TNT equivalent): |
Normalization At 30° from horizontal: |
Ricochet: | ||
| 0% | 50% | 100% | ||||||||
| POT-51A | APC | 1,000 | 6.4 | N/A | N/A | N/A | ° | 48° | 63° | 71° |
| 75mm HE | HE | 753 | 6.2 | 0.4 | 0.1 | 675 | +0° | 79° | 80° | 81° |
| PCOT-51P | APCBC | 1,000 | 6.4 | N/A | N/A | N/A | ° | 48° | 63° | 71° |
Ammo racks

| Full ammo |
1st rack empty |
2nd rack empty |
3rd rack empty |
4th rack empty |
5th rack empty |
6th rack empty |
7th rack empty |
Visual discrepancy |
|---|---|---|---|---|---|---|---|---|
| 36 | 31 (+5) | 27 (+9) | 22 (+14) | 17 (+19) | 12 (+24) | 6 (+30) | 1 (+35) | no |
Machine guns
| 7.5 mm MAC 31 | ||||||
|---|---|---|---|---|---|---|
| Coaxial mount | ||||||
| Capacity (Belt capacity) | Fire rate (shots/minute) |
Vertical guidance |
Horizontal guidance | |||
| 4,950 (150) | 1,350 | N/A | N/A | |||
Usage in battles
The AMX-13 is a very competitive tank as it can reach tricky positions quite fast on the battlefield. Its low profile allows it to hide behind many obstacles, serving as armour for this light vehicle. Keeping hull-down, behind a hill on the border of the map is the best way to use this tank: frontal engagements are a no-go with such little armour. AMX-13 commanders will be surprised to be able to shoot 1 round every 6 seconds with such accuracy and power at this BR.
Long range sniper/flanker: Stay low and scout targets for your team. When spotting a vulnerable enemy, shoot its engine/transmission/driver, don't get back into cover and finish it off 6 second later, only then, fade back into the shadows. Do not get out of cover too often as enemies too much aware of your position may destroy you easily. If spotted, stay as far as possible from enemy fire: this tank's small size can avoid a lot of shots since it takes some serious gunnery skills to hit such a fast and small target from a distance (1000+ m).
Brawler: Even though this is not recommended usage, this can tank actually be taken in close quarter combat. In this role, it behaves much like any SPAA in the same context: flanking and surprising its foes from the sides with an hailstorm of bullets. Use smoke launchers in order to secure roads and advance concealed towards unsuspecting foes.
Pros and cons
Pros:
- Can reach its top speed quite fast
- Awesome reload rate: 1 shot every 5 seconds, comparable to most rank 1 reload times
- Gun performance is comparable to the British QF 17-pounder's solid shots.
- 12 round autoloader mechanism.
- Has smoke launchers (high ark of fire)
- Good gun depression value
- Fast turret rotation
- Thin armour will often not detonate APHE ammo
- Low profile
- High gun placement make hull-down positions very efficient
- Stock shell is quite good, although the upgraded shell is a strict improvement
- Frontally resistant to some SPAA fire (Ostwind and M19)
- Has Scouting ability
Cons:
- Bad reverse speed for a light tank
- Gun penetration subpar in uptiers: relies heavily on flanking maneuvers
- Thin sides will get shredded by SPAAs and HMGs
- Poor gun elevation value
- Lacks defensive armament against aircraft
- Thin top armour: vulnerable to strafing planes (can be penetrated by .50 cals with ground target belts at typical strafing ranges)
- Bad at stop-and-shoot due to oscillating turret design
- Only 3 crew members
History
Describe the history of the creation and combat usage of the ground vehicle in more detail than in the introduction. If the historical reference turns out to be too big, take it to a separate article, taking a link to the article about the vehicle and adding a block "/ History" (example: https://wiki.warthunder.com/(Vehicle-name)/History) and add a link to it here using the main template. Be sure to reference text and sources by using <ref>, as well as adding them at the end of the article. This section may also include the vehicle's dev blog entry (if applicable) and the in-game encyclopedia description (under === Encyclopedia Info ===, also if applicable).
Media
Excellent additions to the article would be video guides, screenshots from the game, and photos.
See also
Links to the articles on the War Thunder Wiki that you think will be useful for the reader, for example:
- reference to the series of the vehicles;
- links to approximate analogues of other nations and research trees.
External links
Paste links to sources and external resources, such as:
- topic on the official game forum;
- encyclopedia page on the tank;
- other literature.
| France light tanks | |
|---|---|
| AMC.34/35 | AMC.34 YR · AMC.35 (ACG.1) |
| H.35/39 | H.35 · H.39 · H.39 "Cambronne" |
| AMX-13 | AMX-13 (FL11) · AMX-13-M24 · AMX-13 · AMX-13 (SS.11) · AMX-13-90 · AMX-13 (HOT) |
| Wheeled | AML-90 · AMX-10RC |
| AMD.35 | AMD.35 · AMD.35 (SA35) |
| E.B.R. | E.B.R. (1951) · E.B.R. (1954) · E.B.R. (1963) |
| Other | FCM.36 · R.35 (SA38) · Char 25t · MARS 15 · VBCI-2 (MCT30) |
| Austria | SK-105A2 |
| Great Britain | ▄Crusader Mk.II |
| USA | LVT-4/40 · ▄M3A3 Stuart |
