Difference between revisions of "AEC Mk II"
Colok76286 (talk | contribs) (→Mobility: Completed section) |
(→Description) |
||
| (17 intermediate revisions by 9 users not shown) | |||
| Line 1: | Line 1: | ||
{{Specs-Card | {{Specs-Card | ||
|code=uk_armored_car_aec_mk_2 | |code=uk_armored_car_aec_mk_2 | ||
| + | |images={{Specs-Card-Image|GarageImage_{{PAGENAME}}.jpg}} | ||
|market=AEC Mk.II | |market=AEC Mk.II | ||
}} | }} | ||
== Description == | == Description == | ||
| − | <!--In the description, the first part should be about the history of the creation and combat usage of the vehicle, as well as its key features. In the second part, tell the reader about the ground vehicle in the game. Insert a screenshot of the vehicle, so that if the novice player does not remember the vehicle by name, he will immediately understand what kind of vehicle the article is talking about.--> | + | <!-- ''In the description, the first part should be about the history of the creation and combat usage of the vehicle, as well as its key features. In the second part, tell the reader about the ground vehicle in the game. Insert a screenshot of the vehicle, so that if the novice player does not remember the vehicle by name, he will immediately understand what kind of vehicle the article is talking about.'' --> |
| − | [[ | + | The AEC Armoured Cars were a series of vehicles developed during World War 2. After the British experience against Italian armoured cars in the Western Sahara, AEC decided to develop their own vehicle while the [[Daimler Mk II|Daimler Armoured Car]] was still in development. A total of 629 units were built and entered service in 1941. Early versions tried to have the same firepower and armour as other British cruiser tanks but they failed. The Mk.II version used a larger turret for a three-man crew with a 6-pounder gun, redesigned front hull, and a 158 hp (118 kW) diesel engine. |
| − | |||
| − | |||
| − | The AEC Mk | + | It was introduced during [[Update 1.75 "La Résistance"]] in the [[wt:en/news/5224-special-festive-quest-en|2017 "Festive Quest"]] that took place between 22 December 2017 to 22 January 2018. The AEC Mk II is similar to the [[AEC AA]], with a different turret housing a 57 mm 6-pounder cannon rather than two synchronized Oerlikon 20 mm anti-aircraft cannons. As such, the vehicle has a lower profile than its predecessor, which grants it more stealth capabilities. In addition, there is a 7.62 mm BESA machine gun for use, which is nice for dealing with lightly armoured targets such as open-topped anti-aircraft vehicles and SPGs. |
== General info == | == General info == | ||
=== Survivability and armour === | === Survivability and armour === | ||
| − | <!--Describe armour protection. Note the most well protected and key weak areas. Appreciate the layout of modules as well as the number and location of crew members. Is the level of armour protection sufficient, is the placement of modules helpful for survival in combat? | + | {{Specs-Tank-Armour}} |
| − | + | <!-- ''Describe armour protection. Note the most well protected and key weak areas. Appreciate the layout of modules as well as the number and location of crew members. Is the level of armour protection sufficient, is the placement of modules helpful for survival in combat? If necessary use a visual template to indicate the most secure and weak zones of the armour.'' --> | |
| − | If necessary use a visual template to indicate the most secure and weak zones of the armour.--> | ||
'''Armour type:''' | '''Armour type:''' | ||
| Line 36: | Line 34: | ||
* Wheels are 2 mm thick. | * Wheels are 2 mm thick. | ||
* Chassis is 5 mm thick. | * Chassis is 5 mm thick. | ||
| + | |||
| + | Being very thinly armoured, the {{PAGENAME}} is very vulnerable to heavy machine gun strafings, artillery strikes and even ammo rack detonations from nearby vehicles. | ||
=== Mobility === | === Mobility === | ||
| + | {{Specs-Tank-Mobility}} | ||
<!-- ''Write about the mobility of the ground vehicle. Estimate the specific power and manoeuvrability, as well as the maximum speed forwards and backwards.'' --> | <!-- ''Write about the mobility of the ground vehicle. Estimate the specific power and manoeuvrability, as well as the maximum speed forwards and backwards.'' --> | ||
| − | {{tankMobility|abMinHp= 256|rbMinHp= 146}} | + | {{tankMobility|abMinHp=256|rbMinHp=146}} |
| + | |||
Being an armoured car, the {{PAGENAME}} is a light vehicle. It accelerates quickly and has a good cruise speed on hard surfaces (solid ground, roads). While your top speed is high, your cruise speed will be around 50 km/h. As it is equipped with tires, the {{PAGENAME}} struggles on soft terrain (sand, mud, snow). The reverse speed is also poor for a light armoured car. | Being an armoured car, the {{PAGENAME}} is a light vehicle. It accelerates quickly and has a good cruise speed on hard surfaces (solid ground, roads). While your top speed is high, your cruise speed will be around 50 km/h. As it is equipped with tires, the {{PAGENAME}} struggles on soft terrain (sand, mud, snow). The reverse speed is also poor for a light armoured car. | ||
The {{PAGENAME}} is average at fording: 17 km/h and loses quickly speed when driving uphill. | The {{PAGENAME}} is average at fording: 17 km/h and loses quickly speed when driving uphill. | ||
Another important point to take into account is the turn radius: like all WW2 wheeled vehicles, you can not turn on the spot and always need space to change direction. The bigger the speed, the bigger the turn radius. You will also need more distance to come to a full stop and braking while turning will cause your vehicle to go into an uncontrolled skid. | Another important point to take into account is the turn radius: like all WW2 wheeled vehicles, you can not turn on the spot and always need space to change direction. The bigger the speed, the bigger the turn radius. You will also need more distance to come to a full stop and braking while turning will cause your vehicle to go into an uncontrolled skid. | ||
| + | |||
| + | === Modifications and economy === | ||
| + | {{Specs-Economy}} | ||
== Armaments == | == Armaments == | ||
| + | {{Specs-Tank-Armaments}} | ||
=== Main armament === | === Main armament === | ||
| + | {{Specs-Tank-Weapon|1}} | ||
<!-- ''Give the reader information about the characteristics of the main gun. Assess its effectiveness in a battle based on the reloading speed, ballistics and the power of shells. Do not forget about the flexibility of the fire, that is how quickly the cannon can be aimed at the target, open fire on it and aim at another enemy. Add a link to the main article on the gun: <code><nowiki>{{main|Name of the weapon}}</nowiki></code>. Describe in general terms the ammunition available for the main gun. Give advice on how to use them and how to fill the ammunition storage.'' --> | <!-- ''Give the reader information about the characteristics of the main gun. Assess its effectiveness in a battle based on the reloading speed, ballistics and the power of shells. Do not forget about the flexibility of the fire, that is how quickly the cannon can be aimed at the target, open fire on it and aim at another enemy. Add a link to the main article on the gun: <code><nowiki>{{main|Name of the weapon}}</nowiki></code>. Describe in general terms the ammunition available for the main gun. Give advice on how to use them and how to fill the ammunition storage.'' --> | ||
{{main|6pdr OQF Mk.V (57 mm)}} | {{main|6pdr OQF Mk.V (57 mm)}} | ||
| Line 52: | Line 59: | ||
{| class="wikitable" style="text-align:center" width="100%" | {| class="wikitable" style="text-align:center" width="100%" | ||
|- | |- | ||
| − | ! colspan="5" | [[6pdr OQF Mk.V (57 mm)|57 mm OQF | + | ! colspan="5" | [[6pdr OQF Mk.V (57 mm)|57 mm 6pdr OQF Mk.V]] || colspan="5" | Turret rotation speed (°/s) || colspan="4" | Reloading rate (seconds) |
|- | |- | ||
! Mode !! Capacity !! Vertical !! Horizontal !! Stabilizer | ! Mode !! Capacity !! Vertical !! Horizontal !! Stabilizer | ||
| Line 59: | Line 66: | ||
|- | |- | ||
! ''Arcade'' | ! ''Arcade'' | ||
| − | | rowspan="2" | 60 || rowspan="2" | -10°/+20° || rowspan="2" | ±180° || rowspan="2" | | + | | rowspan="2" | 60 || rowspan="2" | -10°/+20° || rowspan="2" | ±180° || rowspan="2" | Shoulder || 22.8 || 31.6 || 38.4 || 42.5 || 45.2 || rowspan="2" | 5.20 || rowspan="2" | 4.60 || rowspan="2" | 4.24 || rowspan="2" | 4.00 |
|- | |- | ||
! ''Realistic'' | ! ''Realistic'' | ||
| Line 66: | Line 73: | ||
|} | |} | ||
| − | + | ==== Ammunition ==== | |
| − | { | + | {{:6pdr OQF Mk.V (57 mm)/Ammunition|Shot Mk.8, Shot Mk.5 HV, Shot Mk.9, Shell Mk.10}} |
| − | |||
| − | |||
| − | |||
| − | |||
| − | |||
| − | |||
| − | |||
| − | |||
| − | |||
| − | |||
| − | |||
| − | |||
| − | |||
| − | |||
| − | |||
| − | |||
| − | |||
| − | |||
| − | |||
| − | |||
| − | |||
| − | |||
| − | |||
| − | |||
| − | |||
| − | |||
| − | |||
| − | |||
| − | |||
| − | |||
| − | |||
| − | | Shot Mk.8 | ||
| − | |||
| − | |||
| − | |||
| − | |||
| − | |||
| − | |||
| − | |||
| − | |||
==== [[Ammo racks]] ==== | ==== [[Ammo racks]] ==== | ||
| Line 125: | Line 92: | ||
|- | |- | ||
|} | |} | ||
| − | Notes: | + | '''Notes''': |
* To go into battle with the turret empty of ammo, pack 31 ''(+29)'' shells (racks 1 & 2 emptied). | * To go into battle with the turret empty of ammo, pack 31 ''(+29)'' shells (racks 1 & 2 emptied). | ||
* As they are modeled by sets of 2 or 3, shells disappear from the rack only after you fire all shells in the set. | * As they are modeled by sets of 2 or 3, shells disappear from the rack only after you fire all shells in the set. | ||
| − | + | ==== Optics ==== | |
| − | |||
| − | |||
| − | |||
{| class="wikitable" style="text-align:center" width="50%" | {| class="wikitable" style="text-align:center" width="50%" | ||
| − | ! colspan="3" | {{PAGENAME}} [[Optics]] | + | ! colspan="3" | {{PAGENAME}} [[Optics]] |
|- | |- | ||
! Which ones | ! Which ones | ||
| Line 142: | Line 106: | ||
|- | |- | ||
! Main Gun optics | ! Main Gun optics | ||
| − | | x1.85 || x3.5 | + | | x1.85 || x3.5 |
|- | |- | ||
! Comparable optics | ! Comparable optics | ||
| − | | colspan="2 | + | | colspan="2" | [[M10 GMC]] |
|- | |- | ||
| − | |} | + | |} |
=== Machine guns === | === Machine guns === | ||
| + | {{Specs-Tank-Weapon|2}} | ||
<!-- ''Offensive and anti-aircraft machine guns not only allow you to fight some aircraft but also are effective against lightly armoured vehicles. Evaluate machine guns and give recommendations on its use.'' The text within these arrows are not to be deleted --> | <!-- ''Offensive and anti-aircraft machine guns not only allow you to fight some aircraft but also are effective against lightly armoured vehicles. Evaluate machine guns and give recommendations on its use.'' The text within these arrows are not to be deleted --> | ||
{{main|BESA (7.92 mm)}} | {{main|BESA (7.92 mm)}} | ||
| Line 157: | Line 122: | ||
! colspan="5" | [[BESA (7.92 mm)|7.92 mm BESA]] | ! colspan="5" | [[BESA (7.92 mm)|7.92 mm BESA]] | ||
|- | |- | ||
| − | ! Mount | + | ! Mount !! Capacity (Belt) !! Fire rate !! Vertical !! Horizontal |
| − | ! Capacity (Belt) | ||
| − | ! Fire rate | ||
| − | ! Vertical | ||
| − | ! Horizontal | ||
|- | |- | ||
| Coaxial || 3,375 (225) || 600 || N/A || N/A | | Coaxial || 3,375 (225) || 600 || N/A || N/A | ||
|- | |- | ||
|} | |} | ||
| − | The small | + | |
| + | The small calibre of the BESA machine gun makes it largely ineffective against all armoured vehicles but the ones with an open compartment. It still can be used to ping targets as a rangefinding help. | ||
== Usage in battles == | == Usage in battles == | ||
| − | <!--Describe the tactics of playing in the vehicle, the features of using vehicles in the team and advice on tactics. Refrain from creating a "guide" - do not impose a single point of view but instead give the reader food for thought. Describe the most dangerous enemies and give recommendations on fighting them. If necessary, note the specifics of the game in different modes (AB, RB, SB).--> | + | <!-- ''Describe the tactics of playing in the vehicle, the features of using vehicles in the team and advice on tactics. Refrain from creating a "guide" - do not impose a single point of view but instead give the reader food for thought. Describe the most dangerous enemies and give recommendations on fighting them. If necessary, note the specifics of the game in different modes (AB, RB, SB).'' --> |
| − | The AEC Mk. II is to play mainly in the role of flanking and reconnaissance. Due to the high speed and thin armour, it is ill-advised to use this vehicle in frontal assaults. Added to the new mechanic of active scouting for light tanks, it is rewarding to be an effective scout by highlighting targets for allies, thus farming SP and experience from their assistance. However, the AEC isn't as small as a scout-like the American M22 Locust, so scouting and flanking can be risky if done incorrectly. | + | The AEC Mk. II is to play mainly in the role of flanking and reconnaissance. Due to the high speed and thin armour, it is ill-advised to use this vehicle in frontal assaults. Added to the new mechanic of active scouting for light tanks, it is rewarding to be an effective scout by highlighting targets for allies, thus farming SP and experience from their assistance. However, the AEC isn't as small as a scout-like the American M22 Locust, so scouting and flanking can be risky if done incorrectly. The AEC also have the same 6-Pounder cannon found on the Crusader Mk III, Churchill Mk III, Cromwell Mk I and the Valentine Mk IX, so the AEC has a fast rate of fire with an excellent muzzle velocity. Here are some methods for maximizing not only combat effectiveness but also the chances of surviving. |
| − | The first method of using this vehicle is for reconnaissance. Since the addition of the "active scouting" mechanic, light tanks have the ability to report the position of enemy vehicles to allies. When fulfilling the role of scouting in this vehicle, find a position that is concealed, but that gives a clear view sight of the battlefield. This is most helpful for farming Spawn Points and experience given that when an allied vehicle destroys an enemy player being actively scouted, granting a 50% reward of what the allied player was awarded. This can work best when paired with allied tank destroyers for dislodging stubborn enemy defenders holding down key positions. | + | The first method of using this vehicle is for reconnaissance. Since the addition of the "active scouting" mechanic, light tanks have the ability to report the position of enemy vehicles to allies. When fulfilling the role of scouting in this vehicle, find a position that is concealed, but that gives a clear view sight of the battlefield. This is most helpful for farming Spawn Points and experience given that when an allied vehicle destroys an enemy player being actively scouted, granting a 50% reward of what the allied player was awarded. This can work best when paired with allied tank destroyers for dislodging stubborn enemy defenders holding down key positions. |
The second method of using this vehicle is flanking. When using this as a flanker, try to use the terrain for the advantage and end up on the enemy's flank. Coupled with the AEC's fast speed, it shouldn't be too difficult to get up to speed if the terrain is favourable, as muddy terrain will severely inhibit the ability to manoeuvre. After all, the AEC is still a wheeled vehicle, so don't expect to speed overall terrains as in a tank. Nonetheless, when on the enemy's flank, ensure that it is a spot that isn't as exposed as others. Then, start pumping shots into the sides of the enemy tanks. It is highly recommended to fire a few shots then relocate, thus preventing the enemy from triangulating the AEC's firing location. It doesn't hurt to use "active scouting" as well, to notify allies of an incoming enemy armour movement. | The second method of using this vehicle is flanking. When using this as a flanker, try to use the terrain for the advantage and end up on the enemy's flank. Coupled with the AEC's fast speed, it shouldn't be too difficult to get up to speed if the terrain is favourable, as muddy terrain will severely inhibit the ability to manoeuvre. After all, the AEC is still a wheeled vehicle, so don't expect to speed overall terrains as in a tank. Nonetheless, when on the enemy's flank, ensure that it is a spot that isn't as exposed as others. Then, start pumping shots into the sides of the enemy tanks. It is highly recommended to fire a few shots then relocate, thus preventing the enemy from triangulating the AEC's firing location. It doesn't hurt to use "active scouting" as well, to notify allies of an incoming enemy armour movement. | ||
| − | |||
| − | |||
| − | + | With very light armour, this renders the AEC vehicle highly exposed to any form of enemy fire except machine gunfire. However, at its BR, there are some adversaries that deserve special note. | |
| − | The AEC's greatest adversary is most likely the [[Pz.IV F2|Panzer IV F2]], due to its long-barreled 75 mm cannon, which can punch right through the armour- even from long range. In addition, any later model of the [[Pz.III M|Panzer III]] is going to give severe problems due to their long-barreled 50 mm cannon, which has a rapid rate | + | '''German Vehicles''' - The AEC's greatest adversary is most likely the [[Pz.IV F2|Panzer IV F2]], due to its long-barreled 75 mm cannon, which can punch right through the armour- even from long range. In addition, any later model of the [[Pz.III M|Panzer III]] is going to give severe problems due to their long-barreled 50 mm cannon, which has a rapid rate of fire. As laughable as it sounds, the [[Flakpanzer I]] and the [[Flakpanzer 38]] "Gepard" will also shred the AEC, as a result of their ability to use the HVAP-T round for their 20 mm cannons, which have a murderous rate of fire. In uptier matches, stay away from a Flakpanzer [[Wirbelwind]] at all costs, as the sheer volume of their fire will utterly obliterate the AEC, even if they do not have the HVAP-T round. The most dangerous opponent in respect to the AEC is the [[Sd.Kfz.234/2]] "Puma" due to its amazing speed and a high-velocity 50 mm cannon. The [[Marder III]] and [[Marder III H]] will also give issues, due to their high-velocity cannons. |
| − | + | '''Soviet Vehicles''' - The Soviets have the most tanks with heavy armour, which can make it difficult for even for the 6-Pounder to punch through. That being said, a [[KV-1 (Family)|KV-1]] is going to give a lot of problems, even at close ranges. In addition to that, the most abundant Soviet threat is going to be the [[T-34 (Family)|T-34]], due to its fast speed and sloping armour, which has the chances to bounce a shell, even at close range, if the tank is angled well enough. The most dangerous opponent is the [[SU-122]], due to the 122 mm howitzer it carries, which doesn't need to make a direct hit if firing High-Explosive shells. In addition, the [[YaG-10 (29-K)]] boasts a high-velocity 76 mm cannon, which will tear through the AEC's armour even at long ranges. | |
| − | + | '''Japanese Vehicles''' - Japanese vehicles may not have the strongest armour for their tanks, but their guns will make anyone think twice. Most notable of these is the [[Chi-Nu]] and the [[Ho-Ni III]], which have high-velocity 75 mm cannons, which will rip through most armour at medium to long-range. The [[So-Ki]] SPAA can also rip through the AEC due to the twin 25 mm cannons. In addition, the [[M24 (Japan)|M24 Chaffee (Self-Defense Force)]] boasts a 75 mm cannon and a .50 cal machine gun, which can bore through the thin armour. | |
| − | + | '''French Vehicles''' - The French also have some vehicles that are heavily armoured. Most notable of them being the Char [[B1 bis]] and the Char [[B1 ter]]. The Char B1 ter is probably most notable of them, due to the ridiculous amount of armour from the front. The [[SAu 40]] is a viable threat, thanks to its 75 mm cannon. It is also plausible to face the [[M4A1 (France)|French M4A1 Sherman]], which not only has enough armour to possibly bounce the 6-pdr shells but a 75 mm cannon and a .50 cal machine gun, which is notorious for tearing through just about any lightly-armoured vehicle. It is also important to note that the 40 mm Bofors [[CCKW 353 AA]] truck is a major threat to the AEC, due to the Bofors 40 mm heavy Anti-Aircraft cannon it wields. | |
| − | + | === Pros and cons === | |
| − | + | <!-- ''Summarise and briefly evaluate the vehicle in terms of its characteristics and combat effectiveness. Mark its pros and cons in a bulleted list. Try not to use more than 6 points for each of the characteristics. Avoid using categorical definitions such as "bad", "good" and the like - use substitutions with softer forms such as "inadequate" and "effective".'' --> | |
| − | |||
| − | |||
| − | |||
| − | |||
| − | |||
| − | |||
| − | |||
| − | |||
| − | |||
| − | |||
| − | |||
| − | |||
| − | |||
| − | |||
| − | |||
| − | |||
| − | |||
| − | |||
| − | |||
| − | |||
| − | |||
| − | |||
| − | |||
| − | |||
| − | |||
| − | |||
| − | |||
| − | |||
| − | |||
| − | |||
| − | |||
| − | |||
| − | |||
| − | |||
| − | |||
| − | |||
| − | |||
| − | |||
| − | |||
| − | |||
| − | |||
| − | |||
| − | |||
| − | |||
| − | |||
| − | |||
| − | |||
| − | |||
'''Pros:''' | '''Pros:''' | ||
| − | * | + | * Stabilized 57 mm with fast reload and excellent spalling damage; also 12 degrees of gun depression |
| − | + | * Very mobile in all directions, especially over solid surfaces. At 87km/h it is one of the fastest vehicles in low ranked battles | |
| − | |||
| − | |||
| − | |||
| − | * Very mobile, especially | ||
* Turret has decent armour for an armoured car, can take some hits from autocannons and low-rank guns | * Turret has decent armour for an armoured car, can take some hits from autocannons and low-rank guns | ||
| − | + | * 7.92 mm BESA machine gun has a superb rate of fire and is effective against open-topped vehicles | |
| − | + | * Smoke screen and scouting abilities; a great option at low rank for cooperative playstyle | |
| − | * 7. | ||
'''Cons:''' | '''Cons:''' | ||
| − | * | + | * Off-road performance is not on par with tracked vehicles (wheels bog down easily in mud, sand or snow) |
| − | + | * Cannot turn on the spot because of the wheels | |
| − | + | * Only three crew members. A well-aimed APHE will take the AEC out instantly | |
| − | * Cannot turn on the spot | + | * Aircraft, autocannons and artillery are a threat because of the low hull and rooftop armour |
| − | * Only three crew members | ||
| − | * Aircraft | ||
| − | |||
== History == | == History == | ||
| − | <!--''Describe the history of the creation and combat usage of the | + | <!-- ''Describe the history of the creation and combat usage of the vehicle in more detail than in the introduction. If the historical reference turns out to be too long, take it to a separate article, taking a link to the article about the vehicle and adding a block "/History" (example: <nowiki>https://wiki.warthunder.com/(Vehicle-name)/History</nowiki>) and add a link to it here using the <code>main</code> template. Be sure to reference text and sources by using <code><nowiki><ref></ref></nowiki></code>, as well as adding them at the end of the article with <code><nowiki><references /></nowiki></code>. This section may also include the vehicle's dev blog entry (if applicable) and the in-game encyclopedia description (under <code><nowiki>=== In-game description ===</nowiki></code>, also if applicable).'' --> |
The Associated Equipment Co. (AEC) Ltd. company, which made London's double-decker buses, put forth an unsolicited design for a heavy armoured car, based on their Matador MAT (medium artillery tractor). The army was disinclined at first, but Prime Minister Churchill intervened in AEC's favour. The Mark I model carried a 2-pounder in a Valentine tank turret. Some of these were sent for use in North Africa. The Mark II, which had increased horsepower and a new three-man turret with the 6-pounder, was only produced in small numbers. Approximately 24 were given to Yugoslavian partisans in late 1944. | The Associated Equipment Co. (AEC) Ltd. company, which made London's double-decker buses, put forth an unsolicited design for a heavy armoured car, based on their Matador MAT (medium artillery tractor). The army was disinclined at first, but Prime Minister Churchill intervened in AEC's favour. The Mark I model carried a 2-pounder in a Valentine tank turret. Some of these were sent for use in North Africa. The Mark II, which had increased horsepower and a new three-man turret with the 6-pounder, was only produced in small numbers. Approximately 24 were given to Yugoslavian partisans in late 1944. | ||
| − | This would be followed by the Mark III, mounting the British | + | This would be followed by the Mark III, mounting the British 75 mm gun, making it the most powerful armoured car of the war, and used in Western Europe alongside the 75 mm armed US M3 GMC half-track in the heavy troop of British armoured car squadrons. A total of 122 Mark Is and 507 Mark IIs/IIIs were built. Sometimes referred to as "Junies" or "Matadors." |
== Media == | == Media == | ||
| − | <!--Excellent additions to the article would be video guides, screenshots from the game, and photos.--> | + | <!-- ''Excellent additions to the article would be video guides, screenshots from the game, and photos.'' --> |
| − | {{Youtube-gallery|-KhcG7ajFSw|'''The Shooting Range #80''' - ''War Machines'' section at 00:36 discusses the AEC | + | |
| + | ;Skins | ||
| + | |||
| + | * [https://live.warthunder.com/feed/camouflages/?vehicle=uk_armored_car_aec_mk_2 Skins and camouflages for the {{PAGENAME}} from live.warthunder.com.] | ||
| + | |||
| + | ;Videos | ||
| + | {{Youtube-gallery|-KhcG7ajFSw|'''The Shooting Range #80''' - ''War Machines'' section at 00:36 discusses the {{PAGENAME}}.|RGeu2yLGeTU|'''Best armored cars''' discusses the {{PAGENAME}} at 1:39 - ''War Thunder Official Channel''}} | ||
| + | {{Youtube-gallery|HIo58bnOz_U|'''Tank Chats #141 <nowiki>| AEC Armoured Car |</nowiki> The Tank Museum''' - ''The Tank Museum''}} | ||
== See also == | == See also == | ||
| Line 280: | Line 191: | ||
;Vehicles equipped with the same chassis | ;Vehicles equipped with the same chassis | ||
| + | |||
* [[AEC AA]] | * [[AEC AA]] | ||
| − | ; | + | ;Other vehicles of similar configuration and role |
| − | |||
| − | |||
* [[T18E2]] | * [[T18E2]] | ||
* [[Sd.Kfz.234/2]] | * [[Sd.Kfz.234/2]] | ||
| + | * [[Eland 90 Mk.7]] | ||
== External links == | == External links == | ||
| − | <!--Paste links to sources and external resources, such as: | + | <!-- ''Paste links to sources and external resources, such as:'' |
* ''topic on the official game forum;'' | * ''topic on the official game forum;'' | ||
| − | + | * ''other literature.'' --> | |
| − | * ''other literature.''--> | ||
| − | * [[wt:en/news/5221 | + | * [[wt:en/news/5221-aec-mk-ii-en|[News] AEC Mk.II]] |
| + | {{TankManufacturer AEC}} | ||
{{Britain light tanks}} | {{Britain light tanks}} | ||
{{Britain premium ground vehicles}} | {{Britain premium ground vehicles}} | ||
{{Winter Event}} | {{Winter Event}} | ||
| + | [[Category:Wheeled ground vehicles]] | ||
Latest revision as of 13:32, 2 December 2023

Contents
Description
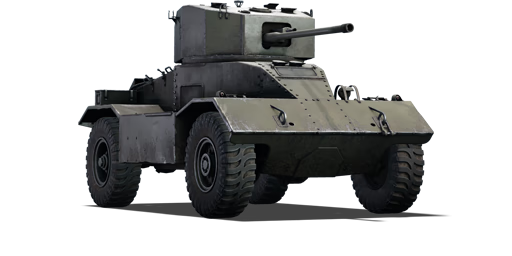
The AEC Armoured Cars were a series of vehicles developed during World War 2. After the British experience against Italian armoured cars in the Western Sahara, AEC decided to develop their own vehicle while the Daimler Armoured Car was still in development. A total of 629 units were built and entered service in 1941. Early versions tried to have the same firepower and armour as other British cruiser tanks but they failed. The Mk.II version used a larger turret for a three-man crew with a 6-pounder gun, redesigned front hull, and a 158 hp (118 kW) diesel engine.
It was introduced during Update 1.75 "La Résistance" in the 2017 "Festive Quest" that took place between 22 December 2017 to 22 January 2018. The AEC Mk II is similar to the AEC AA, with a different turret housing a 57 mm 6-pounder cannon rather than two synchronized Oerlikon 20 mm anti-aircraft cannons. As such, the vehicle has a lower profile than its predecessor, which grants it more stealth capabilities. In addition, there is a 7.62 mm BESA machine gun for use, which is nice for dealing with lightly armoured targets such as open-topped anti-aircraft vehicles and SPGs.
General info
Survivability and armour
Armour type:
- Rolled homogeneous armour
- Structural steel (Sand skirts)
| Armour | Front (Slope angle) | Sides | Rear | Roof |
|---|---|---|---|---|
| Hull | 25 mm (63-78°) Front glacis 10 mm (41°) Lower glacis 5 mm (49°) + 57 mm Joint plate |
16 mm (0-1°) | 16 mm (58°) Top 16 mm (13-14°) Bottom |
16 mm |
| Turret | 57 mm (0-1°) Turret front 31 mm (0-45°) Gun mantlet |
25 mm (0-1°) | 25 mm (0-60°) | 16 mm |
Notes:
- Wheels are 2 mm thick.
- Chassis is 5 mm thick.
Being very thinly armoured, the AEC Mk II is very vulnerable to heavy machine gun strafings, artillery strikes and even ammo rack detonations from nearby vehicles.
Mobility
| Game Mode | Max Speed (km/h) | Weight (tons) | Engine power (horsepower) | Power-to-weight ratio (hp/ton) | |||
|---|---|---|---|---|---|---|---|
| Forward | Reverse | Stock | Upgraded | Stock | Upgraded | ||
| Arcade | 76 | 10 | 12.8 | 256 | 315 | 20 | 24.61 |
| Realistic | 68 | 9 | 146 | 165 | 11.41 | 12.89 | |
Being an armoured car, the AEC Mk II is a light vehicle. It accelerates quickly and has a good cruise speed on hard surfaces (solid ground, roads). While your top speed is high, your cruise speed will be around 50 km/h. As it is equipped with tires, the AEC Mk II struggles on soft terrain (sand, mud, snow). The reverse speed is also poor for a light armoured car. The AEC Mk II is average at fording: 17 km/h and loses quickly speed when driving uphill. Another important point to take into account is the turn radius: like all WW2 wheeled vehicles, you can not turn on the spot and always need space to change direction. The bigger the speed, the bigger the turn radius. You will also need more distance to come to a full stop and braking while turning will cause your vehicle to go into an uncontrolled skid.
Modifications and economy
| Mobility | Protection | Firepower | ||||||||||||||||||||||||
|---|---|---|---|---|---|---|---|---|---|---|---|---|---|---|---|---|---|---|---|---|---|---|---|---|---|---|
|
|
|
Armaments
Main armament
| 57 mm 6pdr OQF Mk.V | Turret rotation speed (°/s) | Reloading rate (seconds) | |||||||||||
|---|---|---|---|---|---|---|---|---|---|---|---|---|---|
| Mode | Capacity | Vertical | Horizontal | Stabilizer | Stock | Upgraded | Full | Expert | Aced | Stock | Full | Expert | Aced |
| Arcade | 60 | -10°/+20° | ±180° | Shoulder | 22.8 | 31.6 | 38.4 | 42.5 | 45.2 | 5.20 | 4.60 | 4.24 | 4.00 |
| Realistic | 14.3 | 16.8 | 20.4 | 22.6 | 24.0 | ||||||||
Ammunition
| Penetration statistics | |||||||
|---|---|---|---|---|---|---|---|
| Ammunition | Type of warhead |
Penetration @ 0° Angle of Attack (mm) | |||||
| 10 m | 100 m | 500 m | 1,000 m | 1,500 m | 2,000 m | ||
| Shot Mk.8 | APC | 116 | 111 | 94 | 76 | 62 | 50 |
| Shot Mk.5 HV | AP | 115 | 111 | 93 | 75 | 60 | 49 |
| Shot Mk.9 | APCBC | 132 | 127 | 110 | 91 | 75 | 63 |
| Shell Mk.10 | HE | 9 | 9 | 9 | 9 | 9 | 9 |
| Shell details | ||||||||||||
|---|---|---|---|---|---|---|---|---|---|---|---|---|
| Ammunition | Type of warhead |
Velocity (m/s) |
Projectile mass (kg) |
Fuse delay | Fuse sensitivity (mm) |
Explosive mass (TNT equivalent) (g) |
Ricochet | |||||
| 0% | 50% | 100% | ||||||||||
| Shot Mk.8 | APC | 883 | 2.87 | - | - | - | 48° | 63° | 71° | |||
| Shot Mk.5 HV | AP | 891 | 2.8 | - | - | - | 47° | 60° | 65° | |||
| Shot Mk.9 | APCBC | 847 | 3.23 | - | - | - | 48° | 63° | 71° | |||
| Shell Mk.10 | HE | 655 | 2.72 | 0 | 0.1 | 590 | 79° | 80° | 81° | |||
Ammo racks

| Full ammo |
1st rack empty |
2nd rack empty |
3rd rack empty |
4th rack empty |
5th rack empty |
6th rack empty |
Visual discrepancy |
|---|---|---|---|---|---|---|---|
| 60 | 45 (+15) | 39 (+21) | 31 (+29) | 23 (+37) | 10 (+50) | 1 (+59) | No |
Notes:
- To go into battle with the turret empty of ammo, pack 31 (+29) shells (racks 1 & 2 emptied).
- As they are modeled by sets of 2 or 3, shells disappear from the rack only after you fire all shells in the set.
Optics
| AEC Mk II Optics | ||
|---|---|---|
| Which ones | Default magnification | Maximum magnification |
| Main Gun optics | x1.85 | x3.5 |
| Comparable optics | M10 GMC | |
Machine guns
| 7.92 mm BESA | ||||
|---|---|---|---|---|
| Mount | Capacity (Belt) | Fire rate | Vertical | Horizontal |
| Coaxial | 3,375 (225) | 600 | N/A | N/A |
The small calibre of the BESA machine gun makes it largely ineffective against all armoured vehicles but the ones with an open compartment. It still can be used to ping targets as a rangefinding help.
Usage in battles
The AEC Mk. II is to play mainly in the role of flanking and reconnaissance. Due to the high speed and thin armour, it is ill-advised to use this vehicle in frontal assaults. Added to the new mechanic of active scouting for light tanks, it is rewarding to be an effective scout by highlighting targets for allies, thus farming SP and experience from their assistance. However, the AEC isn't as small as a scout-like the American M22 Locust, so scouting and flanking can be risky if done incorrectly. The AEC also have the same 6-Pounder cannon found on the Crusader Mk III, Churchill Mk III, Cromwell Mk I and the Valentine Mk IX, so the AEC has a fast rate of fire with an excellent muzzle velocity. Here are some methods for maximizing not only combat effectiveness but also the chances of surviving.
The first method of using this vehicle is for reconnaissance. Since the addition of the "active scouting" mechanic, light tanks have the ability to report the position of enemy vehicles to allies. When fulfilling the role of scouting in this vehicle, find a position that is concealed, but that gives a clear view sight of the battlefield. This is most helpful for farming Spawn Points and experience given that when an allied vehicle destroys an enemy player being actively scouted, granting a 50% reward of what the allied player was awarded. This can work best when paired with allied tank destroyers for dislodging stubborn enemy defenders holding down key positions.
The second method of using this vehicle is flanking. When using this as a flanker, try to use the terrain for the advantage and end up on the enemy's flank. Coupled with the AEC's fast speed, it shouldn't be too difficult to get up to speed if the terrain is favourable, as muddy terrain will severely inhibit the ability to manoeuvre. After all, the AEC is still a wheeled vehicle, so don't expect to speed overall terrains as in a tank. Nonetheless, when on the enemy's flank, ensure that it is a spot that isn't as exposed as others. Then, start pumping shots into the sides of the enemy tanks. It is highly recommended to fire a few shots then relocate, thus preventing the enemy from triangulating the AEC's firing location. It doesn't hurt to use "active scouting" as well, to notify allies of an incoming enemy armour movement.
With very light armour, this renders the AEC vehicle highly exposed to any form of enemy fire except machine gunfire. However, at its BR, there are some adversaries that deserve special note.
German Vehicles - The AEC's greatest adversary is most likely the Panzer IV F2, due to its long-barreled 75 mm cannon, which can punch right through the armour- even from long range. In addition, any later model of the Panzer III is going to give severe problems due to their long-barreled 50 mm cannon, which has a rapid rate of fire. As laughable as it sounds, the Flakpanzer I and the Flakpanzer 38 "Gepard" will also shred the AEC, as a result of their ability to use the HVAP-T round for their 20 mm cannons, which have a murderous rate of fire. In uptier matches, stay away from a Flakpanzer Wirbelwind at all costs, as the sheer volume of their fire will utterly obliterate the AEC, even if they do not have the HVAP-T round. The most dangerous opponent in respect to the AEC is the Sd.Kfz.234/2 "Puma" due to its amazing speed and a high-velocity 50 mm cannon. The Marder III and Marder III H will also give issues, due to their high-velocity cannons.
Soviet Vehicles - The Soviets have the most tanks with heavy armour, which can make it difficult for even for the 6-Pounder to punch through. That being said, a KV-1 is going to give a lot of problems, even at close ranges. In addition to that, the most abundant Soviet threat is going to be the T-34, due to its fast speed and sloping armour, which has the chances to bounce a shell, even at close range, if the tank is angled well enough. The most dangerous opponent is the SU-122, due to the 122 mm howitzer it carries, which doesn't need to make a direct hit if firing High-Explosive shells. In addition, the YaG-10 (29-K) boasts a high-velocity 76 mm cannon, which will tear through the AEC's armour even at long ranges.
Japanese Vehicles - Japanese vehicles may not have the strongest armour for their tanks, but their guns will make anyone think twice. Most notable of these is the Chi-Nu and the Ho-Ni III, which have high-velocity 75 mm cannons, which will rip through most armour at medium to long-range. The So-Ki SPAA can also rip through the AEC due to the twin 25 mm cannons. In addition, the M24 Chaffee (Self-Defense Force) boasts a 75 mm cannon and a .50 cal machine gun, which can bore through the thin armour.
French Vehicles - The French also have some vehicles that are heavily armoured. Most notable of them being the Char B1 bis and the Char B1 ter. The Char B1 ter is probably most notable of them, due to the ridiculous amount of armour from the front. The SAu 40 is a viable threat, thanks to its 75 mm cannon. It is also plausible to face the French M4A1 Sherman, which not only has enough armour to possibly bounce the 6-pdr shells but a 75 mm cannon and a .50 cal machine gun, which is notorious for tearing through just about any lightly-armoured vehicle. It is also important to note that the 40 mm Bofors CCKW 353 AA truck is a major threat to the AEC, due to the Bofors 40 mm heavy Anti-Aircraft cannon it wields.
Pros and cons
Pros:
- Stabilized 57 mm with fast reload and excellent spalling damage; also 12 degrees of gun depression
- Very mobile in all directions, especially over solid surfaces. At 87km/h it is one of the fastest vehicles in low ranked battles
- Turret has decent armour for an armoured car, can take some hits from autocannons and low-rank guns
- 7.92 mm BESA machine gun has a superb rate of fire and is effective against open-topped vehicles
- Smoke screen and scouting abilities; a great option at low rank for cooperative playstyle
Cons:
- Off-road performance is not on par with tracked vehicles (wheels bog down easily in mud, sand or snow)
- Cannot turn on the spot because of the wheels
- Only three crew members. A well-aimed APHE will take the AEC out instantly
- Aircraft, autocannons and artillery are a threat because of the low hull and rooftop armour
History
The Associated Equipment Co. (AEC) Ltd. company, which made London's double-decker buses, put forth an unsolicited design for a heavy armoured car, based on their Matador MAT (medium artillery tractor). The army was disinclined at first, but Prime Minister Churchill intervened in AEC's favour. The Mark I model carried a 2-pounder in a Valentine tank turret. Some of these were sent for use in North Africa. The Mark II, which had increased horsepower and a new three-man turret with the 6-pounder, was only produced in small numbers. Approximately 24 were given to Yugoslavian partisans in late 1944.
This would be followed by the Mark III, mounting the British 75 mm gun, making it the most powerful armoured car of the war, and used in Western Europe alongside the 75 mm armed US M3 GMC half-track in the heavy troop of British armoured car squadrons. A total of 122 Mark Is and 507 Mark IIs/IIIs were built. Sometimes referred to as "Junies" or "Matadors."
Media
- Skins
- Videos
See also
- Vehicles equipped with the same chassis
- Other vehicles of similar configuration and role
External links
| Associated Equipment Company (AEC) | |
|---|---|
| Armoured Cars | AEC Mk II |
| SPAAs | AEC AA |
| Britain light tanks | |
|---|---|
| A13 | A13 Mk I · A13 Mk I (3rd R.T.R.) · A13 Mk II · A13 Mk II 1939 |
| A15 | Crusader II · Crusader "The Saint" · Crusader III |
| A17 | Tetrarch I |
| IFV | Warrior |
| Wheeled | Daimler Mk II · AEC Mk II · Fox · Vickers Mk.11 |
| Other | VFM5 |
| South Africa | |
| SARC | SARC MkIVa · SARC MkVI (2pdr) · SARC MkVI (6pdr) |
| Ratel | Ratel 90 · Ratel 20 |
| Rooikat | Rooikat Mk.1D · Rooikat 105 · Rooikat MTTD |
| Other | Concept 3 · Eland 90 Mk.7 |
| USA | Stuart I · Stuart III |
| Britain premium ground vehicles | |
|---|---|
| Light tanks | A13 Mk I (3rd R.T.R.) · A13 Mk II 1939 · AEC Mk II · Crusader "The Saint" · Rooikat 105 |
| Medium tanks | A.C.I · Grant I · Cromwell V (RP-3) · Sherman IC "Trzyniec" · A.C.IV · Comet I "Iron Duke IV" |
| Centurion Mk.2 · ▄Strv 81 (RB 52) · Centurion Mk.5 AVRE · Centurion Mk.5/1 · ▄Sho't Kal Dalet · Centurion Action X | |
| Vijayanta · Khalid · Challenger DS · Challenger 2 OES | |
| Heavy tanks | Independent · Matilda Hedgehog · Excelsior · TOG II · Churchill Crocodile · Black Prince |
| Tank destroyers | Alecto I · Achilles (65 Rg.) · QF 3.7 Ram |
