Difference between revisions of "A129CBT"
(Added more to the 'Usage in battles section.' This section is all about SPAA dueling: what it is, how to do it, why you should do it, and survivability in general.) (Tag: Visual edit) |
(→SPAA Dueling: - Fixed errors that previously flew over my head. (It was 4 in the morning haha)) (Tag: Visual edit) |
||
| Line 127: | Line 127: | ||
==== SPAA Dueling ==== | ==== SPAA Dueling ==== | ||
| − | + | [[File:Unknown (8).png|thumb|Enemy SPAA locked with the sight stabilisation system in the missile sight.[[File:Laser warning.png|thumb|Red box with crosshair. Note the laser warning the helicopter is receiving and where the rocket aiming reticle (ballistic computer on shown by spikes surrounding it) is aimed. [[File:Firing.png|thumb|Firing. Note that the rocket aiming reticle is now at the top crosshair in the box. [[File:Kill.png|thumb|Target destroyed! In the top left corner you can see a flare. The FlaRakPz 1 fired a missile so defensive action was taken and countermeasures were deployed.]]]]]]]] | |
| − | [[File:Unknown (8).png|thumb|Enemy SPAA locked with the sight stabilisation system in the missile | + | Engaging at close range is a problem for all helicopters on some scale, small or large. Long range won't be a problem however, especially with the ballistic computer. This is where SPAA dueling comes in. SPAA dueling is a form of long-range combat between an aircraft or rotorcraft and an SPAA. Essentially, to ensure your safety while flying to the battlefield, it's essential that your thermal sight, if unlocked, is on and pointing at the enemy spawn(s). If there are any SPAAs, you will get a warning on the RWR for most of them (Exceptions include hand-aimed firing from an SPAA, or a heat-seeker-only SAM system like the Type 93.), unless their radar is hiding behind some hard cover. It is much easier to SPAA duel a gun SPAA rather than a missile SPAA. |
| − | computer. This is where SPAA dueling comes in. SPAA dueling is a form of long-range combat between an aircraft or rotorcraft and an SPAA. Essentially, to ensure your safety while flying to the battlefield, it's essential that your thermal sight, if unlocked, is on and pointing at the enemy spawn(s). If there are any SPAAs, you will get a warning on the RWR for most of them (Exceptions include hand-aimed firing from an SPAA, or a heat-seeker-only SAM system like the Type 93.), unless their radar is hiding behind some hard cover. It is much easier to SPAA duel a gun SPAA rather than a missile SPAA. | ||
For starters, let's say you have spotted an enemy missile SPAA aiming right at you in the thermal sight. Lock him as soon as possible with the sight stabilisation system in the missile sight view by pressing the default key: F. If you've used top helicopters with ATGMs before, you'll know what this screen will look like. | For starters, let's say you have spotted an enemy missile SPAA aiming right at you in the thermal sight. Lock him as soon as possible with the sight stabilisation system in the missile sight view by pressing the default key: F. If you've used top helicopters with ATGMs before, you'll know what this screen will look like. | ||
Revision as of 17:27, 10 July 2021

Contents
Description
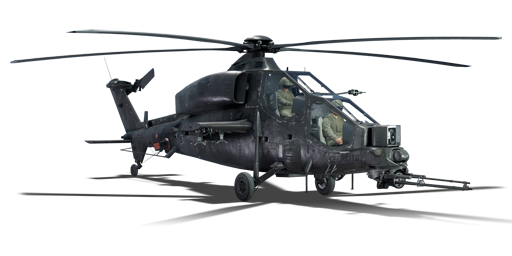
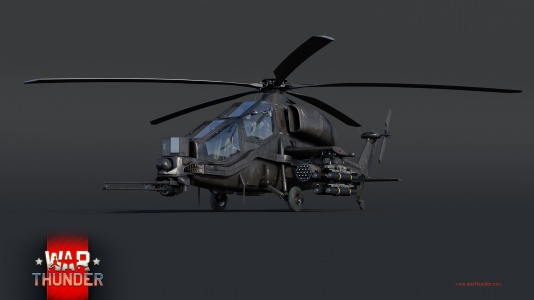
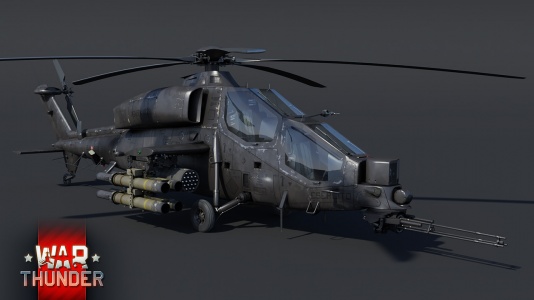
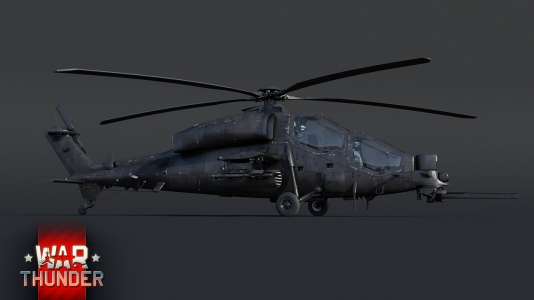
The A129CBT Mangusta is a rank VII Italian attack helicopter with a battle rating of 9.7 (AB/SB) and 10.3 (RB). It was introduced in Update "Hot Tracks".
General info
Flight performance

Outfitting the A129CBT with general payload options (Hellfires, rockets, air-to-air missiles) does not make the helicopter any slower than its adversaries, in fact at times you'll easily be one of the fastest helicopters on the battlefield. The A129CBT is able to do manoeuvres other helicopters can only dream about, even with full payload options. In Ground RB matches however, there should not be many times you'll have to move too much to avoid enemies. You are able to to get good positions thanks to your speed and at times, if done right, you will be able to dodge incoming missiles from ground anti-air or enemy jet aircraft.
| Characteristics | Max Speed (km/h at 1,000 m) |
Max altitude (metres) | |
|---|---|---|---|
| AB | RB | ||
| Stock | 269 | 253 | 5400 |
| Upgraded | 319 | 295 | |
Survivability and armour

The A129CBT is not very survivable. Like many helicopters above and below its battle rating, it is prone to exploding into many pieces after a hit from an anti-air missile. It does have some armour on the cockpit area, but in battles that won't really protect you from anything you'll face. The A129CBT uses Kevlar boron carbide, composite material which is limited only to instrument, floor and side panels around the cockpit. It does not provide the same level of protection as seen on other helicopters. If your enemy is not very accurate and manages to damage you without hitting key components of your helicopter, you might luck out and be able to make it back to the base to repair. It is advised that you stay away from machine gun fire too, generally just stay away from everything that poses a threat, this is the only way to truly maximize your survivability.
Modifications and economy
| Flight performance | Survivability | Weaponry | ||||||||||||||||||||||||||||
|---|---|---|---|---|---|---|---|---|---|---|---|---|---|---|---|---|---|---|---|---|---|---|---|---|---|---|---|---|---|---|
|
|
|
Armaments
Offensive armament
The A129CBT is armed with:
- 1 x 20 mm M197 cannon, nose-mounted ball turret (750 rpg)
Suspended armament

The A129CBT can be outfitted with the following ordnance:
- Without load
- 28 x FFAR Mighty Mouse rockets
- 14 x FFAR Mighty Mouse rockets + 4 x Mistral missiles
- 14 x FFAR Mighty Mouse rockets + 4 x AIM-92 Stinger missiles
- 38 x Hydra-70 M247 rockets
- 76 x Hydra-70 M247 rockets
- 38 x Hydra-70 M247 rockets + 6 x FFAR Mighty Mouse rockets
- 38 x Hydra-70 M247 rockets + 4 x Mistral missiles
- 38 x Hydra-70 M247 rockets + 4 x AIM-92 Stinger missiles
- 38 x Hydra-70 M247 rockets + 4 x BGM-71C Improved TOW missiles
- 38 x Hydra-70 M247 rockets + 8 x BGM-71C Improved TOW missiles
- 38 x Hydra-70 M247 rockets + 4 x AGM-114B Hellfire missiles
- 38 x Hydra-70 M247 rockets + 8 x AGM-114B Hellfire missiles
- 38 x Hydra-70 M247 rockets + 2 x AGM-114B Hellfire missiles + 2 x Mistral missiles
- 38 x Hydra-70 M247 rockets + 2 x AGM-114B Hellfire missiles + 2 x AIM-92 Stinger missiles
- 38 x Hydra-70 M247 rockets + 4 x AGM-114B Hellfire missiles + 2 x Mistral missiles
- 38 x Hydra-70 M247 rockets + 4 x AGM-114B Hellfire missiles + 2 x AIM-92 Stinger missiles
- 38 x Hydra-70 M247 rockets + 2 x BGM-71C Improved TOW missiles + 2 x Mistral missiles
- 38 x Hydra-70 M247 rockets + 2 x BGM-71C Improved TOW missiles + 2 x AIM-92 Stinger missiles
- 38 x Hydra-70 M247 rockets + 4 x BGM-71C Improved TOW missiles + 2 x Mistral missiles
- 38 x Hydra-70 M247 rockets + 4 x BGM-71C Improved TOW missiles + 2 x AIM-92 Stinger missiles
- 2 x 12.7 mm FN M3P machine guns (500 rpg = 1,000 total)
- 2 x 12.7 mm FN M3P machine guns + 6 x FFAR Mighty Mouse rockets
- 2 x 12.7 mm FN M3P machine guns + 4 x Mistral missiles
- 2 x 12.7 mm FN M3P machine guns + 4 x Mistral missiles + 6 x FFAR Mighty Mouse rockets
- 2 x 12.7 mm FN M3P machine guns + 4 x AIM-92 Stinger missiles
- 2 x 12.7 mm FN M3P machine guns + 4 x AIM-92 Stinger missiles + 6 x FFAR Mighty Mouse rockets
- 2 x 12.7 mm FN M3P machine guns + 4 x BGM-71C Improved TOW missiles
- 2 x 12.7 mm FN M3P machine guns + 4 x BGM-71C Improved TOW missiles + 6 x FFAR Mighty Mouse rockets
- 2 x 12.7 mm FN M3P machine guns + 8 x BGM-71C Improved TOW missiles
- 2 x 12.7 mm FN M3P machine guns + 8 x BGM-71C Improved TOW missiles + 6 x FFAR Mighty Mouse rockets
- 2 x 12.7 mm FN M3P machine guns + 4 x AGM-114B Hellfire missiles
- 2 x 12.7 mm FN M3P machine guns + 4 x AGM-114B Hellfire missiles + 6 x FFAR Mighty Mouse rockets
- 2 x 12.7 mm FN M3P machine guns + 8 x AGM-114B Hellfire missiles
- 2 x 12.7 mm FN M3P machine guns + 8 x AGM-114B Hellfire missiles + 6 x FFAR Mighty Mouse rockets
- 2 x 12.7 mm FN M3P machine guns + 2 x BGM-71C Improved TOW missiles + 2 x Mistral missiles
- 2 x 12.7 mm FN M3P machine guns + 2 x BGM-71C Improved TOW missiles + 2 x Mistral missiles + 6 x FFAR Mighty Mouse rockets
- 2 x 12.7 mm FN M3P machine guns + 2 x BGM-71C Improved TOW missiles + 2 x AIM-92 Stinger missiles
- 2 x 12.7 mm FN M3P machine guns + 2 x BGM-71C Improved TOW missiles + 2 x AIM-92 Stinger missiles + 6 x FFAR Mighty Mouse rockets
- 2 x 12.7 mm FN M3P machine guns + 4 x BGM-71C Improved TOW missiles + 2 x Mistral missiles
- 2 x 12.7 mm FN M3P machine guns + 4 x BGM-71C Improved TOW missiles + 2 x Mistral missiles + 6 x FFAR Mighty Mouse rockets
- 2 x 12.7 mm FN M3P machine guns + 4 x BGM-71C Improved TOW missiles + 2 x AIM-92 Stinger missiles
- 2 x 12.7 mm FN M3P machine guns + 4 x BGM-71C Improved TOW missiles + 2 x AIM-92 Stinger missiles + 6 x FFAR Mighty Mouse rockets
- 2 x 12.7 mm FN M3P machine guns + 2 x AGM-114B Hellfire missiles + 2 x Mistral missiles
- 2 x 12.7 mm FN M3P machine guns + 2 x AGM-114B Hellfire missiles + 2 x Mistral missiles + 6 x FFAR Mighty Mouse rockets
- 2 x 12.7 mm FN M3P machine guns + 2 x AGM-114B Hellfire missiles + 2 x AIM-92 Stinger missiles
- 2 x 12.7 mm FN M3P machine guns + 2 x AGM-114B Hellfire missiles + 2 x AIM-92 Stinger missiles + 6 x FFAR Mighty Mouse rockets
- 2 x 12.7 mm FN M3P machine guns + 4 x AGM-114B Hellfire missiles + 2 x Mistral missiles
- 2 x 12.7 mm FN M3P machine guns + 4 x AGM-114B Hellfire missiles + 2 x Mistral missiles + 6 x FFAR Mighty Mouse rockets
- 2 x 12.7 mm FN M3P machine guns + 4 x AGM-114B Hellfire missiles + 2 x AIM-92 Stinger missiles
- 2 x 12.7 mm FN M3P machine guns + 4 x AGM-114B Hellfire missiles + 2 x AIM-92 Stinger missiles + 6 x FFAR Mighty Mouse rockets

Usage in battles
Ground RB
The A129CBT is a great helicopter for its battle rating. Not only are there great line-up options to pair the helicopter up with, but you sit at a battle rating which allows you to be effective both in downtiers and uptiers. For Ground RB, it is recommended you bring in a light vehicle able to scout, with access to the "Air strike" modification. This will mean that once you have captured a point, and scouted a vehicle, you'll be able to get into the helicopter with Hellfires straight away if you happen to get knocked out early. This is the best strategy as if you manage to pull it off inside a match that has only just started, you will likely surprise unsuspecting enemies who might think it's still to early to worry about enemy aircraft.

For Ground RB, you have two options:
With enough spawn points, you can bring the best overall loadout for the A129CBT: Hellfires. With the Hellfires, you'll easily be able to pick off players from a distance. If spawning in during the early minutes of a match, the Hellfires will be a dangerous weapon for pretty much any enemy vehicle you'll be able to track. Do keep in mind who exactly you are choosing to engage, as you'll realise soon enough that killing a player with spawn points backed up will usually lead them to spawn in either as an anti-air ground vehicle or an aircraft. In that case you'll get overwhelmed with everything you need to watch out for, which will lead you to be less effective in the CAS department for your team. If you run out of Hellfires during your match, it is advised you return to base to get rearmed. If not, and you haven't had the chance to use your rocket pods yet, there can be situations where you'll be able to utilize them whilst still being useful to your team. With rockets, you'll need to stay low to avoid any incoming SPAA. Usually, sticking behind mountains or tree lines will suffice. Once you feel you've gotten close enough to the battlefield, it's time for you to come out, quickly find your targets, and engage. This should not pose a challenge as the A129CBT has access to ballistic computer. You'll need to quickly scan, engage and then disengage. If you feel as if you are still able to fight, you still have access to your main 20 mm cannon, which is able to be effective against lightly armoured vehicles.
For a first spawn, bringing AIM-92 Stinger air-to-air missiles and Hydra-70 M247 rockets is the best choice. You won't be as manoeuvrable whilst bringing a full rocket load, so it is unwise, unless you can be precise with the ballistic computer. This is where bringing the Stingers comes into play. Since you can't be fully functional with a full rocket load, the Stingers are great for hunting enemy first-spawn helicopters, specifically Russian helicopters. The Mistrals are a mixed bag with this helicopter; they may pull more Gs than the Stinger, but the Stingers are much more resistant to enemy countermeasures. The Mistrals will go right for countermeasures fired by, most frequently, enemies that get a laser warning or enemies with MAW systems on board.

This unearths a new playstyle for the A129CBT: playing tactically. You can bide your time and shoot down enemy CAS jets and helicopters that may spawn both early and later in the match, or you can fly around terrain, even capturing zones, supporting a team to a strategic point, and destroying ground targets with the sizeable amount of Hydras on board the helicopter. The A129CBT is very functional when supporting allied ground units right on top of them. Make sure not to put yourself into the fray and crosshairs of half the enemy team. To avoid this, fly up a bit as soon as you spawn. If you are prompted with a laser warning, dive while firing countermeasures. Use the thermal sight to determine where most of the enemy is going and where they will be, and who will be the knot in your team's battle on the ground (for instance, an MBT in a sniper spot or a M3A3 Bradley in a hull down position.) Also, try to plot a route where you can engage while taking as minimal fire as possible. Then, fly back down to the safety of the terrain and initiate your attack. For example, in Domination matches with three capture points, the amount of enemies at each capture point is rarely balanced evenly. This leaves you to attack the capture point with the least amount of enemies and potentially capture the point if the enemies are eradicated from said point. Long range maps like Maginot Line and Fields of Poland are great for this.
SPAA Dueling
[[File:Unknown (8).png|thumb|Enemy SPAA locked with the sight stabilisation system in the missile sight.[[File:Laser warning.png|thumb|Red box with crosshair. Note the laser warning the helicopter is receiving and where the rocket aiming reticle (ballistic computer on shown by spikes surrounding it) is aimed.

Engaging at close range is a problem for all helicopters on some scale, small or large. Long range won't be a problem however, especially with the ballistic computer. This is where SPAA dueling comes in. SPAA dueling is a form of long-range combat between an aircraft or rotorcraft and an SPAA. Essentially, to ensure your safety while flying to the battlefield, it's essential that your thermal sight, if unlocked, is on and pointing at the enemy spawn(s). If there are any SPAAs, you will get a warning on the RWR for most of them (Exceptions include hand-aimed firing from an SPAA, or a heat-seeker-only SAM system like the Type 93.), unless their radar is hiding behind some hard cover. It is much easier to SPAA duel a gun SPAA rather than a missile SPAA.
For starters, let's say you have spotted an enemy missile SPAA aiming right at you in the thermal sight. Lock him as soon as possible with the sight stabilisation system in the missile sight view by pressing the default key: F. If you've used top helicopters with ATGMs before, you'll know what this screen will look like.
Say it's an enemy FlaRakPz 1 that spawned first, like in the first image here. What you want to do is, once locked via sight stabilisation, enter third person view. There will be a red box with crosshairs in it (as shown in the second image). What you want to do is aim your ballistic computer rockets on the bottom line of the crosshair and once you fly about halfway above that line, fire all of your rockets, best done by holding the 'Fire rocket salvo' button, and then pitch the helicopter up to the top line of the crosshair in the box. Once all the rockets are fired, beat a hasty retreat. If the SPAA has fired a missile at you, fire countermeasures and get back to your helipad to rearm and retry if your rockets happen to have missed. If you end up destroying the enemy SPAA, good on you. You can somewhat guarantee your survival for the early part of the game and possibly even the entire game if you're lucky. This strategy also works in late game if you're strapped from your ATGMs.
SPAA dueling is very important to know at all battle ratings, especially when facing more powerful SAM systems like the FlaRakRad, ADATS, ItO 90M, etc. In downtiers, which happen a good amount, SPAA dueling becomes way easier as the worst SPAA you'll see is just a FlaRakPz 1 or the Roland 1 at 9.7. The rest of them are gun SPAA. Tracer fire is much easier to dodge than a missile; however you'll find that gun SPAA can be harder to take out at times from long range as they can fire on the move with usually stabilised guns.
For gun SPAA, you'll want them to stop moving first. It's common knowledge that it is way easier to hit a target that isn't moving than a target that is moving. You want the gun SPAA to take aim at you. The tracers will need a fair bit of time to get to your helicopter once fired from the gun SPAA. When a gun SPAA locks the helicopter, usually they stay still as they can only see you moving in one direction and looking like an easy target. This is far from the case however. Once the RWR gives you a long beep, it's time to repeat the steps explained earlier. Lock the enemy SPAA via sight stabilisation if you haven't done so already. Aim the rockets, fire, and head back to base and await results.
With enough practice (and enough rockets), you can even clear out groups of light tanks rushing the capture points early in the game. SPAA dueling can be applied to soft targets as well, however it is advised that you avoid sniping MBTs unless absolutely necessary as it is seen as a waste of rockets as they can take more hits than light targets.
Sometimes the enemy SPAA isn't an SPAA at all! Enemy IFVs and tanks like the Leopard 2K and the AMX-40 will proudly take the role of an SPAA if one didn't spawn early on their team. This is what you need to watch out for. While flying above the battlefield, 20mm autocannon fire and well-placed shots with ATGMs is nothing to sneeze at. Make sure to always stay vigilant against these types of tanks. The turret is more than enough to deal with the light targets like the M3A3 Bradley or the Type 89, but the bigger targets like the Leopard 2K may need some Hydras to take out swiftly if you aren't high above them.
In Arcade Assault, you won't have to worry about going back to base to reload your weapons as they will automatically replenish once every munition has been used up. It's recommended you bring either Hellfires + rockets, or rockets + air-to-air missiles, or a full loadout of rockets.
Helicopter Battles
When playing helicopter battles, your best shot at staying alive and being effective is to bring a load-out of air-to-air missiles and rockets. The air-to-air missiles should be used against the more dangerous, unsuspecting helicopters, who don't have access to countermeasures. They can be easily taken down, and considering that you have 4 missiles at your disposal, that is a potential of 4 easy kills. With rockets, you'll be able to take out ground AI targets. Usually, they will take 1 or 2 shots at minimum to destroy. Rockets are also quite effective in close range as a last ditch effort to come out on top when fighting a 1v1. Your main 20 mm cannon is an absolute monster in this mode. Although it doesn't shine in Ground RB, here you'll be able to easily get kills with it. It does overheat however, so shoot with moderation and pick your targets whilst keeping any other nearby enemies in mind.
Pros and cons
Pros:
- Very good and in most cases, unmatched manoeuvrability
- Respectable speed
- Deadly 20 mm autocannon
- Can carry AIM-92 Stinger or Matra Mistral air-to-air missiles
- Effective anti-tank capabilities
- Functional in almost every lineup
- Has access to countermeasures and a ballistic computer
Cons:
- Fragile - cannot tank as many hits as its counterparts
- Armament is lacklustre compared to other helicopters
- Air-to-air missiles launch downwards
- Slower than its counterparts (230-250 km/h in average with armament)
History
The story of the A129 Mangusta "Combat", (also known as A129 ESS, A129 CBT and A129 Mangusta) began during the late stages of the Cold War. The helicopter began to be developed at the request of the Italian Army, whom saw the need to equip its air units with a dedicated attack helicopter with anti-tank capabilities. The A129 was the first dedicated attack helicopter fully designed and built in Western Europe. Its project began in 1978 and its final project was ready only in 1982. The A129 made its first official maiden flight on the 15th of September of 1983, at the Agusta company Cascina-Costa facilities. The flight lasted about 30 minutes. Agusta pilots were extremely happy with the results, and went on record and said that the helicopter had great handling. They had previously only performed shake down flights twice prior to the first official flight. It was given the name Mangusta by the Italian army and Agusta employees. This name was mainly chosen due to the fact that the A129 was a direct competitor of the Bell A-1 Cobra that at that time rivaled the Agusta project. (The mongoose is known for its ease in killing poisonous snakes).
One of the many characteristics that pushed the A129 Mangusta was also how versatile it was. It was able to carry many types of weapons, such as Hellfires, BGM-TOW, anti-tank missiles, Mistral/Stinger air-to-air missiles, 81 mm Medusa rockets, 70 mm Hydra rockets, and much more. At the time, the first variants of the A129 had access to the latest avionics, and incorporated both day and night capabilities and also was able to be used in bad weather, where there is low visibility. The testing and evaluation program lasted until mid-1987, when a production contract would be signed for that model, that would later generate several different variants during its career. That early version would only ever be seen with BGM TOW ATGM's and rockets. However, more armament options would be able to be fitted if needed.
Later down the line, Agusta had generated a lot of interest for this type of helicopter, so they developed a newer version of the A129 Mangusta in line with export market specifications and needs. This new version of the A129 would go under the designation A129 "International". The International went through several variations, each version had different armaments and engines fitted, such as one having access to the T800 engine, and different types of thermal imaging sights, a .50 cal turret, an enclosed 20 mm cannon, or what is now staple of the A129CBT, the 20 mm M197 three-barrel Gatling-type rotary cannon.
No country had decided to pick up the A129 International, however in 1986, the governments of Italy, Netherlands, Spain and the UK signed a memorandum of understanding to develop an improved version of the A129, called the Joint European Helicopter. The memorandum called for the installation of more powerful engines, a new rotor system, retractable landing gear, better sensors, and more powerful weaponry, but the project collapsed in 1990, when Great Britain and the Netherlands decided to buy the American AH-64 Apache, while Spain opted for the joint made French-German Eurocopter Tiger. This however was not the end of the A129 International. Although it was not bought, everything that had been learned from that version of the helicopter would actually be re-utilized for an upgrade for the Italian Army's A129s. This lead to what we know as the A129 Mangusta "Combat" or "CBT" for short. The CBT was an updated version for the Italian Army, incorporating the same advances of the International version, A-129, where the avionics were modernized and the motorization kept original with Rolls Royce Gem 2-1004D's that produced a maximum unit power of 1120 HP. The Italian Army CBTs would be used in many theaters of war, such as in Iraq and Afghanistan. The Italian Army CBTs did not go out of service. Instead, another upgrade program was made which gave birth to the A129 Mangusta "Delta". The Delta was presented in 2011. The "D" variant improves the armament and optics of the Mangusta, incorporating Israeli-made Spike fire-and-forget ATGMs. The A129 Delta will then go out of service and be replaced with an entirely new helicopter, called the A249.
Devblog
The modern A.129 attack helicopter is successfully used by the Italian armed forces, as well as by a number of foreign operators. The helicopter has excellent flight characteristics, outstanding speed and superb manoeuvrability. The CBT modification was created from combat experience in modern armed conflicts. The Mangusta is armed with a 20 mm autocannon and carries a good arsenal of unguided and guided weapons, including Stinger air-to-air missiles and Hellfire II ATGMs.
Media
- Skins
- Images
- A129CBT Devblog Images


See also
External links
| Agusta | |
|---|---|
| Utility | AB 205 A-1* · A.109EOA-2 |
| Attack | A-129 International (p) · A129CBT · AH-129D · T129** |
| Export | HKP3C |
| See Also | Bell Aircraft Corporation · TAI |
| *Licensed · **Partnership with TAI | |
| Italy helicopters | |
|---|---|
| Utility | AB 205 A-1 · A.109EOA-2 |
| Attack | A-129 International (p) · A129CBT · AH-129D · T129 |
| Hungary | ◔Mi-24D · ◔Mi-24V · ◔Mi-24P |
