Difference between revisions of "75/34 M43"
Colok76286 (talk | contribs) (→Survivability and armour: Corrected typo) |
Colok76286 (talk | contribs) (→Usage in battles: Completed section) |
||
| Line 117: | Line 117: | ||
== Usage in battles == | == Usage in battles == | ||
| − | ''Describe the tactics of playing in the vehicle, the features of using vehicles in the team and advice on tactics. Refrain from creating a "guide" - do not impose a single point of view but give the reader food for thought. Describe the most dangerous enemies and give recommendations on fighting them. If necessary, note the specifics of the game in different modes (AB, RB, SB).'' | + | <!--''Describe the tactics of playing in the vehicle, the features of using vehicles in the team and advice on tactics. Refrain from creating a "guide" - do not impose a single point of view but give the reader food for thought. Describe the most dangerous enemies and give recommendations on fighting them. If necessary, note the specifics of the game in different modes (AB, RB, SB).''--> |
| + | |||
| + | ;Combat tactics | ||
| + | The {{PAGENAME}} is best when used as a tank destroyer thanks to its good frontal armour and the good penetration of its rounds, provided you stay at a distance guaranteeing your survivability (800-1,000 m). With a maximum penetration of 64 mm at 1,000 m for the APCBC round and 100 mm for the HEAT shell, the vehicle will have no problem penetrating the armour of most enemy vehicles at the BR. | ||
| + | |||
| + | If you play too close to the frontline, most tanks will be capable of disabling you. Your weak sides will be exposed if you are taken in a pincer move and being immobilized with the enemy close to your position pretty much seals your vehicle's fate. | ||
| + | |||
| + | ;Notable enemies: | ||
| + | * Tank destroyers with long guns that can penetrate from long range like the [[M10 (Family)|M10]], the Marder III, the Sd.Kfz.234/4, the StuG III F, the SU-57B, the ASU-57, the YaG-10 (29-K), the Gun Carrier (3-in), the Archer, the Na-To, the 90/53 M41M or the Pvkv II. | ||
| + | * Tanks with powerful HEAT shells like the M4A3 (105), the Pz.III N, the StuH 42 G, the 105/25 M43 or the Sav m/43 (1946), | ||
| + | * Frontline tanks with sloped armour like the M4, the M4A1, the [[T-34 (Family)|T-34]], the Sherman II or the M4A4, | ||
| + | * Fast and agile light tanks such as the [[M24 (Family)|M24]], that can easily flank the Semovente undetected are dangerous threats. Their speed and small size make them difficult to target for the Semovente's howitzer and they can disable you easily at close range. | ||
| + | |||
| + | ;How to defeat a {{PAGENAME}} | ||
| + | * Avoid any frontal encounter. Flank it and aim for the sides of the casemate. | ||
| + | * Wait for it to have shot and be reloading (it gives you at least 6 seconds to act). | ||
| + | * If you're forced to engage the Semovente frontally, be as close as possible to increase your chances to penetrate. | ||
| + | * If you can't disable it in one shot, immobilizing the {{PAGENAME}} buys you time to finish it off. Either shoot the transmission, the driver or the engine to do so. Stay out or get out of its line of fire once it is immobilized. | ||
| + | * When flying an aircraft, target the crew compartment to knock the crew out or the engine bay to immobilize it. | ||
=== Modules === | === Modules === | ||
Revision as of 17:03, 6 November 2020
Contents
Description
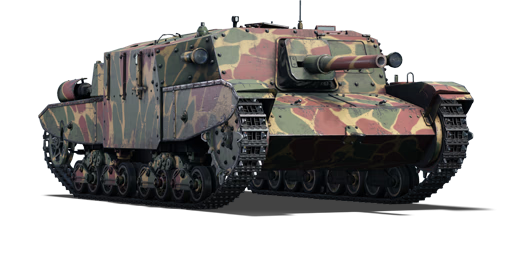
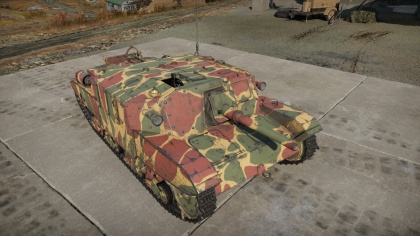
The Semovente 75/34 M43 is a rank II Italian tank destroyer
with a battle rating of 3.3 (AB/RB/SB). It was introduced in Update 1.85 "Supersonic".
General info
Survivability and armour
Armour type:
- Rolled homogeneous armour (hull, casemate)
- Cast homogeneous armour (gun mantlet)
| Armour | Front (Slope angle) | Sides | Rear | Roof |
|---|---|---|---|---|
| Hull | 25 mm (78°) Upper glacis 50 mm (40°) Lower glacis - top 30 mm (50°) Lower glacis - bottom |
40 mm 40 + 25 + 4 mm Casemate area 40 + 4 mm Side skirts area |
25 mm Upper part 25 mm (15°) Lower part |
25 mm (12°) Front glacis 10-15 mm (12°) Rear - Engine hood 5-15 mm (5°) Rear - Radiator vents |
| Casemate | 75 mm (5°) + 25 mm (25°) Casemate front plate 90 mm (5°) + 25 mm (25°) Driver port 50 + 50 mm (spherical) + 25 mm (25°) Gun mantlet |
45 mm (7-9°) + 25 mm | 45 mm | 15 mm (0-4°) Centre 15 mm (18°) Sides |
Notes:
- Suspension wheels are 15 mm thick while tracks are 20 mm thick and bogies 10 mm thick.
- The belly is 15 mm thick.
- Mudguards are 4 mm thick.
The 75/34 M43 has the same good protection as the 105/25 M43: thick vertical front armour plate, reinforced sides and a crew sitting apart in a widened hull. The 75/34 M43 also gets an additional 25 mm armour plate on the front and the sides of the casemate. However, the poor roof armour and a crew of only 3 are still weak points. Your front plate is also wide and easy to target.
Mobility
| Game Mode | Max Speed (km/h) | Weight (tons) | Engine power (horsepower) | Power-to-weight ratio (hp/ton) | |||
|---|---|---|---|---|---|---|---|
| Forward | Reverse | Stock | Upgraded | Stock | Upgraded | ||
| Arcade | 42 | 4 | 15.5 | 263 | 353 | 16.97 | 22.77 |
| Realistic | 39 | 4 | 164 | 185 | 10.58 | 11.94 | |
Armaments
Main armament
| 75 mm Ansaldo 75 L/34 | Turret rotation speed (°/s) | Reloading rate (seconds) | |||||||||||
|---|---|---|---|---|---|---|---|---|---|---|---|---|---|
| Mode | Capacity | Vertical | Horizontal | Stabilizer | Stock | Upgraded | Full | Expert | Aced | Stock | Full | Expert | Aced |
| Arcade | 45 | -10°/+16° | ±18° | N/A | 12.3 | 17.1 | __._ | __._ | 24.4 | 7.80 | _.__ | _.__ | 6.00 |
| Realistic | 8.3 | 9.8 | __._ | __._ | 14.0 | ||||||||
Ammunition
| Penetration statistics | |||||||
|---|---|---|---|---|---|---|---|
| Ammunition | Type of warhead |
Penetration @ 0° Angle of Attack (mm) | |||||
| 10 m | 100 m | 500 m | 1,000 m | 1,500 m | 2,000 m | ||
| Granata Perforante 75/32 | APCBC | 79 | 78 | 71 | 64 | 58 | 52 |
| EPS M42 | HEAT | 100 | 100 | 100 | 100 | 100 | 100 |
| Granata 75/32 | HE | 9 | 9 | 9 | 9 | 9 | 9 |
| Shell details | |||||||||
|---|---|---|---|---|---|---|---|---|---|
| Ammunition | Type of warhead |
Velocity (m/s) |
Projectile Mass (kg) |
Fuse delay (m) |
Fuse sensitivity (mm) |
Explosive Mass (TNT equivalent) (g) |
Ricochet | ||
| 0% | 50% | 100% | |||||||
| Granata Perforante 75/32 | APCBC | 637 | 6.35 | 1.2 | 14 | 270 | 48° | 63° | 71° |
| EPS M42 | HEAT | 552 | 5.3 | 0.0 | 0.1 | 656.64 | 62° | 69° | 73° |
| Granata 75/32 | HE | 552 | 6.35 | 0.4 | 0.1 | 600 | 79° | 80° | 81° |
Ammo racks

| Full ammo |
1st rack empty |
2nd rack empty |
3rd rack empty |
Visual discrepancy |
|---|---|---|---|---|
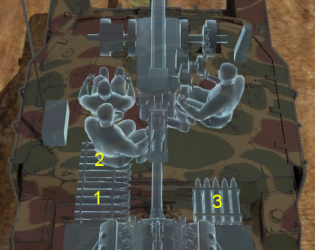
| 45 | 31 (+14) | 16 (+29) | 1 (+44) | No |
Notes:
- Shells are modeled individually and disappear after having been shot or loaded.
Usage in battles
- Combat tactics
The 75/34 M43 is best when used as a tank destroyer thanks to its good frontal armour and the good penetration of its rounds, provided you stay at a distance guaranteeing your survivability (800-1,000 m). With a maximum penetration of 64 mm at 1,000 m for the APCBC round and 100 mm for the HEAT shell, the vehicle will have no problem penetrating the armour of most enemy vehicles at the BR.
If you play too close to the frontline, most tanks will be capable of disabling you. Your weak sides will be exposed if you are taken in a pincer move and being immobilized with the enemy close to your position pretty much seals your vehicle's fate.
- Notable enemies
- Tank destroyers with long guns that can penetrate from long range like the M10, the Marder III, the Sd.Kfz.234/4, the StuG III F, the SU-57B, the ASU-57, the YaG-10 (29-K), the Gun Carrier (3-in), the Archer, the Na-To, the 90/53 M41M or the Pvkv II.
- Tanks with powerful HEAT shells like the M4A3 (105), the Pz.III N, the StuH 42 G, the 105/25 M43 or the Sav m/43 (1946),
- Frontline tanks with sloped armour like the M4, the M4A1, the T-34, the Sherman II or the M4A4,
- Fast and agile light tanks such as the M24, that can easily flank the Semovente undetected are dangerous threats. Their speed and small size make them difficult to target for the Semovente's howitzer and they can disable you easily at close range.
- How to defeat a 75/34 M43
- Avoid any frontal encounter. Flank it and aim for the sides of the casemate.
- Wait for it to have shot and be reloading (it gives you at least 6 seconds to act).
- If you're forced to engage the Semovente frontally, be as close as possible to increase your chances to penetrate.
- If you can't disable it in one shot, immobilizing the 75/34 M43 buys you time to finish it off. Either shoot the transmission, the driver or the engine to do so. Stay out or get out of its line of fire once it is immobilized.
- When flying an aircraft, target the crew compartment to knock the crew out or the engine bay to immobilize it.
Modules
| Tier | Mobility | Protection | Firepower | ||
|---|---|---|---|---|---|
| I | Tracks | Parts | Horizontal Drive | EPS M42 | |
| II | Suspension | Brake System | FPE | Adjustment of Fire | |
| III | Filters | Crew Replenishment | Elevation Mechanism | Smoke grenade | |
| IV | Transmission | Engine | |||
Pros and cons
Pros:
- Effective frontal armour and all-around protection
- Small frontal profile makes the tank easy to conceal and difficult to hit
- Decent mobility and good hull traverse
- Has access to HEAT rounds
Cons:
- Armour becomes much less effective when uptiered against stronger vehicles
- As a casemate tank destroyer, the Semovente is extremely vulnerable to flanks
- A cramped interior and only 3 crew lessens survivability
- Inadequate gun for its tier
History
- Development
After the Italian Armistice in 1943, the Germans took control of Northern Italy and restarted the production of the Semovente da 105/25. Lacking 105 mm guns, 53 units were produced with the 75/34 Mod. SF gun for the Wehrmacht in 1943-44.
- Combat usage
These saw service with German forces in southern Europe in 1944.
Media
- Skins
- Videos
See also
- Vehicles equipped with the same chassis
- Vehicles equipped with the same gun
- Other vehicles of similar configuration and role
External links
| Italy tank destroyers | |
|---|---|
| Italy | |
| M41 | 75/18 M41 · 75/32 M41 · 90/53 M41M |
| M42 | 75/34 M42 |
| M43 | 105/25 M43 · M43 "G.C.Leoncello" · 75/34 M43 · 75/46 M43 |
| Wheeled | Lancia 3Ro (100/17) · AS 42/47 · Breda 90/53 · Breda 501 |
| Other | L3/33 CC · 47/32 L40 |
| Germany | ▄StuG III G |
| USA | M36B1 · ▄M109G · M113A1 (TOW) |
| Hungary | |
| Zrínyi | Zrinyi I · Zrinyi II |
| USSR | ◔2S1 |


