Category:Armament images
Revision as of 12:13, 7 May 2020 by DnaGonite (talk | contribs) (Created page with "Category:Images")
Media in category "Armament images"
The following 200 files are in this category, out of 964 total.
(previous page) (next page)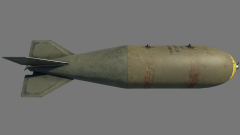 M65A1 Fin M129.png 1,920 × 1,080; 400 KB
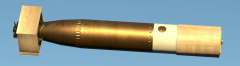
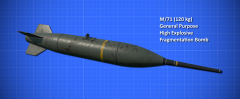 M71 (120 kg) Blueprint.png 2,751 × 1,131; 1.39 MB
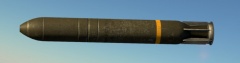 M8 rocket sideview.jpg 1,150 × 303; 55 KB
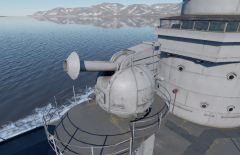 Mark 108 Weapon Alfa on Mitscher-class destroyer.png 3,456 × 2,234; 8.68 MB
 Mark 108 Weapon alfa.png 1,920 × 1,080; 956 KB
 MBU-600 on Project 50 frigate.png 3,456 × 2,234; 9.14 MB
 MC MK I 1000lb.png 1,920 × 1,080; 577 KB
 MG C30.png 1,920 × 1,080; 3.81 MB
 MG C38.png 1,920 × 1,080; 3.88 MB
 MG firing arc T-28E.png 424 × 524; 519 KB
 MG13 Nb.Fz..png 476 × 260; 203 KB
 MG13 Sd.Kfz222.png 484 × 289; 211 KB
 MG34 Naval Mount.png 692 × 690; 338 KB
 Mig 27.png 1,157 × 888; 1.54 MB
 Milan.jpg 1,975 × 1,507; 165 KB
 Milan2.jpg 1,960 × 1,488; 164 KB
 Missile AIM-9B Fired.jpg 1,920 × 1,080; 116 KB
 Missile AIM-9D Fired.jpg 1,920 × 1,080; 120 KB
 Missile AIM-9E Mount F-4E.png 1,920 × 1,080; 3.77 MB
 Missile Fireflash Fired.jpg 1,920 × 1,080; 148 KB
 Missile Firestreak Fired.jpg 1,920 × 1,080; 149 KB
 Missile SRAAM.jpg 1,920 × 1,080; 124 KB
 Mk 2 mortar round.jpg 1,920 × 1,080; 280 KB
 Mk 2 mortar.jpg 1,920 × 1,080; 265 KB
 Mk.10 Hedgehog mortar.jpg 1,920 × 1,080; 276 KB
 Mk.16 (533 mm).png 1,920 × 1,080; 1.16 MB
 Mk.6 depth charge.png 1,920 × 1,080; 903 KB
 Mk.6 mortar depth charge.jpg 1,716 × 965; 266 KB
 Mk.8-3 C-D (533 mm).png 1,920 × 1,080; 644 KB
 Mk.9 depth charge.jpg 1,920 × 1,080; 309 KB
 Mk.IX (533 mm).jpg 1,920 × 614; 188 KB
 Mk.VII depth charge.png 1,920 × 1,080; 814 KB
 Mle 1922T launch tube.png 1,920 × 1,080; 3.83 MB
 Model 1923DT fuse.png 1,920 × 1,080; 2.49 MB
 Model 1923DT.jpg 1,920 × 1,080; 121 KB
 MPK pr. 12412 radars.png 199 × 155; 62 KB
 MPK Pr.204 Firing Arcs.png 1,800 × 1,800; 2.43 MB
 MTB-1(1) DC Order.png 1,920 × 1,080; 2.67 MB
 Mutsuki torpedo firing arcs.jpg 1,402 × 753; 484 KB
 Navy GP Mk12 Mod2 bomb.png 707 × 434; 219 KB
 Navy Type 3 Number 150 AP.jpg 1,920 × 1,080; 154 KB
 Navy Type 97 Number 6.png 300 × 130; 21 KB
 Navy Type 99 Number 80 AP.png 620 × 236; 78 KB
 Navy Type Number 80 Model 1.png 512 × 263; 55 KB
 Nettuno Missile GIF.gif 1,280 × 720; 10.38 MB
 Number Type 2 50 Model 1 GP(SAP) (500 kg).jpg 1,710 × 962; 414 KB
 Oerlikon KBA 25 mm Drawn.png 1,348 × 748; 233 KB
 OFAB 100.png 1,920 × 1,080; 566 KB
 OFAB 250.png 1,920 × 1,080; 810 KB
 Ofab-250svbomb.png 1,920 × 1,200; 983 KB
 Ordnance ML 4.2-inch mortar.jpg 1,920 × 1,080; 186 KB
 Ordnance QF 25pdr (87.6 mm).jpg 1,920 × 1,080; 464 KB
 OTA-40 single launcher.jpg 1,920 × 1,029; 316 KB
 P-39Q-5 firingoff M8.jpg 1,920 × 1,080; 313 KB
 Pair of V-11 guns on Project 68K light cruiser.png 3,456 × 2,234; 9.37 MB
 PC 1400 X.jpg 1,373 × 767; 198 KB
 PC1000 He 111 H-6.jpg 1,920 × 1,080; 163 KB
 PC1600.jpg 1,920 × 1,080; 85 KB
 Phelps Bofors L60 Mark 2.png 1,920 × 1,080; 3.29 MB
 Phelps Mk.15 Torpedo.jpg 1,920 × 1,080; 418 KB
 Pintle Mounted MG 34.jpg 920 × 722; 143 KB
 Pr. 159 Radars.png 320 × 211; 133 KB
 Pr. 206 radars.png 283 × 186; 100 KB
 PTA-40 launcher.jpg 1,920 × 1,027; 486 KB
 QJC88A Belt.jpg 1,920 × 1,080; 872 KB
 QJC88A Side.jpg 1,920 × 1,080; 347 KB
 R-3R.png 1,685 × 482; 965 KB
 R-3S.png 657 × 438; 273 KB
 R-60.png 876 × 584; 458 KB
 R.530.png 1,098 × 622; 955 KB
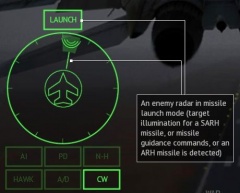
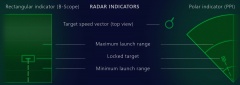 Radar Indicators SARH DEVBLOG.jpg 960 × 338; 152 KB
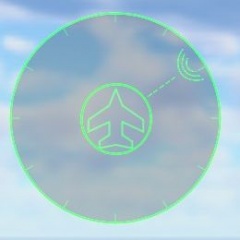
 Radar sidelobes.jpg 1,920 × 1,080; 61 KB
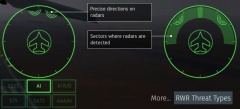
 Radar Warning Receiver.jpg 272 × 272; 9 KB
 Radar warning receiver.jpg 523 × 771; 298 KB
 Rb05a on SAAB-105OE.png 1,920 × 1,080; 2.54 MB
 Rb24 Launch.png 1,920 × 1,200; 1.23 MB
 RBM on Project 122bis submarine chaser.png 3,456 × 2,234; 9.12 MB
 RBU-1200 on Project 12412.png 3,456 × 2,234; 8.76 MB
 RBU-2500 on Project 159.png 3,456 × 2,234; 9.15 MB
 RBU-6000 on Project 35 frigate.png 3,456 × 2,234; 9.66 MB
 RedTop Fired.jpg 1,920 × 1,080; 240 KB
 RIM-24A on Asheville-class gunboat.png 3,456 × 2,234; 9.56 MB
 RKU-36U Launcher.png 3,456 × 2,234; 8.94 MB
 Rocket Aiming.jpg 203 × 243; 2 KB
 RUR-4 antisubmarine rocket.png 1,030 × 579; 211 KB
 RWR dead angles.jpg 1,920 × 1,080; 64 KB
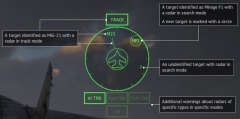
 RWR tutorial 1.jpg 554 × 341; 19 KB
 RWR tutorial 2.jpg 463 × 375; 17 KB
 RWR Tutorial 3.jpg 460 × 370; 25 KB
 RWR tutorial 4.jpg 801 × 397; 36 KB
 RWR tutorial 5.jpg 709 × 322; 28 KB
 Rwr2.jpg 260 × 260; 7 KB
 Rwr4.jpg 306 × 455; 24 KB
 RZ.65 look.png 347 × 170; 88 KB
 S.I. 250 533,4X7,5 Tipo A launched by Bartolomeo Colleoni.jpg 3,072 × 1,728; 717 KB
 S.I. 270-533,4X7,2 Tipo M fired from the twin-turret.jpg 3,840 × 2,160; 1.99 MB
 S.I. 270-533,4X7,2 Tipo M.jpg 1,920 × 1,080; 486 KB
 SC1000L2.jpg 1,373 × 767; 171 KB
 SC1800B.jpg 1,373 × 767; 180 KB
 SC2500.jpg 1,373 × 767; 69 KB
 SC250JA.jpg 1,373 × 767; 167 KB
 SC500K.jpg 1,373 × 767; 156 KB
 SC50JA Bf109E1 Dropping.jpg 1,920 × 1,080; 256 KB
 SC50JA Bf109E1.jpg 1,920 × 1,080; 253 KB
 SC50JA BR20DR bombbay.jpg 1,920 × 1,080; 439 KB
 SC50JA Explanation.jpg 1,085 × 484; 281 KB
 SC50JA Explodedview.png 294 × 546; 115 KB
 SC50JA Ju87B2 externalpylons.jpg 1,920 × 1,080; 203 KB
 SC50JA new.jpg 1,373 × 767; 47 KB
 SC50JA Sideview.jpg 1,164 × 591; 82 KB
 SC50JA.jpg 1,373 × 767; 146 KB
 SD10C.jpg 1,373 × 767; 59 KB
 Seal DM2A1 Torpedoes launched from Type 143.png 1,920 × 1,080; 4.07 MB
 SET-40 CDK.jpg 1,316 × 768; 30 KB
 ShKAS Su-2 M-82 turret.jpg 1,802 × 942; 233 KB
 SKR-1 launching a SET-40.jpg 1,920 × 1,027; 322 KB
 SKR-7 Firing Arcs.gif 675 × 1,200; 9.98 MB
 SM-2-1 on Project 41 destroyer.png 3,456 × 2,234; 9.61 MB
 SM-20-ZIF on Project 56 destroyer.png 3,456 × 2,234; 8.97 MB
 SM-21-ZIF on Project 201K submarine chaser.png 3,456 × 2,234; 9.25 MB
 SM-5-1 on Chapayev.png 3,456 × 2,234; 10.46 MB
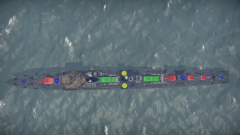
 Soukou-Tei (1940) type 89 'special'.png 1,920 × 1,080; 3.22 MB
 SPO-10.jpg 654 × 468; 52 KB
 SRAAM Fired.jpg 1,920 × 1,080; 138 KB
 T-14 Type 2 torpedo launch.png 1,920 × 1,080; 3.91 MB
 T-51b deadzones.jpg 1,587 × 982; 821 KB
 The turret face of a Dakota after absorbing a 30cm HE shell.png 1,920 × 1,080; 3.03 MB
 Tiny Tim shackle.png 1,543 × 1,017; 2.13 MB
 Tiny Tim sideview.png 1,477 × 667; 725 KB
 Tiny Tim view of rocketmotor.png 1,314 × 860; 1.83 MB
 Torpedo Mark IX.jpg 1,920 × 1,080; 254 KB
 Torpedo Mark VIII.jpg 1,920 × 1,080; 334 KB
 Torpedo Mark XII.jpg 1,920 × 1,080; 282 KB
 Torpedo Mark XV.jpg 1,920 × 1,080; 390 KB
 Torpedo Mk.13 44 Dropped from TBF-1C.png 1,920 × 1,080; 1.16 MB
 Torpedo Mk.13 44 Front View.png 738 × 569; 458 KB
 Torpedo Mk.13 44 portrait.png 873 × 583; 1.21 MB
 Torpedo Mk.13 44 Rear View.png 1,013 × 935; 1.27 MB
 Torpedo Mk.13 44 Sideview.png 1,402 × 384; 505 KB
 Torpedo Mk.13 portrait.png 1,128 × 667; 967 KB
 Torpedo Mk.13 Shroud ring.png 701 × 644; 935 KB
 Torpedo Mk.13 Sideview.png 1,496 × 337; 376 KB
 HMS Churchill anti-air guns.png 1,600 × 900; 2.84 MB
 Town class HMS Churchill Secondary gun.png 1,600 × 900; 2.23 MB
 Two B-34 turrets on Project 50 frigate.png 3,056 × 1,968; 8.39 MB
 Type 107 Screenshot.jpg 1,920 × 1,080; 1.41 MB
 Type 143 aft deck torpedo launchers and cannon.png 1,920 × 1,080; 4.18 MB
 Type 143 bow mounted OTO Melara.png 1,920 × 1,080; 4.19 MB
 Type 143 firing Seal DM2A1 Torpedoes.png 1,920 × 1,080; 4.39 MB
 Type 143 view from aft deck.png 1,920 × 1,080; 4.24 MB
 Type 143 with EXOCET missile launchers.png 1,920 × 1,080; 4.65 MB
 Type 1936A Weapons.png 1,920 × 1,080; 1.89 MB
 Type 2 (450 mm).png 1,920 × 1,080; 701 KB
 Type 3 depth charge.jpg 1,920 × 1,080; 241 KB
 Type 38 pattern 1907.png 1,920 × 1,080; 3.22 MB
 Type 44 No.2 (450 mm).png 1,920 × 1,080; 431 KB
 Type 8 No.2 (610 mm).jpg 3,500 × 1,375; 184 KB
 Type 88 AA (75 mm) firing.jpg 1,920 × 1,080; 195 KB
 Type 88 AA (75 mm).jpg 1,920 × 1,080; 362 KB
 Type 89 (533 mm).png 1,920 × 1,080; 694 KB
 Type 90 610mm torpedo.png 1,920 × 1,080; 1.46 MB
 Type 92 7.7mm.jpg 1,920 × 1,080; 514 KB
 Type 93 13.2 mm AA.png 1,920 × 1,080; 2.41 MB
 Type 93 13.2 mm.png 1,920 × 1,080; 4.49 MB
 Type 93 13.2mm.png 1,622 × 1,080; 3.05 MB
 Type 95 depth charge bomb mortar.png 1,920 × 1,080; 1.21 MB
 Type 95 depth charge max altitude.jpg 1,920 × 1,080; 477 KB
 Type 95 details Mutsuki.png 1,920 × 1,080; 3.88 MB
 Type 95 launch distance.jpg 1,920 × 1,080; 674 KB
 Type K-8 Type 93.jpg 1,920 × 1,080; 238 KB
 Type K-8 Type 96 cannon.jpg 1,920 × 1,080; 292 KB
 Type-95-depth-charge-xray.jpg 1,771 × 996; 534 KB
 Type91 Mod2 torpedo.png 1,920 × 1,080; 1.79 MB
 Type91 Model3.png 1,920 × 1,080; 1.79 MB
 Type93 Model1 mod2.png 1,920 × 1,080; 2.11 MB
 Type93 Model3.png 1,920 × 1,080; 2.35 MB
 Type95 Depth Charge.png 1,920 × 2,160; 5.28 MB
 Type96 25mm.png 1,920 × 1,080; 4.45 MB
 Type98 mod A.png 1,920 × 1,080; 2.77 MB
 Universal versus night belts.png 1,464 × 459; 249 KB
 US low drag bomb.png 542 × 252; 132 KB
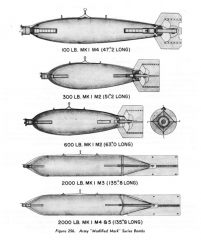 US Modified Mark bombs.png 567 × 678; 245 KB
 W.200 450X5,75 (450 mm).jpg 1,838 × 670; 120 KB
 WBD depth charge.png 1,920 × 1,080; 1.03 MB
 WBF depth charge.png 1,920 × 1,080; 862 KB
 Weapon 100 mm-55 MLE model 53 (100 mm).png 1,920 × 1,080; 3.7 MB
 Weapon 20pdr OQF Mk.I (84 mm).png 1,920 × 1,080; 3.01 MB
 Weapon 28pdr OQF (94 mm).png 1,920 × 1,080; 2.85 MB
 Weapon 2A26 (125 mm).png 1,920 × 1,080; 3.15 MB
 Weapon 2A46 (125 mm).png 1,920 × 1,080; 3.89 MB
 Weapon 2A46M-1 (125 mm).png 1,920 × 1,080; 3.47 MB
 Weapon 2A72 (30 mm).jpg 1,920 × 1,080; 458 KB
 Weapon 2A90 (57 mm).png 1,920 × 1,080; 3.38 MB
 Weapon 32pdr OQF (94 mm).png 1,920 × 1,080; 4.52 MB
 Weapon 40 mm-70 MEL58 (40 mm) breech.png 1,920 × 1,080; 4.45 MB
 Weapon 40 mm-70 MEL58 (40 mm).png 1,920 × 1,080; 4.29 MB
 Weapon A-19 (122 mm).png 1,920 × 1,080; 5.1 MB
 Weapon AAN-F1 (7.62 mm).png 522 × 251; 201 KB
 Weapon AAT-52 (7.5 mm).png 475 × 323; 210 KB
 Weapon AK-726 (76 mm).png 1,920 × 1,080; 3.45 MB

_Blueprint.png)


.png)


.png)

.jpg)


_DC_Order.png)


_(500_kg).jpg)


.jpg)


_type_89_%27special%27.png)


.png)


.png)
.jpg)
_firing.jpg)
.jpg)
.png)


.jpg)


.png)
.png)
.png)
.png)
.png)
.png)
.jpg)
.png)
.png)
_breech.png)
.png)
.png)
.png)
.png)
.png)
