Difference between revisions of "Type 75 MLRS"
bangerland (talk | contribs) m (→Pros and cons) |
m (See also) (Tag: Visual edit) |
||
| (36 intermediate revisions by 10 users not shown) | |||
| Line 1: | Line 1: | ||
| − | {{Specs-Card|code=jp_type_75_mlrs}} | + | {{About |
| + | | about = Japanese MLRS '''{{PAGENAME}}''' | ||
| + | | usage = other versions | ||
| + | | link = Type 73 (Family) | ||
| + | }} | ||
| + | {{Specs-Card | ||
| + | |code=jp_type_75_mlrs | ||
| + | |images={{Specs-Card-Image|GarageImage_{{PAGENAME}}.jpg|ArtImage_{{PAGENAME}}.png}} | ||
| + | }} | ||
== Description == | == Description == | ||
| − | <!--''In the description, the first part | + | <!-- ''In the description, the first part should be about the history of the creation and combat usage of the vehicle, as well as its key features. In the second part, tell the reader about the ground vehicle in the game. Insert a screenshot of the vehicle, so that if the novice player does not remember the vehicle by name, he will immediately understand what kind of vehicle the article is talking about.'' --> |
| − | + | The '''Type 75 {{Annotation|MLRS|Multi Launch Rocket System}}''' is a system that launches multiple rockets based on a prototype of the [[Type 73 (Family)|Type 73 APC]] hull to provide a 30-barrel 130 mm Type 75 rocket launch system. | |
| − | + | ||
| − | The '''{{ | + | It was introduced in [[Update 1.83 "Masters of the Sea"]]. Being an MLRS, it may seem like a gimmicky vehicle, but it has a large payload in its 130 mm rockets. It is similar to a [[Ho-Ro]] but without the need to reload the next shell and with good ballistics that make it rather easy to use. |
== General info == | == General info == | ||
=== Survivability and armour === | === Survivability and armour === | ||
| − | ''Describe armour protection. Note the most well protected and key weak areas. Appreciate the layout of modules as well as the number and location of crew members. Is the level of armour protection sufficient, is the placement of modules helpful for survival in combat?'' | + | {{Specs-Tank-Armour}} |
| + | <!-- ''Describe armour protection. Note the most well protected and key weak areas. Appreciate the layout of modules as well as the number and location of crew members. Is the level of armour protection sufficient, is the placement of modules helpful for survival in combat? If necessary use a visual template to indicate the most secure and weak zones of the armour.'' --> | ||
| + | While the armour is light, it provides enough frontal protection against MGs up to 12.7 mm but only frontally. The 3 crew members all sit in the front with the gunner sitting next to the engine which would protect him from MG fire from the left. | ||
| + | |||
| + | '''Armour type:''' | ||
| + | |||
| + | * Rolled homogeneous armour | ||
| + | * Gun steel (Rocket rack) | ||
| + | |||
| + | {| class="wikitable" | ||
| + | |- | ||
| + | ! Armour !! Front (Slope angle) !! Sides !! Rear !! Roof | ||
| + | |- | ||
| + | | Hull || 20 mm (28°) ''Front glacis'' <br> 20 mm (55°) ''Lower glacis'' || 12.7 mm || 20 mm || 10 mm | ||
| + | |- | ||
| + | | Launcher | ||
| + | ! | ||
| + | | 10 mm | ||
| + | ! | ||
| + | | 10 mm | ||
| + | |- | ||
| + | | Cupola || colspan="4" | 15 mm | ||
| + | |- | ||
| + | |} | ||
| + | '''Notes:''' | ||
| − | + | * Belly armour is 10 mm thick. | |
| + | * Suspension wheels and bogies are 10 mm thick, while tracks are 15 mm thick. | ||
=== Mobility === | === Mobility === | ||
| − | ''Write about the mobility of the ground vehicle. Estimate the specific power and manoeuvrability as well as the maximum speed | + | {{Specs-Tank-Mobility}} |
| + | <!-- ''Write about the mobility of the ground vehicle. Estimate the specific power and manoeuvrability, as well as the maximum speed forwards and backwards.'' --> | ||
| + | |||
| + | {{tankMobility|abMinHp=497|rbMinHp=310}} | ||
| + | |||
| + | === Modifications and economy === | ||
| + | {{Specs-Economy}} | ||
== Armaments == | == Armaments == | ||
| + | {{Specs-Tank-Armaments}} | ||
=== Main armament === | === Main armament === | ||
| + | {{Specs-Tank-Weapon|1}} | ||
| + | <!-- ''Give the reader information about the characteristics of the main gun. Assess its effectiveness in a battle based on the reloading speed, ballistics and the power of shells. Do not forget about the flexibility of the fire, that is how quickly the cannon can be aimed at the target, open fire on it and aim at another enemy. Add a link to the main article on the gun: <code><nowiki>{{main|Name of the weapon}}</nowiki></code>. Describe in general terms the ammunition available for the main gun. Give advice on how to use them and how to fill the ammunition storage.'' --> | ||
{{main|Type 75 (130 mm)}} | {{main|Type 75 (130 mm)}} | ||
| − | '' | + | {| class="wikitable" style="text-align:center" width="100%" |
| + | |- | ||
| + | ! colspan="5" | [[Type 75 (130 mm)|130 mm Type 75 rocket]] || colspan="5" | Turret rotation speed (°/s) || colspan="4" | Reloading rate (seconds)* | ||
| + | |- | ||
| + | ! Mode !! Capacity !! Vertical !! Horizontal !! Stabilizer | ||
| + | ! Stock !! Upgraded !! Full !! Expert !! Aced | ||
| + | ! Stock !! Full !! Expert !! Aced | ||
| + | |- | ||
| + | ! ''Arcade'' | ||
| + | | rowspan="2" | 30 || rowspan="2" | 0°/+50° || rowspan="2" | ±60° || rowspan="2" | N/A || 13.21 || 18.28 || 22.20 || 24.55 || 26.12 || rowspan="2" | 10.40 || rowspan="2" | 9.20 || rowspan="2" | 8.48 || rowspan="2" | 8.00 | ||
| + | |- | ||
| + | ! ''Realistic'' | ||
| + | | 8.93 || 10.50 || 12.75 || 14.10 || 15.00 | ||
| + | |- | ||
| + | |} | ||
| + | |||
| + | Notes: | ||
| + | |||
| + | * The Reloading rate affects the speed at which each rocket is resupplied when standing on a friendly captured point. | ||
| + | * The primary weapon has a fire rate of 144 rounds per minute: this equals to an interval of around 0.42 seconds between each rocket fired. | ||
| + | |||
| + | ==== Ammunition ==== | ||
| + | {{:Type 75 (130 mm)/Ammunition|130 mm Type 75}} | ||
| + | |||
| + | ==== [[Ammo racks]] ==== | ||
| + | [[File:Ammoracks_{{PAGENAME}}.png|right|thumb|x250px|[[Ammo racks]] of the {{PAGENAME}}]] | ||
| + | <!-- '''Last updated: 1.101.1.16''' --> | ||
| + | {| class="wikitable" style="text-align:center" | ||
| + | |- | ||
| + | ! Full<br>ammo | ||
| + | ! Visual<br>discrepancy | ||
| + | |- | ||
| + | | '''30''' || No | ||
| + | |- | ||
| + | |} | ||
| + | |||
| + | * Rockets deplete from right to left, top row first and then bottom row. | ||
| + | * It is not possible to select how many rockets to bring into battle. | ||
=== Machine guns === | === Machine guns === | ||
| + | {{Specs-Tank-Weapon|2}} | ||
| + | <!-- ''Offensive and anti-aircraft machine guns not only allow you to fight some aircraft but also are effective against lightly armoured vehicles. Evaluate machine guns and give recommendations on its use.'' --> | ||
{{main|M2HB (12.7 mm)}} | {{main|M2HB (12.7 mm)}} | ||
| − | + | {| class="wikitable" style="text-align:center" width="50%" | |
| + | |- | ||
| + | ! colspan="5" | [[M2HB (12.7 mm)|12.7 mm M2HB]] | ||
| + | |- | ||
| + | ! Mount !! Capacity (Belt) !! Fire rate !! Vertical !! Horizontal | ||
| + | |- | ||
| + | | Pintle || 600 (200) || 575 || -9°/+65° || ±180° | ||
| + | |- | ||
| + | |} | ||
== Usage in battles == | == Usage in battles == | ||
| − | ''Describe the tactics of playing in the vehicle, the features of using vehicles in the team and advice on tactics. Refrain from creating a "guide" - do not impose a single point of view but give the reader food for thought. Describe the most dangerous enemies and give recommendations on fighting them. If necessary, note the specifics of the game in different modes (AB, RB, SB).'' | + | <!-- ''Describe the tactics of playing in the vehicle, the features of using vehicles in the team and advice on tactics. Refrain from creating a "guide" - do not impose a single point of view but instead give the reader food for thought. Describe the most dangerous enemies and give recommendations on fighting them. If necessary, note the specifics of the game in different modes (AB, RB, SB).'' --> |
| + | The Type 75 MLRS is best played as a support vehicle. It can be used to sneak up on the enemy from a distance and destroying them with a few rockets. The rockets detonate on contact, so beware of bushes, trees and other obstacles. The chance of missing is quite high, so it will require multiple rockets. When a teammate is in danger, you can use your rockets to effectively suppress the enemy. Try to shoot your rockets between the turret and the hull like a HE shell, causing either the enemy ammunition to explode or knocking out the entire crew by overpressure. The side armour is thin enough, that APHE shells won't detonate inside your tank and will just go through. When a tank destroyer with thick frontal armour appears frontally, try to shoot at the commander's cupola or the ground under the belly armour. Having an almost non-existent reload between rockets is a huge advantage over other vehicles. The biggest disadvantage is the non-existent gun depression. | ||
| + | |||
| + | Since the launcher itself is also the ammunition store, it is exposed to everything. When only one of the 30 rockets gets destroyed in the rack, the entire ammo will explode, causing a knock out. When you've expended almost all rockets, stop the attack and retreat with one or two rockets left to defend yourself when necessary and drive to a captured point to reload your rack (RB). | ||
| + | |||
| + | The frontal armour can withstand rifle-calibre machine gun fire and sometimes 12.7 mm heavy machine guns when slightly angled, but not 20 mm autocannons so do not meet enemies in close-quarters. Avoid open fields at all costs, since the armour will not withstand any strafings or bombs from any plane at all or enemy artillery. | ||
| + | |||
| + | Open-topped vehicles or light armoured vehicles can either be destroyed by the 12.7 mm machine gun. The 12.7 mm machine gun sits on a separate commander hatch and will be helpful to destroy low-flying planes. | ||
| + | |||
| + | '''Enemies worth noting:''' | ||
| + | |||
| + | * [[Jagdpanther]] - No turret and no commander's cupola and basically a big upper front plate with no weak spots will make it a strong enemy for the MLRS when faced frontal. There are 3 options to destroy the Jagdpanther frontally. But before you start any of these options, try to take out its main cannon. One until 3 rockets detonating near the cannon should be enough to destroy it if you don't hit the gun directly. Do not hesitate. The Jagdpanther could have enemy teammates nearby or an advanced crew to repair the cannon in a short time, so you have to destroy him quickly. Shoot on the ground, where the Jagdpanther is standing. Its belly armour is thin enough, that the explosive filler won't have any trouble penetrating it. The overpressure will do the rest and if not, shoot more rockets. But remember, that you have no depression, so wobbling your hull will be required.. Shoot at the top. Its armour on the top is visible. It may require multiple rockets, since one or more will most likely bounce off the top. A successful detonation on the top will reward you with a knock-out for the enemy crew. Shoot between tracks and hull. This option requires the most rockets. Not only will you immobilize the Jagdpanther if you shoot its tracks, but also sometimes a successful knockout. When only a bit of the side armour gets hit by 2 or 3 rockets, the crew will most likely get knocked out. All the options stay the same when an enemy [[Bfw. Jagdpanther]] appears. | ||
| + | * [[AMX-50 Foch]] - A huge cupola is the weak spot for high explosive ammunition. Type 75 MLRS rockets included. What you should be aware of is its 15 mm MG 151, which can penetrate you frontally and even when slightly angled. Taking out its main gun, then the machine gun, and then focussing on the cupola is the safest way to go. | ||
| + | * [[Strv 103A]] - A very low profile and a tiny commander's cupola can make it very challenging to destroy it frontally. Especially when the engine compartment is on the front and protects the crew more. Try to take out its cannon, and then wiggle your hull to shoot at him when close distance, and one successful hit on the small commander's cupola will usually destroy it. | ||
| + | * Vehicles with autocannons - Since your strongest armour is a 20 mm plate angled, any vehicle with an auto cannon with a caliber above 12.7 mm can easily destroy you in few seconds. When seeing contact, shoot your rockets at it as quickly as possible. Even when you have to empty your entire rack but in most cases you don't have to since in most cases one direct hit or a detonation near it will destroy it from overpressure. Do not underestimate these vehicles. If necessary, shoot your 12.7 machine gun and your rockets at the same time. | ||
=== Pros and cons === | === Pros and cons === | ||
| − | '' | + | <!-- ''Summarise and briefly evaluate the vehicle in terms of its characteristics and combat effectiveness. Mark its pros and cons in a bulleted list. Try not to use more than 6 points for each of the characteristics. Avoid using categorical definitions such as "bad", "good" and the like - use substitutions with softer forms such as "inadequate" and "effective".'' --> |
'''Pros:''' | '''Pros:''' | ||
| − | *Very mobile when driving on flat terrain | + | |
| − | * | + | * Very mobile when driving on flat terrain |
| + | * The rockets can be continuously fired until the ammo rack is empty | ||
| + | * If a rocket hit anywhere next to the enemy tank's armour weak spots, it is very likely to knock the entire compartment out with overpressure | ||
'''Cons:''' | '''Cons:''' | ||
| − | + | ||
| − | *While rockets are protected by | + | * While rockets are protected by the launcher's panels to some extent and will likely just break on kinetic ammo hit, a direct hit of chemical warhead will likely detonate them, destroying the vehicle |
| − | *It is possible for rockets to hit obstacles next to the tank and destroy it | + | * It is possible for rockets to hit obstacles next to the tank and destroy it by accident |
| − | * | + | * Launcher depression does not exist on this tank, fighting on uneven terrain without setup or long range will result in almost guaranteed defeat |
| + | * Default sights are not helpful for accurately firing rockets; requires user to install a user-made scope that provides firing solutions | ||
== History == | == History == | ||
| − | <!--''Describe the history of the creation and combat usage of the | + | <!-- ''Describe the history of the creation and combat usage of the vehicle in more detail than in the introduction. If the historical reference turns out to be too long, take it to a separate article, taking a link to the article about the vehicle and adding a block "/History" (example: <nowiki>https://wiki.warthunder.com/(Vehicle-name)/History</nowiki>) and add a link to it here using the <code>main</code> template. Be sure to reference text and sources by using <code><nowiki><ref></ref></nowiki></code>, as well as adding them at the end of the article with <code><nowiki><references /></nowiki></code>. This section may also include the vehicle's dev blog entry (if applicable) and the in-game encyclopedia description (under <code><nowiki>=== In-game description ===</nowiki></code>, also if applicable).'' --> |
| − | In the mid-60s, the Japanese Military Administration made the decision to boost their Self-Defense | + | In the mid-60s, the Japanese Military Administration made the decision to boost their Self-Defense Forces' power with a mobile MLRS on a tracked chassis. As a base, it was suggested that the promising tracked armoured personnel carrier, that was at the time being developed by the Mitsubishi company, be used. The military vehicle was subsequently put into service under the designation Type 73 APC and became a base for a whole series of assault and support vehicles of the Japanese army. In order to equip their army with a modern multiple rocket launcher system, the Japanese used an APC as a base to develop the brand new Type 75 MLRS, as well as two other support vehicles – a mobile weather station and a command vehicle – to ensure the launcher's combat readiness. The Type 75 was put into service in 1975 and built up serially to 1985 inclusive. The vehicle fired at its opponents using its 130 mm rockets located on 30 launching tubes inside a rotating pod (the horizontal guidance angle was 50 degrees). The Type 75 had a three-man crew and could reach a speed of 50 km/h. |
| − | ''-From [ | + | ''-From [[wt:en/news/5837-development-type-75-multiple-rocket-launcher-explosive-hailstorm-en|Devblog]]'' |
== Media == | == Media == | ||
| − | '' | + | <!-- ''Excellent additions to the article would be video guides, screenshots from the game, and photos.'' --> |
| + | |||
| + | ;Skins | ||
| + | |||
| + | * [https://live.warthunder.com/feed/camouflages/?vehicle=jp_type_75_mlrs Skins and camouflages for the {{PAGENAME}} from live.warthunder.com.] | ||
| + | |||
| + | ;Videos | ||
| + | {{Youtube-gallery|fvSdDRBazww|'''The Shooting Range #121''' - ''War Machines'' section at 00:35 discusses the Type 75 MLRS.}} | ||
== See also == | == See also == | ||
| − | + | Other vehicles derived from the Type 73 chassis | |
| − | * | + | |
| − | * | + | * [[SUB-I-II]] |
| + | * [[Type 75 SPH]] | ||
== External links == | == External links == | ||
| − | <!--''Paste links to sources and external resources, such as:'' | + | <!-- ''Paste links to sources and external resources, such as:'' |
* ''topic on the official game forum;'' | * ''topic on the official game forum;'' | ||
| − | + | * ''other literature.'' --> | |
| − | * ''other literature.''--> | + | |
| − | * [ | + | * [[wt:en/news/5837-development-type-75-multiple-rocket-launcher-explosive-hailstorm-en|[Devblog] Type 75 Multiple Rocket Launcher: Explosive Hailstorm]] |
| + | {{TankManufacturer Komatsu}} | ||
{{Japan tank destroyers}} | {{Japan tank destroyers}} | ||
{{Japan premium ground vehicles}} | {{Japan premium ground vehicles}} | ||
Latest revision as of 20:04, 7 November 2023
| This page is about the Japanese MLRS Type 75 MLRS. For other versions, see Type 73 (Family). |


Contents
Description
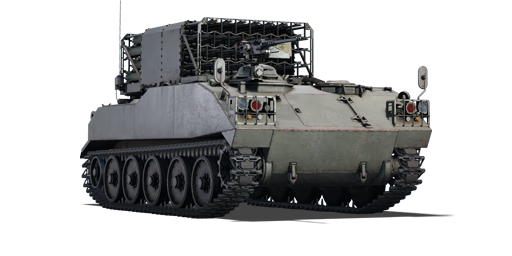
The Type 75 MLRS is a system that launches multiple rockets based on a prototype of the Type 73 APC hull to provide a 30-barrel 130 mm Type 75 rocket launch system.
It was introduced in Update 1.83 "Masters of the Sea". Being an MLRS, it may seem like a gimmicky vehicle, but it has a large payload in its 130 mm rockets. It is similar to a Ho-Ro but without the need to reload the next shell and with good ballistics that make it rather easy to use.
General info
Survivability and armour
While the armour is light, it provides enough frontal protection against MGs up to 12.7 mm but only frontally. The 3 crew members all sit in the front with the gunner sitting next to the engine which would protect him from MG fire from the left.
Armour type:
- Rolled homogeneous armour
- Gun steel (Rocket rack)
| Armour | Front (Slope angle) | Sides | Rear | Roof |
|---|---|---|---|---|
| Hull | 20 mm (28°) Front glacis 20 mm (55°) Lower glacis |
12.7 mm | 20 mm | 10 mm |
| Launcher | 10 mm | 10 mm | ||
| Cupola | 15 mm | |||
Notes:
- Belly armour is 10 mm thick.
- Suspension wheels and bogies are 10 mm thick, while tracks are 15 mm thick.
Mobility
| Game Mode | Max Speed (km/h) | Weight (tons) | Engine power (horsepower) | Power-to-weight ratio (hp/ton) | |||
|---|---|---|---|---|---|---|---|
| Forward | Reverse | Stock | Upgraded | Stock | Upgraded | ||
| Arcade | 55 | 14 | 16.5 | 497 | 668 | 30.12 | 40.48 |
| Realistic | 51 | 13 | 310 | 350 | 18.79 | 21.21 | |
Modifications and economy
| Mobility | Protection | Firepower | ||||||||||||||||||||
|---|---|---|---|---|---|---|---|---|---|---|---|---|---|---|---|---|---|---|---|---|---|---|
|
|
|
Armaments
Main armament
| 130 mm Type 75 rocket | Turret rotation speed (°/s) | Reloading rate (seconds)* | |||||||||||
|---|---|---|---|---|---|---|---|---|---|---|---|---|---|
| Mode | Capacity | Vertical | Horizontal | Stabilizer | Stock | Upgraded | Full | Expert | Aced | Stock | Full | Expert | Aced |
| Arcade | 30 | 0°/+50° | ±60° | N/A | 13.21 | 18.28 | 22.20 | 24.55 | 26.12 | 10.40 | 9.20 | 8.48 | 8.00 |
| Realistic | 8.93 | 10.50 | 12.75 | 14.10 | 15.00 | ||||||||
Notes:
- The Reloading rate affects the speed at which each rocket is resupplied when standing on a friendly captured point.
- The primary weapon has a fire rate of 144 rounds per minute: this equals to an interval of around 0.42 seconds between each rocket fired.
Ammunition
| Penetration statistics | |||||||
|---|---|---|---|---|---|---|---|
| Ammunition | Type of warhead |
Penetration @ 0° Angle of Attack (mm) | |||||
| 10 m | 100 m | 500 m | 1,000 m | 1,500 m | 2,000 m | ||
| 130 mm Type 75 | Rocket | 51 | 51 | 51 | 51 | 51 | 51 |
| Shell details | ||||||||||||
|---|---|---|---|---|---|---|---|---|---|---|---|---|
| Ammunition | Type of warhead |
Velocity (m/s) |
Projectile mass (kg) |
Fuse delay (m) |
Fuse sensitivity (mm) |
Explosive mass (TNT equivalent) (kg) |
Ricochet | |||||
| 0% | 50% | 100% | ||||||||||
| 130 mm Type 75 | Rocket | 700 | 43 | 0 | 0.1 | 6.14 | 79° | 80° | 81° | |||
Ammo racks

| Full ammo |
Visual discrepancy |
|---|---|
| 30 | No |
- Rockets deplete from right to left, top row first and then bottom row.
- It is not possible to select how many rockets to bring into battle.
Machine guns
| 12.7 mm M2HB | ||||
|---|---|---|---|---|
| Mount | Capacity (Belt) | Fire rate | Vertical | Horizontal |
| Pintle | 600 (200) | 575 | -9°/+65° | ±180° |
Usage in battles
The Type 75 MLRS is best played as a support vehicle. It can be used to sneak up on the enemy from a distance and destroying them with a few rockets. The rockets detonate on contact, so beware of bushes, trees and other obstacles. The chance of missing is quite high, so it will require multiple rockets. When a teammate is in danger, you can use your rockets to effectively suppress the enemy. Try to shoot your rockets between the turret and the hull like a HE shell, causing either the enemy ammunition to explode or knocking out the entire crew by overpressure. The side armour is thin enough, that APHE shells won't detonate inside your tank and will just go through. When a tank destroyer with thick frontal armour appears frontally, try to shoot at the commander's cupola or the ground under the belly armour. Having an almost non-existent reload between rockets is a huge advantage over other vehicles. The biggest disadvantage is the non-existent gun depression.
Since the launcher itself is also the ammunition store, it is exposed to everything. When only one of the 30 rockets gets destroyed in the rack, the entire ammo will explode, causing a knock out. When you've expended almost all rockets, stop the attack and retreat with one or two rockets left to defend yourself when necessary and drive to a captured point to reload your rack (RB).
The frontal armour can withstand rifle-calibre machine gun fire and sometimes 12.7 mm heavy machine guns when slightly angled, but not 20 mm autocannons so do not meet enemies in close-quarters. Avoid open fields at all costs, since the armour will not withstand any strafings or bombs from any plane at all or enemy artillery.
Open-topped vehicles or light armoured vehicles can either be destroyed by the 12.7 mm machine gun. The 12.7 mm machine gun sits on a separate commander hatch and will be helpful to destroy low-flying planes.
Enemies worth noting:
- Jagdpanther - No turret and no commander's cupola and basically a big upper front plate with no weak spots will make it a strong enemy for the MLRS when faced frontal. There are 3 options to destroy the Jagdpanther frontally. But before you start any of these options, try to take out its main cannon. One until 3 rockets detonating near the cannon should be enough to destroy it if you don't hit the gun directly. Do not hesitate. The Jagdpanther could have enemy teammates nearby or an advanced crew to repair the cannon in a short time, so you have to destroy him quickly. Shoot on the ground, where the Jagdpanther is standing. Its belly armour is thin enough, that the explosive filler won't have any trouble penetrating it. The overpressure will do the rest and if not, shoot more rockets. But remember, that you have no depression, so wobbling your hull will be required.. Shoot at the top. Its armour on the top is visible. It may require multiple rockets, since one or more will most likely bounce off the top. A successful detonation on the top will reward you with a knock-out for the enemy crew. Shoot between tracks and hull. This option requires the most rockets. Not only will you immobilize the Jagdpanther if you shoot its tracks, but also sometimes a successful knockout. When only a bit of the side armour gets hit by 2 or 3 rockets, the crew will most likely get knocked out. All the options stay the same when an enemy Bfw. Jagdpanther appears.
- AMX-50 Foch - A huge cupola is the weak spot for high explosive ammunition. Type 75 MLRS rockets included. What you should be aware of is its 15 mm MG 151, which can penetrate you frontally and even when slightly angled. Taking out its main gun, then the machine gun, and then focussing on the cupola is the safest way to go.
- Strv 103A - A very low profile and a tiny commander's cupola can make it very challenging to destroy it frontally. Especially when the engine compartment is on the front and protects the crew more. Try to take out its cannon, and then wiggle your hull to shoot at him when close distance, and one successful hit on the small commander's cupola will usually destroy it.
- Vehicles with autocannons - Since your strongest armour is a 20 mm plate angled, any vehicle with an auto cannon with a caliber above 12.7 mm can easily destroy you in few seconds. When seeing contact, shoot your rockets at it as quickly as possible. Even when you have to empty your entire rack but in most cases you don't have to since in most cases one direct hit or a detonation near it will destroy it from overpressure. Do not underestimate these vehicles. If necessary, shoot your 12.7 machine gun and your rockets at the same time.
Pros and cons
Pros:
- Very mobile when driving on flat terrain
- The rockets can be continuously fired until the ammo rack is empty
- If a rocket hit anywhere next to the enemy tank's armour weak spots, it is very likely to knock the entire compartment out with overpressure
Cons:
- While rockets are protected by the launcher's panels to some extent and will likely just break on kinetic ammo hit, a direct hit of chemical warhead will likely detonate them, destroying the vehicle
- It is possible for rockets to hit obstacles next to the tank and destroy it by accident
- Launcher depression does not exist on this tank, fighting on uneven terrain without setup or long range will result in almost guaranteed defeat
- Default sights are not helpful for accurately firing rockets; requires user to install a user-made scope that provides firing solutions
History
In the mid-60s, the Japanese Military Administration made the decision to boost their Self-Defense Forces' power with a mobile MLRS on a tracked chassis. As a base, it was suggested that the promising tracked armoured personnel carrier, that was at the time being developed by the Mitsubishi company, be used. The military vehicle was subsequently put into service under the designation Type 73 APC and became a base for a whole series of assault and support vehicles of the Japanese army. In order to equip their army with a modern multiple rocket launcher system, the Japanese used an APC as a base to develop the brand new Type 75 MLRS, as well as two other support vehicles – a mobile weather station and a command vehicle – to ensure the launcher's combat readiness. The Type 75 was put into service in 1975 and built up serially to 1985 inclusive. The vehicle fired at its opponents using its 130 mm rockets located on 30 launching tubes inside a rotating pod (the horizontal guidance angle was 50 degrees). The Type 75 had a three-man crew and could reach a speed of 50 km/h.
-From Devblog
Media
- Skins
- Videos
See also
Other vehicles derived from the Type 73 chassis
External links
| Komatsu Ltd. (株式会社小松製作所) | |
|---|---|
| SPRG | Type 60 SPRG (C) |
| APC | Type 60 ATM |
| MLRS | Type 75 MLRS |
| RCV | Type 87 RCV (P) · Type 87 RCV |
| Japan tank destroyers | |
|---|---|
| Ro-Go Derivatives | Ro-Go Exp. |
| Chi-Ha Derivatives | Ho-Ni I · Ho-Ni III · Ho-Ro · Chi-Ha LG |
| Ho-Ri | Ho-Ri Prototype · Ho-Ri Production |
| Other | Na-To |
| JGSDF | |
| SPRG | Type 60 (C) |
| SPH | Type 75 · Type 99 |
| ATGM | Type 60 ATM |
| Rocket | Type 75 MLRS |
| USA | ▅M36 |
| Japan premium ground vehicles | |
|---|---|
| Light tanks | Ha-Go Commander · Type 16 (FPS) |
| Medium tanks | Chi-Ha Short Gun · Chi-He (5th Regiment) · Ka-Chi · Chi-Nu II · Type 74 (G) · Type 90 (B) "Fuji" |
| Heavy tanks | Ro-Go · ▅Heavy Tank No.6 |
| Tank destroyers | Ho-Ri Prototype · Type 75 MLRS |
