Difference between revisions of "75/46 M43"
m |
(→Survivability and armour) (Tag: Visual edit) |
||
| (45 intermediate revisions by 13 users not shown) | |||
| Line 1: | Line 1: | ||
| − | {{Specs-Card | + | {{Specs-Card|code=it_semovente_m43_75_46}} |
| − | |code=it_semovente_m43_75_46 | ||
| − | |||
| − | }} | ||
== Description == | == Description == | ||
| − | <!-- ''In the description, the first part | + | <!--''In the description, the first part needs to be about the history of the creation and combat usage of the vehicle, as well as its key features. In the second part, tell the reader about the ground vehicle in the game. Insert the screenshot of the vehicle. If the novice player does not remember the vehicle by name, they will immediately understand what kind of vehicle it is talking about.''--> |
| − | The '''{{Specs|name}}''' is a | + | The '''{{Specs|name}}''' is a Rank {{Specs|rank}} Italy tank destroyer {{Battle-rating|1}}. It was introduced in [[Update 1.85 "Supersonic"]]. |
== General info == | == General info == | ||
=== Survivability and armour === | === Survivability and armour === | ||
| − | + | The Semovente 75/46 retains the improved armour of it's 4.0 predecessor, with a 25mm lightly-angled frontal plate sitting in front of a flat 75mm plate and a driver's hatch on the left-hand side adding additional 25mm of protection. This allows the Semovente's frontal armour to effectively provide up to 145mm of penetration when properly angled, or 170mm over the driver's hatch. For this reason. players should always look to angle the tanks' left side toward the enemy to allow the hatch to bounce shots more effectively. | |
| − | |||
| − | |||
| − | '' | + | Despite this however, the vehicles' armour scheme does contain a number of weak spots. Angling to maximise the protection of the front and side armour exposes an 85mm flat target around the vehicles headlamps. In addition to this, the lower glacis offers only 50mm angled armour plates, although shots that penetrate this area will often be absorbed by the transmission, saving the tank at the cost of it's mobility |
| − | + | As a result, the Semoventes' armour can provide very effective protection against same or lower-tier tanks when properly angled. Ideally the vehicle will look to use it's extremely effective high-velocity gun to engage targets from a distance, where its small frontal profile and strong frontal armour make it difficult to penetrate. Enemy players will often fail to identify the tanks weak-spots and simply fire into the flat frontal plate, allowing the Semovente to bounce rounds effectively. | |
| − | |||
| − | + | The armour becomes much less effective in a full up-tier however, with Allied guns such as the British 17-pdr, US 76mm M1 and Soviet 85mm D-5T being able to reliably penetrate the vehicle at close range even when angled. The tanks' small size and cramped crew compartments also means that APHE shells offer little hope of survival should they get through its armour. | |
| − | |||
| − | |||
| − | |||
| − | |||
| − | |||
| − | |||
| − | |||
| − | |||
| − | |||
| − | + | As with most tank-destroyers, the vehicles' side and rear armour do little to protect in in case of a flank, and players should always look to keep their nose pointed toward the enemy. | |
| − | |||
| − | |||
=== Mobility === | === Mobility === | ||
| − | + | The Semovente has reasonable mobility for a tank destroyer, being able to hit and maintain around 37km/h when driving off-road on level ground. The vehicle has a slow reverse speed however, only being able to hit 4km/h in its single gear. | |
| − | |||
| − | |||
| − | The | ||
| − | + | Despite its lack of neutral steering, the tank can traverse its hull reasonably quickly from a full stop, greatly helping to overcome its lack of a turret. | |
| − | |||
| − | |||
| − | |||
== Armaments == | == Armaments == | ||
| − | |||
=== Main armament === | === Main armament === | ||
| − | + | <!--''Give the reader information about the characteristics of the main gun. Assess its effectiveness in a battle based on the reloading speed, ballistics and the power of shells. Do not forget about the flexibilty of the fire, that is how quickly the cannon can be aimed at the target, open fire on it and aim at another enemy. Add a link to the main article on the gun: <code><nowiki>{{main|Name of the weapon}}</nowiki></code>. Describe in general terms the ammunition available for the main gun. Give advice on how to use them and how to fill the ammunition storage.''--> | |
| − | <!-- ''Give the reader information about the characteristics of the main gun. Assess its effectiveness in a battle based on the reloading speed, ballistics and the power of shells. Do not forget about the | + | {{main|Ansaldo 75 L/34 (75 mm)}} |
| − | {{main| | ||
| − | {| class="wikitable" style="text-align:center | + | {| class="wikitable" style="text-align:center" |
|- | |- | ||
| − | ! colspan=" | + | ! colspan="6" | [[Ansaldo 75 L/34 (75 mm)|75 mm Ansaldo 75 L/34]] |
|- | |- | ||
| − | ! | + | ! colspan="3" rowspan="1" style="width:5em" |Capacity |
| − | + | ! rowspan="1" | Vertical <br> guidance | |
| − | + | ! rowspan="1" | Horizontal <br> guidance | |
| + | ! rowspan="1" | Stabilizer | ||
|- | |- | ||
| − | + | | colspan="3" | 42 || -10°/+16° || ±18° || N/A | |
| − | | | ||
|- | |- | ||
| − | ! ''Realistic'' | + | ! colspan="6" | Turret rotation speed (°/s) |
| − | | 8.3 || | + | |- |
| + | ! style="width:4em" |Mode | ||
| + | ! style="width:4em" |Stock | ||
| + | ! style="width:4em" |Upgraded | ||
| + | ! style="width:4em" |Prior + Full crew | ||
| + | ! style="width:4em" |Prior + Expert qualif. | ||
| + | ! style="width:4em" |Prior + Ace qualif. | ||
| + | |- | ||
| + | | ''Arcade'' || 12.3 || __.__ || __.__ || __.__ || __.__ | ||
| + | |- | ||
| + | | ''Realistic'' || 8.3 || __.__ || __.__ || __.__ || __.__ | ||
| + | |- | ||
| + | ! colspan="4" | Reloading rate (seconds) | ||
| + | |- | ||
| + | ! colspan="1" style="width:4em" |Stock | ||
| + | ! colspan="1" style="width:4em" |Prior + Full crew | ||
| + | ! colspan="1" style="width:4em" |Prior + Expert qualif. | ||
| + | ! colspan="1" style="width:4em" |Prior + Ace qualif. | ||
| + | |- | ||
| + | | 7.8 || __.__ || __.__ || __.__ | ||
|- | |- | ||
|} | |} | ||
| − | ==== Ammunition ==== | + | ===== Ammunition ===== |
| − | { | + | {| class="wikitable sortable" style="text-align:center" width="100%" |
| + | ! colspan="8" | Penetration statistics | ||
| + | |- | ||
| + | ! rowspan="2" data-sort-type="text" | Ammunition | ||
| + | ! rowspan="2" class="unsortable" | Type of <br /> warhead | ||
| + | ! colspan="6" | '''Penetration''' '''''in mm''''' '''@ 90°''' | ||
| + | |- | ||
| + | ! 10m | ||
| + | ! 100m | ||
| + | ! 500m | ||
| + | ! 1000m | ||
| + | ! 1500m | ||
| + | ! 2000m | ||
| + | |- | ||
| + | | Granate Perforante mod.39 || APCBC || 147 || 146 || 133 || 118 || 105 || 93 | ||
| + | |- | ||
| + | | Granata mod.34 || HE || 10 || 10 || 10 || 10 || 10 || 10 | ||
| + | |- | ||
| + | |} | ||
| + | {| class="wikitable sortable" style="text-align:center" width="100%" | ||
| + | ! colspan="11" | Shell details | ||
| + | |- | ||
| + | ! rowspan="2" data-sort-type="text" | Ammunition | ||
| + | ! rowspan="2" class="unsortable" | Type of <br /> warhead | ||
| + | ! rowspan="2" |Velocity <br /> in m/s | ||
| + | ! rowspan="2" |Projectile<br />Mass in kg | ||
| + | ! rowspan="2" | ''Fuse delay'' | ||
| + | ''in m:'' | ||
| + | ! rowspan="2" | ''Fuse sensitivity'' | ||
| + | ''in mm:'' | ||
| + | ! rowspan="2" | ''Explosive Mass in g<br /> (TNT equivalent):'' | ||
| + | ! rowspan="2" | ''Normalization At 30° <br> from horizontal:'' | ||
| + | ! colspan="3" | ''Ricochet:'' | ||
| + | |- | ||
| + | ! 0% | ||
| + | ! 50% | ||
| + | ! 100% | ||
| + | |- | ||
| + | | Granate Perforante mod.39 || APCBC || 792 || 6.8 || 1.3 || 15 || 17 || ° || 48° || 63° || 71° | ||
| + | |- | ||
| + | | Granata mod.34 || HE || 550 || 5.7 || 0.1 || 0.1 || 686 || ° || 79° || 80° || 81° | ||
| + | |- | ||
| + | |} | ||
| − | ==== [[Ammo racks]] ==== | + | ===== [[Ammo racks|Ammo racks]] ===== |
| − | + | {| class="wikitable sortable" style="text-align:center" | |
| − | |||
| − | {| class="wikitable" style="text-align:center" | ||
|- | |- | ||
| − | ! Full<br>ammo | + | ! class="wikitable unsortable" |Full<br /> ammo |
| − | ! 1st<br>rack empty | + | ! class="wikitable unsortable" |1st<br /> rack empty |
| − | ! 2nd<br>rack empty | + | ! class="wikitable unsortable" |2nd<br /> rack empty |
| − | ! Visual<br>discrepancy | + | ! class="wikitable unsortable" |3rd<br /> rack empty |
| + | ! class="wikitable unsortable" |Visual<br /> discrepancy | ||
|- | |- | ||
| − | | ''' | + | || '''XX''' || XX ''(+XX)'' || XX ''(+XX)'' || XX ''(+XX)'' || style="text-align:center" | No |
|- | |- | ||
|} | |} | ||
| − | |||
| − | |||
| − | |||
=== Machine guns === | === Machine guns === | ||
| − | + | <!--''Offensive and anti-aircraft machine guns not only allow you to fight some aircraft, but also are effective against lightly armoured vehicles. Evaluate machine guns and give recommendations on its use.''--> | |
| − | <!-- ''Offensive and anti-aircraft machine guns not only allow you to fight some aircraft but also are effective against lightly armoured vehicles. Evaluate machine guns and give recommendations on its use.'' --> | ||
{{main|Breda Mod. 38 (8 mm)}} | {{main|Breda Mod. 38 (8 mm)}} | ||
| − | {| class="wikitable" style="text-align:center | + | {| class="wikitable" style="text-align:center" |
|- | |- | ||
| − | ! colspan=" | + | ! colspan="7" | [[Breda Mod. 38 (8 mm)|8 mm Breda Mod. 38]] |
|- | |- | ||
| − | ! | + | ! colspan="7" | ''Pintle mount'' |
|- | |- | ||
| − | | | + | ! colspan="4" rowspan="1" style="width:5em" |Capacity (Belt capacity) |
| + | ! rowspan="1" | Fire rate <br> (shots/minute) | ||
| + | ! rowspan="1" | Vertical <br> guidance | ||
| + | ! rowspan="1" | Horizontal <br> guidance | ||
| + | |- | ||
| + | | colspan="4" | 504 (24) || 600 || __° || __° | ||
|- | |- | ||
|} | |} | ||
| − | |||
| − | == Usage in battles == | + | == Usage in the battles == |
| − | + | ''Describe the tactics of playing in the vehicle, the features of using vehicles in the team and advice on tactics. Refrain from creating a "guide" - do not impose a single point of view but give the reader food for thought. Describe the most dangerous enemies and give recommendations on fighting them. If necessary, note the specifics of the game in different modes (AB, RB, SB).'' | |
| − | |||
| − | |||
| − | |||
| − | |||
| − | |||
| − | |||
| − | |||
=== Pros and cons === | === Pros and cons === | ||
| − | + | ''Summarize and briefly evaluate the vehicle in terms of its characteristics and combat effectiveness. Mark its pros and cons in a bulleted list. Do not use more than 6 points for each of the characteristics. Avoid using categorical definitions such as "bad", "good" and the like - they have a substitution in the form of softer "inadequate", "effective".'' | |
'''Pros:''' | '''Pros:''' | ||
| − | * | + | * |
| − | |||
| − | |||
| − | |||
| − | |||
'''Cons:''' | '''Cons:''' | ||
| − | * | + | * |
| − | |||
| − | |||
| − | |||
| − | |||
== History == | == History == | ||
| − | + | ''Describe the history of the creation and combat usage of the ground vehicle in more detail than in the introduction. If the historical reference turns out to be too big, take it to a separate article, taking a link to an article about the vehicle and adding a block "/historical reference" (example: https://wiki.warthunder.com/Name-vehicles/historical reference) and add a link to it here using the <code>main</code> template. Be sure to include links to sources at the end of the article.'' | |
| − | |||
| − | |||
| − | |||
== Media == | == Media == | ||
| − | + | ''An excellent addition to the article will be video guides, as well as screenshots from the game and photos.'' | |
| − | + | == Read also == | |
| + | ''Links to the articles on the War Thunder Wiki that you think will be useful for the reader, for example,'' | ||
| − | |||
| − | |||
| − | |||
| − | |||
| − | |||
| − | |||
| − | |||
* ''reference to the series of the vehicles;'' | * ''reference to the series of the vehicles;'' | ||
| − | * ''links to approximate analogues of other nations and research trees.'' | + | * ''links to approximate analogues of other nations and research trees.'' |
| − | + | ''ETC.'' | |
| − | + | == Sources == | |
| − | + | ''Paste links to sources and external resources, such as:'' | |
| − | |||
| − | |||
| − | |||
| − | |||
| − | |||
| − | |||
| − | |||
| − | |||
* ''topic on the official game forum;'' | * ''topic on the official game forum;'' | ||
| − | * ''other literature.'' | + | * ''other literature.'' |
| − | |||
| − | |||
| − | |||
| − | |||
| − | |||
| − | |||
{{Italy tank destroyers}} | {{Italy tank destroyers}} | ||
Revision as of 16:34, 13 February 2019
Contents
Description
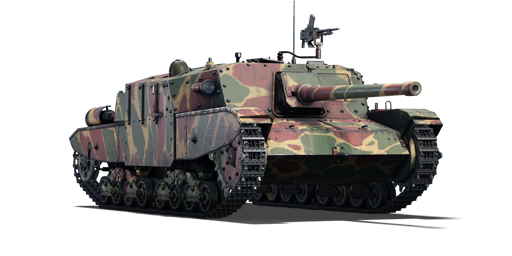
The Semovente 75/46 M43 is a Rank III Italy tank destroyer with a battle rating of 4.7 (AB/RB/SB). It was introduced in Update 1.85 "Supersonic".
General info
Survivability and armour
The Semovente 75/46 retains the improved armour of it's 4.0 predecessor, with a 25mm lightly-angled frontal plate sitting in front of a flat 75mm plate and a driver's hatch on the left-hand side adding additional 25mm of protection. This allows the Semovente's frontal armour to effectively provide up to 145mm of penetration when properly angled, or 170mm over the driver's hatch. For this reason. players should always look to angle the tanks' left side toward the enemy to allow the hatch to bounce shots more effectively.
Despite this however, the vehicles' armour scheme does contain a number of weak spots. Angling to maximise the protection of the front and side armour exposes an 85mm flat target around the vehicles headlamps. In addition to this, the lower glacis offers only 50mm angled armour plates, although shots that penetrate this area will often be absorbed by the transmission, saving the tank at the cost of it's mobility
As a result, the Semoventes' armour can provide very effective protection against same or lower-tier tanks when properly angled. Ideally the vehicle will look to use it's extremely effective high-velocity gun to engage targets from a distance, where its small frontal profile and strong frontal armour make it difficult to penetrate. Enemy players will often fail to identify the tanks weak-spots and simply fire into the flat frontal plate, allowing the Semovente to bounce rounds effectively.
The armour becomes much less effective in a full up-tier however, with Allied guns such as the British 17-pdr, US 76mm M1 and Soviet 85mm D-5T being able to reliably penetrate the vehicle at close range even when angled. The tanks' small size and cramped crew compartments also means that APHE shells offer little hope of survival should they get through its armour.
As with most tank-destroyers, the vehicles' side and rear armour do little to protect in in case of a flank, and players should always look to keep their nose pointed toward the enemy.
Mobility
The Semovente has reasonable mobility for a tank destroyer, being able to hit and maintain around 37km/h when driving off-road on level ground. The vehicle has a slow reverse speed however, only being able to hit 4km/h in its single gear.
Despite its lack of neutral steering, the tank can traverse its hull reasonably quickly from a full stop, greatly helping to overcome its lack of a turret.
Armaments
Main armament
| 75 mm Ansaldo 75 L/34 | |||||
|---|---|---|---|---|---|
| Capacity | Vertical guidance |
Horizontal guidance |
Stabilizer | ||
| 42 | -10°/+16° | ±18° | N/A | ||
| Turret rotation speed (°/s) | |||||
| Mode | Stock | Upgraded | Prior + Full crew | Prior + Expert qualif. | Prior + Ace qualif. |
| Arcade | 12.3 | __.__ | __.__ | __.__ | __.__ |
| Realistic | 8.3 | __.__ | __.__ | __.__ | __.__ |
| Reloading rate (seconds) | |||||
| Stock | Prior + Full crew | Prior + Expert qualif. | Prior + Ace qualif. | ||
| 7.8 | __.__ | __.__ | __.__ | ||
Ammunition
| Penetration statistics | |||||||
|---|---|---|---|---|---|---|---|
| Ammunition | Type of warhead |
Penetration in mm @ 90° | |||||
| 10m | 100m | 500m | 1000m | 1500m | 2000m | ||
| Granate Perforante mod.39 | APCBC | 147 | 146 | 133 | 118 | 105 | 93 |
| Granata mod.34 | HE | 10 | 10 | 10 | 10 | 10 | 10 |
| Shell details | ||||||||||
|---|---|---|---|---|---|---|---|---|---|---|
| Ammunition | Type of warhead |
Velocity in m/s |
Projectile Mass in kg |
Fuse delay
in m: |
Fuse sensitivity
in mm: |
Explosive Mass in g (TNT equivalent): |
Normalization At 30° from horizontal: |
Ricochet: | ||
| 0% | 50% | 100% | ||||||||
| Granate Perforante mod.39 | APCBC | 792 | 6.8 | 1.3 | 15 | 17 | ° | 48° | 63° | 71° |
| Granata mod.34 | HE | 550 | 5.7 | 0.1 | 0.1 | 686 | ° | 79° | 80° | 81° |
Ammo racks
| Full ammo |
1st rack empty |
2nd rack empty |
3rd rack empty |
Visual discrepancy |
|---|---|---|---|---|
| XX | XX (+XX) | XX (+XX) | XX (+XX) | No |
Machine guns
| 8 mm Breda Mod. 38 | ||||||
|---|---|---|---|---|---|---|
| Pintle mount | ||||||
| Capacity (Belt capacity) | Fire rate (shots/minute) |
Vertical guidance |
Horizontal guidance | |||
| 504 (24) | 600 | __° | __° | |||
Usage in the battles
Describe the tactics of playing in the vehicle, the features of using vehicles in the team and advice on tactics. Refrain from creating a "guide" - do not impose a single point of view but give the reader food for thought. Describe the most dangerous enemies and give recommendations on fighting them. If necessary, note the specifics of the game in different modes (AB, RB, SB).
Pros and cons
Summarize and briefly evaluate the vehicle in terms of its characteristics and combat effectiveness. Mark its pros and cons in a bulleted list. Do not use more than 6 points for each of the characteristics. Avoid using categorical definitions such as "bad", "good" and the like - they have a substitution in the form of softer "inadequate", "effective".
Pros:
Cons:
History
Describe the history of the creation and combat usage of the ground vehicle in more detail than in the introduction. If the historical reference turns out to be too big, take it to a separate article, taking a link to an article about the vehicle and adding a block "/historical reference" (example: https://wiki.warthunder.com/Name-vehicles/historical reference) and add a link to it here using the main template. Be sure to include links to sources at the end of the article.
Media
An excellent addition to the article will be video guides, as well as screenshots from the game and photos.
Read also
Links to the articles on the War Thunder Wiki that you think will be useful for the reader, for example,
- reference to the series of the vehicles;
- links to approximate analogues of other nations and research trees.
ETC.
Sources
Paste links to sources and external resources, such as:
- topic on the official game forum;
- other literature.
| Italy tank destroyers | |
|---|---|
| Italy | |
| M41 | 75/18 M41 · 75/32 M41 · 90/53 M41M |
| M42 | 75/34 M42 |
| M43 | 105/25 M43 · M43 "G.C.Leoncello" · 75/34 M43 · 75/46 M43 |
| Wheeled | Lancia 3Ro (100/17) · AS 42/47 · Breda 90/53 · Breda 501 |
| Other | L3/33 CC · 47/32 L40 |
| Germany | ▄StuG III G |
| USA | M36B1 · ▄M109G · M113A1 (TOW) |
| Hungary | |
| Zrínyi | Zrinyi I · Zrinyi II |
| USSR | ◔2S1 |
