|
|
| Line 1: |
Line 1: |
| − | {{Specs-Card|code=us_mbt_70}} | + | {{Specs-Card |
| | + | |code=d_510 |
| | + | |cockpit=411809/1438710 |
| | + | }} |
| | | | |
| | == Description == | | == Description == |
| − | <!--''In the description, the first part needs to be about the history of the creation and combat usage of the vehicle, as well as its key features. In the second part, tell the reader about the ground vehicle in the game. Insert the screenshot of the vehicle. If the novice player does not remember the vehicle by name, they will immediately understand what kind of vehicle it is talking about.''--> | + | <!-- ''In the description, the first part should be about the history of and the creation and combat usage of the aircraft, as well as its key features. In the second part, tell the reader about the aircraft in the game. Insert a screenshot of the vehicle, so that if the novice player does not remember the vehicle by name, he will immediately understand what kind of vehicle the article is talking about.'' --> |
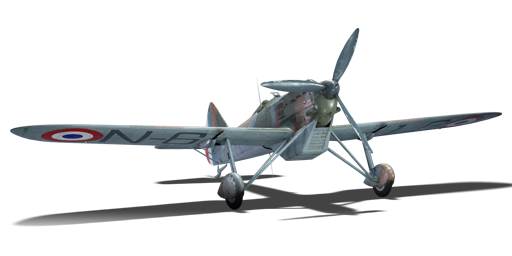
| − | [[File:GarageImage_MBT-70.jpg|420px|thumb|left]] | + | [[File:GarageImage_Pallier'sD.510.jpg|420px|thumb|left]] |
| | {{break}} | | {{break}} |
| − | The '''152-mm Gun-Launcher Main Battle Tank 70''' (shortened as '''{{PAGENAME}}''') is a rank {{Specs|rank}} American medium tank {{Battle-rating}}. This tank was introduced in [[Update 1.71 "New E.R.A"]].
| + | '''{{Specs|name}}''' is a premium rank {{Specs|rank}} French fighter {{Battle-rating}}. It was introduced in [[Update 1.73 "Vive la France"]]. It costs 250 Golden Eagles. The plane is modelled after one used by French pilot Gabriel Pallier. |
| | | | |
| − | The MBT-70 handles like virtually no other vehicle (barring the [[KPz-70]], its German twin) in the game in terms of its ability to pick up and maintain speed over various terrains. Cross country mobility is arguably the best currently available in the game and is one of the signature traits that stands out about it. | + | The Dewoitine D.510 is an open cockpit monoplane equipped with one Hispano-Suiza H.S.404 cannon and two MAC 1934 7.5 mm machine guns. The aircraft has no specific defects, but no notable advantages either. Its engine is extremely prone to catching fire (especially when hit by weapons of 12.7 mm caliber) |
| − | | |
| − | Unlike the Soviet T-64A (its main rival), the MBT-70 does not utilise composite armour, but an air gap that forces munitions penetrating the initial layers to lose their mass by fragmenting apart before moving to the next layer of armour. This general design concept has been in use as far back as World War II and is even used to this day on modern fighting vehicles.
| |
| − | | |
| − | [[Armour#Sloped_armour|Spaced armour]] works wonderfully well against shaped charge munitions or any other munition with explosive filler provided it is of a stronger protection rating. Proceeding weapons and munitions development has seen this benefit decreased with either more powerful or tandem-charge warheads and can be seen in-game against weapons that proceeded different designs of spaced armour. As such, the MBT-70 will find itself against weapons that were designed to defeat spaced armour such as the HOT-K3S ATGM and [[Swingfire|BAE Swingfire]] system that will penetrate it. However, the spaced armour in the MBT-70 works exactly as it was designed to do against older anti-tank missiles, HEAT, HE, and HESH munitions.
| |
| − | | |
| − | The tank mounts no external spaced armour. The armour on the side and rear of the tank is not worth mentioning as it will only stop light machine gun fire and some cannon fire on the turret. Adversary sabot rounds will penetrate clear through the engine and into the crew compartment most likely destroying the MBT-70 if engaged from behind.
| |
| − | | |
| − | The most important feature that makes a tank is the cannon. In this department, the MBT-70 is no slouch. The 152 mm gun launcher system (similar to the one used on the [[M551|M551 Sheridan]]), but with a longer barrel and is capable of firing a variety of munition types including an experimental APFSDS round, a traditional HEAT round (with high penetration), an experimental [[Smoke screen|smoke]] round, and lastly the very capable and proven MGM-61C Shillelagh. This wide range of munition choices gives the operator a variety of options in pre-combat configuration which can greatly either hinder or enhance the tankers capability on the battlefield. The benefit of a longer barrel compared to its Sheridan counterpart ensures the MBT-70 is much more accurate at range and that the rounds leave the barrel at higher velocities thus increasing their overall damage dealing capabilities. | |
| − | | |
| − | Additionally the 152 mm gun launcher gets equipped with an auto loader, greatly reducing its time between followup shots on a target.
| |
| − | For targeting, the option to equip an incredibly accurate laser range finder is available. Additionally the 7.62 mm machine gun mounted in the turret can be used for range finding as well.
| |
| − | | |
| − | The Rheinmetall Rh 202 20 mm auto cannon is highly effective at dealing with light armoured battlefield threats and on some tanks exposed sides or rears. In some situations, it may be more beneficial to utilise the 20 mm as it will allow the tank to deal damage rapidly while conserving the main cannon ammunition. The cannon is also highly effective at shooting down low flying attackers. Note that if the commander is knocked out, the 20 mm will be unable to be used.
| |
| − | | |
| − | The MBT-70 is equipped with a 1,470 horsepower air-cooled Continental V-12 diesel engine. This engine pack compared to its German counterpart produces slightly less power, but both vehicles handle essentially the same.
| |
| − | | |
| − | A highly advantageous feature is the hydro pneumatic suspension system which not only provides great cross country mobility, but allows the crew to position the vehicle in such a way to only expose the strongest armour at an enemy threat. The suspension can also be used to gain further gun depression by raising the rear of the tank and lowering the front thus allowing the gunner to engage from a position that he might not have been able to engage from previously.
| |
| − | | |
| − | The MBT-70 features the standard NATO track and rubber block design. The rubber track blocks provide great traction off road and on road compared to all metal tracks found on other fighting vehicles as sliding on a short halt or drifting is minimised.
| |
| − | | |
| − | Because of the elevated engine deck, gun depression is decreased significantly when firing or aiming the gun over the rear of the tank.
| |
| − | | |
| − | An unconventional feature at the time was that the MBT-70 was designed to house all the crew members in the turret. Because of the autoloading system, the need for a loader was eliminated and due to an attempt to further lower the tanks silhouette, the driver was located to the turret with the gunner and commander. This can have potentially devastating consequences on the battlefield as the crew can easily be injured or knocked out by penetrating munitions entering the crew compartment.
| |
| − | | |
| − | For defensive countermeasures, the tank is equipped with two quad barrel externally mounted smoke canister launchers on both sides of the turret, which can provide either a defensive screen for itself or friendly forces. These launchers can be fired in pairs of two. Keep in mind the smoke grenade launchers are operated by the gunner so should the gunner become incapacitated in a fight, the smoke will be unlaunchable until the gunner is replaced by another crew member or by the crew replenishment consumable.
| |
| − | | |
| − | Due to its low profile and effective array of camouflage options, the MBT-70 scores high marks in the concealability category. The addition of various foliage can further increase the ability to conceal the tank.
| |
| | | | |
| | == General info == | | == General info == |
| − | === Survivability and armour === | + | === Flight Performance === |
| − | <!--''Describe armour protection. Note the most well protected and key weak areas. Appreciate the layout of modules as well as the number and location of crew members. Is the level of armour protection sufficient, is the placement of modules helpful for survival in combat?''
| + | ''Describe how the aircraft behaves in the air. Speed, manoeuvrability, acceleration and allowable loads - these are the most important characteristics of the vehicle.'' |
| | | | |
| − | ''If necessary use a visual template to indicate the most secure and weak zones of the armour.''-->
| + | {| class="wikitable" style="text-align:center" |
| − | '''Armour type:'''
| + | |- |
| − | | + | ! colspan="8" | Characteristics |
| − | * Spaced armour (Hull front, Turret front)
| |
| − | * Rolled homogeneous armour
| |
| − | * Cast homogeneous armour
| |
| − | | |
| − | {| class="wikitable"
| |
| | |- | | |- |
| − | ! Armour !! Front (Slope angle) !! Sides !! Rear !! Roof | + | ! colspan="8" | ''Stock'' |
| | |- | | |- |
| − | | Hull || 34* mm (57°) ''Front glacis'' <br> 76.2 mm (65°) ''Lower glacis'' || 23-34 mm (0-55°) ''Top'' <br> 23-35 mm ''Bottom'' || 25.4 mm (12°) ''Top'' <br> 25 mm (60°) ''Bottom'' <br> 12.7 mm (29-45°) ''Engine exhaust'' || 20 mm ''Front'' <br> 12.7 mm ''Engine deck'' | + | ! colspan="2" | Max Speed<br>(km/h at 3,200 m) |
| | + | ! rowspan="2" | Max altitude<br>(meters) |
| | + | ! colspan="2" | Turn time<br>(seconds) |
| | + | ! colspan="2" | Rate of climb<br>(meters/second) |
| | + | ! rowspan="2" | Take-off run<br>(meters) |
| | |- | | |- |
| − | | Turret || 50-200 mm (0-75°) || 12.7-38* mm (29-34°) || 12.7* mm (27-80°) || 20-50 mm ''Front'' <br> 12.7 mm ''Rear turret''
| + | ! AB |
| | + | ! RB |
| | + | ! AB |
| | + | ! RB |
| | + | ! AB |
| | + | ! RB |
| | |- | | |- |
| − | ! Armour !! Sides !! Roof
| + | | 383 || 374 || {{Specs|ceiling}} || 13.2 || 14.2 || 15.7 || 15.7 || 150 |
| | |- | | |- |
| − | | Cupola || 25 mm || 25 mm | + | ! colspan="8" | ''Upgraded'' |
| | |- | | |- |
| − | ! Spaced armour* !! Front !! Sides !! Rear !! Roof | + | ! colspan="2" | Max Speed<br>(km/h at 3,200 m) |
| | + | ! rowspan="2" | Max altitude<br>(meters) |
| | + | ! colspan="2" | Turn time<br>(seconds) |
| | + | ! colspan="2" | Rate of climb<br>(meters/second) |
| | + | ! rowspan="2" | Take-off run<br>(meters) |
| | |- | | |- |
| − | | Hull || 200 mm ''Kinetic'' <br> 170 mm ''Chemical'' || N/A || N/A || N/A
| + | ! AB |
| | + | ! RB |
| | + | ! AB |
| | + | ! RB |
| | + | ! AB |
| | + | ! RB |
| | |- | | |- |
| − | | Turret || 320 mm ''Kinetic'' <br> 280 mm ''Chemical'' || '''38 mm sections:''' <br> 320 mm ''Kinetic'' <br> 280 mm ''Chemical'' <br> '''12.7 mm sections:''' <br> 35 mm ''Kinetic'' <br> 40 mm ''Chemical'' || 35 mm ''Kinetic'' <br> 40 mm ''Chemical'' || N/A | + | | 407 || 394 || {{Specs|ceiling}} || 12.8 || 13.0 || 23.8 || 19.2 || 150 |
| | |- | | |- |
| | |} | | |} |
| − | '''Notes:'''
| |
| − |
| |
| − | * Suspension wheels are 20 mm thick and tracks are 30 mm thick.
| |
| − | * Belly armour is 16 mm thick.
| |
| − | * Gun mantlet ring around the gun barrel is 305 mm thick.
| |
| − | * A 16 mm RHA plate separates the engine from the crew compartment
| |
| − | * Hull spaced armour configuration is 34 mm RHA + 127 mm air + 46 mm RHA.
| |
| − | * Turret spaced armour configuration is 38 mm RHA + 127 mm air + 130-33 mm RHA.
| |
| − | * Turret rear spaced armour configuration is 13 mm RHA + 38 mm air + 19 mm RHA.
| |
| − |
| |
| − | The MBT-70 is still an average medium tank with weak side armour. Thus, flanking is a good strategy to take for a shot at the weak spots. Go for the ammo, which is located in front of the engine, or in the protruding end of the turret. If in a head on engagement, shoot it directly below the gun, but above the upper glacis. This spot has 250 mm of armour with no composite armour. This shot, if successful, should knock out most of the crew, and maybe even the horizontal drive, allowing for a flank in a fast vehicle.
| |
| − |
| |
| − | === Mobility ===
| |
| − | <!-- ''Write about the mobility of the ground vehicle. Estimate the specific power and manoeuvrability, as well as the maximum speed forwards and backwards.'' -->
| |
| − |
| |
| − | {{tankMobility|abMinHp= 2286|rbMinHp= 1305|<!--AoAweight=(optional) -->}}
| |
| − |
| |
| − | == Armaments ==
| |
| − | === Main armament ===
| |
| − | <!--''Give the reader information about the characteristics of the main gun. Assess its effectiveness in a battle based on the reloading speed, ballistics and the power of shells. Do not forget about the flexibility of the fire, that is how quickly the cannon can be aimed at the target, open fire on it and aim at another enemy. Add a link to the main article on the gun: <code><nowiki>{{main|Name of the weapon}}</nowiki></code>. Describe in general terms the ammunition available for the main gun. Give advice on how to use them and how to fill the ammunition storage.''-->
| |
| − | {{main|XM150E5 (152 mm)}}
| |
| | | | |
| | + | ==== Details ==== |
| | {| class="wikitable" style="text-align:center" | | {| class="wikitable" style="text-align:center" |
| | |- | | |- |
| − | ! colspan="6" | [[XM150E5 (152 mm)|152 mm XM150E5]] | + | ! colspan="5" | Features |
| | |- | | |- |
| − | ! colspan="4" rowspan="1" style="width:5em" |Capacity | + | ! Combat flaps |
| − | ! rowspan="1" | Vertical <br> guidance | + | ! Take-off flaps |
| − | ! rowspan="1" | Horizontal <br> guidance | + | ! Landing flaps |
| | + | ! Air brakes |
| | + | ! Arrestor gear |
| | |- | | |- |
| − | | colspan="4" | 48 || -10°/+20° || ±180° | + | | X || X || X || X || X <!-- ✓ --> |
| − | |- | |
| − | ! colspan="6" | Turret rotation speed (°/s)
| |
| − | |- | |
| − | ! style="width:4em" |Mode
| |
| − | ! style="width:4em" |Stock
| |
| − | ! style="width:4em" |Upgraded | |
| − | ! style="width:4em" |Prior + Full crew
| |
| − | ! style="width:4em" |Prior + Expert qualif.
| |
| − | ! style="width:4em" |Prior + Ace qualif.
| |
| − | |-
| |
| − | | ''Arcade'' || 34.27 || 47.44 || 57.6 || 63.7 || 67.76
| |
| − | |-
| |
| − | | ''Realistic'' || 21.42 || 25.2 || 30.6 || 33.84 || 36
| |
| − | |-
| |
| − | ! colspan="4" | Reloading rate (seconds)
| |
| − | |-
| |
| − | ! colspan="1" style="width:4em" |Stock
| |
| − | ! colspan="1" style="width:4em" |Prior + Full crew
| |
| − | ! colspan="1" style="width:4em" |Prior + Expert qualif.
| |
| − | ! colspan="1" style="width:4em" |Prior + Ace qualif.
| |
| − | |-
| |
| − | | 7.50 || 7.50 || 7.50 || 7.50
| |
| | |- | | |- |
| | |} | | |} |
| | | | |
| − | ===== Ammunition =====
| + | {| class="wikitable" style="text-align:center" |
| − | {| class="wikitable sortable" style="text-align:center" width="100%" | |
| − | ! colspan="8" | Penetration statistics
| |
| | |- | | |- |
| − | ! rowspan="2" data-sort-type="text" | Ammunition
| + | ! colspan="5" | Limits |
| − | ! rowspan="2" class="unsortable" | Type of <br /> warhead
| |
| − | ! colspan="6" | '''Penetration''' '''''in mm''''' '''@ 0° Angle of Attack''' | |
| | |- | | |- |
| − | ! 10m | + | ! rowspan="2" | Wing-break speed<br>(km/h) |
| − | ! 100m | + | ! rowspan="2" | Gear limit<br>(km/h) |
| − | ! 500m | + | ! rowspan="2" | Combat flaps<br>(km/h) |
| − | ! 1000m | + | ! colspan="2" | Max Static G |
| − | ! 1500m
| |
| − | ! 2000m
| |
| | |- | | |- |
| − | | XM578E1 || APFSDS || 380 || 370 || 360 || 345 || 330 || 315
| + | ! + |
| | + | ! - |
| | |- | | |- |
| − | | M409A1 || HEAT || 380 || 380 || 380 || 380 || 380 || 380 | + | | {{Specs|destruction|constructions}} || {{Specs|destruction|chassis}} || 410 || ~13 || ~8 |
| − | |-
| |
| − | | MGM-51C || ATGM || 431 || 431 || 431 || 431 || 431 || 431
| |
| − | |- | |
| − | |} | |
| − | {| class="wikitable sortable" style="text-align:center" width="100%"
| |
| − | ! colspan="10" | Shell details
| |
| | |- | | |- |
| − | ! rowspan="2" data-sort-type="text" | Ammunition
| |
| − | ! rowspan="2" |Velocity <br /> in m/s
| |
| − | ! rowspan="2" |Projectile<br />Mass in kg
| |
| − | ! rowspan="2" | ''Fuse delay''
| |
| − | ''in m:''
| |
| − | ! rowspan="2" | ''Fuse sensitivity''
| |
| − | ''in mm:''
| |
| − | ! rowspan="2" | ''Explosive Mass in g<br /> (TNT equivalent):''
| |
| − | ! rowspan="2" | ''Normalization At 30° <br> from horizontal:''
| |
| − | ! colspan="3" | ''Ricochet:''
| |
| − | |-
| |
| − | ! 0%
| |
| − | ! 50%
| |
| − | ! 100%
| |
| − | |-
| |
| − | | XM578E1 || 1,500 || 3.7 || N/A || N/A || N/A || +1.5° || 76° || 77° || 78°
| |
| − | |-
| |
| − | | M409A1 || 754 || 18.9 || 0.0 || 0.1 || 3,730 || +0° || 62° || 69° || 73°
| |
| − | |-
| |
| − | | MGM-51C || 323 || 27.8 || 0.0 || 0.01 || 3,600 || +0° || 80° || 82° || 90°
| |
| − | |-
| |
| | |} | | |} |
| − | {| class="wikitable sortable" style="text-align:center"
| |
| − | ! colspan="7" | Smoke characteristic
| |
| − | |-
| |
| − | ! Ammunition
| |
| − | ! Velocity <br /> in m/s
| |
| − | ! Projectile<br />Mass in kg
| |
| − | ! ''Screen radius <br /> in m''
| |
| − | ! ''Screen time <br /> in s''
| |
| − | ! ''Screen hold time <br /> in s:''
| |
| − | ! ''Explosive Mass in g<br /> (TNT equivalent):''
| |
| − | |-
| |
| − | | XM410E1 || 754 || 18.9 || 25 || 5 || 30 || 50
| |
| − | |-
| |
| − | |}
| |
| − |
| |
| − | ===== [[Ammo racks|Ammo racks]] =====
| |
| − | [[File:Ammoracks_MBT-70.png|right|thumbnail|x250px|[[Ammo racks|Ammo racks]] for he MBT-70.]]
| |
| − | {| class="wikitable sortable" style="text-align:center"
| |
| − | |-
| |
| − | ! class="wikitable unsortable" |Full<br /> ammo
| |
| − | ! class="wikitable unsortable" |1st<br /> rack empty
| |
| − | ! class="wikitable unsortable" |2nd<br /> rack empty
| |
| − | ! class="wikitable unsortable" |3rd<br /> rack empty
| |
| − | ! class="wikitable unsortable" |4th<br /> rack empty
| |
| − | ! class="wikitable unsortable" |5th<br /> rack empty
| |
| − | ! class="wikitable unsortable" |Visual<br /> discrepancy
| |
| − | |-
| |
| − | || '''48''' || 44 ''(+4)'' || 33 ''(+15)'' || 25 ''(+23)'' || 7 ''(+41)'' || 1 ''(+47)'' || style="text-align:left" | No
| |
| − | |-
| |
| − | |}
| |
| − | Hull empty: 25 ''(+23)''
| |
| − |
| |
| − | Racks 4 and 5 deplete top row together first before emptying in the second row.
| |
| − |
| |
| − | === Machine guns ===
| |
| − | <!--''Offensive and anti-aircraft machine guns not only allow you to fight some aircraft, but also are effective against lightly armoured vehicles. Evaluate machine guns and give recommendations on its use.''-->
| |
| − | {{main|Rh202 (20 mm)|M73 (7.62 mm)}}
| |
| | | | |
| | {| class="wikitable" style="text-align:center" | | {| class="wikitable" style="text-align:center" |
| | |- | | |- |
| − | ! colspan="7" | [[Rh202 (20 mm)|20 mm Rh202]] | + | ! colspan="4" | Optimal velocities |
| | |- | | |- |
| − | ! colspan="7" | ''Pintle mount'' | + | ! Ailerons<br>(km/h) |
| | + | ! Rudder<br>(km/h) |
| | + | ! Elevators<br>(km/h) |
| | + | ! Radiator<br>(km/h) |
| | |- | | |- |
| − | ! colspan="4" rowspan="1" style="width:5em" |Capacity (Belt capacity)
| + | | < 320 || < 330 || < 360 || > 280 |
| − | ! rowspan="1" | Fire rate <br> (shots/minute)
| |
| − | ! rowspan="1" | Vertical <br> guidance
| |
| − | ! rowspan="1" | Horizontal <br> guidance
| |
| − | |- | |
| − | | colspan="4" | 750 (750) || 900 || -9°/+65° || ±180° | |
| | |- | | |- |
| | |} | | |} |
| | + | |
| | {| class="wikitable" style="text-align:center" | | {| class="wikitable" style="text-align:center" |
| | |- | | |- |
| − | ! colspan="7" | [[M73 (7.62 mm)|7.62 mm M73]] | + | ! colspan="3" | Compressor (RB/SB) |
| | |- | | |- |
| − | ! colspan="7" | ''Coaxial mount'' | + | ! colspan="3" | Setting 1 |
| | |- | | |- |
| − | ! colspan="4" rowspan="1" style="width:5em" |Capacity (Belt capacity) | + | ! Optimal altitude |
| − | ! rowspan="1" | Fire rate <br> (shots/minute) | + | ! 100% Engine power |
| − | ! rowspan="1" | Vertical <br> guidance | + | ! WEP Engine power |
| − | ! rowspan="1" | Horizontal <br> guidance
| |
| | |- | | |- |
| − | | colspan="4" | 6,000 (250) || 500 || N/A || N/A | + | | 3,800 m || 690 hp || N/A |
| | |- | | |- |
| | |} | | |} |
| | | | |
| − | == Usage in battles == | + | === Survivability and armour === |
| − | <!--''Describe the tactics of playing in the vehicle, the features of using vehicles in the team and advice on tactics. Refrain from creating a "guide" - do not impose a single point of view but give the reader food for thought. Describe the most dangerous enemies and give recommendations on fighting them. If necessary, note the specifics of the game in different modes (AB, RB, SB).''--> | + | <!-- ''Examine the survivability of the aircraft. Note how vulnerable the structure is and how secure the pilot is, whether the fuel tanks are armoured, etc. Describe the armour, if there is any, and also mention the vulnerability of other critical aircraft systems.'' --> |
| − | The tank plays very much like the [[M41A1|M41A1 Walker Bulldog]]. Players familiar with the hit and run play style will easily adapt to the MBT-70. Its fast speed, especially with full upgrades and aced crew, allows it to maneuver into spots not typically accessible by less mobile tanks. Utilize this to an advantage to set up ambushes as this is how the MBT-70 will get most victories. It's important to recognize when an engagement is not beneficial to the tank so that it can re-position itself or escape from the threat.
| |
| | | | |
| − | Despite the initial appearance of strong frontal armour, it's important to remember when compared to its counterparts at its rank, it is not nearly enough to defeat threats head on such as the [[T-64A (1971)|T-64A]]. Even ATGM from missile vehicles such as the [[RakJPz 2 (HOT)|Raketenjagdpanzer 2 HOT]] will penetrate the turret and upper glacis plate. Even other Rank V tanks can and will penetrate from the front. Because of the rather condensed placement of crew and ammunition, the MBT-70 will most likely be destroyed with one shot. Because of this, it is critical to get the first shot off in an engagement and ensure it is either an eliminating shot or one that cripples the threat to such a capacity that they either cannot engage, will instinctively panic and try to run to repair or determine the engagement location and direction.
| + | * 3 mm Steel plate in the nose behind the engine. |
| | | | |
| − | The gun is especially versatile and powerful with a wide range of ammunition selection, but the cannon-launched ATGM's and sabot rounds will generally be able to get the job done in most situations. The 20 mm turret roof mounted cannon is great for taking out lightly armored targets (to include some tanks, ATGM vehicles, etc), anti-air, and aircraft.
| + | == Armaments == |
| | + | === Offensive armament === |
| | + | <!-- ''Describe the offensive armament of the aircraft, if any. Describe how effective the cannons and machine guns are in a battle, and also what belts or drums are better to use. If there is no offensive weaponry, delete this subsection.'' --> |
| | + | {{main|Hispano 404 (20 mm)|MAC 1934 (7.5 mm)}} |
| | | | |
| − | Essentially if this tanks is treated like a light tank or fast medium tank, the survivability will increase dramatically. The hydropneumatic suspension allows for positioning the tank in such ways that it can engage from non-conventional spots while exposing only the strongest armor at the threat. The low silhouette makes the tank especially difficult to hit at longer ranges and this can be further enhanced by the adjustable suspension depending on the situation. Because of the accurate cannon, the MBT-70 will also find it to be easy to engage at longer ranges, which will maximize the strengths while reducing the targets.
| + | The '''''{{PAGENAME}}''''' is armed with: |
| | | | |
| − | In summary, the MBT-70 is a great addition to any end game lineup as it provides great flexibility in almost all engagements and is well worth the time and investment to acquire.
| + | * 1 x 20 mm Hispano 404 cannon, nose-mounted (60 rpg) |
| | + | * 2 x 7.5 mm MAC 1934 machine guns, wing-mounted (300 rpg = 600 total) |
| | | | |
| − | ===Tactics===
| + | The two machine guns are arranged with one mounted on the underside of each wing. Each are armed with the same amount of ammunition, which means that all guns will fire with each other until empty. The 20 mm Hispano 404 cannon is mounted in the nose and fires out of the propeller hub. |
| − | Ambushing is the MBT-70's strength. As covered previously, utilize the speed to get into firing positions quickly and cause chaos and confusion among the enemy. In arcade battles, an MBT-70 can usually reach key positions quicker than even some 10.0 BR main battle tanks. This is only provided if it consistently drives in a linear format.
| |
| | | | |
| − | The MBT-70 can also quickly capture objective points and when used properly, it can hold these positions so long as it does not stay in them for too long.
| + | == Usage in battles == |
| | + | <!-- ''Describe the tactics of playing in an aircraft, the features of using vehicles in a team and advice on tactics. Refrain from creating a "guide" - do not impose a single point of view, but instead, give the reader food for thought. Examine the most dangerous enemies and give recommendations on fighting them. If necessary, note the specifics of the game in different modes (AB, RB, SB).'' --> |
| | + | The extremely limited 20 mm ammo supply should be guarded carefully and used only for heavier and larger targets where the destructive power of the HEF shells can make quick work of enemies. Most other fighters of the period will fall quickly enough to the 7.5 mm MAC rounds. |
| | | | |
| − | Scoot and shoot tactics will benefit the MBT-70, as well as terrain masking techniques.
| + | Like most other low-tier fighters, the D.510 is exceptionally agile, able to turn well inside aircraft even a single BR higher. Combined with the powerful 20mm Hispano cannon, the D.510 can be a serious threat to aircraft well above its normal rank. |
| | | | |
| − | Should the MBT-70 have to fight in closer engagement ranges or in close quarters, it is critical to always remember that the armour will not protect the tank reliably; however, the speed, fast rotating turret, and maneuverability will. Provided the player utilise these traits to its advantage, the MBT-70 will be able to control the fight. Recognise when the MBT-70 is being baited into an ambush and avoid them as the MBT-70 doesn't stand a great chance of conducting a counter ambush due to the weak armour, which will allow the MBT-70 to be destroyed easily at close range.
| + | === Manual Engine Control === |
| | + | {| class="wikitable" style="text-align:center" |
| | + | |- |
| | + | ! colspan="7" | MEC elements |
| | + | |- |
| | + | ! rowspan="2" | Mixer |
| | + | ! rowspan="2" | Pitch |
| | + | ! colspan="3" | Radiator |
| | + | ! rowspan="2" | Supercharger |
| | + | ! rowspan="2" | Turbocharger |
| | + | |- |
| | + | ! Oil |
| | + | ! Water |
| | + | ! Type |
| | + | |- |
| | + | | Not controllable || rowspan="2" | Not controllable<br>Not auto controlled || rowspan="2" | Not controllable<br>Not auto controlled || rowspan="2" | Controllable<br>Not auto controlled || rowspan="2" | Combined || rowspan="2" | Not controllable<br>1 gear || rowspan="2" | Not controllable |
| | + | |- |
| | + | |} |
| | | | |
| − | If the MBT-70 finds itself a victim of an ambush from an opponent, launch a smokescreen, escape, and reassess for a counter ambush.
| + | === Modules === |
| − | | |
| − | The MBT-70 benefits greatly from squad play. A skilled lone MBT-70 is most certainly a threat on the battlefield, but two or even three MBT-70's working in conjunction with each other in a squad is an extreme danger to the opposing team as the use of squad tactics in combination with the great strengths of the tank can almost completely control the momentum of the conflict.
| |
| − | | |
| − | ===Modules=== | |
| | {| class="wikitable" | | {| class="wikitable" |
| − | !Tier | + | ! colspan="1" | Tier |
| − | ! colspan="2" |Mobility | + | ! colspan="2" | Flight performance |
| − | !Protection | + | ! colspan="1" | Survivability |
| − | ! colspan="2" |Firepower | + | ! colspan="1" | Weaponry |
| − | !
| |
| | |- | | |- |
| − | |I | + | | I |
| − | |Tracks | + | | Fuselage repair |
| − | | | + | | Radiator |
| − | |Parts
| |
| − | |Horizontal Drive
| |
| − | |XM410E1
| |
| | | | | | |
| | + | | Offensive 7 mm |
| | |- | | |- |
| − | |II | + | | II |
| − | |Suspension
| |
| − | |Brake System
| |
| − | |FPE
| |
| − | |Adjustment of Fire
| |
| − | |XM578E1
| |
| | | | | | |
| | + | | Compressor |
| | + | | Airframe |
| | + | | New 7 mm MGs |
| | |- | | |- |
| − | |III | + | | III |
| − | |Filters | + | | Wings repair |
| − | | | + | | Engine |
| − | |Crew Replenishment
| |
| − | |Elevation Mechanism
| |
| − | |Smoke grenade
| |
| | | | | | |
| | + | | Offensive 20 mm |
| | |- | | |- |
| − | |IV | + | | IV |
| − | |Transmission
| |
| − | |Engine
| |
| | | | | | |
| − | |Artillery Support | + | | Engine injection |
| − | |Laser rangefinder | + | | Cover |
| − | |NVD | + | | New 20 mm cannons |
| | |- | | |- |
| | |} | | |} |
| | | | |
| − | The recommended research order of modules is Parts, FPE, the XM578E1 APFSDS shell, NVD, mobility modifications, and then any remaining modules.
| + | === Pros and cons === |
| | + | <!-- ''Summarise and briefly evaluate the vehicle in terms of its characteristics and combat effectiveness. Mark its pros and cons in the bulleted list. Try not to use more than 6 points for each of the characteristics. Avoid using categorical definitions such as "bad", "good" and the like - use substitutions with softer forms such as "inadequate" and "effective".'' --> |
| | | | |
| − | === Pros and cons ===
| |
| − | <!--''Summarize and briefly evaluate the vehicle in terms of its characteristics and combat effectiveness. Mark its pros and cons in a bulleted list. Try not to use more than 6 points for each of the characteristics. Avoid using categorical definitions such as "bad", "good" and the like - they have a substitution in the form of softer "inadequate", "effective".''-->
| |
| | '''Pros:''' | | '''Pros:''' |
| | | | |
| − | * Composite armour greatly enhances its survivabilty on the battlefield | + | * Strong weaponry |
| − | * Stock ammunition consists of the good MGM 51C "Shillelagh" Guided Missile, means no ammo costs for using it, plus a decent but inferior HEAT shell. | + | * Pretty agile |
| − | * Has access to APFSDS Shells with great close-range penetrating power | + | * Considerably fast for a vehicle in its tier |
| − | * Has a top mounted 20 mm anti-aircraft cannon installed which can also be used to defeat lightly armoured vehicles reliably with its 44 mm of penetration.
| + | * Easy to control |
| − | * Has access to hydropenumatic suspension, useful for hull down engagements. | + | * Excellent for dog fighting |
| − | * Extremely fast in both forwards and reverse. | |
| − | * Fast acceleration.
| |
| − | * Autoloader means a consistent load rate of 7.5 seconds
| |
| | | | |
| | '''Cons:''' | | '''Cons:''' |
| | | | |
| − | * Mediocre reload rate of 7.5 seconds, lower than that of the equal-tiered Kpz-70. | + | * Low ammo count |
| − | * Generally less protection from composite armour, relative to other Rank 6 tanks.
| + | * Weak armour |
| − | * Weak Side armour and LFP | + | * Pretty easy to get shoot down |
| − | * 20 mm AA Gun overheats rather quickly with sustained firing
| |
| − | * Ammo racks are easy targets and are not entirely covered by its composite armour | |
| − | * Vulnerable to the rear due to raised engine deck, it can be solved if hydropneumatic suspension are used.
| |
| − | * Cramped interior, loss of more than one crew member more likely when penetrated.
| |
| | | | |
| | == History == | | == History == |
| − | <!--''Describe the history of the creation and combat usage of the ground vehicle in more detail than in the introduction. If the historical reference turns out to be too big, take it to a separate article, taking a link to an article about the vehicle and adding a block "/ History" (example: <nowiki>https://wiki.warthunder.com/(Vehicle-name)/History</nowiki>) and add a link to it here using the <code>main</code> template. Be sure to reference text and sources by using <code><nowiki><ref></nowiki></code>, as well as adding them at the end of the article.''-->
| + | ''Describe the history of the creation and combat usage of the aircraft in more detail than in the introduction. If the historical reference turns out to be too long, take it to a separate article, taking a link to the article about the vehicle and adding a block "/ History" (example: <nowiki>https://wiki.warthunder.com/(Vehicle-name)/History</nowiki>) and add a link to it here using the <code>main</code> template. Be sure to reference text and sources by using <code><nowiki><ref></ref></nowiki></code>, as well as adding them at the end of the article with <code><nowiki><references /></nowiki></code>. This section may also include the vehicle's dev blog entry (if applicable) and the in-game encyclopedia description (under <code><nowiki>=== In-game description ===</nowiki></code>, also if applicable).'' |
| − | In the early 1960s, West Germany and the United States began work on a joint project to create a standardized new MBT design that would meet specific requirements set by both nations. The cause for this, was the introduction of the powerful Soviet 115mm smoothbore cannon, mounted on the [[T-62]]. The new cannon presented a serious issue for the respective primary fighting vehicles of the two nations - the [[Leopard I|Leopard 1]] and [[M60]]. Thus, work on the joint project, designated MBT-70 in the US and KPz-70 in West Germany, began in 1964. Right from the start, development was plagued by disagreements between the numerous design team members, due to the differing engineering practices of the two sides. By the time the disagreements were settled, the project has already suffered from several delays, which in addition to other things, inflated the project’s budget early on in its development life.
| |
| − | | |
| − | Nevertheless, the result of the combined effort of engineers from both sides was first put to the test in the mid ‘60s, after the first prototypes were manufactured. The KPz-70 MBT received an innovative design like no other tank before it, in addition to being equipped with some of the latest military equipment of the time, such as hydropneumatic suspension, an autoloading system and laser rangefinding, just to name a few.
| |
| − | | |
| − | However, whilst the MBT/KPz-70 did come equipped with some of the most high-tech equipment of its time, the vehicle did also come with its own set of unique problems. Considered to be way ahead of its time, the designers often faced challenges that neither the German or American side of the team was able to effectively address, making the vehicle quickly exceed both weight limitations as well as budget restrictions. Spiraling development costs and design disagreements eventually lead to the Germans backing out of the project in 1969 to continue work on one of their own designs, before the Americans also abandoned the project a couple years later in 1971, leaving a total of 14 prototypes built.
| |
| − | | |
| − | ''- From [https://warthunder.com/en/news/4923-development-kpz-70-mbt-70-a-warrior-of-two-armies-en/ Devblog]''
| |
| | | | |
| | == Media == | | == Media == |
| − | <!--Excellent additions to the article would be video guides, screenshots from the game, and photos.--> | + | <!-- ''Excellent additions to the article would be video guides, screenshots from the game, and photos.'' --> |
| − | | + | <div><ul> |
| − | ;Skins | + | <li style="display: inline-block;"> [[File:First battle d 510.jpg|thumb|none|250px|Pallier's D.510 First Battle graphic.]] </li> |
| − | | + | </ul></div> |
| − | * [https://live.warthunder.com/feed/camouflages/?q=%23mbt70 '''Skins''' and '''camouflages''' for the MBT-70 from live.warthunder.com.]
| |
| − | | |
| − | ;Videos
| |
| − | {{Youtube-gallery|POgsyKommVk|'''T-64A versus MBT-70''' - ''War Thunder Official Channel''}}
| |
| | | | |
| | == See also == | | == See also == |
| − | <!--''Links to the articles on the War Thunder Wiki that you think will be useful for the reader, for example:''
| + | ''Links to the articles on the War Thunder Wiki that you think will be useful for the reader, for example:'' |
| − | * ''reference to the series of the vehicles;''
| |
| − | * ''links to approximate analogues of other nations and research trees.''-->
| |
| | | | |
| − | * [[KPz-70]] - German counterpart of the same vehicle. | + | * ''reference to the series of the aircraft;'' |
| − | * [[XM-803]] - An American "budget" version of the vehicle. | + | * ''links to approximate analogues of other nations and research trees.'' |
| | | | |
| | == External links == | | == External links == |
| − | <!--''Paste links to sources and external resources, such as:''
| + | ''Paste links to sources and external resources, such as:'' |
| | + | |
| | * ''topic on the official game forum;'' | | * ''topic on the official game forum;'' |
| − | * ''encyclopedia page on tank;'' | + | * ''encyclopedia page on the aircraft;'' |
| − | * ''other literature.''--> | + | * ''other literature.'' |
| − | | |
| − | * [https://warthunder.com/en/news/4923-gamescom-kpz-70-mbt-70-a-warrior-of-two-armies-en [Devblog<nowiki>]</nowiki> KPz-70 & MBT-70 - A Warrior of Two Armies]
| |
| | | | |
| − | {{USA medium tanks}} | + | {{AirManufacturer Dewoitine}} |
| − | [[Category:ATGM vehicles]]
| + | {{France fighters}} |
| | + | {{France premium aircraft}} |