Difference between pages "War Thunder Wiki:Buzz" and "BMP-2M"
Inceptor57 (talk | contribs) |
(→Ammunition: added ricochet) (Tag: Visual edit) |
||
| Line 1: | Line 1: | ||
| − | {{ | + | {{Specs-Card|code=ussr_bmp_2m}} |
| − | | | + | {{About |
| − | | | + | | about = squadron Soviet light tank '''{{PAGENAME}}''' |
| − | | | + | | usage = other uses |
| − | | | + | | link = BMP (Disambiguation) |
}} | }} | ||
| − | ---- | + | == Description == |
| − | {{ | + | <!-- ''In the description, the first part should be about the history of the creation and combat usage of the vehicle, as well as its key features. In the second part, tell the reader about the ground vehicle in the game. Insert a screenshot of the vehicle, so that if the novice player does not remember the vehicle by name, he will immediately understand what kind of vehicle the article is talking about.'' --> |
| − | | | + | [[File:GarageImage_{{PAGENAME}}.jpg|420px|thumb|left]] |
| − | | | + | {{Break}} |
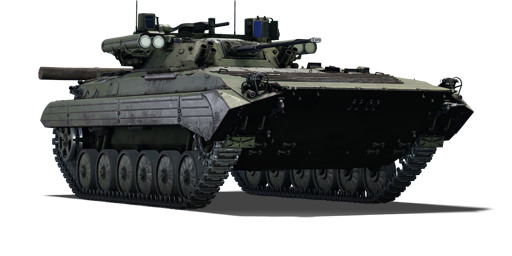
| − | | | + | The '''{{Specs|name}}''' is a squadron rank {{Specs|rank}} Soviet infantry fighting vehicle (light tank) {{Battle-rating}}. It was introduced during [[Update "Starfighters"]]. |
| − | |text = | + | |
| − | } | + | == General info == |
| + | === Survivability and armour === | ||
| + | <!-- ''Describe armour protection. Note the most well protected and key weak areas. Appreciate the layout of modules as well as the number and location of crew members. Is the level of armour protection sufficient, is the placement of modules helpful for survival in combat? If necessary use a visual template to indicate the most secure and weak zones of the armour.'' --> | ||
| + | The vehicle's playstyle is relatively similar to the [[BMP-2]]'s. The fast turret traverse speed, wide field of view, and thermals for the optics combined with a fast-firing 2A42 autocannon and four 9M133 ATGMs makes it an excellent close range combat IFV and good front line scout at open fields. Armour on this vehicle can only protect the crew from 7.62 mm fire at all angles and sometimes 12.7 mm or even 20 mm when being shot from the front. The BMP-2M is prone to hull-break, but sometimes AP rounds such as APFSDS can penetrate the vehicle without significant damage due to its large empty space inside. The hull-break mechanics will mean that even a poorly placed shot may immediately destroy the vehicle. Overall, survivability is poor, and the BMP-2M should use its manoeuvrability to flank opponents and strike before the enemy can locate you and return fire. | ||
| + | |||
| + | === Mobility === | ||
| + | <!-- ''Write about the mobility of the ground vehicle. Estimate the specific power and manoeuvrability, as well as the maximum speed forwards and backwards.'' --> | ||
| + | |||
| + | {{tankMobility|abMinHp=465|rbMinHp=265}} | ||
| + | |||
| + | With 60 extra horsepower, the BMP-2M has excellent mobility compared to the BMP-2. The acceleration of the BMP-2M in off road conditions is excellent, and it is able to keep up with top tier MBTs like the [[T-80U]], [[M1A2 Abrams]] and [[Leopard 2A5]]. The reverse speed however is still 10 kilometers per hour and it still has no neutral steering. Its amphibious capabilities can be useful to cross deep water sections to reach places normally unreachable for other vehicles. | ||
| + | |||
| + | == Armaments == | ||
| + | === Main armament === | ||
| + | <!-- ''Give the reader information about the characteristics of the main gun. Assess its effectiveness in a battle based on the reloading speed, ballistics and the power of shells. Do not forget about the flexibility of the fire, that is how quickly the cannon can be aimed at the target, open fire on it and aim at another enemy. Add a link to the main article on the gun: <code><nowiki>{{main|Name of the weapon}}</nowiki></code>. Describe in general terms the ammunition available for the main gun. Give advice on how to use them and how to fill the ammunition storage.'' --> | ||
| + | {{main|2A42 (30 mm)}} | ||
| + | ''Give the reader information about the characteristics of the main gun. Assess its effectiveness in a battle based on the reloading speed, ballistics and the power of shells. Do not forget about the flexibility of the fire, that is how quickly the cannon can be aimed at the target, open fire on it and aim at another enemy. Add a link to the main article on the gun: <code><nowiki>{{main|Name of the weapon}}</nowiki></code>. Describe in general terms the ammunition available for the main gun. Give advice on how to use them and how to fill the ammunition storage.'' | ||
| + | |||
| + | {| class="wikitable" style="text-align:center" width="100%" | ||
| + | |- | ||
| + | ! colspan="6" | [[2A42 (30 mm)|30 mm 2A42]] || colspan="5" | Turret rotation speed (°/s) || colspan="4" | Reloading rate (seconds) | ||
| + | |- | ||
| + | ! Mode !! Capacity (Belt) !! Fire rate !! Vertical !! Horizontal !! Stabilizer | ||
| + | ! Stock !! Upgraded !! Full !! Expert !! Aced | ||
| + | ! Stock !! Full !! Expert !! Aced | ||
| + | |- | ||
| + | ! ''Arcade'' | ||
| + | | rowspan="2" | 500 (340) || rowspan="2" | 550 || rowspan="2" | -4°/+74° || rowspan="2" | ±180° || rowspan="2" | Two-plane || __.__ || __.__ || __.__ || __.__ || __.__ || rowspan="2" | _.__ || rowspan="2" | _.__ || rowspan="2" | _.__ || rowspan="2" | _.__ | ||
| + | |- | ||
| + | ! ''Realistic'' | ||
| + | | __.__ || __.__ || __.__ || __.__ || __.__ | ||
| + | |- | ||
| + | |} | ||
| + | |||
| + | ==== Ammunition ==== | ||
| + | |||
| + | * '''Default:''' {{Annotation|AP-T|Armour-piercing tracer}}{{-}}{{Annotation|HEF-I|High-explosive fragmentation incendiary}} | ||
| + | * '''30 mm HE:''' {{Annotation|HEF-I|High-explosive fragmentation incendiary}}{{-}}{{Annotation|AP-T|Armour-piercing tracer}}{{-}}{{Annotation|HEF-I|High-explosive fragmentation incendiary}}{{-}}{{Annotation|HEF-T|High-explosive fragmentation tracer}} | ||
| + | * '''30 mm APT:''' {{Annotation|AP-T|Armour-piercing tracer}}{{-}}{{Annotation|AP-T|Armour-piercing tracer}}{{-}}{{Annotation|AP-T|Armour-piercing tracer}}{{-}}{{Annotation|HEF-T|High-explosive fragmentation tracer}} | ||
| + | * '''30 mm APDS:''' {{Annotation|APDS|Armour-piercing discarding sabot}}{{-}}{{Annotation|APDS|Armour-piercing discarding sabot}}{{-}}{{Annotation|APDS|Armour-piercing discarding sabot}}{{-}}{{Annotation|APDS|Armour-piercing discarding sabot}}{{-}}{{Annotation|HEF-T|High-explosive fragmentation tracer}} | ||
| + | |||
| + | {| class="wikitable sortable" style="text-align:center" width="100%" | ||
| + | ! colspan="8" | Penetration statistics | ||
| + | |- | ||
| + | ! rowspan="2" data-sort-type="text" | Belt | ||
| + | ! colspan="6" | '''Penetration @ 0° Angle of Attack (mm)''' | ||
| + | |- | ||
| + | ! 10 m !! 100 m !! 500 m !! 1,000 m !! 1,500 m !! 2,000 m | ||
| + | |- | ||
| + | | Default || 65 || 62 || 50 || 38 || 29 || 22 | ||
| + | |- | ||
| + | | 30 mm HE || 65 || 62 || 50 || 38 || 29 || 22 | ||
| + | |- | ||
| + | | 30 mm APT || 65 || 62 || 50 || 38 || 29 || 22 | ||
| + | |- | ||
| + | | 30 mm APDS || 82 || 81 || 79 || 75 || 72 || 69 | ||
| + | |- | ||
| + | |} | ||
| + | |||
| + | ==== [[Ammo racks]] ==== | ||
| + | <!-- [[File:Ammoracks_{{PAGENAME}}.png|right|thumb|x250px|[[Ammo racks]] of the {{PAGENAME}}]] --> | ||
| + | {| class="wikitable" style="text-align:center" | ||
| + | |- | ||
| + | ! Full<br>ammo | ||
| + | ! 1st<br>rack empty | ||
| + | ! 2nd<br>rack empty | ||
| + | ! 3rd<br>rack empty | ||
| + | ! 4th<br>rack empty | ||
| + | ! 5th<br>rack empty | ||
| + | ! 6th<br>rack empty | ||
| + | ! Visual<br>discrepancy | ||
| + | |- | ||
| + | | '''__''' || __ ''(+__)'' || __ ''(+__)'' || __ ''(+__)'' || __ ''(+__)'' || __ ''(+__)'' || __ ''(+__)'' || __ | ||
| + | |- | ||
| + | |} | ||
| + | |||
| + | === Additional armament === | ||
| + | <!-- ''Some tanks are armed with several guns in one or more turrets. Evaluate the additional weaponry and give advice on its use. Describe the ammunition available for additional weaponry. Give advice on about how to use them and how to fill the ammunition storage. If there is no additional weaponry remove this subsection.'' --> | ||
| + | {{main|9M133}} | ||
| + | |||
| + | {| class="wikitable" style="text-align:center" width="100%" | ||
| + | |- | ||
| + | ! colspan="5" | [[9M133]] missile || colspan="5" | Turret rotation speed (°/s) || colspan="4" | Reloading rate (seconds) | ||
| + | |- | ||
| + | ! Mode !! Capacity (Belt) !! Vertical !! Horizontal !! Stabilizer | ||
| + | ! Stock !! Upgraded !! Full !! Expert !! Aced | ||
| + | ! Stock !! Full !! Expert !! Aced | ||
| + | |- | ||
| + | ! ''Arcade'' | ||
| + | | rowspan="2" | 8 (4) || rowspan="2" | -5°/+10° || rowspan="2" | N/A || rowspan="2" | N/A || __.__ || __.__ || __.__ || __.__ || __.__ || rowspan="2" | _.__ || rowspan="2" | _.__ || rowspan="2" | _.__ || rowspan="2" | _.__ | ||
| + | |- | ||
| + | ! ''Realistic'' | ||
| + | | __.__ || __.__ || __.__ || __.__ || __.__ | ||
| + | |- | ||
| + | |} | ||
| + | |||
| + | ==== Ammunition ==== | ||
| + | {| class="wikitable sortable" style="text-align:center" width="100%" | ||
| + | ! colspan="8" | Penetration statistics | ||
| + | |- | ||
| + | ! rowspan="2" data-sort-type="text" | Ammunition | ||
| + | ! rowspan="2" | Type of<br>warhead | ||
| + | ! colspan="6" | '''Penetration @ 0° Angle of Attack (mm)''' | ||
| + | |- | ||
| + | ! 10 m !! 100 m !! 500 m !! 1,000 m !! 1,500 m !! 2,000 m | ||
| + | |- | ||
| + | | 9M133 || ATGM (tandem) || 1,200 || 1,200 || 1,200 || 1,200 || 1,200 || 1,200 | ||
| + | |- | ||
| + | | 9M133FM-3 || ATGM-HE || 61 || 61 || 61 || 61 || 61 || 61 | ||
| + | |- | ||
| + | |} | ||
| + | {| class="wikitable sortable" style="text-align:center" width="100%" | ||
| + | ! colspan="10" | Shell details | ||
| + | |- | ||
| + | ! rowspan="2" data-sort-type="text" | Ammunition | ||
| + | ! rowspan="2" | Type of<br>warhead | ||
| + | ! rowspan="2" | Velocity<br>(m/s) | ||
| + | ! rowspan="2" | Projectile<br>Mass (kg) | ||
| + | ! rowspan="2" | Fuse delay<br>(m) | ||
| + | ! rowspan="2" | Fuse sensitivity<br>(mm) | ||
| + | ! rowspan="2" | Explosive Mass<br>(TNT equivalent) (g) | ||
| + | ! colspan="3" | Ricochet | ||
| + | |- | ||
| + | ! 0% !! 50% !! 100% | ||
| + | |- | ||
| + | | 9M133 || ATGM (tandem) || 300 || 26.00 || 0.2 || 0.01 || 6,160 || 80° || 82° || 90° | ||
| + | |- | ||
| + | | 9M133FM-3 || ATGM-HE || 300 || 26.00 || 0.2 || 0.01 || 9,240 || 79° || 80° || 81° | ||
| + | |- | ||
| + | |} | ||
| + | |||
| + | ==== [[Ammo racks]] ==== | ||
| + | <!-- [[File:Ammoracks_{{PAGENAME}}.png|right|thumb|x250px|[[Ammo racks]] of the {{PAGENAME}}]] --> | ||
| + | {| class="wikitable" style="text-align:center" | ||
| + | |- | ||
| + | ! Full<br>ammo | ||
| + | ! 1st<br>rack empty | ||
| + | ! 2nd<br>rack empty | ||
| + | ! 3rd<br>rack empty | ||
| + | ! 4th<br>rack empty | ||
| + | ! 5th<br>rack empty | ||
| + | ! 6th<br>rack empty | ||
| + | ! Visual<br>discrepancy | ||
| + | |- | ||
| + | | '''__''' || __ ''(+__)'' || __ ''(+__)'' || __ ''(+__)'' || __ ''(+__)'' || __ ''(+__)'' || __ ''(+__)'' || __ | ||
| + | |- | ||
| + | |} | ||
| + | |||
| + | === Additional armament === | ||
| + | <!-- ''Some tanks are armed with several guns in one or more turrets. Evaluate the additional weaponry and give advice on its use. Describe the ammunition available for additional weaponry. Give advice on about how to use them and how to fill the ammunition storage. If there is no additional weaponry remove this subsection.'' --> | ||
| + | {{main|AG-30 (30 mm)}} | ||
| + | |||
| + | {| class="wikitable" style="text-align:center" width="100%" | ||
| + | |- | ||
| + | ! colspan="6" | [[AG-30 (30 mm)|30 mm AG-30]] || colspan="5" | Turret rotation speed (°/s) || colspan="4" | Reloading rate (seconds) | ||
| + | |- | ||
| + | ! Mode !! Capacity (Belt) !! Fire rate !! Vertical !! Horizontal !! Stabilizer | ||
| + | ! Stock !! Upgraded !! Full !! Expert !! Aced | ||
| + | ! Stock !! Full !! Expert !! Aced | ||
| + | |- | ||
| + | ! ''Arcade'' | ||
| + | | rowspan="2" | 300 (300) || rowspan="2" | 400 || rowspan="2" | N/A || rowspan="2" | N/A || rowspan="2" | N/A || __.__ || __.__ || __.__ || __.__ || __.__ || rowspan="2" | _.__ || rowspan="2" | _.__ || rowspan="2" | _.__ || rowspan="2" | _.__ | ||
| + | |- | ||
| + | ! ''Realistic'' | ||
| + | | __.__ || __.__ || __.__ || __.__ || __.__ | ||
| + | |- | ||
| + | |} | ||
| + | |||
| + | ==== Ammunition ==== | ||
| + | {| class="wikitable" style="text-align:center" width="100%" | ||
| + | ! colspan="8" | Penetration statistics | ||
| + | |- | ||
| + | ! rowspan="2" data-sort-type="text" | Ammunition | ||
| + | ! rowspan="2" | Type of<br>warhead | ||
| + | ! colspan="6" | '''Penetration @ 0° Angle of Attack (mm)''' | ||
| + | |- | ||
| + | ! 10 m !! 100 m !! 500 m !! 1,000 m !! 1,500 m !! 2,000 m | ||
| + | |- | ||
| + | | VOG-30 || VOG || 6 || 6 || 6 || 6 || 6 || 6 | ||
| + | |- | ||
| + | |} | ||
| + | {| class="wikitable" style="text-align:center" width="100%" | ||
| + | ! colspan="10" | Shell details | ||
| + | |- | ||
| + | ! rowspan="2" data-sort-type="text" | Ammunition | ||
| + | ! rowspan="2" | Type of<br>warhead | ||
| + | ! rowspan="2" | Velocity<br>(m/s) | ||
| + | ! rowspan="2" | Projectile<br>Mass (kg) | ||
| + | ! rowspan="2" | Fuse delay<br>(m) | ||
| + | ! rowspan="2" | Fuse sensitivity<br>(mm) | ||
| + | ! rowspan="2" | Explosive Mass<br>(TNT equivalent) (g) | ||
| + | ! colspan="3" | Ricochet | ||
| + | |- | ||
| + | ! 0% !! 50% !! 100% | ||
| + | |- | ||
| + | | VOG-30 || 185 || 0.35 || N/A || 0.1 || 284.9 || 79° || 79° || 80° | ||
| + | |81° | ||
| + | |- | ||
| + | |} | ||
| + | |||
| + | ==== [[Ammo racks]] ==== | ||
| + | <!-- [[File:Ammoracks_{{PAGENAME}}.png|right|thumb|x250px|[[Ammo racks]] of the {{PAGENAME}}]] --> | ||
| + | {| class="wikitable" style="text-align:center" | ||
| + | |- | ||
| + | ! Full<br>ammo | ||
| + | ! 1st<br>rack empty | ||
| + | ! 2nd<br>rack empty | ||
| + | ! 3rd<br>rack empty | ||
| + | ! 4th<br>rack empty | ||
| + | ! 5th<br>rack empty | ||
| + | ! 6th<br>rack empty | ||
| + | ! Visual<br>discrepancy | ||
| + | |- | ||
| + | | '''1''' || __ ''(+__)'' || __ ''(+__)'' || __ ''(+__)'' || __ ''(+__)'' || __ ''(+__)'' || __ ''(+__)'' || __ | ||
| + | |- | ||
| + | |} | ||
| + | |||
| + | === Machine guns === | ||
| + | <!-- ''Offensive and anti-aircraft machine guns not only allow you to fight some aircraft but also are effective against lightly armoured vehicles. Evaluate machine guns and give recommendations on its use.'' --> | ||
| + | {{main|PKT (7.62 mm)}} | ||
| + | |||
| + | {| class="wikitable" style="text-align:center" width="50%" | ||
| + | |- | ||
| + | ! colspan="5" | [[PKT (7.62 mm)|7.62 mm PKT]] | ||
| + | |- | ||
| + | ! Mount !! Capacity (Belt) !! Fire rate !! Vertical !! Horizontal | ||
| + | |- | ||
| + | | Coaxial || 2,000 (250) || 700 || N/A || N/A | ||
| + | |- | ||
| + | |} | ||
| + | |||
| + | == Usage in battles == | ||
| + | <!-- ''Describe the tactics of playing in the vehicle, the features of using vehicles in the team and advice on tactics. Refrain from creating a "guide" - do not impose a single point of view but instead give the reader food for thought. Describe the most dangerous enemies and give recommendations on fighting them. If necessary, note the specifics of the game in different modes (AB, RB, SB).'' --> | ||
| + | During the stock grind, the vehicle is best played as a scout/SPAA platform, as the stock ammo with the exception of the ATGMs is poor. Once it is spaded, the vehicle is basically a complete lineup in itself, as it can play the part of a light tank, with excellent manoeuvrability, the ability to scout and repair, and the fast-firing autocannon to flank and destroy light to medium armoured targets, and mark the heavily armoured targets for allies or eliminate them with ATGMs. If played cautiously, it can also be played as a true IFV, supporting MBTs in CQB. However, when playing like this, it is a SUPPORT vehicle, and should not engage in frontal brawls with MBTs, as it will quickly be destroyed. It can be played at long range, using its scouting ability and ATGMs to know out targets at long range. Once the laser rangefinder is unlocked, one can use APDS rounds at range as it can easily pen the side and roofs of most enemies it will face, and the high volume of rounds will quickly disable if not destroy the target. This vehicle can also be played as an SPAA, with its fast firing 30 mm autocannon and proximity fuse ATGMs. | ||
| + | |||
| + | === Modules === | ||
| + | {| class="wikitable" | ||
| + | ! Tier | ||
| + | ! colspan="2" | Mobility | ||
| + | ! colspan="2" | Protection | ||
| + | ! colspan="2" | Firepower | ||
| + | |- | ||
| + | | I | ||
| + | | Tracks | ||
| + | | | ||
| + | | Parts | ||
| + | | Airstrike | ||
| + | | Horizontal Drive | ||
| + | | 30 mm APT | ||
| + | |- | ||
| + | | II | ||
| + | | Suspension | ||
| + | | Brake System | ||
| + | | FPE | ||
| + | | NVD | ||
| + | | Adjustment of Fire | ||
| + | | 9M133FM-3 | ||
| + | |- | ||
| + | | III | ||
| + | | Filters | ||
| + | | | ||
| + | | Laser rangefinder | ||
| + | | Crew Replenishment | ||
| + | | Elevation Mechanism | ||
| + | | 30 mm APDS | ||
| + | |- | ||
| + | | IV | ||
| + | | Transmission | ||
| + | | Engine | ||
| + | | ESS | ||
| + | | Smoke grenade | ||
| + | | Artillery Support | ||
| + | | Improved optics | ||
| + | |- | ||
| + | |} | ||
| + | |||
| + | === Pros and cons === | ||
| + | <!-- ''Summarise and briefly evaluate the vehicle in terms of its characteristics and combat effectiveness. Mark its pros and cons in a bulleted list. Try not to use more than 6 points for each of the characteristics. Avoid using categorical definitions such as "bad", "good" and the like - use substitutions with softer forms such as "inadequate" and "effective".'' --> | ||
| + | |||
| + | '''Pros:''' | ||
| − | ---- | + | * 2A42 autocannon can punch through any vehicle at its battle rating from the back, side and sometimes front |
| − | + | * Fast turret traverse speed, 35, 42, and 60 degrees per second at stock and full modifications respectively | |
| − | + | * High-resolution thermal optics, wide field of view and 2.5 to 12 times zoom for gun sight, suitable for combat at any range | |
| − | + | * 1,200 mm penetration power for the standard 9M133 missile, highest in the game; can fire and guide all four missiles simultaneously while on the move | |
| − | + | * Can equip 9M133FM-3 HE missile with proximity fuses, useful for SPAA purposes | |
| − | + | * Amphibious ability can be useful for crossing the water to areas hard-to-reach for other vehicles | |
| + | * Very cheap repair cost means easy Silver Lions profit from combat | ||
| + | * Roof-mounted grenade launcher can clear obstacles that typically machine guns can not | ||
| + | * Relatively easy stock grind | ||
| + | * Can be played as a light tank, long range tank, CQB support vehicle, or SPAA | ||
| − | + | '''Cons:''' | |
| − | |||
| − | |||
| − | |||
| − | |||
| − | |||
| − | |||
| − | |||
| − | |||
| − | |||
| − | |||
| − | |||
| − | |||
| − | |||
| − | |||
| − | |||
| − | |||
| − | |||
| − | |||
| − | |||
| − | |||
| − | |||
| − | |||
| − | |||
| − | |||
| − | |||
| − | |||
| − | |||
| − | |||
| − | |||
| − | |||
| − | |||
| − | |||
| − | |||
| − | |||
| − | |||
| − | + | * Missiles mounted on the turret has a chance to explode from shrapnel if too close to any form of explosion | |
| − | + | * Chassis can only protect the crew from 7.62 mm and with limited 12.7 mm or bigger calibre ammunition protection from the front | |
| − | + | * No neutral steering, the slow reverse speed maxes out at 10 kilometres per hour | |
| − | + | * While driving, thermal optics vision to the left of the chassis at 30 to 50 degrees are obscured from the engine exhaust gas | |
| − | + | * Grenade launcher has only 6 mm of pen, is useful for obstacles and clearing ERA at close range, but otherwise useless | |
| − | |||
| − | |||
| − | |||
| − | + | == History == | |
| + | <!-- ''Describe the history of the creation and combat usage of the vehicle in more detail than in the introduction. If the historical reference turns out to be too long, take it to a separate article, taking a link to the article about the vehicle and adding a block "/History" (example: <nowiki>https://wiki.warthunder.com/(Vehicle-name)/History</nowiki>) and add a link to it here using the <code>main</code> template. Be sure to reference text and sources by using <code><nowiki><ref></ref></nowiki></code>, as well as adding them at the end of the article with <code><nowiki><references /></nowiki></code>. This section may also include the vehicle's dev blog entry (if applicable) and the in-game encyclopedia description (under <code><nowiki>=== In-game description ===</nowiki></code>, also if applicable).'' --> | ||
| + | ''Describe the history of the creation and combat usage of the vehicle in more detail than in the introduction. If the historical reference turns out to be too long, take it to a separate article, taking a link to the article about the vehicle and adding a block "/History" (example: <nowiki>https://wiki.warthunder.com/(Vehicle-name)/History</nowiki>) and add a link to it here using the <code>main</code> template. Be sure to reference text and sources by using <code><nowiki><ref></ref></nowiki></code>, as well as adding them at the end of the article with <code><nowiki><references /></nowiki></code>. This section may also include the vehicle's dev blog entry (if applicable) and the in-game encyclopedia description (under <code><nowiki>=== In-game description ===</nowiki></code>, also if applicable).'' | ||
| − | + | == Media == | |
| − | + | <!-- ''Excellent additions to the article would be video guides, screenshots from the game, and photos.'' --> | |
| − | + | ''Excellent additions to the article would be video guides, screenshots from the game, and photos.'' | |
| − | |||
| − | |||
| − | |||
| − | |||
| − | |||
| − | + | == See also == | |
| − | + | <!-- ''Links to the articles on the War Thunder Wiki that you think will be useful for the reader, for example:'' | |
| − | + | * ''reference to the series of the vehicles;'' | |
| − | + | * ''links to approximate analogues of other nations and research trees.'' --> | |
| − | + | ''Links to the articles on the War Thunder Wiki that you think will be useful for the reader, for example:'' | |
| − | |||
| − | |||
| − | |||
| − | + | * ''reference to the series of the vehicles;'' | |
| − | + | * ''links to approximate analogues of other nations and research trees.'' | |
| − | |||
| − | |||
| − | |||
| − | |||
| − | |||
| − | |||
| − | + | == External links == | |
| + | <!-- ''Paste links to sources and external resources, such as:'' | ||
| + | * ''topic on the official game forum;'' | ||
| + | * ''encyclopedia page on the tank;'' | ||
| + | * ''other literature.'' --> | ||
| − | + | * [[wt:en/news/6758-development-squadron-vehicles-bmp-2m-berezhok-en|[Devblog] Squadron vehicles: BMP-2M "Berezhok"]] | |
| − | |||
| − | ---- | ||
| − | |||
| − | |||
| − | |||
| − | |||
| − | |||
| − | |||
| − | + | {{USSR light tanks}} | |
| + | {{USSR squadron ground vehicles}} | ||
Revision as of 17:19, 9 August 2020
Contents
| This page is about the squadron Soviet light tank BMP-2M. For other uses, see BMP (Disambiguation). |
Description

The BMP-2M is a squadron rank VII Soviet infantry fighting vehicle (light tank)
with a battle rating of 10.0 (AB/RB/SB). It was introduced during Update "Starfighters".
General info
Survivability and armour
The vehicle's playstyle is relatively similar to the BMP-2's. The fast turret traverse speed, wide field of view, and thermals for the optics combined with a fast-firing 2A42 autocannon and four 9M133 ATGMs makes it an excellent close range combat IFV and good front line scout at open fields. Armour on this vehicle can only protect the crew from 7.62 mm fire at all angles and sometimes 12.7 mm or even 20 mm when being shot from the front. The BMP-2M is prone to hull-break, but sometimes AP rounds such as APFSDS can penetrate the vehicle without significant damage due to its large empty space inside. The hull-break mechanics will mean that even a poorly placed shot may immediately destroy the vehicle. Overall, survivability is poor, and the BMP-2M should use its manoeuvrability to flank opponents and strike before the enemy can locate you and return fire.
Mobility
| Game Mode | Max Speed (km/h) | Weight (tons) | Engine power (horsepower) | Power-to-weight ratio (hp/ton) | |||
|---|---|---|---|---|---|---|---|
| Forward | Reverse | Stock | Upgraded | Stock | Upgraded | ||
| Arcade | 72 | 12 | 14.5 | 465 | 687 | 32.07 | 47.38 |
| Realistic | 65 | 11 | 265 | 360 | 18.28 | 24.83 | |
With 60 extra horsepower, the BMP-2M has excellent mobility compared to the BMP-2. The acceleration of the BMP-2M in off road conditions is excellent, and it is able to keep up with top tier MBTs like the T-80U, M1A2 Abrams and Leopard 2A5. The reverse speed however is still 10 kilometers per hour and it still has no neutral steering. Its amphibious capabilities can be useful to cross deep water sections to reach places normally unreachable for other vehicles.
Armaments
Main armament
Give the reader information about the characteristics of the main gun. Assess its effectiveness in a battle based on the reloading speed, ballistics and the power of shells. Do not forget about the flexibility of the fire, that is how quickly the cannon can be aimed at the target, open fire on it and aim at another enemy. Add a link to the main article on the gun: {{main|Name of the weapon}}. Describe in general terms the ammunition available for the main gun. Give advice on how to use them and how to fill the ammunition storage.
| 30 mm 2A42 | Turret rotation speed (°/s) | Reloading rate (seconds) | ||||||||||||
|---|---|---|---|---|---|---|---|---|---|---|---|---|---|---|
| Mode | Capacity (Belt) | Fire rate | Vertical | Horizontal | Stabilizer | Stock | Upgraded | Full | Expert | Aced | Stock | Full | Expert | Aced |
| Arcade | 500 (340) | 550 | -4°/+74° | ±180° | Two-plane | __.__ | __.__ | __.__ | __.__ | __.__ | _.__ | _.__ | _.__ | _.__ |
| Realistic | __.__ | __.__ | __.__ | __.__ | __.__ | |||||||||
Ammunition
- Default: AP-T · HEF-I
- 30 mm HE: HEF-I · AP-T · HEF-I · HEF-T
- 30 mm APT: AP-T · AP-T · AP-T · HEF-T
- 30 mm APDS: APDS · APDS · APDS · APDS · HEF-T
| Penetration statistics | |||||||
|---|---|---|---|---|---|---|---|
| Belt | Penetration @ 0° Angle of Attack (mm) | ||||||
| 10 m | 100 m | 500 m | 1,000 m | 1,500 m | 2,000 m | ||
| Default | 65 | 62 | 50 | 38 | 29 | 22 | |
| 30 mm HE | 65 | 62 | 50 | 38 | 29 | 22 | |
| 30 mm APT | 65 | 62 | 50 | 38 | 29 | 22 | |
| 30 mm APDS | 82 | 81 | 79 | 75 | 72 | 69 | |
Ammo racks
| Full ammo |
1st rack empty |
2nd rack empty |
3rd rack empty |
4th rack empty |
5th rack empty |
6th rack empty |
Visual discrepancy |
|---|---|---|---|---|---|---|---|
| __ | __ (+__) | __ (+__) | __ (+__) | __ (+__) | __ (+__) | __ (+__) | __ |
Additional armament
| 9M133 missile | Turret rotation speed (°/s) | Reloading rate (seconds) | |||||||||||
|---|---|---|---|---|---|---|---|---|---|---|---|---|---|
| Mode | Capacity (Belt) | Vertical | Horizontal | Stabilizer | Stock | Upgraded | Full | Expert | Aced | Stock | Full | Expert | Aced |
| Arcade | 8 (4) | -5°/+10° | N/A | N/A | __.__ | __.__ | __.__ | __.__ | __.__ | _.__ | _.__ | _.__ | _.__ |
| Realistic | __.__ | __.__ | __.__ | __.__ | __.__ | ||||||||
Ammunition
| Penetration statistics | |||||||
|---|---|---|---|---|---|---|---|
| Ammunition | Type of warhead |
Penetration @ 0° Angle of Attack (mm) | |||||
| 10 m | 100 m | 500 m | 1,000 m | 1,500 m | 2,000 m | ||
| 9M133 | ATGM (tandem) | 1,200 | 1,200 | 1,200 | 1,200 | 1,200 | 1,200 |
| 9M133FM-3 | ATGM-HE | 61 | 61 | 61 | 61 | 61 | 61 |
| Shell details | |||||||||
|---|---|---|---|---|---|---|---|---|---|
| Ammunition | Type of warhead |
Velocity (m/s) |
Projectile Mass (kg) |
Fuse delay (m) |
Fuse sensitivity (mm) |
Explosive Mass (TNT equivalent) (g) |
Ricochet | ||
| 0% | 50% | 100% | |||||||
| 9M133 | ATGM (tandem) | 300 | 26.00 | 0.2 | 0.01 | 6,160 | 80° | 82° | 90° |
| 9M133FM-3 | ATGM-HE | 300 | 26.00 | 0.2 | 0.01 | 9,240 | 79° | 80° | 81° |
Ammo racks
| Full ammo |
1st rack empty |
2nd rack empty |
3rd rack empty |
4th rack empty |
5th rack empty |
6th rack empty |
Visual discrepancy |
|---|---|---|---|---|---|---|---|
| __ | __ (+__) | __ (+__) | __ (+__) | __ (+__) | __ (+__) | __ (+__) | __ |
Additional armament
| 30 mm AG-30 | Turret rotation speed (°/s) | Reloading rate (seconds) | ||||||||||||
|---|---|---|---|---|---|---|---|---|---|---|---|---|---|---|
| Mode | Capacity (Belt) | Fire rate | Vertical | Horizontal | Stabilizer | Stock | Upgraded | Full | Expert | Aced | Stock | Full | Expert | Aced |
| Arcade | 300 (300) | 400 | N/A | N/A | N/A | __.__ | __.__ | __.__ | __.__ | __.__ | _.__ | _.__ | _.__ | _.__ |
| Realistic | __.__ | __.__ | __.__ | __.__ | __.__ | |||||||||
Ammunition
| Penetration statistics | |||||||
|---|---|---|---|---|---|---|---|
| Ammunition | Type of warhead |
Penetration @ 0° Angle of Attack (mm) | |||||
| 10 m | 100 m | 500 m | 1,000 m | 1,500 m | 2,000 m | ||
| VOG-30 | VOG | 6 | 6 | 6 | 6 | 6 | 6 |
| Shell details | |||||||||
|---|---|---|---|---|---|---|---|---|---|
| Ammunition | Type of warhead |
Velocity (m/s) |
Projectile Mass (kg) |
Fuse delay (m) |
Fuse sensitivity (mm) |
Explosive Mass (TNT equivalent) (g) |
Ricochet | ||
| 0% | 50% | 100% | |||||||
| VOG-30 | 185 | 0.35 | N/A | 0.1 | 284.9 | 79° | 79° | 80° | 81° |
Ammo racks
| Full ammo |
1st rack empty |
2nd rack empty |
3rd rack empty |
4th rack empty |
5th rack empty |
6th rack empty |
Visual discrepancy |
|---|---|---|---|---|---|---|---|
| 1 | __ (+__) | __ (+__) | __ (+__) | __ (+__) | __ (+__) | __ (+__) | __ |
Machine guns
| 7.62 mm PKT | ||||
|---|---|---|---|---|
| Mount | Capacity (Belt) | Fire rate | Vertical | Horizontal |
| Coaxial | 2,000 (250) | 700 | N/A | N/A |
Usage in battles
During the stock grind, the vehicle is best played as a scout/SPAA platform, as the stock ammo with the exception of the ATGMs is poor. Once it is spaded, the vehicle is basically a complete lineup in itself, as it can play the part of a light tank, with excellent manoeuvrability, the ability to scout and repair, and the fast-firing autocannon to flank and destroy light to medium armoured targets, and mark the heavily armoured targets for allies or eliminate them with ATGMs. If played cautiously, it can also be played as a true IFV, supporting MBTs in CQB. However, when playing like this, it is a SUPPORT vehicle, and should not engage in frontal brawls with MBTs, as it will quickly be destroyed. It can be played at long range, using its scouting ability and ATGMs to know out targets at long range. Once the laser rangefinder is unlocked, one can use APDS rounds at range as it can easily pen the side and roofs of most enemies it will face, and the high volume of rounds will quickly disable if not destroy the target. This vehicle can also be played as an SPAA, with its fast firing 30 mm autocannon and proximity fuse ATGMs.
Modules
| Tier | Mobility | Protection | Firepower | |||
|---|---|---|---|---|---|---|
| I | Tracks | Parts | Airstrike | Horizontal Drive | 30 mm APT | |
| II | Suspension | Brake System | FPE | NVD | Adjustment of Fire | 9M133FM-3 |
| III | Filters | Laser rangefinder | Crew Replenishment | Elevation Mechanism | 30 mm APDS | |
| IV | Transmission | Engine | ESS | Smoke grenade | Artillery Support | Improved optics |
Pros and cons
Pros:
- 2A42 autocannon can punch through any vehicle at its battle rating from the back, side and sometimes front
- Fast turret traverse speed, 35, 42, and 60 degrees per second at stock and full modifications respectively
- High-resolution thermal optics, wide field of view and 2.5 to 12 times zoom for gun sight, suitable for combat at any range
- 1,200 mm penetration power for the standard 9M133 missile, highest in the game; can fire and guide all four missiles simultaneously while on the move
- Can equip 9M133FM-3 HE missile with proximity fuses, useful for SPAA purposes
- Amphibious ability can be useful for crossing the water to areas hard-to-reach for other vehicles
- Very cheap repair cost means easy Silver Lions profit from combat
- Roof-mounted grenade launcher can clear obstacles that typically machine guns can not
- Relatively easy stock grind
- Can be played as a light tank, long range tank, CQB support vehicle, or SPAA
Cons:
- Missiles mounted on the turret has a chance to explode from shrapnel if too close to any form of explosion
- Chassis can only protect the crew from 7.62 mm and with limited 12.7 mm or bigger calibre ammunition protection from the front
- No neutral steering, the slow reverse speed maxes out at 10 kilometres per hour
- While driving, thermal optics vision to the left of the chassis at 30 to 50 degrees are obscured from the engine exhaust gas
- Grenade launcher has only 6 mm of pen, is useful for obstacles and clearing ERA at close range, but otherwise useless
History
Describe the history of the creation and combat usage of the vehicle in more detail than in the introduction. If the historical reference turns out to be too long, take it to a separate article, taking a link to the article about the vehicle and adding a block "/History" (example: https://wiki.warthunder.com/(Vehicle-name)/History) and add a link to it here using the main template. Be sure to reference text and sources by using <ref></ref>, as well as adding them at the end of the article with <references />. This section may also include the vehicle's dev blog entry (if applicable) and the in-game encyclopedia description (under === In-game description ===, also if applicable).
Media
Excellent additions to the article would be video guides, screenshots from the game, and photos.
See also
Links to the articles on the War Thunder Wiki that you think will be useful for the reader, for example:
- reference to the series of the vehicles;
- links to approximate analogues of other nations and research trees.
External links
| USSR light tanks | |
|---|---|
| T-26 | T-26 · T-26 (1st Gv.T.Br.) · T-26-4 · T-26E |
| BT | BT-5 · RBT-5 · BT-7 · BT-7 TD · BT-7M · BT-7A (F-32) |
| T-50 | T-126 · T-50 |
| T-70 | T-70 · T-80 |
| PT-76 | PT-76B · PT-76-57 · Object 906 |
| BMP | BMP-1 · BMP-2 · BMP-2M · BMP-3 |
| BMD | BMD-4 |
| 2S25 | 2S25 · 2S25M |
| Wheeled | BA-11 · BTR-80A |
| Other | T-60 · Object 685 · 2S38 |
| China | ▂Type 62 |
| USSR squadron ground vehicles | |
|---|---|
