Difference between pages "How to add Ammo Rack information to vehicle pages" and "CM11"
Inceptor57 (talk | contribs) (Page WIP) |
(Updated) |
||
| Line 1: | Line 1: | ||
| − | {{ | + | {{Specs-Card|code=cn_cm11}} |
| + | {{About | ||
| + | | about = Chinese main battle tank '''{{PAGENAME}}''' | ||
| + | | and | ||
| + | | usage = other vehicles of the family | ||
| + | | link-1 = M48 Patton (Family) | ||
| + | | link-2 = M60 (Family) | ||
| + | }} | ||
| − | == | + | == Description == |
| − | + | <!-- ''In the description, the first part should be about the history of the creation and combat usage of the vehicle, as well as its key features. In the second part, tell the reader about the ground vehicle in the game. Insert a screenshot of the vehicle, so that if the novice player does not remember the vehicle by name, he will immediately understand what kind of vehicle the article is talking about.'' --> | |
| + | [[File:GarageImage_{{PAGENAME}}.jpg|420px|thumb|left]] | ||
| + | {{Break}} | ||
| + | The '''{{Specs|name}}''' is a rank {{Specs|rank}} Chinese medium tank {{Battle-rating}}. It was introduced in [[Update 1.91 "Night Vision"]]. | ||
| − | + | A Taiwanese upgrade to the [[M60A3 TTS (China)|M60A3]], the CM11 "Brave Tiger" is currently the most modern tank in active service with Republic of China Army. It retains the general appearance of the M60 aside from the smaller turret and the unique pagoda-like ERA arrays on the turret sides. Though its mobility and kinetic protection are poor, it has the same 105 mm gun as the [[M1 Abrams]]. If used carefully, the CM11 can do some serious damage with its thermal sight and powerful DM63 APFSDS. | |
| − | |||
| − | === | + | == General info == |
| − | + | === Survivability and armour === | |
| − | + | <!-- ''Describe armour protection. Note the most well protected and key weak areas. Appreciate the layout of modules as well as the number and location of crew members. Is the level of armour protection sufficient, is the placement of modules helpful for survival in combat? If necessary use a visual template to indicate the most secure and weak zones of the armour.'' --> | |
| − | + | The CM11 combines the hull of a M60 Patton with the turret of a M48 Patton, and as such the base turret and hull armour is mostly identical to these two tanks, respectively. The M48's bulbous cupola has been replaced with a low-profile version. The armour is quite resistant to APHE rounds, which may be fired by the occasional [[Object 906]], [[Object 685]], and [[T-55AM-1]], but the vast majority of opponents at its rank use HEAT-FS and APFSDS rounds that can cut through steel like butter. To counter the former, the CM11 is slathered with ERA, and can generally survive the first shot from most HEAT-FS rounds. However the ERA offers close to no protection against APFSDS rounds, which are the round of choice in top rank battles. | |
| − | |||
| − | |||
| − | |||
| − | + | Post-penetration survivability is also questionable. It lacks blowout racks and ammunition is scattered around the tank, so successful penetrations can reduce the CM11 to a fiery grave. | |
| + | '''Armour type:''' | ||
| − | + | * Cast homogeneous armour | |
| − | + | * Rolled homogeneous armour (Rear roof, Engine grille) | |
| − | * | ||
| − | |||
| − | * | ||
| − | + | {| class="wikitable" | |
| − | + | |- | |
| − | + | ! Armour !! Front !! Sides !! Rear !! Roof | |
| − | + | |- | |
| − | + | | Hull || 108 mm (66°) ''Front Glacis'' <br> 137 mm (54°) ''Lower Glacis''|| 36 - 70 mm || 25 mm (1°) ''Engine Grille'' <br> 40 mm (31°) ''Top'' <br> 28 mm (61°) ''Bottom'' || 36 mm ''Front'' <br> 20 mm ''Engine deck'' | |
| + | |- | ||
| + | | Turret || 127 mm (12-76°) ''Turret front'' <br> 152 + 82 mm (17-26°) ''Gun mantlet'' || 69-100 mm (12-36°) || 51-55 mm (2-71°) || 25-69 mm | ||
| + | |- | ||
| + | ! Armour !! Front !! Sides !! Rear !! Roof | ||
| + | |- | ||
| + | | Cupola || 70 mm || 70 mm || 70 mm || 70 mm | ||
| + | |} | ||
| + | '''Notes:''' | ||
| − | * | + | * Tracks are 30 mm thick while suspension wheels are 20 mm thick. |
| + | * Belly armour is 19 mm in the front, 13 mm in the rear. | ||
| + | * 15 mm RHA plate between the engine and crew compartment. | ||
| − | + | === Mobility === | |
| − | + | <!-- ''Write about the mobility of the ground vehicle. Estimate the specific power and manoeuvrability, as well as the maximum speed forwards and backwards.'' --> | |
| − | |||
| − | |||
| − | |||
| + | {{tankMobility|abMinHp=1,162|rbMinHp=663}} | ||
| − | + | The {{PAGENAME}}'s mobility is awful compared to its contemporaries. It weighs practically the same as the [[M1 Abrams]] while having less than half of the engine power. It is very slightly more mobile than the [[Chieftain Mk 10]], but that is a very low bar, and unlike the Chieftain it does not have strong armour to make up for it. Expect to be among the last to arrive on the battlefield. | |
| − | + | == Armaments == | |
| − | + | === Main armament === | |
| + | <!-- ''Give the reader information about the characteristics of the main gun. Assess its effectiveness in a battle based on the reloading speed, ballistics and the power of shells. Do not forget about the flexibility of the fire, that is how quickly the cannon can be aimed at the target, open fire on it and aim at another enemy. Add a link to the main article on the gun: <code><nowiki>{{main|Name of the weapon}}</nowiki></code>. Describe in general terms the ammunition available for the main gun. Give advice on how to use them and how to fill the ammunition storage.'' --> | ||
| + | {{main|M68A1 (105 mm)}} | ||
| − | + | The M68A1 is the same gun used by the [[M1 Abrams]]. It enjoys a quicker reload that tops out at 5 seconds. The gun handling is otherwise identical to the [[M60A3 TTS]], which is not great but still better than typical Soviet tanks. | |
| − | [[ | + | {| class="wikitable" style="text-align:center" width="100%" |
| + | |- | ||
| + | ! colspan="5" | [[M68A1 (105 mm)|105 mm M68A1]] || colspan="5" | Turret rotation speed (°/s) || colspan="4" | Reloading rate (seconds) | ||
| + | |- | ||
| + | ! Mode !! Capacity !! Vertical !! Horizontal !! Stabilizer | ||
| + | ! Stock !! Upgraded !! Full !! Expert !! Aced | ||
| + | ! Stock !! Full !! Expert !! Aced | ||
| + | |- | ||
| + | ! ''Arcade'' | ||
| + | | rowspan="2" | 56 || rowspan="2" | -9°/+19° || rowspan="2" | ±180° || rowspan="2" | Two-plane || 21.42 || 29.65 || 36.00 || 39.81 || 42.35 || rowspan="2" | 6.50 || rowspan="2" | 5.75 || rowspan="2" | 5.30 || rowspan="2" | 5.00 | ||
| + | |- | ||
| + | ! ''Realistic'' | ||
| + | | 13.40 || 15.75 || 19.13 || 21.15 || 22.50 | ||
| + | |- | ||
| + | |} | ||
| − | + | ==== Ammunition ==== | |
| + | The stock M735 APFSDS round is a fairly good and reliable option. The flat penetration is not exceptional but as a long rod APFSDS, it does well against sloped armour. M735 will easily dispatch any enemy tank that does not have composite armour. MBTs with weaker composite armour like the [[XM-1 (GM)]] or [[M48 Super]] are still vulnerable. | ||
| + | For tougher targets, the unlockable DM63 APFSDS round will rarely disappoint. It has the highest penetration of any 105 mm APFSDS round currently in the game, exceeding 430 mm of flat penetration. This is actually enough to penetrate the turret cheek of the M1 Abrams. However, it is overkill against most tanks that the CM11 will encounter. If Silver Lion costs are a concern, do not use DM63 as a primary round unless the CM11 has been uptiered a lot. Tanks to watch out for include the [[Chieftain Mk 10]], [[Challenger Mk.2]], [[Challenger Mk.3]], and [[Leopard 2A4]]. These all feature strong composite armour on their turret cheeks that DM63 will not be able to penetrate. Shoot the hull, gun mantlet, or turret ring instead. | ||
| + | The M456 HEAT-FS round is the less effective than the M735 APFSDS when fighting armoured targets due to its lower post-penetration damage, lower muzzle velocity, and weakness against composite or reactive armour. It is not a stock round either. Keep a few on hand for hull-breaking light targets. | ||
| + | The M393A2 HESH round is even more effective against light targets but has bad ballistics and low penetration. It can also be neutralized by spaced armour in addition to reactive and composite. The wide cone of damage may be helpful once in a while, so it does not hurt to take a handful, but it will generally not be useful. | ||
| − | ====''' | + | {| class="wikitable sortable" style="text-align:center" width="100%" |
| + | ! colspan="8" | Penetration statistics | ||
| + | |- | ||
| + | ! rowspan="2" data-sort-type="text" | Ammunition | ||
| + | ! rowspan="2" | Type of<br>warhead | ||
| + | ! colspan="6" | '''Penetration @ 0° Angle of Attack (mm)''' | ||
| + | |- | ||
| + | ! 10 m !! 100 m !! 500 m !! 1,000 m !! 1,500 m !! 2,000 m | ||
| + | |- | ||
| + | | M735 || APFSDS || 353 || 350 || 342 || 333 || 322 || 312 | ||
| + | |- | ||
| + | | M393A2 || HESH || 127 || 127 || 127 || 127 || 127 || 127 | ||
| + | |- | ||
| + | | M456A2 || HEATFS || 400 || 400 || 400 || 400 || 400 || 400 | ||
| + | |- | ||
| + | | DM63 || APFSDS || 436 || 434 || 426 || 416 || 406 || 396 | ||
| + | |- | ||
| + | |} | ||
| + | {| class="wikitable sortable" style="text-align:center" width="100%" | ||
| + | ! colspan="10" | Shell details | ||
| + | |- | ||
| + | ! rowspan="2" data-sort-type="text" | Ammunition | ||
| + | ! rowspan="2" | Type of<br>warhead | ||
| + | ! rowspan="2" | Velocity<br>(m/s) | ||
| + | ! rowspan="2" | Projectile<br>Mass (kg) | ||
| + | ! rowspan="2" | Fuse delay<br>(m) | ||
| + | ! rowspan="2" | Fuse sensitivity<br>(mm) | ||
| + | ! rowspan="2" | Explosive Mass<br>(TNT equivalent) (g) | ||
| + | ! colspan="3" | Ricochet | ||
| + | |- | ||
| + | ! 0% !! 50% !! 100% | ||
| + | |- | ||
| + | | M735 || APFSDS || 1,501 || 3.70 || N/A || N/A || N/A || 76° || 77° || 80° | ||
| + | |- | ||
| + | | M393A2 || HESH || 732 || 14.85 || 0.4 || 0.1 || 4,310 || 73° || 77° || 80° | ||
| + | |- | ||
| + | | M456A2 || HEATFS || 1,173 || 10.50 || N/A || 0.1 || 1,270 || 65° || 72° || 77° | ||
| + | |- | ||
| + | | DM63 || APFSDS || 1,455 || 4.30 || N/A || N/A || N/A || 78° || 80° || 81° | ||
| + | |- | ||
| + | |} | ||
| + | {| class="wikitable" style="text-align:center" | ||
| + | ! colspan="7" | Smoke shell characteristics | ||
| + | |- | ||
| + | ! Ammunition | ||
| + | ! Velocity<br>(m/s) | ||
| + | ! Projectile<br>Mass (kg) | ||
| + | ! Screen radius<br>(m) | ||
| + | ! Screen deploy time<br>(s) | ||
| + | ! Screen hold time<br>(s) | ||
| + | ! Explosive Mass<br>(TNT equivalent) (g) | ||
| + | |- | ||
| + | | M416 || 730 || 11.4 || 20 || 5 || 25 || 50 | ||
| + | |- | ||
| + | |} | ||
| − | + | ==== [[Ammo racks]] ==== | |
| + | <!-- [[File:Ammoracks_{{PAGENAME}}.png|right|thumb|x250px|[[Ammo racks]] of the {{PAGENAME}}]] --> | ||
| + | {| class="wikitable" style="text-align:center" | ||
| + | |- | ||
| + | ! Full<br>ammo | ||
| + | ! 1st<br>rack empty | ||
| + | ! 2nd<br>rack empty | ||
| + | ! 3rd<br>rack empty | ||
| + | ! 4th<br>rack empty | ||
| + | ! 5th<br>rack empty | ||
| + | ! 6th<br>rack empty | ||
| + | ! Visual<br>discrepancy | ||
| + | |- | ||
| + | | '''56''' || __ ''(+__)'' || __ ''(+__)'' || __ ''(+__)'' || __ ''(+__)'' || __ ''(+__)'' || __ ''(+__)'' || __ | ||
| + | |- | ||
| + | |} | ||
| − | ===='''' | + | === Machine guns === |
| + | <!-- ''Offensive and anti-aircraft machine guns not only allow you to fight some aircraft but also are effective against lightly armoured vehicles. Evaluate machine guns and give recommendations on its use.'' --> | ||
| + | {{main|M2HB (12.7 mm)|M240 (7.62 mm)}} | ||
| − | + | {| class="wikitable" style="text-align:center" width="50%" | |
| − | + | |- | |
| + | ! colspan="5" | [[M2HB (12.7 mm)|12.7 mm M2HB]] | ||
| + | |- | ||
| + | ! Mount !! Capacity (Belt) !! Fire rate !! Vertical !! Horizontal | ||
| + | |- | ||
| + | | Commander's cupola || 900 (200) || 576 || -9°/+65° || ±180° | ||
| + | |- | ||
| + | |} | ||
| + | {| class="wikitable" style="text-align:center" width="50%" | ||
| + | |- | ||
| + | ! colspan="5" | [[M240 (7.62 mm)|7.62 mm M240]] | ||
| + | |- | ||
| + | ! Mount !! Capacity (Belt) !! Fire rate !! Vertical !! Horizontal | ||
| + | |- | ||
| + | | Loader's cupola || 3,000 (200) || 750 || -9°/+65° || -77°/+135° | ||
| + | |- | ||
| + | | Coaxial || 3,000 (200) || 750 || N/A || N/A | ||
| + | |- | ||
| + | |} | ||
| − | + | == Usage in battles == | |
| + | <!-- ''Describe the tactics of playing in the vehicle, the features of using vehicles in the team and advice on tactics. Refrain from creating a "guide" - do not impose a single point of view but instead give the reader food for thought. Describe the most dangerous enemies and give recommendations on fighting them. If necessary, note the specifics of the game in different modes (AB, RB, SB).'' --> | ||
| − | + | Like most MBTs in the Chinese tech tree, the CM11 should be played in a laid back, cautious manner since its firepower is good but its speed is not nearly sufficient for flanking quickly and catching enemies by surprise. Unfortunately its poor armour and large profile make hull-down sniping difficult, though it does enjoy better gun depression than most PRC/Soviet tanks. It is best to stay close to cover and observe the environment. When the enemies are spotted, pop out, shoot first, and try to at least cripple them. The DM63 APFSDS has very good penetration for a 105 mm round, easily penetrating almost all targets that the CM11 is likely to encounter. The fast reload time ensures rapid follow-up shots. If the teammates do a good job distracting the enemy team or the CM11 somehow manages to flank successfully, several targets can be knocked out in rapid succession. Make good use of the thermal optics, as not all tanks at its battle rating feature them and they are very advantageous for spotting enemies early. | |
| − | |||
| − | |||
| − | |||
| − | + | As a whole, the CM11 is somewhat like a tank destroyer, having a powerful gun but not much else. In a meta favouring high speed and high protection, it is rather out of place, but it can still work in the hands of a skilled player with good aim and reflexes. Trust the DM63 APFSDS, stay alert, shoot first, and avoid getting shot in return. | |
| − | |||
| − | |||
| − | |||
| − | ==== | + | === Modules === |
| + | {| class="wikitable" | ||
| + | ! Tier | ||
| + | ! colspan="2" | Mobility | ||
| + | ! Protection | ||
| + | ! colspan="2" | Firepower | ||
| + | |- | ||
| + | | I | ||
| + | | Tracks | ||
| + | | | ||
| + | | Parts | ||
| + | | Horizontal Drive | ||
| + | | M393A2 | ||
| + | | | ||
| + | |- | ||
| + | | II | ||
| + | | Suspension | ||
| + | | Brake System | ||
| + | | FPE | ||
| + | | Adjustment of Fire | ||
| + | | M416 | ||
| + | | | ||
| + | |- | ||
| + | | III | ||
| + | | Filters | ||
| + | | | ||
| + | | Crew Replenishment | ||
| + | | Elevation Mechanism | ||
| + | | Smoke grenade | ||
| + | | NVD | ||
| + | |- | ||
| + | | IV | ||
| + | | Transmission | ||
| + | | Engine | ||
| + | | | ||
| + | | Artillery Support | ||
| + | | DM63 | ||
| + | | Laser rangefinder | ||
| + | |- | ||
| + | |} | ||
| − | + | === Pros and cons === | |
| − | + | <!-- ''Summarise and briefly evaluate the vehicle in terms of its characteristics and combat effectiveness. Mark its pros and cons in a bulleted list. Try not to use more than 6 points for each of the characteristics. Avoid using categorical definitions such as "bad", "good" and the like - use substitutions with softer forms such as "inadequate" and "effective".'' --> | |
| − | |||
| − | |||
| − | |||
| − | |||
| − | |||
| + | '''Pros:''' | ||
| − | + | * Access to powerful DM63 APFSDS | |
| + | * Fast reload, topping out at 5 seconds like the [[M1 Abrams]] | ||
| + | * Heavy ERA coverage, decent resistance to chemical rounds | ||
| + | * Has a thermal sight for the gunner | ||
| + | * Low-profile cupola | ||
| + | * Stock M735 APFSDS is economical | ||
| − | + | '''Cons:''' | |
| + | * Large target | ||
| + | * Poor mobility | ||
| + | * ERA has negligible kinetic protection | ||
| + | * Vulnerable to APFSDS rounds | ||
| − | + | == History == | |
| + | <!-- ''Describe the history of the creation and combat usage of the vehicle in more detail than in the introduction. If the historical reference turns out to be too long, take it to a separate article, taking a link to the article about the vehicle and adding a block "/History" (example: <nowiki>https://wiki.warthunder.com/(Vehicle-name)/History</nowiki>) and add a link to it here using the <code>main</code> template. Be sure to reference text and sources by using <code><nowiki><ref></ref></nowiki></code>, as well as adding them at the end of the article with <code><nowiki><references /></nowiki></code>. This section may also include the vehicle's dev blog entry (if applicable) and the in-game encyclopedia description (under <code><nowiki>=== In-game description ===</nowiki></code>, also if applicable).'' --> | ||
| + | '''Development''' | ||
| − | + | In 1980, the Republic of China (ROC), also known as Taiwan, created the Armored Vehicle Development Center. It was created partially to develop the CM-11 tank. The Republic of China Army (ROCA) needed a 2nd generation main battle tank (MBT), and they wanted to acquire one without breaking any limitations placed on the ROC by the US-PRC Joint Communique. As such, they decided to create a hybrid design using the M48A3 turret and the M60A3 hull. In the ROC, it is known as the CM-11 Brave Tiger, whereas the United States designated it as the M48H for M48 hybrid. To create the tank, the ROC imported M60A3 hulls from the United States along with M68 105 mm cannons and M48A3 turrets. They imported the commanders cupola from Israel. Two prototypes were finished in 1988 and the ROCA ordered 450 CM-11 tanks. | |
| − | |||
| − | + | '''Design''' | |
| − | + | The hull of the CM-11 is from the M60A3 tank built in the US. As such, the CM-11 uses a torsion bar suspension system, and is powered by a Continental AVDS-1790-2C diesel engine producing 750 hp. The turret is from the M48A3 tank, but with the Israeli Urdan style commander's cupola with a low profile. Armament consists of an M68 105 mm cannon, the commander's 12.7 mm (.50 in) M2 Browning machine gun, a co-axial 7.62 mm M240 machine gun, and the loader's 7.62 mm M240 machine gun. The fire control system is the same system as used by the M1 Abrams, and the M68 105 mm gun has a two-plane stabilizer. The optics and thermal imaging are also as modern as those on the M1 Abrams, giving the CM-11 night fighting and fire-on-the-move ability. The design has a number of drawbacks though. The main battle tanks of the People's Liberation Army (PLO) are the 2nd generation ZTZ/Type 96 and 3rd generation ZTZ/Type 99, which mount a 125 mm gun which can reliably penetrate the armor of the CM-11. This is because the CM-11 is a design that has become outdated in terms of combat capability, as its parts were designed in the 1960's. To counter this, it was attempted to put explosive reactive armor (ERA) from the French company GIAT on the CM-11, but that would tax the suspension too much, so the idea was dropped. In 2012, a CM-11 was seen at an exercise mounting ERA designed by CSIST, which featured extreme angles to increase the chance of enemy shells deflecting off of the armor. | |
| − | + | '''Production and Service''' | |
| − | + | 450 CM-11 Brave Tigers were ordered and delivered. They are still in service with the ROCA, and are likely to be upgraded in the 2020's after the upgrade program for the M60A3 TTS in ROCA service is completed. | |
| − | |||
| − | |||
| − | + | '''Devblog''' | |
| + | During the 1980s, armed forces in Taiwan were looking for more capable AFVs. However, as some existing agreements with the USA prevented the supply with more advanced US equipment, such as later versions of the M60 and the newer M1 Abrams tanks, military production was forced to develop an indigenous design. | ||
| − | + | While still retaining access to supplies of older US equipment and components, the decision was made to create a hybrid tank from the available components and outfit it with the latest electronics. As such, Taiwanese engineers took the hull and chassis of the M60A3 and combined it with the turret of the M48, while installing the M68A1 105mm cannon and the latest US fire control systems available. | |
| − | + | The result of this undertaking was the CM11. In the late 1980s, two prototypes were sent to the US for comparative tests against the M60A3, where the CM11 outperformed its counterpart in gunnery trials. Shortly after these successful tests, the CM11 officially entered service in 1990. | |
| − | |||
| − | |||
| − | |||
| − | + | However, as the protection was seen to be somewhat lacking, the decision was made to upgrade the CM11 with ERA packages obtained from GIAT in the early '90s. Due to substantial weight increases and associated upgrade costs however, this modernization effort was only applied to about a dozen vehicles. In total, 450 CM11s were built for the armed forces, still representing the spearhead of the country's armored units today. | |
| − | |||
| − | |||
| − | |||
| − | |||
| − | + | ''- From [[wt:en/news/6366-development-cm11-when-old-meets-new-en|Devblog]]'' | |
| − | |||
| − | + | == Media == | |
| + | ''Excellent additions to the article would be video guides, screenshots from the game, and photos.'' | ||
| − | + | == See also == | |
| + | ''Links to the articles on the War Thunder Wiki that you think will be useful for the reader, for example:'' | ||
| + | * ''reference to the series of the vehicles;'' | ||
| + | * ''links to approximate analogues of other nations and research trees.'' | ||
| − | * | + | == External links == |
| + | <!-- ''Paste links to sources and external resources, such as:'' | ||
| + | * ''topic on the official game forum;'' | ||
| + | * ''encyclopedia page on the tank;'' | ||
| + | * ''other literature.'' --> | ||
| + | |||
| + | * [[wt:en/news/6366-development-cm11-when-old-meets-new-en|[Devblog] CM11: When Old Meets New]] | ||
| + | |||
| + | {{China medium tanks}} | ||
Revision as of 16:46, 31 July 2020
Contents
| This page is about the Chinese main battle tank CM11. For other vehicles of the family, see M48 Patton (Family) and M60 (Family). |
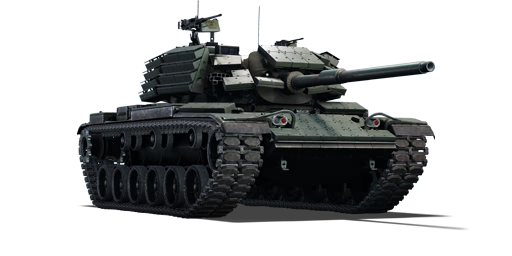
Description

The CM11 is a rank VI Chinese medium tank
with a battle rating of 9.3 (AB/RB/SB). It was introduced in Update 1.91 "Night Vision".
A Taiwanese upgrade to the M60A3, the CM11 "Brave Tiger" is currently the most modern tank in active service with Republic of China Army. It retains the general appearance of the M60 aside from the smaller turret and the unique pagoda-like ERA arrays on the turret sides. Though its mobility and kinetic protection are poor, it has the same 105 mm gun as the M1 Abrams. If used carefully, the CM11 can do some serious damage with its thermal sight and powerful DM63 APFSDS.
General info
Survivability and armour
The CM11 combines the hull of a M60 Patton with the turret of a M48 Patton, and as such the base turret and hull armour is mostly identical to these two tanks, respectively. The M48's bulbous cupola has been replaced with a low-profile version. The armour is quite resistant to APHE rounds, which may be fired by the occasional Object 906, Object 685, and T-55AM-1, but the vast majority of opponents at its rank use HEAT-FS and APFSDS rounds that can cut through steel like butter. To counter the former, the CM11 is slathered with ERA, and can generally survive the first shot from most HEAT-FS rounds. However the ERA offers close to no protection against APFSDS rounds, which are the round of choice in top rank battles.
Post-penetration survivability is also questionable. It lacks blowout racks and ammunition is scattered around the tank, so successful penetrations can reduce the CM11 to a fiery grave.
Armour type:
- Cast homogeneous armour
- Rolled homogeneous armour (Rear roof, Engine grille)
| Armour | Front | Sides | Rear | Roof |
|---|---|---|---|---|
| Hull | 108 mm (66°) Front Glacis 137 mm (54°) Lower Glacis |
36 - 70 mm | 25 mm (1°) Engine Grille 40 mm (31°) Top 28 mm (61°) Bottom |
36 mm Front 20 mm Engine deck |
| Turret | 127 mm (12-76°) Turret front 152 + 82 mm (17-26°) Gun mantlet |
69-100 mm (12-36°) | 51-55 mm (2-71°) | 25-69 mm |
| Armour | Front | Sides | Rear | Roof |
| Cupola | 70 mm | 70 mm | 70 mm | 70 mm |
Notes:
- Tracks are 30 mm thick while suspension wheels are 20 mm thick.
- Belly armour is 19 mm in the front, 13 mm in the rear.
- 15 mm RHA plate between the engine and crew compartment.
Mobility
| Game Mode | Max Speed (km/h) | Weight (tons) | Engine power (horsepower) | Power-to-weight ratio (hp/ton) | |||
|---|---|---|---|---|---|---|---|
| Forward | Reverse | Stock | Upgraded | Stock | Upgraded | ||
| Arcade | 54 | 9 | 50.4 | 1,162 | 1,431 | 23.06 | 28.39 |
| Realistic | 49 | 8 | 663 | 750 | 13.15 | 14.88 | |
The CM11's mobility is awful compared to its contemporaries. It weighs practically the same as the M1 Abrams while having less than half of the engine power. It is very slightly more mobile than the Chieftain Mk 10, but that is a very low bar, and unlike the Chieftain it does not have strong armour to make up for it. Expect to be among the last to arrive on the battlefield.
Armaments
Main armament
The M68A1 is the same gun used by the M1 Abrams. It enjoys a quicker reload that tops out at 5 seconds. The gun handling is otherwise identical to the M60A3 TTS, which is not great but still better than typical Soviet tanks.
| 105 mm M68A1 | Turret rotation speed (°/s) | Reloading rate (seconds) | |||||||||||
|---|---|---|---|---|---|---|---|---|---|---|---|---|---|
| Mode | Capacity | Vertical | Horizontal | Stabilizer | Stock | Upgraded | Full | Expert | Aced | Stock | Full | Expert | Aced |
| Arcade | 56 | -9°/+19° | ±180° | Two-plane | 21.42 | 29.65 | 36.00 | 39.81 | 42.35 | 6.50 | 5.75 | 5.30 | 5.00 |
| Realistic | 13.40 | 15.75 | 19.13 | 21.15 | 22.50 | ||||||||
Ammunition
The stock M735 APFSDS round is a fairly good and reliable option. The flat penetration is not exceptional but as a long rod APFSDS, it does well against sloped armour. M735 will easily dispatch any enemy tank that does not have composite armour. MBTs with weaker composite armour like the XM-1 (GM) or M48 Super are still vulnerable.
For tougher targets, the unlockable DM63 APFSDS round will rarely disappoint. It has the highest penetration of any 105 mm APFSDS round currently in the game, exceeding 430 mm of flat penetration. This is actually enough to penetrate the turret cheek of the M1 Abrams. However, it is overkill against most tanks that the CM11 will encounter. If Silver Lion costs are a concern, do not use DM63 as a primary round unless the CM11 has been uptiered a lot. Tanks to watch out for include the Chieftain Mk 10, Challenger Mk.2, Challenger Mk.3, and Leopard 2A4. These all feature strong composite armour on their turret cheeks that DM63 will not be able to penetrate. Shoot the hull, gun mantlet, or turret ring instead.
The M456 HEAT-FS round is the less effective than the M735 APFSDS when fighting armoured targets due to its lower post-penetration damage, lower muzzle velocity, and weakness against composite or reactive armour. It is not a stock round either. Keep a few on hand for hull-breaking light targets.
The M393A2 HESH round is even more effective against light targets but has bad ballistics and low penetration. It can also be neutralized by spaced armour in addition to reactive and composite. The wide cone of damage may be helpful once in a while, so it does not hurt to take a handful, but it will generally not be useful.
| Penetration statistics | |||||||
|---|---|---|---|---|---|---|---|
| Ammunition | Type of warhead |
Penetration @ 0° Angle of Attack (mm) | |||||
| 10 m | 100 m | 500 m | 1,000 m | 1,500 m | 2,000 m | ||
| M735 | APFSDS | 353 | 350 | 342 | 333 | 322 | 312 |
| M393A2 | HESH | 127 | 127 | 127 | 127 | 127 | 127 |
| M456A2 | HEATFS | 400 | 400 | 400 | 400 | 400 | 400 |
| DM63 | APFSDS | 436 | 434 | 426 | 416 | 406 | 396 |
| Shell details | |||||||||
|---|---|---|---|---|---|---|---|---|---|
| Ammunition | Type of warhead |
Velocity (m/s) |
Projectile Mass (kg) |
Fuse delay (m) |
Fuse sensitivity (mm) |
Explosive Mass (TNT equivalent) (g) |
Ricochet | ||
| 0% | 50% | 100% | |||||||
| M735 | APFSDS | 1,501 | 3.70 | N/A | N/A | N/A | 76° | 77° | 80° |
| M393A2 | HESH | 732 | 14.85 | 0.4 | 0.1 | 4,310 | 73° | 77° | 80° |
| M456A2 | HEATFS | 1,173 | 10.50 | N/A | 0.1 | 1,270 | 65° | 72° | 77° |
| DM63 | APFSDS | 1,455 | 4.30 | N/A | N/A | N/A | 78° | 80° | 81° |
| Smoke shell characteristics | ||||||
|---|---|---|---|---|---|---|
| Ammunition | Velocity (m/s) |
Projectile Mass (kg) |
Screen radius (m) |
Screen deploy time (s) |
Screen hold time (s) |
Explosive Mass (TNT equivalent) (g) |
| M416 | 730 | 11.4 | 20 | 5 | 25 | 50 |
Ammo racks
| Full ammo |
1st rack empty |
2nd rack empty |
3rd rack empty |
4th rack empty |
5th rack empty |
6th rack empty |
Visual discrepancy |
|---|---|---|---|---|---|---|---|
| 56 | __ (+__) | __ (+__) | __ (+__) | __ (+__) | __ (+__) | __ (+__) | __ |
Machine guns
| 12.7 mm M2HB | ||||
|---|---|---|---|---|
| Mount | Capacity (Belt) | Fire rate | Vertical | Horizontal |
| Commander's cupola | 900 (200) | 576 | -9°/+65° | ±180° |
| 7.62 mm M240 | ||||
|---|---|---|---|---|
| Mount | Capacity (Belt) | Fire rate | Vertical | Horizontal |
| Loader's cupola | 3,000 (200) | 750 | -9°/+65° | -77°/+135° |
| Coaxial | 3,000 (200) | 750 | N/A | N/A |
Usage in battles
Like most MBTs in the Chinese tech tree, the CM11 should be played in a laid back, cautious manner since its firepower is good but its speed is not nearly sufficient for flanking quickly and catching enemies by surprise. Unfortunately its poor armour and large profile make hull-down sniping difficult, though it does enjoy better gun depression than most PRC/Soviet tanks. It is best to stay close to cover and observe the environment. When the enemies are spotted, pop out, shoot first, and try to at least cripple them. The DM63 APFSDS has very good penetration for a 105 mm round, easily penetrating almost all targets that the CM11 is likely to encounter. The fast reload time ensures rapid follow-up shots. If the teammates do a good job distracting the enemy team or the CM11 somehow manages to flank successfully, several targets can be knocked out in rapid succession. Make good use of the thermal optics, as not all tanks at its battle rating feature them and they are very advantageous for spotting enemies early.
As a whole, the CM11 is somewhat like a tank destroyer, having a powerful gun but not much else. In a meta favouring high speed and high protection, it is rather out of place, but it can still work in the hands of a skilled player with good aim and reflexes. Trust the DM63 APFSDS, stay alert, shoot first, and avoid getting shot in return.
Modules
| Tier | Mobility | Protection | Firepower | |||
|---|---|---|---|---|---|---|
| I | Tracks | Parts | Horizontal Drive | M393A2 | ||
| II | Suspension | Brake System | FPE | Adjustment of Fire | M416 | |
| III | Filters | Crew Replenishment | Elevation Mechanism | Smoke grenade | NVD | |
| IV | Transmission | Engine | Artillery Support | DM63 | Laser rangefinder | |
Pros and cons
Pros:
- Access to powerful DM63 APFSDS
- Fast reload, topping out at 5 seconds like the M1 Abrams
- Heavy ERA coverage, decent resistance to chemical rounds
- Has a thermal sight for the gunner
- Low-profile cupola
- Stock M735 APFSDS is economical
Cons:
- Large target
- Poor mobility
- ERA has negligible kinetic protection
- Vulnerable to APFSDS rounds
History
Development
In 1980, the Republic of China (ROC), also known as Taiwan, created the Armored Vehicle Development Center. It was created partially to develop the CM-11 tank. The Republic of China Army (ROCA) needed a 2nd generation main battle tank (MBT), and they wanted to acquire one without breaking any limitations placed on the ROC by the US-PRC Joint Communique. As such, they decided to create a hybrid design using the M48A3 turret and the M60A3 hull. In the ROC, it is known as the CM-11 Brave Tiger, whereas the United States designated it as the M48H for M48 hybrid. To create the tank, the ROC imported M60A3 hulls from the United States along with M68 105 mm cannons and M48A3 turrets. They imported the commanders cupola from Israel. Two prototypes were finished in 1988 and the ROCA ordered 450 CM-11 tanks.
Design
The hull of the CM-11 is from the M60A3 tank built in the US. As such, the CM-11 uses a torsion bar suspension system, and is powered by a Continental AVDS-1790-2C diesel engine producing 750 hp. The turret is from the M48A3 tank, but with the Israeli Urdan style commander's cupola with a low profile. Armament consists of an M68 105 mm cannon, the commander's 12.7 mm (.50 in) M2 Browning machine gun, a co-axial 7.62 mm M240 machine gun, and the loader's 7.62 mm M240 machine gun. The fire control system is the same system as used by the M1 Abrams, and the M68 105 mm gun has a two-plane stabilizer. The optics and thermal imaging are also as modern as those on the M1 Abrams, giving the CM-11 night fighting and fire-on-the-move ability. The design has a number of drawbacks though. The main battle tanks of the People's Liberation Army (PLO) are the 2nd generation ZTZ/Type 96 and 3rd generation ZTZ/Type 99, which mount a 125 mm gun which can reliably penetrate the armor of the CM-11. This is because the CM-11 is a design that has become outdated in terms of combat capability, as its parts were designed in the 1960's. To counter this, it was attempted to put explosive reactive armor (ERA) from the French company GIAT on the CM-11, but that would tax the suspension too much, so the idea was dropped. In 2012, a CM-11 was seen at an exercise mounting ERA designed by CSIST, which featured extreme angles to increase the chance of enemy shells deflecting off of the armor.
Production and Service
450 CM-11 Brave Tigers were ordered and delivered. They are still in service with the ROCA, and are likely to be upgraded in the 2020's after the upgrade program for the M60A3 TTS in ROCA service is completed.
Devblog
During the 1980s, armed forces in Taiwan were looking for more capable AFVs. However, as some existing agreements with the USA prevented the supply with more advanced US equipment, such as later versions of the M60 and the newer M1 Abrams tanks, military production was forced to develop an indigenous design.
While still retaining access to supplies of older US equipment and components, the decision was made to create a hybrid tank from the available components and outfit it with the latest electronics. As such, Taiwanese engineers took the hull and chassis of the M60A3 and combined it with the turret of the M48, while installing the M68A1 105mm cannon and the latest US fire control systems available.
The result of this undertaking was the CM11. In the late 1980s, two prototypes were sent to the US for comparative tests against the M60A3, where the CM11 outperformed its counterpart in gunnery trials. Shortly after these successful tests, the CM11 officially entered service in 1990.
However, as the protection was seen to be somewhat lacking, the decision was made to upgrade the CM11 with ERA packages obtained from GIAT in the early '90s. Due to substantial weight increases and associated upgrade costs however, this modernization effort was only applied to about a dozen vehicles. In total, 450 CM11s were built for the armed forces, still representing the spearhead of the country's armored units today.
- From Devblog
Media
Excellent additions to the article would be video guides, screenshots from the game, and photos.
See also
Links to the articles on the War Thunder Wiki that you think will be useful for the reader, for example:
- reference to the series of the vehicles;
- links to approximate analogues of other nations and research trees.
External links
| China medium tanks | |
|---|---|
| ZTZ59 | Type 59 · ZTZ59A · ZTZ59D1 |
| ZTZ69 | Type 69 · Type 69-IIa · T-69 II G |
| ZTZ88/96 | ZTZ88A · ZTZ88B |
| ZTZ96 · ZTZ96A · ZTZ96A (P) | |
| ZTZ99 | ZTZ99-II · ZTZ99-III |
| ZTZ99A | ZTZ99A · WZ1001(E) LCT |
| Export series | MBT2000 · VT-4A1 |
| ROC | CM11 |
| Other | Т-34-85 Gai · Object 122MT "MC" |
| Japan | ␗Chi-Ha · ␗Chi-Ha Kai |
| USA | ␗M4A4 · ␗M4A4 (1st PTG) · ␗M4A1 (75) W · ␗M48A1 · ␗M60A3 TTS |
| USSR | ␗T-34 (1943) · ␗Т-34-85 (S-53) · T-34-85 No.215 · Т-62 №545 |
