Difference between pages "J22-B" and "AMX-30B2 BRENUS"
(Edits. Added J22-B page.) |
Colok76286 (talk | contribs) (→Survivability and armour: Corrected typo) |
||
| Line 1: | Line 1: | ||
| − | {{Specs-Card| | + | {{Specs-Card|code=fr_amx_30_b2_brenus}} |
{{About | {{About | ||
| − | | about = | + | |about=medium tank '''{{PAGENAME}}''' |
| − | | usage = other | + | |usage=other uses |
| − | | link = | + | |link=AMX-30 (Family) |
}} | }} | ||
| + | |||
== Description == | == Description == | ||
| − | <!-- | + | <!--In the description, the first part should be about the history of the creation and combat usage of the vehicle, as well as its key features. In the second part, tell the reader about the ground vehicle in the game. Insert a screenshot of the vehicle, so that if the novice player does not remember the vehicle by name, he will immediately understand what kind of vehicle the article is talking about.--> |
| + | |||
[[File:GarageImage_{{PAGENAME}}.jpg|420px|thumb|left]] | [[File:GarageImage_{{PAGENAME}}.jpg|420px|thumb|left]] | ||
{{break}} | {{break}} | ||
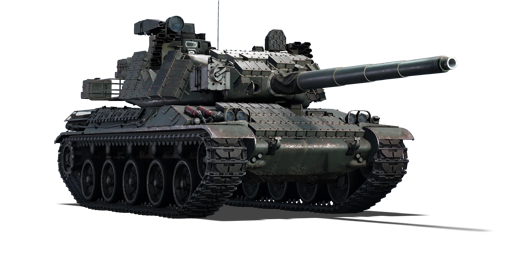
| − | The '''{{Specs|name}}''' is a | + | The '''{{Specs|name}}''' is a Rank {{Specs|rank}} French medium tank {{Battle-rating}}. It was introduced in [[Update 1.77 "Advancing Storm"]]. |
| + | The AMX-30B2 BRENUS, or Brennus in some sources, was a modernized French MBT which saw combat in the Gulf War. | ||
| − | + | == General info == | |
| + | === Survivability and armour === | ||
| + | <!--Describe armour protection. Note the most well protected and key weak areas. Appreciate the layout of modules as well as the number and location of crew members. Is the level of armour protection sufficient, is the placement of modules helpful for survival in combat? | ||
| − | + | If necessary use a visual template to indicate the most secure and weak zones of the armour.--> | |
| + | |||
| + | The AMX-30B2 has a complex array of armour plates in addition of the ERA. | ||
| + | |||
| + | The frontal glacis is in two parts, the upper area that is 50mm RHA sloped at 76 degrees and the lower one being 79mm CHA sloped at roughly 70 degrees. The lower part of the front glacis is, in theory, able to withstand the [[T-54 (1951)|T-54]] APCBC shell better than the Leopard does. However, shots contacting the upper part will often resulting the shot bouncing upward and penetrating the turret front, which is very weak (even the [[M18 GMC]] can penetrate it with ease). The lower glacis plate is not as strong since it is not sloped as much as the front plate, but penetrating this plate will often not result in a colossal damage. However, the curve joint between the upper and the lower glacis plate is very weak and often a penetration through this area will end with a one-shot. | ||
| + | |||
| + | Also, it is noted that there is a fuel container in the front of the tank protecting the ammo rack, which sometimes penetrating rounds will just set a fire just like the T-54 does. The difference is that AMX-30 tank's first stage ammo rack is the turret rack, so after experiencing prolonged combat, the hull ammo rack will be emptied and left defused. The hull sides and rears are very weak, they are all 30mm plates. Even anti-aircraft vehicles doing side shots will penetrate this tank fast (for example, the [[R3 T20 FA-HS]] at BR 3.7 for Italy). | ||
| + | |||
| + | The turret armour is not sufficient at this rank, nor at any rank from even rank IV upwards. The gun shield itself mostly offers a 60mm-100mm protection. However, some sabot shots will get absorbed by the breech, which actually offers better protection in the AMX-30B2 than the Leopard 1 does. Shooting the turret ring will damage the turret drives, and can sometimes trigger a crew knock out. The turret sides are very weak, often gives you a protection around 60mm. The rear is worse, plus the turret ammo rack is placed at the end of the turret rear, shooting this area will destroy the tank one shot. | ||
| + | |||
| + | The ERA is what makes this tank sit at 8.7. When sloped, the ERA at front of the UFP will offer a 400mm protection against HEAT. Mostly, this package is useless. However, since 8.0-8.7 is an actual BR in the game, you will encounter the [[M551]], [[M60A2]], [[RakJPz 2|RakJpz]], and [[KPz-70]]s that primarily fire missiles. ERA at the side of turret is at 260 mm effective in chemical protection, which is not very effective against most threats. Also, you can sometimes roll high in the chances and deflect a 700 mm penetrating missile from the [[Type 89]] IFV. However, there are multiple places in the front of the tank where no ERA blocks could be found. | ||
| + | |||
| + | Other weak spots that are noticeable on the tank are: drivers view port, turret front that is not the gun shield, the commander's cupola, gunner's view port, | ||
| + | |||
| + | '''Armour type:''' | ||
| + | |||
| + | * Explosive reactive armour | ||
| + | * Cast homogeneous armour | ||
| + | * Rolled homogeneous armour (Rear roof, Engine grille) | ||
| + | |||
| + | {| class="wikitable" | ||
| + | |- | ||
| + | ! Armour !! Front (Slope angle) !! Sides !! Rear !! Roof | ||
| + | |- | ||
| + | | Hull || 79* mm (57-68°), 50* mm (52-76°) ''Front glacis'' <br> 79 mm (0-57°), 30 mm (75°) ''Lower glacis'' || 35-57 mm (0-35) <br> 30 mm ''Bottom'' <br> 25 mm (70°) ''Belly'' || 30 mm (10°) ''Top'' <br> 30 mm ''Center'' <br> 25 mm (70°) ''Bottom'' || 15 mm <br> 8 mm ''Engine grille'' | ||
| + | |- | ||
| + | | Turret || 30-150* mm (0-79°) ''Gun mantlet'' <br> 30* mm (61-75°) ''Turret front top'' || 41.5* mm (19-47°) || 30 mm (1-64°) <br> 20 mm (54-64°) ''Turret underside'' || 20 mm | ||
| + | |- | ||
| + | ! Armour !! Sides !! Roof | ||
| + | |- | ||
| + | | Cupola || 60 mm || 20 mm | ||
| + | |- | ||
| + | ! Special armour* !! Kinetic !! Chemical | ||
| + | |- | ||
| + | | ERA || 5 mm || 400 mm | ||
| + | |- | ||
| + | |} | ||
| − | + | === Mobility === | |
| + | <!-- ''Write about the mobility of the ground vehicle. Estimate the specific power and manoeuvrability, as well as the maximum speed forwards and backwards.'' --> | ||
| − | == | + | {{tankMobility|abMinHp= 1162|rbMinHp= 663}} |
| − | |||
| − | |||
| − | + | When fully upgraded, the engine offers a 750 hp output at 2400 rpm. Max speed is 65 km/h, and the tank can achieve 45-50 km/h on a map like Kursk (when driving downward, you can achieve 65 km/h). Reverse gear is 27 km/h, which is fast. The reverse gear is faster than Leopard 1's by 2 km/h. The tank feels somewhat lighter than Leopard 1 series of tanks, since it has lighter weight (note that Leopard 1 tanks have a 830 hp output engine). | |
| − | + | == Armaments == | |
| + | === Main armament === | ||
| + | <!--''Give the reader information about the characteristics of the main gun. Assess its effectiveness in a battle based on the reloading speed, ballistics and the power of shells. Do not forget about the flexibility of the fire, that is how quickly the cannon can be aimed at the target, open fire on it and aim at another enemy. Add a link to the main article on the gun: <code><nowiki>{{main|Name of the weapon}}</nowiki></code>. Describe in general terms the ammunition available for the main gun. Give advice on how to use them and how to fill the ammunition storage.''--> | ||
| + | {{main|CN-105-F1 (105 mm)}} | ||
{| class="wikitable" style="text-align:center" | {| class="wikitable" style="text-align:center" | ||
|- | |- | ||
| − | ! colspan=" | + | ! colspan="6" | [[CN-105-F1 (105 mm)|105 mm CN-105-F1]] |
|- | |- | ||
| − | ! colspan=" | + | ! colspan="3" rowspan="1" style="width:5em" |Capacity |
| + | ! rowspan="1" | Vertical <br> guidance | ||
| + | ! rowspan="1" | Horizontal <br> guidance | ||
| + | ! rowspan="1" | Stabilizer | ||
|- | |- | ||
| − | + | | colspan="3" | 47 || -8°/+20° || ±180° || N/A | |
| − | |||
| − | |||
| − | |||
| − | |||
|- | |- | ||
| − | ! | + | ! colspan="6" | Turret rotation speed (°/s) |
| − | |||
| − | |||
| − | |||
| − | |||
| − | |||
|- | |- | ||
| − | | | + | ! style="width:4em" |Mode |
| + | ! style="width:4em" |Stock | ||
| + | ! style="width:4em" |Upgraded | ||
| + | ! style="width:4em" |Prior + Full crew | ||
| + | ! style="width:4em" |Prior + Expert qualif. | ||
| + | ! style="width:4em" |Prior + Ace qualif. | ||
|- | |- | ||
| − | + | | ''Arcade'' || 28.6 || __.__ || __.__ || __.__ || __.__ | |
|- | |- | ||
| − | + | | ''Realistic'' || 17.9 || 22.1 || 25.7 || 28.4 || 30.0 | |
| − | |||
| − | |||
| − | |||
| − | |||
|- | |- | ||
| − | ! | + | ! colspan="4" | Reloading rate (seconds) |
| − | |||
| − | |||
| − | |||
| − | |||
| − | |||
|- | |- | ||
| − | | | + | ! colspan="1" style="width:4em" |Stock |
| + | ! colspan="1" style="width:4em" |Prior + Full crew | ||
| + | ! colspan="1" style="width:4em" |Prior + Expert qualif. | ||
| + | ! colspan="1" style="width:4em" |Prior + Ace qualif. | ||
| + | |- | ||
| + | | 8.7 || 7.7 || 7.1 || 6.7 | ||
|- | |- | ||
|} | |} | ||
| − | ==== | + | ===== Ammunition ===== |
| − | {| class="wikitable" style="text-align:center" | + | {| class="wikitable sortable" style="text-align:center" width="100%" |
| + | ! colspan="8" | Penetration statistics | ||
| + | |- | ||
| + | ! rowspan="2" data-sort-type="text" | Ammunition | ||
| + | ! rowspan="2" class="unsortable" | Type of <br /> warhead | ||
| + | ! colspan="6" | '''Penetration''' '''''in mm''''' '''@ 0° Angle of Attack''' | ||
|- | |- | ||
| − | ! | + | ! 10m |
| + | ! 100m | ||
| + | ! 500m | ||
| + | ! 1000m | ||
| + | ! 1500m | ||
| + | ! 2000m | ||
|- | |- | ||
| − | + | | OCC 105 F1 || HEAT || 400 || 400 || 400 || 400 || 400 || 400 | |
| − | |||
| − | |||
| − | |||
| − | |||
|- | |- | ||
| − | | | + | | OE 105 F1 Mle.60 || HE || 26 || 26 || 25 || 25 || 25 || 25 |
| + | |- | ||
| + | | OFL 105 F1 || APFSDS || 361 || 358 || 350 || 341 || 332 || 322 | ||
|- | |- | ||
|} | |} | ||
| − | + | {| class="wikitable sortable" style="text-align:center" width="100%" | |
| − | {| class="wikitable" style="text-align:center" | + | ! colspan="11" | Shell details |
| + | |- | ||
| + | ! rowspan="2" data-sort-type="text" | Ammunition | ||
| + | ! rowspan="2" class="unsortable" | Type of <br /> warhead | ||
| + | ! rowspan="2" |Velocity <br /> in m/s | ||
| + | ! rowspan="2" |Projectile<br />Mass in kg | ||
| + | ! rowspan="2" | ''Fuse delay'' | ||
| + | ''in m:'' | ||
| + | ! rowspan="2" | ''Fuse sensitivity'' | ||
| + | ''in mm:'' | ||
| + | ! rowspan="2" | ''Explosive Mass in g<br /> (TNT equivalent):'' | ||
| + | ! rowspan="2" | ''Normalization At 30° <br> from horizontal:'' | ||
| + | ! colspan="3" | ''Ricochet:'' | ||
| + | |- | ||
| + | ! 0% | ||
| + | ! 50% | ||
| + | ! 100% | ||
| + | |- | ||
| + | | OCC 105 F1 || HEAT || 1,000 || 10.95 || 0.0 || 0.1 || 1,020 || +0° || 62° || 69° || 73° | ||
|- | |- | ||
| − | + | | OE 105 F1 Mle.60 || HE || 700 || 12.1 || 0.1 || 0.1 || 2,000 || +0° || 79° || 80° || 81° | |
| + | |- | ||
| + | | OFL 105 F1 || APFSDS || 1,525 || 3.8 || N/A || N/A || N/A || ° || 78° || 80° || 81° | ||
|- | |- | ||
| − | + | |} | |
| − | + | {| class="wikitable sortable" style="text-align:center" | |
| − | + | ! colspan="7" | Smoke characteristic | |
| − | ! colspan=" | ||
|- | |- | ||
| − | ! | + | ! Ammunition |
| − | ! | + | ! Velocity <br /> in m/s |
| + | ! Projectile<br />Mass in kg | ||
| + | ! ''Screen radius <br /> in m'' | ||
| + | ! ''Screen time <br /> in s'' | ||
| + | ! ''Screen hold time <br /> in s:'' | ||
| + | ! ''Explosive Mass in g<br /> (TNT equivalent):'' | ||
|- | |- | ||
| − | | | + | | OFPH 105 F1 || 700 || 11.4 || 20 || 5 || 25 || 50 |
|- | |- | ||
|} | |} | ||
| − | {| class="wikitable" style="text-align:center" | + | ===== [[Ammo racks|Ammo racks]] ===== |
| + | [[File:Ammoracks_{{PAGENAME}}.png|right|thumbnail|x250px|Ammo racks of the {{PAGENAME}}.]] | ||
| + | {| class="wikitable sortable" style="text-align:center" | ||
|- | |- | ||
| − | ! | + | ! class="wikitable unsortable" |Full<br /> ammo |
| + | ! class="wikitable unsortable" |1st<br /> rack empty | ||
| + | ! class="wikitable unsortable" |2nd<br /> rack empty | ||
| + | ! class="wikitable unsortable" |3rd<br /> rack empty | ||
| + | ! class="wikitable unsortable" |4th<br /> rack empty | ||
| + | ! class="wikitable unsortable" |5th<br /> rack empty | ||
| + | ! class="wikitable unsortable" |6th<br /> rack empty | ||
| + | ! class="wikitable unsortable" |Visual<br /> discrepancy | ||
|- | |- | ||
| − | + | || '''47''' || 23 ''(+24)'' || ''(+)'' || ''(+)'' || ''(+)'' || ''(+)'' || ''(+)'' || style="text-align:left" | no | |
| − | |||
| − | |||
| − | |||
| − | | | ||
| − | | | ||
|- | |- | ||
|} | |} | ||
| + | |||
| + | === Machine guns === | ||
| + | <!--''Offensive and anti-aircraft machine guns not only allow you to fight some aircraft but also are effective against lightly armoured vehicles. Evaluate machine guns and give recommendations on its use.''--> | ||
| + | {{main|M693 (20 mm)|AAN-F1 (7.62 mm)}} | ||
{| class="wikitable" style="text-align:center" | {| class="wikitable" style="text-align:center" | ||
|- | |- | ||
| − | ! colspan=" | + | ! colspan="7" | [[M693 (20 mm)|20 mm M693]] |
|- | |- | ||
| − | ! colspan=" | + | ! colspan="7" | ''Coaxial mount'' |
|- | |- | ||
| − | ! | + | ! colspan="4" rowspan="1" style="width:5em" |Capacity (Belt capacity) |
| − | ! | + | ! rowspan="1" | Fire rate <br> (shots/minute) |
| − | ! | + | ! rowspan="1" | Vertical <br> guidance |
| + | ! rowspan="1" | Horizontal <br> guidance | ||
|- | |- | ||
| − | | | + | | colspan="4" | 1,000 (500) || 740 || -0°/+20° || N/A |
|- | |- | ||
|} | |} | ||
| − | |||
| − | |||
| − | |||
| − | |||
| − | |||
| − | |||
| − | |||
| − | |||
| − | |||
| − | |||
| − | |||
| − | |||
| − | |||
| − | |||
| − | |||
| − | |||
| − | |||
| − | |||
| − | |||
| − | |||
| − | |||
| − | |||
| − | |||
| − | |||
| − | |||
| − | |||
| − | |||
| − | |||
| − | |||
| − | |||
| − | |||
{| class="wikitable" style="text-align:center" | {| class="wikitable" style="text-align:center" | ||
|- | |- | ||
| − | ! colspan="7" | | + | ! colspan="7" | [[AAN-F1 (7.62 mm)|7.62 mm AAN-F1]] |
|- | |- | ||
| − | + | ! colspan="7" | ''Pintle mount'' | |
| − | |||
| − | ! colspan=" | ||
| − | |||
| − | |||
|- | |- | ||
| − | ! | + | ! colspan="4" rowspan="1" style="width:5em" |Capacity (Belt capacity) |
| − | ! | + | ! rowspan="1" | Fire rate <br> (shots/minute) |
| − | ! | + | ! rowspan="1" | Vertical <br> guidance |
| + | ! rowspan="1" | Horizontal <br> guidance | ||
|- | |- | ||
| − | | | + | | colspan="4" | 2,000 (100) || 900 || -10°/+45° || ±120° |
|- | |- | ||
|} | |} | ||
| − | === Modules === | + | ==Usage in battles== |
| + | <!--Describe the tactics of playing in the vehicle, the features of using vehicles in the team and advice on tactics. Refrain from creating a "guide" - do not impose a single point of view but instead give the reader food for thought. Describe the most dangerous enemies and give recommendations on fighting them. If necessary, note the specifics of the game in different modes (AB, RB, SB).--> | ||
| + | The AMX 30B2 Brenus cannot withstand a frontal encounter with most opponents due to the lack of a reliable armor and a stabilizer, making the tank an easy prey for almost anyone on the battlefield. However, the tank comes with a great mobility, able to reach 65 km/h in RB (72 in AB) even in reverse, making it the ideal tank to shoot the enemy and rapidly retreat to change position. The optics are better than the ones found on the other AMX-30s, but still not sufficient to properly see targets at long ranges, unlike tanks like the Leopard I with its 16x. However, it's not something to worry about: the thermal sight will allow the player to easily spot targets from far away. Its gun is capable of punching through most of enemy tanks, but caution is a must when uptiered: tanks like the T-72 cannot be damaged in the turret even by the AMX-30B2's APFSDS, leaving only the hull as a potential target. | ||
| + | |||
| + | The tank is not very suitable for urban combat, since most enemies will have a stabilizer and thus will be capable of landing the first shot, often knocking out the gunner, disabling the engine, the gun, or just setting the tank on fire. The best thing to do, in these cases, is to avoid the center of the map, flanking the enemy to hit him from the side and staying hidden from sight so enemies don't focus their firepower on the AMX-30B2. | ||
| + | |||
| + | In larger and flat maps the tank gives its best, thanks to the high mobility and the capability to shoot the enemy from far away, although the commander cupola can be an issue since it ruin the silhouette of the tank, making it clearly visible, sometimes even when behind cover. | ||
| + | |||
| + | ===Modules=== | ||
{| class="wikitable" | {| class="wikitable" | ||
| − | ! | + | ! Tier |
| − | ! colspan="2" | | + | ! colspan="2" |Mobility |
| − | ! | + | ! Protection |
| − | ! colspan=" | + | ! colspan="3" |Firepower |
|- | |- | ||
| I | | I | ||
| − | | | + | | Tracks |
| − | | | + | | |
| + | | Parts | ||
| + | | Horizontal Drive | ||
| + | | OFPH 105 F1 | ||
| | | | ||
| − | |||
|- | |- | ||
| II | | II | ||
| − | | | + | | Suspension |
| − | | | + | | Brake System |
| − | | | + | | FPE |
| + | | Adjustment of Fire | ||
| + | | OFL 105 F1 | ||
| | | | ||
|- | |- | ||
| III | | III | ||
| − | | | + | | Filters |
| − | | | + | | |
| + | | Crew Replenishment | ||
| + | | Elevation Mechanism | ||
| + | | Smoke grenade | ||
| | | | ||
| − | |||
|- | |- | ||
| IV | | IV | ||
| − | | | + | | Transmission |
| − | | | + | | Engine |
| − | | | + | | |
| − | | | + | | Artillery Support |
| + | | Laser rangefinder | ||
| + | | NVD | ||
|- | |- | ||
|} | |} | ||
| − | === Pros and cons === | + | ===Pros and cons=== |
| − | <!-- | + | <!--Summarize and briefly evaluate the vehicle in terms of its characteristics and combat effectiveness. Mark its pros and cons in a bulleted list. Try not to use more than 6 points for each of the characteristics. Avoid using categorical definitions such as "bad", "good" and the like - they can be substituted with softer forms such as "inadequate" and "effective".--> |
'''Pros:''' | '''Pros:''' | ||
| − | * Good | + | |
| − | * | + | *Reactive armour, good chemical protection |
| − | * | + | *Good mobility |
| − | * | + | *Good forward and reverse speed |
| + | *Low profile | ||
| + | *Effective in an ambush role | ||
| + | *Thermals can be unlocked | ||
| + | *Laser rangefinder, high-velocity APFSDS rounds and thermal vision make for an effective sniper | ||
| + | *The coaxial 20mm cannon makes short work of thinly armoured vehicles and helicopters. Also works great against tracks and cannon barrels | ||
'''Cons:''' | '''Cons:''' | ||
| − | * | + | |
| − | * | + | *Same ammunition as B2 version, random HEAT rounds effects and low APFSDS penetration |
| − | * | + | *No composite armour, low survivability against kinetic rounds |
| − | * | + | *Some weak spots between reactive armor plates |
| + | *Not having a gun stabilizer greatly hampers its performance | ||
| + | *Ammo racks in turret, high risk of explosion | ||
== History == | == History == | ||
| − | <!-- | + | <!--Describe the history of the creation and combat usage of the ground vehicle in more detail than in the introduction. If the historical reference turns out to be too long, take it to a separate article, taking a link to the article about the vehicle and adding a block "/ History" (example: <nowiki>https://wiki.warthunder.com/(Vehicle-name)/History</nowiki>) and add a link to it here using the <code>main</code> template. Be sure to reference text and sources by using <code><nowiki><ref></nowiki></code>, as well as adding them at the end of the article. This section may also include the vehicle's dev blog entry (if applicable) and the in-game encyclopedia description (under <code><nowiki>=== Encyclopedia Info ===</nowiki></code>, also if applicable).--> |
| − | |||
| − | |||
| − | |||
| − | |||
| − | |||
| − | |||
| − | |||
| − | |||
| − | |||
| − | |||
| − | |||
| − | |||
| − | |||
| − | |||
| − | + | During the mid to late 1990s, AMX-30B2 tanks of the 1er/ 2e Chasseurs tank regiments, which formed France’s rapid reaction force in peacetime, underwent upgrading under the Brenus modernization program, whilst two further regiments received modifications to quickly upgrade their AMX-30s with the Brenus package if needed (2e/5e Dragons). The Brenus upgrade package (acronym for briques réactives de surblindage) most notably allowed for the installation of 112 ERA blocks developed by the GIAT company across the front portion of the hull and turret. To compensate for the additional weight of the ERA packages, an improved 8-cylinder 750 horsepower MACK E9 diesel engine was fitted. The Brenus modernization upgrade was among the last to be fitted to the original AMX-30 tank. | |
| − | + | ''- From [https://warthunder.com/en/news/5349-development-amx-30b2-brenus-modern-ironclad-en Devblog]'' | |
== Media == | == Media == | ||
| − | + | ''Excellent additions to the article would be video guides, screenshots from the game, and photos.'' | |
| − | |||
| − | |||
| − | |||
| − | |||
| − | |||
| − | |||
| − | |||
| − | |||
== See also == | == See also == | ||
| − | + | ''Links to the articles on the War Thunder Wiki that you think will be useful for the reader, for example:'' | |
| − | * ''reference to the series of the | + | |
| − | * ''links to approximate analogues of other nations and research trees.'' | + | * ''reference to the series of the vehicles;'' |
| − | + | * ''links to approximate analogues of other nations and research trees.'' | |
| − | |||
| − | |||
| − | |||
| − | |||
== External links == | == External links == | ||
| − | <!-- | + | <!--Paste links to sources and external resources, such as: |
* ''topic on the official game forum;'' | * ''topic on the official game forum;'' | ||
| − | * ''encyclopedia page on the | + | * ''encyclopedia page on the tank;'' |
* ''other literature.''--> | * ''other literature.''--> | ||
| − | |||
| − | |||
| − | |||
| − | |||
| − | |||
| − | |||
| − | |||
| − | |||
| − | |||
| − | |||
| + | * [https://warthunder.com/en/news/5349-development-amx-30b2-brenus-modern-ironclad-en [Devblog<nowiki>]</nowiki> AMX-30B2 Brenus: Modern Ironclad] | ||
| − | + | {{France medium tanks}} | |
Revision as of 13:59, 26 June 2020
Contents
| This page is about the medium tank AMX-30B2 BRENUS. For other uses, see AMX-30 (Family). |
Description

The AMX-30B2 BRENUS is a Rank VI French medium tank
with a battle rating of 8.7 (AB/RB/SB). It was introduced in Update 1.77 "Advancing Storm".
The AMX-30B2 BRENUS, or Brennus in some sources, was a modernized French MBT which saw combat in the Gulf War.
General info
Survivability and armour
The AMX-30B2 has a complex array of armour plates in addition of the ERA.
The frontal glacis is in two parts, the upper area that is 50mm RHA sloped at 76 degrees and the lower one being 79mm CHA sloped at roughly 70 degrees. The lower part of the front glacis is, in theory, able to withstand the T-54 APCBC shell better than the Leopard does. However, shots contacting the upper part will often resulting the shot bouncing upward and penetrating the turret front, which is very weak (even the M18 GMC can penetrate it with ease). The lower glacis plate is not as strong since it is not sloped as much as the front plate, but penetrating this plate will often not result in a colossal damage. However, the curve joint between the upper and the lower glacis plate is very weak and often a penetration through this area will end with a one-shot.
Also, it is noted that there is a fuel container in the front of the tank protecting the ammo rack, which sometimes penetrating rounds will just set a fire just like the T-54 does. The difference is that AMX-30 tank's first stage ammo rack is the turret rack, so after experiencing prolonged combat, the hull ammo rack will be emptied and left defused. The hull sides and rears are very weak, they are all 30mm plates. Even anti-aircraft vehicles doing side shots will penetrate this tank fast (for example, the R3 T20 FA-HS at BR 3.7 for Italy).
The turret armour is not sufficient at this rank, nor at any rank from even rank IV upwards. The gun shield itself mostly offers a 60mm-100mm protection. However, some sabot shots will get absorbed by the breech, which actually offers better protection in the AMX-30B2 than the Leopard 1 does. Shooting the turret ring will damage the turret drives, and can sometimes trigger a crew knock out. The turret sides are very weak, often gives you a protection around 60mm. The rear is worse, plus the turret ammo rack is placed at the end of the turret rear, shooting this area will destroy the tank one shot.
The ERA is what makes this tank sit at 8.7. When sloped, the ERA at front of the UFP will offer a 400mm protection against HEAT. Mostly, this package is useless. However, since 8.0-8.7 is an actual BR in the game, you will encounter the M551, M60A2, RakJpz, and KPz-70s that primarily fire missiles. ERA at the side of turret is at 260 mm effective in chemical protection, which is not very effective against most threats. Also, you can sometimes roll high in the chances and deflect a 700 mm penetrating missile from the Type 89 IFV. However, there are multiple places in the front of the tank where no ERA blocks could be found.
Other weak spots that are noticeable on the tank are: drivers view port, turret front that is not the gun shield, the commander's cupola, gunner's view port,
Armour type:
- Explosive reactive armour
- Cast homogeneous armour
- Rolled homogeneous armour (Rear roof, Engine grille)
| Armour | Front (Slope angle) | Sides | Rear | Roof |
|---|---|---|---|---|
| Hull | 79* mm (57-68°), 50* mm (52-76°) Front glacis 79 mm (0-57°), 30 mm (75°) Lower glacis |
35-57 mm (0-35) 30 mm Bottom 25 mm (70°) Belly |
30 mm (10°) Top 30 mm Center 25 mm (70°) Bottom |
15 mm 8 mm Engine grille |
| Turret | 30-150* mm (0-79°) Gun mantlet 30* mm (61-75°) Turret front top |
41.5* mm (19-47°) | 30 mm (1-64°) 20 mm (54-64°) Turret underside |
20 mm |
| Armour | Sides | Roof | ||
| Cupola | 60 mm | 20 mm | ||
| Special armour* | Kinetic | Chemical | ||
| ERA | 5 mm | 400 mm |
Mobility
| Game Mode | Max Speed (km/h) | Weight (tons) | Engine power (horsepower) | Power-to-weight ratio (hp/ton) | |||
|---|---|---|---|---|---|---|---|
| Forward | Reverse | Stock | Upgraded | Stock | Upgraded | ||
| Arcade | 73 | 73 | 38.2 | 1162 | 1,431 | 30.42 | 37.46 |
| Realistic | 66 | 66 | 663 | 750 | 17.36 | 19.63 | |
When fully upgraded, the engine offers a 750 hp output at 2400 rpm. Max speed is 65 km/h, and the tank can achieve 45-50 km/h on a map like Kursk (when driving downward, you can achieve 65 km/h). Reverse gear is 27 km/h, which is fast. The reverse gear is faster than Leopard 1's by 2 km/h. The tank feels somewhat lighter than Leopard 1 series of tanks, since it has lighter weight (note that Leopard 1 tanks have a 830 hp output engine).
Armaments
Main armament
| 105 mm CN-105-F1 | |||||
|---|---|---|---|---|---|
| Capacity | Vertical guidance |
Horizontal guidance |
Stabilizer | ||
| 47 | -8°/+20° | ±180° | N/A | ||
| Turret rotation speed (°/s) | |||||
| Mode | Stock | Upgraded | Prior + Full crew | Prior + Expert qualif. | Prior + Ace qualif. |
| Arcade | 28.6 | __.__ | __.__ | __.__ | __.__ |
| Realistic | 17.9 | 22.1 | 25.7 | 28.4 | 30.0 |
| Reloading rate (seconds) | |||||
| Stock | Prior + Full crew | Prior + Expert qualif. | Prior + Ace qualif. | ||
| 8.7 | 7.7 | 7.1 | 6.7 | ||
Ammunition
| Penetration statistics | |||||||
|---|---|---|---|---|---|---|---|
| Ammunition | Type of warhead |
Penetration in mm @ 0° Angle of Attack | |||||
| 10m | 100m | 500m | 1000m | 1500m | 2000m | ||
| OCC 105 F1 | HEAT | 400 | 400 | 400 | 400 | 400 | 400 |
| OE 105 F1 Mle.60 | HE | 26 | 26 | 25 | 25 | 25 | 25 |
| OFL 105 F1 | APFSDS | 361 | 358 | 350 | 341 | 332 | 322 |
| Shell details | ||||||||||
|---|---|---|---|---|---|---|---|---|---|---|
| Ammunition | Type of warhead |
Velocity in m/s |
Projectile Mass in kg |
Fuse delay
in m: |
Fuse sensitivity
in mm: |
Explosive Mass in g (TNT equivalent): |
Normalization At 30° from horizontal: |
Ricochet: | ||
| 0% | 50% | 100% | ||||||||
| OCC 105 F1 | HEAT | 1,000 | 10.95 | 0.0 | 0.1 | 1,020 | +0° | 62° | 69° | 73° |
| OE 105 F1 Mle.60 | HE | 700 | 12.1 | 0.1 | 0.1 | 2,000 | +0° | 79° | 80° | 81° |
| OFL 105 F1 | APFSDS | 1,525 | 3.8 | N/A | N/A | N/A | ° | 78° | 80° | 81° |
| Smoke characteristic | ||||||
|---|---|---|---|---|---|---|
| Ammunition | Velocity in m/s |
Projectile Mass in kg |
Screen radius in m |
Screen time in s |
Screen hold time in s: |
Explosive Mass in g (TNT equivalent): |
| OFPH 105 F1 | 700 | 11.4 | 20 | 5 | 25 | 50 |
Ammo racks

| Full ammo |
1st rack empty |
2nd rack empty |
3rd rack empty |
4th rack empty |
5th rack empty |
6th rack empty |
Visual discrepancy |
|---|---|---|---|---|---|---|---|
| 47 | 23 (+24) | (+) | (+) | (+) | (+) | (+) | no |
Machine guns
| 20 mm M693 | ||||||
|---|---|---|---|---|---|---|
| Coaxial mount | ||||||
| Capacity (Belt capacity) | Fire rate (shots/minute) |
Vertical guidance |
Horizontal guidance | |||
| 1,000 (500) | 740 | -0°/+20° | N/A | |||
| 7.62 mm AAN-F1 | ||||||
|---|---|---|---|---|---|---|
| Pintle mount | ||||||
| Capacity (Belt capacity) | Fire rate (shots/minute) |
Vertical guidance |
Horizontal guidance | |||
| 2,000 (100) | 900 | -10°/+45° | ±120° | |||
Usage in battles
The AMX 30B2 Brenus cannot withstand a frontal encounter with most opponents due to the lack of a reliable armor and a stabilizer, making the tank an easy prey for almost anyone on the battlefield. However, the tank comes with a great mobility, able to reach 65 km/h in RB (72 in AB) even in reverse, making it the ideal tank to shoot the enemy and rapidly retreat to change position. The optics are better than the ones found on the other AMX-30s, but still not sufficient to properly see targets at long ranges, unlike tanks like the Leopard I with its 16x. However, it's not something to worry about: the thermal sight will allow the player to easily spot targets from far away. Its gun is capable of punching through most of enemy tanks, but caution is a must when uptiered: tanks like the T-72 cannot be damaged in the turret even by the AMX-30B2's APFSDS, leaving only the hull as a potential target.
The tank is not very suitable for urban combat, since most enemies will have a stabilizer and thus will be capable of landing the first shot, often knocking out the gunner, disabling the engine, the gun, or just setting the tank on fire. The best thing to do, in these cases, is to avoid the center of the map, flanking the enemy to hit him from the side and staying hidden from sight so enemies don't focus their firepower on the AMX-30B2.
In larger and flat maps the tank gives its best, thanks to the high mobility and the capability to shoot the enemy from far away, although the commander cupola can be an issue since it ruin the silhouette of the tank, making it clearly visible, sometimes even when behind cover.
Modules
| Tier | Mobility | Protection | Firepower | |||
|---|---|---|---|---|---|---|
| I | Tracks | Parts | Horizontal Drive | OFPH 105 F1 | ||
| II | Suspension | Brake System | FPE | Adjustment of Fire | OFL 105 F1 | |
| III | Filters | Crew Replenishment | Elevation Mechanism | Smoke grenade | ||
| IV | Transmission | Engine | Artillery Support | Laser rangefinder | NVD | |
Pros and cons
Pros:
- Reactive armour, good chemical protection
- Good mobility
- Good forward and reverse speed
- Low profile
- Effective in an ambush role
- Thermals can be unlocked
- Laser rangefinder, high-velocity APFSDS rounds and thermal vision make for an effective sniper
- The coaxial 20mm cannon makes short work of thinly armoured vehicles and helicopters. Also works great against tracks and cannon barrels
Cons:
- Same ammunition as B2 version, random HEAT rounds effects and low APFSDS penetration
- No composite armour, low survivability against kinetic rounds
- Some weak spots between reactive armor plates
- Not having a gun stabilizer greatly hampers its performance
- Ammo racks in turret, high risk of explosion
History
During the mid to late 1990s, AMX-30B2 tanks of the 1er/ 2e Chasseurs tank regiments, which formed France’s rapid reaction force in peacetime, underwent upgrading under the Brenus modernization program, whilst two further regiments received modifications to quickly upgrade their AMX-30s with the Brenus package if needed (2e/5e Dragons). The Brenus upgrade package (acronym for briques réactives de surblindage) most notably allowed for the installation of 112 ERA blocks developed by the GIAT company across the front portion of the hull and turret. To compensate for the additional weight of the ERA packages, an improved 8-cylinder 750 horsepower MACK E9 diesel engine was fitted. The Brenus modernization upgrade was among the last to be fitted to the original AMX-30 tank.
- From Devblog
Media
Excellent additions to the article would be video guides, screenshots from the game, and photos.
See also
Links to the articles on the War Thunder Wiki that you think will be useful for the reader, for example:
- reference to the series of the vehicles;
- links to approximate analogues of other nations and research trees.
External links
| France medium tanks | |
|---|---|
| M4 Derivatives | M4A1 (FL10) · M4A4 (SA50) |
| AMX-50 | AMX M4 · AMX-50 (TOA100) · AMX-50 (TO90/930) |
| AMX-30 | AMX-30 · AMX-30 (1972) · AMX-30B2 · AMX-30B2 BRENUS · AMX-30 ACRA · AMX-30 Super |
| AMX-32/40 | AMX-32 · AMX-32 (105) · AMX-40 |
| Leclerc | Leclerc · Leclerc S2 · Leclerc SXXI · Leclerc AZUR |
| Other | D2 · S.35 · Lorraine 40t |
| Germany | Panther "Dauphiné" |
| USA | ▄M4A1 · ▄M4A3 (105) · ▄M4A4 · ▄M26 |
