Difference between pages "S.35" and "A.C.IV"
(→Description: Updated with Specs and Battle-rating templates) |
(→Description: Updated with Specs and Battle-rating templates) |
||
| Line 1: | Line 1: | ||
| − | {{Specs-Card|code= | + | {{Specs-Card|code=uk_ac4_thunderbolt}} |
== Description == | == Description == | ||
<!--''In the description, the first part needs to be about the history of the creation and combat usage of the vehicle, as well as its key features. In the second part, tell the reader about the ground vehicle in the game. Insert the screenshot of the vehicle. If the novice player does not remember the vehicle by name, they will immediately understand what kind of vehicle it is talking about.''--> | <!--''In the description, the first part needs to be about the history of the creation and combat usage of the vehicle, as well as its key features. In the second part, tell the reader about the ground vehicle in the game. Insert the screenshot of the vehicle. If the novice player does not remember the vehicle by name, they will immediately understand what kind of vehicle it is talking about.''--> | ||
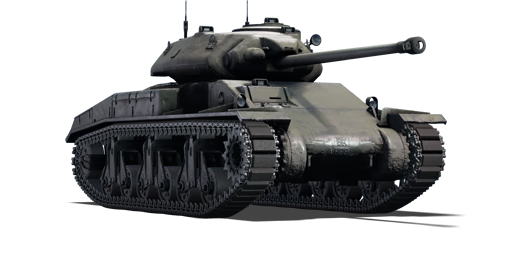
| − | [[File: | + | [[File:GarageImage_A.C.IV.jpg|420px|thumb|left]] |
{{break}} | {{break}} | ||
| − | The '''{{Specs|name}}''' | + | The '''{{Specs|name}}''', also known as the ''AC IV Thunderbolt'' or the ''AC IV Sentinel'', is a premium Rank {{Specs|rank}} British medium tank on the British tree {{Battle-rating}}. It was released some time after [[Update 1.55 "Royal Armour"]]. Armed with a [[Ordnance QF 17-pounder (76 mm)|17-pounder gun]], it has a high firepower for the battle rating it is in, able to effectively fight any other tanks at the battle rating. The Thunderbolt is also a small and maneuverable tank able to exploit harsh terrain to target the enemy. |
| − | The | + | The AC IV is a relatively small medium tank in comparison to the common mainstay of the other countries, especially when compared to the American [[M4A2|Sherman]] tanks. The Sentinel also has a good maneuverability and power-to-weight ratio for the propulsion, able to accelerate to its max speed of roughly 30 km/h quickly and stay there on stable terrain. The tank has a great advantage of a decent reverse speed in comparison to other medium tanks of its caliber, with a reverse speed almost the same speed as forward. The addition of the 17-pounder gun also gives this tank a whopping high firepower for the size, so it can stand a chance against tanks of the same tier despite being out of the league in terms of armour. |
== General info == | == General info == | ||
=== Survivability and armour === | === Survivability and armour === | ||
| − | <!--''Describe armour protection. Note the most well protected and key weak areas. Appreciate the layout of modules as well as the number and location of crew members. Is the level of armour protection sufficient, is the placement of modules | + | <!--''Describe armour protection. Note the most well protected and key weak areas. Appreciate the layout of modules as well as the number and location of crew members. Is the level of armour protection sufficient, is the placement of modules helpfull for survival in combat?'' |
''If necessary use a visual template to indicate the most secure and weak zones of the armour.''--> | ''If necessary use a visual template to indicate the most secure and weak zones of the armour.''--> | ||
| − | + | '''Armour type:''' | |
| − | + | * Cast homogeneous armour | |
| − | '''Armour type:'' | + | * Rolled homogeneous armour (Hull roof) |
| − | |||
| − | |||
{| class="wikitable" | {| class="wikitable" | ||
|- | |- | ||
| − | ! Armour !! Front | + | ! Armour !! Front !! Sides !! Rear !! Roof |
|- | |- | ||
| − | | Hull || | + | | Hull || 50.8 mm (66-67°) ''Frontal glacis'' <br> 50.8 mm (30°) ''Driver's port'' <br> 50.8 mm (7-68°) ''Lower glacis'' || 44.45 mm (0-12°) || 22.22 mm (78°) ''Top'' <br> 44.45 mm (21-52°) ''Bottom'' || 22.22 mm |
|- | |- | ||
| − | | Turret || | + | | Turret || 63.5 mm (4-47°) ''Turret front'' <br> 25.4-63.5 mm (1-68°) ''Gun mantlet'' || 63.5 mm (0-88°) || 63.5 mm (1-53°) || 35 mm |
|- | |- | ||
! Armour !! Sides !! Roof | ! Armour !! Sides !! Roof | ||
|- | |- | ||
| − | | Cupola || | + | | Cupola || 63.5 mm || 35 mm |
| − | |||
|} | |} | ||
'''Notes:''' | '''Notes:''' | ||
| − | * Suspension wheels are | + | * Suspension wheels and bogies are 20 mm thick, tracks are 20 mm. |
| − | * | + | * The rear bottom area has a track placed there, providing 20 mm of extra armour. |
| − | * | + | * The commander cupola is extended outwards from the left side of the turret, creating a vulnerable unsloped area vulnerable to weaker guns. |
| − | + | The AC IV Thunderbolt's armour have a high tendency to bounce shells. This is obvious with the extreme slope on the from of the tank, and turret design. The armour itself is not think, but due to the angle it is put at this tank is very fierce competition. | |
=== Mobility === | === Mobility === | ||
<!--''Write about the mobility of the ground vehicle. Estimate the specific power and maneuverability as well as the maximum speed forward and backward.''--> | <!--''Write about the mobility of the ground vehicle. Estimate the specific power and maneuverability as well as the maximum speed forward and backward.''--> | ||
| − | |||
| − | |||
{| class="wikitable" style="text-align:center" | {| class="wikitable" style="text-align:center" | ||
|- | |- | ||
| Line 48: | Line 43: | ||
|- | |- | ||
! Weight (tons) | ! Weight (tons) | ||
| − | !colspan="1" | Add-on | + | !colspan="1" | Add-on Armour<br>weight (tons) |
!colspan="1" | Max speed (km/h) | !colspan="1" | Max speed (km/h) | ||
|- | |- | ||
| − | |rowspan="2" | | + | |rowspan="2" | 26.4 || colspan="1" rowspan="2" | N/A || colspan="1" | 53 (AB) |
|- | |- | ||
| − | | | + | |48 (RB/SB) |
|- | |- | ||
!colspan="3" | Engine power (horsepower) | !colspan="3" | Engine power (horsepower) | ||
| Line 62: | Line 57: | ||
|- | |- | ||
|''Arcade'' | |''Arcade'' | ||
| − | | | + | |615 |
| − | | | + | |757 |
|- | |- | ||
|''Realistic/Simulator'' | |''Realistic/Simulator'' | ||
| − | | | + | |351 |
| − | | | + | |397 |
|- | |- | ||
!colspan="3" | Power-to-weight ratio (hp/ton) | !colspan="3" | Power-to-weight ratio (hp/ton) | ||
| Line 76: | Line 71: | ||
|- | |- | ||
|''Arcade'' | |''Arcade'' | ||
| − | | | + | |23.29 |
| − | | | + | |28.67 |
|- | |- | ||
|''Realistic/Simulator'' | |''Realistic/Simulator'' | ||
| − | | | + | |13.29 |
| − | | | + | |15.04 |
|- | |- | ||
|} | |} | ||
| Line 87: | Line 82: | ||
== Armaments == | == Armaments == | ||
=== Main armament === | === Main armament === | ||
| − | <!--''Give the reader information about the characteristics of the main gun. Assess its effectiveness in a battle based on the reloading speed, ballistics and the power of shells. Do not forget about the | + | <!--''Give the reader information about the characteristics of the main gun. Assess its effectiveness in a battle based on the reloading speed, ballistics and the power of shells. Do not forget about the flexibilty of the fire, that is how quickly the cannon can be aimed at the target, open fire on it and aim at another enemy. Add a link to the main article on the gun: <code><nowiki>{{main|Name of the weapon}}</nowiki></code>. Describe in general terms the ammunition available for the main gun. Give advice on how to use them and how to fill the ammunition storage.''--> |
| − | {{main| | + | {{main|Ordnance QF 17-pounder (76 mm)}} |
| − | |||
| − | |||
{| class="wikitable" style="text-align:center" | {| class="wikitable" style="text-align:center" | ||
|- | |- | ||
| − | ! colspan="6" | [[ | + | ! colspan="6" | [[Ordnance QF 17-pounder (76 mm)|76 mm OQF 17-pounder]] |
|- | |- | ||
! colspan="3" rowspan="1" style="width:5em" |Capacity | ! colspan="3" rowspan="1" style="width:5em" |Capacity | ||
| Line 101: | Line 94: | ||
! rowspan="1" | Stabilizer | ! rowspan="1" | Stabilizer | ||
|- | |- | ||
| − | | colspan="3" | | + | | colspan="3" | 47 || -6°/+20° || ±180° || N/A |
|- | |- | ||
! colspan="6" | Turret rotation speed (°/s) | ! colspan="6" | Turret rotation speed (°/s) | ||
| Line 112: | Line 105: | ||
! style="width:4em" |Prior + Ace qualif. | ! style="width:4em" |Prior + Ace qualif. | ||
|- | |- | ||
| − | | ''Arcade'' || | + | | ''Arcade'' || 10.7 || 14.8 || _.__ || _.__ || _.__ |
|- | |- | ||
| − | | ''Realistic'' || | + | | ''Realistic'' || 10.7 || 12.6 || _.__ || _.__ || _.__ |
|- | |- | ||
! colspan="4" | Reloading rate (seconds) | ! colspan="4" | Reloading rate (seconds) | ||
| Line 123: | Line 116: | ||
! colspan="1" style="width:4em" |Prior + Ace qualif. | ! colspan="1" style="width:4em" |Prior + Ace qualif. | ||
|- | |- | ||
| − | | | + | | 7.60 || _.__ || _.__ || _.__ |
|- | |- | ||
|} | |} | ||
| Line 133: | Line 126: | ||
! rowspan="2" data-sort-type="text" | Ammunition | ! rowspan="2" data-sort-type="text" | Ammunition | ||
! rowspan="2" class="unsortable" | Type of <br /> warhead | ! rowspan="2" class="unsortable" | Type of <br /> warhead | ||
| − | ! colspan="6" | '''Penetration''' '''''in mm''''' '''@ | + | ! colspan="6" | '''Penetration''' '''''in mm''''' '''@ 90°''' |
|- | |- | ||
! 10m | ! 10m | ||
| Line 142: | Line 135: | ||
! 2000m | ! 2000m | ||
|- | |- | ||
| − | | | + | | Shot Mk.6 || AP || 160 || 157 || 133 || 112 || 96 || 86 |
| + | |- | ||
| + | | Shell Mk.1 || HE || 9 || 9 || 9 || 9 || 9 || 9 | ||
| + | |- | ||
| + | | Shot Mk.4 || APC || 165 || 160 || 138 || 108 || 94 || 81 | ||
| + | |- | ||
| + | | Shot Mk.8 || APCBC || 171 || 168 || 156 || 143 || 130 || 120 | ||
|- | |- | ||
| − | |||
| − | |||
|} | |} | ||
{| class="wikitable sortable" style="text-align:center" width="100%" | {| class="wikitable sortable" style="text-align:center" width="100%" | ||
| Line 166: | Line 163: | ||
! 100% | ! 100% | ||
|- | |- | ||
| − | | | + | | Shot Mk.6 || AP || 883 || 7.7 || N/A || N/A || N/A || -1° || 47° || 60° || 65° |
| + | |- | ||
| + | | Shell Mk.1 || HE || 883 || 7.0 || 0.4 || 0.5 || 580 || +0° || 79° || 80° || 81° | ||
| + | |- | ||
| + | | Shot Mk.4 || APC || 883 || 7.7 || N/A || N/A || N/A || -1° || 48° || 63° || 71° | ||
| + | |- | ||
| + | | Shot Mk.8 || APCBC || 883 || 7.7 || N/A || N/A || N/A || +4° || 48° || 63° || 71° | ||
| + | |- | ||
| + | |} | ||
| + | {| class="wikitable sortable" style="text-align:center" | ||
| + | ! colspan="7" | Smoke characteristic | ||
| + | |- | ||
| + | ! Ammunition | ||
| + | ! Velocity <br /> in m/s | ||
| + | ! Projectile<br />Mass in kg | ||
| + | ! ''Screen radius <br /> in m'' | ||
| + | ! ''Screen time <br /> in s'' | ||
| + | ! ''Screen hold time <br /> in s:'' | ||
| + | ! ''Explosive Mass in g<br /> (TNT equivalent):'' | ||
| + | |- | ||
| + | | 17pdr Shell SS Mk.1 || 754 || 8.4 || 13 || 5 || 20 || 50 | ||
|- | |- | ||
| − | |||
| − | |||
|} | |} | ||
===== [[Ammo racks|Ammo racks]] ===== | ===== [[Ammo racks|Ammo racks]] ===== | ||
| − | [[File: | + | [[File:Ammoracks A.C.IV.png|right|thumbnail|x250px|[[Ammo racks|Ammo racks]] of the AC IV Thunderbolt]] |
{| class="wikitable sortable" style="text-align:center" | {| class="wikitable sortable" style="text-align:center" | ||
|- | |- | ||
| Line 181: | Line 196: | ||
! class="wikitable unsortable" |3rd<br /> rack empty | ! class="wikitable unsortable" |3rd<br /> rack empty | ||
! class="wikitable unsortable" |4th<br /> rack empty | ! class="wikitable unsortable" |4th<br /> rack empty | ||
| + | ! class="wikitable unsortable" |5th<br /> rack empty | ||
| + | ! class="wikitable unsortable" |6th<br /> rack empty | ||
| + | ! class="wikitable unsortable" |7th<br /> rack empty | ||
| + | ! class="wikitable unsortable" |8th<br /> rack empty | ||
| + | ! class="wikitable unsortable" |9th<br /> rack empty | ||
! class="wikitable unsortable" |Visual<br /> discrepancy | ! class="wikitable unsortable" |Visual<br /> discrepancy | ||
|- | |- | ||
| − | || ''' | + | || '''50''' || XX ''(+X)'' || XX ''(+X)'' || XX ''(+X)'' || XX ''(+X)'' || XX ''(+X)'' || XX ''(+X)'' || XX ''(+X)'' || XX ''(+X)'' || 1 ''(+49)'' || style="text-align:center" | No |
|- | |- | ||
|} | |} | ||
| Line 189: | Line 209: | ||
=== Machine guns === | === Machine guns === | ||
<!--''Offensive and anti-aircraft machine guns not only allow you to fight some aircraft, but also are effective against lightly armoured vehicles. Evaluate machine guns and give recommendations on its use.''--> | <!--''Offensive and anti-aircraft machine guns not only allow you to fight some aircraft, but also are effective against lightly armoured vehicles. Evaluate machine guns and give recommendations on its use.''--> | ||
| − | {{main| | + | {{main|Vickers (7.7 mm)}} |
{| class="wikitable" style="text-align:center" | {| class="wikitable" style="text-align:center" | ||
| + | |- | ||
| + | ! colspan="7" | [[Vickers (7.7 mm)|7.7 mm Vickers]] | ||
|- | |- | ||
! colspan="7" | ''Coaxial mount'' | ! colspan="7" | ''Coaxial mount'' | ||
| Line 200: | Line 222: | ||
! rowspan="1" | Horizontal <br> guidance | ! rowspan="1" | Horizontal <br> guidance | ||
|- | |- | ||
| − | | colspan="4" | | + | | colspan="4" | 4,250 (250) || 390 || N/A || N/A |
|- | |- | ||
|} | |} | ||
| − | == Usage in battles == | + | == Usage in the battles == |
<!--''Describe the tactics of playing in the vehicle, the features of using vehicles in the team and advice on tactics. Refrain from creating a "guide" - do not impose a single point of view but give the reader food for thought. Describe the most dangerous enemies and give recommendations on fighting them. If necessary, note the specifics of the game in different modes (AB, RB, SB).''--> | <!--''Describe the tactics of playing in the vehicle, the features of using vehicles in the team and advice on tactics. Refrain from creating a "guide" - do not impose a single point of view but give the reader food for thought. Describe the most dangerous enemies and give recommendations on fighting them. If necessary, note the specifics of the game in different modes (AB, RB, SB).''--> | ||
| − | + | Exploit the A.C. IV's maneuverability against the heavier tanks, plus the 17-pounder tank allows for a penetration through the enemy's armour to cause internal damages. The fast reverse speed makes the "shoot-and-scoot" tactic a viable method against the enemy, and should be the prime one as the armour of the Sentinel is not exactly the most durable at only 50 mm flat. However, the sloping nature of the armour could give the bouncing capability of the tank comparable to the [[T-34 (1942)|T-34]], it's even arguably much better. So while the weight class is definitely against the Sentinel, a chance is always there to take out the opposition. | |
| − | + | "Shoot-and-scoot" tactics are the best tactics to use with this vehicle. The Sentinel's armour does not let the tank be a brawler, so it must be more "sneaky" against the enemies. Another thing to note is the driver's hatch at the front of the tank. To avoid a frontally penetrating shot, always angle the driver's hatch away from the enemy. | |
=== Pros and cons === | === Pros and cons === | ||
| − | <!--''Summarize and briefly evaluate the vehicle in terms of its characteristics and combat effectiveness. Mark its pros and cons in a bulleted list. | + | <!--''Summarize and briefly evaluate the vehicle in terms of its characteristics and combat effectiveness. Mark its pros and cons in a bulleted list. Do not use more than 6 points for each of the characteristics. Avoid using categorical definitions such as "bad", "good" and the like - they have a substitution in the form of softer "inadequate", "effective".''--> |
'''Pros:''' | '''Pros:''' | ||
| − | * | + | *Good sloped armour. |
| − | + | *High penetration solid shot rounds. | |
| − | + | *Good manoeuvrability. | |
| − | + | *Fast reverse speed. | |
| − | + | *Small profile. | |
| − | |||
| − | |||
| − | |||
| − | * | ||
| − | |||
| − | |||
| − | * Small | ||
'''Cons:''' | '''Cons:''' | ||
| − | * | + | *Sloped armour only on the front. |
| − | + | **Susceptible to large caliber HE. | |
| − | + | *Only 44mm (4.4cm) of side armour. | |
| − | + | *Cannon lacks armour-piercing rounds with high-explosive filler. | |
| − | * | + | *No APDS rounds, unlike other British medium tanks at this rank. |
| − | |||
| − | |||
| − | |||
| − | |||
| − | |||
== History == | == History == | ||
| − | <!--''Describe the history of the creation and combat usage of the ground vehicle in more detail than in the introduction. If the historical reference turns out to be too big, take it to a separate article, taking a link to an article about the vehicle and adding a block "/ | + | <!--''Describe the history of the creation and combat usage of the ground vehicle in more detail than in the introduction. If the historical reference turns out to be too big, take it to a separate article, taking a link to an article about the vehicle and adding a block "/historical reference" (example: https://wiki.warthunder.com/Name-vehicles/historical reference) and add a link to it here using the <code>main</code> template. Be sure to include links to sources at the end of the article.''--> |
| − | + | ===Development=== | |
| − | + | Australia began designing a tank in November 1940 as the ''AC I'', and was intended to be a cruiser tank weighing between 16 to 20 tons with a [[Ordnance QF 2-pounder (40 mm)|2-pounder gun]]. With no prior experience in producing a domestic tank, Australia sent a task force to the United States to study the [[M3 Lee|M3 Medium]] design to understand the in-and-outs of a tank. They also received the aid of Colonel W.D. Watson MC in December 1940 from Britain, who has many years of tank designing experience. The overall mission ended up having the tank design to have a similar concept as the Canadian ''[[M4A5|Ram]]'' tank, being based off the the M3 Medium chassis and mated with a domestic design of their choice for the upper part. The Australian attached the chassis with a hull and turret with design similarities to the British [[Crusader Mk III|Crusader]] tanks. The design started to become less of a cruiser tank and more of a medium tank by American specifications due to the attempt to up-armour and up-gun the tank to keep up with German armour development. | |
| − | |||
| − | |||
| − | |||
| − | |||
| − | |||
| − | + | The first design was completed in February 1942 as the Cruiser Tank Mark 1 (AC I) and designated the "Sentinel". The design was simplified by using existing parts of current tanks and using a cast hull and turret. Though originally specified for a 2-pounder, it was then asked for a [[Ordnance QF 6-pounder Mk.III (57 mm)|6-pounder]] armament. Two Vickers machine gun were used as the coaxial and hull machine gun. With the power of three Cadillac V8 Petrol engines. It was unorthodox, but powerful enough to propel the vehicle. 65 of these tanks were made by June 1943 before being succeeded by a more advanced design known as ''AC III'', also known as the "Thunderbolt". It had better armour and an improved firepower in the form of the 25-pounder howitzer. Despite the bigger gun, the 54-inch turret ring was never expanded to accommodate for the gun's larger size, so the crew experienced a slightly cramped turret interior for the benefit of having a better high-explosive charge and armour-piercing capability. Other differences in the design was the removal of the hull machine gun and a different set-up of the three Cadillac engines. One pilot model was built and plans were made for a production for 25 tanks for further trials, but the program was terminated. | |
| − | + | Another attempt was made to increase Australian tank firepower with the '''AC IV''' design. It first started when the designers check to see if the turret could mount the massive 17-pounder in use by the British to fight the heavier and more protected German tanks. When the tests proved successful, the 17-pounder was chosen to be the gun for the ''AC IV'', with a new and larger turret and 70-inch turret ring to improve crew comfort. These tanks were only made for evaluation purposes only and were never mass-produced for equipping the armoured units. | |
| − | + | ===Termination=== | |
| + | The ''AC IV'' design, along with the entire Australian Cruiser tank program, was terminated in July 1943, ending with only 65 tanks produced and a few prototype models. The reason was that the funds were better spent improving the infrastructure than building new tanks due to the large number of American tanks such as the [[M4|M4 Medium]] that were being supplied to Australia. The AC "Sentinel" were all put into storage and kept until the end of the war. The only use the Sentinel saw was in the film ''The Rats of Tobruk'' in 1943 when a squadron of ''AC I'' tanks were modified to resemble German tanks. | ||
| − | + | ===Survivors=== | |
| + | After the war, the Australian government disposed most of the tanks in 1945, most were sold off by the Commonwealth Disposals Commission. Today, about six Sentinels survive in intact conditions across the world. One notably in the Bovington Tank Museum, and three in Australia in the RAAC Tank Museum, Treloar Technology Centre, and one in the United States in the Collings Foundation. | ||
| − | '' | + | '''Trivia:'''<br/> |
| + | The tank in the game is the version planned for serial production, so it has the hull of the AC III; unlike the actual prototype design developed, which used the hull from the AC I version. | ||
== Media == | == Media == | ||
''An excellent addition to the article will be video guides, as well as screenshots from the game and photos.'' | ''An excellent addition to the article will be video guides, as well as screenshots from the game and photos.'' | ||
| − | == | + | == Read also == |
| − | + | * [https://warthunder.com/en/devblog/current/849/ [Devblog<nowiki>]</nowiki> AC IV Thunderbolt] | |
| − | |||
| − | |||
| − | == | + | == Sources == |
| − | + | ''Paste links to sources and external resources, such as:'' | |
* ''topic on the official game forum;'' | * ''topic on the official game forum;'' | ||
| − | + | * ''other literature.'' | |
| − | * ''other literature.'' | ||
| − | |||
| − | {{ | + | {{Britain medium tanks}} |
| + | {{Britain premium ground vehicles}} | ||
Revision as of 16:31, 14 March 2019
Contents
Description

The Cruiser tank A.C. Mark IV, also known as the AC IV Thunderbolt or the AC IV Sentinel, is a premium Rank III British medium tank on the British tree
with a battle rating of 5.3 (AB/RB/SB). It was released some time after Update 1.55 "Royal Armour". Armed with a 17-pounder gun, it has a high firepower for the battle rating it is in, able to effectively fight any other tanks at the battle rating. The Thunderbolt is also a small and maneuverable tank able to exploit harsh terrain to target the enemy.
The AC IV is a relatively small medium tank in comparison to the common mainstay of the other countries, especially when compared to the American Sherman tanks. The Sentinel also has a good maneuverability and power-to-weight ratio for the propulsion, able to accelerate to its max speed of roughly 30 km/h quickly and stay there on stable terrain. The tank has a great advantage of a decent reverse speed in comparison to other medium tanks of its caliber, with a reverse speed almost the same speed as forward. The addition of the 17-pounder gun also gives this tank a whopping high firepower for the size, so it can stand a chance against tanks of the same tier despite being out of the league in terms of armour.
General info
Survivability and armour
Armour type:
- Cast homogeneous armour
- Rolled homogeneous armour (Hull roof)
| Armour | Front | Sides | Rear | Roof |
|---|---|---|---|---|
| Hull | 50.8 mm (66-67°) Frontal glacis 50.8 mm (30°) Driver's port 50.8 mm (7-68°) Lower glacis |
44.45 mm (0-12°) | 22.22 mm (78°) Top 44.45 mm (21-52°) Bottom |
22.22 mm |
| Turret | 63.5 mm (4-47°) Turret front 25.4-63.5 mm (1-68°) Gun mantlet |
63.5 mm (0-88°) | 63.5 mm (1-53°) | 35 mm |
| Armour | Sides | Roof | ||
| Cupola | 63.5 mm | 35 mm |
Notes:
- Suspension wheels and bogies are 20 mm thick, tracks are 20 mm.
- The rear bottom area has a track placed there, providing 20 mm of extra armour.
- The commander cupola is extended outwards from the left side of the turret, creating a vulnerable unsloped area vulnerable to weaker guns.
The AC IV Thunderbolt's armour have a high tendency to bounce shells. This is obvious with the extreme slope on the from of the tank, and turret design. The armour itself is not think, but due to the angle it is put at this tank is very fierce competition.
Mobility
| Mobility characteristic | ||
|---|---|---|
| Weight (tons) | Add-on Armour weight (tons) |
Max speed (km/h) |
| 26.4 | N/A | 53 (AB) |
| 48 (RB/SB) | ||
| Engine power (horsepower) | ||
| Mode | Stock | Upgraded |
| Arcade | 615 | 757 |
| Realistic/Simulator | 351 | 397 |
| Power-to-weight ratio (hp/ton) | ||
| Mode | Stock | Upgraded |
| Arcade | 23.29 | 28.67 |
| Realistic/Simulator | 13.29 | 15.04 |
Armaments
Main armament
| 76 mm OQF 17-pounder | |||||
|---|---|---|---|---|---|
| Capacity | Vertical guidance |
Horizontal guidance |
Stabilizer | ||
| 47 | -6°/+20° | ±180° | N/A | ||
| Turret rotation speed (°/s) | |||||
| Mode | Stock | Upgraded | Prior + Full crew | Prior + Expert qualif. | Prior + Ace qualif. |
| Arcade | 10.7 | 14.8 | _.__ | _.__ | _.__ |
| Realistic | 10.7 | 12.6 | _.__ | _.__ | _.__ |
| Reloading rate (seconds) | |||||
| Stock | Prior + Full crew | Prior + Expert qualif. | Prior + Ace qualif. | ||
| 7.60 | _.__ | _.__ | _.__ | ||
Ammunition
| Penetration statistics | |||||||
|---|---|---|---|---|---|---|---|
| Ammunition | Type of warhead |
Penetration in mm @ 90° | |||||
| 10m | 100m | 500m | 1000m | 1500m | 2000m | ||
| Shot Mk.6 | AP | 160 | 157 | 133 | 112 | 96 | 86 |
| Shell Mk.1 | HE | 9 | 9 | 9 | 9 | 9 | 9 |
| Shot Mk.4 | APC | 165 | 160 | 138 | 108 | 94 | 81 |
| Shot Mk.8 | APCBC | 171 | 168 | 156 | 143 | 130 | 120 |
| Shell details | ||||||||||
|---|---|---|---|---|---|---|---|---|---|---|
| Ammunition | Type of warhead |
Velocity in m/s |
Projectile Mass in kg |
Fuse delay
in m: |
Fuse sensitivity
in mm: |
Explosive Mass in g (TNT equivalent): |
Normalization At 30° from horizontal: |
Ricochet: | ||
| 0% | 50% | 100% | ||||||||
| Shot Mk.6 | AP | 883 | 7.7 | N/A | N/A | N/A | -1° | 47° | 60° | 65° |
| Shell Mk.1 | HE | 883 | 7.0 | 0.4 | 0.5 | 580 | +0° | 79° | 80° | 81° |
| Shot Mk.4 | APC | 883 | 7.7 | N/A | N/A | N/A | -1° | 48° | 63° | 71° |
| Shot Mk.8 | APCBC | 883 | 7.7 | N/A | N/A | N/A | +4° | 48° | 63° | 71° |
| Smoke characteristic | ||||||
|---|---|---|---|---|---|---|
| Ammunition | Velocity in m/s |
Projectile Mass in kg |
Screen radius in m |
Screen time in s |
Screen hold time in s: |
Explosive Mass in g (TNT equivalent): |
| 17pdr Shell SS Mk.1 | 754 | 8.4 | 13 | 5 | 20 | 50 |
Ammo racks

| Full ammo |
1st rack empty |
2nd rack empty |
3rd rack empty |
4th rack empty |
5th rack empty |
6th rack empty |
7th rack empty |
8th rack empty |
9th rack empty |
Visual discrepancy |
|---|---|---|---|---|---|---|---|---|---|---|
| 50 | XX (+X) | XX (+X) | XX (+X) | XX (+X) | XX (+X) | XX (+X) | XX (+X) | XX (+X) | 1 (+49) | No |
Machine guns
| 7.7 mm Vickers | ||||||
|---|---|---|---|---|---|---|
| Coaxial mount | ||||||
| Capacity (Belt capacity) | Fire rate (shots/minute) |
Vertical guidance |
Horizontal guidance | |||
| 4,250 (250) | 390 | N/A | N/A | |||
Usage in the battles
Exploit the A.C. IV's maneuverability against the heavier tanks, plus the 17-pounder tank allows for a penetration through the enemy's armour to cause internal damages. The fast reverse speed makes the "shoot-and-scoot" tactic a viable method against the enemy, and should be the prime one as the armour of the Sentinel is not exactly the most durable at only 50 mm flat. However, the sloping nature of the armour could give the bouncing capability of the tank comparable to the T-34, it's even arguably much better. So while the weight class is definitely against the Sentinel, a chance is always there to take out the opposition.
"Shoot-and-scoot" tactics are the best tactics to use with this vehicle. The Sentinel's armour does not let the tank be a brawler, so it must be more "sneaky" against the enemies. Another thing to note is the driver's hatch at the front of the tank. To avoid a frontally penetrating shot, always angle the driver's hatch away from the enemy.
Pros and cons
Pros:
- Good sloped armour.
- High penetration solid shot rounds.
- Good manoeuvrability.
- Fast reverse speed.
- Small profile.
Cons:
- Sloped armour only on the front.
- Susceptible to large caliber HE.
- Only 44mm (4.4cm) of side armour.
- Cannon lacks armour-piercing rounds with high-explosive filler.
- No APDS rounds, unlike other British medium tanks at this rank.
History
Development
Australia began designing a tank in November 1940 as the AC I, and was intended to be a cruiser tank weighing between 16 to 20 tons with a 2-pounder gun. With no prior experience in producing a domestic tank, Australia sent a task force to the United States to study the M3 Medium design to understand the in-and-outs of a tank. They also received the aid of Colonel W.D. Watson MC in December 1940 from Britain, who has many years of tank designing experience. The overall mission ended up having the tank design to have a similar concept as the Canadian Ram tank, being based off the the M3 Medium chassis and mated with a domestic design of their choice for the upper part. The Australian attached the chassis with a hull and turret with design similarities to the British Crusader tanks. The design started to become less of a cruiser tank and more of a medium tank by American specifications due to the attempt to up-armour and up-gun the tank to keep up with German armour development.
The first design was completed in February 1942 as the Cruiser Tank Mark 1 (AC I) and designated the "Sentinel". The design was simplified by using existing parts of current tanks and using a cast hull and turret. Though originally specified for a 2-pounder, it was then asked for a 6-pounder armament. Two Vickers machine gun were used as the coaxial and hull machine gun. With the power of three Cadillac V8 Petrol engines. It was unorthodox, but powerful enough to propel the vehicle. 65 of these tanks were made by June 1943 before being succeeded by a more advanced design known as AC III, also known as the "Thunderbolt". It had better armour and an improved firepower in the form of the 25-pounder howitzer. Despite the bigger gun, the 54-inch turret ring was never expanded to accommodate for the gun's larger size, so the crew experienced a slightly cramped turret interior for the benefit of having a better high-explosive charge and armour-piercing capability. Other differences in the design was the removal of the hull machine gun and a different set-up of the three Cadillac engines. One pilot model was built and plans were made for a production for 25 tanks for further trials, but the program was terminated.
Another attempt was made to increase Australian tank firepower with the AC IV design. It first started when the designers check to see if the turret could mount the massive 17-pounder in use by the British to fight the heavier and more protected German tanks. When the tests proved successful, the 17-pounder was chosen to be the gun for the AC IV, with a new and larger turret and 70-inch turret ring to improve crew comfort. These tanks were only made for evaluation purposes only and were never mass-produced for equipping the armoured units.
Termination
The AC IV design, along with the entire Australian Cruiser tank program, was terminated in July 1943, ending with only 65 tanks produced and a few prototype models. The reason was that the funds were better spent improving the infrastructure than building new tanks due to the large number of American tanks such as the M4 Medium that were being supplied to Australia. The AC "Sentinel" were all put into storage and kept until the end of the war. The only use the Sentinel saw was in the film The Rats of Tobruk in 1943 when a squadron of AC I tanks were modified to resemble German tanks.
Survivors
After the war, the Australian government disposed most of the tanks in 1945, most were sold off by the Commonwealth Disposals Commission. Today, about six Sentinels survive in intact conditions across the world. One notably in the Bovington Tank Museum, and three in Australia in the RAAC Tank Museum, Treloar Technology Centre, and one in the United States in the Collings Foundation.
Trivia:
The tank in the game is the version planned for serial production, so it has the hull of the AC III; unlike the actual prototype design developed, which used the hull from the AC I version.
Media
An excellent addition to the article will be video guides, as well as screenshots from the game and photos.
Read also
Sources
Paste links to sources and external resources, such as:
- topic on the official game forum;
- other literature.
| Britain medium tanks | |
|---|---|
| Valentine | Valentine I · Valentine IX · Valentine XI |
| Cromwell | Cromwell I · Cromwell V · Cromwell V (RP-3) |
| Cromwell derivatives | Challenger · Avenger · Comet I · Comet I "Iron Duke IV" · Charioteer Mk VII |
| Centurion | Centurion Mk 1 · Centurion Mk.2 · Centurion Mk 3 · Centurion Mk.5 AVRE · Centurion Mk 10 · Centurion Action X · FV4202 |
| Vickers MBT | Vickers Mk.1 · Vickers Mk.3 · Vickers Mk.7 |
| Chieftain | Chieftain Mk 3 · Chieftain Mk 5 · Chieftain Mk 10 |
| Challenger 1 | Challenger Mk.2 · Challenger Mk.3 · Challenger DS |
| Challenger 2 | Challenger 2 · Challenger 2 (2F) · Challenger 2 TES · Challenger 2 OES · Challenger 2E · Challenger 2 Black Night |
| Challenger 3 | Challenger 3 TD |
| Australia | A.C.I · A.C.IV · Centurion Mk.5/1 |
| South Africa | Olifant Mk.1A · Olifant Mk.2 · TTD |
| India | Vijayanta · Bhishma TWMP |
| Israel | ▄Sho't Kal Dalet |
| Jordan | Khalid |
| Sweden | ▄Strv 81 (RB 52) |
| USA | Grant I · Sherman II · Sherman Firefly · Sherman IC "Trzyniec" |
| Britain premium ground vehicles | |
|---|---|
| Light tanks | A13 Mk I (3rd R.T.R.) · A13 Mk II 1939 · AEC Mk II · Crusader "The Saint" · Rooikat 105 |
| Medium tanks | A.C.I · Grant I · Cromwell V (RP-3) · Sherman IC "Trzyniec" · A.C.IV · Comet I "Iron Duke IV" |
| Centurion Mk.2 · ▄Strv 81 (RB 52) · Centurion Mk.5 AVRE · Centurion Mk.5/1 · ▄Sho't Kal Dalet · Centurion Action X | |
| Vijayanta · Khalid · Challenger DS · Challenger 2 OES | |
| Heavy tanks | Independent · Matilda Hedgehog · Excelsior · TOG II · Churchill Crocodile · Black Prince |
| Tank destroyers | Alecto I · Achilles (65 Rg.) · QF 3.7 Ram |
