Difference between pages "Black Prince" and "P-43A-1 (China)"
Colok76286 (talk | contribs) (→Mobility: Updated to new, sleek profile table) |
(→Usage in battles) |
||
| Line 1: | Line 1: | ||
| − | {{Specs-Card|code= | + | {{Specs-Card|code=p-43a-1_china}} |
| + | {{About | ||
| + | | about = Chinese fighter '''{{PAGENAME}}''' | ||
| + | | usage = American version | ||
| + | | link = P-43A-1 | ||
| + | }} | ||
== Description == | == Description == | ||
| − | <!--''In the description, the first part | + | <!-- ''In the description, the first part should be about the history of and the creation and combat usage of the aircraft, as well as its key features. In the second part, tell the reader about the aircraft in the game. Insert a screenshot of the vehicle, so that if the novice player does not remember the vehicle by name, he will immediately understand what kind of vehicle the article is talking about.'' --> |
| − | [[File: | + | [[File:GarageImage_{{PAGENAME}}.jpg|420px|thumb|left]] |
| − | {{ | + | {{Break}} |
| − | The ''' | + | The '''{{Specs|name}}''' is a rank {{Specs|rank}} Chinese fighter {{Battle-rating}}. It was introduced in [[Update 1.91 "Night Vision"]]. |
| − | |||
| − | |||
| − | |||
| − | |||
| − | |||
| − | |||
== General info == | == General info == | ||
| − | === | + | === Flight performance === |
| − | <!--Describe | + | <!-- ''Describe how the aircraft behaves in the air. Speed, manoeuvrability, acceleration and allowable loads - these are the most important characteristics of the vehicle.'' --> |
| − | + | The P-43 was started as a private venture by the Seversky Aircraft Company (later known as Republic) which sought to improve upon its earlier fighter design the P-35. Several design changes turned this fighter into a good platform of which made the leap to the younger sibling, the P-47. The P-43 in its own right during 1940 when introduced to the United States Army Air Corps (USAAC) was the only fighter which excelled at high-altitude performance due to its belly-mounted turbo-supercharger and an effective oxygen system to sustain the pilot at those heights. | |
| − | |||
| − | + | Much like its predecessor and successor, the P-43 is a heavy fighter with a large engine which fills the role of a fighter/interceptor. Japanese aircraft at this rank can still outturn the P-43, but if used properly as a Boom & Zoom fighter, there should not be any need to turn fight. Priorities are to gain altitude and then be selective of the targets. Use diving speeds to zip in, shoot the enemy aircraft and then pull up and climb away. Resist the temptation of immediately turning back and finishing off an aircraft which was missed or wounded as doing so will only cause the P-43 to bleed energy it needs to work at its optimum. As a last resort, if caught in a situation where you need to dogfight, do so, but look for a way out so that you don't become easy pickings for another enemy pilot. | |
| − | |||
| − | + | {| class="wikitable" style="text-align:center" width="70%" | |
| − | + | ! rowspan="2" | Characteristics | |
| − | + | ! colspan="2" | Max Speed<br>(km/h at 7,600 m) | |
| − | + | ! rowspan="2" | Max altitude<br>(metres) | |
| − | + | ! colspan="2" | Turn time<br>(seconds) | |
| − | + | ! colspan="2" | Rate of climb<br>(metres/second) | |
| − | {| class="wikitable" style="text-align:center" | + | ! rowspan="2" | Take-off run<br>(metres) |
| − | | colspan=" | ||
|- | |- | ||
| − | ! | + | ! AB !! RB !! AB !! RB !! AB !! RB |
|- | |- | ||
| − | | | + | ! Stock |
| + | | 546 || 531 || rowspan="2" | {{Specs|ceiling}} || 19.9 || 20.6 || 10.8 || 10.8 || rowspan="2" | 343 | ||
|- | |- | ||
| − | | | + | ! Upgraded |
| − | + | | 589 || 566 || 18.1 || 19.0 || 17.1 || 13.6 | |
| − | |||
| − | | | ||
| − | | | ||
|- | |- | ||
|} | |} | ||
| − | |||
| − | + | ==== Details ==== | |
| − | + | {| class="wikitable" style="text-align:center" width="50%" | |
| − | |||
| − | |||
| − | |||
| − | === | ||
| − | |||
| − | |||
| − | |||
| − | |||
| − | |||
| − | |||
| − | |||
| − | |||
| − | |||
| − | |||
| − | |||
| − | |||
| − | |||
| − | |||
| − | |||
| − | {| class="wikitable" style="text-align:center" | ||
|- | |- | ||
| − | ! colspan=" | + | ! colspan="5" | Features |
|- | |- | ||
| − | ! | + | ! Combat flaps !! Take-off flaps !! Landing flaps !! Air brakes !! Arrestor gear |
| − | ! | ||
| − | ! | ||
| − | ! | ||
|- | |- | ||
| − | | | + | | ✓ || ✓ || ✓ || X || X <!-- ✓ --> |
|- | |- | ||
| − | + | |} | |
| − | + | ||
| − | + | {| class="wikitable" style="text-align:center" width="50%" | |
| − | |||
| − | |||
| − | |||
| − | |||
| − | |||
| − | |||
| − | |||
|- | |- | ||
| − | | | + | ! colspan="7" | Limits |
|- | |- | ||
| − | ! colspan=" | + | ! rowspan="2" | Wings (km/h) |
| + | ! rowspan="2" | Gear (km/h) | ||
| + | ! colspan="3" | Flaps (km/h) | ||
| + | ! colspan="2" | Max Static G | ||
|- | |- | ||
| − | ! | + | ! Combat !! Take-off !! Landing !! + !! - |
| − | ! | ||
| − | ! | ||
| − | ! | ||
|- | |- | ||
| − | | | + | | {{Specs|destruction|body}} || {{Specs|destruction|gear}} || 450 || 450 || 241 || ~11 || ~8 |
|- | |- | ||
|} | |} | ||
| − | + | {| class="wikitable" style="text-align:center" | |
| − | {| class="wikitable | ||
| − | |||
|- | |- | ||
| − | + | ! colspan="4" | Optimal velocities | |
| − | |||
| − | ! colspan=" | ||
|- | |- | ||
| − | ! | + | ! Ailerons<br>(km/h) |
| − | ! | + | ! Rudder<br>(km/h) |
| − | ! | + | ! Elevators<br>(km/h) |
| − | ! | + | ! Radiator<br>(km/h) |
| − | |||
| − | |||
|- | |- | ||
| − | | | + | | < 370 || < 400 || < 440 || > 270 |
| − | |||
| − | |||
| − | |||
| − | |||
| − | |||
| − | |||
| − | |||
| − | |||
|- | |- | ||
|} | |} | ||
| − | {| class="wikitable | + | |
| − | + | {| class="wikitable" style="text-align:center" | |
|- | |- | ||
| − | ! | + | ! colspan="3" | Compressor (RB/SB) |
| − | |||
| − | |||
| − | |||
| − | |||
| − | |||
| − | |||
| − | |||
| − | |||
| − | |||
| − | |||
|- | |- | ||
| − | ! | + | ! colspan="3" | Setting 1 |
| − | |||
| − | |||
|- | |- | ||
| − | + | ! Optimal altitude | |
| + | ! 100% Engine power | ||
| + | ! WEP Engine power | ||
|- | |- | ||
| − | + | | 7,620 m || 1,100 hp || 1,199 hp | |
| − | |||
| − | |||
| − | |||
| − | |||
| − | |||
| − | |||
| − | |||
| − | |||
| − | |||
| − | |||
| − | |||
| − | |||
| − | |||
| − | |||
| − | |||
| − | |||
| − | |||
| − | |||
| − | | | ||
| − | | | ||
|- | |- | ||
|} | |} | ||
| − | ===== | + | === Survivability and armour === |
| − | The | + | ''Examine the survivability of the aircraft. Note how vulnerable the structure is and how secure the pilot is, whether the fuel tanks are armoured, etc. Describe the armour, if there is any, and also mention the vulnerability of other critical aircraft systems.'' |
| + | |||
| + | == Armaments == | ||
| + | === Offensive armament === | ||
| + | <!-- ''Describe the offensive armament of the aircraft, if any. Describe how effective the cannons and machine guns are in a battle, and also what belts or drums are better to use. If there is no offensive weaponry, delete this subsection.'' --> | ||
| + | {{main|M2 Browning (12.7 mm)}} | ||
| + | |||
| + | The '''''{{PAGENAME}}''''' is armed with: | ||
| + | * 2 x 12.7 mm M2 Browning machine guns, nose-mounted (200 rpg = 400 total) | ||
| + | * 2 x 12.7 mm M2 Browning machine guns, wing-mounted (200 rpg = 400 total) | ||
| + | |||
| + | == Usage in battles == | ||
| + | <!-- ''Describe the tactics of playing in the aircraft, the features of using aircraft in a team and advice on tactics. Refrain from creating a "guide" - do not impose a single point of view, but instead, give the reader food for thought. Examine the most dangerous enemies and give recommendations on fighting them. If necessary, note the specifics of the game in different modes (AB, RB, SB).'' --> | ||
| + | P-43 pilots should climb at the beginning of a match. A climb angle of about 25 degrees should work fine. Aim to reach 4000 m before leveling out and gaining speed. Generally, the Lancer will be pitted against Japanese fighters. | ||
| + | |||
| + | The P-43 is a heavy hitter and can be used for both Boom & Zoom tactics or as a bomber hunter. While still a fairly manoeuvrable aircraft, it is suggested to avoid turn-fighting especially with Bf 109s and A6M Zeros which will dance around the P-43. | ||
| + | |||
| + | The four .50 calibre machine guns are the perfect platform for P-43 as a Boom & Zoom fighter. With diving speeds, the P-43 can race down and attack an enemy aircraft and then with full throttle can climb right back up to the perch where it was. Any enemy aircraft testing fate by climbing up after you, will most likely run out of energy and stall out, floating helplessly waiting for gravity to take over. At this point, the P-43 can rudder over with its large tail rudder and once again dive, but at this point will have a quite stationary target to eliminate. Once dispatched, the P-43 should climb right back up to its observation altitude and look for its next target. | ||
| − | + | One challenge of flying a fighter aircraft is the ability to climb higher altitudes to get to bombers. Many fighters simply do not have any superchargers or turbo-superchargers which allow it to continue to climb in the thinner air. The P-43 was outfitted with one such turbo-supercharger and therefore can easily get up to bomber altitude and pick off any pesky bombers orbiting ground targets. While the P-43 does not have any armour and can easily be disabled with a few machine gun rounds, it is advised to come at most bombers from the front, from above or from the side where many bombers tend to be the weakest in armament. It is important to attack critical components on the bomber such as the engines or the pilot as many bomber bodies and wings can easily soak up a large number of 12.7 mm rounds before systems begin to fail. As a bomber interceptor, it is important that you are attacking a bomber for the shortest amount of time possible because of their ability to shoot back. | |
| − | |||
| − | |||
| − | |||
| − | |||
| − | |||
| − | |||
| − | |||
| − | |||
| − | |||
| − | |||
| − | |||
| − | |||
| − | |||
| − | |||
| − | + | For those aircraft which find themselves facing a P-43 in combat, head-on encounters can work to take out an engine or the pilot, but beware of the 4 x .50 calibre machine guns pointing at you, typically fire off some rounds at range and then take evasive manoeuvres setting up for an Immelmann or a Split-S right before or right after passing so to get your guns on target before the P-43 has a chance to manoeuvre or zoom away. If you are lucky to catch a P-43 pilot in a turn fight, maximize your turns with flaps and throttle control and it should not be long before you are in a situation where you have a firing solution and dispatch the aircraft. If you can bleed the P-43's energy, then there will not be many options left for that pilot and leave you holding all the important cards in the deck. | |
| − | |||
| − | |||
| − | |||
| − | |||
| − | |||
| − | |||
| − | |||
| − | |||
| − | |||
| − | |||
| − | |||
| − | + | *The most dangerous enemies will be Ki-43s, A6Ms, Spitfires, P-40's, Bf-109's and Ki-61s. | |
| − | + | The limited ammo means trigger discipline is important - something made a bit easier by the poor armour of those enemies. Use stealth belts. 400 m convergence is recommended, and you will want to wait until you are 0.5 km away to start firing. In a good pilot's hands, a P-43 can easily take out 5 enemy aircraft. However, if not played with a boom and zoom tactic, it is a sitting duck. The P-43 is a good plane for pilots the offers a great learning step towards the P-47. | |
| − | + | === Manual Engine Control === | |
| − | {| class="wikitable" style="text-align:center" | + | {| class="wikitable" style="text-align:center" |
| − | ! colspan=" | + | |- |
| + | ! colspan="7" | MEC elements | ||
|- | |- | ||
| − | ! | + | ! rowspan="2" | Mixer |
| − | ! | + | ! rowspan="2" | Pitch |
| − | ! | + | ! colspan="3" | Radiator |
| + | ! rowspan="2" | Supercharger | ||
| + | ! rowspan="2" | Turbocharger | ||
|- | |- | ||
| − | ! | + | ! Oil !! Water !! Type |
| − | |||
|- | |- | ||
| − | + | | Controllable || Controllable<br>Not auto controlled || Controllable<br>Not auto controlled || Controllable<br>Not auto controlled || Separate || Not controllable<br>1 gear || Auto controlled | |
| − | | | ||
|- | |- | ||
|} | |} | ||
| − | + | === Modules === | |
| − | + | {| class="wikitable" | |
| − | + | ! Tier | |
| − | + | ! colspan="2" | Flight performance | |
| − | === | + | ! Survivability |
| − | + | ! Weaponry | |
| − | |||
| − | |||
| − | {| class="wikitable" | ||
|- | |- | ||
| − | + | | I | |
| + | | Fuselage repair | ||
| + | | Radiator | ||
| + | | | ||
| + | | Offensive 12 mm | ||
|- | |- | ||
| − | + | | II | |
| + | | | ||
| + | | Compressor | ||
| + | | Airframe | ||
| + | | | ||
|- | |- | ||
| − | + | | III | |
| − | + | | Wings repair | |
| − | + | | Engine | |
| − | + | | | |
| + | | New 12 mm MGs | ||
|- | |- | ||
| − | | | + | | IV |
| + | | | ||
| + | | Engine injection | ||
| + | | Cover | ||
| + | | | ||
|- | |- | ||
|} | |} | ||
| − | |||
| − | |||
| − | |||
| − | |||
| − | |||
| − | |||
| − | |||
| − | |||
| − | |||
| − | |||
| − | |||
| − | |||
| − | |||
| − | |||
| − | |||
| − | |||
| − | |||
| − | |||
| − | |||
| − | |||
=== Pros and cons === | === Pros and cons === | ||
| − | <!--Summarise and briefly evaluate the vehicle in terms of its characteristics and combat effectiveness. Mark its pros and cons in | + | <!-- ''Summarise and briefly evaluate the vehicle in terms of its characteristics and combat effectiveness. Mark its pros and cons in the bulleted list. Try not to use more than 6 points for each of the characteristics. Avoid using categorical definitions such as "bad", "good" and the like - use substitutions with softer forms such as "inadequate" and "effective".'' --> |
'''Pros:''' | '''Pros:''' | ||
| − | * | + | * Decent top speed |
| − | * | + | * Respectable firepower |
| − | + | * Good high-speed manoeuvrability | |
| − | * | + | * Good dive speed |
| − | * | + | * Mostly faces Japanese aircraft |
| − | |||
| − | |||
| − | |||
'''Cons:''' | '''Cons:''' | ||
| − | * | + | * Low-speed manoeuvrability is not very good |
| − | + | * No payload options | |
| − | + | * Low ammo | |
| − | |||
| − | * | ||
| − | * | ||
| − | |||
| − | |||
| − | |||
| − | |||
| − | |||
== History == | == History == | ||
| − | + | ''Describe the history of the creation and combat usage of the aircraft in more detail than in the introduction. If the historical reference turns out to be too long, take it to a separate article, taking a link to the article about the vehicle and adding a block "/History" (example: <nowiki>https://wiki.warthunder.com/(Vehicle-name)/History</nowiki>) and add a link to it here using the <code>main</code> template. Be sure to reference text and sources by using <code><nowiki><ref></ref></nowiki></code>, as well as adding them at the end of the article with <code><nowiki><references /></nowiki></code>. This section may also include the vehicle's dev blog entry (if applicable) and the in-game encyclopedia description (under <code><nowiki>=== In-game description ===</nowiki></code>, also if applicable).'' | |
| − | |||
| − | |||
| − | |||
| − | |||
| − | |||
| − | |||
| − | |||
| − | |||
== Media == | == Media == | ||
| − | + | ''Excellent additions to the article would be video guides, screenshots from the game, and photos.'' | |
| − | |||
| − | |||
| − | |||
| − | |||
| − | |||
== See also == | == See also == | ||
''Links to the articles on the War Thunder Wiki that you think will be useful for the reader, for example:'' | ''Links to the articles on the War Thunder Wiki that you think will be useful for the reader, for example:'' | ||
| − | + | * ''reference to the series of the aircraft;'' | |
| − | * ''reference to the series of the | ||
* ''links to approximate analogues of other nations and research trees.'' | * ''links to approximate analogues of other nations and research trees.'' | ||
== External links == | == External links == | ||
''Paste links to sources and external resources, such as:'' | ''Paste links to sources and external resources, such as:'' | ||
| − | |||
* ''topic on the official game forum;'' | * ''topic on the official game forum;'' | ||
| − | * ''encyclopedia page on the | + | * ''encyclopedia page on the aircraft;'' |
* ''other literature.'' | * ''other literature.'' | ||
| − | |||
| − | {{ | + | {{AirManufacturer Republic}} |
| − | {{ | + | {{China fighters}} |
Revision as of 22:37, 6 May 2020
Contents
| This page is about the Chinese fighter P-43A-1 (China). For American version, see P-43A-1. |
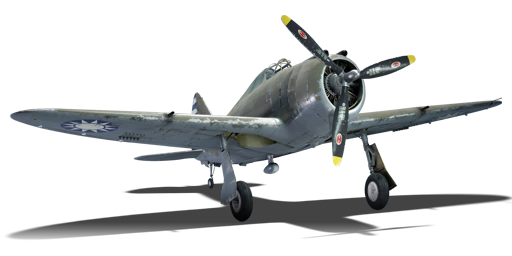
Description
.jpg)
The ␗P-43A-1 is a rank II Chinese fighter
with a battle rating of 3.0 (AB) and 2.7 (RB/SB). It was introduced in Update 1.91 "Night Vision".
General info
Flight performance
The P-43 was started as a private venture by the Seversky Aircraft Company (later known as Republic) which sought to improve upon its earlier fighter design the P-35. Several design changes turned this fighter into a good platform of which made the leap to the younger sibling, the P-47. The P-43 in its own right during 1940 when introduced to the United States Army Air Corps (USAAC) was the only fighter which excelled at high-altitude performance due to its belly-mounted turbo-supercharger and an effective oxygen system to sustain the pilot at those heights.
Much like its predecessor and successor, the P-43 is a heavy fighter with a large engine which fills the role of a fighter/interceptor. Japanese aircraft at this rank can still outturn the P-43, but if used properly as a Boom & Zoom fighter, there should not be any need to turn fight. Priorities are to gain altitude and then be selective of the targets. Use diving speeds to zip in, shoot the enemy aircraft and then pull up and climb away. Resist the temptation of immediately turning back and finishing off an aircraft which was missed or wounded as doing so will only cause the P-43 to bleed energy it needs to work at its optimum. As a last resort, if caught in a situation where you need to dogfight, do so, but look for a way out so that you don't become easy pickings for another enemy pilot.
| Characteristics | Max Speed (km/h at 7,600 m) |
Max altitude (metres) |
Turn time (seconds) |
Rate of climb (metres/second) |
Take-off run (metres) | |||
|---|---|---|---|---|---|---|---|---|
| AB | RB | AB | RB | AB | RB | |||
| Stock | 546 | 531 | 9700 | 19.9 | 20.6 | 10.8 | 10.8 | 343 |
| Upgraded | 589 | 566 | 18.1 | 19.0 | 17.1 | 13.6 | ||
Details
| Features | ||||
|---|---|---|---|---|
| Combat flaps | Take-off flaps | Landing flaps | Air brakes | Arrestor gear |
| ✓ | ✓ | ✓ | X | X |
| Limits | ||||||
|---|---|---|---|---|---|---|
| Wings (km/h) | Gear (km/h) | Flaps (km/h) | Max Static G | |||
| Combat | Take-off | Landing | + | - | ||
| 760 | 281 | 450 | 450 | 241 | ~11 | ~8 |
| Optimal velocities | |||
|---|---|---|---|
| Ailerons (km/h) |
Rudder (km/h) |
Elevators (km/h) |
Radiator (km/h) |
| < 370 | < 400 | < 440 | > 270 |
| Compressor (RB/SB) | ||
|---|---|---|
| Setting 1 | ||
| Optimal altitude | 100% Engine power | WEP Engine power |
| 7,620 m | 1,100 hp | 1,199 hp |
Survivability and armour
Examine the survivability of the aircraft. Note how vulnerable the structure is and how secure the pilot is, whether the fuel tanks are armoured, etc. Describe the armour, if there is any, and also mention the vulnerability of other critical aircraft systems.
Armaments
Offensive armament
The P-43A-1 (China) is armed with:
- 2 x 12.7 mm M2 Browning machine guns, nose-mounted (200 rpg = 400 total)
- 2 x 12.7 mm M2 Browning machine guns, wing-mounted (200 rpg = 400 total)
Usage in battles
P-43 pilots should climb at the beginning of a match. A climb angle of about 25 degrees should work fine. Aim to reach 4000 m before leveling out and gaining speed. Generally, the Lancer will be pitted against Japanese fighters.
The P-43 is a heavy hitter and can be used for both Boom & Zoom tactics or as a bomber hunter. While still a fairly manoeuvrable aircraft, it is suggested to avoid turn-fighting especially with Bf 109s and A6M Zeros which will dance around the P-43.
The four .50 calibre machine guns are the perfect platform for P-43 as a Boom & Zoom fighter. With diving speeds, the P-43 can race down and attack an enemy aircraft and then with full throttle can climb right back up to the perch where it was. Any enemy aircraft testing fate by climbing up after you, will most likely run out of energy and stall out, floating helplessly waiting for gravity to take over. At this point, the P-43 can rudder over with its large tail rudder and once again dive, but at this point will have a quite stationary target to eliminate. Once dispatched, the P-43 should climb right back up to its observation altitude and look for its next target.
One challenge of flying a fighter aircraft is the ability to climb higher altitudes to get to bombers. Many fighters simply do not have any superchargers or turbo-superchargers which allow it to continue to climb in the thinner air. The P-43 was outfitted with one such turbo-supercharger and therefore can easily get up to bomber altitude and pick off any pesky bombers orbiting ground targets. While the P-43 does not have any armour and can easily be disabled with a few machine gun rounds, it is advised to come at most bombers from the front, from above or from the side where many bombers tend to be the weakest in armament. It is important to attack critical components on the bomber such as the engines or the pilot as many bomber bodies and wings can easily soak up a large number of 12.7 mm rounds before systems begin to fail. As a bomber interceptor, it is important that you are attacking a bomber for the shortest amount of time possible because of their ability to shoot back.
For those aircraft which find themselves facing a P-43 in combat, head-on encounters can work to take out an engine or the pilot, but beware of the 4 x .50 calibre machine guns pointing at you, typically fire off some rounds at range and then take evasive manoeuvres setting up for an Immelmann or a Split-S right before or right after passing so to get your guns on target before the P-43 has a chance to manoeuvre or zoom away. If you are lucky to catch a P-43 pilot in a turn fight, maximize your turns with flaps and throttle control and it should not be long before you are in a situation where you have a firing solution and dispatch the aircraft. If you can bleed the P-43's energy, then there will not be many options left for that pilot and leave you holding all the important cards in the deck.
- The most dangerous enemies will be Ki-43s, A6Ms, Spitfires, P-40's, Bf-109's and Ki-61s.
The limited ammo means trigger discipline is important - something made a bit easier by the poor armour of those enemies. Use stealth belts. 400 m convergence is recommended, and you will want to wait until you are 0.5 km away to start firing. In a good pilot's hands, a P-43 can easily take out 5 enemy aircraft. However, if not played with a boom and zoom tactic, it is a sitting duck. The P-43 is a good plane for pilots the offers a great learning step towards the P-47.
Manual Engine Control
| MEC elements | ||||||
|---|---|---|---|---|---|---|
| Mixer | Pitch | Radiator | Supercharger | Turbocharger | ||
| Oil | Water | Type | ||||
| Controllable | Controllable Not auto controlled |
Controllable Not auto controlled |
Controllable Not auto controlled |
Separate | Not controllable 1 gear |
Auto controlled |
Modules
| Tier | Flight performance | Survivability | Weaponry | |
|---|---|---|---|---|
| I | Fuselage repair | Radiator | Offensive 12 mm | |
| II | Compressor | Airframe | ||
| III | Wings repair | Engine | New 12 mm MGs | |
| IV | Engine injection | Cover | ||
Pros and cons
Pros:
- Decent top speed
- Respectable firepower
- Good high-speed manoeuvrability
- Good dive speed
- Mostly faces Japanese aircraft
Cons:
- Low-speed manoeuvrability is not very good
- No payload options
- Low ammo
History
Describe the history of the creation and combat usage of the aircraft in more detail than in the introduction. If the historical reference turns out to be too long, take it to a separate article, taking a link to the article about the vehicle and adding a block "/History" (example: https://wiki.warthunder.com/(Vehicle-name)/History) and add a link to it here using the main template. Be sure to reference text and sources by using <ref></ref>, as well as adding them at the end of the article with <references />. This section may also include the vehicle's dev blog entry (if applicable) and the in-game encyclopedia description (under === In-game description ===, also if applicable).
Media
Excellent additions to the article would be video guides, screenshots from the game, and photos.
See also
Links to the articles on the War Thunder Wiki that you think will be useful for the reader, for example:
- reference to the series of the aircraft;
- links to approximate analogues of other nations and research trees.
External links
Paste links to sources and external resources, such as:
- topic on the official game forum;
- encyclopedia page on the aircraft;
- other literature.
| Republic Aviation Corporation | |
|---|---|
| Fighters | P-43A-1 |
| P-47D-22-RE · P-47D-25 · P-47D-28 · P-47M-1-RE · ⋠P-47M-1-RE · P-47N-15 | |
| Jet Aircraft | F-84B-26 · F-84F · F-84G-21-RE |
| F-105D | |
| Export | J9 Early* |
| ␗P-43A-1 | |
| ▄Thunderbolt Mk.1 · ▄P-47D-22-RE · ␗P-47D-23-RA · ▂P-47D-27 · ␗P-47D-30 · ▄P-47D-30 | |
| ◄F-84F · ▄F-84F (Italy) · ▄F-84F (France) · F-84F IAF · F-84F | |
| ␗F-84G-21-RE · ▄F-84G-21-RE · ▄F-84G-26-RE · ␗F-84G-31-RE | |
| Captured | ▀P-47D-16-RE · ▀P-47D |
| *The company was named "Seversky Aircraft Company" before being renamed in 1939 | |
| China fighters | |
|---|---|
| British | ␗Gladiator Mk I |
| French | D.510C |
| Japanese | ␗A6M2 · ␗Ki-27 otsu · ␗Ki-43-III ko · ␗Ki-44-II hei · ␗Ki-61-I otsu · ␗Ki-84 ko |
| American | CW-21 · Hawk III · P-66 · ␗P-40E-1 · H-81A-2 · ␗P-43A-1 · ␗P-47D-23-RA · ␗P-47D-30 · ␗P-51D-20 · ␗P-51K |
| Soviet | ␗I-15bis · ␗I-153 M-62 · ␗I-16 Chung 28 · ␗I-16 type 5 · ␗I-16 type 10 · ␗I-16 type 17 · ␗La-11 · ␗La-9 |
