Difference between pages "Me 262 A-1/U4" and "M247"
m (→Details: Updated template to preferred type) |
Victor_B18 (talk | contribs) (→Radars: I have added radars since it lacks information about it, with some pros and cons about it too.) (Tag: Visual edit) |
||
| Line 1: | Line 1: | ||
| − | {{Specs-Card|code= | + | {{Specs-Card|code=us_m247}} |
| − | |||
| − | |||
| − | |||
| − | |||
| − | }} | ||
== Description == | == Description == | ||
| − | <!--In the description, the first part | + | <!--''In the description, the first part needs to be about the history of the creation and combat usage of the vehicle, as well as its key features. In the second part, tell the reader about the ground vehicle in the game. Insert the screenshot of the vehicle. If the novice player does not remember the vehicle by name, they will immediately understand what kind of vehicle it is talking about.''--> |
| + | The '''{{Specs|name}}''' is a Rank {{Specs|rank}} American self-propelled anti-aircraft gun {{Battle-rating|1}}. It was introduced in [[Update 1.81 "The Valkyries"]]. | ||
| − | + | == General info == | |
| − | + | === Survivability and armour === | |
| − | + | <!--''Describe armour protection. Note the most well protected and key weak areas. Appreciate the layout of modules as well as the number and location of crew members. Is the level of armour protection sufficient, is the placement of modules helpful for survival in combat?'' | |
| − | + | ''If necessary use a visual template to indicate the most secure and weak zones of the armour.''--> | |
| + | '''Armour type:''' | ||
| − | + | *Cast homogeneous armour (Hull) | |
| − | + | *Rolled homogeneous armour (Rear (low), Roof, Turret) | |
| − | |||
| − | {| class="wikitable" | + | {| class="wikitable" |
| − | |||
| − | |||
| − | |||
| − | |||
| − | |||
| − | |||
|- | |- | ||
| − | ! | + | ! Armour !! Front (Slope angle) !! Sides !! Rear !! Roof |
|- | |- | ||
| − | + | | Hull || 85-200 mm (59-74°) ''Front glacis'' <br> 63-200 mm (13-60°) ''Lower glacis'' || 76 mm (8-43°) ''Front'' <br> 51 mm (0-43°) ''Rear'' || 35 mm (26-32°) ''Top'' <br> 25 mm (61-62°) ''Bottom'' || 57 mm | |
| − | | | ||
|- | |- | ||
| − | + | | Turret || 25.4 mm (15-76°) ''Turret front (Upper)'' <br> 12.7 mm (40-69°) ''Turret front (Lower)'' <br> 25.4 mm (0-87°) ''Gun mantlet'' || 12.7-25.4 mm (0-19°) ''Upper'' <br> 12.7 mm (40-69°) ''Lower'' || 12.7 mm (18°) || 12.7 mm | |
| − | | | ||
|- | |- | ||
|} | |} | ||
| + | '''Notes:''' | ||
| + | |||
| + | * Suspension wheels and tracks are 20 mm thick. | ||
| + | * Belly armour is 38 mm in the front and 25 mm in the rear. | ||
| + | |||
| + | === Mobility === | ||
| + | <!-- ''Write about the mobility of the ground vehicle. Estimate the specific power and manoeuvrability, as well as the maximum speed forwards and backwards.'' --> | ||
| + | |||
| + | {{tankMobility|abMinHp= 1065|rbMinHp= 663|<!--AoAweight=(optional) -->}} | ||
| + | |||
| + | The {{PAGENAME}}'s turret is installed on the hull of an [[M48A1|M48 medium tank]], because of this they have roughly similar mobility. The {{PAGENAME}} is about 3 tons heavier than the M48A1 (49.3 tons vs. 46.4 tons), and has a slightly weaker engine, which translates into a slightly more sluggish machine compared to the M48A1. The M48A1 has a max engine power of 810 hp, while the {{PAGENAME}}'s engine power is 750 hp. For a vehicle this heavy, it has fairly good mobility. When spaded, it can comfortably hit a top speed of 45 km/h on flat terrain, while in cross-country you will have a top speed of around 25 km/h. While going backwards, the top speed is somewhat less impressive: about -9 km/h. | ||
| + | |||
| + | == Armaments == | ||
| + | <!--''Give the reader information about the characteristics of the main gun. Assess its effectiveness in a battle based on the reloading speed, ballistics and the power of shells. Do not forget about the flexibility of the fire, that is how quickly the cannon can be aimed at the target, open fire on it and aim at another enemy. Add a link to the main article on the gun: <code><nowiki>{{main|Name of the weapon}}</nowiki></code>. Describe in general terms the ammunition available for the main gun. Give advice on how to use them and how to fill the ammunition storage.''--> | ||
| + | {{main|Bofors L/70 (40 mm)}} | ||
| − | |||
{| class="wikitable" style="text-align:center" | {| class="wikitable" style="text-align:center" | ||
|- | |- | ||
| − | ! colspan="6" | | + | ! colspan="6" | [[Bofors L/70 (40 mm)|40 mm M266 Automatic Cannon]] (x2) |
| + | |- | ||
| + | ! colspan="3" rowspan="1" style="width:5em" |Capacity (Belt capacity each) | ||
| + | ! rowspan="1" | Fire rate <br> (shots/minute) | ||
| + | ! rowspan="1" | Vertical <br> guidance | ||
| + | ! rowspan="1" | Horizontal <br> guidance | ||
| + | |- | ||
| + | | colspan="3" | 560 (280) || 300 || -5°/+85° || ±180° | ||
|- | |- | ||
| − | ! | + | ! colspan="6" | Turret rotation speed (°/s) |
|- | |- | ||
| − | | | + | ! style="width:4em" |Mode |
| + | ! style="width:4em" |Stock | ||
| + | ! style="width:4em" |Upgraded | ||
| + | ! style="width:4em" |Prior + Full crew | ||
| + | ! style="width:4em" |Prior + Expert qualif. | ||
| + | ! style="width:4em" |Prior + Ace qualif. | ||
|- | |- | ||
| − | | | + | | ''Arcade'' || 52.8 || ? || ? || ? || ? |
| − | |||
| − | |||
|- | |- | ||
| − | + | | ''Realistic'' || 35.7 || ? || ? || ? || ? | |
|- | |- | ||
| − | + | ! colspan="4" | Reloading rate (seconds) | |
| − | |||
| − | ! colspan=" | ||
| − | |||
|- | |- | ||
| − | ! | + | ! colspan="1" style="width:4em" |Stock |
| + | ! colspan="1" style="width:4em" |Prior + Full crew | ||
| + | ! colspan="1" style="width:4em" |Prior + Expert qualif. | ||
| + | ! colspan="1" style="width:4em" |Prior + Ace qualif. | ||
|- | |- | ||
| − | | | + | | 6.5 || ? || ? || ? |
|- | |- | ||
|} | |} | ||
| − | {| class="wikitable" style="text-align:center" | + | === Ammunition === |
| + | {| class="wikitable sortable" style="text-align:center" width="100%" | ||
| + | ! colspan="8" | Penetration statistics | ||
| + | |- | ||
| + | ! rowspan="2" data-sort-type="text" | Ammunition | ||
| + | ! rowspan="2" class="unsortable" | Type of <br /> warhead | ||
| + | ! colspan="6" | '''Penetration''' '''''in mm''''' '''@ 90°''' | ||
|- | |- | ||
| − | ! | + | ! 10m |
| + | ! 100m | ||
| + | ! 500m | ||
| + | ! 1000m | ||
| + | ! 1500m | ||
| + | ! 2000m | ||
|- | |- | ||
| − | + | | M811 || HEFI-T* || 5 || 5 || 5 || 5 || 5 || 5 | |
|- | |- | ||
| − | | | + | | M822 || HEFI-T* || 5 || 5 || 5 || 5 || 5 || 5 |
|- | |- | ||
| + | | 40 mm AP-T || AP-T || 93 || 90 || 77 || 62 || 51 || 41 | ||
| + | |- | ||
|} | |} | ||
| − | + | {| class="wikitable sortable" style="text-align:center" width="100%" | |
| − | + | ! colspan="11" | Shell details | |
| − | {| class="wikitable" style="text-align:center" | ||
|- | |- | ||
| − | ! | + | ! rowspan="2" data-sort-type="text" | Ammunition |
| − | ! colspan=" | + | ! rowspan="2" class="unsortable" | Type of <br /> warhead |
| + | ! rowspan="2" |Velocity <br /> in m/s | ||
| + | ! rowspan="2" |Projectile<br />Mass in kg | ||
| + | ! rowspan="2" | ''Fuse delay'' | ||
| + | ''in m:'' | ||
| + | ! rowspan="2" | ''Fuse sensitivity'' | ||
| + | ''in mm:'' | ||
| + | ! rowspan="2" | ''Explosive Mass in g<br /> (TNT equivalent):'' | ||
| + | ! rowspan="2" | ''Normalization At 30° <br> from horizontal:'' | ||
| + | ! colspan="3" | ''Ricochet:'' | ||
|- | |- | ||
| − | ! | + | ! 0% |
| − | ! | + | ! 50% |
| + | ! 100% | ||
|- | |- | ||
| − | | | + | | M811 || HEFI-T* || 1100 || 0.87 || 0.2 || 0.1 || 255 || +0° || 79° || 80° || 81° |
| − | | | ||
|- | |- | ||
| − | + | | M822 || HEFI-T* || 1100 || 0.87 || 0.2 || 0.1 || 185 || +0° || 79° || 80° || 81° | |
| − | |||
|- | |- | ||
| − | + | | 40 mm AP-T || AP-T || 1030 || 0.88 || N/A || N/A || N/A || -1° || 48° || 69° || 79° | |
| − | |||
|- | |- | ||
| − | | | + | |} |
| − | | | + | |
| − | | | + | ===Belt types=== |
| − | + | {| class="wikitable" style="text-align:center" width="100%" | |
| − | + | | style="width: 8%" | '''Belts''' | |
| + | | style="width: 20%" | '''Shell composition''' | ||
| + | | '''Combat usage''' | ||
|- | |- | ||
| − | + | | ''Default'' || HEFI-T* / AP-T || align="left" | Good general ammunition, a hit on an aircraft typically means its destruction while still enough to do damage to armoured ground vehicles, especially if it shoots into the side of an enemy tank (weaker armour). Good to start with until comfortable with other types of ammunition. | |
| − | |||
|- | |- | ||
| − | | '' | + | |''40 mm AP-T'' || AP-T / AP-T / AP-T / HEFI-T* || align="left" | Very powerful ammunition which can be used against ground targets with significantly more penetration than other 35-40 mm AP-T projectiles. Will easily destroy any target with side shots even outside the point-blank range and can destroy lighter targets and weak spots from the front even against main battle tanks. |
| − | |||
|- | |- | ||
| − | | '' | + | |''M811'' || HEFI-T* / HEFI-T* / HEFI-T* / AP-T || align="left" | "Poor man's anti-air ammunition." Unlike the M822 shells these require direct hits to do significant damage, but if problems are experienced with M822 detonating too early this belt may be your best choice. |
| − | | | ||
|- | |- | ||
| + | |''M822'' || HEFI-T* / HEFI-T* / AP-T || align="left" | Proximity-fused shells that absolutely obliterate aircraft when they make contact, though if they detonate too early, they will do little to no damage. Somewhat unreliable in if they detonate within range of the target, but when they do the target will quickly take considerable damage if not destroyed. The only ammunition for self-propelled anti-aircraft guns that which can cause enough shrapnel damage to bring down planes and helicopters even with near misses. This round should be the go-to anti-air ammunition, although the M811 is a good backup if the M822 is problematic for the gunner. | ||
|} | |} | ||
| − | |||
| − | |||
| − | |||
| − | |||
| − | |||
| − | |||
| − | |||
| − | |||
| − | |||
| − | |||
| − | |||
| − | |||
| − | |||
| − | |||
| − | |||
| − | |||
| − | |||
| − | |||
| − | |||
== Usage in battles == | == Usage in battles == | ||
| − | + | ''Describe the tactics of playing in the vehicle, the features of using vehicles in the team and advice on tactics. Refrain from creating a "guide" - do not impose a single point of view but give the reader food for thought. Describe the most dangerous enemies and give recommendations on fighting them. If necessary, note the specifics of the game in different modes (AB, RB, SB).'' | |
| − | |||
| − | + | === Modules === | |
| + | {| class="wikitable" | ||
| + | !Tier | ||
| + | ! colspan="2" |Mobility | ||
| + | !Protection | ||
| + | ! colspan="3" |Firepower | ||
| + | |- | ||
| + | |I | ||
| + | |Tracks|| | ||
| + | |Parts | ||
| + | |Horizontal Drive||M811|| | ||
| + | |- | ||
| + | |II | ||
| + | |Suspension||Brake System | ||
| + | |FPE | ||
| + | |Adjustment of Fire||40 mm AP-T|| | ||
| + | |- | ||
| + | |III | ||
| + | |Filters|| | ||
| + | |Crew Replenishment | ||
| + | |Elevation Mechanism||Smoke grenade||NVD | ||
| + | |- | ||
| + | |IV | ||
| + | |Transmission||Engine | ||
| + | | | ||
| + | |Laser rangefinder||Artillery support||M822 | ||
| + | |} | ||
| − | + | === '''Radar'''s === | |
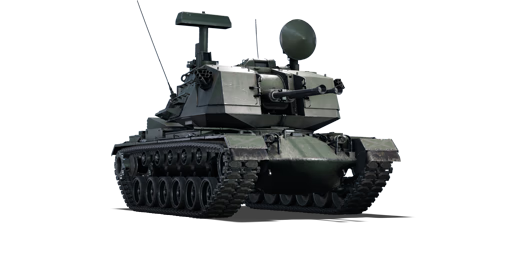
| − | + | === [[Albis]] === | |
| + | The M247 uses the [[Albis]] tracking radar. The ''tracking radar director'' is the circular looking cone located above the leftmost forward of the turret and has a fixed horizontal position and only follows vertical targeting together with the armament. It may look like almost the same ''tracking radar director'' as the M163's but it's different. | ||
| − | + | {| class="wikitable" | |
| + | ! colspan="5" |[[wikipedia:AN/APG-66|AN/APG-66]] - Target Tracking Radar | ||
| + | |- | ||
| + | !Maximum | ||
| + | Detection | ||
| − | + | Range | |
| + | !Minimum | ||
| + | Detection | ||
| − | + | Range | |
| − | + | !Max Azimuth | |
| − | + | Tracking Angle | |
| + | !Elevation Tracking | ||
| + | Angle | ||
| + | !Minimum Relative | ||
| + | Speed | ||
| + | |- | ||
| + | |15,000 m | ||
| + | |100 m | ||
| + | |±10 degrees | ||
| + | | -5°/+85° | ||
| + | |15m/s (54km/h) | ||
| + | |} | ||
| − | '' | + | ==== [[wikipedia:AN/MPQ-49_Forward_Area_Alerting_Radar|AN/MPQ-49]] ==== |
| − | + | The M247's uses a modified [[wikipedia:AN/MPQ-49_Forward_Area_Alerting_Radar|AN/MPQ-49]] search radar. It has the longest search range even when compared to 10.0 SPAAGs, yet it is still questionable if that long search range will be used often or frequently as most ''ground realistic battles''<nowiki/>' jets and helicopters spawn already within 10km into the battlefield, this is why most commanders of the M247 have their ranges set to only 10km most of the time, not unless maps like ''Port Novorossiysk'' that have airfields that are more than 30kms away. Some helicopters do spawn on the farthest helipad where it is near the airfield, this is one of the reasons commanders of the M247 can set their ranges to 20km which is way above their target locking range and especially engagement range. | |
| − | + | {| class="wikitable" | |
| − | + | ! colspan="5" |[[wikipedia:AN/MPQ-49_Forward_Area_Alerting_Radar|AN/MPQ-49]] | |
| − | + | |- | |
| − | + | !Maximum | |
| − | + | Detection | |
| − | |||
| − | |||
| − | |||
| − | + | Range | |
| + | !Minimum | ||
| + | Detection | ||
| − | + | Range | |
| − | + | !Max Azimuth | |
| − | + | Scan Angle | |
| − | ! | + | !Max Elevation |
| − | + | Scan Angle | |
| − | ! | + | !Minimum |
| − | + | Relative | |
| − | ! | ||
| − | |||
| − | |||
| − | |||
| − | |||
| − | |||
| − | |||
| − | |||
| − | |||
| − | |||
| − | |||
| − | + | Speed | |
| − | |||
| − | |||
| − | |||
| − | |||
| − | |||
| − | |||
| − | |||
| − | |||
| − | |||
| − | |||
| − | |||
| − | |||
| − | |||
| − | |||
| − | |||
| − | |||
| − | |||
| − | |||
| − | |||
| − | |||
| − | |||
| − | |||
| − | |||
| − | |||
| − | |||
|- | |- | ||
| + | |40,000 m | ||
| + | |100 m | ||
| + | |360° | ||
| + | |17° | ||
| + | |10m/s (34km/h) | ||
|} | |} | ||
| + | {{Notice|Locking a target through sniper mode is not needed anymore as long as the target to be destroyed is detected and selected from the search radar while turret is pointed within 200 degrees to the target.}} | ||
| − | + | == Pros and cons == | |
| + | <!--''Summarize and briefly evaluate the vehicle in terms of its characteristics and combat effectiveness. Mark its pros and cons in a bulleted list. Try not to use more than 6 points for each of the characteristics. Avoid using categorical definitions such as "bad", "good" and the like - they have a substitution in the form of softer "inadequate", "effective".''--> | ||
| − | + | '''Pros:''' | |
| − | |||
| − | + | * Twin stabilized 40 mm M266 cannon (L/70 40 mm Bofors) have a much higher rate of fire compared to the M42 Duster: Deadlier and more accurate | |
| − | * | + | * Large ammunition count ensures that you will have plenty to fire throughout a match without fear of running out of ammo mid-game |
| − | * | + | * Has access to 12 x 66 mm smoke grenades, perfect for exiting a dangerous situation |
| − | * | + | * The M822 ammunition is proximity fused and will detonate if the projectile passes close enough to the target |
| − | * | + | * The 40 mm's pose a serious threat to lightly-armoured vehicles |
| − | * | + | * Uses the M48 Patton's hull (armour included) = one of the best-protected SPAA in the game |
| − | * | + | * Benefits in realistic battles from aim-assistance thanks to the radar |
| − | * | + | * Has access to night-vision devices for use in night battles |
| − | + | * Large radar sweep range to easily spot targets, as well as a large radar lock-on marker in its scope | |
| − | * | + | * Has the furthest search radar range even when compared to 10.0 SPAAGs |
'''Cons:''' | '''Cons:''' | ||
| − | + | ||
| − | * | + | * As with all high-rank SPAA, the M247 has very thin turret armour; a shell strike could instantly end the vehicle |
| − | * | + | ** Turret is also vulnerable to strafing aircraft + rockets |
| − | * | + | *Armour advantages are nullified due to the inclusion of the Hull Break mechanic |
| − | * | + | *No thermal sights |
| − | + | *Search radar cannot be folded | |
| − | |||
| − | * | ||
| − | * | ||
== History == | == History == | ||
| − | ''Describe the history of the creation and combat usage of the | + | <!--''Describe the history of the creation and combat usage of the ground vehicle in more detail than in the introduction. If the historical reference turns out to be too big, take it to a separate article, taking a link to an article about the vehicle and adding a block "/ History" (example: <nowiki>https://wiki.warthunder.com/(Vehicle-name)/History</nowiki>) and add a link to it here using the <code>main</code> template. Be sure to reference text and sources by using <code><nowiki><ref></nowiki></code>, as well as adding them at the end of the article.''--> |
| + | |||
| + | The M247 "Sergeant York" was designed in the late 1970's as a purpose-built SPAAG. It was designed to fight alongside the [[M1 Abrams]] and [[M3 Bradley|M2/M3 Bradley]], in order to provide cover against aircraft. There were other SPAA vehicles in service at the time; these were the [[M163|M163 Vulcan]] and the MIM-72/M48 Chaparral. The former being a 20 mm rotary cannon mounted on an armored personnel carrier, and the latter being a heavily modified armored personnel carrier chassis with a surface-to-air missile launcher. Neither of those two vehicles were designed as SPAA's, and so, did not have the necessary performance to be adequate at their job. The M247 was designed as a replacement for both of the previous vehicles. | ||
| + | |||
| + | Designs from a multitude of companies were entered into the competition. Only two were selected for testing: the Ford XM-247 with twin Bofors 40mm cannons and the General Dynamics XM-246 with twin Oerlikon 35mm cannons. The two prototypes were tested, and the XM-247 was selected as the winner, although the XM-246 had outscored it in all the shooting tests. The M247, as it was soon designated, ran into many problems. The radar was extremely deficient; it had a hard time distinguishing trees from planes, and if the guns were pointed too high, they would get in the radar's way and confuse it even more. In addition, it took too long for the radar to pick up a target and for the guns to actually take aim. In addition, the turret traverse speed was much too slow, the vehicle it's self was too sluggish to keep up the M1's and M2's, and it was unreliable in cold weather. Eventually, the program was cancelled after more testing, where it was proven the system could not even shoot down stationary drones. There was still a need for an anti-aircraft vehicle that could keep up with modern vehicles, so Oerlikon Canada created the [[ADATS]] anti-aircraft missile system. This was not as successful as hoped, and was only accepted into Canadian service. The void was eventually filled by the M6 Linebacker, an M2 Bradley with Stinger missiles instead of TOW missiles. The Linebacker was capable of keeping up with modern armored forces, which was the reason for its acceptance, even though the Stingers were not as effective as the ADATS missiles<ref>https://en.wikipedia.org/wiki/M247_Sergeant_York</ref>. | ||
== Media == | == Media == | ||
| − | '' | + | <!--''An excellent addition to the article will be video guides, as well as screenshots from the game and photos.''--> |
| + | [https://live.warthunder.com/feed/camouflages/?q=#m247 '''Skins''' and '''camouflages''' for the M247 Sergeant York from live.warthunder.com.] | ||
== See also == | == See also == | ||
| − | ''Links to the articles on the War Thunder Wiki that you think will be useful for the reader, for example:'' | + | <!--''Links to the articles on the War Thunder Wiki that you think will be useful for the reader, for example:'' |
| − | * ''reference to the series of the | + | |
| − | * ''links to approximate analogues of other nations and research trees.'' | + | * ''reference to the series of the vehicles;'' |
| + | * ''links to approximate analogues of other nations and research trees.''--> | ||
| + | |||
| + | * [[M48A1|M48A1 Patton]] | ||
| + | * [[M42|M42 Duster]] | ||
| + | * [[M163|M163 Vulcan]] | ||
| + | * [[ADATS]] | ||
== External links == | == External links == | ||
| − | ''Paste links to sources and external resources, such as:'' | + | <!--''Paste links to sources and external resources, such as:'' |
* ''topic on the official game forum;'' | * ''topic on the official game forum;'' | ||
| − | * ''encyclopedia page on | + | * ''encyclopedia page on tank;'' |
| − | * ''other literature.'' | + | * ''other literature.''--> |
| + | |||
| + | * [[wt:en/news/5714-development-tam-and-m247-sergeant-york-en|[Devblog<nowiki>]</nowiki> TAM and M247 Sergeant York]] | ||
| + | * "[https://en.wikipedia.org/wiki/M247_Sergeant_York|M247 Sergeant York]", ''Wikipedia.org'', Accessed on 24 March 2020. | ||
| − | {{ | + | {{USA anti-aircraft vehicles}} |
| − | + | <references /> | |
Revision as of 17:09, 30 April 2020
Contents
Description
The Gun, Air Defence Artillery, Self-Propelled, 40-mm, M247 is a Rank VI American self-propelled anti-aircraft gun with a battle rating of 9.0 (AB/RB/SB). It was introduced in Update 1.81 "The Valkyries".
General info
Survivability and armour
Armour type:
- Cast homogeneous armour (Hull)
- Rolled homogeneous armour (Rear (low), Roof, Turret)
| Armour | Front (Slope angle) | Sides | Rear | Roof |
|---|---|---|---|---|
| Hull | 85-200 mm (59-74°) Front glacis 63-200 mm (13-60°) Lower glacis |
76 mm (8-43°) Front 51 mm (0-43°) Rear |
35 mm (26-32°) Top 25 mm (61-62°) Bottom |
57 mm |
| Turret | 25.4 mm (15-76°) Turret front (Upper) 12.7 mm (40-69°) Turret front (Lower) 25.4 mm (0-87°) Gun mantlet |
12.7-25.4 mm (0-19°) Upper 12.7 mm (40-69°) Lower |
12.7 mm (18°) | 12.7 mm |
Notes:
- Suspension wheels and tracks are 20 mm thick.
- Belly armour is 38 mm in the front and 25 mm in the rear.
Mobility
| Game Mode | Max Speed (km/h) | Weight (tons) | Engine power (horsepower) | Power-to-weight ratio (hp/ton) | |||
|---|---|---|---|---|---|---|---|
| Forward | Reverse | Stock | Upgraded | Stock | Upgraded | ||
| Arcade | 53 | 9 | 49.4 | 1065 | 1,431 | 21.56 | 28.97 |
| Realistic | 49 | 8 | 663 | 750 | 13.42 | 15.18 | |
The M247's turret is installed on the hull of an M48 medium tank, because of this they have roughly similar mobility. The M247 is about 3 tons heavier than the M48A1 (49.3 tons vs. 46.4 tons), and has a slightly weaker engine, which translates into a slightly more sluggish machine compared to the M48A1. The M48A1 has a max engine power of 810 hp, while the M247's engine power is 750 hp. For a vehicle this heavy, it has fairly good mobility. When spaded, it can comfortably hit a top speed of 45 km/h on flat terrain, while in cross-country you will have a top speed of around 25 km/h. While going backwards, the top speed is somewhat less impressive: about -9 km/h.
Armaments
| 40 mm M266 Automatic Cannon (x2) | |||||
|---|---|---|---|---|---|
| Capacity (Belt capacity each) | Fire rate (shots/minute) |
Vertical guidance |
Horizontal guidance | ||
| 560 (280) | 300 | -5°/+85° | ±180° | ||
| Turret rotation speed (°/s) | |||||
| Mode | Stock | Upgraded | Prior + Full crew | Prior + Expert qualif. | Prior + Ace qualif. |
| Arcade | 52.8 | ? | ? | ? | ? |
| Realistic | 35.7 | ? | ? | ? | ? |
| Reloading rate (seconds) | |||||
| Stock | Prior + Full crew | Prior + Expert qualif. | Prior + Ace qualif. | ||
| 6.5 | ? | ? | ? | ||
Ammunition
| Penetration statistics | |||||||
|---|---|---|---|---|---|---|---|
| Ammunition | Type of warhead |
Penetration in mm @ 90° | |||||
| 10m | 100m | 500m | 1000m | 1500m | 2000m | ||
| M811 | HEFI-T* | 5 | 5 | 5 | 5 | 5 | 5 |
| M822 | HEFI-T* | 5 | 5 | 5 | 5 | 5 | 5 |
| 40 mm AP-T | AP-T | 93 | 90 | 77 | 62 | 51 | 41 |
| Shell details | ||||||||||
|---|---|---|---|---|---|---|---|---|---|---|
| Ammunition | Type of warhead |
Velocity in m/s |
Projectile Mass in kg |
Fuse delay
in m: |
Fuse sensitivity
in mm: |
Explosive Mass in g (TNT equivalent): |
Normalization At 30° from horizontal: |
Ricochet: | ||
| 0% | 50% | 100% | ||||||||
| M811 | HEFI-T* | 1100 | 0.87 | 0.2 | 0.1 | 255 | +0° | 79° | 80° | 81° |
| M822 | HEFI-T* | 1100 | 0.87 | 0.2 | 0.1 | 185 | +0° | 79° | 80° | 81° |
| 40 mm AP-T | AP-T | 1030 | 0.88 | N/A | N/A | N/A | -1° | 48° | 69° | 79° |
Belt types
| Belts | Shell composition | Combat usage |
| Default | HEFI-T* / AP-T | Good general ammunition, a hit on an aircraft typically means its destruction while still enough to do damage to armoured ground vehicles, especially if it shoots into the side of an enemy tank (weaker armour). Good to start with until comfortable with other types of ammunition. |
| 40 mm AP-T | AP-T / AP-T / AP-T / HEFI-T* | Very powerful ammunition which can be used against ground targets with significantly more penetration than other 35-40 mm AP-T projectiles. Will easily destroy any target with side shots even outside the point-blank range and can destroy lighter targets and weak spots from the front even against main battle tanks. |
| M811 | HEFI-T* / HEFI-T* / HEFI-T* / AP-T | "Poor man's anti-air ammunition." Unlike the M822 shells these require direct hits to do significant damage, but if problems are experienced with M822 detonating too early this belt may be your best choice. |
| M822 | HEFI-T* / HEFI-T* / AP-T | Proximity-fused shells that absolutely obliterate aircraft when they make contact, though if they detonate too early, they will do little to no damage. Somewhat unreliable in if they detonate within range of the target, but when they do the target will quickly take considerable damage if not destroyed. The only ammunition for self-propelled anti-aircraft guns that which can cause enough shrapnel damage to bring down planes and helicopters even with near misses. This round should be the go-to anti-air ammunition, although the M811 is a good backup if the M822 is problematic for the gunner. |
Usage in battles
Describe the tactics of playing in the vehicle, the features of using vehicles in the team and advice on tactics. Refrain from creating a "guide" - do not impose a single point of view but give the reader food for thought. Describe the most dangerous enemies and give recommendations on fighting them. If necessary, note the specifics of the game in different modes (AB, RB, SB).
Modules
| Tier | Mobility | Protection | Firepower | |||
|---|---|---|---|---|---|---|
| I | Tracks | Parts | Horizontal Drive | M811 | ||
| II | Suspension | Brake System | FPE | Adjustment of Fire | 40 mm AP-T | |
| III | Filters | Crew Replenishment | Elevation Mechanism | Smoke grenade | NVD | |
| IV | Transmission | Engine | Laser rangefinder | Artillery support | M822 | |
Radars
Albis
The M247 uses the Albis tracking radar. The tracking radar director is the circular looking cone located above the leftmost forward of the turret and has a fixed horizontal position and only follows vertical targeting together with the armament. It may look like almost the same tracking radar director as the M163's but it's different.
| AN/APG-66 - Target Tracking Radar | ||||
|---|---|---|---|---|
| Maximum
Detection Range |
Minimum
Detection Range |
Max Azimuth
Tracking Angle |
Elevation Tracking
Angle |
Minimum Relative
Speed |
| 15,000 m | 100 m | ±10 degrees | -5°/+85° | 15m/s (54km/h) |
AN/MPQ-49
The M247's uses a modified AN/MPQ-49 search radar. It has the longest search range even when compared to 10.0 SPAAGs, yet it is still questionable if that long search range will be used often or frequently as most ground realistic battles' jets and helicopters spawn already within 10km into the battlefield, this is why most commanders of the M247 have their ranges set to only 10km most of the time, not unless maps like Port Novorossiysk that have airfields that are more than 30kms away. Some helicopters do spawn on the farthest helipad where it is near the airfield, this is one of the reasons commanders of the M247 can set their ranges to 20km which is way above their target locking range and especially engagement range.
| AN/MPQ-49 | ||||
|---|---|---|---|---|
| Maximum
Detection Range |
Minimum
Detection Range |
Max Azimuth
Scan Angle |
Max Elevation
Scan Angle |
Minimum
Relative Speed |
| 40,000 m | 100 m | 360° | 17° | 10m/s (34km/h) |
| Locking a target through sniper mode is not needed anymore as long as the target to be destroyed is detected and selected from the search radar while turret is pointed within 200 degrees to the target. |
Pros and cons
Pros:
- Twin stabilized 40 mm M266 cannon (L/70 40 mm Bofors) have a much higher rate of fire compared to the M42 Duster: Deadlier and more accurate
- Large ammunition count ensures that you will have plenty to fire throughout a match without fear of running out of ammo mid-game
- Has access to 12 x 66 mm smoke grenades, perfect for exiting a dangerous situation
- The M822 ammunition is proximity fused and will detonate if the projectile passes close enough to the target
- The 40 mm's pose a serious threat to lightly-armoured vehicles
- Uses the M48 Patton's hull (armour included) = one of the best-protected SPAA in the game
- Benefits in realistic battles from aim-assistance thanks to the radar
- Has access to night-vision devices for use in night battles
- Large radar sweep range to easily spot targets, as well as a large radar lock-on marker in its scope
- Has the furthest search radar range even when compared to 10.0 SPAAGs
Cons:
- As with all high-rank SPAA, the M247 has very thin turret armour; a shell strike could instantly end the vehicle
- Turret is also vulnerable to strafing aircraft + rockets
- Armour advantages are nullified due to the inclusion of the Hull Break mechanic
- No thermal sights
- Search radar cannot be folded
History
The M247 "Sergeant York" was designed in the late 1970's as a purpose-built SPAAG. It was designed to fight alongside the M1 Abrams and M2/M3 Bradley, in order to provide cover against aircraft. There were other SPAA vehicles in service at the time; these were the M163 Vulcan and the MIM-72/M48 Chaparral. The former being a 20 mm rotary cannon mounted on an armored personnel carrier, and the latter being a heavily modified armored personnel carrier chassis with a surface-to-air missile launcher. Neither of those two vehicles were designed as SPAA's, and so, did not have the necessary performance to be adequate at their job. The M247 was designed as a replacement for both of the previous vehicles.
Designs from a multitude of companies were entered into the competition. Only two were selected for testing: the Ford XM-247 with twin Bofors 40mm cannons and the General Dynamics XM-246 with twin Oerlikon 35mm cannons. The two prototypes were tested, and the XM-247 was selected as the winner, although the XM-246 had outscored it in all the shooting tests. The M247, as it was soon designated, ran into many problems. The radar was extremely deficient; it had a hard time distinguishing trees from planes, and if the guns were pointed too high, they would get in the radar's way and confuse it even more. In addition, it took too long for the radar to pick up a target and for the guns to actually take aim. In addition, the turret traverse speed was much too slow, the vehicle it's self was too sluggish to keep up the M1's and M2's, and it was unreliable in cold weather. Eventually, the program was cancelled after more testing, where it was proven the system could not even shoot down stationary drones. There was still a need for an anti-aircraft vehicle that could keep up with modern vehicles, so Oerlikon Canada created the ADATS anti-aircraft missile system. This was not as successful as hoped, and was only accepted into Canadian service. The void was eventually filled by the M6 Linebacker, an M2 Bradley with Stinger missiles instead of TOW missiles. The Linebacker was capable of keeping up with modern armored forces, which was the reason for its acceptance, even though the Stingers were not as effective as the ADATS missiles[1].
Media
Skins and camouflages for the M247 Sergeant York from live.warthunder.com.
See also
External links
- [Devblog] TAM and M247 Sergeant York
- "Sergeant York", Wikipedia.org, Accessed on 24 March 2020.
| USA anti-aircraft vehicles | |
|---|---|
| M3 Half-track derivatives | M13 MGMC · M15 CGMC · M16 MGMC |
| M24 derivative | M19A1 |
| M41 derivative | M42 |
| Radar SPAAG | M163 · M247 |
| Missile SPAA | Imp.Chaparral · LAV-AD · XM975 |
