Difference between pages "Cobra King" and "Tempest Mk V"
Inceptor57 (talk | contribs) m (→Machine guns) |
Inceptor57 (talk | contribs) m (→Flight Performance) |
||
| Line 1: | Line 1: | ||
| − | {{Specs-Card|code= | + | {{Specs-Card|code=tempest_mkv}} |
| + | {{About | ||
| + | | about = British fighter '''{{PAGENAME}}''' | ||
| + | | usage = other uses | ||
| + | | link = Tempest (Family) | ||
| + | }} | ||
== Description == | == Description == | ||
| − | <!--''In the description, the first part needs to be about the history of the creation and combat usage of the | + | <!--''In the description, the first part needs to be about the history of and the creation and combat usage of the aircraft, as well as its key features. In the second part, tell the reader about the aircraft in the game. Insert a screenshot of the vehicle. If the novice player does not remember the vehicle by name, he will immediately understand what kind of vehicle it is talking about.''--> |
| − | [[File: | + | |
| + | <!--[[File:GarageImage_{{PAGENAME}}.jpg|420px|thumb|left|The '''{{PAGENAME}}''' in the garage]]--> | ||
{{break}} | {{break}} | ||
| − | The ''' | + | The '''{{Specs|name}}''' is a Rank {{Specs|rank}} British fighter {{Battle-rating}}. This fighter aircraft has been in the game since the start of the Open Beta Test prior to [[Update 1.29]]. |
| − | |||
| − | |||
| − | |||
| − | |||
| − | |||
| − | |||
| − | |||
| − | |||
| − | |||
| − | |||
| − | |||
| − | |||
| − | |||
== General info == | == General info == | ||
| − | === | + | === Flight Performance === |
| − | <!--''Describe | + | <!--''Describe how the aircraft behaves in the air. Maximum speed, manoeuverability, speed and allowable loads - these are the most important characteristics of the vehicle.''--> |
| − | |||
| − | |||
| − | |||
| − | |||
| − | |||
| − | |||
| − | |||
| − | |||
| − | |||
| − | |||
| − | |||
| − | |||
| − | |||
| − | |||
| − | |||
| − | |||
| − | |||
| − | |||
| − | |||
| − | |||
| − | |||
| − | |||
| − | |||
| − | |||
| − | |||
| − | |||
| − | |||
| − | |||
| − | |||
| − | |||
{| class="wikitable" style="text-align:center" | {| class="wikitable" style="text-align:center" | ||
|- | |- | ||
| − | !colspan=" | + | ! colspan="8" | Characteristics |
|- | |- | ||
| − | + | ! colspan="8" | ''Stock'' | |
| − | !colspan=" | ||
| − | |||
|- | |- | ||
| − | |rowspan="2" | | + | ! colspan="2" | Max Speed<br>(km/h at 5,000 m) |
| + | ! rowspan="2" | Max altitude<br>(meters) | ||
| + | ! colspan="2" | Turn time<br>(seconds) | ||
| + | ! colspan="2" | Rate of climb<br>(meters/second) | ||
| + | ! rowspan="2" |Take-off run<br>(meters) | ||
|- | |- | ||
| − | + | ! AB | |
| + | ! RB | ||
| + | ! AB | ||
| + | ! RB | ||
| + | ! AB | ||
| + | ! RB | ||
|- | |- | ||
| − | + | | 649 ||636||{{Specs|ceiling}}|| 14.5 ||22.4||14||14|| 580 | |
|- | |- | ||
| − | !colspan=" | + | ! colspan="8" | ''Upgraded'' |
| − | |||
| − | |||
|- | |- | ||
| − | | | + | ! colspan="2" |Max Speed |
| − | | | + | (km/h at 5,000 m) |
| − | | | + | ! rowspan="2" |Max altitude (meters) |
| + | ! colspan="2" | Turn time (seconds) | ||
| + | ! colspan="2" | Rate of climb<br>(meters/second) | ||
| + | ! rowspan="2" |Take-off run (meters) | ||
|- | |- | ||
| − | + | ! AB | |
| − | + | ! RB | |
| − | + | ! AB | |
| + | ! RB | ||
| + | ! AB | ||
| + | ! RB | ||
|- | |- | ||
| − | + | | 788 ||703||{{Specs|ceiling}}|| 34.7 ||20.1||30.1||20.4|| 370 | |
| − | | | ||
| − | |||
| − | |||
| − | |||
| − | | | ||
| − | | | ||
| − | | | ||
| − | | | ||
| − | | | ||
| − | | | ||
| − | | | ||
| − | | | ||
|- | |- | ||
|} | |} | ||
| − | == | + | ====Details==== |
| − | === | ||
| − | |||
| − | |||
| − | |||
{| class="wikitable" style="text-align:center" | {| class="wikitable" style="text-align:center" | ||
|- | |- | ||
| − | ! colspan=" | + | ! colspan="5" | Features |
|- | |- | ||
| − | ! | + | ! Combat flap |
| − | ! | + | ! Take-off flap |
| − | ! | + | ! Landing flap |
| − | ! | + | ! Air brakes |
| + | ! Arrestor gear | ||
|- | |- | ||
| − | | | + | | ✓ || ✓ || ✓ || X || X <!-- ✓ --> |
|- | |- | ||
| − | + | |} | |
| + | |||
| + | {| class="wikitable" style="text-align:center" | ||
|- | |- | ||
| − | ! | + | ! colspan="5" | Limits |
| − | |||
| − | |||
| − | |||
| − | |||
| − | |||
|- | |- | ||
| − | | | + | ! rowspan="2" | Wing-break speed<br>(km/h) |
| + | ! rowspan="2" | Gear limit<br>(km/h) | ||
| + | ! rowspan="2" | Combat flap<br> (km/h) | ||
| + | ! colspan="2" | Max Static G | ||
|- | |- | ||
| − | + | ! + | |
| + | ! - | ||
|- | |- | ||
| − | + | | {{Specs|разрушение|конструкции}} || {{Specs|разрушение|шасси}} || 470 || ~11 || ~8 | |
| − | | | ||
| − | |||
| − | |||
| − | |||
| − | |||
| − | | | ||
| − | | | ||
|- | |- | ||
|} | |} | ||
| − | + | {| class="wikitable" style="text-align:center" | |
| − | {| class="wikitable | ||
| − | |||
|- | |- | ||
| − | + | ! colspan="4" | Optimal velocities | |
| − | |||
| − | ! colspan=" | ||
|- | |- | ||
| − | ! | + | ! Ailerons<br>(km/h) |
| − | ! | + | ! Rudder<br>(km/h) |
| − | ! | + | ! Elevators<br>(km/h) |
| − | ! | + | ! Radiator<br>(km/h) |
| − | |||
| − | |||
|- | |- | ||
| − | | | + | | < 473 || < 490 || < 530 || > 350 |
|- | |- | ||
| − | | | + | |} |
| − | + | ||
| − | + | {| class="wikitable" style="text-align:center" | |
| − | |- | ||
| − | |||
|- | |- | ||
| − | + | ! colspan="3" | Compressor (RB/SB) | |
| − | |||
| − | ! colspan=" | ||
|- | |- | ||
| − | + | ! colspan="3" | Setting 1 | |
| − | |||
| − | |||
| − | |||
| − | |||
| − | |||
| − | |||
| − | |||
| − | |||
| − | |||
| − | ! colspan="3" | | ||
|- | |- | ||
| − | ! | + | ! Optimal altitude |
| − | ! | + | ! 100% Engine power |
| − | ! | + | ! WEP Engine power |
|- | |- | ||
| − | | | + | | 1,447 m || 2,085 hp || 2,585 hp |
|- | |- | ||
| − | + | ! colspan="3" | Setting 2 | |
|- | |- | ||
| − | + | ! Optimal altitude | |
| − | + | ! 100% Engine power | |
| − | + | ! WEP Engine power | |
|- | |- | ||
| − | | | + | | 4,981 m || 1,735 hp || 2,151 hp |
| − | |||
| − | |||
|- | |- | ||
| − | + | <!--! colspan="3" | Setting 3 | |
| − | |||
| − | |||
| − | |||
| − | ! | ||
| − | ! | ||
| − | |||
|- | |- | ||
| − | + | ! Optimal altitude | |
| + | ! 100% Engine power | ||
| + | ! WEP Engine power | ||
|- | |- | ||
| + | | ?,??? m || ?,??? hp || ?,??? hp | ||
| + | |- --> | ||
|} | |} | ||
| − | ===== | + | === Survivability and armour === |
| − | + | <!--''Examine the survivability of the aircraft. Note how vulnerable the structure is and how secure the pilot is, whether the fuel tanks are armoured. Describe the armour, if there is any, also mention the vulnerability of other critical aircraft systems.''--> | |
| − | {| | + | |
| − | + | * No armour plating | |
| − | + | * No armour glazing | |
| − | + | * Critical components located at the front of aircraft (fuel, pilot, engine, controls) | |
| − | + | * More fuel tanks located in wings near the fuselage | |
| − | + | ||
| − | + | == Armaments == | |
| − | ! | + | === Offensive armament === |
| − | | | + | <!--''Describe the offensive armament of the aircraft, if any. Describe how effective the cannons and machine guns are in a battle, and also what belts or drums are better to use. If there is no offensive weaponry, delete this subsection.''--> |
| − | + | ||
| − | + | {{main|Hispano Mk.V (20 mm)}} | |
| − | + | ||
| + | The '''''{{PAGENAME}}''''' is armed with: | ||
| + | |||
| + | * 4 x 20 mm Hispano Mk.V cannons, wing-mounted (200 RPG = 800 total) | ||
| + | |||
| + | === Suspended armament === | ||
| + | <!--''Describe the aircraft's suspended armament: additional cannons under the wings, bombs, rockets and torpedoes. This section is especially important for bombers and attackers. If there is no suspended weaponry remove this subsection.''--> | ||
| + | {{main|:Category:Suspended armaments|l1=Suspended armaments}} | ||
| + | |||
| + | The '''''{{PAGENAME}}''''' can be outfitted with the following ordinance: | ||
| + | |||
| + | * Without load | ||
| + | * 2 x G.P. 250 lb Mk.IV bombs | ||
| + | * 2 x G.P. 500 lb Mk.IV bombs | ||
| + | * 2 x M.C. 1000 lb Mk.I bombs | ||
| + | * 8 x RP-3 rockets | ||
| + | <!-- | ||
| + | === Defensive armament === | ||
| + | ''Defensive armament with turret machine guns or cannons, crewed by gunners. Examine the number of gunners and what belts or drums are better to use. If defensive weaponry is not available, remove this subsection.'' | ||
| + | --> | ||
| + | |||
| + | == Usage in the battles == | ||
| + | <!--''Describe the tactics of playing in an aircraft, the features of using vehicles in a team and advice on tactics. Refrain from creating a "guide" - do not impose a single point of view but give the reader food for thought. Examine the most dangerous enemies and give recommendations on fighting them. If necessary, note the specifics of the game in different modes (AB, RB, SB).''--> | ||
| + | |||
| + | Climb with your team as high as you can muster (<4,000 m) and proceed to feast on anything the Spitfires above drop from their clouds. Speed is life and should never be wasted. Maintaining its velocity is the way of the Tempest in realistic battles. | ||
| + | |||
| + | The Tempest Mk. V excels at low to medium altitude battles, performing both as a Boom'n'Zoomer, ground attacker or energy fighter. To efficiently utilise its full engine power, do not get above 6,000 m or 19,000 ft, as the engine power drops significantly beyond that point. However, due to the supercharged engine, it outperforms aircraft like the Fw 190 D-9 by far at high altitudes (over 7,600 m or 25,000 ft) but gets obliterated by Ta 152Hs and some Bf 109 models, such as the K-4s and G-10s. To counter the BF109K-4, pilot Pierre Clostermann was quoted as saying: | ||
| − | + | "Tempest V. Messerschmitts: I kept on reminding my pilots to keep their speed above 300 m.p.h., for "109's" could turn better than we could at low speed, and you had to watch out for the 30 mm cannon in their propeller - it didn't give you a second chance. The best technique was to do a spiral dive, work up to a speed of 450 m.p.h., do a straight climb and then start all over again. The "109's" on the other hand, knowing that we dived faster than they did, tried to get us up to 16,000 feet, where our Tempests were heavy and our engines sluggish." | |
| − | + | In arcade battles, stick with WEP on and Boom & Zoom tactics. On realistic you can try the above strategy, but you may find that due to mouse aim some adaptations must be implemented. Don't lose sight of your attacker and be on guard for when his cannon fires. As soon as you see the barrel flash, you have about 0.7 seconds to take your plane out of the way, depending on the distance. At that point, you can throw off his aim by performing a low Yo-Yo to gain more speed and proceed to zoom away if you're below 3,000 m or 10,000 ft, because at this altitude your engine should provide enough power for you to outrun the BF109K-4 or G-10. However, you may find that the Tempest Mk.V is a cinder brick because you accelerate stupidly fast diving straight to the ground. When in trouble at high heights, dive like there is no tomorrow. | |
| − | |||
| − | |||
| + | ===Manual Engine Control=== | ||
{| class="wikitable" style="text-align:center" | {| class="wikitable" style="text-align:center" | ||
|- | |- | ||
| − | ! colspan="7" | | + | ! colspan="7" | MEC elements |
|- | |- | ||
| − | ! colspan=" | + | ! rowspan="2" |Mixer |
| + | ! rowspan="2" |Pitch | ||
| + | ! colspan="3" |Radiator | ||
| + | ! rowspan="2" |Supercharger | ||
| + | ! rowspan="2" |Turbocharger | ||
|- | |- | ||
| − | ! | + | ! Oil |
| − | ! | + | ! Water |
| − | ! | + | ! Type |
| − | |||
|- | |- | ||
| − | | | + | | Controllable || rowspan="2" | Not controllable || rowspan="2" | Not controllable || rowspan="2" | Not controllable || rowspan="2" | Separate || rowspan="2" | Not ontrollable || rowspan="2" | Not controllable |
|- | |- | ||
|} | |} | ||
| − | {| class="wikitable" | + | |
| + | ===Modules=== | ||
| + | {| class="wikitable" | ||
| + | ! colspan="1" | Tier | ||
| + | ! colspan="2" | Flight performance | ||
| + | ! colspan="1" | Survivability | ||
| + | ! colspan="2" | Weaponry | ||
|- | |- | ||
| − | + | | I | |
| + | | Fuselage Repair | ||
| + | | Radiator | ||
| + | | | ||
| + | | | ||
|- | |- | ||
| − | + | | II | |
| + | | | ||
| + | | Compressor | ||
| + | | Airframe | ||
| + | | | ||
|- | |- | ||
| − | + | | III | |
| − | + | | Wings Repair | |
| − | + | | Engine | |
| − | + | | | |
| + | | | ||
|- | |- | ||
| − | | | + | | IV |
| + | | | ||
| + | | Engine Injection | ||
| + | | Cover | ||
| + | | | ||
|- | |- | ||
|} | |} | ||
| − | == | + | === Pros and cons === |
| − | <!--'' | + | <!--''Summarise and briefly evaluate the vehicle regarding its characteristics and combat effectiveness. Mark its pros and cons in the bulleted list. Do not use more than 6 points for each of the characteristics. Avoid using categorical definitions such as "bad", "good" and the like - they have a substitution in the form of softer "inadequate", "effective".''--> |
| − | |||
| − | + | '''Pros:''' | |
| − | + | * Powerful engine providing both great acceleration and top speed below 3 km altitude | |
| + | * Powerful armament with lots of ammo allowing to stay a long time in battle and ability to take out even four-engined bombers easily | ||
| + | * Excellent acceleration in dive | ||
| + | * Pretty good manoeuvrability at high speeds | ||
| − | + | '''Cons:''' | |
| − | + | * Poor engine performance at high altitudes | |
| − | + | * Not good manoeuvrability at low speeds | |
| − | + | * High repair costs | |
| − | * | ||
| − | * | ||
| − | |||
| − | |||
| − | * | ||
| − | |||
| − | |||
| − | |||
| − | |||
| − | |||
| − | |||
| − | |||
| − | |||
| − | |||
| − | |||
| − | |||
| − | |||
| − | |||
| − | |||
| − | |||
| − | |||
| − | |||
| − | |||
| − | |||
| − | |||
== History == | == History == | ||
| − | <!--''Describe the history of the creation and combat usage of the | + | <!--''Describe the history of the creation and combat usage of the aircraft in more detail than in the introduction. If the historical reference turns out to be too big, take it to a separate article, taking a link to an article about the vehicle and adding a block "/ historical reference" (example: https://wiki.warthunder.com/Name-vehicles/historical reference) and add a link to it here using the <code>main</code> template. Be sure to include links to sources at the end of the article.''--> |
| − | |||
| − | |||
| − | The | + | From its initial conception, the Hawker Tempest was conceived of as a replacement for the Typhoon, a fighter-bomber created by the Hawker company in 1941. The Typhoon had many deficiencies such as an unreliable engine, insufficient structural strength leading in some cases to the entire tail detaching, a sub-standard rate of climb and poor high altitude performance. Because of these, it could not compete with the latest fighter of the time, the German Focke-Wolf FW190, and the Typhoon’s was removed from its planned role as an interceptor and used mainly for ground strike missions. The Tempest prototype, first flown in February 1943, inherited some of the traits of its older brother, but experts took into account Hawker’s negative experience and did their best to refine the aerodynamic shape of the new aircraft. The wing was slightly shorter, the profile more slender, and the back edge elliptical. Compensating the fuel capacity lost in the newly designed, thinner wings, came in the way of adding another fuel tank to the fuselage which accounted for the increased length of the aircraft. Consequently, the tail section was also modified, most noticeably by a fairing fitted to the vertical fin’s leading edge and an increase of the tailplane chord. |
| − | + | Due to the unavailability of Napier Sabre Mk IV engine, which was supposed to keep the new aircraft from having the Typhoon’s “beard” radiator, the same Sabre Mk IIA engine, rated at 2,180 HP, had to be installed along with a four-bladed de Havilland propeller. On the first batch of Tempests (100 aircraft) the armament stayed unchanged, but subsequent fighters had the long-barrelled Hispano Mk II gun replaced with the more rapid and light Hispano Mk V. The ammunition was also increased from 140 to 150 rounds per gun. Thanks to the strength of its wings, the aircraft could carry a substantial bomb load or two 500 lb or 1000 lb bombs, two 45 or 90-gallon fuel tanks, or eight 76mm rockets. The Tempest proved far more successful and popular with its pilots than the Typhoon, eliminating its predecessor’s shortcomings. | |
| − | + | Front line service for the Tempest began in April 1944, when 50 Tempest Mk Vs formed the first Tempest Wing at Newchurch. The Tempest Wing was particularly active in the build-up to D-Day, but when the first German V-1 flying bombs began to fall on British soil, the Tempest was found to be one of the only fighters fast enough to counter the new threat. Fast, manoeuvrable and heavily armed, the Tempest was also able to prove a threat to the Messerschmitt Me 262 jet fighter by destroying a total of 20 262s. Some 1,700 Tempests were manufactured until the aircraft was phased out of service with the RAF in 1949. | |
| − | |||
| − | + | === In-game description === | |
| + | |||
| + | "From its initial conception, the Hawker Tempest was conceived of as a replacement for the Typhoon, a fighter-bomber created by the Hawker company in 1941. The Typhoon had many deficiencies such as an unreliable engine, insufficient structural strength leading in some cases to the entire tail detaching, sub-standard rate of climb and a poor high altitude performance. Because of these it could not compete with the latest fighter of the time, the German Focke-Wolf FW190, and the Typhoon’s was removed from its planned role as an interceptor and used mainly for ground strike missions. The Tempest prototype, first flown in February 1943, inherited some of the traits of its older brother, but experts took into account Hawker’s negative experience and did their best to refine the aerodynamic shape of the new aircraft. The wing was slightly shorter, the profile more slender, and the back edge elliptical. To compensate for the fuel capacity lost in the new, thinner wings, another fuel tank was added to the fuselage which accounted for the increased length of the aircraft. Consequently, the tail section was also modified, most noticeably by a fairing fitted to the vertical fin’s leading edge and an increase of the tail plane chord. | ||
| + | |||
| + | Due to the unavailability of Napier Sabre Mk IV engine, which was supposed to keep the new aircraft from having the Typhoon’s “beard” radiator, the same Sabre Mk IIA engine, rated at 2180 HP, had to be installed; this was fitted with a de Havilland four bladed propeller. On the first batch of Tempests (100 aircraft) the armament stayed unchanged, but subsequent fighters had the long-barrelled Hispano Mk II gun replaced with the more rapid and light Hispano Mk V. The ammunition was also increased from 140 to 150 rounds per gun. Thanks to the strength of its wings, the aircraft could carry a substantial bomb load or two 500 lb or 1000 lb bombs, two 45 or 90 gallon fuel tanks, or eight 76mm rockets. The Tempest proved far more successful and popular with its pilots than the Typhoon, eliminating its predecessor’s shortcomings. | ||
| + | |||
| + | Front line service for the Tempest began in April 1944, when 50 Tempest Mk Vs formed the first Tempest Wing at Newchurch. The Tempest Wing was particularly active in the build up to D-Day, but when the first German V-1 flying bombs began to fall on British soil, the Tempest was found to be one of the only fighters fast enough to counter the new threat. Fast, manoeuvrable and heavily armed, the Tempest was also able to prove a threat to the Messerschmitt Me 262 jet fighter, with 20 262s being destroyed by Tempests. Some 1700 Tempests were manufactured until the aircraft was phased out of service with the RAF in 1949." | ||
== Media == | == Media == | ||
| − | + | ''An excellent addition to the article will be video guides, as well as screenshots from the game and photos.'' | |
| − | |||
| − | == | + | == Read also == |
| − | + | ''Links to the articles on the War Thunder Wiki that you think will be useful for the reader, for example,'' | |
| − | + | * ''reference to the series of the aircraft;'' | |
| − | + | * ''links to approximate analogues of other nations and research trees.'' | |
| − | + | <!--''ETC.''--> | |
| − | |||
| − | |||
== Sources == | == Sources == | ||
| − | * | + | ''Paste links to sources and external resources, such as:'' |
| + | |||
| + | * ''topic on the official game forum;'' | ||
| + | * ''page on aircraft encyclopedia;'' | ||
| + | * ''other literature.'' | ||
| − | {{ | + | {{Britain fighters}} |
| − | |||
Revision as of 07:36, 3 June 2019
Contents
| This page is about the British fighter Tempest Mk V. For other uses, see Tempest (Family). |
Description
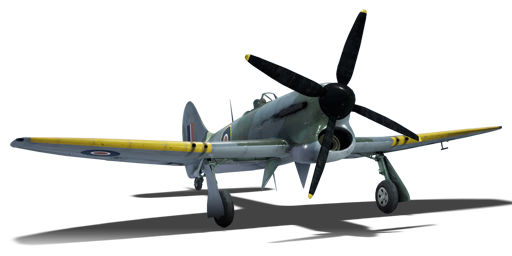
The Tempest Mk V is a Rank IV British fighter
with a battle rating of 6.0 (AB/SB) and 5.7 (RB). This fighter aircraft has been in the game since the start of the Open Beta Test prior to Update 1.29.
General info
Flight Performance
| Characteristics | |||||||
|---|---|---|---|---|---|---|---|
| Stock | |||||||
| Max Speed (km/h at 5,000 m) |
Max altitude (meters) |
Turn time (seconds) |
Rate of climb (meters/second) |
Take-off run (meters) | |||
| AB | RB | AB | RB | AB | RB | ||
| 649 | 636 | 11000 | 14.5 | 22.4 | 14 | 14 | 580 |
| Upgraded | |||||||
| Max Speed
(km/h at 5,000 m) |
Max altitude (meters) | Turn time (seconds) | Rate of climb (meters/second) |
Take-off run (meters) | |||
| AB | RB | AB | RB | AB | RB | ||
| 788 | 703 | 11000 | 34.7 | 20.1 | 30.1 | 20.4 | 370 |
Details
| Features | ||||
|---|---|---|---|---|
| Combat flap | Take-off flap | Landing flap | Air brakes | Arrestor gear |
| ✓ | ✓ | ✓ | X | X |
| Limits | ||||
|---|---|---|---|---|
| Wing-break speed (km/h) |
Gear limit (km/h) |
Combat flap (km/h) |
Max Static G | |
| + | - | |||
| 880 | 361 | 470 | ~11 | ~8 |
| Optimal velocities | |||
|---|---|---|---|
| Ailerons (km/h) |
Rudder (km/h) |
Elevators (km/h) |
Radiator (km/h) |
| < 473 | < 490 | < 530 | > 350 |
| Compressor (RB/SB) | ||
|---|---|---|
| Setting 1 | ||
| Optimal altitude | 100% Engine power | WEP Engine power |
| 1,447 m | 2,085 hp | 2,585 hp |
| Setting 2 | ||
| Optimal altitude | 100% Engine power | WEP Engine power |
| 4,981 m | 1,735 hp | 2,151 hp |
Survivability and armour
- No armour plating
- No armour glazing
- Critical components located at the front of aircraft (fuel, pilot, engine, controls)
- More fuel tanks located in wings near the fuselage
Armaments
Offensive armament
The Tempest Mk V is armed with:
- 4 x 20 mm Hispano Mk.V cannons, wing-mounted (200 RPG = 800 total)
Suspended armament
The Tempest Mk V can be outfitted with the following ordinance:
- Without load
- 2 x G.P. 250 lb Mk.IV bombs
- 2 x G.P. 500 lb Mk.IV bombs
- 2 x M.C. 1000 lb Mk.I bombs
- 8 x RP-3 rockets
Usage in the battles
Climb with your team as high as you can muster (<4,000 m) and proceed to feast on anything the Spitfires above drop from their clouds. Speed is life and should never be wasted. Maintaining its velocity is the way of the Tempest in realistic battles.
The Tempest Mk. V excels at low to medium altitude battles, performing both as a Boom'n'Zoomer, ground attacker or energy fighter. To efficiently utilise its full engine power, do not get above 6,000 m or 19,000 ft, as the engine power drops significantly beyond that point. However, due to the supercharged engine, it outperforms aircraft like the Fw 190 D-9 by far at high altitudes (over 7,600 m or 25,000 ft) but gets obliterated by Ta 152Hs and some Bf 109 models, such as the K-4s and G-10s. To counter the BF109K-4, pilot Pierre Clostermann was quoted as saying:
"Tempest V. Messerschmitts: I kept on reminding my pilots to keep their speed above 300 m.p.h., for "109's" could turn better than we could at low speed, and you had to watch out for the 30 mm cannon in their propeller - it didn't give you a second chance. The best technique was to do a spiral dive, work up to a speed of 450 m.p.h., do a straight climb and then start all over again. The "109's" on the other hand, knowing that we dived faster than they did, tried to get us up to 16,000 feet, where our Tempests were heavy and our engines sluggish."
In arcade battles, stick with WEP on and Boom & Zoom tactics. On realistic you can try the above strategy, but you may find that due to mouse aim some adaptations must be implemented. Don't lose sight of your attacker and be on guard for when his cannon fires. As soon as you see the barrel flash, you have about 0.7 seconds to take your plane out of the way, depending on the distance. At that point, you can throw off his aim by performing a low Yo-Yo to gain more speed and proceed to zoom away if you're below 3,000 m or 10,000 ft, because at this altitude your engine should provide enough power for you to outrun the BF109K-4 or G-10. However, you may find that the Tempest Mk.V is a cinder brick because you accelerate stupidly fast diving straight to the ground. When in trouble at high heights, dive like there is no tomorrow.
Manual Engine Control
| MEC elements | ||||||
|---|---|---|---|---|---|---|
| Mixer | Pitch | Radiator | Supercharger | Turbocharger | ||
| Oil | Water | Type | ||||
| Controllable | Not controllable | Not controllable | Not controllable | Separate | Not ontrollable | Not controllable |
Modules
| Tier | Flight performance | Survivability | Weaponry | ||
|---|---|---|---|---|---|
| I | Fuselage Repair | Radiator | |||
| II | Compressor | Airframe | |||
| III | Wings Repair | Engine | |||
| IV | Engine Injection | Cover | |||
Pros and cons
Pros:
- Powerful engine providing both great acceleration and top speed below 3 km altitude
- Powerful armament with lots of ammo allowing to stay a long time in battle and ability to take out even four-engined bombers easily
- Excellent acceleration in dive
- Pretty good manoeuvrability at high speeds
Cons:
- Poor engine performance at high altitudes
- Not good manoeuvrability at low speeds
- High repair costs
History
From its initial conception, the Hawker Tempest was conceived of as a replacement for the Typhoon, a fighter-bomber created by the Hawker company in 1941. The Typhoon had many deficiencies such as an unreliable engine, insufficient structural strength leading in some cases to the entire tail detaching, a sub-standard rate of climb and poor high altitude performance. Because of these, it could not compete with the latest fighter of the time, the German Focke-Wolf FW190, and the Typhoon’s was removed from its planned role as an interceptor and used mainly for ground strike missions. The Tempest prototype, first flown in February 1943, inherited some of the traits of its older brother, but experts took into account Hawker’s negative experience and did their best to refine the aerodynamic shape of the new aircraft. The wing was slightly shorter, the profile more slender, and the back edge elliptical. Compensating the fuel capacity lost in the newly designed, thinner wings, came in the way of adding another fuel tank to the fuselage which accounted for the increased length of the aircraft. Consequently, the tail section was also modified, most noticeably by a fairing fitted to the vertical fin’s leading edge and an increase of the tailplane chord.
Due to the unavailability of Napier Sabre Mk IV engine, which was supposed to keep the new aircraft from having the Typhoon’s “beard” radiator, the same Sabre Mk IIA engine, rated at 2,180 HP, had to be installed along with a four-bladed de Havilland propeller. On the first batch of Tempests (100 aircraft) the armament stayed unchanged, but subsequent fighters had the long-barrelled Hispano Mk II gun replaced with the more rapid and light Hispano Mk V. The ammunition was also increased from 140 to 150 rounds per gun. Thanks to the strength of its wings, the aircraft could carry a substantial bomb load or two 500 lb or 1000 lb bombs, two 45 or 90-gallon fuel tanks, or eight 76mm rockets. The Tempest proved far more successful and popular with its pilots than the Typhoon, eliminating its predecessor’s shortcomings.
Front line service for the Tempest began in April 1944, when 50 Tempest Mk Vs formed the first Tempest Wing at Newchurch. The Tempest Wing was particularly active in the build-up to D-Day, but when the first German V-1 flying bombs began to fall on British soil, the Tempest was found to be one of the only fighters fast enough to counter the new threat. Fast, manoeuvrable and heavily armed, the Tempest was also able to prove a threat to the Messerschmitt Me 262 jet fighter by destroying a total of 20 262s. Some 1,700 Tempests were manufactured until the aircraft was phased out of service with the RAF in 1949.
In-game description
"From its initial conception, the Hawker Tempest was conceived of as a replacement for the Typhoon, a fighter-bomber created by the Hawker company in 1941. The Typhoon had many deficiencies such as an unreliable engine, insufficient structural strength leading in some cases to the entire tail detaching, sub-standard rate of climb and a poor high altitude performance. Because of these it could not compete with the latest fighter of the time, the German Focke-Wolf FW190, and the Typhoon’s was removed from its planned role as an interceptor and used mainly for ground strike missions. The Tempest prototype, first flown in February 1943, inherited some of the traits of its older brother, but experts took into account Hawker’s negative experience and did their best to refine the aerodynamic shape of the new aircraft. The wing was slightly shorter, the profile more slender, and the back edge elliptical. To compensate for the fuel capacity lost in the new, thinner wings, another fuel tank was added to the fuselage which accounted for the increased length of the aircraft. Consequently, the tail section was also modified, most noticeably by a fairing fitted to the vertical fin’s leading edge and an increase of the tail plane chord.
Due to the unavailability of Napier Sabre Mk IV engine, which was supposed to keep the new aircraft from having the Typhoon’s “beard” radiator, the same Sabre Mk IIA engine, rated at 2180 HP, had to be installed; this was fitted with a de Havilland four bladed propeller. On the first batch of Tempests (100 aircraft) the armament stayed unchanged, but subsequent fighters had the long-barrelled Hispano Mk II gun replaced with the more rapid and light Hispano Mk V. The ammunition was also increased from 140 to 150 rounds per gun. Thanks to the strength of its wings, the aircraft could carry a substantial bomb load or two 500 lb or 1000 lb bombs, two 45 or 90 gallon fuel tanks, or eight 76mm rockets. The Tempest proved far more successful and popular with its pilots than the Typhoon, eliminating its predecessor’s shortcomings.
Front line service for the Tempest began in April 1944, when 50 Tempest Mk Vs formed the first Tempest Wing at Newchurch. The Tempest Wing was particularly active in the build up to D-Day, but when the first German V-1 flying bombs began to fall on British soil, the Tempest was found to be one of the only fighters fast enough to counter the new threat. Fast, manoeuvrable and heavily armed, the Tempest was also able to prove a threat to the Messerschmitt Me 262 jet fighter, with 20 262s being destroyed by Tempests. Some 1700 Tempests were manufactured until the aircraft was phased out of service with the RAF in 1949."
Media
An excellent addition to the article will be video guides, as well as screenshots from the game and photos.
Read also
Links to the articles on the War Thunder Wiki that you think will be useful for the reader, for example,
- reference to the series of the aircraft;
- links to approximate analogues of other nations and research trees.
Sources
Paste links to sources and external resources, such as:
- topic on the official game forum;
- page on aircraft encyclopedia;
- other literature.
