Difference between pages "Strv 103-0" and "T-80B"
CobraKingII (talk | contribs) (→Machine guns) |
(→Machine guns: Updated) |
||
| Line 1: | Line 1: | ||
| − | {{Specs-Card | + | {{Specs-Card|code=ussr_t_80b}} |
| − | |code= | ||
| − | |||
| − | }} | ||
== Description == | == Description == | ||
| Line 8: | Line 5: | ||
[[File:GarageImage_{{PAGENAME}}.jpg|420px|thumb|left]] | [[File:GarageImage_{{PAGENAME}}.jpg|420px|thumb|left]] | ||
{{Break}} | {{Break}} | ||
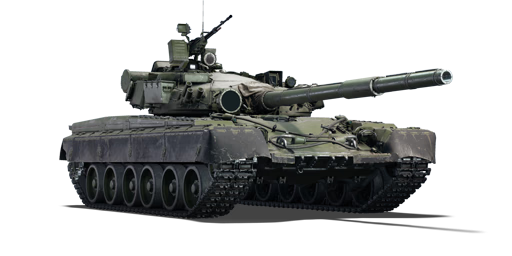
| − | The '''{{Specs|name}}''' is a | + | The '''{{Specs|name}}''' is a rank {{Specs|rank}} Soviet medium tank {{Battle-rating}}. It was introduced in [[Update 1.81 "The Valkyries"]]. |
| + | |||
| + | The T-80B is visually similar to the [[T-64B]], it retains the same rounded turret, sloped frontal armour and skirted sides, as well as the same jacketed 125 mm smoothbore gun. The turret bears different kit, however, such as the use of rounded storage bins and a snorkel tube. The same NSVT 12 mm machine gun is fitted, but this time it is used with 150-round boxes instead of the 100-round boxes found on the T-64B. The T-80B retains the same rubber-mesh screens covering the upper portion of the tracks. The frontal glacis has an additional 30 mm plate of HHRA welded onto it. This replaces the regular V-shaped "splash plate" found on the T-64B. The primary difference between the T-80B and its predecessor is the significantly improved engine which offers increased mobility. | ||
== General info == | == General info == | ||
=== Survivability and armour === | === Survivability and armour === | ||
| − | ''Describe armour protection. Note the most well protected and key weak areas. Appreciate the layout of modules as well as the number and location of crew members. Is the level of armour protection sufficient, is the placement of modules helpful for survival in combat? If necessary use a visual template to indicate the most secure and weak zones of the armour.'' | + | <!-- ''Describe armour protection. Note the most well protected and key weak areas. Appreciate the layout of modules as well as the number and location of crew members. Is the level of armour protection sufficient, is the placement of modules helpful for survival in combat? If necessary use a visual template to indicate the most secure and weak zones of the armour.'' --> |
| + | The T-80B encounters the same weaknesses and strengths as the T-64 line does - extremely strong turret cheeks, an average upper front glacis with a large weak spot around the driver's port, and a lack of composite on the lower front plate. It's also vulnerable to the same incoming fire as the T-64B - turret shots will often disable the gun breech; penetrating shots on the hull will often detonate the ammunition in the carousel. | ||
| + | |||
| + | As with the T-64B, the T-80B is best used in hull-down positions where only the turret is exposed - and unlike the T-64B, it has an acceptable reverse speed for utilising cover. | ||
=== Mobility === | === Mobility === | ||
<!-- ''Write about the mobility of the ground vehicle. Estimate the specific power and manoeuvrability, as well as the maximum speed forwards and backwards.'' --> | <!-- ''Write about the mobility of the ground vehicle. Estimate the specific power and manoeuvrability, as well as the maximum speed forwards and backwards.'' --> | ||
| − | {{tankMobility|abMinHp= | + | {{tankMobility|abMinHp=1,705|rbMinHp=973}} |
| + | |||
| + | The {{PAGENAME}} has a turbine engine which produces significantly more power than the T-64B's diesel - top speed and manoeuvrability are both improved thanks to this but the most significant change is the acceleration - the {{PAGENAME}} is able to achieve reasonable speeds both off- and on-road and maintain them much better than the T-64B. More importantly, the reverse speed is nearly doubled from the measly -4 km/h on the T-64B to -7 km/h - still not ideal but a big improvement. | ||
| + | |||
| + | Thanks to the improvements, the {{PAGENAME}} is a much better match for the Abrams/Challenger/Leopard series - it's still not the fastest but it's a much closer race. | ||
== Armaments == | == Armaments == | ||
=== Main armament === | === Main armament === | ||
| − | ''Give the reader information about the characteristics of the main gun. Assess its effectiveness in a battle based on the reloading speed, ballistics and the power of shells. Do not forget about the flexibility of the fire, that is how quickly the cannon can be aimed at the target, open fire on it and aim at another enemy. Add a link to the main article on the gun: <code><nowiki>{{main|Name of the weapon}}</nowiki></code>. Describe in general terms the ammunition available for the main gun. | + | <!-- ''Give the reader information about the characteristics of the main gun. Assess its effectiveness in a battle based on the reloading speed, ballistics and the power of shells. Do not forget about the flexibility of the fire, that is how quickly the cannon can be aimed at the target, open fire on it and aim at another enemy. Add a link to the main article on the gun: <code><nowiki>{{main|Name of the weapon}}</nowiki></code>. Describe in general terms the ammunition available for the main gun. Give advice on how to use them and how to fill the ammunition storage.'' --> |
| + | {{main|2A46M-1 (125 mm)}} | ||
| − | |||
{| class="wikitable" style="text-align:center" width="100%" | {| class="wikitable" style="text-align:center" width="100%" | ||
|- | |- | ||
| − | ! colspan="5" | [[ | + | ! colspan="5" | [[2A46M-1 (125 mm)|125 mm 2A46M-1]] || colspan="5" | Turret rotation speed (°/s) || colspan="4" | Reloading rate (seconds) |
|- | |- | ||
! Mode !! Capacity !! Vertical !! Horizontal !! Stabilizer | ! Mode !! Capacity !! Vertical !! Horizontal !! Stabilizer | ||
| Line 33: | Line 39: | ||
|- | |- | ||
! ''Arcade'' | ! ''Arcade'' | ||
| − | | rowspan="2" | | + | | rowspan="2" | 38 || rowspan="2" | -5°/+15° || rowspan="2" | ±180° || rowspan="2" | Two-plane || 22.80 || 31.46 || __.__ || __.__ || __.__ || rowspan="2" | 7.10 || rowspan="2" | 7.10 || rowspan="2" | 7.10 || rowspan="2" | 7.10 |
|- | |- | ||
! ''Realistic'' | ! ''Realistic'' | ||
| − | | | + | | 14.30 || 16.87 || __.__ || __.__ || __.__ |
|- | |- | ||
|} | |} | ||
| Line 50: | Line 56: | ||
! 10 m !! 100 m !! 500 m !! 1,000 m !! 1,500 m !! 2,000 m | ! 10 m !! 100 m !! 500 m !! 1,000 m !! 1,500 m !! 2,000 m | ||
|- | |- | ||
| − | | | + | | 3BM22 || APFSDS || 425 || 420 || 415 || 405 || 393 || 380 |
| + | |- | ||
| + | | 3BM42 || APFSDS || 479 || 477 || 470 || 462 || 453 || 445 | ||
|- | |- | ||
| − | | | + | | 3BK18M || HEATFS || 550 || 550 || 550 || 550 || 550 || 550 |
| − | | | ||
| − | | | ||
| − | | | ||
| − | | | ||
| − | | | ||
| − | | | ||
| − | | | ||
|- | |- | ||
| − | | | + | | 3OF26 || HE || 42 || 42 || 42 || 42 || 42 || 42 |
| − | |HE | ||
| − | | | ||
| − | | | ||
| − | | | ||
| − | | | ||
| − | | | ||
| − | | | ||
|- | |- | ||
| − | | | + | | 9M112 || ATGM || 650 || 650 || 650 || 650 || 650 || 650 |
| − | | | ||
| − | | | ||
| − | | | ||
| − | | | ||
| − | | | ||
| − | | | ||
| − | | | ||
|- | |- | ||
|} | |} | ||
| − | |||
{| class="wikitable sortable" style="text-align:center" width="100%" | {| class="wikitable sortable" style="text-align:center" width="100%" | ||
! colspan="10" | Shell details | ! colspan="10" | Shell details | ||
| Line 95: | Line 81: | ||
! 0% !! 50% !! 100% | ! 0% !! 50% !! 100% | ||
|- | |- | ||
| − | | | + | | 3BM22 || APFSDS || 1,760 || 4.83 || N/A || N/A || N/A || 76° || 77° || 80° |
| + | |- | ||
| + | | 3BM42 || APFSDS || 1,700 || 4.85 || N/A || N/A || N/A || 78° || 80° || 81° | ||
|- | |- | ||
| − | | | + | | 3BK18M || HEATFS || 905 || 19.00 || N/A || 0.1 || 2,790 || 65° || 72° || 77° |
| − | | | ||
| − | | | ||
| − | | | ||
| − | |N/A | ||
| − | | | ||
| − | | | ||
| − | | | ||
| − | | | ||
| − | | | ||
|- | |- | ||
| − | | | + | | 3OF26 || HE || 850 || 23.00 || 0.1 || 0.1 || 5,240 || 79° || 80° || 81° |
| − | |HE | ||
| − | | | ||
| − | | | ||
| − | |0.1 | ||
| − | |0.1 | ||
| − | | | ||
| − | |79° | ||
| − | |80° | ||
| − | |81° | ||
|- | |- | ||
| − | | | + | | 9M112 || ATGM || 400 || 27.50 || N/A || 0.1 || 3,600 || 80° || 82° || 90° |
| − | | | ||
| − | | | ||
| − | | | ||
| − | | | ||
| − | |0.1 | ||
| − | |3 | ||
| − | | | ||
| − | | | ||
| − | | | ||
|- | |- | ||
|} | |} | ||
| + | ==== [[Ammo racks]] ==== | ||
| + | <!-- [[File:Ammoracks_{{PAGENAME}}.png|right|thumb|x250px|[[Ammo racks]] of the {{PAGENAME}}]] --> | ||
{| class="wikitable" style="text-align:center" | {| class="wikitable" style="text-align:center" | ||
| − | |||
|- | |- | ||
| − | ! | + | ! Full<br>ammo |
| − | ! | + | ! 1st<br>rack empty |
| − | ! | + | ! 2nd<br>rack empty |
| − | ! | + | ! 3rd<br>rack empty |
| − | ! | + | ! 4th<br>rack empty |
| − | ! | + | ! 5th<br>rack empty |
| − | ! | + | ! 6th<br>rack empty |
| + | ! Visual<br>discrepancy | ||
|- | |- | ||
| − | | | + | | '''38''' || __ ''(+__)'' || __ ''(+__)'' || __ ''(+__)'' || __ ''(+__)'' || __ ''(+__)'' || __ ''(+__)'' || __ |
|- | |- | ||
|} | |} | ||
| Line 149: | Line 112: | ||
=== Machine guns === | === Machine guns === | ||
<!-- ''Offensive and anti-aircraft machine guns not only allow you to fight some aircraft but also are effective against lightly armoured vehicles. Evaluate machine guns and give recommendations on its use.'' --> | <!-- ''Offensive and anti-aircraft machine guns not only allow you to fight some aircraft but also are effective against lightly armoured vehicles. Evaluate machine guns and give recommendations on its use.'' --> | ||
| − | + | {{main|NSVT (12.7 mm)|PKT (7.62 mm)}} | |
| − | |||
{| class="wikitable" style="text-align:center" width="50%" | {| class="wikitable" style="text-align:center" width="50%" | ||
|- | |- | ||
| − | ! colspan="5" |[[ | + | ! colspan="5" | [[NSVT (12.7 mm)|12.7 mm NSVT]] |
| + | |- | ||
| + | ! Mount !! Capacity (Belt) !! Fire rate !! Vertical !! Horizontal | ||
| + | |- | ||
| + | | Pintle || 300 (150) || 700 || -5°/+75° || ±180° | ||
| + | |- | ||
| + | |} | ||
| + | {| class="wikitable" style="text-align:center" width="50%" | ||
|- | |- | ||
| − | ! | + | ! colspan="5" | [[PKT (7.62 mm)|7.62 mm PKT]] |
| − | |||
| − | |||
| − | |||
| − | |||
|- | |- | ||
| − | + | ! Mount !! Capacity (Belt) !! Fire rate !! Vertical !! Horizontal | |
|- | |- | ||
| − | |Coaxial | + | | Coaxial || 1,250 (250) || 700 || N/A || N/A |
| − | | | ||
| − | | | ||
| − | |N/A | ||
| − | |N/A | ||
|- | |- | ||
|} | |} | ||
== Usage in battles == | == Usage in battles == | ||
| − | ''Describe the tactics of playing in the vehicle, the features of using vehicles in the team and advice on tactics. Refrain from creating a "guide" - do not impose a single point of view but instead give the reader food for thought. Describe the most dangerous enemies and give recommendations on fighting them. If necessary, note the specifics of the game in different modes (AB, RB, SB).'' | + | <!-- ''Describe the tactics of playing in the vehicle, the features of using vehicles in the team and advice on tactics. Refrain from creating a "guide" - do not impose a single point of view but instead give the reader food for thought. Describe the most dangerous enemies and give recommendations on fighting them. If necessary, note the specifics of the game in different modes (AB, RB, SB).'' --> |
| + | The T-80B should be played like a T-64B, using your powerful gun and decent armour to pick off enemies in the distance. When needed, the T-80B can perform flanking runs with its decent speed. However, the T-80B should not be played like an M1 Abrams, as the tank will explode when anything penetrates your armour. | ||
| + | |||
| + | When playing in large maps such as "Kursk" and "Maginot Line" use the mobility of the T-80B to get into a hull-down position and make use of the T-80B's armament as well as its phenomenal turret armour to pick-off faraway enemy tanks. When playing in small maps such as "Normandy" and "Poland", use the mobility of the T-80B to flank enemy tanks as you would with the "M1 Abrams" or similar western MBT. | ||
| + | |||
| + | Some threats to be worried about: | ||
| + | |||
| + | * [[Type 90]] can penetrate any part of your tank and any plausible range. So don't get hit by it. The same goes for AMX-40 | ||
| + | * An ATGM will result in an ammunition detonation or crew kill. It is extremely important to get the Kontact-1 ERA modification as soon as possible because those ERA blocks will save you from helicopters. If you do not have the ERA modification, pay attention to the skies, try to maintain some sort of cover, as you will usually have 1-3 seconds of reaction time from detecting an ATGM and getting hit by one. | ||
=== Modules === | === Modules === | ||
| Line 179: | Line 148: | ||
! Tier | ! Tier | ||
! colspan="2" | Mobility | ! colspan="2" | Mobility | ||
| − | ! Protection | + | ! colspan="2" | Protection |
| − | ! colspan=" | + | ! colspan="2" | Firepower |
|- | |- | ||
| I | | I | ||
| Line 186: | Line 155: | ||
| | | | ||
| Parts | | Parts | ||
| − | | | + | | Crew Replenishment |
| − | | | + | | Horizontal Drive |
| − | | | + | | 3BK18M |
|- | |- | ||
| II | | II | ||
| Line 194: | Line 163: | ||
| Brake System | | Brake System | ||
| FPE | | FPE | ||
| + | | Smoke grenade | ||
| Adjustment of Fire | | Adjustment of Fire | ||
| − | | | + | | Laser rangefinder |
| − | |||
|- | |- | ||
| III | | III | ||
| Filters | | Filters | ||
| | | | ||
| − | |||
| − | |||
| NVD | | NVD | ||
| − | | | + | | Kontakt-I |
| + | | Elevation Mechanism | ||
| + | | 9M112 | ||
|- | |- | ||
| IV | | IV | ||
| Transmission | | Transmission | ||
| Engine | | Engine | ||
| − | | | + | | NVD upgrade |
| − | | | + | | ESS |
| Artillery Support | | Artillery Support | ||
| − | | | + | | 3BM42 |
| − | |||
| − | |||
|- | |- | ||
|} | |} | ||
=== Pros and cons === | === Pros and cons === | ||
| − | <!--''Summarise and briefly evaluate the vehicle in terms of its characteristics and combat effectiveness. Mark its pros and cons in a bulleted list. Try not to use more than 6 points for each of the characteristics. Avoid using categorical definitions such as "bad", "good" and the like - use substitutions with softer forms such as "inadequate" and "effective".''--> | + | <!-- ''Summarise and briefly evaluate the vehicle in terms of its characteristics and combat effectiveness. Mark its pros and cons in a bulleted list. Try not to use more than 6 points for each of the characteristics. Avoid using categorical definitions such as "bad", "good" and the like - use substitutions with softer forms such as "inadequate" and "effective".'' --> |
'''Pros:''' | '''Pros:''' | ||
| − | * | + | * Very good composite armour |
| − | * | + | * Powerful main gun with great stabilizers and accuracy |
| − | * | + | * Very good mobility |
| − | * | + | * Small vehicle |
| − | * | + | * Decent reverse speed of 12 km/h |
| − | * Has | + | * Autoloader like the T-64 |
| + | * Good chemical munitions protection with the ERA upgrade | ||
| + | * Has access to thermal vision | ||
'''Cons:''' | '''Cons:''' | ||
| − | * | + | * Same autoloader as the T-64, same rate of fire and weak spot |
| − | * | + | * 3 crew member makes it hard to survive on the battlefield |
| − | * | + | * Bad gun depression, the generic trouble of Soviet tanks |
| − | * | + | * Not a very fast turning turret |
| − | * | + | * Lower frontal hull armour devoid of composite armour |
| + | * Breech is easily damaged | ||
== History == | == History == | ||
| Line 242: | Line 212: | ||
== Media == | == Media == | ||
| − | <!--Excellent additions to the article would be video guides, screenshots from the game, and photos.--> | + | <!-- ''Excellent additions to the article would be video guides, screenshots from the game, and photos.'' --> |
| − | {{Youtube-gallery| | + | |
| + | ;Skins | ||
| + | |||
| + | * [https://live.warthunder.com/feed/camouflages/?vehicleCountry=ussr&vehicleType=tank&vehicleClass=medium_tank&vehicle=ussr_t_80b '''Skins''' and '''camouflages''' for the T-80B from live.warthunder.com.] | ||
| + | |||
| + | ;Videos | ||
| + | {{Youtube-gallery|Q6sYNcaVVO0|'''The Shooting Range #88''' - ''Pages of History'' section at 07:34 discusses the T-80.|Kn5rIoPjHuA|'''The Shooting Range #118''' - ''Metal Beasts'' section at 00:35 discusses the T-80B.|CJ9sCL1BGy4|'''M1 Abrams vs T-72A vs T-80B''' - ''War Thunder Official Channel''}} | ||
== See also == | == See also == | ||
''Links to the articles on the War Thunder Wiki that you think will be useful for the reader, for example:'' | ''Links to the articles on the War Thunder Wiki that you think will be useful for the reader, for example:'' | ||
| − | |||
* ''reference to the series of the vehicles;'' | * ''reference to the series of the vehicles;'' | ||
* ''links to approximate analogues of other nations and research trees.'' | * ''links to approximate analogues of other nations and research trees.'' | ||
== External links == | == External links == | ||
| − | <!--Paste links to sources and external resources, such as: | + | <!-- ''Paste links to sources and external resources, such as:'' |
* ''topic on the official game forum;'' | * ''topic on the official game forum;'' | ||
* ''encyclopedia page on the tank;'' | * ''encyclopedia page on the tank;'' | ||
| − | * ''other literature.''--> | + | * ''other literature.'' --> |
| + | |||
| + | * [[wt:en/news/5713-development-char-25t-and-t-80b-en|[Devblog] Char 25t and T-80B]] | ||
| + | * [[wt:en/news/5844-development-explosive-reactive-armor-for-the-t-80b-en|[Devblog] Explosive Reactive Armor for the T-80B]] | ||
| − | + | {{USSR medium tanks}} | |
| − | + | [[Category:ATGM vehicles]] | |
| − | |||
Revision as of 15:17, 31 July 2020
Contents
Description

The T-80B is a rank VII Soviet medium tank
with a battle rating of 10.3 (AB/RB/SB). It was introduced in Update 1.81 "The Valkyries".
The T-80B is visually similar to the T-64B, it retains the same rounded turret, sloped frontal armour and skirted sides, as well as the same jacketed 125 mm smoothbore gun. The turret bears different kit, however, such as the use of rounded storage bins and a snorkel tube. The same NSVT 12 mm machine gun is fitted, but this time it is used with 150-round boxes instead of the 100-round boxes found on the T-64B. The T-80B retains the same rubber-mesh screens covering the upper portion of the tracks. The frontal glacis has an additional 30 mm plate of HHRA welded onto it. This replaces the regular V-shaped "splash plate" found on the T-64B. The primary difference between the T-80B and its predecessor is the significantly improved engine which offers increased mobility.
General info
Survivability and armour
The T-80B encounters the same weaknesses and strengths as the T-64 line does - extremely strong turret cheeks, an average upper front glacis with a large weak spot around the driver's port, and a lack of composite on the lower front plate. It's also vulnerable to the same incoming fire as the T-64B - turret shots will often disable the gun breech; penetrating shots on the hull will often detonate the ammunition in the carousel.
As with the T-64B, the T-80B is best used in hull-down positions where only the turret is exposed - and unlike the T-64B, it has an acceptable reverse speed for utilising cover.
Mobility
| Game Mode | Max Speed (km/h) | Weight (tons) | Engine power (horsepower) | Power-to-weight ratio (hp/ton) | |||
|---|---|---|---|---|---|---|---|
| Forward | Reverse | Stock | Upgraded | Stock | Upgraded | ||
| Arcade | 78 | 13 | 42.5 | 1,705 | 2,099 | 40.12 | 49.39 |
| Realistic | 70 | 11 | 973 | 1,100 | 22.89 | 25.88 | |
The T-80B has a turbine engine which produces significantly more power than the T-64B's diesel - top speed and manoeuvrability are both improved thanks to this but the most significant change is the acceleration - the T-80B is able to achieve reasonable speeds both off- and on-road and maintain them much better than the T-64B. More importantly, the reverse speed is nearly doubled from the measly -4 km/h on the T-64B to -7 km/h - still not ideal but a big improvement.
Thanks to the improvements, the T-80B is a much better match for the Abrams/Challenger/Leopard series - it's still not the fastest but it's a much closer race.
Armaments
Main armament
| 125 mm 2A46M-1 | Turret rotation speed (°/s) | Reloading rate (seconds) | |||||||||||
|---|---|---|---|---|---|---|---|---|---|---|---|---|---|
| Mode | Capacity | Vertical | Horizontal | Stabilizer | Stock | Upgraded | Full | Expert | Aced | Stock | Full | Expert | Aced |
| Arcade | 38 | -5°/+15° | ±180° | Two-plane | 22.80 | 31.46 | __.__ | __.__ | __.__ | 7.10 | 7.10 | 7.10 | 7.10 |
| Realistic | 14.30 | 16.87 | __.__ | __.__ | __.__ | ||||||||
Ammunition
| Penetration statistics | |||||||
|---|---|---|---|---|---|---|---|
| Ammunition | Type of warhead |
Penetration @ 0° Angle of Attack (mm) | |||||
| 10 m | 100 m | 500 m | 1,000 m | 1,500 m | 2,000 m | ||
| 3BM22 | APFSDS | 425 | 420 | 415 | 405 | 393 | 380 |
| 3BM42 | APFSDS | 479 | 477 | 470 | 462 | 453 | 445 |
| 3BK18M | HEATFS | 550 | 550 | 550 | 550 | 550 | 550 |
| 3OF26 | HE | 42 | 42 | 42 | 42 | 42 | 42 |
| 9M112 | ATGM | 650 | 650 | 650 | 650 | 650 | 650 |
| Shell details | |||||||||
|---|---|---|---|---|---|---|---|---|---|
| Ammunition | Type of warhead |
Velocity (m/s) |
Projectile Mass (kg) |
Fuse delay (m) |
Fuse sensitivity (mm) |
Explosive Mass (TNT equivalent) (g) |
Ricochet | ||
| 0% | 50% | 100% | |||||||
| 3BM22 | APFSDS | 1,760 | 4.83 | N/A | N/A | N/A | 76° | 77° | 80° |
| 3BM42 | APFSDS | 1,700 | 4.85 | N/A | N/A | N/A | 78° | 80° | 81° |
| 3BK18M | HEATFS | 905 | 19.00 | N/A | 0.1 | 2,790 | 65° | 72° | 77° |
| 3OF26 | HE | 850 | 23.00 | 0.1 | 0.1 | 5,240 | 79° | 80° | 81° |
| 9M112 | ATGM | 400 | 27.50 | N/A | 0.1 | 3,600 | 80° | 82° | 90° |
Ammo racks
| Full ammo |
1st rack empty |
2nd rack empty |
3rd rack empty |
4th rack empty |
5th rack empty |
6th rack empty |
Visual discrepancy |
|---|---|---|---|---|---|---|---|
| 38 | __ (+__) | __ (+__) | __ (+__) | __ (+__) | __ (+__) | __ (+__) | __ |
Machine guns
| 12.7 mm NSVT | ||||
|---|---|---|---|---|
| Mount | Capacity (Belt) | Fire rate | Vertical | Horizontal |
| Pintle | 300 (150) | 700 | -5°/+75° | ±180° |
| 7.62 mm PKT | ||||
|---|---|---|---|---|
| Mount | Capacity (Belt) | Fire rate | Vertical | Horizontal |
| Coaxial | 1,250 (250) | 700 | N/A | N/A |
Usage in battles
The T-80B should be played like a T-64B, using your powerful gun and decent armour to pick off enemies in the distance. When needed, the T-80B can perform flanking runs with its decent speed. However, the T-80B should not be played like an M1 Abrams, as the tank will explode when anything penetrates your armour.
When playing in large maps such as "Kursk" and "Maginot Line" use the mobility of the T-80B to get into a hull-down position and make use of the T-80B's armament as well as its phenomenal turret armour to pick-off faraway enemy tanks. When playing in small maps such as "Normandy" and "Poland", use the mobility of the T-80B to flank enemy tanks as you would with the "M1 Abrams" or similar western MBT.
Some threats to be worried about:
- Type 90 can penetrate any part of your tank and any plausible range. So don't get hit by it. The same goes for AMX-40
- An ATGM will result in an ammunition detonation or crew kill. It is extremely important to get the Kontact-1 ERA modification as soon as possible because those ERA blocks will save you from helicopters. If you do not have the ERA modification, pay attention to the skies, try to maintain some sort of cover, as you will usually have 1-3 seconds of reaction time from detecting an ATGM and getting hit by one.
Modules
| Tier | Mobility | Protection | Firepower | |||
|---|---|---|---|---|---|---|
| I | Tracks | Parts | Crew Replenishment | Horizontal Drive | 3BK18M | |
| II | Suspension | Brake System | FPE | Smoke grenade | Adjustment of Fire | Laser rangefinder |
| III | Filters | NVD | Kontakt-I | Elevation Mechanism | 9M112 | |
| IV | Transmission | Engine | NVD upgrade | ESS | Artillery Support | 3BM42 |
Pros and cons
Pros:
- Very good composite armour
- Powerful main gun with great stabilizers and accuracy
- Very good mobility
- Small vehicle
- Decent reverse speed of 12 km/h
- Autoloader like the T-64
- Good chemical munitions protection with the ERA upgrade
- Has access to thermal vision
Cons:
- Same autoloader as the T-64, same rate of fire and weak spot
- 3 crew member makes it hard to survive on the battlefield
- Bad gun depression, the generic trouble of Soviet tanks
- Not a very fast turning turret
- Lower frontal hull armour devoid of composite armour
- Breech is easily damaged
History
Describe the history of the creation and combat usage of the vehicle in more detail than in the introduction. If the historical reference turns out to be too long, take it to a separate article, taking a link to the article about the vehicle and adding a block "/History" (example: https://wiki.warthunder.com/(Vehicle-name)/History) and add a link to it here using the main template. Be sure to reference text and sources by using <ref></ref>, as well as adding them at the end of the article with <references />. This section may also include the vehicle's dev blog entry (if applicable) and the in-game encyclopedia description (under === In-game description ===, also if applicable).
Media
- Skins
- Videos
See also
Links to the articles on the War Thunder Wiki that you think will be useful for the reader, for example:
- reference to the series of the vehicles;
- links to approximate analogues of other nations and research trees.
External links
| USSR medium tanks | |
|---|---|
| T-28 | T-28 (1938) · T-28 · T-28E |
| T-34-76 | T-34 (Prototype) · T-34 (1940) · T-34 (1941) · T-34 (1st Gv.T.Br.) · T-34 (1942) · T-34E STZ · T-34E |
| T-34-57 | T-34-57 · T-34-57 (1943) |
| T-34-85 | T-34-85 (D-5T) · T-34-85 · T-34-85E |
| T-34-100 | T-34-100 |
| T-44 | T-44 · T-44-100 · T-44-122 |
| T-54 | T-54 (1947) · T-54 (1949) · T-54 (1951) |
| T-55 | TO-55 · T-55A · T-55AM-1 · T-55AMD-1 |
| T-62 | T-62 · T-62M-1 |
| T-64 | Object 435 · T-64A (1971) · T-64B |
| T-72 | T-72A · T-72AV (TURMS-T) · T-72B · T-72B (1989) · T-72B3 · T-72M2 Moderna |
| T-80 | T-80B · T-80U · T-80UD · T-80UK · T-80UM2 · T-80BVM · Object 292 |
| T-90 | Т-90А · T-90M |
| Trophies/Lend-Lease | |
| Germany | ▂T-III · ▂T-V |
| Great Britain | ▂МК-IX "Valentine" |
| USA | ▂M3 Medium · ▂M4A2 |
