Difference between pages "QF 3.7 Ram" and "SB 2M-103 MV-3"
Colok76286 (talk | contribs) (→Usage in battles: Added modules) |
(→Flight performance: Readded specs call) |
||
| Line 1: | Line 1: | ||
| − | {{Specs-Card | + | {{Specs-Card|code=sb_2m_103_mv3}} |
| − | | | + | {{About |
| − | | | + | | about = gift Russian bomber '''{{PAGENAME}}''' |
| + | | usage = other variants | ||
| + | | link = SB 2M (Family) | ||
}} | }} | ||
== Description == | == Description == | ||
| − | <!--In the description, the first part should be about the history of the creation and combat usage of the | + | <!-- ''In the description, the first part should be about the history of and the creation and combat usage of the aircraft, as well as its key features. In the second part, tell the reader about the aircraft in the game. Insert a screenshot of the vehicle, so that if the novice player does not remember the vehicle by name, he will immediately understand what kind of vehicle the article is talking about.'' --> |
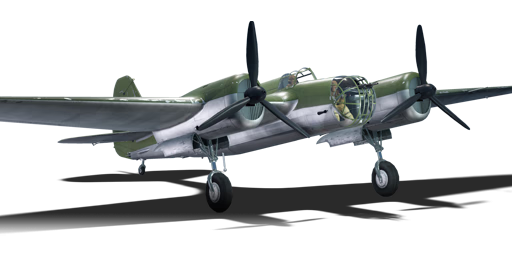
[[File:GarageImage_{{PAGENAME}}.jpg|420px|thumb|left]] | [[File:GarageImage_{{PAGENAME}}.jpg|420px|thumb|left]] | ||
{{Break}} | {{Break}} | ||
| − | The '''{{Specs|name}} | + | The '''{{Specs|name}}''' is a gift rank {{Specs|rank}} Soviet bomber {{Battle-rating}}. Though initially in the game pre-1.29, this plane was removed upon Update 1.37 due to redundancy. Those players who acquired the aircraft before it was removed still have access to it. |
== General info == | == General info == | ||
| − | === | + | === Flight performance === |
| − | + | ''Describe how the aircraft behaves in the air. Speed, manoeuvrability, acceleration and allowable loads - these are the most important characteristics of the vehicle.'' | |
| + | |||
| + | {| class="wikitable" style="text-align:center" width="70%" | ||
| + | ! rowspan="2" | Characteristics | ||
| + | ! colspan="2" | Max Speed<br>(km/h at 4,500 m) | ||
| + | ! rowspan="2" | Max altitude<br>(metres) | ||
| + | ! colspan="2" | Turn time<br>(seconds) | ||
| + | ! colspan="2" | Rate of climb<br>(metres/second) | ||
| + | ! rowspan="2" | Take-off run<br>(metres) | ||
| + | |- | ||
| + | ! AB !! RB !! AB !! RB !! AB !! RB | ||
| + | |- | ||
| + | ! Stock | ||
| + | | 430 || 415 || rowspan="2" | {{Specs|ceiling}} || 22.8 || 23.4 || 6.5 || 6.5 || rowspan="2" | 366 | ||
| + | |- | ||
| + | ! Upgraded | ||
| + | | ___ || ___ || __._ || __._ || __._ || __._ | ||
| + | |- | ||
| + | |} | ||
| − | + | ==== Details ==== | |
| + | {| class="wikitable" style="text-align:center" width="50%" | ||
| + | |- | ||
| + | ! colspan="5" | Features | ||
| + | |- | ||
| + | ! Combat flaps !! Take-off flaps !! Landing flaps !! Air brakes !! Arrestor gear | ||
| + | |- | ||
| + | | ✓ || ✓ || ✓ || X || X <!-- ✓ --> | ||
| + | |- | ||
| + | |} | ||
| − | + | {| class="wikitable" style="text-align:center" width="50%" | |
| + | |- | ||
| + | ! colspan="7" | Limits | ||
| + | |- | ||
| + | ! rowspan="2" | Wings (km/h) | ||
| + | ! rowspan="2" | Gear (km/h) | ||
| + | ! colspan="3" | Flaps (km/h) | ||
| + | ! colspan="2" | Max Static G | ||
| + | |- | ||
| + | ! Combat !! Take-off !! Landing !! + !! - | ||
| + | |- | ||
| + | | {{Specs|destruction|body}} || {{Specs|destruction|gear}} || 320 || 320 || 280 || ~3 || ~2 | ||
| + | |- | ||
| + | |} | ||
| − | + | {| class="wikitable" style="text-align:center" | |
| + | |- | ||
| + | ! colspan="4" | Optimal velocities (km/h) | ||
| + | |- | ||
| + | ! Ailerons !! Rudder !! Elevators !! Radiator | ||
| + | |- | ||
| + | | < 250 || < 300 || < 185 || > 350 | ||
| + | |- | ||
| + | |} | ||
| − | + | === Survivability and armour === | |
| − | + | ''Examine the survivability of the aircraft. Note how vulnerable the structure is and how secure the pilot is, whether the fuel tanks are armoured, etc. Describe the armour, if there is any, and also mention the vulnerability of other critical aircraft systems.'' | |
| − | + | == Armaments == | |
| + | === Suspended armament === | ||
| + | <!-- ''Describe the aircraft's suspended armament: additional cannons under the wings, bombs, rockets and torpedoes. This section is especially important for bombers and attackers. If there is no suspended weaponry remove this subsection.'' --> | ||
| + | {{main|FAB-100 (100 kg)|FAB-250M43 (250 kg)|FAB-500 (500 kg)}} | ||
| − | The | + | The '''''{{PAGENAME}}''''' can be outfitted with the following ordnance: |
| − | + | * 6 x 100 kg FAB-100 bombs (600 kg total) | |
| + | * 2 x 250 kg FAB-250M43 bombs + 6 x 100 kg FAB-100 bombs (1,100 kg total) | ||
| + | * 2 x 250 kg FAB-250M43 bombs (500 kg total) | ||
| + | * 4 x 250 kg FAB-250M43 bombs (1,000 kg total) | ||
| + | * 1 x 500 kg FAB-500 bomb (500 kg total) | ||
| + | * 2 x 500 kg FAB-500 bombs + 2 x 250 kg FAB-250M43 bombs (1,500 kg total) | ||
| + | * 3 x 500 kg FAB-500 bombs (1,500 kg total) | ||
| + | * 1 x 500 kg FAB-500 bomb + 2 x 250 kg FAB-250M43 bombs (1,000 kg total) | ||
| − | + | === Defensive armament === | |
| + | <!-- ''Defensive armament with turret machine guns or cannons, crewed by gunners. Examine the number of gunners and what belts or drums are better to use. If defensive weaponry is not available, remove this subsection.'' --> | ||
| + | {{main|ShKAS (7.62 mm)}} | ||
| − | + | The '''''{{PAGENAME}}''''' is defended by: | |
| − | + | * 2 x 7.62 mm ShKAS machine gun, nose turret (960 rpg = 1,920 total) | |
| + | * 1 x 7.62 mm ShKAS machine gun, dorsal turret (1,000 rpg) | ||
| + | * 1 x 7.62 mm ShKAS machine gun, ventral turret (500 rpg) | ||
| − | + | == Usage in battles == | |
| + | <!-- ''Describe the tactics of playing in the aircraft, the features of using aircraft in a team and advice on tactics. Refrain from creating a "guide" - do not impose a single point of view, but instead, give the reader food for thought. Examine the most dangerous enemies and give recommendations on fighting them. If necessary, note the specifics of the game in different modes (AB, RB, SB).'' --> | ||
| + | '''Arcade Battles:''' | ||
| − | + | This bomber is quite fast for its BR so you should use this as an advantage. For example, you should climb directly at the beginning of the match to 5,000 m and destroy the enemy bases with setup 5 (2 x 250 kg + 2 x 500 kg) which is the heaviest payload you'll have with this plane. | |
| − | |||
| − | |||
| − | |||
| − | |||
| − | + | '''Realistic Battles:''' | |
| − | + | In Realistic battles you should use the same tactics as in Arcade battles. Note that 2 x 500 kg FAB 500 bombs are enough to destroy a base. | |
| − | + | '''Simulator Battles:''' | |
| − | |||
| − | + | In Sim, the overall tactic remains the same as other bombers: base/airfield bombing. However, there are several notes for this particular SB 2M bomber. | |
| − | + | Maybe it's because of the design of short fuselage and huge wings, or it's caused by something else, the SB 2M is super hard to control in the pitch. If you leave the stick at the deadzone, the aircraft will automatically climb or dive which will lead to a crash if unnoticed. Trimming doesn't help. For the gunner view, even though you might have the "autopilot when in gunner view" enabled, it won't help either, as it will still continuously pitch up and down like a boat. Also note that when switching to gunner view, it will sometimes uncontrollably roll to one side which will make it enter a spin quickly. Therefore this bomber is extremely frustrating to fly in Sim. | |
| − | + | Note: the setup with the most explosive mass is the 2x 250 kg + 2x 500 kg, but this way the two 500 kg bombs are carried under the wing roots and the two 250 kg inside the bomb bay. So if you use the default keybind (space) to open bomb bay ''and'' drop bombs, the timing will get messed up when bombing a base, since the two wing-mounted bombs will go first, ''then'' the bomb bay opens, dropping the two inside. The time between the two drops are long enough for one drop to completely miss the target. To avoid this, set up a keybind for open / close bomb bay, and drop bomb series (all bombs go at once). When approaching a base, open the bomb base first, then drop all the bombs, they will now all hit the target. | |
| − | + | When bombing airfields, make sure to fly above 2,000 m to avoid the AAA, as this plane is unprotected and its coolers will often get damaged, leading to the engines overheating. You should familiarise each module of the airfield to maximise the damage. The airstrip is the most visible and the easiest one to hit, however bombing it seems to halve your reward. So it is recommended to bomb everything else: hangar, fuel area, living quarters, etc. The plane hangars are probably easy, since they aren't too small. | |
| − | + | '''Against the SB 2M (all modes but mostly in sim):''' | |
| − | + | You should be very careful against bombers since with the Sim control (whether it be mouse joystick or a real stick) the plane will manoeuvre much more gently, making yourself a great target for the bomber's gunners. DO NOT follow behind the SB 2M's six unless you are sure that its tail gunners are unconscious. Chasing behind the SB 2M makes yourself pretty much stationary for the tail gunners, and you will be showered with 7.62 mm bullets. | |
| − | |||
| − | |||
| − | |||
| − | + | If your plane is an early biplane armed with weak MG (2-4 x 7.7 mm or below), you should use deflection shots. That is, imagine yourself as an anti-air missile, predict where you two will meet and fly towards that point. This way it gives the gunners little window to open fire at you. When firing, try to aim for the cockpit for a possible pilot-snipe, as the pilot is very unprotected. Or aim at its engines to damage it or the cooler. Without an engine the SB 2M won't fly far. | |
| − | + | If you are flying an interceptor/heavy fighter that is heavily armed and armoured, you can just sit behind the SB 2M and confidently take out its crew/modules one by one, as its 7.62 mm MG has rather weak penetration and damage. This is the most precise way of damaging an aircraft, however the safest tactic is still, and will always be deflection shooting. One accurate burst will critically damage the weak airframe of the SB 2M, or snap off its wing straight away. | |
| − | {| class="wikitable | + | === Manual Engine Control === |
| − | + | {| class="wikitable" style="text-align:center" | |
| − | |||
| − | |||
| − | |||
| − | |||
| − | |||
| − | |||
| − | |||
| − | |||
| − | |||
| − | |||
| − | |||
| − | |||
| − | |||
|- | |- | ||
| − | | | + | ! colspan="7" | MEC elements |
|- | |- | ||
| − | | | + | ! rowspan="2" | Mixer |
| − | + | ! rowspan="2" | Pitch | |
| − | = | + | ! colspan="3" | Radiator |
| − | + | ! rowspan="2" | Supercharger | |
| − | + | ! rowspan="2" | Turbocharger | |
|- | |- | ||
| − | ! | + | ! Oil !! Water !! Type |
| − | ! | ||
| − | ! | ||
| − | ! | ||
| − | ! | ||
| − | |||
|- | |- | ||
| − | | | + | | Controllable || Controllable<br>Not auto controlled || Not controllable<br>Not auto controlled || Controllable<br>Not auto controlled || Combined || Not controllable<br>1 gear || Not controllable |
|- | |- | ||
|} | |} | ||
| − | |||
| − | |||
| − | |||
| − | |||
| − | |||
| − | |||
| − | |||
| − | |||
| − | |||
| − | |||
| − | |||
| − | |||
=== Modules === | === Modules === | ||
{| class="wikitable" | {| class="wikitable" | ||
! Tier | ! Tier | ||
| − | ! colspan="2" | | + | ! colspan="2" | Flight performance |
| − | ! | + | ! Survivability |
| − | ! | + | ! colspan="2" | Weaponry |
|- | |- | ||
| I | | I | ||
| − | | | + | | Fuselage repair |
| + | | Radiator | ||
| + | | | ||
| + | | Turret 7 mm | ||
| | | | ||
| − | |||
| − | |||
|- | |- | ||
| II | | II | ||
| − | | | + | | |
| − | | | + | | Compressor |
| − | | | + | | |
| − | | | + | | |
| + | | DER-33 | ||
|- | |- | ||
| III | | III | ||
| − | | | + | | Wings repair |
| − | | | + | | Engine |
| − | | | + | | Airframe |
| − | | | + | | New 7 mm MGs (turret) |
| + | | Der-19 | ||
|- | |- | ||
| IV | | IV | ||
| − | |||
| − | |||
| | | | ||
| | | | ||
| − | | | + | | Cover |
| − | + | | | |
| + | | | ||
|- | |- | ||
|} | |} | ||
=== Pros and cons === | === Pros and cons === | ||
| − | <!--Summarise and briefly evaluate the vehicle in terms of its characteristics and combat effectiveness. Mark its pros and cons in | + | <!-- ''Summarise and briefly evaluate the vehicle in terms of its characteristics and combat effectiveness. Mark its pros and cons in the bulleted list. Try not to use more than 6 points for each of the characteristics. Avoid using categorical definitions such as "bad", "good" and the like - use substitutions with softer forms such as "inadequate" and "effective".'' --> |
'''Pros:''' | '''Pros:''' | ||
| − | * | + | * Adequate speed for a bomber, allowing it to get to targets quickly |
| − | * | + | * Great turn rate allows it to change direction quickly, or to even dodge attacks |
| − | * | + | * Nice payload allows it to finish off a base in one go, or destroy tanks / pillboxes easily |
| − | * | + | * Great defensive firepower at the tail (2 x 7.62 mm MGs) with fast firerate, good trajectory and plenty of ammo allows it to deal with enemies on its six effectively |
| − | |||
'''Cons:''' | '''Cons:''' | ||
| − | * | + | * Defensive guns don't cover the belly and the sides well, and are quite light against fighters such as [[Bf 109 E-1]] or [[Ki-61 (Family)|Ki-61]] |
| − | + | * Crew and important parts (eg. fuel tank, engines, coolers) lack protection, increasing the chance of being pilot-sniped or critically damaged. Combined with its weak airframe, it is vulnerable to heavy fighters like [[Ju 88 (Family)|Ju 88]]. | |
| − | + | * In Simulator, it is extremely hard to control. No matter how precisely you trim, it will always automatically pitch up and down. Also when switching to gunner view, it will roll, causing a death spin. | |
| − | |||
| − | * | ||
| − | |||
| − | * | ||
== History == | == History == | ||
| − | + | ''Describe the history of the creation and combat usage of the aircraft in more detail than in the introduction. If the historical reference turns out to be too long, take it to a separate article, taking a link to the article about the vehicle and adding a block "/History" (example: <nowiki>https://wiki.warthunder.com/(Vehicle-name)/History</nowiki>) and add a link to it here using the <code>main</code> template. Be sure to reference text and sources by using <code><nowiki><ref></ref></nowiki></code>, as well as adding them at the end of the article with <code><nowiki><references /></nowiki></code>. This section may also include the vehicle's dev blog entry (if applicable) and the in-game encyclopedia description (under <code><nowiki>=== In-game description ===</nowiki></code>, also if applicable).'' | |
| + | |||
| + | === In-game description === | ||
| + | In 1937, designers under the direction of A. A. Arkhangelski began working to improve the SB even more. The aircraft received a 960 hp Klimov M-103 twelve-cylinder, V-shaped, liquid-cooled engine. The M-103 engine, created in 1936-37, was based on the M-100. | ||
| + | |||
| + | After testing was performed, the SB 2M-103 bomber was launched into full-scale production in 1938 under the designation of "96th series". | ||
| + | |||
| + | SB 2M-103 planes of the 96th series had external DER-19 bomb racks under the centre wing section that were designed to carry aerial bombs weighing up to 500 kg. The aircraft's maximum bomb capacity was increased up to 1,500 kg. DER-19 racks could house external teardrop-shaped fuel tanks with a capacity of 370 litres each. | ||
| + | |||
| + | To improve reliability, a mechanical bomb release system was introduced and also duplicated in the pilot's cockpit. The aircraft was equipped with an AFA-13 photo camera. An electrohydraulic landing gear retraction system was used, and the pilot's chair received an armored backrest. Due to these many changes, the aircraft's flight weight increased significantly, and the airframe's structure was strengthened. | ||
| − | + | From this point on, all production SB 2M-103s began to be produced with a shielded MV-3 gun turret and an LU hatch mount with an optical sight. An inert gas filling system was introduced for the fuel tanks. | |
| + | |||
| + | Planes of later production series had modified M-103U and M-103A engines. These engines were equipped with ducted coolant radiators located over the engine. The power unit cowling was completely changed. For this, the engine oil coolers were moved to the leading edge of the outer wing. | ||
| + | |||
| + | This SB 2M-103 with ducted radiators became the most high-speed model among production SB bombers, reaching a speed of 450 km/h at a height of 4,100 m. These bombers were produced full-scale from 1939-40, being nicknamed "Shchuka" ("Pike", as a fish) among the troops, due to the distinctive form of their engine cowls. | ||
| + | |||
| + | From December 1939 on, all SB bombers were equipped with VISh-22 three-bladed, controllable-pitch propellers. | ||
== Media == | == Media == | ||
| − | ''Excellent additions to the article would be video guides, screenshots from the game, and photos.'' | + | <!-- ''Excellent additions to the article would be video guides, screenshots from the game, and photos.'' --> |
| + | {{Youtube-gallery|1R9OL0Hf-yw|'''The Shooting Range #33''' - ''Pages of History'' section at 03:10 discusses the SB 2M.}} | ||
== See also == | == See also == | ||
| − | ''Links to the articles on the War Thunder Wiki that you think will be useful for the reader, for example:'' | + | <!-- ''Links to the articles on the War Thunder Wiki that you think will be useful for the reader, for example:'' |
| + | * ''reference to the series of the aircraft;'' | ||
| + | * ''links to approximate analogues of other nations and research trees.'' --> | ||
| + | |||
| + | ;Aircraft of comparable role, configuration and era | ||
| − | * | + | * Martin [[B-10B|B-10]] |
| − | * | + | * Martin [[Martin 139WC|139WC]] |
| + | * Fiat [[BR.20 DR|BR.20]] | ||
| + | * Martin [[Martin 167-A3|167]] Maryland | ||
| + | * Mitsubishi [[Ki-21-Ia|Ki-21]] | ||
| + | * Heinkel [[He 111 H-3|He 111]] | ||
== External links == | == External links == | ||
| Line 190: | Line 239: | ||
* ''topic on the official game forum;'' | * ''topic on the official game forum;'' | ||
| − | * ''encyclopedia page on the | + | * ''encyclopedia page on the aircraft;'' |
* ''other literature.'' | * ''other literature.'' | ||
| − | {{ | + | {{AirManufacturer Tupolev}} |
| − | {{ | + | {{USSR bombers}} |
| − | + | [[Category:Hidden vehicles]] | |
Revision as of 17:45, 14 July 2020
Contents
| This page is about the gift Russian bomber SB 2M-103 MV-3. For other variants, see SB 2M (Family). |
Description

The SB 2M-103 MV-3 is a gift rank I Soviet bomber
with a battle rating of 2.3 (AB/SB) and 1.7 (RB). Though initially in the game pre-1.29, this plane was removed upon Update 1.37 due to redundancy. Those players who acquired the aircraft before it was removed still have access to it.
General info
Flight performance
Describe how the aircraft behaves in the air. Speed, manoeuvrability, acceleration and allowable loads - these are the most important characteristics of the vehicle.
| Characteristics | Max Speed (km/h at 4,500 m) |
Max altitude (metres) |
Turn time (seconds) |
Rate of climb (metres/second) |
Take-off run (metres) | |||
|---|---|---|---|---|---|---|---|---|
| AB | RB | AB | RB | AB | RB | |||
| Stock | 430 | 415 | 9800 | 22.8 | 23.4 | 6.5 | 6.5 | 366 |
| Upgraded | ___ | ___ | __._ | __._ | __._ | __._ | ||
Details
| Features | ||||
|---|---|---|---|---|
| Combat flaps | Take-off flaps | Landing flaps | Air brakes | Arrestor gear |
| ✓ | ✓ | ✓ | X | X |
| Limits | ||||||
|---|---|---|---|---|---|---|
| Wings (km/h) | Gear (km/h) | Flaps (km/h) | Max Static G | |||
| Combat | Take-off | Landing | + | - | ||
| 0 | 350 | 320 | 320 | 280 | ~3 | ~2 |
| Optimal velocities (km/h) | |||
|---|---|---|---|
| Ailerons | Rudder | Elevators | Radiator |
| < 250 | < 300 | < 185 | > 350 |
Survivability and armour
Examine the survivability of the aircraft. Note how vulnerable the structure is and how secure the pilot is, whether the fuel tanks are armoured, etc. Describe the armour, if there is any, and also mention the vulnerability of other critical aircraft systems.
Armaments
Suspended armament
The SB 2M-103 MV-3 can be outfitted with the following ordnance:
- 6 x 100 kg FAB-100 bombs (600 kg total)
- 2 x 250 kg FAB-250M43 bombs + 6 x 100 kg FAB-100 bombs (1,100 kg total)
- 2 x 250 kg FAB-250M43 bombs (500 kg total)
- 4 x 250 kg FAB-250M43 bombs (1,000 kg total)
- 1 x 500 kg FAB-500 bomb (500 kg total)
- 2 x 500 kg FAB-500 bombs + 2 x 250 kg FAB-250M43 bombs (1,500 kg total)
- 3 x 500 kg FAB-500 bombs (1,500 kg total)
- 1 x 500 kg FAB-500 bomb + 2 x 250 kg FAB-250M43 bombs (1,000 kg total)
Defensive armament
The SB 2M-103 MV-3 is defended by:
- 2 x 7.62 mm ShKAS machine gun, nose turret (960 rpg = 1,920 total)
- 1 x 7.62 mm ShKAS machine gun, dorsal turret (1,000 rpg)
- 1 x 7.62 mm ShKAS machine gun, ventral turret (500 rpg)
Usage in battles
Arcade Battles:
This bomber is quite fast for its BR so you should use this as an advantage. For example, you should climb directly at the beginning of the match to 5,000 m and destroy the enemy bases with setup 5 (2 x 250 kg + 2 x 500 kg) which is the heaviest payload you'll have with this plane.
Realistic Battles:
In Realistic battles you should use the same tactics as in Arcade battles. Note that 2 x 500 kg FAB 500 bombs are enough to destroy a base.
Simulator Battles:
In Sim, the overall tactic remains the same as other bombers: base/airfield bombing. However, there are several notes for this particular SB 2M bomber.
Maybe it's because of the design of short fuselage and huge wings, or it's caused by something else, the SB 2M is super hard to control in the pitch. If you leave the stick at the deadzone, the aircraft will automatically climb or dive which will lead to a crash if unnoticed. Trimming doesn't help. For the gunner view, even though you might have the "autopilot when in gunner view" enabled, it won't help either, as it will still continuously pitch up and down like a boat. Also note that when switching to gunner view, it will sometimes uncontrollably roll to one side which will make it enter a spin quickly. Therefore this bomber is extremely frustrating to fly in Sim.
Note: the setup with the most explosive mass is the 2x 250 kg + 2x 500 kg, but this way the two 500 kg bombs are carried under the wing roots and the two 250 kg inside the bomb bay. So if you use the default keybind (space) to open bomb bay and drop bombs, the timing will get messed up when bombing a base, since the two wing-mounted bombs will go first, then the bomb bay opens, dropping the two inside. The time between the two drops are long enough for one drop to completely miss the target. To avoid this, set up a keybind for open / close bomb bay, and drop bomb series (all bombs go at once). When approaching a base, open the bomb base first, then drop all the bombs, they will now all hit the target.
When bombing airfields, make sure to fly above 2,000 m to avoid the AAA, as this plane is unprotected and its coolers will often get damaged, leading to the engines overheating. You should familiarise each module of the airfield to maximise the damage. The airstrip is the most visible and the easiest one to hit, however bombing it seems to halve your reward. So it is recommended to bomb everything else: hangar, fuel area, living quarters, etc. The plane hangars are probably easy, since they aren't too small.
Against the SB 2M (all modes but mostly in sim):
You should be very careful against bombers since with the Sim control (whether it be mouse joystick or a real stick) the plane will manoeuvre much more gently, making yourself a great target for the bomber's gunners. DO NOT follow behind the SB 2M's six unless you are sure that its tail gunners are unconscious. Chasing behind the SB 2M makes yourself pretty much stationary for the tail gunners, and you will be showered with 7.62 mm bullets.
If your plane is an early biplane armed with weak MG (2-4 x 7.7 mm or below), you should use deflection shots. That is, imagine yourself as an anti-air missile, predict where you two will meet and fly towards that point. This way it gives the gunners little window to open fire at you. When firing, try to aim for the cockpit for a possible pilot-snipe, as the pilot is very unprotected. Or aim at its engines to damage it or the cooler. Without an engine the SB 2M won't fly far.
If you are flying an interceptor/heavy fighter that is heavily armed and armoured, you can just sit behind the SB 2M and confidently take out its crew/modules one by one, as its 7.62 mm MG has rather weak penetration and damage. This is the most precise way of damaging an aircraft, however the safest tactic is still, and will always be deflection shooting. One accurate burst will critically damage the weak airframe of the SB 2M, or snap off its wing straight away.
Manual Engine Control
| MEC elements | ||||||
|---|---|---|---|---|---|---|
| Mixer | Pitch | Radiator | Supercharger | Turbocharger | ||
| Oil | Water | Type | ||||
| Controllable | Controllable Not auto controlled |
Not controllable Not auto controlled |
Controllable Not auto controlled |
Combined | Not controllable 1 gear |
Not controllable |
Modules
| Tier | Flight performance | Survivability | Weaponry | ||
|---|---|---|---|---|---|
| I | Fuselage repair | Radiator | Turret 7 mm | ||
| II | Compressor | DER-33 | |||
| III | Wings repair | Engine | Airframe | New 7 mm MGs (turret) | Der-19 |
| IV | Cover | ||||
Pros and cons
Pros:
- Adequate speed for a bomber, allowing it to get to targets quickly
- Great turn rate allows it to change direction quickly, or to even dodge attacks
- Nice payload allows it to finish off a base in one go, or destroy tanks / pillboxes easily
- Great defensive firepower at the tail (2 x 7.62 mm MGs) with fast firerate, good trajectory and plenty of ammo allows it to deal with enemies on its six effectively
Cons:
- Defensive guns don't cover the belly and the sides well, and are quite light against fighters such as Bf 109 E-1 or Ki-61
- Crew and important parts (eg. fuel tank, engines, coolers) lack protection, increasing the chance of being pilot-sniped or critically damaged. Combined with its weak airframe, it is vulnerable to heavy fighters like Ju 88.
- In Simulator, it is extremely hard to control. No matter how precisely you trim, it will always automatically pitch up and down. Also when switching to gunner view, it will roll, causing a death spin.
History
Describe the history of the creation and combat usage of the aircraft in more detail than in the introduction. If the historical reference turns out to be too long, take it to a separate article, taking a link to the article about the vehicle and adding a block "/History" (example: https://wiki.warthunder.com/(Vehicle-name)/History) and add a link to it here using the main template. Be sure to reference text and sources by using <ref></ref>, as well as adding them at the end of the article with <references />. This section may also include the vehicle's dev blog entry (if applicable) and the in-game encyclopedia description (under === In-game description ===, also if applicable).
In-game description
In 1937, designers under the direction of A. A. Arkhangelski began working to improve the SB even more. The aircraft received a 960 hp Klimov M-103 twelve-cylinder, V-shaped, liquid-cooled engine. The M-103 engine, created in 1936-37, was based on the M-100.
After testing was performed, the SB 2M-103 bomber was launched into full-scale production in 1938 under the designation of "96th series".
SB 2M-103 planes of the 96th series had external DER-19 bomb racks under the centre wing section that were designed to carry aerial bombs weighing up to 500 kg. The aircraft's maximum bomb capacity was increased up to 1,500 kg. DER-19 racks could house external teardrop-shaped fuel tanks with a capacity of 370 litres each.
To improve reliability, a mechanical bomb release system was introduced and also duplicated in the pilot's cockpit. The aircraft was equipped with an AFA-13 photo camera. An electrohydraulic landing gear retraction system was used, and the pilot's chair received an armored backrest. Due to these many changes, the aircraft's flight weight increased significantly, and the airframe's structure was strengthened.
From this point on, all production SB 2M-103s began to be produced with a shielded MV-3 gun turret and an LU hatch mount with an optical sight. An inert gas filling system was introduced for the fuel tanks.
Planes of later production series had modified M-103U and M-103A engines. These engines were equipped with ducted coolant radiators located over the engine. The power unit cowling was completely changed. For this, the engine oil coolers were moved to the leading edge of the outer wing.
This SB 2M-103 with ducted radiators became the most high-speed model among production SB bombers, reaching a speed of 450 km/h at a height of 4,100 m. These bombers were produced full-scale from 1939-40, being nicknamed "Shchuka" ("Pike", as a fish) among the troops, due to the distinctive form of their engine cowls.
From December 1939 on, all SB bombers were equipped with VISh-22 three-bladed, controllable-pitch propellers.
Media
See also
- Aircraft of comparable role, configuration and era
External links
Paste links to sources and external resources, such as:
- topic on the official game forum;
- encyclopedia page on the aircraft;
- other literature.
| Tupolev Design Bureau (Ту́полев Опытное конструкторское бюро) | |
|---|---|
| Bombers | TB-3M-17-32 · SB 2M-100 · SB 2M-103 MV-3 · SB 2M-103 · SB 2M-103U · SB 2M-103U MV-3 · SB 2M-105 |
| Tu-2 · Tu-2S · Tu-2S-44 · Tu-2S-59 · Tu-4 | |
| Arkhangelsky Bomber | Ar-2* |
| Strike Aircraft | Tu-1 |
| Jet Bomber | Tu-14T |
| Export | ␗SB 2M-103U · ␗Tu-2S-44 · ␗Tu-4 |
| ◔Tu-2S-59 | |
| * While Andrei Tupolev was imprisoned, Alexander Arkhangelsky, second in command at Tupolev OKB was able to append his name to the final production series of the SB bomber. | |
| USSR bombers | |
|---|---|
| SB and Ar | SB 2M-100 · SB 2M-103 · SB 2M-103 MV-3 · SB 2M-103U · SB 2M-103U MV-3 · SB 2M-105 · Ar-2 |
| Yer-2 (petrol) | Yer-2 (M-105) · Yer-2 (M-105) TAT · Yer-2 (M-105R) TAT · Yer-2 (M-105R) LU |
| Yer-2 (diesel) | Yer-2 (ACh-30B) (e) · Yer-2 (ACh-30B) (l) |
| Tu | Tu-2 · Tu-2S · Tu-2S-44 · Tu-2S-59 · Tu-4 |
| Pe | Pe-2-1 · Pe-2-31 · Pe-2-83 · Pe-2-110 · Pe-2-205 · Pe-2-359 · Pe-8 |
| IL | DB-3B · IL-4 |
| Po | Po-2 · Po-2M |
| Other | MBR-2-M-34 · TB-3M-17-32 · Yak-4 · Be-6 |
| Lend-Lease | ▂PBY-5A Catalina · ▂Hampden TB Mk I · ▂A-20G-30 · ▂B-25J-30 |
