Difference between pages "Black Prince" and "M4A3E2 (76) W"
m (APDS was labeled as APCBC) (Tag: Visual edit) |
(→Usage in the battles: Edits) |
||
| Line 1: | Line 1: | ||
| − | {{Specs-Card|code= | + | {{Specs-Card|code=us_m4a3e2_76w_sherman_jumbo}} |
| + | {{About | ||
| + | | about = heavy tank '''{{PAGENAME}}''' | ||
| + | | and | ||
| + | | usage = similar vehicles | ||
| + | | link-1 = M4A3E2 | ||
| + | | link-2 = M4A3E2 (France) | ||
| + | }} | ||
== Description == | == Description == | ||
| − | <!-- ''In the description, the first part | + | <!--''In the description, the first part needs to be about the history of the creation and combat usage of the vehicle, as well as its key features. In the second part, tell the reader about the ground vehicle in the game. Insert the screenshot of the vehicle. If the novice player does not remember the vehicle by name, they will immediately understand what kind of vehicle it is talking about.''--> |
| − | [[File: | + | [[File:GarageImage_M4A3E2(76)W.jpg|420px|thumb|left]] |
| − | {{ | + | {{break}} |
| − | The '''{{Specs|name}}''' is a | + | The '''{{Specs|name}}''' is a Rank {{Specs|rank}} American heavy tank {{Battle-rating}}. It was introduced in [[Update 1.45 "Steel Generals"]] in the initial batch of US vehicles available at launch. Taking from its predecessor, the [[M4A3E2|M4A3E2]], it is improved with a more powerful 76 mm cannon that allows it to take on the majority of Rank III and some of the Rank IV tanks. As a side note, the nickname "Jumbo" was likely never used during WWII, as there is no record of it. However, its use both on the Wiki and In-Game is still prevalent. |
| − | The | + | The M4A3E2 (76) W Jumbo is an all-around good tank with no major limitations or advantages, with average speed, manoeuvrability and thick frontal armour, making it a 'jack of all trades tank' equally good in defensive tactics as well as offensive tactics. staying behind good cover, exposing only the thick gun mantlet and engaging targets in long range, or offensive tactics. It's 2 main advantage is that it has a fast firing 76 mm gun, combined with high penetration rounds,and it can be used to quickly disable and overwhelm otherwise heavier targets. Its armour is also excellent - the hull armour is just 1 mm short of the [[Tiger H1|Tiger I]]'s hull, and that is not even taking into account the sloping, making the hull next to impossible to penetrate frontally, and your sides are also up armoured, so unlike the Shermans, your angling will not cause you to be shot through the side. Angling with this tank will make you nearly indestructible to enemy fire. Compare this to the very tough Tiger I at the same battle rating. Beware, your hull is not up armoured from the rear, and most rounds at it's BR will set the engine on fire, and some will even go into the fighting compartment. You should also beware that you are not always indestructible, and things like the [[Tiger II (P)|Tiger II (P)]] will penetrate you, even when angled. Another final thing to keep in mind is that despite you mainly fighting other 5.7 vehicles like [[Panther D|Panthers]], the battle rating will sometimes get you up against tougher opponents like the [[T-44]] and the dreaded [[Tiger II (H)|Tiger II (H)]], and if in arcade, even the terrifying [[T29|T29]]. |
| − | |||
| − | |||
| − | |||
| − | |||
== General info == | == General info == | ||
=== Survivability and armour === | === Survivability and armour === | ||
| − | <!-- ''Describe armour protection. Note the most well protected and key weak areas. Appreciate the layout of modules as well as the number and location of crew members. Is the level of armour protection sufficient, is the placement of modules helpful for survival in combat? | + | <!--''Describe armour protection. Note the most well protected and key weak areas. Appreciate the layout of modules as well as the number and location of crew members. Is the level of armour protection sufficient, is the placement of modules helpful for survival in combat?'' |
| − | |||
| − | |||
| − | |||
| − | |||
| − | + | ''If necessary use a visual template to indicate the most secure and weak zones of the armour.''--> | |
| + | '''Armour type:''' | ||
| − | + | *Rolled homogeneous armour (Front, Side, Rear, Roof) | |
| + | *Cast homogeneous armour (Turret, Transmission area) | ||
| − | + | {| class="wikitable" | |
| − | |||
| − | |||
| − | {| class="wikitable" | ||
| − | |||
| − | |||
| − | |||
| − | |||
| − | |||
| − | |||
| − | |||
|- | |- | ||
| − | ! Armour !! Sides !! Roof | + | ! Armour !! Front (Slope angle) !! Sides !! Rear !! Roof |
|- | |- | ||
| − | | | + | | Hull || 63.5 + 38.1 mm (47°) || 76.2 mm || 38.1 mm || 19.5 mm |
|- | |- | ||
| + | | Turret || 177.8 mm || 152.4 mm || 152.4 mm || 25.4 mm | ||
|} | |} | ||
| − | |||
| − | |||
| − | |||
| − | |||
| − | |||
| − | |||
=== Mobility === | === Mobility === | ||
<!-- ''Write about the mobility of the ground vehicle. Estimate the specific power and manoeuvrability, as well as the maximum speed forwards and backwards.'' --> | <!-- ''Write about the mobility of the ground vehicle. Estimate the specific power and manoeuvrability, as well as the maximum speed forwards and backwards.'' --> | ||
| − | {{tankMobility|abMinHp= | + | {{tankMobility|abMinHp= 646|rbMinHp= 442|<!--AoAweight=(optional) -->}} |
| − | |||
| − | |||
| − | |||
| − | |||
== Armaments == | == Armaments == | ||
=== Main armament === | === Main armament === | ||
| − | <!-- ''Give the reader information about the characteristics of the main gun. Assess its effectiveness in a battle based on the reloading speed, ballistics and the power of shells. Do not forget about the | + | <!--''Give the reader information about the characteristics of the main gun. Assess its effectiveness in a battle based on the reloading speed, ballistics and the power of shells. Do not forget about the flexibilty of the fire, that is how quickly the cannon can be aimed at the target, open fire on it and aim at another enemy. Add a link to the main article on the gun: <code><nowiki>{{main|Name of the weapon}}</nowiki></code>. Describe in general terms the ammunition available for the main gun. Give advice on how to use them and how to fill the ammunition storage.''--> |
| − | {{main| | + | {{main|M1 (76 mm)}} |
| − | + | {| class="wikitable" style="text-align:center" | |
| − | + | |- | |
| − | {| class="wikitable" style="text-align:center" width=" | + | ! colspan="6" | [[M1 (76 mm)|76 mm M1]] |
| + | |- | ||
| + | ! colspan="3" rowspan="1" style="width:5em" |Capacity | ||
| + | ! rowspan="1" | Vertical <br> guidance | ||
| + | ! rowspan="1" | Horizontal <br> guidance | ||
| + | ! rowspan="1" | Stabilizer | ||
| + | |- | ||
| + | | colspan="3" | 71 || -10°/+25° || ±180° || Vertical | ||
| + | |- | ||
| + | ! colspan="6" | Turret rotation speed (°/s) | ||
| + | |- | ||
| + | ! style="width:4em" |Mode | ||
| + | ! style="width:4em" |Stock | ||
| + | ! style="width:4em" |Upgraded | ||
| + | ! style="width:4em" |Prior + Full crew | ||
| + | ! style="width:4em" |Prior + Expert qualif. | ||
| + | ! style="width:4em" |Prior + Ace qualif. | ||
| + | |- | ||
| + | | ''Arcade'' || 14.28 || 19.80 || 24.0 || 26.60 || 28.20 | ||
|- | |- | ||
| − | + | | ''Realistic'' || 14.28 || 16.80 || 20.4 || 22.60 || 24.00 | |
|- | |- | ||
| − | ! | + | ! colspan="4" | Reloading rate (seconds) |
| − | |||
| − | |||
|- | |- | ||
| − | ! | + | ! colspan="1" style="width:4em" |Stock |
| − | + | ! colspan="1" style="width:4em" |Prior + Full crew | |
| + | ! colspan="1" style="width:4em" |Prior + Expert qualif. | ||
| + | ! colspan="1" style="width:4em" |Prior + Ace qualif. | ||
|- | |- | ||
| − | + | | 7.67 || 6.78 || 6.25 || 5.90 | |
| − | | | ||
|- | |- | ||
|} | |} | ||
| − | ==== Ammunition ==== | + | ===== Ammunition ===== |
| − | |||
| − | |||
| − | |||
| − | |||
| − | |||
| − | |||
| − | |||
| − | |||
{| class="wikitable sortable" style="text-align:center" width="100%" | {| class="wikitable sortable" style="text-align:center" width="100%" | ||
! colspan="8" | Penetration statistics | ! colspan="8" | Penetration statistics | ||
|- | |- | ||
! rowspan="2" data-sort-type="text" | Ammunition | ! rowspan="2" data-sort-type="text" | Ammunition | ||
| − | ! rowspan="2" | Type of<br>warhead | + | ! rowspan="2" class="unsortable" | Type of <br /> warhead |
| − | ! colspan="6" | '''Penetration @ | + | ! colspan="6" | '''Penetration''' '''''in mm''''' '''@ 90°''' |
|- | |- | ||
| − | ! | + | ! 10m |
| + | ! 100m | ||
| + | ! 500m | ||
| + | ! 1000m | ||
| + | ! 1500m | ||
| + | ! 2000m | ||
|- | |- | ||
| − | | Shell | + | | M62 Shell || APCBC || 149 || 146 || 133 || 119 || 106 || 95 |
|- | |- | ||
| − | | | + | | M42A1 Shell || HE || 7 || 7 || 7 || 7 || 7 || 7 |
|- | |- | ||
| − | | Shot | + | | M79 Shot || AP || 155 || 154 || 131 || 107 || 88 || 72 |
|- | |- | ||
| − | | Shot | + | | M93 Shot || APCR || 221 || 215 || 203 || 181 || 154 || 124 |
| − | |||
| − | |||
|- | |- | ||
|} | |} | ||
{| class="wikitable sortable" style="text-align:center" width="100%" | {| class="wikitable sortable" style="text-align:center" width="100%" | ||
| − | ! colspan=" | + | ! colspan="11" | Shell details |
|- | |- | ||
! rowspan="2" data-sort-type="text" | Ammunition | ! rowspan="2" data-sort-type="text" | Ammunition | ||
| − | ! rowspan="2" | Type of<br>warhead | + | ! rowspan="2" class="unsortable" | Type of <br /> warhead |
| − | ! rowspan="2" | Velocity<br> | + | ! rowspan="2" |Velocity <br /> in m/s |
| − | ! rowspan="2" | Projectile<br>Mass | + | ! rowspan="2" |Projectile<br />Mass in kg |
| − | ! rowspan="2" | Fuse delay | + | ! rowspan="2" | ''Fuse delay'' |
| − | ! rowspan="2" | Fuse sensitivity | + | ''in m:'' |
| − | ! rowspan="2" | Explosive Mass<br>(TNT equivalent) | + | ! rowspan="2" | ''Fuse sensitivity'' |
| − | ! colspan="3" | Ricochet | + | ''in mm:'' |
| + | ! rowspan="2" | ''Explosive Mass in g<br /> (TNT equivalent):'' | ||
| + | ! rowspan="2" | ''Normalization At 30° <br> from horizontal:'' | ||
| + | ! colspan="3" | ''Ricochet:'' | ||
|- | |- | ||
| − | ! 0% | + | ! 0% |
| + | ! 50% | ||
| + | ! 100% | ||
|- | |- | ||
| − | | Shell | + | | M62 Shell || APCBC || 792 || 7 || 1.2 || 20 || +4° || 48° || 63° || 71° |
|- | |- | ||
| − | | | + | | M42A1 Shell || HE || 800 || 5.8 || 0.4 || 0.5 || +0° || 79° || 80° || 81° |
|- | |- | ||
| − | | Shot | + | | M79 Shot || AP || 792 || 6.8 || N/A || N/A || -1° || 47° || 60° || 65° |
|- | |- | ||
| − | | Shot | + | | M93 Shot || APCR || 1036 || 4.3 || N/A || N/A || +1.5° || 66° || 70° || 72° |
| − | |||
| − | |||
|- | |- | ||
|} | |} | ||
{| class="wikitable sortable" style="text-align:center" | {| class="wikitable sortable" style="text-align:center" | ||
| − | ! colspan="7" | Smoke | + | ! colspan="7" | Smoke characteristic |
|- | |- | ||
! Ammunition | ! Ammunition | ||
| − | ! Velocity<br> | + | ! Velocity <br /> in m/s |
| − | ! Projectile<br>Mass | + | ! Projectile<br />Mass in kg |
| − | ! Screen radius<br> | + | ! ''Screen radius <br /> in m'' |
| − | ! Screen | + | ! ''Screen time <br /> in s'' |
| − | ! Screen hold time<br> | + | ! ''Screen hold time <br /> in s:'' |
| − | ! Explosive Mass<br>(TNT equivalent) | + | ! ''Explosive Mass in g<br /> (TNT equivalent):'' |
|- | |- | ||
| − | | | + | | M88 || 274 || 3.4 || 13 || 5 || 20 || 50 |
|- | |- | ||
|} | |} | ||
| − | ==== | + | =====Ammo types===== |
| − | + | '''M62 Shot''' - M62 shot is the standard stock shell of the M4A3E2(76)W. With a 149 mm top penetration, it usually won't be able to destroy heavy opponents or tank destroyers it will see at it's BR/rank from the front, however, the armour makes up for it to have more time looking for a good shot. Although this is the stock shell it is quite handy, and can deal with many of the opponents at its BR, if you know where to aim. For one thing, this shell can destroy most cannon barrels with a direct hit, but this should not be your go-to in most situations. | |
| − | {| class="wikitable" style="text-align:center" | + | |
| + | '''M42A1 Shot''' - This is the HE shell of the M4A3E2(76)W. With a 7mm penetration at all ranges, it's best to use this when fighting AA trucks or other lower-armoured tanks. It's advised to only carry 0-5 of these shells as you won't really need them, but they're useful for when a pesky AA truck comes around the corner and shoots your cannon barrel off when your firing APCR at it. | ||
| + | |||
| + | '''M79 Shot''' - The M79 shot is a clear upgrade from the M62 shot, with more than 30mm more penetration, this will pack a punch. However, you will need to make sure you know your enemy tank's guts, as this does not fragment nor have a HE filler, and will rely on your aiming skills to destroy the core components of a tank. Just like the M93 shot, this tank shell will not explode in the tank, but rather go straight through. It's best to carry these shells instead of the M62, but when you get the upgrade to M93 don't carry any at all. | ||
| + | |||
| + | '''M93 Shot''' - This is the last shot upgrade of the M4A3E2(76)W. With a penetration upgrade of more than 110mm from the M62 shot and more than 70mm than the M79 shot, this will be the best shell for the M4A3E2(76)W Sherman Jumbo. With this shell, you'll be able to pen even the most armoured of opponents, except perhaps the occasional Tiger II or IS-2 mod. However, it's best to carry at least 35-50 shells of this, as this should be your main shell during combat. | ||
| + | |||
| + | ===== [[Ammo racks|Ammo racks]] ===== | ||
| + | {| class="wikitable sortable" style="text-align:center" | ||
|- | |- | ||
| − | ! Full<br>ammo | + | ! class="wikitable unsortable" |Full<br /> ammo |
| − | ! 1st<br>rack empty | + | ! class="wikitable unsortable" |1st<br /> rack empty |
| − | ! 2nd<br>rack empty | + | ! class="wikitable unsortable" |2nd<br /> rack empty |
| − | ! 3rd<br>rack empty | + | ! class="wikitable unsortable" |3rd<br /> rack empty |
| − | ! 4th<br>rack empty | + | ! class="wikitable unsortable" |4th<br /> rack empty |
| − | ! 5th<br>rack empty | + | ! class="wikitable unsortable" |5th<br /> rack empty |
| − | ! | + | ! class="wikitable unsortable" |Visual<br /> discrepancy |
| − | |||
|- | |- | ||
| − | | ''' | + | || '''71''' || 57 ''(+14)'' || 43 ''(+28)'' || 29 ''(+42)'' || 15 ''(+56)'' || 1 ''(+70)'' || style="text-align:center" | Yes |
|- | |- | ||
|} | |} | ||
| − | === | + | === Machine guns === |
| + | <!--''Offensive and anti-aircraft machine guns not only allow you to fight some aircraft but also are effective against lightly armoured vehicles. Evaluate machine guns and give recommendations on its use.''--> | ||
| + | {{main|Browning M2 (12.7 mm)|Browning (7.62 mm)}} | ||
| + | |||
{| class="wikitable" style="text-align:center" | {| class="wikitable" style="text-align:center" | ||
| − | |||
|- | |- | ||
| − | ! | + | ! colspan="7" | [[Browning M2 (12.7 mm)|12.7 mm M2HB]] |
| − | + | |- | |
| − | ! | + | ! colspan="7" | ''Pintle mount'' |
|- | |- | ||
| − | ! | + | ! colspan="4" rowspan="1" style="width:5em" |Capacity (Belt capacity) |
| − | | | + | ! rowspan="1" | Fire rate <br> (shots/minute) |
| + | ! rowspan="1" | Vertical <br> guidance | ||
| + | ! rowspan="1" | Horizontal <br> guidance | ||
|- | |- | ||
| − | + | | colspan="4" | 600 (200) || 577 || -10°/+30° || ±60° | |
| − | | colspan=" | ||
|- | |- | ||
|} | |} | ||
| − | |||
| − | |||
| − | |||
| − | |||
| − | |||
| − | |||
| − | |||
| − | |||
| − | |||
{| class="wikitable" style="text-align:center" | {| class="wikitable" style="text-align:center" | ||
|- | |- | ||
| − | ! colspan=" | + | ! colspan="7" | [[Browning (7.62 mm)|7.62 mm M1919A4]] |
| + | |- | ||
| + | ! colspan="7" | ''Coaxial mount'' | ||
|- | |- | ||
| − | ! | + | ! colspan="4" rowspan="1" style="width:5em" |Capacity (Belt capacity) |
| − | + | ! rowspan="1" | Fire rate <br> (shots/minute) | |
| − | ! | + | ! rowspan="1" | Vertical <br> guidance |
| − | ! Vertical<br>guidance | + | ! rowspan="1" | Horizontal <br> guidance |
| − | ! Horizontal<br>guidance | ||
|- | |- | ||
| − | | | + | | colspan="4" | 3,000 (250) || 500 || N/A || N/A |
|- | |- | ||
|} | |} | ||
| − | == Usage in battles == | + | == Usage in the battles == |
| − | <!-- ''Describe the tactics of playing in the vehicle, the features of using vehicles in the team and advice on tactics. Refrain from creating a "guide" - do not impose a single point of view but | + | <!--''Describe the tactics of playing in the vehicle, the features of using vehicles in the team and advice on tactics. Refrain from creating a "guide" - do not impose a single point of view but give the reader food for thought. Describe the most dangerous enemies and give recommendations on fighting them. If necessary, note the specifics of the game in different modes (AB, RB, SB).''--> |
| − | + | The M4A3E2's regular enemies are [[Tiger H1|Tiger I]] and [[Panther (Disambiguation)|Panthers of all variants]] and [[Panzer IV/70(V)|Jagdpanzer IV/70]]s which can be dealt with using the tactics described above. Occasionally you will face [[Tiger II (P)|Tiger II]]s and [[Jagdpanther|Jagdpanther]]s, the best way to deal with them is to flank and disable them quickly. However, if this is not possible, you should not engage them, and await help. Beware though, that things like the [[Tiger II (H)|Tiger II (H)]] and [[T29|T29]] and [[Caernarvon|Caernarvon]] might get away with destroying all those trying to help you, ending up with your untimely end. Avoid engaging them frontally at all costs, especially at long ranges. | |
| − | + | Although this is based on a medium tank, the tank is not as fast as the other mediums at its rank. Because of the heavier armour, this tank will be a few more miles slower than the rest of the tanks. However, this does not mean that the tank is bad. Most Russian tanks at this rank will usually have a very easy to spot the point where the hull and turret meet together, that point is usually under-armoured and a well-placed shot will usually cripple the tank and the turrets horizontal will be gone. | |
| − | + | Never show your side. No matter what you do, never show your side. Your front is the most armoured piece on your tank, and you must use that your advantage. Never allow the enemy to flank or ambush you. To ensure that you can get a good shot, find out what enemy tanks you'll see in the Jumbo then check where their ammo is and how much armour is protecting that area. If you know you can penetrate that, go for the ammo/gunner/gun, as the M93 shot does not fragment or have a HE filler, it simply pierces the tank and goes straight through. | |
| − | ''' | + | '''''Environments'''''<br> |
| + | In urban environments, you're going to want to move up with the rest of the group, however, don't move up as the lead tank because you will surely find a nasty surprise at the end of the road. When facing Tiger II's, they will be able to pen anywhere they want in your frontal armour, even your thickest point(turret) if their ammo is upgraded enough. It's best to shoot the flat part of the turret, or get to their sides and pen them. However, if you can't do either of those, track them and hope that something bigger on your team will be able to take it out. Even though the M93 shot has an amazing penetration, it cannot penetrate the Tiger II's frontal armour. | ||
| − | + | In open terrain, you can usually brawl from long-range with certain tanks, such as the Tiger I, and mediums of Russia. However, if you see a Tiger II or other formidable opponent, it's best to stay far and show your front, angling the best. You can also use the hills to your advantage as most tanks do, and hide behind them quickly moving out of cover, pot-shotting the enemy tank then heading back into cover. | |
| − | + | ===Arcade battles=== | |
| + | In Arcade Battles you will usually see some pretty nasty tanks, however, because of your turret and hull armour, you will be able to usually survive. Use the player-name system to your advantage and shoot enemy tanks when they're not looking. However, because it's arcade and you're much more likely to be hit, it's best to angle your armour at a slightly less 35-degree angle. In AB, you will most likely have an advantage if you make the first shot, you're fast, and you never show your side. | ||
| − | + | ===Realistic/Simulator battles=== | |
| + | [[File:Where to Aim at a Tiger E With A 76mm Jumbo.png|thumb|This is where you should aim with the M62 shell to penetrate a Tiger from the front.]] | ||
| + | In realistic battles and simulator battles, your opponents will be much more battle hardened and know where to shoot the Jumbo. When facing enemy tanks, don't always suspect that you can just show your frontal armour and turret and expect to not get penetrated. As said before, be safe and be quick, and angle your armour when you can because that saves lives. You never want to go solo and move up on your own, as you will most definitely meet a tank destroyer or quite possibly a heavy tank. When meeting an [[IS-2]], a turret hit or shot between the hull and turret will usually cripple it, but when facing a Tiger II you'll have to be a bit more careful, as the tank is bigger and stronger than you. Although your M93 shot usually has the penetration power, it cannot penetrate the Tiger II's hull and your best luck will be shooting the flat armour of the turret front. | ||
| − | + | '''Tiger I E:''' This is a tough opponent to face, but, it can be killed quite easily if you know what to do. With the M62 round, you should aim at the area shown in the picture. It will penetrate the Tiger unless it is very sharply angled, but that could often mean that you can get a side shot. Do not aim for the drivers viewport or the machine gun, just aim for the flat armor on this section of the tank. | |
| + | [[File:Panther Cupola - Where to Shoot.png|left|thumb|This is the most most surefire way to disable a Panther quickly.]] | ||
| + | '''Panther:''' This is another very common and tough opponent to face. Do not shoot for the hull front, it will not be able to penetrate. You can try to shoot the turret front, but there is a chance you will bounce. The most surefire way to disable a Panther is to shoot the commander's cupola, highlighted on the left. This will often kill the commander and gunner, and about half the time it will also kill the loader. | ||
| − | + | '''IS-2:''' This is one common opponent from the Soviet/Chinese tree. Its 122 mm gun can easily penetrate the Jumbo, regardless of angle and distance. To destroy it, shoot at it when it's reloading or is unaware of your presence. For the 1943 model, aim at the cupola or the curved part of its hull armour that blends into the side. It has only 4 crew so killing all the turret crew (3, which is easy) will destroy it. For the 1944 model, only aim at the turret or the cupola as its hull is very strong. | |
| + | |||
| + | ===Modules=== | ||
| + | {| class="wikitable" | ||
| + | !Tier | ||
| + | ! colspan="2" |Mobility | ||
| + | !Protection | ||
| + | ! colspan="2" |Firepower | ||
| + | |- | ||
| + | |I | ||
| + | |Tracks|| | ||
| + | |Parts | ||
| + | |Horizontal Drive|| | ||
| + | |- | ||
| + | |II | ||
| + | |Suspension||Brake System | ||
| + | |FPE | ||
| + | |M79 shot||Adjustment of Fire | ||
| + | |- | ||
| + | |III | ||
| + | |Filters|| | ||
| + | |Crew Replenishment | ||
| + | |M93 shot||Elevation Mechanism | ||
| + | |- | ||
| + | |IV | ||
| + | |Transmission||Engine | ||
| + | | | ||
| + | |M88|| | ||
| + | |- | ||
| + | |} | ||
| + | |||
| + | To start out, you will want to get Tracks, Parts, then M79 Shot, and work your way from there, as those are the core components of the M4A3E2 (76) W Sherman Jumbo. With the better ammunition, you will be able to penetrate more and be far more dangerous on the field. And with Tracks & Parts, you won't need to worry about the lights/mediums that keep popping out your tracks to get to your side or backside. After getting these three things, it's best to work on manoeuvrability and M93 Shot as a first priority. | ||
=== Pros and cons === | === Pros and cons === | ||
| − | <!-- '' | + | <!--''Summarize and briefly evaluate the vehicle in terms of its characteristics and combat effectiveness. Mark its pros and cons in a bulleted list. Do not use more than 6 points for each of the characteristics. Avoid using categorical definitions such as "bad", "good" and the like - they have a substitution in the form of softer "inadequate", "effective".''--> |
| − | |||
'''Pros:''' | '''Pros:''' | ||
| − | * | + | * Learning curve from the 75 mm Jumbo should help a lot when playing this tank |
| − | * | + | * Decent 76 mm gun with APCR rounds |
| − | * | + | * Can now dish a little bit more damage than the 75 mm Jumbo |
| − | * | + | * APCR shells are a step up from the 75 mm and cost slightly more with a lot of added benefits |
| − | * | + | * High rate of fire for the main gun |
| − | * | + | * Excellent gun depression |
| − | * | + | * Very strong turret armour from all sides, very good at hull down position |
| − | * | + | * Very good at leading a spearhead towards a capture point where it can provide cover to weaker allied tanks with more powerful guns |
| + | * Excellent frontal armour, about 101 mm thick and sloped | ||
| + | * Excellent all around turret armour, average 152 mm thick! and a 177.8 mm gun mantlet | ||
| + | * Can absorb a lot of damage | ||
| + | * Wet ammo storage - Which reduces greatly ammo rack chances, is indicated by the "W" in its name, this also means tightly packed ammo only placed under the turret | ||
| + | * Equipped with gun stabilizer, working only at slow speeds under 20 km/h | ||
| + | * Good acceleration | ||
| + | * 1.72 RP efficiency | ||
| + | * Incredibly tough when angled, except for its lower side armour | ||
| + | * Wider tracks than regular Shermans, except M4A3E8 variants | ||
'''Cons:''' | '''Cons:''' | ||
| − | * It | + | * Will struggle a lot when getting up-tiered as in general it will be unable to compete with 6.7 vehicles. |
| − | * | + | * It still needs allies support to be effective in battle |
| − | * | + | * Armour is not very effective at this rank; Panthers, Tigers and large calibre Russian tanks can still penetrate you from the front with little issue |
| − | + | * Armour weak spot above the gun-mantlet (63.5 mm @ 61°). (can be corrected by angling yourself with a hill) | |
| − | * | + | * Side armour better than normal, but still weak (76.2 mm). Allows for light angling and protection against AA |
| − | * | + | * Rear armour is still thin |
| − | * | + | * Roof armour is not upgraded from the previous version, still weak but protects against most calibres under 37 mm |
| − | * | + | * Tall profile makes it a bigger target |
| − | * | + | * Bad off-road manoeuvrability |
| − | * | + | * Quite low top speed of 35 km/h |
| − | + | * Reverse speed is bad, 4 km/h | |
| + | * Hull MG is still a weak spot but hard to hit | ||
| + | * Due to the layered armour at the front and the armour over-matching mechanic, the upper glacis armour can be dubious in that it does not reliably ricochet shells, even from smaller calibre guns like the 75 mm SA50 | ||
== History == | == History == | ||
| − | <!-- ''Describe the history of the creation and combat usage of the vehicle in more detail than in the introduction. If the historical reference turns out to be too | + | <!--''Describe the history of the creation and combat usage of the ground vehicle in more detail than in the introduction. If the historical reference turns out to be too big, take it to a separate article, taking a link to an article about the vehicle and adding a block "/historical reference" (example: https://wiki.warthunder.com/Name-vehicles/historical reference) and add a link to it here using the <code>main</code> template. Be sure to include links to sources at the end of the article.''--> |
===Development=== | ===Development=== | ||
| − | + | Long before D-Day, American war planners knew that it would a long and decisive battle against the German defensive and that the need for an assault tank to push the lines and capture the beach was needed. The Americans knew they would need a tank that was up-armoured and up-gunned, something beyond the standard M4 Sherman. The hope was the have the M26 Pershing finished by 1944, however, because of difficulties, it was delayed to 1945. | |
| − | + | The US ordinance then took their abundant [[M4|M4 Shermans]] in stock and fixed them up for the new role they've been assigned in. Although keeping the same engine, the armour was upped from around 76.2 mm initial thickness to 102 mm and angled at 47 degrees from vertical. This angle would influence later Sherman design such as the M4A3 by changing the original 56 degrees angled glacis with protruding crew hatches to 47 degrees angled glacis without any protrusion from the crew hatches. This modified M4 Sherman's armour when angled would then be 150 mm line-of-sight (LOS) thick and 180 mm effective. The side armour is also increased to 76.2 mm thick and the turret is redesigned to provide more protection. These modified Shermans were designated the '''[[M4A3E2|M4A3E2]]''' by the Ordnance Department, whereas the nickname "Jumbo" was likely a post-war invention. At the end of the modifications, the Sherman "Jumbo" now weighed about 42 tons and moves a lower speed of 22 miles per hour. A drawback to the increased weight of the Sherman is that the Vertical Volute Suspension System (VVSS) from the Sherman was unable to take the weight easily, so extra care was taken by the crew members to not break the suspension. | |
| − | + | In March of 1944, the US Army ordered for 254 of these vehicles to be delivered for use for European Operations. Intended for the assault on the Normandy Beachhead, it was deployed in Normandy after D-Day to assist the infantry push through German defences. The M4A3E2 originally came with the 75 mm guns to support infantry with its better HE shells compared to the planned 76 mm instalment, but the 76 mm was installed later in the campaign and called the '''M4A3E2 (76) W Jumbo'''. | |
| − | |||
| − | == | + | ===Combat usage=== |
| − | + | The M4A3E2 was well-liked by the crew and commanders due to its protection value. Despite the weight difference and strain on the suspension, it performed reliably and could absorb damage that would otherwise destroy regular Shermans. Later in the war, when the quantity of the M4 Sherman "Jumbos" were unable to meet the demand, George S. Patton ordered for existing M4 Shermans to weld on armour plates scavenged from knocked out tanks to a makeshift "'Expedient Jumbos'. This caused the newer Shermans such as the [[M4A3 (76) W|M4A3 (76) W HVSS]] could have the same protection by welding metal onto the hull. One of the Jumbo's notable participation in the war was in Patton's Third Army where it spearheaded the assault to Bastogne to relieve the pinned down 101st Paratroopers. | |
| + | |||
| + | When the war in the European Theater ended, the M4A3E2s were then placed stateside for the preparation for the invasion of the Japanese Home Islands. However, this was never to be fulfilled as Japan then surrendered to the United States in September 1945. The M4A3E2 Shermans proved to be a very effective stop-gap solution until heavier armoured tanks such as the Pershing could come into play. In 1948, about 96 Sherman Jumbos still remained in US inventory. | ||
| + | |||
| + | === In-game description === | ||
| + | "Installing heavy weaponry and making other changes increased the tank's weight, also sacrificing maneuverability. In 1943 builders widened the T80 track to 23"" and added a ridge down the center. The new HVSS suspension with its horizontal volute springs replaced the VVSS and its vertical alignment. Bogies had two paired wheels, and the supporting rollers were attached to the side of the hull. The HVSS suspension was developed such that individual wheels could be replaced without taking apart the entire bogie. The new suspension was installed beginning in the mid-1944. Wide-tracked tanks equipped with the new suspension were also fitted with wings and shelves with screens above the tracks. | ||
| + | |||
| + | The initial M4 tracks got a rubber-coated internal band, though the rubber shortage forced the use of two types of steel tracks, all of which were interchangeable. There were three types of tracks on the M4, and they could be fitted with spikes to make traveling across soft earth easier. The spikes were not used with the T80 tracks at the beginning, though they were later developed for them as well. | ||
| + | |||
| + | The prototypes were designated M4E8, M4A1E8, M4A2E8, and M4A3E8. Their weight grew somewhat, though widening the tracks to 584 mm counteracted that by spreading the weight across a wider surface. As a result, maneuverability not only did not decrease, it actually enjoyed an uptick. At the end of March 1945 all M4 Shermans began to be fitted with the new suspension. | ||
| − | + | Between August 1944 and May 1945, 1,217 M4А3E8 (76)Ws were produced. | |
| − | + | M4A3 (76)Ws fought on the Western Front in 1945 and in the Korean War from 1950 to 1953." | |
| − | |||
| − | + | == Media == | |
| − | + | '''Camouflages''' and '''skins''' for the M4A3E2 (76) from live.warthunder.com. Two common terms are in use:<br> The full name [http://live.warthunder.com/feed/camouflages/?q=%23m4a3e2_76 '''#m4a3e2_76'''] and the postwar definition [http://live.warthunder.com/feed/camouflages/?q=%23jumbo '''#jumbo'''], albeit the last one contains entries for the earlier [[M4A3E2|75mm Jumbo]], too. | |
| − | == | + | == Read also == |
| − | ''Links to the articles on the War Thunder Wiki that you think will be useful for the reader, for example | + | ''Links to the articles on the War Thunder Wiki that you think will be useful for the reader, for example,'' |
* ''reference to the series of the vehicles;'' | * ''reference to the series of the vehicles;'' | ||
* ''links to approximate analogues of other nations and research trees.'' | * ''links to approximate analogues of other nations and research trees.'' | ||
| − | == | + | ''ETC.'' |
| − | + | ||
| + | == Sources == | ||
| + | ''Paste links to sources and external resources, such as:'' | ||
| + | |||
* ''topic on the official game forum;'' | * ''topic on the official game forum;'' | ||
| − | + | * ''other literature.'' | |
| − | * ''other literature.'' | ||
| − | |||
| − | |||
| − | {{ | + | {{USA heavy tanks}} |
| − | |||
Revision as of 10:21, 13 June 2020
Contents
| This page is about the heavy tank M4A3E2 (76) W. For similar vehicles, see M4A3E2 and M4A3E2 (France). |
Description
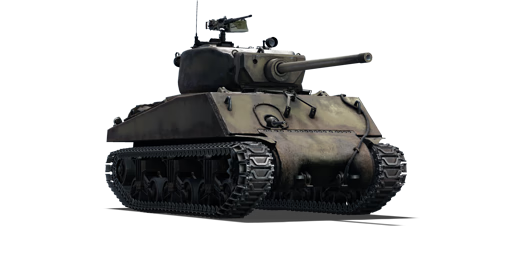
_W.jpg)
The Assault Tank M4A3E2 (76) W Jumbo is a Rank IV American heavy tank
with a battle rating of 6.3 (AB/RB/SB). It was introduced in Update 1.45 "Steel Generals" in the initial batch of US vehicles available at launch. Taking from its predecessor, the M4A3E2, it is improved with a more powerful 76 mm cannon that allows it to take on the majority of Rank III and some of the Rank IV tanks. As a side note, the nickname "Jumbo" was likely never used during WWII, as there is no record of it. However, its use both on the Wiki and In-Game is still prevalent.
The M4A3E2 (76) W Jumbo is an all-around good tank with no major limitations or advantages, with average speed, manoeuvrability and thick frontal armour, making it a 'jack of all trades tank' equally good in defensive tactics as well as offensive tactics. staying behind good cover, exposing only the thick gun mantlet and engaging targets in long range, or offensive tactics. It's 2 main advantage is that it has a fast firing 76 mm gun, combined with high penetration rounds,and it can be used to quickly disable and overwhelm otherwise heavier targets. Its armour is also excellent - the hull armour is just 1 mm short of the Tiger I's hull, and that is not even taking into account the sloping, making the hull next to impossible to penetrate frontally, and your sides are also up armoured, so unlike the Shermans, your angling will not cause you to be shot through the side. Angling with this tank will make you nearly indestructible to enemy fire. Compare this to the very tough Tiger I at the same battle rating. Beware, your hull is not up armoured from the rear, and most rounds at it's BR will set the engine on fire, and some will even go into the fighting compartment. You should also beware that you are not always indestructible, and things like the Tiger II (P) will penetrate you, even when angled. Another final thing to keep in mind is that despite you mainly fighting other 5.7 vehicles like Panthers, the battle rating will sometimes get you up against tougher opponents like the T-44 and the dreaded Tiger II (H), and if in arcade, even the terrifying T29.
General info
Survivability and armour
Armour type:
- Rolled homogeneous armour (Front, Side, Rear, Roof)
- Cast homogeneous armour (Turret, Transmission area)
| Armour | Front (Slope angle) | Sides | Rear | Roof |
|---|---|---|---|---|
| Hull | 63.5 + 38.1 mm (47°) | 76.2 mm | 38.1 mm | 19.5 mm |
| Turret | 177.8 mm | 152.4 mm | 152.4 mm | 25.4 mm |
Mobility
| Game Mode | Max Speed (km/h) | Weight (tons) | Engine power (horsepower) | Power-to-weight ratio (hp/ton) | |||
|---|---|---|---|---|---|---|---|
| Forward | Reverse | Stock | Upgraded | Stock | Upgraded | ||
| Arcade | 38 | 5 | 37.8 | 646 | 954 | 17.09 | 25.24 |
| Realistic | 36 | 5 | 442 | 500 | 11.69 | 13.23 | |
Armaments
Main armament
| 76 mm M1 | |||||
|---|---|---|---|---|---|
| Capacity | Vertical guidance |
Horizontal guidance |
Stabilizer | ||
| 71 | -10°/+25° | ±180° | Vertical | ||
| Turret rotation speed (°/s) | |||||
| Mode | Stock | Upgraded | Prior + Full crew | Prior + Expert qualif. | Prior + Ace qualif. |
| Arcade | 14.28 | 19.80 | 24.0 | 26.60 | 28.20 |
| Realistic | 14.28 | 16.80 | 20.4 | 22.60 | 24.00 |
| Reloading rate (seconds) | |||||
| Stock | Prior + Full crew | Prior + Expert qualif. | Prior + Ace qualif. | ||
| 7.67 | 6.78 | 6.25 | 5.90 | ||
Ammunition
| Penetration statistics | |||||||
|---|---|---|---|---|---|---|---|
| Ammunition | Type of warhead |
Penetration in mm @ 90° | |||||
| 10m | 100m | 500m | 1000m | 1500m | 2000m | ||
| M62 Shell | APCBC | 149 | 146 | 133 | 119 | 106 | 95 |
| M42A1 Shell | HE | 7 | 7 | 7 | 7 | 7 | 7 |
| M79 Shot | AP | 155 | 154 | 131 | 107 | 88 | 72 |
| M93 Shot | APCR | 221 | 215 | 203 | 181 | 154 | 124 |
| Shell details | ||||||||||
|---|---|---|---|---|---|---|---|---|---|---|
| Ammunition | Type of warhead |
Velocity in m/s |
Projectile Mass in kg |
Fuse delay
in m: |
Fuse sensitivity
in mm: |
Explosive Mass in g (TNT equivalent): |
Normalization At 30° from horizontal: |
Ricochet: | ||
| 0% | 50% | 100% | ||||||||
| M62 Shell | APCBC | 792 | 7 | 1.2 | 20 | +4° | 48° | 63° | 71° | |
| M42A1 Shell | HE | 800 | 5.8 | 0.4 | 0.5 | +0° | 79° | 80° | 81° | |
| M79 Shot | AP | 792 | 6.8 | N/A | N/A | -1° | 47° | 60° | 65° | |
| M93 Shot | APCR | 1036 | 4.3 | N/A | N/A | +1.5° | 66° | 70° | 72° | |
| Smoke characteristic | ||||||
|---|---|---|---|---|---|---|
| Ammunition | Velocity in m/s |
Projectile Mass in kg |
Screen radius in m |
Screen time in s |
Screen hold time in s: |
Explosive Mass in g (TNT equivalent): |
| M88 | 274 | 3.4 | 13 | 5 | 20 | 50 |
Ammo types
M62 Shot - M62 shot is the standard stock shell of the M4A3E2(76)W. With a 149 mm top penetration, it usually won't be able to destroy heavy opponents or tank destroyers it will see at it's BR/rank from the front, however, the armour makes up for it to have more time looking for a good shot. Although this is the stock shell it is quite handy, and can deal with many of the opponents at its BR, if you know where to aim. For one thing, this shell can destroy most cannon barrels with a direct hit, but this should not be your go-to in most situations.
M42A1 Shot - This is the HE shell of the M4A3E2(76)W. With a 7mm penetration at all ranges, it's best to use this when fighting AA trucks or other lower-armoured tanks. It's advised to only carry 0-5 of these shells as you won't really need them, but they're useful for when a pesky AA truck comes around the corner and shoots your cannon barrel off when your firing APCR at it.
M79 Shot - The M79 shot is a clear upgrade from the M62 shot, with more than 30mm more penetration, this will pack a punch. However, you will need to make sure you know your enemy tank's guts, as this does not fragment nor have a HE filler, and will rely on your aiming skills to destroy the core components of a tank. Just like the M93 shot, this tank shell will not explode in the tank, but rather go straight through. It's best to carry these shells instead of the M62, but when you get the upgrade to M93 don't carry any at all.
M93 Shot - This is the last shot upgrade of the M4A3E2(76)W. With a penetration upgrade of more than 110mm from the M62 shot and more than 70mm than the M79 shot, this will be the best shell for the M4A3E2(76)W Sherman Jumbo. With this shell, you'll be able to pen even the most armoured of opponents, except perhaps the occasional Tiger II or IS-2 mod. However, it's best to carry at least 35-50 shells of this, as this should be your main shell during combat.
Ammo racks
| Full ammo |
1st rack empty |
2nd rack empty |
3rd rack empty |
4th rack empty |
5th rack empty |
Visual discrepancy |
|---|---|---|---|---|---|---|
| 71 | 57 (+14) | 43 (+28) | 29 (+42) | 15 (+56) | 1 (+70) | Yes |
Machine guns
| 12.7 mm M2HB | ||||||
|---|---|---|---|---|---|---|
| Pintle mount | ||||||
| Capacity (Belt capacity) | Fire rate (shots/minute) |
Vertical guidance |
Horizontal guidance | |||
| 600 (200) | 577 | -10°/+30° | ±60° | |||
| 7.62 mm M1919A4 | ||||||
|---|---|---|---|---|---|---|
| Coaxial mount | ||||||
| Capacity (Belt capacity) | Fire rate (shots/minute) |
Vertical guidance |
Horizontal guidance | |||
| 3,000 (250) | 500 | N/A | N/A | |||
Usage in the battles
The M4A3E2's regular enemies are Tiger I and Panthers of all variants and Jagdpanzer IV/70s which can be dealt with using the tactics described above. Occasionally you will face Tiger IIs and Jagdpanthers, the best way to deal with them is to flank and disable them quickly. However, if this is not possible, you should not engage them, and await help. Beware though, that things like the Tiger II (H) and T29 and Caernarvon might get away with destroying all those trying to help you, ending up with your untimely end. Avoid engaging them frontally at all costs, especially at long ranges.
Although this is based on a medium tank, the tank is not as fast as the other mediums at its rank. Because of the heavier armour, this tank will be a few more miles slower than the rest of the tanks. However, this does not mean that the tank is bad. Most Russian tanks at this rank will usually have a very easy to spot the point where the hull and turret meet together, that point is usually under-armoured and a well-placed shot will usually cripple the tank and the turrets horizontal will be gone.
Never show your side. No matter what you do, never show your side. Your front is the most armoured piece on your tank, and you must use that your advantage. Never allow the enemy to flank or ambush you. To ensure that you can get a good shot, find out what enemy tanks you'll see in the Jumbo then check where their ammo is and how much armour is protecting that area. If you know you can penetrate that, go for the ammo/gunner/gun, as the M93 shot does not fragment or have a HE filler, it simply pierces the tank and goes straight through.
Environments
In urban environments, you're going to want to move up with the rest of the group, however, don't move up as the lead tank because you will surely find a nasty surprise at the end of the road. When facing Tiger II's, they will be able to pen anywhere they want in your frontal armour, even your thickest point(turret) if their ammo is upgraded enough. It's best to shoot the flat part of the turret, or get to their sides and pen them. However, if you can't do either of those, track them and hope that something bigger on your team will be able to take it out. Even though the M93 shot has an amazing penetration, it cannot penetrate the Tiger II's frontal armour.
In open terrain, you can usually brawl from long-range with certain tanks, such as the Tiger I, and mediums of Russia. However, if you see a Tiger II or other formidable opponent, it's best to stay far and show your front, angling the best. You can also use the hills to your advantage as most tanks do, and hide behind them quickly moving out of cover, pot-shotting the enemy tank then heading back into cover.
Arcade battles
In Arcade Battles you will usually see some pretty nasty tanks, however, because of your turret and hull armour, you will be able to usually survive. Use the player-name system to your advantage and shoot enemy tanks when they're not looking. However, because it's arcade and you're much more likely to be hit, it's best to angle your armour at a slightly less 35-degree angle. In AB, you will most likely have an advantage if you make the first shot, you're fast, and you never show your side.
Realistic/Simulator battles

In realistic battles and simulator battles, your opponents will be much more battle hardened and know where to shoot the Jumbo. When facing enemy tanks, don't always suspect that you can just show your frontal armour and turret and expect to not get penetrated. As said before, be safe and be quick, and angle your armour when you can because that saves lives. You never want to go solo and move up on your own, as you will most definitely meet a tank destroyer or quite possibly a heavy tank. When meeting an IS-2, a turret hit or shot between the hull and turret will usually cripple it, but when facing a Tiger II you'll have to be a bit more careful, as the tank is bigger and stronger than you. Although your M93 shot usually has the penetration power, it cannot penetrate the Tiger II's hull and your best luck will be shooting the flat armour of the turret front.
Tiger I E: This is a tough opponent to face, but, it can be killed quite easily if you know what to do. With the M62 round, you should aim at the area shown in the picture. It will penetrate the Tiger unless it is very sharply angled, but that could often mean that you can get a side shot. Do not aim for the drivers viewport or the machine gun, just aim for the flat armor on this section of the tank.

Panther: This is another very common and tough opponent to face. Do not shoot for the hull front, it will not be able to penetrate. You can try to shoot the turret front, but there is a chance you will bounce. The most surefire way to disable a Panther is to shoot the commander's cupola, highlighted on the left. This will often kill the commander and gunner, and about half the time it will also kill the loader.
IS-2: This is one common opponent from the Soviet/Chinese tree. Its 122 mm gun can easily penetrate the Jumbo, regardless of angle and distance. To destroy it, shoot at it when it's reloading or is unaware of your presence. For the 1943 model, aim at the cupola or the curved part of its hull armour that blends into the side. It has only 4 crew so killing all the turret crew (3, which is easy) will destroy it. For the 1944 model, only aim at the turret or the cupola as its hull is very strong.
Modules
| Tier | Mobility | Protection | Firepower | ||
|---|---|---|---|---|---|
| I | Tracks | Parts | Horizontal Drive | ||
| II | Suspension | Brake System | FPE | M79 shot | Adjustment of Fire |
| III | Filters | Crew Replenishment | M93 shot | Elevation Mechanism | |
| IV | Transmission | Engine | M88 | ||
To start out, you will want to get Tracks, Parts, then M79 Shot, and work your way from there, as those are the core components of the M4A3E2 (76) W Sherman Jumbo. With the better ammunition, you will be able to penetrate more and be far more dangerous on the field. And with Tracks & Parts, you won't need to worry about the lights/mediums that keep popping out your tracks to get to your side or backside. After getting these three things, it's best to work on manoeuvrability and M93 Shot as a first priority.
Pros and cons
Pros:
- Learning curve from the 75 mm Jumbo should help a lot when playing this tank
- Decent 76 mm gun with APCR rounds
- Can now dish a little bit more damage than the 75 mm Jumbo
- APCR shells are a step up from the 75 mm and cost slightly more with a lot of added benefits
- High rate of fire for the main gun
- Excellent gun depression
- Very strong turret armour from all sides, very good at hull down position
- Very good at leading a spearhead towards a capture point where it can provide cover to weaker allied tanks with more powerful guns
- Excellent frontal armour, about 101 mm thick and sloped
- Excellent all around turret armour, average 152 mm thick! and a 177.8 mm gun mantlet
- Can absorb a lot of damage
- Wet ammo storage - Which reduces greatly ammo rack chances, is indicated by the "W" in its name, this also means tightly packed ammo only placed under the turret
- Equipped with gun stabilizer, working only at slow speeds under 20 km/h
- Good acceleration
- 1.72 RP efficiency
- Incredibly tough when angled, except for its lower side armour
- Wider tracks than regular Shermans, except M4A3E8 variants
Cons:
- Will struggle a lot when getting up-tiered as in general it will be unable to compete with 6.7 vehicles.
- It still needs allies support to be effective in battle
- Armour is not very effective at this rank; Panthers, Tigers and large calibre Russian tanks can still penetrate you from the front with little issue
- Armour weak spot above the gun-mantlet (63.5 mm @ 61°). (can be corrected by angling yourself with a hill)
- Side armour better than normal, but still weak (76.2 mm). Allows for light angling and protection against AA
- Rear armour is still thin
- Roof armour is not upgraded from the previous version, still weak but protects against most calibres under 37 mm
- Tall profile makes it a bigger target
- Bad off-road manoeuvrability
- Quite low top speed of 35 km/h
- Reverse speed is bad, 4 km/h
- Hull MG is still a weak spot but hard to hit
- Due to the layered armour at the front and the armour over-matching mechanic, the upper glacis armour can be dubious in that it does not reliably ricochet shells, even from smaller calibre guns like the 75 mm SA50
History
Development
Long before D-Day, American war planners knew that it would a long and decisive battle against the German defensive and that the need for an assault tank to push the lines and capture the beach was needed. The Americans knew they would need a tank that was up-armoured and up-gunned, something beyond the standard M4 Sherman. The hope was the have the M26 Pershing finished by 1944, however, because of difficulties, it was delayed to 1945.
The US ordinance then took their abundant M4 Shermans in stock and fixed them up for the new role they've been assigned in. Although keeping the same engine, the armour was upped from around 76.2 mm initial thickness to 102 mm and angled at 47 degrees from vertical. This angle would influence later Sherman design such as the M4A3 by changing the original 56 degrees angled glacis with protruding crew hatches to 47 degrees angled glacis without any protrusion from the crew hatches. This modified M4 Sherman's armour when angled would then be 150 mm line-of-sight (LOS) thick and 180 mm effective. The side armour is also increased to 76.2 mm thick and the turret is redesigned to provide more protection. These modified Shermans were designated the M4A3E2 by the Ordnance Department, whereas the nickname "Jumbo" was likely a post-war invention. At the end of the modifications, the Sherman "Jumbo" now weighed about 42 tons and moves a lower speed of 22 miles per hour. A drawback to the increased weight of the Sherman is that the Vertical Volute Suspension System (VVSS) from the Sherman was unable to take the weight easily, so extra care was taken by the crew members to not break the suspension.
In March of 1944, the US Army ordered for 254 of these vehicles to be delivered for use for European Operations. Intended for the assault on the Normandy Beachhead, it was deployed in Normandy after D-Day to assist the infantry push through German defences. The M4A3E2 originally came with the 75 mm guns to support infantry with its better HE shells compared to the planned 76 mm instalment, but the 76 mm was installed later in the campaign and called the M4A3E2 (76) W Jumbo.
Combat usage
The M4A3E2 was well-liked by the crew and commanders due to its protection value. Despite the weight difference and strain on the suspension, it performed reliably and could absorb damage that would otherwise destroy regular Shermans. Later in the war, when the quantity of the M4 Sherman "Jumbos" were unable to meet the demand, George S. Patton ordered for existing M4 Shermans to weld on armour plates scavenged from knocked out tanks to a makeshift "'Expedient Jumbos'. This caused the newer Shermans such as the M4A3 (76) W HVSS could have the same protection by welding metal onto the hull. One of the Jumbo's notable participation in the war was in Patton's Third Army where it spearheaded the assault to Bastogne to relieve the pinned down 101st Paratroopers.
When the war in the European Theater ended, the M4A3E2s were then placed stateside for the preparation for the invasion of the Japanese Home Islands. However, this was never to be fulfilled as Japan then surrendered to the United States in September 1945. The M4A3E2 Shermans proved to be a very effective stop-gap solution until heavier armoured tanks such as the Pershing could come into play. In 1948, about 96 Sherman Jumbos still remained in US inventory.
In-game description
"Installing heavy weaponry and making other changes increased the tank's weight, also sacrificing maneuverability. In 1943 builders widened the T80 track to 23"" and added a ridge down the center. The new HVSS suspension with its horizontal volute springs replaced the VVSS and its vertical alignment. Bogies had two paired wheels, and the supporting rollers were attached to the side of the hull. The HVSS suspension was developed such that individual wheels could be replaced without taking apart the entire bogie. The new suspension was installed beginning in the mid-1944. Wide-tracked tanks equipped with the new suspension were also fitted with wings and shelves with screens above the tracks.
The initial M4 tracks got a rubber-coated internal band, though the rubber shortage forced the use of two types of steel tracks, all of which were interchangeable. There were three types of tracks on the M4, and they could be fitted with spikes to make traveling across soft earth easier. The spikes were not used with the T80 tracks at the beginning, though they were later developed for them as well.
The prototypes were designated M4E8, M4A1E8, M4A2E8, and M4A3E8. Their weight grew somewhat, though widening the tracks to 584 mm counteracted that by spreading the weight across a wider surface. As a result, maneuverability not only did not decrease, it actually enjoyed an uptick. At the end of March 1945 all M4 Shermans began to be fitted with the new suspension.
Between August 1944 and May 1945, 1,217 M4А3E8 (76)Ws were produced.
M4A3 (76)Ws fought on the Western Front in 1945 and in the Korean War from 1950 to 1953."
Media
Camouflages and skins for the M4A3E2 (76) from live.warthunder.com. Two common terms are in use:
The full name #m4a3e2_76 and the postwar definition #jumbo, albeit the last one contains entries for the earlier 75mm Jumbo, too.
Read also
Links to the articles on the War Thunder Wiki that you think will be useful for the reader, for example,
- reference to the series of the vehicles;
- links to approximate analogues of other nations and research trees.
ETC.
Sources
Paste links to sources and external resources, such as:
- topic on the official game forum;
- other literature.
| USA heavy tanks | |
|---|---|
| M4 Jumbo | M4A3E2 · Cobra King · M4A3E2 (76) W |
| M6 | T1E1 · M6A1 · M6A2E1 |
| T26 | T26E1-1 · T26E5 |
| T29/30/34 | T29 · T30 · T34 |
| T32 | T32 · T32E1 |
| M103 | M103 |
| Others | T14 |
