Difference between pages "Type 87" and "Pr.123-bis"
m (Changed the incorrect information that the chassis is that of the Type 90 and not the Type 74.) (Tag: Visual edit) |
(→Usage in battles) |
||
| Line 1: | Line 1: | ||
| − | {{Specs-Card|code= | + | {{Specs-Card|code=ussr_pr_123bis}} |
== Description == | == Description == | ||
| − | <!--''In the description, | + | <!--''In the first part of the description, cover the history of the ship’s creation and military application. In the second part, tell the reader about using this ship in the game. Add a screenshot. If a beginner player has a hard time remembering vehicles by name, a picture will help them understand which ship is being discussed.''--> |
[[File:GarageImage_{{PAGENAME}}.jpg|420px|thumb|left]] | [[File:GarageImage_{{PAGENAME}}.jpg|420px|thumb|left]] | ||
{{break}} | {{break}} | ||
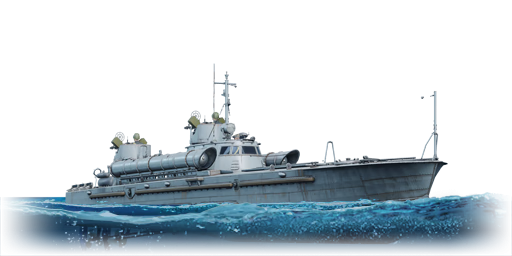
| − | The '''{{Specs|name}} is a rank {{Specs|rank}} | + | The '''{{Specs|name}}''' is a rank {{Specs|rank}} Soviet motor torpedo boat {{Battle-rating}}. It was introduced during [[Update 1.79 "Project X"]] when the Soviet fleet was implemented into the game. |
| − | |||
| − | |||
| − | |||
| − | |||
== General info == | == General info == | ||
=== Survivability and armour === | === Survivability and armour === | ||
| − | <!--' | + | <!-- Talk about the vehicle's armour. Note the most well-defended and most vulnerable zones, e.g. the ammo magazine. Evaluate the composition of components and assemblies responsible for movement and manoeuvrability. Evaluate the survivability of the primary and secondary armament separately. Don't forget to mention the size of the crew, which plays an important role in fleet mechanics. Tips for preserving survivability should be saved for the "Use in battle" section. |
| − | |||
| − | |||
| − | |||
| − | + | If necessary, use a graphic template to show the most well-protected or most vulnerable points in the armour. -->[[File:Pr123bis.png|thumb|X-Ray view of the Pr. 123bis showing key components that are prone to be damaged when taking enemy fire.]] | |
| − | + | The Pr. 123bis doesn't have any armour in the game. When under fire, it is almost certain that an opponent will disable your engines and/or set you on fire (see image on the right). However, you will very rarely be destroyed due to an ammunition explosion. | |
| − | |||
| − | |||
| − | |||
| − | |||
| − | |||
| − | |||
| − | |||
| − | |||
| − | |||
| − | |||
=== Mobility === | === Mobility === | ||
| − | <!-- | + | <!-- Write about the ship’s mobility. Evaluate its power and manoeuvrability, rudder rerouting speed, stopping speed at full tilt, with its maximum forward speed and reverse speed. --> |
| − | + | The Pr. 123bis can reach speeds over 120 km/h in AB and around 90 km/h in RB and SB. Backwards, the Pr. 123bis can reach -45km/h, so there should be no trouble reaching strategic points first or at the same time as the lighter boats. The Pr. 123bis turns very quickly, a tactic which should be used to flank opponents and destroy them with machine guns. Lastly, it is unwise to come to a full stop, due to the fact the ship becomes a "sitting duck", easy to pick off by enemy ships or aircraft. | |
| − | |||
| − | |||
| − | |||
| − | |||
| − | |||
| − | |||
| − | |||
| − | |||
| − | |||
| − | |||
| − | |||
| − | |||
| − | |||
| − | |||
| − | |||
| − | |||
| − | |||
| − | |||
| − | |||
| − | |||
| − | |||
| − | |||
| − | |||
| − | |||
| − | |||
| − | |||
| − | |||
| − | |||
| − | |||
| − | |||
| − | |||
| − | |||
| − | |||
| − | |||
| − | |||
| − | |||
| − | |||
| − | |||
| − | |||
| − | |||
| − | == | + | == Armament == |
| − | === | + | === Primary armament === |
| − | <!-- | + | {{main|DShK (12.7 mm)}} |
| − | + | <!--Provide information about the characteristics of the primary armament. Evaluate their efficacy in battle based on their reload speed, ballistics and the capacity of their shells. Add a link to the main article about the weapon: <code><nowiki>{{main|Weapon name (calibre)}}</nowiki></code>. | |
| − | + | Broadly describe the ammunition available for the primary armament, and provide recommendations on how to use it and which ammunition to choose.--> | |
| − | + | Primary armament composes of two, dual mounted [[DShK (12.7 mm)|DShK]] heavy machine gun turrets with one located at the stern and the other at the centre of the vessel just above and behind the bridge. Note that the turret at the stern is obstructed when pointed towards the bow due to the other turret therefore somewhat restricting fire coverage. The turret just behind the bridge has near 360° though it is slightly obstructed by the mast when pointing towards the bow. | |
| − | The guns | + | The DShK 12.7 mm guns provide good firepower and rate of fire against similarly sized ships and somewhat larger ships thanks to its heavy calibre. They have an ammunition capacity of 1,000 rounds with reloads taking ~4.7 seconds. Available belts to research include the high explosive incendiary (HEI) and armour piercing incendiary tracer (APIT) rounds. |
| − | + | === Torpedo armament === | |
| + | {{main|45-36NU (450 mm)}} | ||
| + | <!--Many ships are armed with torpedo launchers, and for some vessels such as boats, torpedoes are an extremely important means of defeating an opponent. Evaluate the position of the torpedo launchers, discuss the ammunition available, firing specifics such as dead zones, features of the torpedoes themselves, etc. | ||
| − | + | If there is no torpedo armament, remove this section.--> | |
| − | + | The Pr. 123bis carries two 450 mm wet-heating 45-36NU torpedoes. They have a range of 3 km at a speed of 78 km/h or a range of 6 km at 73 km/h with the Torpedo Mode module installed. They are placed at the bow of the boat and fired out already at speed, so you can surprise your opponents with your torpedoes, unlike early American boats, which simply throw the torpedoes to their sides. | |
| − | + | ''Be careful with your torpedoes!'' Due to torpedoes being fired out of their tubes at an upwards angle, this means that your torpedoes might over-shoot (literally) any boats which are passing right in front of the Pr. 123bis. | |
| − | + | === Special armament === | |
| + | {{main|BM-1 small depth charge}} | ||
| + | <!-- Depth charges, mines, rocket launchers and missiles are also effective in skilled hands and can be an unexpected surprise for an opponent. Evaluate the ammunition of this type of armament and rate its performance in combat. --> | ||
| + | The Pr. 123bis can carry 6x BB-1 depth charges, which can be used as timed mines to damage/destroy tougher enemies. You can place depth charges around a capture point if you get there first, or in front of an enemy. | ||
| − | + | ''Remember'' to set your Depth Charge activation time before battle, if you carry depth charges. The default option of 3 seconds is too short to be useful, so it is advised to set it to something between 5-8 seconds to keep your options open. | |
| − | + | == Usage in battles == | |
| + | <!-- Describe the technique of using this ship, the characteristics of her use in a team and tips on strategy. Abstain from writing an entire guide – don’t get try to provide a single point of view, but give the reader food for thought. Talk about the most dangerous opponents for this vehicle and provide recommendations on fighting them. If necessary, note the specifics of playing with this vehicle in various modes (AB, RB, SB). --> | ||
| + | The Pr. 123bis is one of the first Russian boats that get decent firepower, which can destroy its opponents very quickly. Moreover, it gets two torpedoes, which are fired forwards at speed (can be an advantage, but also a disadvantage). All of that weaponry is placed on a motor boat which can reach very high speeds. It's a boat that will help you grind out USSR rank I fleet. | ||
| − | + | The Pr. 123bis strikes a balance between speed and weaponry. At its low battle rating, the two dual 12.7 mm machine guns reliably destroy all light boats, experiencing difficulty only in a full up-tier. For the most part, the Pr. 123bis should be used as a flanker. Your machine guns destroy compartments with 3-5 bursts, and if you get the first shot on most of your opponents, they are most likely going to die very soon after. However, if you meet tougher opponents, it is viable to simply cross the map around the flank, (ignoring the lighter boats) while the opponents are focused on their front, and fire your torpedoes at their sides (best done when up close and personal). | |
| − | |||
| − | |||
| − | |||
| − | |||
| − | |||
| − | |||
| − | |||
| − | |||
| − | |||
| − | |||
| − | |||
| − | |||
| − | |||
| − | |||
| − | |||
| − | |||
| − | |||
| − | |||
| − | |||
| − | |||
| − | |||
| − | |||
| − | ' | + | As a rule of thumb, you should never remain stationary. The Pr. 123bis doesn't have any armour, and all other boats at its battle rating can kill it, so to make it much more difficult for the opponents, try to stay at your top speed and avoid head-on encounters. Although, you can still handle some threats from the sides because your guns' rotation speeds are very fast. |
| − | === | + | === Modules === |
| − | + | {| class="wikitable" | |
| − | + | ! Tier | |
| − | + | ! colspan="2" | Seakeeping | |
| − | + | ! colspan="2" | Unsinkability | |
| − | + | ! colspan="2" | Firepower | |
| − | {| class="wikitable" | ||
| − | ! colspan=" | ||
| − | |||
| − | ! | ||
| − | |||
| − | |||
| − | |||
| − | |||
|- | |- | ||
| − | | | + | | I |
| + | | Dry-Docking | ||
| + | | | ||
| + | | Tool Set | ||
| + | | | ||
| + | | 12.7 mm HE belts | ||
| + | | | ||
|- | |- | ||
| − | + | | II | |
| + | | | ||
| + | | Rudder Replacement | ||
| + | | Fire Protection System | ||
| + | | Smokescreen | ||
| + | | 12.7 mm APIT belts | ||
| + | | | ||
|- | |- | ||
| − | + | | III | |
| − | + | | Propeller Replacement | |
| − | + | | | |
| − | + | | | |
| − | + | | | |
| + | | Primary Armament Targeting | ||
| + | | Depth Charges | ||
|- | |- | ||
| − | | | + | | IV |
| + | | | ||
| + | | Engine Maintenance | ||
| + | | New Pumps | ||
| + | | | ||
| + | | Artillery Support | ||
| + | | Torpedo Mode | ||
|- | |- | ||
|} | |} | ||
| − | |||
| − | |||
| − | |||
| − | |||
| − | |||
| − | |||
| − | |||
| − | |||
| − | |||
| − | |||
| − | |||
| − | |||
=== Pros and cons === | === Pros and cons === | ||
| − | <!-- | + | <!-- Summarize and briefly evaluate the vehicle in terms of its characteristics and combat effectiveness. Mark its pros and cons in the bulleted list. Try not to use more than 6 points for each of the characteristics. Avoid using categorical definitions such as "bad", "good" and the like - they have a substitution in the form of softer "inadequate", "effective". --> |
| − | '''Pros''' | + | '''Pros:''' |
| − | * | + | * Decent firepower, with effective turret placement |
| − | * Quick | + | * Quick turret rotation speeds |
| − | * | + | * Great mobility and speed |
| − | * | + | * Torpedoes fired forward at speed |
| − | '''Cons''' | + | '''Cons:''' |
| − | * | + | * Enemies can easily destroy the ship |
| − | * | + | * Only 2 torpedoes, which fire forwards |
| − | |||
| − | |||
| − | |||
== History == | == History == | ||
| − | ''Describe the history of the creation and combat usage of the | + | ''Describe the history of the creation and combat usage of the ship in more detail than in the introduction. If the historical reference turns out to be too big, take it to a separate article, taking a link to an article about the vehicle and adding a block "/ History" (example: <nowiki>https://wiki.warthunder.com/(Vehicle-name)/History</nowiki>) and add a link to it here using the <code>main</code> template. Be sure to reference text and sources by using <code><nowiki><ref></nowiki></code>, as well as adding them at the end of the article.'' |
== Media == | == Media == | ||
| − | + | ''An excellent addition to the article will be video guides, as well as screenshots from the game and photos.'' | |
| − | |||
== See also == | == See also == | ||
''Links to the articles on the War Thunder Wiki that you think will be useful for the reader, for example:'' | ''Links to the articles on the War Thunder Wiki that you think will be useful for the reader, for example:'' | ||
| − | * ''reference to the series of the | + | * ''reference to the series of the ship;'' |
* ''links to approximate analogues of other nations and research trees.'' | * ''links to approximate analogues of other nations and research trees.'' | ||
== External links == | == External links == | ||
| − | + | ''Paste links to sources and external resources, such as:'' | |
| + | |||
* ''topic on the official game forum;'' | * ''topic on the official game forum;'' | ||
| − | * ''encyclopedia page on | + | * ''encyclopedia page on ship;'' |
| − | * ''other literature.'' | + | * ''other literature.'' |
| − | |||
| − | |||
| − | {{ | + | {{USSR boats}} |
Revision as of 13:08, 6 July 2020
Contents
Description

The Pr.123-bis is a rank II Soviet motor torpedo boat
with a battle rating of 2.3 (AB/RB/SB). It was introduced during Update 1.79 "Project X" when the Soviet fleet was implemented into the game.
General info
Survivability and armour

The Pr. 123bis doesn't have any armour in the game. When under fire, it is almost certain that an opponent will disable your engines and/or set you on fire (see image on the right). However, you will very rarely be destroyed due to an ammunition explosion.
Mobility
The Pr. 123bis can reach speeds over 120 km/h in AB and around 90 km/h in RB and SB. Backwards, the Pr. 123bis can reach -45km/h, so there should be no trouble reaching strategic points first or at the same time as the lighter boats. The Pr. 123bis turns very quickly, a tactic which should be used to flank opponents and destroy them with machine guns. Lastly, it is unwise to come to a full stop, due to the fact the ship becomes a "sitting duck", easy to pick off by enemy ships or aircraft.
Armament
Primary armament
Primary armament composes of two, dual mounted DShK heavy machine gun turrets with one located at the stern and the other at the centre of the vessel just above and behind the bridge. Note that the turret at the stern is obstructed when pointed towards the bow due to the other turret therefore somewhat restricting fire coverage. The turret just behind the bridge has near 360° though it is slightly obstructed by the mast when pointing towards the bow.
The DShK 12.7 mm guns provide good firepower and rate of fire against similarly sized ships and somewhat larger ships thanks to its heavy calibre. They have an ammunition capacity of 1,000 rounds with reloads taking ~4.7 seconds. Available belts to research include the high explosive incendiary (HEI) and armour piercing incendiary tracer (APIT) rounds.
Torpedo armament
The Pr. 123bis carries two 450 mm wet-heating 45-36NU torpedoes. They have a range of 3 km at a speed of 78 km/h or a range of 6 km at 73 km/h with the Torpedo Mode module installed. They are placed at the bow of the boat and fired out already at speed, so you can surprise your opponents with your torpedoes, unlike early American boats, which simply throw the torpedoes to their sides.
Be careful with your torpedoes! Due to torpedoes being fired out of their tubes at an upwards angle, this means that your torpedoes might over-shoot (literally) any boats which are passing right in front of the Pr. 123bis.
Special armament
The Pr. 123bis can carry 6x BB-1 depth charges, which can be used as timed mines to damage/destroy tougher enemies. You can place depth charges around a capture point if you get there first, or in front of an enemy.
Remember to set your Depth Charge activation time before battle, if you carry depth charges. The default option of 3 seconds is too short to be useful, so it is advised to set it to something between 5-8 seconds to keep your options open.
Usage in battles
The Pr. 123bis is one of the first Russian boats that get decent firepower, which can destroy its opponents very quickly. Moreover, it gets two torpedoes, which are fired forwards at speed (can be an advantage, but also a disadvantage). All of that weaponry is placed on a motor boat which can reach very high speeds. It's a boat that will help you grind out USSR rank I fleet.
The Pr. 123bis strikes a balance between speed and weaponry. At its low battle rating, the two dual 12.7 mm machine guns reliably destroy all light boats, experiencing difficulty only in a full up-tier. For the most part, the Pr. 123bis should be used as a flanker. Your machine guns destroy compartments with 3-5 bursts, and if you get the first shot on most of your opponents, they are most likely going to die very soon after. However, if you meet tougher opponents, it is viable to simply cross the map around the flank, (ignoring the lighter boats) while the opponents are focused on their front, and fire your torpedoes at their sides (best done when up close and personal).
As a rule of thumb, you should never remain stationary. The Pr. 123bis doesn't have any armour, and all other boats at its battle rating can kill it, so to make it much more difficult for the opponents, try to stay at your top speed and avoid head-on encounters. Although, you can still handle some threats from the sides because your guns' rotation speeds are very fast.
Modules
| Tier | Seakeeping | Unsinkability | Firepower | |||
|---|---|---|---|---|---|---|
| I | Dry-Docking | Tool Set | 12.7 mm HE belts | |||
| II | Rudder Replacement | Fire Protection System | Smokescreen | 12.7 mm APIT belts | ||
| III | Propeller Replacement | Primary Armament Targeting | Depth Charges | |||
| IV | Engine Maintenance | New Pumps | Artillery Support | Torpedo Mode | ||
Pros and cons
Pros:
- Decent firepower, with effective turret placement
- Quick turret rotation speeds
- Great mobility and speed
- Torpedoes fired forward at speed
Cons:
- Enemies can easily destroy the ship
- Only 2 torpedoes, which fire forwards
History
Describe the history of the creation and combat usage of the ship in more detail than in the introduction. If the historical reference turns out to be too big, take it to a separate article, taking a link to an article about the vehicle and adding a block "/ History" (example: https://wiki.warthunder.com/(Vehicle-name)/History) and add a link to it here using the main template. Be sure to reference text and sources by using <ref>, as well as adding them at the end of the article.
Media
An excellent addition to the article will be video guides, as well as screenshots from the game and photos.
See also
Links to the articles on the War Thunder Wiki that you think will be useful for the reader, for example:
- reference to the series of the ship;
- links to approximate analogues of other nations and research trees.
External links
Paste links to sources and external resources, such as:
- topic on the official game forum;
- encyclopedia page on ship;
- other literature.
| USSR boats | |
|---|---|
| Motor torpedo boats | D-3 · G-5 · G-5 (ShVAK) · Pr.123-bis · Pr.123K (A-11) · Pr.123K · Pr.183 |
| Motor gun boats | TKA-106 · MO-4 · OD-200 · Pr.183 BM-21 · Ya-5M |
| Motor torpedo gun boats | Pr. 206 · Pr.206-M · MPK Pr.12412 · MPK Pr.12412P |
| Gunboats | Groza |
| Armoured gun boats | BMO · MBK-161 early · MBK-161 late · MBK pr.186 · MBK pr.186 (MK 85) · Pr.1124 early · Pr.1124 late · Pr.1124 MLRS |
| Pr.191 · Pr.191M · Pr.1204 · Pr.1204 late | |
