Difference between pages "T-44" and "Fw 190 D-9 (USSR)"
HeyItsAdam (talk | contribs) m (grammar / readability) |
|||
| Line 1: | Line 1: | ||
| − | {{Specs-Card|code= | + | {{Specs-Card|code=fw-190d-9_ussr}} |
| + | {{About | ||
| + | | about = premium Soviet fighter '''{{Specs|name}}''' | ||
| + | | usage = other uses | ||
| + | | link = Fw 190 (Family) | ||
| + | }} | ||
== Description == | == Description == | ||
| − | <!--''In the description, the first part needs to be about the history of the creation and combat usage of the | + | <!--''In the description, the first part needs to be about the history of and the creation and combat usage of the aircraft, as well as its key features. In the second part, tell the reader about the aircraft in the game. Insert a screenshot of the vehicle. If the novice player does not remember the vehicle by name, he will immediately understand what kind of vehicle it is talking about.''--> |
| − | [[File: | + | |
| + | [[File:GarageImage_{{PAGENAME}}.jpg|420px|thumb|left]] | ||
{{break}} | {{break}} | ||
| − | The ''' | + | The '''Fw 190 D-9''' is a premium Rank IV Soviet fighter with a battle rating of 5.0 (AB), 5.3 (RB), and 5.7 (SB). It was introduced in Update 1.37. It costs 7,420 Golden Eagles. |
| − | + | The Fw 190 D-9 is definitely in the top 3 list for Germany's piston-engine fighter lineup. Thanks to the new inline engine, this Fw has a massive power upgrade from the radial versions of the Fw 190. The Fw 190 D-9 has a unique and powerful list of traits that set it apart from the pack and have solidified it as one of the deadliest battle rating fighters in the game. | |
| − | + | The engine and airframe characteristics are the major area where the new inline engine of the 190 Dora series benefits. Not only is the Jumo 213A smaller and more aerodynamically clean than a BMW radial, it also has more power. Acceleration is extremely good across the entire speed range, but most notably at low-medium speeds and likewise for altitudes, being competitive with the vaunted La-7B-20 at low altitudes. The D-9 goes a blazing 621 kph at sea level, which is 20 or so km/h faster than the Bf-109 K-4! Maximum speed at 2200 m is 660 kph (TAS) and rises from there, at 5500 m it is 710 kph, and at 8000 m it's 680 kph, steadily dropping off from there. Those are all extremely competitive numbers, beating out most of it's opposition. Climb rate is equally good, taking 90 seconds to hit 2000 m, 192 to 4000 m, 297 to 6000 m, and 430 to 8000 m. Again, this is outstanding performance that is better than most aircraft it faces. Dive acceleration and maximum diving speed are both extremely strong traits of the D-9. This plane red-lines at about 880 kph IAS, which is absolutely insane! I have yet to snap the wings off both in maneuvering and extended dives. At the start of a RB match you can WEP for about 5-6 minutes before engine heat will give you trouble. The engine overheats at 120°C and the oil at 90°C. Engine heat decreases at a relatively slow rate while at 100% throttle and the MW-50 lasts for a total of 30 minutes. | |
| − | + | It is widely considered that manoeuvrability is how well a plane can turn, which is the D-9's case it's turning is generally poor. The D-9's turn rate is at it's best above 450 km/h, where it can swing it's nose around at alarming speed. at speeds below 320 km/h, the D-9 is one of the worst turners in the game. It is important to keep speeds relatively high to maximize your turn rate and manoeuvring potential. Energy conserving manoeuvres like yo-yos should be utilized to make the most out of your precious energy reserve. Never get in sustained turning engagements, always disengage early if you find yourself losing too much speed. While the D-9 may be a bad turner, it more than makes up for it with it's extremely responsive and high rate of roll. The Fw-190's have always been known to dominate in this area, and the D-9 continues the 190 traditions of crushing the opposition here. Rate of the roll is sadly best utilized by more experienced pilots, but it is one of the most important traits for fighter aircraft. Try to think of manoeuvres that best utilize your roll rate advantage when on the defensive. The 190's manoeuvring traits suit a more Boom & Zoom/slash attack style of play; keeping crisp controls up to breakneck speeds combined with the roll rate and instantaneous turn ability makes it one of the best Boom & Zoom planes in the game. It is for this reason the D-9 is the preferred ride for veterans and newbies alike. | |
| − | |||
| − | |||
| − | + | The Fw-190 D-9 carries a strong weapon set with two 20 mm MG-151/20 cannons in the wing root and two 13 mm MG-131 in the cowling. Like all 190s, the D-9 has a very generous ammunition load, packing 250 rounds per cannon and 475 rounds per MG. Do not be afraid to take low percentage shots, and feel free to pelt stationary targets at long distance. A good belt setup would be air targets for the cannons and stealth for the MG's. The bulk of the firepower here are the cannons, so maximizing your Mineshell count is important. Stealth belts for the 13 mm make your 20 mm rounds easier to track and make it more difficult for your enemy to see your fire due to the low amount of tracers the cannons spew. The MG-151/20 has a comparatively slow firing rate and muzzle velocity if you are used to Hispanos and allied .50 calibre, so lead more than you are used to. As a whole, the D-9's weapons allow good snapshot ability while retaining a lot of firing time, making it a well rounded yet powerful package. | |
| − | |||
| − | + | == General info == | |
| − | + | === Flight Performance === | |
| − | + | <!--''Describe how the aircraft behaves in the air. Maximum speed, maneuverability, speed and allowable loads - these are the most important characteristics of the vehicle.''--> | |
| − | {| class="wikitable" | + | {| class="wikitable" style="text-align:center" |
|- | |- | ||
| − | ! | + | ! colspan="8" | Characteristics |
|- | |- | ||
| − | | | + | ! colspan="8" | ''Stock'' |
|- | |- | ||
| − | | | + | ! colspan="2" | Max Speed<br>(km/h at 4,800 m) |
| + | ! rowspan="2" | Max altitude<br>(meters) | ||
| + | ! colspan="2" | Turn time<br>(seconds) | ||
| + | ! colspan="2" | Rate of climb<br>(meters/second) | ||
| + | ! rowspan="2" |Take-off run<br>(meters) | ||
|- | |- | ||
| − | ! | + | ! AB |
| + | ! RB | ||
| + | ! AB | ||
| + | ! RB | ||
| + | ! AB | ||
| + | ! RB | ||
|- | |- | ||
| − | | | + | | 674 || ? || 12,000 || 21.9 || ??.? || 8.6 || ??.? || 453 |
|- | |- | ||
| − | + | ! colspan="8" | ''Upgraded'' | |
| − | |||
| − | |||
| − | |||
| − | |||
| − | |||
| − | |||
| − | |||
| − | |||
| − | |||
| − | |||
| − | |||
| − | = | ||
| − | |||
| − | |||
|- | |- | ||
| − | ! colspan=" | + | ! colspan="2" | Max Speed<br>(km/h at 4,800 m) |
| + | ! rowspan="2" |Max altitude (meters) | ||
| + | ! colspan="2" | Turn time (seconds) | ||
| + | ! colspan="2" | Rate of climb<br>(meters/second) | ||
| + | ! rowspan="2" |Take-off run (meters) | ||
|- | |- | ||
| − | ! | + | ! AB |
| − | ! | + | ! RB |
| − | ! | + | ! AB |
| + | ! RB | ||
| + | ! AB | ||
| + | ! RB | ||
|- | |- | ||
| − | | | + | | 675 || 657 || 12,000 || 22.0 || 22.5 || 11.4 || 11.4 || 453 |
|- | |- | ||
| − | | | + | |} |
| + | |||
| + | ====Details==== | ||
| + | {| class="wikitable" style="text-align:center" | ||
|- | |- | ||
| − | ! colspan=" | + | ! colspan="5" | Features |
|- | |- | ||
| − | ! | + | ! Combat flap |
| − | ! | + | ! Take-off flap |
| − | ! | + | ! Landing flap |
| + | ! Air brakes | ||
| + | ! Arrestor gear | ||
|- | |- | ||
| − | | | + | | X || X || ✓ || X || X <!-- ✓ --> |
| − | | | ||
| − | | | ||
|- | |- | ||
| − | | | + | |} |
| − | + | ||
| − | | | + | {| class="wikitable" style="text-align:center" |
|- | |- | ||
| − | ! colspan=" | + | ! colspan="5" | Limits |
|- | |- | ||
| − | ! | + | ! rowspan="2" | Wing-break speed<br>(km/h) |
| − | ! | + | ! rowspan="2" | Gear limit<br>(km/h) |
| − | ! | + | ! rowspan="2" | Combat flap<br> (km/h) |
| + | ! colspan="2" | Max Static G | ||
|- | |- | ||
| − | + | ! + | |
| − | + | ! - | |
| − | |||
|- | |- | ||
| − | | | + | | 920 || 920 || ??? || ~22 || ~22 |
| − | | | ||
| − | | | ||
|- | |- | ||
|} | |} | ||
| − | |||
| − | |||
| − | |||
| − | |||
| − | |||
{| class="wikitable" style="text-align:center" | {| class="wikitable" style="text-align:center" | ||
|- | |- | ||
| − | + | ! colspan="4" | Optimal velocities | |
| − | |||
| − | |||
| − | |||
| − | |||
| − | |||
| − | |||
| − | |||
| − | |||
| − | |||
| − | |||
| − | |||
| − | |||
| − | |||
| − | |||
| − | |||
| − | |||
| − | |||
| − | |||
| − | |||
| − | |||
| − | |||
| − | ! colspan="4" | | ||
|- | |- | ||
| − | ! | + | ! Ailerons<br>(km/h) |
| − | ! | + | ! Rudder<br>(km/h) |
| − | ! | + | ! Elevators<br>(km/h) |
| − | ! | + | ! Radiator<br>(km/h) |
|- | |- | ||
| − | | | + | | < 420 || < 510 || < 510 || > 280 |
|- | |- | ||
|} | |} | ||
| − | + | {| class="wikitable" style="text-align:center" | |
| − | |||
| − | |||
| − | {| class="wikitable | ||
| − | |||
|- | |- | ||
| − | ! | + | ! colspan="3" | Compressor (RB/SB) |
| − | |||
| − | |||
|- | |- | ||
| − | ! | + | ! colspan="3" | Setting 1 |
| − | |||
| − | |||
| − | |||
| − | |||
| − | |||
|- | |- | ||
| − | + | ! Optimal altitude | |
| + | ! 100% Engine power | ||
| + | ! WEP Engine power | ||
|- | |- | ||
| − | | | + | | 2,700 m || 1,768 hp || 2,192 hp |
| − | |||
| − | |||
| − | |||
| − | |||
| − | |||
| − | |||
|- | |- | ||
| − | + | ! colspan="3" | Setting 2 | |
| − | |||
| − | |||
| − | |||
| − | ! colspan=" | ||
|- | |- | ||
| − | ! | + | ! Optimal altitude |
| − | ! | + | ! 100% Engine power |
| − | ! | + | ! WEP Engine power |
| − | |||
| − | |||
| − | |||
| − | |||
| − | |||
| − | |||
| − | |||
| − | |||
|- | |- | ||
| − | + | | 6,000 m || 1,649 hp || 2,045 hp | |
| − | |||
| − | |||
|- | |- | ||
| − | + | <!--! colspan="3" | Setting 3 | |
|- | |- | ||
| − | + | ! Optimal altitude | |
| − | + | ! 100% Engine power | |
| − | + | ! WEP Engine power | |
| − | |||
| − | |||
| − | |||
| − | |||
|- | |- | ||
| − | | | + | | ?,??? m || ?,??? hp || ?,??? hp |
| − | |- | + | |- --> |
|} | |} | ||
| − | === | + | === Survivability and armour === |
| − | + | <!--''Examine the survivability of the aircraft. Note how vulnerable the structure is and how secure the pilot is, whether the fuel tanks are armoured. Describe the armour, if there is any, also mention the vulnerability of other critical aircraft systems.''--> | |
| − | + | * 57 mm Bulletproof glass in cockpit front. | |
| − | + | * 8-12 mm Steel plates behind the pilot. | |
| − | + | * 3 mm Steel plate in front of the liquid cooling system. | |
| − | + | * 8 mm Steel plate under the fuel tanks. | |
| − | + | * 5 mm Steel plate behind the fuel tanks | |
| − | + | ||
| − | + | == Armaments == | |
| − | + | === Offensive armament === | |
| − | + | <!--''Describe the offensive armament of the aircraft, if any. Describe how effective the cannons and machine guns are in a battle, and also what belts or drums are better to use. If there is no offensive weaponry, delete this subsection.''--> | |
| − | ! | + | {{main|MG 151/20 (20 mm)|MG 131 (13 mm)}} |
| − | + | ||
| − | + | The '''''{{PAGENAME}}''''' is armed with: | |
| − | + | ||
| − | + | * 2 x 20 mm MG 151 cannon, wing-mounted (250 rpg = 500 total) | |
| + | * 2 x 13 mm MG 131 machine gun, nose-mounted (450 rpg = 900 total) | ||
| − | + | <!--=== Suspended armament === | |
| + | ''Describe the aircraft's suspended armament: additional cannons under the wings, bombs, rockets and torpedoes. This section is especially important for bombers and attackers. If there is no suspended weaponry remove this subsection.'' | ||
| − | === | + | === Defensive armament === |
| − | <!--'' | + | ''Defensive armament with turret machine guns or cannons, crewed by gunners. Examine the number of gunners and what belts or drums are better to use. If defensive weaponry is not available remove this subsection.'' |
| − | + | --> | |
| + | == Usage in the battles == | ||
| + | <!--''Describe the tactics of playing in an aircraft, the features of using vehicles in a team and advice on tactics. Refrain from creating a "guide" - do not impose a single point of view but give the reader food for thought. Examine the most dangerous enemies and give recommendations on fighting them. If necessary, note the specifics of the game in different modes (AB, RB, SB).''--> | ||
| + | The Fw-190 D-9 is considered by many to be the best prop plane Germany has at 6.0 BR and below, and for good reason. The 190 D-9 is one of the few planes where it's advantages are in extreme excess of its disadvantages. With its outstanding climb, high speed, crisp controls and tight firepower it is able to zoom in, get shots on target, and then escape in the blink of an eye. It may have mushy manoeuvring at low speeds, and may not be the best aircraft to take into the high vertical while slow, but it is by and large a top-tier aircraft in good hands. | ||
| + | At the start of the battle, take the Fw-190 D-9 first out of your line up. Climb at a 30-45 degree angle while holding WEP (make sure you don't stall out). This plane should out climb everything it sees. Your priority targets are the highest enemy fighters. Bombers are fine too, but watch out for escort aircraft. Be careful when attacking heavily armoured bombers, as the MG 151 cannons sometimes take a while to bring down your target. Do not attack enemy aircraft under 1000 meters unless the match is near a close. If you do not have much energy and there is an enemy fighter less than 1000 m higher, perform a head-on attack, but don't commit. Break about 600 meters and dive. Once you reached 400 kph, start climbing. Unless the enemy is flying an Fw 190, you will not be caught. Once you achieved air superiority above 3000 m, look for climbing aircraft and aircraft tunnel-visioned on a target, as these generally result in easy kills. As for ammunition belts, use the Mine belt of the MG 151s and stealth for the 13 mm. These belts pack a punch and don't have much tracer ammunition, perfect for the surprise Boom & Zoom attacks. For the last tips, DO NOT TURN in combat under any circumstances (you will not out turn anything smaller than a B-17 and lose precious speed in the process). Also, always maintain at least 2,000 meters of altitude (if you are caught at low altitudes, you will be caught and killed). In conclusion, this is one of the most OP planes in arcade. It has better top speed and climb rate than 6.0 BR aircraft and has a great armament. In the hands of even inexperienced pilots, this plane is almost invincible. This is possibly the best and most forgiving Boom & Zoom aircraft. | ||
| + | ===Manual Engine Control=== | ||
{| class="wikitable" style="text-align:center" | {| class="wikitable" style="text-align:center" | ||
|- | |- | ||
| − | ! colspan="7" | | + | ! colspan="7" | MEC elements |
|- | |- | ||
| − | ! colspan=" | + | ! rowspan="2" |Mixer |
| + | ! rowspan="2" |Pitch | ||
| + | ! colspan="3" |Radiator | ||
| + | ! rowspan="2" |Supercharger | ||
| + | ! rowspan="2" |Turbocharger | ||
|- | |- | ||
| − | ! | + | ! Oil |
| − | ! | + | ! Water |
| − | ! | + | ! Type |
| − | |||
|- | |- | ||
| − | | | + | | Controllable || rowspan="2" | Not controllable || rowspan="2" | Not controllable || rowspan="2" | Not controllable || rowspan="2" | Separate || rowspan="2" | Not controllable || rowspan="2" | Not controllable |
|- | |- | ||
|} | |} | ||
| − | |||
| − | |||
| − | |||
| − | |||
| − | |||
| − | |||
| − | |||
| − | |||
| − | |||
| − | |||
| − | |||
| − | |||
| − | |||
| − | |||
| − | |||
| − | |||
| − | |||
| − | |||
| − | |||
| − | |||
===Modules=== | ===Modules=== | ||
| − | + | {| class="wikitable" | |
| + | !colspan = "1"| Tier | ||
| + | !colspan = "2"| Flight performance | ||
| + | !colspan = "1"| Survivability | ||
| + | !colspan = "1"| Weaponry | ||
| + | |- | ||
| + | | I | ||
| + | | Fuselage Repair | ||
| + | | Radiator | ||
| + | | | ||
| + | | Offensive 13 mm | ||
| + | |- | ||
| + | | II | ||
| + | | | ||
| + | | Compressor | ||
| + | | Airframe | ||
| + | | New 13 mm MGs | ||
| + | |- | ||
| + | | III | ||
| + | | Wings Repair | ||
| + | | Engine | ||
| + | | | ||
| + | | Offensive 20 mm | ||
| + | |- | ||
| + | | IV | ||
| + | | | ||
| + | | Engine Injection | ||
| + | | Cover | ||
| + | | New 20 mm Cannons | ||
| + | |- | ||
| + | |} | ||
=== Pros and cons === | === Pros and cons === | ||
| − | <!--''Summarize and briefly evaluate the vehicle in terms of its characteristics and combat effectiveness. Mark its pros and cons in | + | <!--''Summarize and briefly evaluate the vehicle in terms of its characteristics and combat effectiveness. Mark its pros and cons in the bulleted list. Do not use more than 6 points for each of the characteristics. Avoid using categorical definitions such as "bad", "good" and the like - they have a substitution in the form of softer "inadequate", "effective".''--> |
| + | |||
'''Pros:''' | '''Pros:''' | ||
| − | + | * Exceptional climb Rate | |
| − | * | + | * Exceptional speed |
| − | * High | + | * Great firepower |
| − | * | + | * Exceptional roll rate at low speeds |
| + | * Mediocre in turns | ||
| + | * High Altitude fighter/bomber hunter | ||
| + | * Energy fighter, "boom and zoom" | ||
| + | * Great ammo capacity | ||
'''Cons:''' | '''Cons:''' | ||
| − | + | *Bad flat turn rate | |
| − | * | + | *Elevator has low responsibility & effect at low speeds |
| − | * | + | *Maneuverability at low speeds is bad |
| − | |||
| − | * | ||
| − | |||
| − | |||
| − | |||
== History == | == History == | ||
| − | <!--''Describe the history of the creation and combat usage of the | + | <!--''Describe the history of the creation and combat usage of the aircraft in more detail than in the introduction. If the historical reference turns out to be too big, take it to a separate article, taking a link to an article about the vehicle and adding a block "/ historical reference" (example: https://wiki.warthunder.com/Name-vehicles/historical reference) and add a link to it here using the <code>main</code> template. Be sure to include links to sources at the end of the article.''--> |
| − | + | Kurt Tank, the designer of the venerable Fw 190 lineup quickly realized by 1943 that the field of aerial warfare was changing rapidly. The world had moved on beyond dive bombers, and the allies had begun forming massive, four-engine bomber wings that devastated Axis ground troops and factories. At the time, Fw 190's played similar roles to the American P-47 Thunderbolts, serving as ground attack planes and low altitude interceptors. Fw 190's retained air superiority over allied forces all the way up to the introduction of the British Spitfire Mk. IX. Despite this impressive service record, Fw 190's had one flaw, which would soon usher in the need of the "Dora" Line-up. Their performance was hindered drastically at higher altitudes, where aerial warfare was now moving towards. Germany, in desperate need of fighters to engage and stop these massive bomber raids had turned to Messerschmitt and Focke-wulf to produce a high altitude interceptor, and Kurt Tank's response was the Fw 190 D-9. | |
| − | + | ||
| − | + | Unlike previous models, the "Dora" series boasted an improved engine. Specifically, a Jumo 213A bomber engine, more commonly used in the Ju-88. This much larger engine required for the hull of the Fw-190 to also be extended in the front, and for balancing reasons, the tail as well. The D-9 also sacrificed it's 4 x 20 mm MG-151 cannons previously used in previous Fw 190s for two 20 mm MG-151 cannons, and a twin set of 13 mm's over the previous models' MG-82's. With an impressive 700+ kph speed, the D-9 proved to be one of the fastest interceptors to be rolled off a German assembly line. Despite this, the D-9 was instead used for ground attack rolls and fighter interception, using its speed to drop its payload and vanish long before enemy Flak had the time to line up a shot. | |
| − | |||
| − | |||
| − | |||
| − | |||
| − | |||
| − | |||
| − | |||
| − | |||
| − | |||
| − | |||
| − | |||
| − | |||
| − | |||
| − | |||
| − | |||
| − | |||
=== In-game description === | === In-game description === | ||
| − | |||
| − | The | + | "The Great Patriotic War had already ended when the Soviet Air Forces Research Institute (SAFRI) began testing the German piston-engine aircraft in service with the Luftwaffe at the culmination of the war. To begin with, Soviet engineers studied an FW.190D-9 with the assembly number W.Nr.210251. |
| − | + | On the model D-9, the Jumo 213А liquid-cooled in-line engine replaced the BMW 801D air-cooled engine. This slightly increased the aerodynamics of its engine-propeller unit and increased the plane's length by 80 cm. The more powerful engine promised to make the new vehicle superior to the FW.190A in speed and climbing rate. | |
| − | + | According to leading specialists at the SAFRI, the modified FW.190D-9 could not go up against the Russian Yak-3, Yak-9Y and La-7 on equal terms at low and medium altitudes. The Focke-Wulf's low-altitude speed was inferior to theirs by at least 24 km/h, and at 5,000 meters, by more than 10 km/h. The German fighter's insufficient horizontal and vertical maneuverability also put it at a disadvantage. | |
| − | + | Russia was interested in manufacturing the plane mainly due to its convenient arrangement of engine and powertrain parts, high maximum oil temperature during engine operation and well-designed automatic water temperature regulator. It was also noted that over its entire testing period from the 11th to the 26th of May 1945, all of the parts in the German plane's special equipment remained operational. | |
| − | The | + | It could fire all its weapons at once without this affecting its trajectory, and the pilots could barely feel the weapons' recoil. It could fire the cannons and machine guns separately. The extensive electrically-powered equipment made the pilot's work easier. |
| + | |||
| + | A mock aviation battle between the FW.190D-9 and La-7 fighters showed the full superiority of the Russian airplane. SAFRI pilots came to the conclusion that the new German fighter's ability to go up against the Lavochkins was no greater than that of its predecessor, the FW.190A-8. Having begun the “battle” on a head-on course, the Soviet fighter easily got on the German plane's tail after three banked turns or two chandelles. It's worth noting, however, that these “battles” took place without using the engine's methanol-water injection WEP system." | ||
== Media == | == Media == | ||
| − | + | ''An excellent addition to the article will be video guides, as well as screenshots from the game and photos.'' | |
| − | |||
| − | |||
| − | |||
| − | |||
== Read also == | == Read also == | ||
| − | + | ''Links to the articles on the War Thunder Wiki that you think will be useful for the reader, for example,'' | |
| − | * ''reference to the series of the | + | * ''reference to the series of the aircraft;'' |
* ''links to approximate analogues of other nations and research trees.'' | * ''links to approximate analogues of other nations and research trees.'' | ||
| − | ''ETC.''--> | + | <!--''ETC.''--> |
| − | |||
== Sources == | == Sources == | ||
''Paste links to sources and external resources, such as:'' | ''Paste links to sources and external resources, such as:'' | ||
| − | |||
* ''topic on the official game forum;'' | * ''topic on the official game forum;'' | ||
| + | * ''page on aircraft encyclopedia;'' | ||
* ''other literature.'' | * ''other literature.'' | ||
| − | {{USSR | + | {{AirManufacturer Focke-Wulf}} |
| + | {{USSR fighters}} | ||
Revision as of 00:16, 31 December 2019
Contents
| This page is about the premium Soviet fighter ▂Fw 190 D-9. For other uses, see Fw 190 (Family). |
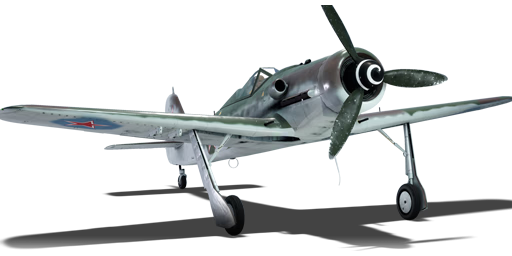
Description
.jpg)
The Fw 190 D-9 is a premium Rank IV Soviet fighter with a battle rating of 5.0 (AB), 5.3 (RB), and 5.7 (SB). It was introduced in Update 1.37. It costs 7,420 Golden Eagles.
The Fw 190 D-9 is definitely in the top 3 list for Germany's piston-engine fighter lineup. Thanks to the new inline engine, this Fw has a massive power upgrade from the radial versions of the Fw 190. The Fw 190 D-9 has a unique and powerful list of traits that set it apart from the pack and have solidified it as one of the deadliest battle rating fighters in the game.
The engine and airframe characteristics are the major area where the new inline engine of the 190 Dora series benefits. Not only is the Jumo 213A smaller and more aerodynamically clean than a BMW radial, it also has more power. Acceleration is extremely good across the entire speed range, but most notably at low-medium speeds and likewise for altitudes, being competitive with the vaunted La-7B-20 at low altitudes. The D-9 goes a blazing 621 kph at sea level, which is 20 or so km/h faster than the Bf-109 K-4! Maximum speed at 2200 m is 660 kph (TAS) and rises from there, at 5500 m it is 710 kph, and at 8000 m it's 680 kph, steadily dropping off from there. Those are all extremely competitive numbers, beating out most of it's opposition. Climb rate is equally good, taking 90 seconds to hit 2000 m, 192 to 4000 m, 297 to 6000 m, and 430 to 8000 m. Again, this is outstanding performance that is better than most aircraft it faces. Dive acceleration and maximum diving speed are both extremely strong traits of the D-9. This plane red-lines at about 880 kph IAS, which is absolutely insane! I have yet to snap the wings off both in maneuvering and extended dives. At the start of a RB match you can WEP for about 5-6 minutes before engine heat will give you trouble. The engine overheats at 120°C and the oil at 90°C. Engine heat decreases at a relatively slow rate while at 100% throttle and the MW-50 lasts for a total of 30 minutes.
It is widely considered that manoeuvrability is how well a plane can turn, which is the D-9's case it's turning is generally poor. The D-9's turn rate is at it's best above 450 km/h, where it can swing it's nose around at alarming speed. at speeds below 320 km/h, the D-9 is one of the worst turners in the game. It is important to keep speeds relatively high to maximize your turn rate and manoeuvring potential. Energy conserving manoeuvres like yo-yos should be utilized to make the most out of your precious energy reserve. Never get in sustained turning engagements, always disengage early if you find yourself losing too much speed. While the D-9 may be a bad turner, it more than makes up for it with it's extremely responsive and high rate of roll. The Fw-190's have always been known to dominate in this area, and the D-9 continues the 190 traditions of crushing the opposition here. Rate of the roll is sadly best utilized by more experienced pilots, but it is one of the most important traits for fighter aircraft. Try to think of manoeuvres that best utilize your roll rate advantage when on the defensive. The 190's manoeuvring traits suit a more Boom & Zoom/slash attack style of play; keeping crisp controls up to breakneck speeds combined with the roll rate and instantaneous turn ability makes it one of the best Boom & Zoom planes in the game. It is for this reason the D-9 is the preferred ride for veterans and newbies alike.
The Fw-190 D-9 carries a strong weapon set with two 20 mm MG-151/20 cannons in the wing root and two 13 mm MG-131 in the cowling. Like all 190s, the D-9 has a very generous ammunition load, packing 250 rounds per cannon and 475 rounds per MG. Do not be afraid to take low percentage shots, and feel free to pelt stationary targets at long distance. A good belt setup would be air targets for the cannons and stealth for the MG's. The bulk of the firepower here are the cannons, so maximizing your Mineshell count is important. Stealth belts for the 13 mm make your 20 mm rounds easier to track and make it more difficult for your enemy to see your fire due to the low amount of tracers the cannons spew. The MG-151/20 has a comparatively slow firing rate and muzzle velocity if you are used to Hispanos and allied .50 calibre, so lead more than you are used to. As a whole, the D-9's weapons allow good snapshot ability while retaining a lot of firing time, making it a well rounded yet powerful package.
General info
Flight Performance
| Characteristics | |||||||
|---|---|---|---|---|---|---|---|
| Stock | |||||||
| Max Speed (km/h at 4,800 m) |
Max altitude (meters) |
Turn time (seconds) |
Rate of climb (meters/second) |
Take-off run (meters) | |||
| AB | RB | AB | RB | AB | RB | ||
| 674 | ? | 12,000 | 21.9 | ??.? | 8.6 | ??.? | 453 |
| Upgraded | |||||||
| Max Speed (km/h at 4,800 m) |
Max altitude (meters) | Turn time (seconds) | Rate of climb (meters/second) |
Take-off run (meters) | |||
| AB | RB | AB | RB | AB | RB | ||
| 675 | 657 | 12,000 | 22.0 | 22.5 | 11.4 | 11.4 | 453 |
Details
| Features | ||||
|---|---|---|---|---|
| Combat flap | Take-off flap | Landing flap | Air brakes | Arrestor gear |
| X | X | ✓ | X | X |
| Limits | ||||
|---|---|---|---|---|
| Wing-break speed (km/h) |
Gear limit (km/h) |
Combat flap (km/h) |
Max Static G | |
| + | - | |||
| 920 | 920 | ??? | ~22 | ~22 |
| Optimal velocities | |||
|---|---|---|---|
| Ailerons (km/h) |
Rudder (km/h) |
Elevators (km/h) |
Radiator (km/h) |
| < 420 | < 510 | < 510 | > 280 |
| Compressor (RB/SB) | ||
|---|---|---|
| Setting 1 | ||
| Optimal altitude | 100% Engine power | WEP Engine power |
| 2,700 m | 1,768 hp | 2,192 hp |
| Setting 2 | ||
| Optimal altitude | 100% Engine power | WEP Engine power |
| 6,000 m | 1,649 hp | 2,045 hp |
Survivability and armour
- 57 mm Bulletproof glass in cockpit front.
- 8-12 mm Steel plates behind the pilot.
- 3 mm Steel plate in front of the liquid cooling system.
- 8 mm Steel plate under the fuel tanks.
- 5 mm Steel plate behind the fuel tanks
Armaments
Offensive armament
The Fw 190 D-9 (USSR) is armed with:
- 2 x 20 mm MG 151 cannon, wing-mounted (250 rpg = 500 total)
- 2 x 13 mm MG 131 machine gun, nose-mounted (450 rpg = 900 total)
Usage in the battles
The Fw-190 D-9 is considered by many to be the best prop plane Germany has at 6.0 BR and below, and for good reason. The 190 D-9 is one of the few planes where it's advantages are in extreme excess of its disadvantages. With its outstanding climb, high speed, crisp controls and tight firepower it is able to zoom in, get shots on target, and then escape in the blink of an eye. It may have mushy manoeuvring at low speeds, and may not be the best aircraft to take into the high vertical while slow, but it is by and large a top-tier aircraft in good hands.
At the start of the battle, take the Fw-190 D-9 first out of your line up. Climb at a 30-45 degree angle while holding WEP (make sure you don't stall out). This plane should out climb everything it sees. Your priority targets are the highest enemy fighters. Bombers are fine too, but watch out for escort aircraft. Be careful when attacking heavily armoured bombers, as the MG 151 cannons sometimes take a while to bring down your target. Do not attack enemy aircraft under 1000 meters unless the match is near a close. If you do not have much energy and there is an enemy fighter less than 1000 m higher, perform a head-on attack, but don't commit. Break about 600 meters and dive. Once you reached 400 kph, start climbing. Unless the enemy is flying an Fw 190, you will not be caught. Once you achieved air superiority above 3000 m, look for climbing aircraft and aircraft tunnel-visioned on a target, as these generally result in easy kills. As for ammunition belts, use the Mine belt of the MG 151s and stealth for the 13 mm. These belts pack a punch and don't have much tracer ammunition, perfect for the surprise Boom & Zoom attacks. For the last tips, DO NOT TURN in combat under any circumstances (you will not out turn anything smaller than a B-17 and lose precious speed in the process). Also, always maintain at least 2,000 meters of altitude (if you are caught at low altitudes, you will be caught and killed). In conclusion, this is one of the most OP planes in arcade. It has better top speed and climb rate than 6.0 BR aircraft and has a great armament. In the hands of even inexperienced pilots, this plane is almost invincible. This is possibly the best and most forgiving Boom & Zoom aircraft.
Manual Engine Control
| MEC elements | ||||||
|---|---|---|---|---|---|---|
| Mixer | Pitch | Radiator | Supercharger | Turbocharger | ||
| Oil | Water | Type | ||||
| Controllable | Not controllable | Not controllable | Not controllable | Separate | Not controllable | Not controllable |
Modules
| Tier | Flight performance | Survivability | Weaponry | |
|---|---|---|---|---|
| I | Fuselage Repair | Radiator | Offensive 13 mm | |
| II | Compressor | Airframe | New 13 mm MGs | |
| III | Wings Repair | Engine | Offensive 20 mm | |
| IV | Engine Injection | Cover | New 20 mm Cannons | |
Pros and cons
Pros:
- Exceptional climb Rate
- Exceptional speed
- Great firepower
- Exceptional roll rate at low speeds
- Mediocre in turns
- High Altitude fighter/bomber hunter
- Energy fighter, "boom and zoom"
- Great ammo capacity
Cons:
- Bad flat turn rate
- Elevator has low responsibility & effect at low speeds
- Maneuverability at low speeds is bad
History
Kurt Tank, the designer of the venerable Fw 190 lineup quickly realized by 1943 that the field of aerial warfare was changing rapidly. The world had moved on beyond dive bombers, and the allies had begun forming massive, four-engine bomber wings that devastated Axis ground troops and factories. At the time, Fw 190's played similar roles to the American P-47 Thunderbolts, serving as ground attack planes and low altitude interceptors. Fw 190's retained air superiority over allied forces all the way up to the introduction of the British Spitfire Mk. IX. Despite this impressive service record, Fw 190's had one flaw, which would soon usher in the need of the "Dora" Line-up. Their performance was hindered drastically at higher altitudes, where aerial warfare was now moving towards. Germany, in desperate need of fighters to engage and stop these massive bomber raids had turned to Messerschmitt and Focke-wulf to produce a high altitude interceptor, and Kurt Tank's response was the Fw 190 D-9.
Unlike previous models, the "Dora" series boasted an improved engine. Specifically, a Jumo 213A bomber engine, more commonly used in the Ju-88. This much larger engine required for the hull of the Fw-190 to also be extended in the front, and for balancing reasons, the tail as well. The D-9 also sacrificed it's 4 x 20 mm MG-151 cannons previously used in previous Fw 190s for two 20 mm MG-151 cannons, and a twin set of 13 mm's over the previous models' MG-82's. With an impressive 700+ kph speed, the D-9 proved to be one of the fastest interceptors to be rolled off a German assembly line. Despite this, the D-9 was instead used for ground attack rolls and fighter interception, using its speed to drop its payload and vanish long before enemy Flak had the time to line up a shot.
In-game description
"The Great Patriotic War had already ended when the Soviet Air Forces Research Institute (SAFRI) began testing the German piston-engine aircraft in service with the Luftwaffe at the culmination of the war. To begin with, Soviet engineers studied an FW.190D-9 with the assembly number W.Nr.210251.
On the model D-9, the Jumo 213А liquid-cooled in-line engine replaced the BMW 801D air-cooled engine. This slightly increased the aerodynamics of its engine-propeller unit and increased the plane's length by 80 cm. The more powerful engine promised to make the new vehicle superior to the FW.190A in speed and climbing rate.
According to leading specialists at the SAFRI, the modified FW.190D-9 could not go up against the Russian Yak-3, Yak-9Y and La-7 on equal terms at low and medium altitudes. The Focke-Wulf's low-altitude speed was inferior to theirs by at least 24 km/h, and at 5,000 meters, by more than 10 km/h. The German fighter's insufficient horizontal and vertical maneuverability also put it at a disadvantage.
Russia was interested in manufacturing the plane mainly due to its convenient arrangement of engine and powertrain parts, high maximum oil temperature during engine operation and well-designed automatic water temperature regulator. It was also noted that over its entire testing period from the 11th to the 26th of May 1945, all of the parts in the German plane's special equipment remained operational.
It could fire all its weapons at once without this affecting its trajectory, and the pilots could barely feel the weapons' recoil. It could fire the cannons and machine guns separately. The extensive electrically-powered equipment made the pilot's work easier.
A mock aviation battle between the FW.190D-9 and La-7 fighters showed the full superiority of the Russian airplane. SAFRI pilots came to the conclusion that the new German fighter's ability to go up against the Lavochkins was no greater than that of its predecessor, the FW.190A-8. Having begun the “battle” on a head-on course, the Soviet fighter easily got on the German plane's tail after three banked turns or two chandelles. It's worth noting, however, that these “battles” took place without using the engine's methanol-water injection WEP system."
Media
An excellent addition to the article will be video guides, as well as screenshots from the game and photos.
Read also
Links to the articles on the War Thunder Wiki that you think will be useful for the reader, for example,
- reference to the series of the aircraft;
- links to approximate analogues of other nations and research trees.
Sources
Paste links to sources and external resources, such as:
- topic on the official game forum;
- page on aircraft encyclopedia;
- other literature.
| Focke-Wulf Aircraft Corporation (Focke-Wulf Flugzeugbau Aktiengesellschaft) | |
|---|---|
| Fighters | Fw 190 A-1 · Fw 190 A-4 · Fw 190 A-5 · Fw 190 A-5/U2 · Fw 190 A-5/U12 · Fw 190 A-5/U14 · Fw 190 A-8 |
| Fw 190 C | |
| Fw 190 D-9 · Fw 190 D-12 · Fw 190 D-13 | |
| Fw 190 F-8 | |
| Ta 152 C-3* · Ta 152 H-1* · Ta 154 A-1* | |
| Bombers | Fw 189 A-1 · Fw 200 C-1 |
| Export | ▅Fw 190 A-5 |
| Captured | ▃Fw 190 A-8 · ▂Fw 190 D-9 |
| * In 1944, the Germany Air Ministry changed new fighter aircraft designation to that of the chief designer. Kurt Tank was the chief designer at Focke-Wulf and later aircraft he designed were given the prefix of Ta. | |
| USSR fighters | |
|---|---|
| I-15 | I-15 WR · I-15 M-22 · I-15 M-25 · I-15bis · Krasnolutsky's I-15bis |
| I-153 M-62 · Zhukovsky's I-153-M62 · I-153P | |
| I-16 | I-16 type 5 · I-16 type 10 · I-16 type 18 · I-16 type 24 · I-16 type 27 · I-16 type 28 · I-180S |
| I-29 | I-29 |
| I-185 | I-185 (M-71) · I-185 (M-82) |
| I-225 | I-225 |
| ITP | ITP (M-1) |
| MiG-3 | MiG-3-15 · MiG-3-15 (BK) · MiG-3-34 |
| LaGG | I-301 · LaGG-3-4 · LaGG-3-8 · LaGG-3-11 · LaGG-3-23 · LaGG-3-34 · LaGG-3-35 · LaGG-3-66 |
| La | La-5 · La-5F · La-5FN · La-7 · Dolgushin's La-7 · La-7B-20 · La-9 · La-11 |
| Yak-1/7 | Yak-1 · Yak-1B · Yak-7B |
| Yak-3 | Yak-3 · Yak-3P · Yak-3T · Yak-3U · Yak-3 (VK-107) |
| Yak-9 | Yak-9 · Yak-9B · Golovachev's Yak-9M · Yak-9T · Yak-9K · Yak-9U · Yak-9UT · Yak-9P |
| Other countries | ▂P-40E-1 · ▂P-47D-27 · ▂Hurricane Mk IIB · ▂Fw 190 D-9 · ▂Spitfire Mk IXc |
| P-39 | ▂P-39K-1 · ▂Pokryshkin's P-39N-0 · ▂P-39Q-15 |
| P-63 | ▂P-63A-5 · ▂P-63A-10 · ▂P-63C-5 |
