Difference between pages "M551" and "IS-7"
(→Pros and cons) (Tag: Visual edit) |
(Edits.) |
||
| Line 1: | Line 1: | ||
| − | {{Specs-Card|code= | + | {{Specs-Card |
| + | |code=ussr_is_7 | ||
| + | |market=IS-7 | ||
| + | }} | ||
== Description == | == Description == | ||
<!--''In the description, the first part needs to be about the history of the creation and combat usage of the vehicle, as well as its key features. In the second part, tell the reader about the ground vehicle in the game. Insert the screenshot of the vehicle. If the novice player does not remember the vehicle by name, they will immediately understand what kind of vehicle it is talking about.''--> | <!--''In the description, the first part needs to be about the history of the creation and combat usage of the vehicle, as well as its key features. In the second part, tell the reader about the ground vehicle in the game. Insert the screenshot of the vehicle. If the novice player does not remember the vehicle by name, they will immediately understand what kind of vehicle it is talking about.''--> | ||
| − | [[File: | + | [[File:GarageImage_{{PAGENAME}}.jpg|420px|thumb|left]] |
{{break}} | {{break}} | ||
| − | The '''{{Specs|name}}''' is a Rank {{Specs|rank}} | + | The '''{{Specs|name}}''' is a gift Rank {{Specs|rank}} Soviet heavy tank {{Battle-rating}}. This tank was introduced in [[Update 1.79 "Project X"]] as the main reward of [[Operation S.U.M.M.E.R.|Operation S.U.M.M.E.R. 2018]]. |
| + | |||
| + | The IS-7 is the culmination of decades of heavy tank development by the USSR, combining distinctive features of previous iterations of the IS series with more modern technology like an assisted loader. The IS-7 is the ultimate 'super-heavy tank', rivalling the Maus and E-100 in pure survivability, with a massive 130mm naval gun. Nigh impenetrable from the front, even with all but the highest penetration HEAT rounds and ATGMs, this behemoth is more than capable of standing its ground at 8.3 when played correctly. | ||
| + | |||
| + | The IS-7 looks quite similar to the [[IS-3]] and [[T-10M]], however due to the assisted loader and much heavier armour, the turret is significantly longer. It has machine guns strewn all over the hull and turret, and a distinctive gun with a perforated cylinder type muzzle brake. Its’ top-mounted 14.5mm KPVT machine gun is on an extremely tall spindle mount. | ||
| + | |||
| + | As with previous IS tanks, the IS-7 should be played at close to medium ranges, as the monstrous short-range power of the gun falls off with range. Unlike previous models, the IS-7 has far fewer issues with flankers, as the majority of its side armour is leagues ahead of what the earlier machines had. The frontal armour is impossible for almost any kinetic round to penetrate, and with very few weak spots it can be frustrating to deal with. The weapon has a fantastic assisted loader, allowing the 130 mm rounds to be loaded in as little as 10 seconds. This newly upsized C-70 cannon (exclusive to the IS-7) only has APCBC and HE rounds, but with 35 mm additional penetration on the BR-482B over the top-tier ammunition from the previous D-25T gun (taking it to a total of 265 mm at 10 meters), an experienced IS driver will be able to deal with the vast majority of enemy vehicles they come up against. | ||
| + | |||
| + | In addition to the formidable armour, the IS-7 has no less than 8 machine guns, a powerful deterrent for any light vehicles that may stray into the path of this machine. To top this off, the IS-7 has a ''significantly'' more powerful engine than previous models, with over 1300 horsepower relieving the acceleration and manoeuvrability issues encountered prior without costing at all in reverse speed or top forward speed. IS-7 drivers should not be deterred by any terrain, as the wide tracks and powerful engine will make quick work of any surface. | ||
| + | |||
| + | The IS-7 should be played as a breakthrough tank, pushing forward to enable team members in lighter vehicles and secure objectives. Beware, however, that it’s not entirely invulnerable and experienced opponents may take advantage of the few small weak points the vehicle has. In addition, some high-calibre HESH rounds (such as the [[FV4005|FV4005]] and [[Conway|Conway]] will have no trouble disabling your vehicle almost regardless of where they land. Always be aware of what you may encounter! | ||
== General info == | == General info == | ||
| Line 12: | Line 25: | ||
''If necessary use a visual template to indicate the most secure and weak zones of the armour.''--> | ''If necessary use a visual template to indicate the most secure and weak zones of the armour.''--> | ||
| − | |||
| − | + | The IS-7's armour is some of the best conventional armour on any vehicle available in War Thunder. However, due to its placement at 8.3 it often faces vehicles that possess weaponry that the thick, conventional steel armour has no hope of stopping: HEAT-FS, ATGMs and APFSDS. While some sections of the vehicle might be resistant to even these, for the most part, these rounds won't struggle to penetrate. | |
| − | * | + | |
| − | * | + | As such, the IS-7's true chances of survivability come from its excellent mobility and the spread-out crew. The ideal use of the IS-7, particularly when facing more modern vehicles, is to use its good mobility to get into an early advantageous position, and from there using its reverse speed to duck in and out of cover. |
| + | |||
| + | Unfortunately, however, the vehicle's limited ammunition load and the sheer size of the rounds result in ammunition being vulnerable, strewn throughout. In fact, penetrating rounds are often more likely to hit one of many ammo racks than they are crew members. | ||
| + | |||
| + | To put it simply: Despite the IS-7's status as a 'heavy tank', it shouldn't be played like earlier heavy tanks, but instead should be played like an early MBT, utilising mobility and reload over armour. | ||
| + | |||
| + | '''Armour type:''' | ||
| + | |||
| + | * Cast homogeneous armour (Turret) | ||
| + | * Rolled homogeneous armour (Hull) | ||
{| class="wikitable" | {| class="wikitable" | ||
|- | |- | ||
| − | ! Armour !! Front (Slope | + | ! Armour !! Front (Slope angle) !! Sides !! Rear !! Roof |
| − | |||
| − | |||
|- | |- | ||
| − | | | + | | Hull || 150 mm || 150 mm ''Top'' <br> 100 mm ''Bottom'' || 60 mm || 5 - 40 mm |
|- | |- | ||
| − | + | | Turret || 101 - 235 mm ''Turret front'' <br> 250 mm ''Gun mantlet'' || 139 - 202 mm || 63 - 179 mm || 30 - 99 mm | |
|- | |- | ||
| − | | Cupola || | + | | Cupola || 30 mm || 30 mm || 30 mm || 30 mm |
|- | |- | ||
|} | |} | ||
'''Notes:''' | '''Notes:''' | ||
| − | * Suspension wheels | + | * Suspension wheels are 20 mm thick, tracks are 30 mm thick, and torsion bars are 60 mm thick. |
| − | |||
| − | |||
=== Mobility === | === Mobility === | ||
<!--''Write about the mobility of the ground vehicle. Estimate the specific power and maneuverability as well as the maximum speed forward and backward.''--> | <!--''Write about the mobility of the ground vehicle. Estimate the specific power and maneuverability as well as the maximum speed forward and backward.''--> | ||
| − | {| class="wikitable" style="text-align:center" | + | {| class="wikitable" style="text-align:center" width="70%" |
| + | ! rowspan="2" | Game Mode | ||
| + | ! colspan="3" | Mobility characteristics | ||
| + | ! colspan="2" | Engine power (horsepower) | ||
| + | ! colspan="2" | Power-to-weight ratio (hp/ton) | ||
|- | |- | ||
| − | ! | + | ! Max Speed |
| + | ! {{Annotation|Weight|Vehicle Weight (Tons)}} | ||
| + | ! {{Annotation|AoA Weight|Add on Armor Weight (Tons)}} | ||
| + | ! Stock | ||
| + | ! Upgraded | ||
| + | ! Stock | ||
| + | ! Upgraded | ||
|- | |- | ||
| − | ! | + | ! Arcade |
| − | + | | 63 || rowspan="2" | 68.0 || rowspan="2" | N/A || 1,356 || 1,669 || 19.94 || 24.54 | |
| − | |||
| − | | | ||
| − | | rowspan="2" | | ||
| − | |||
| − | |||
| − | |||
| − | |||
| − | |||
| − | |||
| − | |||
| − | |||
| − | |||
| − | |||
| − | |||
| − | |||
| − | |||
| − | |||
| − | |||
| − | |||
| − | |||
| − | |||
| − | | | ||
| − | |||
| − | |||
| − | |||
| − | |||
| − | | | ||
| − | | | ||
| − | |||
| − | | | ||
| − | |||
| − | |||
| − | | | ||
|- | |- | ||
| + | ! {{Annotation|Realistic|Simulator uses Realistic FMs}} | ||
| + | | 60 || 929 || 1,050 || 13.66 || 15.44 | ||
|} | |} | ||
| Line 84: | Line 80: | ||
=== Main armament === | === Main armament === | ||
<!--''Give the reader information about the characteristics of the main gun. Assess its effectiveness in a battle based on the reloading speed, ballistics and the power of shells. Do not forget about the flexibility of the fire, that is how quickly the cannon can be aimed at the target, open fire on it and aim at another enemy. Add a link to the main article on the gun: <code><nowiki>{{main|Name of the weapon}}</nowiki></code>. Describe in general terms the ammunition available for the main gun. Give advice on how to use them and how to fill the ammunition storage.''--> | <!--''Give the reader information about the characteristics of the main gun. Assess its effectiveness in a battle based on the reloading speed, ballistics and the power of shells. Do not forget about the flexibility of the fire, that is how quickly the cannon can be aimed at the target, open fire on it and aim at another enemy. Add a link to the main article on the gun: <code><nowiki>{{main|Name of the weapon}}</nowiki></code>. Describe in general terms the ammunition available for the main gun. Give advice on how to use them and how to fill the ammunition storage.''--> | ||
| − | {{main| | + | {{main|C-70 (130 mm)}} |
| − | + | {| class="wikitable" style="text-align:center" width="100%" | |
| − | {| class="wikitable" style="text-align:center | ||
| − | |||
| − | |||
| − | |||
| − | |||
| − | |||
| − | |||
| − | |||
| − | |||
| − | |||
| − | |||
| − | |||
| − | |||
| − | |||
| − | |||
| − | |||
| − | |||
| − | |||
| − | |||
|- | |- | ||
| − | | | + | ! colspan="5" | [[C-70 (130 mm)|130 mm C-70]] || colspan="5" | Turret rotation speed (°/s) || colspan="4" | Reloading rate (seconds) |
|- | |- | ||
| − | + | ! Mode | |
| + | ! Capacity | ||
| + | ! Vertical | ||
| + | ! Horizontal | ||
| + | ! Stabilizer | ||
| + | ! Stock | ||
| + | ! Upgraded | ||
| + | ! Full | ||
| + | ! Expert | ||
| + | ! Aced | ||
| + | ! Stock | ||
| + | ! Full | ||
| + | ! Expert | ||
| + | ! Aced | ||
|- | |- | ||
| − | ! | + | ! ''Arcade'' |
| + | | rowspan="2" | 30 || rowspan="2" | -3°/+15° || rowspan="2" | ±180° || rowspan="2" | N/A || 16.2 || 22.4 || 27.2 || 30.1 || 32.0 || rowspan="2" | 10.00 || rowspan="2" | 10.00 || rowspan="2" | 10.00 || rowspan="2" | 10.00 | ||
|- | |- | ||
| − | ! | + | ! ''Realistic'' |
| − | + | | 11.9 || 14.0 || 17.0 || 18.8 || 20.0 | |
| − | |||
| − | |||
| − | | | ||
| − | | | ||
|- | |- | ||
|} | |} | ||
| Line 136: | Line 123: | ||
! 2000m | ! 2000m | ||
|- | |- | ||
| − | | | + | | BR-482B || APCBC || 311 || 308 || 294 || 276 || 260 || 244 |
| − | |||
| − | |||
| − | |||
| − | |||
|- | |- | ||
| + | | OF-482M || HE || 47 || 47 || 45 || 44 || 43 || 43 | ||
| + | |- | ||
|} | |} | ||
{| class="wikitable sortable" style="text-align:center" width="100%" | {| class="wikitable sortable" style="text-align:center" width="100%" | ||
| − | ! colspan=" | + | ! colspan="11" | Shell details |
|- | |- | ||
! rowspan="2" data-sort-type="text" | Ammunition | ! rowspan="2" data-sort-type="text" | Ammunition | ||
| + | ! rowspan="2" class="unsortable" | Type of <br /> warhead | ||
! rowspan="2" |Velocity <br /> in m/s | ! rowspan="2" |Velocity <br /> in m/s | ||
! rowspan="2" |Projectile<br />Mass in kg | ! rowspan="2" |Projectile<br />Mass in kg | ||
| Line 161: | Line 147: | ||
! 100% | ! 100% | ||
|- | |- | ||
| − | | | + | | BR-482B || APCBC || 900 || 33.3 || 1.2 || 15 || 195.5 || ° || 48° || 63° || 71° |
| − | |||
| − | |||
| − | |||
| − | |||
|- | |- | ||
| + | | OF-482M || HE || 900 || 33.7 || N/A || N/A || 2,650 || +0° || 79° || 80° || 81° | ||
| + | |- | ||
|} | |} | ||
===== [[Ammo racks|Ammo racks]] ===== | ===== [[Ammo racks|Ammo racks]] ===== | ||
| − | |||
{| class="wikitable sortable" style="text-align:center" | {| class="wikitable sortable" style="text-align:center" | ||
|- | |- | ||
| Line 179: | Line 162: | ||
! class="wikitable unsortable" |4th<br /> rack empty | ! class="wikitable unsortable" |4th<br /> rack empty | ||
! class="wikitable unsortable" |5th<br /> rack empty | ! class="wikitable unsortable" |5th<br /> rack empty | ||
| + | ! class="wikitable unsortable" |6th<br /> rack empty | ||
! class="wikitable unsortable" |Visual<br /> discrepancy | ! class="wikitable unsortable" |Visual<br /> discrepancy | ||
|- | |- | ||
| − | || '''30''' || | + | || '''30''' || XX ''(X+)'' || ''(+)'' || ''(+)'' || ''(+)'' || ''(+)'' || ''(+)'' || style="text-align:left" | no |
|- | |- | ||
|} | |} | ||
| Line 187: | Line 171: | ||
=== Machine guns === | === Machine guns === | ||
<!--''Offensive and anti-aircraft machine guns not only allow you to fight some aircraft, but also are effective against lightly armoured vehicles. Evaluate machine guns and give recommendations on its use.''--> | <!--''Offensive and anti-aircraft machine guns not only allow you to fight some aircraft, but also are effective against lightly armoured vehicles. Evaluate machine guns and give recommendations on its use.''--> | ||
| − | {{main| | + | {{main|KPVT (14.5 mm)|RP-46 (7.62 mm)}} |
| − | {| class="wikitable" style="text-align:center" | + | {| class="wikitable" style="text-align:center" width="70%" |
|- | |- | ||
| − | ! colspan=" | + | ! colspan="6" | [[KPVT (14.5 mm)|14.5 mm KPVT]] |
|- | |- | ||
| − | ! | + | ! Mount |
| + | ! Total Ammo | ||
| + | ! Shots per Belt | ||
| + | ! {{Annotation|Fire rate|Shots per minute}} | ||
| + | ! Vertical guidance | ||
| + | ! Horizontal guidance | ||
|- | |- | ||
| − | + | | Pintle || 200 || 50 || 600 || -5°/+85° || ±180° | |
| − | |||
| − | |||
| − | |||
|- | |- | ||
| − | | | + | | Coaxial || 200 || 50 || 600 || colspan="2" | Not Applicable (Fixed) |
|- | |- | ||
|} | |} | ||
| − | {| class="wikitable" style="text-align:center" | + | |
| + | {| class="wikitable" style="text-align:center" width="70%" | ||
| + | |- | ||
| + | ! colspan="6" | [[RP-46 (7.62 mm)|7.62 mm RP-46]] | ||
|- | |- | ||
| − | ! | + | ! Mount |
| + | ! Total Ammo | ||
| + | ! Shots per Belt | ||
| + | ! {{Annotation|Fire rate|Shots per minute}} | ||
| + | ! Vertical guidance | ||
| + | ! Horizontal guidance | ||
|- | |- | ||
| − | + | | Coaxial || 800 || 400 || 600 || colspan="2" | Not Applicable (Fixed) | |
|- | |- | ||
| − | + | | Fixed front || 800 || 400 || 600 || colspan="2" | Not Applicable (Fixed) | |
| − | |||
| − | |||
| − | |||
|- | |- | ||
| − | | colspan=" | + | | Fixed rear || 800 || 400 || 600 || colspan="2" | Not Applicable (Fixed) |
|- | |- | ||
|} | |} | ||
| Line 220: | Line 211: | ||
== Usage in battles == | == Usage in battles == | ||
<!--''Describe the tactics of playing in the vehicle, the features of using vehicles in the team and advice on tactics. Refrain from creating a "guide" - do not impose a single point of view but give the reader food for thought. Describe the most dangerous enemies and give recommendations on fighting them. If necessary, note the specifics of the game in different modes (AB, RB, SB).''--> | <!--''Describe the tactics of playing in the vehicle, the features of using vehicles in the team and advice on tactics. Refrain from creating a "guide" - do not impose a single point of view but give the reader food for thought. Describe the most dangerous enemies and give recommendations on fighting them. If necessary, note the specifics of the game in different modes (AB, RB, SB).''--> | ||
| − | The | + | The IS-7, similarly to the rest of the IS line, should be played as a breakthrough tank, taking advantage of its extreme durability, and avoiding long-range engagements where its shells simply lose effectiveness. With upwards of 450mm of effective armour in places, there’s no need to shy away from taking on almost any opponent. |
| − | + | The IS-7 is capable of destroying almost any machine on the battlefield and should have no qualms about combatting anything on the right terms. However, it’s best to be wary of tanks with ATGMs, high-penetration HEAT, large-calibre HESH and anything with APFSDS, as they are able to disable you, often through your frontal plate. Also be wary of any tanks with two plane stabilisers, as the IS-7s main armament is not stabilised in any way and must be stopped before it can fire accurately. | |
| + | |||
| + | ===Fighting the IS-7=== | ||
| + | [[File:IS7 mantlet weakspot.jpg|thumb|If you don't have any powerful chemical warhead, or just got suddenly attacked by IS-7 point-blank, the highlighted weak spot on the bottom of the turret your only real hope, since you won't have time to look for any others. APDS or other strong shells with the power of ~280 mm should be able to breach the 250 mm thick mantlet bottom even if it's a bit angled, potentially destroying horizontal and vertical turret drives as well as cannon breach. After that you should rush IS-7 down and destroy it ASAP, as it shouldn't be able to use it's gun and turret anymore.]] | ||
| + | '''General tactic''': | ||
| + | |||
| + | It’s best to avoid taking the IS-7 on if it stands any chance of firing back - it’s very likely that if it gets a shot off, it will be able to destroy your vehicle. Try to disable the gun, or if behind or to the sides, attempt to take out the ammo - the primary store is in the back of the turret, with excess ammunition stored in the upper sides of the hull and beside the driver, as well as a small stash right below the gun breech. If forced to engage the IS-7 from the front, attempt to fire through the turret optic (just above and to the right of the gun when looking at the front), as this is your best opportunity to disable the gunner and the breech. Shooting from an angle significantly reduces the amount of effective armour your shells have to penetrate. The IS-7 can be vulnerable to trap shots or high-calibre HE rounds above the driver’s port, although it does have significantly more armour there than the IS-3. Powerful ATGM's can easily breach hull armour and potentially take out 3 crew members, or explode excessive ammo near to tank's front. | ||
| + | |||
| + | '''With 7.* vehicles''': | ||
| + | |||
| + | IS-7 can easily destroy your entire team with little to no effort, so if you see one, you should immediately start planning your attack or escape route. Firstly, if you can't just attack it with your entire squad, you want it to be alone. Secondly, start predicting where it's going to go, so you can get the advantage of the first attack. Some urban environment with enough cover to sneak up on it and enough space to drive around it is perfect. After that, use your tools of choice: | ||
| + | |||
| + | ''Smoke and cannon'': To make this tactic easier, it's best to ask your scout ally (usually light tank) to "Scout" it constantly if they can. Use smoke shells to completely blind IS-7 and get as close to it as possible. Avoid being hit by numerous machine guns, as it will try to use it to detect you or destroy your scout buddy. Do not drive in a straight line after shooting smoke shells. After getting close, it's advisable to drop even more smokes (the hull-mounted ones or the engine exhaust system works perfect, as you don't really have a lot of time), just to make sure that his teammates won't be able to stop you, then try to find out it's rear and set its engine on fire. After that, keep circling around it, setting it on fire and keeping the smoke screen up, or find it's turret's back and destroy the tank with a single well placed shot. | ||
| + | [[File:IS7 takedown.gif|thumb|720x720px|As an example of all the attack methods, we will use this 8.3 battle rating fight. Firstly, IS7 got antagonized by another IS7 and M70A1 (AOS) which counts as '''overkill''' and '''heavy numbers'''. '''SPAA''' used this opening to flank it and break its tracks. Since it's lightly armoured, APHE didn't detonate. IS-7 didn't expect such trickery and didn't even bother to fire its HMG. Being outnumbered 3 to 1, it '''drops''' '''smokes''', which was a mistake, since it only helps IS-7s enemies to get even closer, while SPAA returns to distract it and damage every MG it has, now in range, where it can circle around it safely. By the time that smoke disappeared, IS-7 got damaged by SPAA's teammates, and it finishes the tank off by unloading APDS magazine into the back of the turret point-blank.]] | ||
| + | ''Overkill'': If you are a proud owner of FV4005, Type 60 ATM, Sturmpanzer 2, M50 Ontos, FV 4004 Conway, BMP-1 (AB), and some other vehicles with weapons that have extreme overkill potential (usually at the cost of all the mobility and/or all armour), this is your time to shine. Aim for the weak spots, or simply fire at the left side of the hull (for you it's on the right if the tank is in front of you), depending on your weapon type. If IS-7 has full ammo loadout, it will most definitely explode. In type 60 ATM's case, you can even drop ATGM right on top of its roof or swing it into the side of the turret. Since it's not completely round, unlike most Soviet designs, it has lesser bounce chance. | ||
| + | |||
| + | ''Strength in numbers'': Send someone to bait and stall IS-7, while rest are going to flank or simply rush it down. Despite being nearly invulnerable from the front, it may easily explode, when multiple tanks fire at its '''sides''' at less than 30° angle. Ideally, you want to send something like T95 or another extremely armoured tank as bait (or even another IS-7 in AB), so foe can't simply destroy it without putting an effort, but if there is none such tanks, sacrifices must be made. Unless... | ||
| + | |||
| + | ''Combat SPAA'': This may sound absurd, but IS-7 can easily be doomed by SPAA. SPAA can easily use some cover to attack it's exposed track with cannons, making moving IS-7 topple over, then destroy second track, to immobilize it. Even if IS-7 fires back at it, APHE is going to over-penetrate, if it's armour is less than 15mm. After that, someone can be called in to make a clean side shot (about 170 mm penetration required for sides). In case if SPAA is combat-capable and has APDS shells with 110 mm of penetration, it can try to get behind the turret, while breaking every MG with autocannons, to execute it personally. If IS-7 is aware of your intentions and keeps tracking SPAA with the turret, just set the vehicle on fire by damaging the engine, the foe will have to extinguish the fire eventually or face consequences. | ||
=== Pros and cons === | === Pros and cons === | ||
| Line 228: | Line 237: | ||
'''Pros:''' | '''Pros:''' | ||
| − | * | + | * 130mm BR-482B APCBC round capable of dealing a lot of internal damage - very few tanks will survive a successful penetration |
| − | * | + | * The only Soviet heavy tank to have a 5-man crew, increasing its survivability |
| − | * | + | * Has an assisted loader (which loads a shell every 10 seconds) |
| − | * | + | * Decent turret rotation (16.47° per second with a stock crew, 23.53° per second with a fully upgraded aced crew) |
| − | * | + | * A lot of machine guns; total of two 14.5 mm KPVT's and six 7.62 mm RP-46's that are deadly against open-top vehicles/ lightly armoured vehicles |
| + | * Anti-aircraft 14.5 mm HMG that can rip apart any thin-skinned vehicles (45 mm of penetration at 10 m) | ||
| + | * Impressive armour display with a heavily sloped turret, piked front hull, thick gun mantlet, spaced and sloped side armour | ||
| + | * Can be very difficult to destroy for players who are inexperienced in fighting it | ||
| + | * Good reverse speed and can accelerate backwards rather quickly | ||
| + | * Good acceleration and decent top speed for its weight | ||
| + | * Dominant when facing 7.3/7.7 vehicles | ||
'''Cons:''' | '''Cons:''' | ||
| − | * | + | * Limited maximum ammunition load of 30 rounds |
| − | * | + | * Terrible gun depression and elevation (only -3° depression and 15° elevation) |
| − | * | + | * Shots to the back of the turret will set off the ammo rack located there, this is the first rack of shells which are loaded into the cannon |
| − | * | + | * Often faces 8.7 tanks with stabilisers and APFSDS that can easily penetrate it |
| − | * | + | * The front turret optic is a reasonably easy spot to penetrate from the front, needing ~170 mm penetration |
| − | * | + | * Vulnerable, as with all late heavy tanks, to chemical rounds, ATGMs and late kinetic rounds |
| + | * 20 mm of armour over the engine deck and only 5mm of armour plating over the engine ventilation, meaning planes can often cause engine damage and fires | ||
| + | * It takes a rather long time to replenish shells in the assisted loader, and having an assisted loader means it must reload a shell into the mechanism first before reloading the gun | ||
| + | * Not a lot of ammo for the machine guns, some of the machine guns cannot even reload once they've expended their first ammo belt | ||
| + | * The assisted loader will not complete reloads if the loader is knocked out or replaced by another crew member partway through a reload | ||
== History == | == History == | ||
<!--''Describe the history of the creation and combat usage of the ground vehicle in more detail than in the introduction. If the historical reference turns out to be too big, take it to a separate article, taking a link to an article about the vehicle and adding a block "/ History" (example: <nowiki>https://wiki.warthunder.com/(Vehicle-name)/History</nowiki>) and add a link to it here using the <code>main</code> template. Be sure to reference text and sources by using <code><nowiki><ref></nowiki></code>, as well as adding them at the end of the article.''--> | <!--''Describe the history of the creation and combat usage of the ground vehicle in more detail than in the introduction. If the historical reference turns out to be too big, take it to a separate article, taking a link to an article about the vehicle and adding a block "/ History" (example: <nowiki>https://wiki.warthunder.com/(Vehicle-name)/History</nowiki>) and add a link to it here using the <code>main</code> template. Be sure to reference text and sources by using <code><nowiki><ref></nowiki></code>, as well as adding them at the end of the article.''--> | ||
| − | + | The development of this advanced Soviet heavy tank began in early 1945. Several outstanding scientific groups got involved with the work at once, and the new vehicle was supposed to combine all the latest developments and a great deal of military experience in the design of heavy tanks. After creating several prototypes and experimenting with the engine, armament, and suspension, a steel giant was born and christened Object 260, with the letter designation IS-7. Weighing 68 tons, the heavy tank was equipped with a naval diesel engine that took the monster up to a fantastic 60 km/h. The tank was armed with a powerful 130 mm rifled cannon with mechanized first-order ammo racks and an amazing eight machine guns: two high-calibre 14.5 mm KPVs (one twinned with the cannon and the other an anti-air gun) and six 7.62 mm RP-46 machine guns The armour of the IS-7 is its main feature with high protection value, along with a range of advanced technological solutions, some of which were successfully used on more modern tanks. | |
| − | |||
| − | |||
| − | |||
| − | |||
| − | |||
| − | |||
| − | |||
| − | + | Unfortunately, the tank turned out to be very expensive for a country that was recovering after World War II. Mass production would involve a range of technological problems. In addition, transporting the giant IS-7 was very complex, it required special railroad platforms and the tank’s weight exceeded the maximum load for the majority of Soviet bridges of that time. After the construction of several prototypes and a limited experimental series, the project was closed. | |
| − | + | ''- From [https://warthunder.com/en/news/5657-development-is-7-an-old-school-heavy-tank-en Devblog]'' | |
== Media == | == Media == | ||
| − | |||
| − | |||
| − | == | + | <!-- These 2 big pics --> |
| − | + | <!--IMAGES use: frame="box" or: border="1" rules="groups" --> | |
| − | + | <div class="portale" align="center"> | |
| − | + | {| class="catlist" frame="box" style="background: #efefef;" align="center" | |
| − | ''' | + | | style="text-align:left" |[https://live.warthunder.com/feed/all/?q=#is7| '''Click here to see more!''' You can upload, download and create: custom images, skins, scopes much more on live.warthunder.com] |
| − | + | |- | |
| − | + | |<span style="white-space:nowrap;">[[File:IS7_MEDIA_TEST_IMGV1.png|810px|link=https://live.warthunder.com/feed/all/?q=#is7|]]</span> || | |
| + | |- | ||
| + | |} | ||
| + | </div> | ||
== See also == | == See also == | ||
| Line 281: | Line 294: | ||
* ''encyclopedia page on tank;'' | * ''encyclopedia page on tank;'' | ||
* ''other literature.''--> | * ''other literature.''--> | ||
| − | |||
| − | + | * [https://warthunder.com/en/news/5657-development-is-7-an-old-school-heavy-tank-en [Devblog<nowiki>]</nowiki> IS-7, an old school heavy tank] | |
| − | + | {{USSR heavy tanks}} | |
Revision as of 01:54, 18 October 2019
Contents
Description

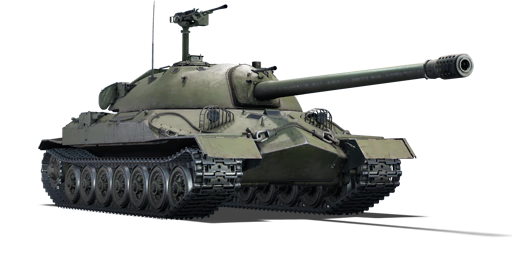
The IS-7 is a gift Rank VI Soviet heavy tank
with a battle rating of 8.3 (AB/RB/SB). This tank was introduced in Update 1.79 "Project X" as the main reward of Operation S.U.M.M.E.R. 2018.
The IS-7 is the culmination of decades of heavy tank development by the USSR, combining distinctive features of previous iterations of the IS series with more modern technology like an assisted loader. The IS-7 is the ultimate 'super-heavy tank', rivalling the Maus and E-100 in pure survivability, with a massive 130mm naval gun. Nigh impenetrable from the front, even with all but the highest penetration HEAT rounds and ATGMs, this behemoth is more than capable of standing its ground at 8.3 when played correctly.
The IS-7 looks quite similar to the IS-3 and T-10M, however due to the assisted loader and much heavier armour, the turret is significantly longer. It has machine guns strewn all over the hull and turret, and a distinctive gun with a perforated cylinder type muzzle brake. Its’ top-mounted 14.5mm KPVT machine gun is on an extremely tall spindle mount.
As with previous IS tanks, the IS-7 should be played at close to medium ranges, as the monstrous short-range power of the gun falls off with range. Unlike previous models, the IS-7 has far fewer issues with flankers, as the majority of its side armour is leagues ahead of what the earlier machines had. The frontal armour is impossible for almost any kinetic round to penetrate, and with very few weak spots it can be frustrating to deal with. The weapon has a fantastic assisted loader, allowing the 130 mm rounds to be loaded in as little as 10 seconds. This newly upsized C-70 cannon (exclusive to the IS-7) only has APCBC and HE rounds, but with 35 mm additional penetration on the BR-482B over the top-tier ammunition from the previous D-25T gun (taking it to a total of 265 mm at 10 meters), an experienced IS driver will be able to deal with the vast majority of enemy vehicles they come up against.
In addition to the formidable armour, the IS-7 has no less than 8 machine guns, a powerful deterrent for any light vehicles that may stray into the path of this machine. To top this off, the IS-7 has a significantly more powerful engine than previous models, with over 1300 horsepower relieving the acceleration and manoeuvrability issues encountered prior without costing at all in reverse speed or top forward speed. IS-7 drivers should not be deterred by any terrain, as the wide tracks and powerful engine will make quick work of any surface.
The IS-7 should be played as a breakthrough tank, pushing forward to enable team members in lighter vehicles and secure objectives. Beware, however, that it’s not entirely invulnerable and experienced opponents may take advantage of the few small weak points the vehicle has. In addition, some high-calibre HESH rounds (such as the FV4005 and Conway will have no trouble disabling your vehicle almost regardless of where they land. Always be aware of what you may encounter!
General info
Survivability and armour
The IS-7's armour is some of the best conventional armour on any vehicle available in War Thunder. However, due to its placement at 8.3 it often faces vehicles that possess weaponry that the thick, conventional steel armour has no hope of stopping: HEAT-FS, ATGMs and APFSDS. While some sections of the vehicle might be resistant to even these, for the most part, these rounds won't struggle to penetrate.
As such, the IS-7's true chances of survivability come from its excellent mobility and the spread-out crew. The ideal use of the IS-7, particularly when facing more modern vehicles, is to use its good mobility to get into an early advantageous position, and from there using its reverse speed to duck in and out of cover.
Unfortunately, however, the vehicle's limited ammunition load and the sheer size of the rounds result in ammunition being vulnerable, strewn throughout. In fact, penetrating rounds are often more likely to hit one of many ammo racks than they are crew members.
To put it simply: Despite the IS-7's status as a 'heavy tank', it shouldn't be played like earlier heavy tanks, but instead should be played like an early MBT, utilising mobility and reload over armour.
Armour type:
- Cast homogeneous armour (Turret)
- Rolled homogeneous armour (Hull)
| Armour | Front (Slope angle) | Sides | Rear | Roof |
|---|---|---|---|---|
| Hull | 150 mm | 150 mm Top 100 mm Bottom |
60 mm | 5 - 40 mm |
| Turret | 101 - 235 mm Turret front 250 mm Gun mantlet |
139 - 202 mm | 63 - 179 mm | 30 - 99 mm |
| Cupola | 30 mm | 30 mm | 30 mm | 30 mm |
Notes:
- Suspension wheels are 20 mm thick, tracks are 30 mm thick, and torsion bars are 60 mm thick.
Mobility
| Game Mode | Mobility characteristics | Engine power (horsepower) | Power-to-weight ratio (hp/ton) | ||||
|---|---|---|---|---|---|---|---|
| Max Speed | Weight | AoA Weight | Stock | Upgraded | Stock | Upgraded | |
| Arcade | 63 | 68.0 | N/A | 1,356 | 1,669 | 19.94 | 24.54 |
| Realistic | 60 | 929 | 1,050 | 13.66 | 15.44 | ||
Armaments
Main armament
| 130 mm C-70 | Turret rotation speed (°/s) | Reloading rate (seconds) | |||||||||||
|---|---|---|---|---|---|---|---|---|---|---|---|---|---|
| Mode | Capacity | Vertical | Horizontal | Stabilizer | Stock | Upgraded | Full | Expert | Aced | Stock | Full | Expert | Aced |
| Arcade | 30 | -3°/+15° | ±180° | N/A | 16.2 | 22.4 | 27.2 | 30.1 | 32.0 | 10.00 | 10.00 | 10.00 | 10.00 |
| Realistic | 11.9 | 14.0 | 17.0 | 18.8 | 20.0 | ||||||||
Ammunition
| Penetration statistics | |||||||
|---|---|---|---|---|---|---|---|
| Ammunition | Type of warhead |
Penetration in mm @ 0° Angle of Attack | |||||
| 10m | 100m | 500m | 1000m | 1500m | 2000m | ||
| BR-482B | APCBC | 311 | 308 | 294 | 276 | 260 | 244 |
| OF-482M | HE | 47 | 47 | 45 | 44 | 43 | 43 |
| Shell details | ||||||||||
|---|---|---|---|---|---|---|---|---|---|---|
| Ammunition | Type of warhead |
Velocity in m/s |
Projectile Mass in kg |
Fuse delay
in m: |
Fuse sensitivity
in mm: |
Explosive Mass in g (TNT equivalent): |
Normalization At 30° from horizontal: |
Ricochet: | ||
| 0% | 50% | 100% | ||||||||
| BR-482B | APCBC | 900 | 33.3 | 1.2 | 15 | 195.5 | ° | 48° | 63° | 71° |
| OF-482M | HE | 900 | 33.7 | N/A | N/A | 2,650 | +0° | 79° | 80° | 81° |
Ammo racks
| Full ammo |
1st rack empty |
2nd rack empty |
3rd rack empty |
4th rack empty |
5th rack empty |
6th rack empty |
Visual discrepancy |
|---|---|---|---|---|---|---|---|
| 30 | XX (X+) | (+) | (+) | (+) | (+) | (+) | no |
Machine guns
| 14.5 mm KPVT | |||||
|---|---|---|---|---|---|
| Mount | Total Ammo | Shots per Belt | Fire rate | Vertical guidance | Horizontal guidance |
| Pintle | 200 | 50 | 600 | -5°/+85° | ±180° |
| Coaxial | 200 | 50 | 600 | Not Applicable (Fixed) | |
| 7.62 mm RP-46 | |||||
|---|---|---|---|---|---|
| Mount | Total Ammo | Shots per Belt | Fire rate | Vertical guidance | Horizontal guidance |
| Coaxial | 800 | 400 | 600 | Not Applicable (Fixed) | |
| Fixed front | 800 | 400 | 600 | Not Applicable (Fixed) | |
| Fixed rear | 800 | 400 | 600 | Not Applicable (Fixed) | |
Usage in battles
The IS-7, similarly to the rest of the IS line, should be played as a breakthrough tank, taking advantage of its extreme durability, and avoiding long-range engagements where its shells simply lose effectiveness. With upwards of 450mm of effective armour in places, there’s no need to shy away from taking on almost any opponent.
The IS-7 is capable of destroying almost any machine on the battlefield and should have no qualms about combatting anything on the right terms. However, it’s best to be wary of tanks with ATGMs, high-penetration HEAT, large-calibre HESH and anything with APFSDS, as they are able to disable you, often through your frontal plate. Also be wary of any tanks with two plane stabilisers, as the IS-7s main armament is not stabilised in any way and must be stopped before it can fire accurately.
Fighting the IS-7

General tactic:
It’s best to avoid taking the IS-7 on if it stands any chance of firing back - it’s very likely that if it gets a shot off, it will be able to destroy your vehicle. Try to disable the gun, or if behind or to the sides, attempt to take out the ammo - the primary store is in the back of the turret, with excess ammunition stored in the upper sides of the hull and beside the driver, as well as a small stash right below the gun breech. If forced to engage the IS-7 from the front, attempt to fire through the turret optic (just above and to the right of the gun when looking at the front), as this is your best opportunity to disable the gunner and the breech. Shooting from an angle significantly reduces the amount of effective armour your shells have to penetrate. The IS-7 can be vulnerable to trap shots or high-calibre HE rounds above the driver’s port, although it does have significantly more armour there than the IS-3. Powerful ATGM's can easily breach hull armour and potentially take out 3 crew members, or explode excessive ammo near to tank's front.
With 7.* vehicles:
IS-7 can easily destroy your entire team with little to no effort, so if you see one, you should immediately start planning your attack or escape route. Firstly, if you can't just attack it with your entire squad, you want it to be alone. Secondly, start predicting where it's going to go, so you can get the advantage of the first attack. Some urban environment with enough cover to sneak up on it and enough space to drive around it is perfect. After that, use your tools of choice:
Smoke and cannon: To make this tactic easier, it's best to ask your scout ally (usually light tank) to "Scout" it constantly if they can. Use smoke shells to completely blind IS-7 and get as close to it as possible. Avoid being hit by numerous machine guns, as it will try to use it to detect you or destroy your scout buddy. Do not drive in a straight line after shooting smoke shells. After getting close, it's advisable to drop even more smokes (the hull-mounted ones or the engine exhaust system works perfect, as you don't really have a lot of time), just to make sure that his teammates won't be able to stop you, then try to find out it's rear and set its engine on fire. After that, keep circling around it, setting it on fire and keeping the smoke screen up, or find it's turret's back and destroy the tank with a single well placed shot.

Overkill: If you are a proud owner of FV4005, Type 60 ATM, Sturmpanzer 2, M50 Ontos, FV 4004 Conway, BMP-1 (AB), and some other vehicles with weapons that have extreme overkill potential (usually at the cost of all the mobility and/or all armour), this is your time to shine. Aim for the weak spots, or simply fire at the left side of the hull (for you it's on the right if the tank is in front of you), depending on your weapon type. If IS-7 has full ammo loadout, it will most definitely explode. In type 60 ATM's case, you can even drop ATGM right on top of its roof or swing it into the side of the turret. Since it's not completely round, unlike most Soviet designs, it has lesser bounce chance.
Strength in numbers: Send someone to bait and stall IS-7, while rest are going to flank or simply rush it down. Despite being nearly invulnerable from the front, it may easily explode, when multiple tanks fire at its sides at less than 30° angle. Ideally, you want to send something like T95 or another extremely armoured tank as bait (or even another IS-7 in AB), so foe can't simply destroy it without putting an effort, but if there is none such tanks, sacrifices must be made. Unless...
Combat SPAA: This may sound absurd, but IS-7 can easily be doomed by SPAA. SPAA can easily use some cover to attack it's exposed track with cannons, making moving IS-7 topple over, then destroy second track, to immobilize it. Even if IS-7 fires back at it, APHE is going to over-penetrate, if it's armour is less than 15mm. After that, someone can be called in to make a clean side shot (about 170 mm penetration required for sides). In case if SPAA is combat-capable and has APDS shells with 110 mm of penetration, it can try to get behind the turret, while breaking every MG with autocannons, to execute it personally. If IS-7 is aware of your intentions and keeps tracking SPAA with the turret, just set the vehicle on fire by damaging the engine, the foe will have to extinguish the fire eventually or face consequences.
Pros and cons
Pros:
- 130mm BR-482B APCBC round capable of dealing a lot of internal damage - very few tanks will survive a successful penetration
- The only Soviet heavy tank to have a 5-man crew, increasing its survivability
- Has an assisted loader (which loads a shell every 10 seconds)
- Decent turret rotation (16.47° per second with a stock crew, 23.53° per second with a fully upgraded aced crew)
- A lot of machine guns; total of two 14.5 mm KPVT's and six 7.62 mm RP-46's that are deadly against open-top vehicles/ lightly armoured vehicles
- Anti-aircraft 14.5 mm HMG that can rip apart any thin-skinned vehicles (45 mm of penetration at 10 m)
- Impressive armour display with a heavily sloped turret, piked front hull, thick gun mantlet, spaced and sloped side armour
- Can be very difficult to destroy for players who are inexperienced in fighting it
- Good reverse speed and can accelerate backwards rather quickly
- Good acceleration and decent top speed for its weight
- Dominant when facing 7.3/7.7 vehicles
Cons:
- Limited maximum ammunition load of 30 rounds
- Terrible gun depression and elevation (only -3° depression and 15° elevation)
- Shots to the back of the turret will set off the ammo rack located there, this is the first rack of shells which are loaded into the cannon
- Often faces 8.7 tanks with stabilisers and APFSDS that can easily penetrate it
- The front turret optic is a reasonably easy spot to penetrate from the front, needing ~170 mm penetration
- Vulnerable, as with all late heavy tanks, to chemical rounds, ATGMs and late kinetic rounds
- 20 mm of armour over the engine deck and only 5mm of armour plating over the engine ventilation, meaning planes can often cause engine damage and fires
- It takes a rather long time to replenish shells in the assisted loader, and having an assisted loader means it must reload a shell into the mechanism first before reloading the gun
- Not a lot of ammo for the machine guns, some of the machine guns cannot even reload once they've expended their first ammo belt
- The assisted loader will not complete reloads if the loader is knocked out or replaced by another crew member partway through a reload
History
The development of this advanced Soviet heavy tank began in early 1945. Several outstanding scientific groups got involved with the work at once, and the new vehicle was supposed to combine all the latest developments and a great deal of military experience in the design of heavy tanks. After creating several prototypes and experimenting with the engine, armament, and suspension, a steel giant was born and christened Object 260, with the letter designation IS-7. Weighing 68 tons, the heavy tank was equipped with a naval diesel engine that took the monster up to a fantastic 60 km/h. The tank was armed with a powerful 130 mm rifled cannon with mechanized first-order ammo racks and an amazing eight machine guns: two high-calibre 14.5 mm KPVs (one twinned with the cannon and the other an anti-air gun) and six 7.62 mm RP-46 machine guns The armour of the IS-7 is its main feature with high protection value, along with a range of advanced technological solutions, some of which were successfully used on more modern tanks.
Unfortunately, the tank turned out to be very expensive for a country that was recovering after World War II. Mass production would involve a range of technological problems. In addition, transporting the giant IS-7 was very complex, it required special railroad platforms and the tank’s weight exceeded the maximum load for the majority of Soviet bridges of that time. After the construction of several prototypes and a limited experimental series, the project was closed.
- From Devblog
Media
See also
Links to the articles on the War Thunder Wiki that you think will be useful for the reader, for example:
- reference to the series of the vehicles;
- links to approximate analogues of other nations and research trees.
External links
| USSR heavy tanks | |
|---|---|
| KV-1 | KV-1 (L-11) · KV-1 (ZiS-5) · KV-1E · KV-1S |
| KV-2 | KV-2 (1939) · KV-2 (1940) · KV-2 (ZiS-6) |
| Other KVs | KV-85 · KV-122 · KV-220 |
| IS-1/2 | IS-1 · IS-2 · IS-2 (1944) · IS-2 No.321 · IS-2 "Revenge" · Object 248 |
| Other IS tanks | IS-3 · IS-4M · IS-6 · IS-7 |
| T-10 | T-10A · T-10M |
| Multi-turreted | T-35 · SMK |
| Other | Object 279 |
| Lend-Lease | ▂MK-II "Matilda" |
