Difference between pages "M15 CGMC" and "T-80"
Inceptor57 (talk | contribs) m (→Machine guns) |
Colok76286 (talk | contribs) (→Media: Added video) |
||
| Line 1: | Line 1: | ||
| − | {{Specs-Card|code= | + | {{Specs-Card|code=ussr_t_80}} |
| + | {{About | ||
| + | | about = Soviet light tank '''{{PAGENAME}}''' | ||
| + | | usage = the Main Battle Tank with similar designation | ||
| + | | link = T-80B | ||
| + | }} | ||
== Description == | == Description == | ||
| − | <!--''In the description, the first part | + | <!-- ''In the description, the first part should be about the history of the creation and combat usage of the vehicle, as well as its key features. In the second part, tell the reader about the ground vehicle in the game. Insert a screenshot of the vehicle, so that if the novice player does not remember the vehicle by name, he will immediately understand what kind of vehicle the article is talking about.'' --> |
| − | [[File: | + | [[File:GarageImage_{{PAGENAME}}.jpg|420px|thumb|left]] |
| − | {{ | + | {{Break}} |
| − | The ''' | + | The '''{{Specs|name}}''' is a rank {{Specs|rank}} Soviet light tank {{Battle-rating}}. It was introduced during the Closed Beta Test for Ground Forces before Update 1.41. An upgrade over the [[T-70]], the T-80 introduces better armour and an extra crew member to increase the tank's survivability in the battlefield. |
| − | + | Just like the previous [[T-70]], the T-80 boasts strong frontal armour and high mobility in a compact package. However, several notable upgrades are present. These upgrades include an increased crew count, fire rate, and cannon traverse range. The only downsides are that turret armour is reduced, and a somewhat large shot trap now exists all around the turret. | |
| − | |||
| − | |||
| − | |||
| − | |||
| − | |||
| − | |||
== General info == | == General info == | ||
=== Survivability and armour === | === Survivability and armour === | ||
| − | <!--''Describe armour protection. Note the most well protected and key weak areas. Appreciate the layout of modules as well as the number and location of crew members. Is the level of armour protection sufficient, is the placement of modules | + | <!-- ''Describe armour protection. Note the most well protected and key weak areas. Appreciate the layout of modules as well as the number and location of crew members. Is the level of armour protection sufficient, is the placement of modules helpful for survival in combat? If necessary use a visual template to indicate the most secure and weak zones of the armour.'' --> |
| + | '''Armour type:''' | ||
| + | |||
| + | * Rolled homogeneous armour | ||
| + | * Cast homogeneous armour (Gun mantlet) | ||
| − | |||
| − | |||
| − | |||
{| class="wikitable" | {| class="wikitable" | ||
|- | |- | ||
| − | ! Armour !! Front | + | ! Armour !! Front !! Sides !! Rear !! Roof |
| − | |||
| − | |||
|- | |- | ||
| − | | | + | | Hull || 35 mm (62°) ''Front glacis'' <br> 35 mm (33-71°) ''Driver's port'' <br> 45 mm (31°) ''Lower glacis''|| 25 mm || 15 mm (70°) ''Top'' <br> 25 mm (43°) ''Bottom'' || 15 mm |
|- | |- | ||
| + | | Turret || 35 mm (4-67°) ''Turret front'' <br> 45 mm (12-59°) ''Gun mantlet'' || 35 mm (6-23°) || 35 mm (28°) || 15 mm | ||
|} | |} | ||
| + | '''Notes:''' | ||
| − | + | * Suspension wheels are 10 mm thick while tracks are 15 mm thick. | |
=== Mobility === | === Mobility === | ||
| − | <!--''Write about the mobility of the ground vehicle. Estimate the specific power and | + | <!-- ''Write about the mobility of the ground vehicle. Estimate the specific power and manoeuvrability, as well as the maximum speed forwards and backwards.'' --> |
| − | {| | + | |
| − | + | {{tankMobility|abMinHp= 263|rbMinHp= 150}} | |
| − | |||
| − | |||
| − | |||
| − | |||
| − | |||
| − | |||
| − | |||
| − | |||
| − | |||
| − | |||
| − | |||
| − | |||
| − | |||
| − | |||
| − | |||
| − | |||
| − | |||
| − | |||
| − | |||
| − | |||
| − | |||
| − | |||
| − | |||
| − | |||
| − | |||
| − | |||
| − | |||
| − | |||
| − | |||
| − | |||
| − | |||
| − | |||
| − | |||
| − | |||
| − | |||
| − | |||
| − | |||
| − | |||
| − | |||
== Armaments == | == Armaments == | ||
| − | |||
=== Main armament === | === Main armament === | ||
| − | <!--''Give the reader information about the characteristics of the main gun. Assess its effectiveness in a battle based on the reloading speed, ballistics and the power of shells. Do not forget about the | + | <!-- ''Give the reader information about the characteristics of the main gun. Assess its effectiveness in a battle based on the reloading speed, ballistics and the power of shells. Do not forget about the flexibility of the fire, that is how quickly the cannon can be aimed at the target, open fire on it and aim at another enemy. Add a link to the main article on the gun: <code><nowiki>{{main|Name of the weapon}}</nowiki></code>. Describe in general terms the ammunition available for the main gun. Give advice on how to use them and how to fill the ammunition storage.'' --> |
| − | {{main| | + | {{main|20-K (45 mm)}}The T-80 has an adequate cannon for its BR. Stock round BR-240 has a maximum penetration of 70 mm. Combined with the 29 g TNT, it is almost certain that the T-80 will one-shot most tank upon penetration. Even at more than 500 m away from the target, it still has 40-50 mm of penetration which is still enough to go through a lot of light tanks' armour. The 3.3 second reload (stock) is one of the fastest reload time for non-automatic guns, allowing the player to quickly fire more shells if the first shot didn't kill. The tank has 8 degrees of gun depression which is enough for most terrain. At 2.3 BR, facing heavily armored tanks becomes a common thing, so the player should get comfortable with using the BR-240P APCR which penetrates more but lacks damage. |
| − | {| class="wikitable" style="text-align:center | + | |
| − | + | {| class="wikitable" style="text-align:center" width="100%" | |
| − | |||
| − | |||
| − | |||
| − | |||
| − | |||
| − | |||
| − | |||
| − | |||
| − | |||
|- | |- | ||
| − | ! colspan=" | + | ! colspan="5" | [[20-K (45 mm)|45 mm 20-K]] || colspan="5" | Turret rotation speed (°/s) || colspan="4" | Reloading rate (seconds) |
|- | |- | ||
| − | ! | + | ! Mode !! Capacity !! Vertical !! Horizontal !! Stabilizer |
| − | ! | + | ! Stock !! Upgraded !! Full !! Expert !! Aced |
| − | ! | + | ! Stock !! Full !! Expert !! Aced |
| − | ! | ||
| − | ! | ||
| − | ! | ||
|- | |- | ||
| − | + | ! ''Arcade'' | |
| + | | rowspan="2" | 94 || rowspan="2" | -8°/+65° || rowspan="2" | ±180° || rowspan="2" | N/A ||5.71||7.91||9.60||10.62||11.29|| rowspan="2" |3.25|| rowspan="2" |2.87|| rowspan="2" |2.65|| rowspan="2" |2.5 | ||
|- | |- | ||
| − | + | ! ''Realistic'' | |
| − | + | |3.57||4.2||5.10||5.64||6.0 | |
| − | |||
| − | |||
| − | |||
| − | |||
| − | |||
| − | |||
| − | | | ||
| − | |||
|- | |- | ||
|} | |} | ||
| − | + | ==== Ammunition ==== | |
{| class="wikitable sortable" style="text-align:center" width="100%" | {| class="wikitable sortable" style="text-align:center" width="100%" | ||
! colspan="8" | Penetration statistics | ! colspan="8" | Penetration statistics | ||
|- | |- | ||
! rowspan="2" data-sort-type="text" | Ammunition | ! rowspan="2" data-sort-type="text" | Ammunition | ||
| − | ! rowspan="2 | + | ! rowspan="2" | Type of<br>warhead |
| − | ! colspan="6" | '''Penetration | + | ! colspan="6" | '''Penetration @ 0° Angle of Attack (mm)''' |
| + | |- | ||
| + | ! 10 m !! 100 m !! 500 m !! 1,000 m !! 1,500 m !! 2,000 m | ||
| + | |- | ||
| + | | BR-240 || APHEBC || 70 || 68 || 59 || 50 || 42 || 35 | ||
|- | |- | ||
| − | + | | BR-240P || APCR || 106 || 99 || 72 || 49 || 33 || 23 | |
| − | |||
| − | |||
| − | |||
| − | |||
| − | |||
|- | |- | ||
| − | | | + | | BR-240SP || AP || 73 || 71 || 62 || 52 || 44 || 37 |
|- | |- | ||
| − | | | + | | O-243 || HE || 4 || 4 || 4 || 4 || 4 || 4 |
|- | |- | ||
|} | |} | ||
{| class="wikitable sortable" style="text-align:center" width="100%" | {| class="wikitable sortable" style="text-align:center" width="100%" | ||
| − | ! colspan=" | + | ! colspan="10" | Shell details |
|- | |- | ||
! rowspan="2" data-sort-type="text" | Ammunition | ! rowspan="2" data-sort-type="text" | Ammunition | ||
| − | ! rowspan="2 | + | ! rowspan="2" | Type of<br>warhead |
| − | ! rowspan="2" |Velocity <br | + | ! rowspan="2" | Velocity<br>(m/s) |
| − | ! rowspan="2" |Projectile<br | + | ! rowspan="2" | Projectile<br>Mass (kg) |
| − | ! rowspan="2" | | + | ! rowspan="2" | Fuse delay<br>(m) |
| − | + | ! rowspan="2" | Fuse sensitivity<br>(mm) | |
| − | ! rowspan="2" | | + | ! rowspan="2" | Explosive Mass<br>(TNT equivalent) (g) |
| − | + | ! colspan="3" | Ricochet | |
| − | ! rowspan="2" | | ||
| − | |||
| − | ! colspan="3" | | ||
|- | |- | ||
| − | ! 0% | + | ! 0% !! 50% !! 100% |
| − | ! 50% | ||
| − | ! 100% | ||
|- | |- | ||
| − | | | + | | BR-240 || APHEBC || 760 || 1.43 || 1.2 || 9.0 || 29.26 || 48° || 63° || 71° |
|- | |- | ||
| − | | | + | | BR-240P || APCR || 1,070 || 0.85 || N/A || N/A || N/A || 66° || 70° || 72° |
| + | |- | ||
| + | | BR-240SP || AP || 757 || 1.43 || N/A || N/A || N/A || 47° || 60° || 65° | ||
| + | |- | ||
| + | | O-243 || HE || 343 || 2.15 || 0.4 || 0.3 || 118 || 79° || 80° || 81° | ||
|- | |- | ||
|} | |} | ||
| − | + | ==== [[Ammo racks]] ==== | |
| − | + | {| class="wikitable" style="text-align:center" | |
| − | {|class="wikitable" | ||
| − | |||
|- | |- | ||
| − | + | ! Full<br>ammo | |
| + | ! 1st<br>rack empty | ||
| + | ! 2nd<br>rack empty | ||
| + | ! 3rd<br>rack empty | ||
| + | ! 4th<br>rack empty | ||
| + | ! 5th<br>rack empty | ||
| + | ! 6th<br>rack empty | ||
| + | ! 7th<br>rack empty | ||
| + | ! 8th<br>rack empty | ||
| + | ! Visual<br>discrepancy | ||
|- | |- | ||
| − | | | + | | '''94''' || 85 ''(+9)'' || 75 ''(+19)'' || 63 ''(+31)'' || 51 ''(+43)'' || 39 ''(+55)'' || 27 ''(+67)'' || 15 ''(+79)'' || 1 ''(+93)'' || No |
|- | |- | ||
| − | |||
|} | |} | ||
| + | [[File:Ammoracks_{{PAGENAME}}.png|right|thumb|x250px|[[Ammo racks]] of the {{PAGENAME}}]] | ||
| + | Notes: | ||
| + | |||
| + | * To go into battle with the turret empty of ammo, pack 75 ''(+19)'' shells (racks 1 and 2 emptied). | ||
| + | * Racks disappear after you've fired all shells in the rack. | ||
=== Machine guns === | === Machine guns === | ||
| − | <!--''Offensive and anti-aircraft machine guns not only allow you to fight some aircraft | + | <!-- ''Offensive and anti-aircraft machine guns not only allow you to fight some aircraft but also are effective against lightly armoured vehicles. Evaluate machine guns and give recommendations on its use.'' --> |
| − | {{main| | + | {{main|DT (7.62 mm)}} |
{| class="wikitable" style="text-align:center" | {| class="wikitable" style="text-align:center" | ||
|- | |- | ||
| − | ! colspan=" | + | ! colspan="5" | [[DT (7.62 mm)|7.62 mm DT]] |
|- | |- | ||
| − | ! | + | ! Mount |
| + | ! Capacity<br>(Belt capacity) | ||
| + | ! Rate of fire<br>(shots/minute) | ||
| + | ! Vertical<br>guidance | ||
| + | ! Horizontal<br>guidance | ||
|- | |- | ||
| − | + | | Coaxial || 1,071 (63) || 600 || N/A || N/A | |
| − | |||
| − | |||
| − | |||
| − | |||
| − | |||
|- | |- | ||
|} | |} | ||
| − | == | + | == Usage in battles == |
| − | + | <!-- ''Describe the tactics of playing in the vehicle, the features of using vehicles in the team and advice on tactics. Refrain from creating a "guide" - do not impose a single point of view but instead give the reader food for thought. Describe the most dangerous enemies and give recommendations on fighting them. If necessary, note the specifics of the game in different modes (AB, RB, SB).'' --> | |
| − | + | The T-80 is a little different from most light tanks. Like all light tanks, it has excellent speed and mobility. Unlike most light tanks it has great, sloped frontal armour and good turret armour, making it highly resistant to most tier 1 gun. Pair this with its fast firing 45mm gun and it becomes an excellent vehicle for hunting lightly armoured foes. The addition of APCR allows you to fight more heavily armoured vehicles. You may come across Matilda and Valentine tanks, which are highly resistant to the APHEBC round but can be more easily penetrated by the APCR (at the expense of less damage). | |
| − | + | ||
| − | + | In order to take full advantage of this tank's strengths, you should aim to use one of two distinct tactical options. Option one is to operate as a frontline tank in urban combat. Your frontal armour is of great use here. However, this strategy should be avoided if you are not near or at the top of this tank's matchmaking range. The other option is to work as a flanking tank. Your gun is more than capable in this role, and unlike most flanking role tanks, the surprise isn't always necessary for survival. Thanks to your strong frontal armour, you can do well under incoming fire if your attempt at flanking is discovered, or if your opponent is determined to survive and providing stiff resistance. Few tanks offer the level of flexibility in terms of combat approach that is granted to the T-80. | |
| − | + | ||
| − | + | When taking the tank into battle, a mix of APHEBC and APCR is favourable. The BR-240 AP shells against flanked opponents and structural weaknesses (e.g. [[Pz.IV E]] turret), while the BR-240P APCR role is for close range combat (<400m, due blunt nose cone) and engaging heavy armoured box tanks, especially the [[M3 Lee]], [[StuG III A|StuG]] and up-armoured [[T-28E]]. As usual, having a few rounds of pure HE is great against any [[:Category:Anti-aircraft_vehicles|SPAAG]]. | |
| − | + | ||
| − | + | In battle, you must beware of some of the high calibre guns found at the tier. Tank destroyers such as the [[Panzerjager I|Panzerjäger I]], [[M3 GMC]] and the Japanese [[Ho-Ni III]] will all be able to take the T-80 out easily. SPGs armed with howitzer type guns like the Type 4 [[Ho-Ro]] also pose a high threat. Also, beware German vehicles armed with the long barreled 50 mm gun, like the [[Pz.III J]] and [[Sd.Kfz.234/2]] Puma. The best way to play the T-80 is to use it as a light tank. Do not be overconfident. Avoid direct combat and assume that enemy tanks will be able to penetrate you. Attacking from an advantageous position will allow your tanks great armour and gun to shine. | |
| − | + | ||
| − | + | === Modules === | |
| − | + | {| class="wikitable" | |
| − | + | ! Tier | |
| − | + | ! colspan="2" | Mobility | |
| − | + | ! Protection | |
| − | + | ! colspan="3" | Firepower | |
| − | | I | ||
| − | |||
| − | |||
| − | |||
| − | |||
| − | |||
| − | |||
| − | |||
| − | |||
| − | |||
| − | |||
| − | |||
| − | |||
| − | ! | ||
| − | |||
| − | ! | ||
| − | |||
| − | |||
| − | ! | ||
| − | ! colspan="3" | | ||
|- | |- | ||
| − | + | | I | |
| − | + | | Tracks | |
| − | + | | | |
| + | | Parts | ||
| + | | BR-240SP | ||
| + | | Horizontal Drive | ||
| + | | | ||
|- | |- | ||
| − | | | + | | II |
| + | | Suspension | ||
| + | | Brake System | ||
| + | | FPE | ||
| + | | | ||
| + | | Adjustment of Fire | ||
| + | | Airstrike | ||
|- | |- | ||
| − | | | + | | III |
| + | | Filters | ||
| + | | | ||
| + | | Crew Replenishment | ||
| + | | BR-240P | ||
| + | | Elevation Mechanism | ||
| + | | | ||
|- | |- | ||
| − | | | + | | IV |
| + | | Transmission | ||
| + | | Engine | ||
| + | | | ||
| + | | Artillery Support | ||
| + | | Improved optics | ||
| + | | | ||
|- | |- | ||
| − | |||
| − | |||
|} | |} | ||
| − | + | The T-80 is damaged very easily, and as such, having the "parts" modification should be the first priority. After that, researching AP and APCR rounds is very useful, since it allows the tanker to be much more of a threat to well-armoured opponents, being much more versatile. | |
| − | |||
| − | |||
| − | |||
| − | |||
| − | |||
| − | |||
| − | |||
| − | |||
| − | |||
| − | |||
| − | |||
| − | === | + | === Pros and cons === |
| − | + | <!-- ''Summarise and briefly evaluate the vehicle in terms of its characteristics and combat effectiveness. Mark its pros and cons in a bulleted list. Try not to use more than 6 points for each of the characteristics. Avoid using categorical definitions such as "bad", "good" and the like - use substitutions with softer forms such as "inadequate" and "effective".'' --> | |
| − | |||
| − | |||
| − | |||
| − | |||
| − | |||
| − | |||
| − | |||
| − | |||
| − | |||
| − | |||
| − | |||
| − | |||
| − | |||
| − | |||
| − | |||
| − | + | '''Pros:''' | |
| − | |||
| − | |||
| − | + | * Fastest reload speed in the game for a non-automated cannon | |
| − | + | * Small target | |
| + | * Co-axial MG suitable against unarmoured vehicles | ||
| + | * Capability to shoot APCR rounds | ||
| + | * Frontal turret and hull armour is surprisingly good, and can easily bounce shots from same Br opponents | ||
| + | * First Soviet light tank to feature more than two crew, meaning you can now afford to lose a crew member | ||
| + | * Awesome vertical traverse limit of 65°, allows for some anti-air potential, though it is unreliable in this role | ||
| + | * Some guns will really struggle to penetrate your armour at this tier. Japanese 37/57 mm and other 45 mm guns (without APCR) pose very little threat. | ||
| + | * Often underestimated. Many players will aim poorly and their shells will ricochet | ||
| + | * Ability to scout in low rank | ||
| − | + | '''Cons:''' | |
| − | + | * Very slow traverse speed for turret (hand cranked) | |
| − | + | * Slow gun elevation speed | |
| − | + | * Front shot trap, although decently protected, is a serious weak point | |
| − | * | + | * Low calibre gun |
| − | * | + | * Easily damaged by careless driving |
| − | + | * Gun is inaccurate at long range. | |
| − | + | * Tank wobbles when you stop, meaning you will have to wait a few seconds before you can fire accurately. | |
| − | + | * Easily one-shotted due to the small crew number | |
| − | |||
| − | * Low | ||
| − | |||
| − | * | ||
| − | * | ||
| − | * | ||
| − | |||
| − | * | ||
| − | |||
== History == | == History == | ||
| − | <!--''Describe the history of the creation and combat usage of the | + | <!-- ''Describe the history of the creation and combat usage of the vehicle in more detail than in the introduction. If the historical reference turns out to be too long, take it to a separate article, taking a link to the article about the vehicle and adding a block "/History" (example: <nowiki>https://wiki.warthunder.com/(Vehicle-name)/History</nowiki>) and add a link to it here using the <code>main</code> template. Be sure to reference text and sources by using <code><nowiki><ref></ref></nowiki></code>, as well as adding them at the end of the article with <code><nowiki><references /></nowiki></code>. This section may also include the vehicle's dev blog entry (if applicable) and the in-game encyclopedia description (under <code><nowiki>=== In-game description ===</nowiki></code>, also if applicable).'' --> |
| − | === | + | The '''T-80''' light tank was a redesign of the [[T-70]] light tank in an attempt to make the design relevant again. |
| − | |||
| − | + | During World War II, the concept of the light tank was deemed obsolete, they were too lightly armoured, too lightly armed, and sometimes don't go that much faster than the 1940s medium tank designs which had better armour and guns. Plus, the smaller profile of the tank meant that the crew are not necessarily given enough comfort room and the constraint would force turret design to be a one or two-man turret, restricting the commander to perform other duties as well. | |
| − | + | The T-80 tried to remedy this by giving the tank more armour and a two-man turret so the commander could coordinate more efficiently than the one-man turret on the T-70. However, the role of the light tank in the Soviet Union could be fulfilled by the incoming supplies of Lend-Lease equipment available from Britain and America in the form of [[M3 Stuart]]s and [[Valentine Mk I|Valentine]] tanks, which are better than the T-70 and T-80 designs. In October of 1943, the light tank production were all cancelled, resulting in only 120 T-80s being produced in its brief production life. | |
| − | The | ||
| − | + | === In-game description === | |
| + | This tank was created based on the T-70M, with the aim of eliminating its main flaws. | ||
| − | + | An analysis of the use of this tank in battle showed that a tank equipped with a cannon needs more than two crew members: the tank commander had to fulfill the role of both a driver and a loader, which negatively affected the tank's manoeuvrability and firing rate in battle. In addition, the constantly developing array of anti-tank weapons meant that stronger armour was required. So in 1943, the GAZ design bureau developed the new T-80 light tank with stronger armour and a three-man crew. One of the tank's key elements was its 45 mm cannon's high angle of fire. To allow for high-angle firing, e.g. during battles in urban conditions, the tank was equipped with a K-8T collimator sight. This sight provided the ability to fire at both air and ground targets. | |
| + | |||
| + | By September 1943, factory No. 40 in the town of Mytishchi had produced 81 vehicles of this type in total. | ||
| + | |||
| + | The T-80 tank had an assembly typical of Soviet-produced light tanks. The transmission compartment was located at the front, and the engine at the back. This caused increased vulnerability, since it was the front of the tank that was most often subjected to fire from the enemy. The T-80's fuel tanks were located outside of the fighting compartment in an armoured partition, which reduced the risk of a hit starting a fire. This arrangement increased the survivability of the tank's crew. | ||
| + | |||
| + | The tank's effectivity in combat was reduced by the unreliability of its high-powered engines and its low mobility due to its increased weight. | ||
| + | |||
| + | The new vehicles entered service in self-propelled artillery regiments as command tanks and were used until 1945. | ||
== Media == | == Media == | ||
| − | [ | + | <!-- ''Excellent additions to the article would be video guides, screenshots from the game, and photos.'' --> |
| + | ;Skins | ||
| + | * [https://live.warthunder.com/feed/camouflages/?vehicleCountry=ussr&vehicleType=tank&vehicleClass=light_tank&vehicle=ussr_t_80 Skins and camouflages for the {{PAGENAME}} from live.warthunder.com.] | ||
| + | |||
| + | ;Videos | ||
| + | {{Youtube-gallery|EEZYLCusQo8|'''T-80 Tank Review''' - ''NUSensei''}} | ||
| + | |||
| + | == See also == | ||
| + | <!-- ''Links to the articles on the War Thunder Wiki that you think will be useful for the reader, for example:'' | ||
| + | * ''reference to the series of the vehicles;'' | ||
| + | * ''links to approximate analogues of other nations and research trees.'' --> | ||
| + | ;Vehicles equipped with the same chassis | ||
| + | * [[T-60]] | ||
| + | * [[T-70]] | ||
| + | * [[ZUT-37]] | ||
| − | + | ;Vehicles equipped with the same gun | |
| − | [ | + | * [[T-26 (Family)]] |
| + | * [[BT-5]] / [[BT-7]] | ||
| + | * [[T-50]] / [[T-126]] | ||
| − | == | + | == External links == |
''Paste links to sources and external resources, such as:'' | ''Paste links to sources and external resources, such as:'' | ||
| + | |||
* ''topic on the official game forum;'' | * ''topic on the official game forum;'' | ||
| + | * ''encyclopedia page on the tank;'' | ||
* ''other literature.'' | * ''other literature.'' | ||
| − | {{ | + | {{USSR light tanks}} |
Revision as of 22:12, 3 August 2020
Contents
| This page is about the Soviet light tank T-80. For the Main Battle Tank with similar designation, see T-80B. |
Description

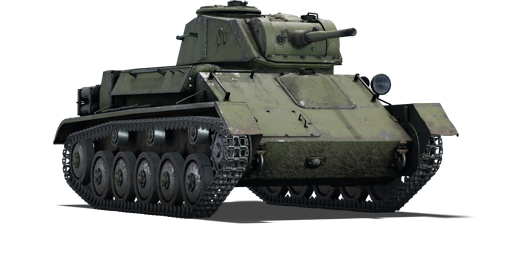
The T-80 is a rank II Soviet light tank
with a battle rating of 2.0 (AB) and 2.3 (RB/SB). It was introduced during the Closed Beta Test for Ground Forces before Update 1.41. An upgrade over the T-70, the T-80 introduces better armour and an extra crew member to increase the tank's survivability in the battlefield.
Just like the previous T-70, the T-80 boasts strong frontal armour and high mobility in a compact package. However, several notable upgrades are present. These upgrades include an increased crew count, fire rate, and cannon traverse range. The only downsides are that turret armour is reduced, and a somewhat large shot trap now exists all around the turret.
General info
Survivability and armour
Armour type:
- Rolled homogeneous armour
- Cast homogeneous armour (Gun mantlet)
| Armour | Front | Sides | Rear | Roof |
|---|---|---|---|---|
| Hull | 35 mm (62°) Front glacis 35 mm (33-71°) Driver's port 45 mm (31°) Lower glacis |
25 mm | 15 mm (70°) Top 25 mm (43°) Bottom |
15 mm |
| Turret | 35 mm (4-67°) Turret front 45 mm (12-59°) Gun mantlet |
35 mm (6-23°) | 35 mm (28°) | 15 mm |
Notes:
- Suspension wheels are 10 mm thick while tracks are 15 mm thick.
Mobility
| Game Mode | Max Speed (km/h) | Weight (tons) | Engine power (horsepower) | Power-to-weight ratio (hp/ton) | |||
|---|---|---|---|---|---|---|---|
| Forward | Reverse | Stock | Upgraded | Stock | Upgraded | ||
| Arcade | 51 | 7 | 11.6 | 263 | 324 | 22.67 | 27.93 |
| Realistic | 46 | 6 | 150 | 170 | 12.93 | 14.66 | |
Armaments
Main armament
The T-80 has an adequate cannon for its BR. Stock round BR-240 has a maximum penetration of 70 mm. Combined with the 29 g TNT, it is almost certain that the T-80 will one-shot most tank upon penetration. Even at more than 500 m away from the target, it still has 40-50 mm of penetration which is still enough to go through a lot of light tanks' armour. The 3.3 second reload (stock) is one of the fastest reload time for non-automatic guns, allowing the player to quickly fire more shells if the first shot didn't kill. The tank has 8 degrees of gun depression which is enough for most terrain. At 2.3 BR, facing heavily armored tanks becomes a common thing, so the player should get comfortable with using the BR-240P APCR which penetrates more but lacks damage.| 45 mm 20-K | Turret rotation speed (°/s) | Reloading rate (seconds) | |||||||||||
|---|---|---|---|---|---|---|---|---|---|---|---|---|---|
| Mode | Capacity | Vertical | Horizontal | Stabilizer | Stock | Upgraded | Full | Expert | Aced | Stock | Full | Expert | Aced |
| Arcade | 94 | -8°/+65° | ±180° | N/A | 5.71 | 7.91 | 9.60 | 10.62 | 11.29 | 3.25 | 2.87 | 2.65 | 2.5 |
| Realistic | 3.57 | 4.2 | 5.10 | 5.64 | 6.0 | ||||||||
Ammunition
| Penetration statistics | |||||||
|---|---|---|---|---|---|---|---|
| Ammunition | Type of warhead |
Penetration @ 0° Angle of Attack (mm) | |||||
| 10 m | 100 m | 500 m | 1,000 m | 1,500 m | 2,000 m | ||
| BR-240 | APHEBC | 70 | 68 | 59 | 50 | 42 | 35 |
| BR-240P | APCR | 106 | 99 | 72 | 49 | 33 | 23 |
| BR-240SP | AP | 73 | 71 | 62 | 52 | 44 | 37 |
| O-243 | HE | 4 | 4 | 4 | 4 | 4 | 4 |
| Shell details | |||||||||
|---|---|---|---|---|---|---|---|---|---|
| Ammunition | Type of warhead |
Velocity (m/s) |
Projectile Mass (kg) |
Fuse delay (m) |
Fuse sensitivity (mm) |
Explosive Mass (TNT equivalent) (g) |
Ricochet | ||
| 0% | 50% | 100% | |||||||
| BR-240 | APHEBC | 760 | 1.43 | 1.2 | 9.0 | 29.26 | 48° | 63° | 71° |
| BR-240P | APCR | 1,070 | 0.85 | N/A | N/A | N/A | 66° | 70° | 72° |
| BR-240SP | AP | 757 | 1.43 | N/A | N/A | N/A | 47° | 60° | 65° |
| O-243 | HE | 343 | 2.15 | 0.4 | 0.3 | 118 | 79° | 80° | 81° |
Ammo racks
| Full ammo |
1st rack empty |
2nd rack empty |
3rd rack empty |
4th rack empty |
5th rack empty |
6th rack empty |
7th rack empty |
8th rack empty |
Visual discrepancy |
|---|---|---|---|---|---|---|---|---|---|
| 94 | 85 (+9) | 75 (+19) | 63 (+31) | 51 (+43) | 39 (+55) | 27 (+67) | 15 (+79) | 1 (+93) | No |

Notes:
- To go into battle with the turret empty of ammo, pack 75 (+19) shells (racks 1 and 2 emptied).
- Racks disappear after you've fired all shells in the rack.
Machine guns
| 7.62 mm DT | ||||
|---|---|---|---|---|
| Mount | Capacity (Belt capacity) |
Rate of fire (shots/minute) |
Vertical guidance |
Horizontal guidance |
| Coaxial | 1,071 (63) | 600 | N/A | N/A |
Usage in battles
The T-80 is a little different from most light tanks. Like all light tanks, it has excellent speed and mobility. Unlike most light tanks it has great, sloped frontal armour and good turret armour, making it highly resistant to most tier 1 gun. Pair this with its fast firing 45mm gun and it becomes an excellent vehicle for hunting lightly armoured foes. The addition of APCR allows you to fight more heavily armoured vehicles. You may come across Matilda and Valentine tanks, which are highly resistant to the APHEBC round but can be more easily penetrated by the APCR (at the expense of less damage).
In order to take full advantage of this tank's strengths, you should aim to use one of two distinct tactical options. Option one is to operate as a frontline tank in urban combat. Your frontal armour is of great use here. However, this strategy should be avoided if you are not near or at the top of this tank's matchmaking range. The other option is to work as a flanking tank. Your gun is more than capable in this role, and unlike most flanking role tanks, the surprise isn't always necessary for survival. Thanks to your strong frontal armour, you can do well under incoming fire if your attempt at flanking is discovered, or if your opponent is determined to survive and providing stiff resistance. Few tanks offer the level of flexibility in terms of combat approach that is granted to the T-80.
When taking the tank into battle, a mix of APHEBC and APCR is favourable. The BR-240 AP shells against flanked opponents and structural weaknesses (e.g. Pz.IV E turret), while the BR-240P APCR role is for close range combat (<400m, due blunt nose cone) and engaging heavy armoured box tanks, especially the M3 Lee, StuG and up-armoured T-28E. As usual, having a few rounds of pure HE is great against any SPAAG.
In battle, you must beware of some of the high calibre guns found at the tier. Tank destroyers such as the Panzerjäger I, M3 GMC and the Japanese Ho-Ni III will all be able to take the T-80 out easily. SPGs armed with howitzer type guns like the Type 4 Ho-Ro also pose a high threat. Also, beware German vehicles armed with the long barreled 50 mm gun, like the Pz.III J and Sd.Kfz.234/2 Puma. The best way to play the T-80 is to use it as a light tank. Do not be overconfident. Avoid direct combat and assume that enemy tanks will be able to penetrate you. Attacking from an advantageous position will allow your tanks great armour and gun to shine.
Modules
| Tier | Mobility | Protection | Firepower | |||
|---|---|---|---|---|---|---|
| I | Tracks | Parts | BR-240SP | Horizontal Drive | ||
| II | Suspension | Brake System | FPE | Adjustment of Fire | Airstrike | |
| III | Filters | Crew Replenishment | BR-240P | Elevation Mechanism | ||
| IV | Transmission | Engine | Artillery Support | Improved optics | ||
The T-80 is damaged very easily, and as such, having the "parts" modification should be the first priority. After that, researching AP and APCR rounds is very useful, since it allows the tanker to be much more of a threat to well-armoured opponents, being much more versatile.
Pros and cons
Pros:
- Fastest reload speed in the game for a non-automated cannon
- Small target
- Co-axial MG suitable against unarmoured vehicles
- Capability to shoot APCR rounds
- Frontal turret and hull armour is surprisingly good, and can easily bounce shots from same Br opponents
- First Soviet light tank to feature more than two crew, meaning you can now afford to lose a crew member
- Awesome vertical traverse limit of 65°, allows for some anti-air potential, though it is unreliable in this role
- Some guns will really struggle to penetrate your armour at this tier. Japanese 37/57 mm and other 45 mm guns (without APCR) pose very little threat.
- Often underestimated. Many players will aim poorly and their shells will ricochet
- Ability to scout in low rank
Cons:
- Very slow traverse speed for turret (hand cranked)
- Slow gun elevation speed
- Front shot trap, although decently protected, is a serious weak point
- Low calibre gun
- Easily damaged by careless driving
- Gun is inaccurate at long range.
- Tank wobbles when you stop, meaning you will have to wait a few seconds before you can fire accurately.
- Easily one-shotted due to the small crew number
History
The T-80 light tank was a redesign of the T-70 light tank in an attempt to make the design relevant again.
During World War II, the concept of the light tank was deemed obsolete, they were too lightly armoured, too lightly armed, and sometimes don't go that much faster than the 1940s medium tank designs which had better armour and guns. Plus, the smaller profile of the tank meant that the crew are not necessarily given enough comfort room and the constraint would force turret design to be a one or two-man turret, restricting the commander to perform other duties as well.
The T-80 tried to remedy this by giving the tank more armour and a two-man turret so the commander could coordinate more efficiently than the one-man turret on the T-70. However, the role of the light tank in the Soviet Union could be fulfilled by the incoming supplies of Lend-Lease equipment available from Britain and America in the form of M3 Stuarts and Valentine tanks, which are better than the T-70 and T-80 designs. In October of 1943, the light tank production were all cancelled, resulting in only 120 T-80s being produced in its brief production life.
In-game description
This tank was created based on the T-70M, with the aim of eliminating its main flaws.
An analysis of the use of this tank in battle showed that a tank equipped with a cannon needs more than two crew members: the tank commander had to fulfill the role of both a driver and a loader, which negatively affected the tank's manoeuvrability and firing rate in battle. In addition, the constantly developing array of anti-tank weapons meant that stronger armour was required. So in 1943, the GAZ design bureau developed the new T-80 light tank with stronger armour and a three-man crew. One of the tank's key elements was its 45 mm cannon's high angle of fire. To allow for high-angle firing, e.g. during battles in urban conditions, the tank was equipped with a K-8T collimator sight. This sight provided the ability to fire at both air and ground targets.
By September 1943, factory No. 40 in the town of Mytishchi had produced 81 vehicles of this type in total.
The T-80 tank had an assembly typical of Soviet-produced light tanks. The transmission compartment was located at the front, and the engine at the back. This caused increased vulnerability, since it was the front of the tank that was most often subjected to fire from the enemy. The T-80's fuel tanks were located outside of the fighting compartment in an armoured partition, which reduced the risk of a hit starting a fire. This arrangement increased the survivability of the tank's crew.
The tank's effectivity in combat was reduced by the unreliability of its high-powered engines and its low mobility due to its increased weight.
The new vehicles entered service in self-propelled artillery regiments as command tanks and were used until 1945.
Media
- Skins
- Videos
See also
- Vehicles equipped with the same chassis
- Vehicles equipped with the same gun
- T-26 (Family)
- BT-5 / BT-7
- T-50 / T-126
External links
Paste links to sources and external resources, such as:
- topic on the official game forum;
- encyclopedia page on the tank;
- other literature.
| USSR light tanks | |
|---|---|
| T-26 | T-26 · T-26 (1st Gv.T.Br.) · T-26-4 · T-26E |
| BT | BT-5 · RBT-5 · BT-7 · BT-7 TD · BT-7M · BT-7A (F-32) |
| T-50 | T-126 · T-50 |
| T-70 | T-70 · T-80 |
| PT-76 | PT-76B · PT-76-57 · Object 906 |
| BMP | BMP-1 · BMP-2 · BMP-2M · BMP-3 |
| BMD | BMD-4 |
| 2S25 | 2S25 · 2S25M |
| Wheeled | BA-11 · BTR-80A |
| Other | T-60 · Object 685 · 2S38 |
| China | ▂Type 62 |
