Difference between pages "Swift F.1" and "Warrior"
m (→Pros and cons) (Tag: Visual edit) |
(→Pros and cons) |
||
| Line 1: | Line 1: | ||
| − | {{Specs-Card|code= | + | {{Specs-Card|code=uk_fv510_isv}} |
| − | |||
| − | |||
| − | |||
| − | |||
| − | }} | ||
== Description == | == Description == | ||
| − | <!-- ''In the description, the first part | + | <!--''In the description, the first part needs to be about the history of the creation and combat usage of the vehicle, as well as its key features. In the second part, tell the reader about the ground vehicle in the game. Insert the screenshot of the vehicle. If the novice player does not remember the vehicle by name, they will immediately understand what kind of vehicle it is talking about.''--> |
| − | [[File: | + | [[File:GarageImage_Warrior.jpg|420px|thumb|left]] |
{{break}} | {{break}} | ||
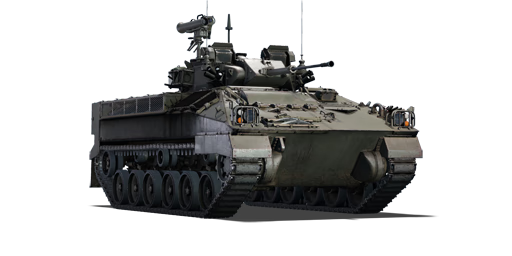
| − | The '''{{ | + | The '''{{specs|name}}''' (or just the '''{{specs|pseudonym}}''') is a Rank {{specs|rank}} British light tank {{Battle-rating|1}}. It was introduced in [[Update 1.81 "The Valkyries"]]. |
| + | |||
| + | Warrior is basically a box with a round turret, which has a little gun in middle, "ears" (ATGM cameras), and the ATGM launcher itself on the right side. Front of the hull is sloped, but it doesn't really help. On its right, there is an exhaust port, which may prevent gunner from firing precisely in Realistic Battles, but usually, it's not a problem. | ||
| + | |||
| + | If the vehicle has Add-on armour, it's easily identified for its riveted plates on sides of the vehicle. Usually, after being shot with a high velocity round, they break off. Plates do not protect the rear of the vehicle. | ||
| + | |||
| + | Practically, the Warrior is the only proper light tank the British faction has. It's mostly played as an aggressive ATGM tank or ambush scout tank, though it can fulfil any role that doesn't involve it being constantly shot at. | ||
| + | |||
| + | It's best described as a hybrid between a slowed down SPAA and assault ATGM launcher, while armour is either nonexistent or installed via a modification to partially protect from hazards that normally annihilate light tanks. The weapon combo is potent enough to destroy even modern MBT's, and with add-on armour, the Warrior can bully even heavy tanks in close range, though the turret is still very vulnerable. | ||
| + | |||
| + | The Warrior can be played defensively (mostly around hills and mountains), or aggressively (on flat terrains and in towns), given that there is enough cover for the Warrior. In realistic battles, Warrior can also hide relatively well and use either of its weapons to punish unsuspecting people, or just scout them. | ||
| + | |||
| + | This vehicle is very easy to play while still in stock mode, as it has most essentials available at stock or unlocked early on, however, every upgrade only makes it even stronger. | ||
== General info == | == General info == | ||
| − | === | + | === Survivability and armour === |
| − | '' | + | <!-- Describe armour protection. Note the most well protected and key weak areas. Appreciate the layout of modules as well as the number and location of crew members. Is the level of armour protection sufficient, is the placement of modules helpful for survival in combat? |
| + | |||
| + | If necessary use a visual template to indicate the most secure and weak zones of the armour. -->[[File:Weakspot warrior.jpg|thumb|304x304px|This box outside of warrior can sometimes block APHE from leaving the vehicle. On top of that, chemical rounds can also hit it, or construction below it and cause the hull to break.]] | ||
| + | Warrior is well protected against heavy machine guns, however, it's a turret, engine ventilation, hull's back and even sides have weakspots, which can be penetrated by 12.7 mm and 14.5mm HMG, if shot correctly. Frontal armour can sustain light automatic cannon fire. Anything of higher caliber has high chance of destroying the light tank immediately at close range. | ||
| + | |||
| + | The Warrior can be hull-broken by any chemical shells of 105 mm calibre and kinetic shells of 120 mm calibre. Due to its boxy profile, it often gets accidentally hit by ATGM's that were meant for other tanks nearby. Also, if artillery hit its hull or turret directly, it will instantly blow up entire tank. | ||
| + | |||
| + | It's important to remember, that hull itself is somewhat resistant to hull break, but suspension, ventilation or track hit can instantly destroy the tank if done by '''any''' chemical explosives of '''any''' caliber. Heavy Explosives (HE) of high enough caliber instantly hull break the tank regardless of hit surface, destroying tank even if shockwave barely reaches any part of the tank. | ||
| + | |||
| + | Vehicles defenses with and without add-on armour vary greatly: | ||
| + | |||
| + | Coaxial autocannons and low calibre SPAA penetrate turret and hull sides without add-on armour instantly. With add-on armour hull generally can sustain attack for 1 to 5 seconds, depending on angle of attack. | ||
| + | |||
| + | Due to armour being thick enough to protect from HMG, it will trigger fuse on any cannon shell in the game, unless it hits engine ventilation (which is extremely unlikely and bad on its own). As such, popular misconception of not using add-on armour to "increase the chance of over-penetration and move faster" should not be taken as a single truth. In fact, single APDSFS or APHE can annihilate Warrior easily by just scratching it, if it enters the vehicle at a bad angle. | ||
| + | |||
| + | Overall, add-on panels defend the sides and half of the front of the hull, with the frontal plate covering the driver. These panels protect from chemical ammunition, and add a bit of an edge against kinetic ammunition. The side panels also hide obvious weak spots on warrior's hull (hatches), forcing enemy to fire randomly. Side armour plates can block HESH and some weaker forms of chemical ammunition with about 130-160 mm of penetration power, the frontal plate can save from about 220 mm of chemical penetration power, saving the light tank from hull break. Unfortunately, since composite armour panel placement is not solid, sometimes shrapnel can penetrate stitches between them and destroy track, resulting in hull break. | ||
| + | |||
| + | As such, with Add-on armour, the Warrior can survive almost any machine gun fire, misplaced autocannon fire, close artillery miss, low-caliber SPAA fire, some chemical shells and the other things, that normally cause hull break or annihilate light tanks, so the Warrior can play much more boldly and harass enemy if they are alone. | ||
| + | |||
| + | In case if frontal panel somehow saved the vehicle from a frontal shot, but failed to completely nullify the attack, the Warrior will be very likely set on fire and have the engine broke, which may mean an impending knock-out if unable to retaliate, so keep that in mind. Keeping low ammo amount (about 30 out of 104 magazines) increases chance of survival against HEAT shells after hull break prevention. | ||
| + | |||
| + | If 120 mm HE hits the frontal NERA plate, explosion can still reach the turret and blast it off the tank, resulting in hull break. Avoid being hit by it at all costs. | ||
| + | |||
| + | The front-right side '''does not''' have complete armour protection because it's expected, that engine compartment takes the hit for the vehicle. In game, it cannot prevent hull break, caused by explosives even touching the track, so '''try to face the enemy with the left side, if possible'''. Engine deck can prevent hull break from HEAT and, sometimes, HESH. | ||
| + | |||
| + | [[File:WarriorArmour ProtectionAnalysis HESH.jpg|x170px|thumb|right|Protection analysis might get all weird with protection and damage values, but essentially frontal panel gives a 45% chance for the Warrior to not be destroyed from frontal HESH shot by just being there. Side armour does the same thing for the entirety of the sides but is weaker. Any shells of 120 mm caliber will likely obliterate Warrior from sides unless it was a grazing shot.]] | ||
| + | |||
| + | The side plates are not invulnerable, and so, after being hit too hard, they will break off, much like explosive reaction armour. The protection quality of these armour plates is most notable when compared to facing the BMP-2 (when it gets destroyed immediately) and the Begleitpanzer (when it actually saves the vehicle from grazing shots and only then falls off). | ||
| + | |||
| + | Any AP based shot, like APHE, will go through composite lists unless it was a grazing shot. Because of this, it's advised to avoid directly attacking SPAA with 30mm guns, and other IFV, as those can destroy the Warrior even without special APDS ammo, and have guns with much higher rate of fire. | ||
| + | |||
| + | Here is '''the''' most unlikely and ridiculous example of add-on armour saving the Warrior's life. IT-1 ATGM has about 500 penetration power, which should destroy side armour of warrior at any angle, and even frontal plate with ease, however: | ||
| + | |||
| + | <gallery> | ||
| + | WarriorArmour ProtectionAnalysis MagicPixel.jpg | ||
| + | WarriorArmour IT-1Missile (1 of 3).jpg | ||
| + | WarriorArmour IT-1Missile (2 of 3).jpg | ||
| + | WarriorArmour IT-1Missile (3 of 3).jpg | ||
| + | </gallery> | ||
| + | |||
| + | Since this particular edge of Armour plates is invulnerable, ATGM destroyed the entirety of Warrior Armour, but Warrior survived. As could be seen here, armour on warrior is '''extremely random'''. The sharper the angle of attack, the bigger the chance of miraculous survival. | ||
| + | |||
| + | === Mobility === | ||
| + | <!--''Write about the mobility of the ground vehicle. Estimate the specific power and manoeuvrability as well as the maximum speed forward and backwards.''--> | ||
| + | |||
| + | Mobility is adequate on vehicle's BR, it can move forward and backwards equally fast, but don't expect it to be climbing mountains like with the Vickers MBT in Arcade Battles. It will just slide down if the surface is too steep. | ||
| + | |||
| + | In Arcade Battles, it's generally driving at 46-54 km/h offroad in either direction without engine upgrades, regardless of additional armour. With mobility upgrades it may drive up to 60 km/h, but not very often. Speed of 81-83 km/h can be reached if the Warrior drove off the hill and keep driving forward, or on completely flat terrains, like roads in the American desert, though sometimes it just doesn't work again at the same spot. | ||
| + | |||
| + | Accidentally hitting something on max speed, especially explosive decorations, launches the Warrior up to 5 meters in the air, which is very entertaining, but almost never fazes the enemy. | ||
{| class="wikitable" style="text-align:center" | {| class="wikitable" style="text-align:center" | ||
|- | |- | ||
| − | ! colspan=" | + | ! colspan="4" | Mobility characteristic |
| + | |- | ||
| + | ! Weight (tons) | ||
| + | ! colspan="1" | Add-on Armour<br>weight (tons) | ||
| + | ! colspan="2" | Max speed (km/h) | ||
|- | |- | ||
| − | + | | rowspan="2" | 22.5 || colspan="1" rowspan="2" | 1.0 || colspan="2" | 83 (AB) | |
|- | |- | ||
| − | + | | colspan="2" |75 (RB/SB) | |
| − | |||
| − | |||
| − | |||
| − | |||
|- | |- | ||
| − | ! | + | ! colspan="4" | Engine power (horsepower) |
|- | |- | ||
| − | | | + | ! colspan="1" | Mode |
| + | !Stock | ||
| + | ! colspan="2" |Upgraded | ||
|- | |- | ||
| − | + | |''Arcade'' | |
| + | |852 | ||
| + | | colspan="2" |1049 | ||
|- | |- | ||
| − | + | |''Realistic/Simulator'' | |
| − | + | |486 | |
| − | + | | colspan="2" |550 | |
| − | |||
| − | |||
|- | |- | ||
| − | ! | + | ! colspan="4" | Power-to-weight ratio (hp/ton) |
|- | |- | ||
| − | | | + | ! colspan="1" | Mode |
| + | !Stock | ||
| + | !Upgraded | ||
| + | !Upgraded w/<br>add-on armour | ||
| + | |- | ||
| + | |''Arcade'' | ||
| + | |37.87 | ||
| + | |46.62 | ||
| + | |44.63 | ||
| + | |- | ||
| + | |''Realistic/Simulator'' | ||
| + | |21.60 | ||
| + | |24.44 | ||
| + | |23.40 | ||
|- | |- | ||
|} | |} | ||
| − | ==== | + | * Adding armour does not decrease Warrior's hp/ton significantly, and it only reduces maximum climb angle by 2 degrees, so it should be used when unlocked without worries of mobility penalty. |
| + | * Despite having enough horsepower, cannot climb mountains. | ||
| + | |||
| + | == Armaments == | ||
| + | |||
| + | First of all, one needs to understand that both of the weapons on the Warrior are useful. | ||
| + | |||
| + | === Main armament === | ||
| + | <!--''Give the reader information about the characteristics of the main gun. Assess its effectiveness in a battle based on the reloading speed, ballistics and the power of shells. Do not forget about the flexibility of the fire, that is how quickly the cannon can be aimed at the target, open fire on it and aim at another enemy. Add a link to the main article on the gun: <code><nowiki>{{main|Name of the weapon}}</nowiki></code>. Describe in general terms the ammunition available for the main gun. Give advice on how to use them and how to fill the ammunition storage.''--> | ||
| + | |||
| + | The gun is very slow firing, but with APDS belt it can penetrate the sides of most medium tanks and SPGs. Basically, it's effective against medium tanks, but lacklustre against fast vehicles that have spaced armour. It can be used to hurt crew from over 1 km distance, but it's not very good at damaging enemy ammo racks, so it's best used to destroy engines, tracks and crew unless it's easier to hit. | ||
| + | |||
| + | Proper heavy tanks are normally not fazed by its fire at all, but for them there is the powerful MILAN launcher, which can penetrate them even from the front with its 580 mm penetration power, leaving them completely disabled. | ||
| + | |||
| + | In a perfect world, even in the worst situation, the Warrior can still use its 30 mm gun to de-track charging enemy tank and instantly destroy it with side shot or ATGM, but it's not very likely that the Warrior will live that long. | ||
| + | |||
| + | Also, in a worst case scenario, the 30 mm autocannon can be used to try and shoot down planes with it, but it will require skill with slow-firing SPAA (like the Crusader AA MK I), and any plane coming down at a high angle can't be engaged. | ||
| + | |||
| + | Not convinced? The main gun can still remove any trees and solid fences at any range, which is normally a nightmare for any other British ATGM vehicle. | ||
| + | |||
| + | {{main|L21A1 (30 mm)}} | ||
| + | |||
{| class="wikitable" style="text-align:center" | {| class="wikitable" style="text-align:center" | ||
|- | |- | ||
| − | ! colspan="5" | | + | ! colspan="6" | [[L21A1 (30 mm)|30 mm L21A1]] |
| + | |- | ||
| + | ! colspan="2" rowspan="1" style="width:5em" |Capacity (Belt capacity) | ||
| + | ! rowspan="1" | Fire rate <br> (shots/minute) | ||
| + | ! rowspan="1" | Vertical <br> guidance | ||
| + | ! rowspan="1" | Horizontal <br> guidance | ||
| + | ! rowspan="1" | Stabilizer | ||
| + | |- | ||
| + | | colspan="2" | 222 (6) || 81 || -10°/+45° || ±180° || N/A | ||
| + | |- | ||
| + | ! colspan="6" | Turret rotation speed (°/s) | ||
| + | |- | ||
| + | ! style="width:4em" |Mode | ||
| + | ! style="width:4em" |Stock | ||
| + | ! style="width:4em" |Upgraded | ||
| + | ! style="width:4em" |Prior + Full crew | ||
| + | ! style="width:4em" |Prior + Expert qualif. | ||
| + | ! style="width:4em" |Prior + Ace qualif. | ||
| + | |- | ||
| + | | ''Arcade'' || 57.1 ||79.06||96.0||106.16||112.94 | ||
| + | |- | ||
| + | | ''Realistic'' || 35.7 ||42.0||51.0||56.4||60.0 | ||
| + | |- | ||
| + | ! colspan="4" | Reloading rate (seconds) | ||
| + | |- | ||
| + | ! colspan="1" style="width:4em" |Stock | ||
| + | ! colspan="1" style="width:4em" |Prior + Full crew | ||
| + | ! colspan="1" style="width:4em" |Prior + Expert qualif. | ||
| + | ! colspan="1" style="width:4em" |Prior + Ace qualif. | ||
| + | |- | ||
| + | | 1.30 ||1.15||1.06||1.0 | ||
| + | |- | ||
| + | |} | ||
| + | |||
| + | ===== Ammunition ===== | ||
| + | {| class="wikitable sortable" style="text-align:center" width="100%" | ||
| + | ! colspan="8" | Penetration statistics | ||
| + | |- | ||
| + | ! rowspan="2" data-sort-type="text" | Ammunition | ||
| + | ! rowspan="2" class="unsortable" | Type of <br /> warhead | ||
| + | ! colspan="6" | '''Penetration''' '''''in mm''''' '''@ 90°''' | ||
| + | |- | ||
| + | ! 10m | ||
| + | ! 100m | ||
| + | ! 500m | ||
| + | ! 1000m | ||
| + | ! 1500m | ||
| + | ! 2000m | ||
| + | |- | ||
| + | | Default || AP-I/HEI-T* || 60 || 53 || 40 || 33 || 28 ||19 | ||
| + | |- | ||
| + | | 30x170 APDS-T || APDS || 110 || 101 || 95 || 69 || 52 || 41 | ||
| + | |- | ||
| + | |} | ||
| + | |||
| + | ===== Belt types ===== | ||
| + | {| class="wikitable" | ||
| + | | '''Belts''' || '''Shell composition''' || '''Combat usage''' | ||
| + | |- | ||
| + | | align="left" |'''''Default''''' || align="left" | AP-I, HEI-T | ||
| + | (Armor Piercing Incendiary), (High-explosive incendiary-tracer) shells | ||
| + | | align="left" | This belt can be used against other light tanks and certain lightly armoured medium tanks. However, it also includes anti-air round (HEI-T), which does increase damage to air targets but is useless against tanks at rank 5. The low rate of fire of Warrior doesn't compliment this dual belt. | ||
| + | |- | ||
| + | | align="left" |30x170 APDS-T|| align="left" | APDS<br>(Armor piercing discarding sabot) shells || align="left" | This belt can be used against sides of most medium tanks of rank 5 and 6, and even some heavy tanks can be damaged by it. Performance of this belt deteriorates '''much''' slower than of AP-I belt, but it does less damage the more armour it had to penetrate, resulting in an inability to set off enemy ammo racks in 1 hit if it was behind any good armour. If used against planes, it can damage or rip off wings, or snipe out the pilot. | ||
| + | |- | ||
| + | |} | ||
| + | |||
| + | ===== [[Ammo racks|Ammo racks]] ===== | ||
| + | {| class="wikitable sortable" style="text-align:center" | ||
|- | |- | ||
| − | ! | + | ! class="wikitable unsortable" |Full<br /> ammo |
| + | ! class="wikitable unsortable" |1st<br /> rack empty | ||
| + | ! class="wikitable unsortable" |2nd<br /> rack empty | ||
| + | ! class="wikitable unsortable" |3rd<br /> rack empty | ||
| + | ! class="wikitable unsortable" |4th<br /> rack empty | ||
| + | ! class="wikitable unsortable" |Visual<br /> discrepancy | ||
|- | |- | ||
| − | | | + | || '''XX''' || XX ''(+XX)'' || XX ''(+XX)'' || XX ''(+XX)'' || XX ''(+XX)'' || style="text-align:center" | |
|- | |- | ||
|} | |} | ||
| + | |||
| + | Turret empty: 62 ''(+3)'' <br> Front empty: 33 ''(+32)'' | ||
| + | |||
| + | |||
| + | === Additional armament === | ||
| + | <!--''Some tanks are armed with several guns in one or more turrets. Evaluate the additional weaponry and give advice on its use. Describe the ammunition available for additional weaponry. Give advice on how to use them and how to fill the ammunition storage. If there is no additional weaponry remove this subsection.''--> | ||
| + | |||
| + | Warrior carries MILAN missiles as a secondary weapon. | ||
| + | [[File:Warrior sneak attack on tank.JPG|220px|thumb|right|Warrior managed to launch MILAN 2 straight at the enemy tank, instantly destroying it.]] | ||
| + | The MILAN missile itself is launched at absurdly high speed in contrast to Swingfire missiles while retaining good control. This makes it very hard to dodge up to 700 m range, but harder to turn it into enemy cover, especially horizontally. However, it can be launched above small obstacles and flat hills, if the enemy is far away enough. | ||
| + | |||
| + | It can be used in general melee range, but cannot be fired point-blank (10 m or so), and if not careful it can overshoot (look at launcher itself in Third-person view to avoid this). It cannot be used for super-long range attack, as it's maximum range is just 2 km. | ||
| + | |||
| + | MILAN launcher can be upgraded to the MILAN 2, which has an absolutely insane 730 mm of armour penetration. Needless to say, it simply disintegrates or cripples the target tank that doesn't have chemical armour, unless the missile somehow hits the enemy gun barrel. | ||
| + | |||
| + | The Warrior also cannot be flanked, unlike normal ATGM launcher, since its weapons are turret based. | ||
{| class="wikitable" style="text-align:center" | {| class="wikitable" style="text-align:center" | ||
|- | |- | ||
| − | ! colspan=" | + | ! colspan="7" | 103 mm MILAN ATGM |
| + | |- | ||
| + | ! colspan="3" rowspan="1" style="width:5em" |Capacity | ||
| + | ! rowspan="1" | Vertical <br> guidance | ||
| + | !Flight speed <br> on launch (m/s) | ||
| + | ! rowspan="1" | Max Flight <br> speed (m/s) | ||
| + | ! rowspan="1" | Range (m) | ||
| + | |- | ||
| + | | colspan="3" | 8 || N/A | ||
| + | |~160|| 200 || 2,000 | ||
|- | |- | ||
| − | ! | + | ! colspan="7" | 115 mm MILAN 2 ATGM |
| − | |||
| − | |||
| − | |||
|- | |- | ||
| − | ! | + | ! colspan="3" rowspan="1" style="width:5em" |Capacity |
| + | ! rowspan="1" | Vertical <br> guidance | ||
| + | !Flight speed <br> on launch (m/s) | ||
| + | ! rowspan="1" | Max Flight <br> speed (m/s) | ||
| + | ! rowspan="1" | Range (m) | ||
|- | |- | ||
| − | | | + | | colspan="3" | 8 || N/A |
| + | |~200|| 200 || 2,000 | ||
|- | |- | ||
|} | |} | ||
| − | {| class="wikitable" style="text-align:center" | + | * Despite being launched at their max speed, they are still very manoeuvrable, so they still can be curved behind some hills at targets ~500 meters away, and generally targets up to 800 meters can't dodge it. |
| + | |||
| + | ===== Ammunition ===== | ||
| + | {| class="wikitable sortable" style="text-align:center" width="100%" | ||
| + | ! colspan="8" | Penetration statistics | ||
| + | |- | ||
| + | ! rowspan="2" data-sort-type="text" | Ammunition | ||
| + | ! rowspan="2" class="unsortable" | Type of <br /> warhead | ||
| + | ! colspan="6" | '''Penetration''' '''''in mm''''' '''@ 90°''' | ||
| + | |- | ||
| + | ! 10m | ||
| + | ! 100m | ||
| + | ! 500m | ||
| + | ! 1000m | ||
| + | ! 1500m | ||
| + | ! 2000m | ||
| + | |- | ||
| + | | MILAN || ATGM || 580 || 580 || 580 || 580 || 580 || 580 | ||
| + | |- | ||
| + | | MILAN 2 || ATGM || 730 || 730 || 730 || 730 || 730 || 730 | ||
| + | |- | ||
| + | |} | ||
| + | {| class="wikitable sortable" style="text-align:center" width="100%" | ||
| + | ! colspan="11" | Shell details | ||
| + | |- | ||
| + | ! rowspan="2" data-sort-type="text" | Ammunition | ||
| + | ! rowspan="2" class="unsortable" | Type of <br /> warhead | ||
| + | ! rowspan="2" |Velocity <br /> in m/s | ||
| + | ! rowspan="2" |Projectile<br />Mass in kg | ||
| + | ! rowspan="2" | ''Fuse delay'' | ||
| + | ''in m:'' | ||
| + | ! rowspan="2" | ''Fuse sensitivity'' | ||
| + | ''in mm:'' | ||
| + | ! rowspan="2" | ''Explosive Mass in g<br /> (TNT equivalent):'' | ||
| + | ! rowspan="2" | ''Normalization At 30° <br> from horizontal:'' | ||
| + | ! colspan="3" | ''Ricochet:'' | ||
| + | |- | ||
| + | ! 0% | ||
| + | ! 50% | ||
| + | ! 100% | ||
| + | |- | ||
| + | | MILAN || ATGM || 200 || 6.6 || 0.0 || 0.1 || 1,400 || +0° || 80° || 82° || 90° | ||
| + | |- | ||
| + | | MILAN || ATGM || 200 || 7.0 || 0.0 || 0.1 || 1,800 || +0° || 80° || 82° || 90° | ||
|- | |- | ||
| − | + | |} | |
| + | |||
| + | ===== [[Ammo racks|Ammo racks]] ===== | ||
| + | {| class="wikitable sortable" style="text-align:center" | ||
|- | |- | ||
| − | ! | + | ! class="wikitable unsortable" |Full<br /> ammo |
| − | ! | + | ! class="wikitable unsortable" |1st<br /> rack empty |
| − | ! | + | ! class="wikitable unsortable" |2nd<br /> rack empty |
| − | ! | + | ! class="wikitable unsortable" |3rd<br /> rack empty |
| + | ! class="wikitable unsortable" |Visual<br /> discrepancy | ||
|- | |- | ||
| − | | | + | || '''8''' || XX ''(+XX)'' || XX ''(+XX)'' || XX ''(+XX)'' || style="text-align:center" | |
|- | |- | ||
|} | |} | ||
| + | |||
| + | === Machine guns === | ||
| + | <!--''Offensive and anti-aircraft machine guns not only allow you to fight some aircraft but also are effective against lightly armoured vehicles. Evaluate machine guns and give recommendations on its use.''--> | ||
| + | The machine gun is kind of useless for Warrior, but it can still destroy weak fences, which normally slows any tank down if they hit them, and it makes much less noise than the main gun. For enemy marking purposes, Scouting should be used instead, as it doesn't reveal the vehicle. | ||
| + | |||
| + | {{main|L94A1 (7.62 mm)}} | ||
{| class="wikitable" style="text-align:center" | {| class="wikitable" style="text-align:center" | ||
|- | |- | ||
| − | ! colspan=" | + | ! colspan="7" | [[L94A1 (7.62 mm)|7.62 mm L94A1]] |
|- | |- | ||
| − | ! colspan=" | + | ! colspan="7" | ''Coaxial mount'' |
|- | |- | ||
| − | ! | + | ! colspan="4" rowspan="1" style="width:5em" |Capacity (Belt capacity) |
| − | ! | + | ! rowspan="1" | Fire rate <br> (shots/minute) |
| − | ! | + | ! rowspan="1" | Vertical <br> guidance |
| + | ! rowspan="1" | Horizontal <br> guidance | ||
|- | |- | ||
| − | | | + | | colspan="4" | 2,000 (2,00) || 600 || N/A || N/A |
|- | |- | ||
|} | |} | ||
| − | == | + | == Usage in battles == |
| − | <!-- | + | <!--''Describe the tactics of playing in the vehicle, the features of using vehicles in the team and advice on tactics. Refrain from creating a "guide" - do not impose a single point of view but give the reader food for thought. Describe the most dangerous enemies and give recommendations on fighting them. If necessary, note the specifics of the game in different modes (AB, RB, SB).''--> |
| + | |||
| + | Generally, Warrior needs to quickly get into the medium range of the expected enemy, then figure out its strategy for the current battle. While moving towards an objective, Warrior should keep a low profile and scout every enemy it can notice. | ||
| − | + | After looking around, Warrior either takes some hills or well protected hull-down position near to capture point to utilize ATGMs and scouting ability for medium range attacks and team support, or takes an aggressive approach and goes for stealthy flanks and close range combat. It's not rare to see Warrior try and destroy heavy tanks, which just don't expect the light tank to go at them. | |
| − | |||
| − | |||
| − | + | If forced, Warrior can always use a smoke screen to disrupt enemy plans of taking it down, either baiting them to waste time looking for it, or using smoke screen, MILAN-2, scouting and add-on armour together to attack the enemy from the fog with little fear of being punished for it. For some reason enemy does not often reply to ATGM shots but instantly fires back at cannon fire, so use cannon sparingly during this. | |
| − | + | ||
| − | + | [[File:Warrior shadow strike.jpg|thumb|Example of using smokes and armour '''offensively''' in arcade battle. Not only enemy is blinded and can't hold the line, allowing the team to rush in, but even if they fire towards the Warrior's general direction, they will likely load HESH and fire at the hull, hitting the add-on armour and doing no damage. MILAN-2, on the other hand, is almost unblockable and does fatal damage, and the player can clearly see the direction they are in due to '''scouting'''. A skilled Warrior can take out up to 2 tanks per 1 smoke deploy like that. Works on any range from 30m to 800m.]] | |
| − | + | In any mode, but especially in AB, mark the enemy with the "scout" ability, so they can be found whenever smoke is deployed. This must be done for two main reasons: | |
| − | + | # Since the MILAN ATGM can instantly destroy or cripple anything, even seeing just the name of enemy and type of tank through smoke is good enough for the Warrior to have a chance for a hit. In realistic battles, it's less reliable, but the Warrior can still see where the enemy is. For light tanks, the 30 mm autocannon can work just fine (just don't do that against BMP; unless it already spotted and scouted the Warrior, it's not worth it). | |
| + | # In Arcade Battles, If the "intelligence" reward is obtained for marking enemy that was or is invisible to teammates and then got destroyed, the player will get artillery support point and airstrike point. If the '''squadmates''' destroys the marked target, the player will get airstrike point regardless as a squad assist. | ||
| − | + | Due to this, in 9.0 arcade battle warrior can call in ATGM helicopters on '''very first minute''' of a fight, simply by marking 2 enemy vehicles and destroying someone with an almost undodgeable and unblockable missile, while the enemy cannot even request gunships to protect themselves from it. ATGM helicopter than can destroy 6 to 10 enemy tanks, '''significantly''' weakening the enemy team. As the game goes on, Warrior can join multiple air battles in a row as second attack helicopter or bomber, because it's a scout vehicle. | |
| − | + | Since MILAN has relatively good controls and there is 8 missiles total, the Warrior can try and fire it above hills and guide it down on people, much like Swingfire and Striker. It's harder to aim at the enemy without a straight visual firing line, but if it hits anywhere important, they could be knocked out anyway. Since the Warrior is considered a scout vehicle, mark them and ping them on the map, even if a shot lands a hit. | |
| − | |||
| − | |||
| − | + | In Arcade Battles (AB), it's best to fire the missile at tank's gunner, so in case if it didn't destroy the tank on its own, the Warrior can just circle around the enemy and use the main gun to destroy the engine, then proceed to incapacitate the crew. In Realistic battles (RB) even taking out cannon barrel or breach might be enough, as repairs in that mode take much more time, and field repair doesn't even guarantee, that gun won't just jam itself again or fire in a completely different direction. | |
| − | + | As with all light tanks play style, be very wary of people that have any kind of explosive ammo, as the Warrior has the Hull Break mechanism on it and can be easily engaged. With Add-on armour, the Warrior can fight them directly, but the vehicle's turret, front and back are still a giant weak spot. | |
| − | |||
| − | |||
| − | |||
| − | |||
| − | + | Usually, MBT's will carry AP ammo as their first shot, which may just over penetrate and maybe do almost nothing. So if there is an absolute must directly attack someone, attack them, SPGs or other non-Soviet light tanks. | |
| − | |||
| − | + | There is also a trick related to the Warrior - if baiting an enemy that is looking towards the Warrior, pull the Warrior's rear end out of cover first. Since the rear has very little critical components outside of the MILAN missile stowage, usually being shot there doesn't do anything too drastic for the overall tank health. After being fired at, drive out of cover and fire back at them. This trick probably won't work twice, indicating you should make the most out of the opportunity you have at hand. Nobody likes to be shot with ATGMs and the second shot coming will most certainly be HE of some kind. This tactic may backfire if your IFV gets shot with APHE, or APDSFS will enter the vehicle at a bad angle, but those types of ammunition have the potential of instantly destroying Warrior regardless of the entry point. | |
| − | + | Finally, the Warrior can also repair any allies, so if in cover and not busy - do help them. | |
| − | + | ====Specific enemies worth noting==== | |
| + | <!--Some concerning vehicles to worry about if playing this tank and how to fight them in an encounter. (i.e. Tiger II - shoot the turret cheeks)--> | ||
| + | Any Soviet light tanks: Destroy it with ATGM, use scout ability to see when they are trying to leave their cover, use gun adjustment to never miss, generally never play around with them. BMP-1 will just hull break the Warrior, BMP-2 will just turn on full auto mode and unload half of its magazine into its target, even if it misses its ATGM, just to get rid of a threat and even add-on armour won't save the Warrior at that point. Oddly enough, the infamous Object 906 is probably the least dangerous of them, but it will still destroy the Warrior with proper shot placements. If the Warrior is spaded in modifications, just call artillery strike on them. | ||
| − | + | IS-7: Do not '''ever''' engage this thing frontally without MILAN 2 and add-on armour. It is also extremely risky to attack it on a narrow street. Fire at the right (their left) side, to disable its turret. The main goal in engaging this tank is to disable its engine with the 30 mm gun and then blow it up by destroying its ammo in back of a turret or just blowing it up by firing ATGM in the middle of it or into ammo rack, if there is a spare ATGM (the IS-7, as a threat to any BR below 8.0, should be prioritized with every missile in the Warrior's capacity). Even the many machine guns on the IS-7 can shred the Warrior apart. | |
| − | + | Any tank with heavy machine guns: If possessing the add-on armour modification, simply avoid turning the rear towards them, otherwise the weak rear armour would be easily penetrated. Weaker machine guns of around 7.62 mm calibre can't penetrate the Warrior armour at all, and even 14,5 mm will have some problems penetrating the front of the hull and protected sides, so just destroy them by returning cannon fire and avoiding being hit in the turret. They'll never see it coming. | |
| − | === | + | ====Counter-tactics==== |
| − | <!-- | + | <!--What to expect, if it would be in command of the enemy and how to counter it. (i.e. Just flank)--> |
| + | Just fire at its turret, preferably with explosives or high fire rate guns. | ||
| − | + | If it tries to spook away a threat by being ominous and peeking over hills, disable its ATGM camera (on "ears") with concentrated fire if a direct hit to the crew and modules is not possible. Keep in mind that must damage whole IFV really hard for ATGM repairs to take long (otherwise it may take less than rearm time, which is not good). If the missile is already homing towards a vehicle with no way to break visual, try to get outside of direct missile control range (which will make missile spiral crazily and possibly missing by a centimetre) or face it with the gun barrel in hopes that it would absorb the damage and not cripple any critical modules. | |
| − | + | Never fire pure AP rounds to the back of this tank, since unless it hits one of the missile ammo racks there, it will just do nothing to it. | |
| − | |||
| − | |||
| − | |||
| − | |||
| − | |||
| − | ''' | + | If the Warrior has the add-on armour package, '''do not''' underestimate it and use anything possible when engaging it, not just HMG. Warrior repairs and reloads fast enough to disable its adversaries, if it must, just set it on fire is not going to stop it. Low calibre machine guns are useless against hull from front, despite it having incomplete add-on armour protection. |
| − | + | In case Warrior destroyed your primary weapon, but you still have 12.7 mm machinegun, you can fire at it's ventilation to destroy it. It's very well hidden on the right-front side of the IFV (left for you, if facing it) behind a small gray shield, making it nearly unnoticeable. Firing at ventilation from the side is also possible, but it will do less than fatal damage. | |
| − | |||
| − | + | The Warrior can be destroyed by a fighter jet. However, do not just strafe it directly, as it actually can fire back and may have armour. It's best to attack it from the top. | |
| − | |||
| − | |||
| − | + | === Pros and cons === | |
| + | <!--''Summarize and briefly evaluate the vehicle in terms of its characteristics and combat effectiveness. Mark its pros and cons in a bulleted list. Try not to use more than 6 points for each of the characteristics. Avoid using categorical definitions such as "bad", "good" and the like - they have a substitution in the form of softer "inadequate", "effective".''--> | ||
| + | '''Pros:''' | ||
| − | + | * Extremely powerful ATGM with 8 missiles | |
| + | * Can stop pushes if manages to get to good cover | ||
| + | * Can survive a direct hit by a miracle and even brawl with MBT's if armour mod is installed | ||
| + | * The only British light tank beyond rank 1 | ||
| + | * Has gunner thermal vision and commander / driver night vision | ||
| − | + | '''Cons:''' | |
| − | + | * Can be destroyed by other light tanks easily, especially if situation awareness is not maintained | |
| + | * Any properly landed turret shot will destroy the vehicle, with nearly no way to survive if it was a HE shell | ||
| + | * Many will be disheartened by the main gun's performance, especially in a duel with other light tanks | ||
| + | * Add-on armour does less than one may expect from it, it's not clear when the Warrior survived a hit by sheer luck or because of armour plates. | ||
| + | * Engine exhaust placement (front right corner of tank) means that hot exhaust fumes obscure gunners thermal vision when looking between approximately 45° and 80° to the right. | ||
| − | + | == History == | |
| + | <!--''Describe the history of the creation and combat usage of the ground vehicle in more detail than in the introduction. If the historical reference turns out to be too big, take it to a separate article, taking a link to an article about the vehicle and adding a block "/ History" (example: <nowiki>https://wiki.warthunder.com/(Vehicle-name)/History</nowiki>) and add a link to it here using the <code>main</code> template. Be sure to reference text and sources by using <code><nowiki><ref></nowiki></code>, as well as adding them at the end of the article.''--> | ||
| + | The FV510 infantry fighting vehicle was developed as part of a program to create a modern IFV for the British army at the end of the ’70s. The vehicle went into series production in 1986. The vehicle was equipped with 30 mm gun, fed by magazines of three shells each. This gun was designed to destroy lightly armoured vehicles with maximum accuracy. For the Desert Storm operation, the Warriors were equipped with Chobham passive armour – add-on armour plates that significantly improved the IFV’s defence in battle, allowing it to survive a hit from an RPG-7 grenade and shrapnel from high-calibre HE rounds. A little later, in 1990, the military decided to equip the Warrior with anti-tank weaponry – a 30 mm gun for these targets was clearly not enough. The roof of the turret was equipped with a launcher for the MILAN ATGM. The commander used a hatch to fire the ATGM, and it was reloaded through the upper hatch of the armoured vehicle’s infantry compartment. The FV510 Warrior is still in service with the British army and is the main IFV of the United Kingdom. | ||
| − | ''- From [ | + | ''- From [https://warthunder.com/en/news/5753-development-fv510-warrior-built-for-the-future-en Devblog]'' |
== Media == | == Media == | ||
| − | '' | + | <!--''An excellent addition to the article will be video guides, as well as screenshots from the game and photos.''--> |
| + | {{Youtube-gallery|pTSojlOp7bI|Confusion and destruction tactics with the Warrior.|18Nl66ImFU4|PhyDaily - Warrior gameplay in Realistic Battle}} | ||
== See also == | == See also == | ||
''Links to the articles on the War Thunder Wiki that you think will be useful for the reader, for example:'' | ''Links to the articles on the War Thunder Wiki that you think will be useful for the reader, for example:'' | ||
| − | * ''reference to the series of the | + | * ''reference to the series of the vehicles;'' |
* ''links to approximate analogues of other nations and research trees.'' | * ''links to approximate analogues of other nations and research trees.'' | ||
| Line 185: | Line 433: | ||
<!--''Paste links to sources and external resources, such as:'' | <!--''Paste links to sources and external resources, such as:'' | ||
* ''topic on the official game forum;'' | * ''topic on the official game forum;'' | ||
| − | * ''encyclopedia page on | + | * ''encyclopedia page on tank;'' |
* ''other literature.''--> | * ''other literature.''--> | ||
| − | * [ | + | * [https://warthunder.com/en/news/5753-development-fv510-warrior-built-for-the-future-en [Devblog<nowiki>]</nowiki> FV510 Warrior: Built for the future!] |
| − | {{Britain | + | {{Britain light tanks}} |
Revision as of 09:44, 18 October 2019
Contents
Description

The Combat Vehicle, Personnel, Tracked, 30mm Gun, Warrior FV510 (or just the Warrior) is a Rank VI British light tank
with a battle rating of 8.3 (AB/RB/SB). It was introduced in Update 1.81 "The Valkyries".
Warrior is basically a box with a round turret, which has a little gun in middle, "ears" (ATGM cameras), and the ATGM launcher itself on the right side. Front of the hull is sloped, but it doesn't really help. On its right, there is an exhaust port, which may prevent gunner from firing precisely in Realistic Battles, but usually, it's not a problem.
If the vehicle has Add-on armour, it's easily identified for its riveted plates on sides of the vehicle. Usually, after being shot with a high velocity round, they break off. Plates do not protect the rear of the vehicle.
Practically, the Warrior is the only proper light tank the British faction has. It's mostly played as an aggressive ATGM tank or ambush scout tank, though it can fulfil any role that doesn't involve it being constantly shot at.
It's best described as a hybrid between a slowed down SPAA and assault ATGM launcher, while armour is either nonexistent or installed via a modification to partially protect from hazards that normally annihilate light tanks. The weapon combo is potent enough to destroy even modern MBT's, and with add-on armour, the Warrior can bully even heavy tanks in close range, though the turret is still very vulnerable.
The Warrior can be played defensively (mostly around hills and mountains), or aggressively (on flat terrains and in towns), given that there is enough cover for the Warrior. In realistic battles, Warrior can also hide relatively well and use either of its weapons to punish unsuspecting people, or just scout them.
This vehicle is very easy to play while still in stock mode, as it has most essentials available at stock or unlocked early on, however, every upgrade only makes it even stronger.
General info
Survivability and armour

Warrior is well protected against heavy machine guns, however, it's a turret, engine ventilation, hull's back and even sides have weakspots, which can be penetrated by 12.7 mm and 14.5mm HMG, if shot correctly. Frontal armour can sustain light automatic cannon fire. Anything of higher caliber has high chance of destroying the light tank immediately at close range.
The Warrior can be hull-broken by any chemical shells of 105 mm calibre and kinetic shells of 120 mm calibre. Due to its boxy profile, it often gets accidentally hit by ATGM's that were meant for other tanks nearby. Also, if artillery hit its hull or turret directly, it will instantly blow up entire tank.
It's important to remember, that hull itself is somewhat resistant to hull break, but suspension, ventilation or track hit can instantly destroy the tank if done by any chemical explosives of any caliber. Heavy Explosives (HE) of high enough caliber instantly hull break the tank regardless of hit surface, destroying tank even if shockwave barely reaches any part of the tank.
Vehicles defenses with and without add-on armour vary greatly:
Coaxial autocannons and low calibre SPAA penetrate turret and hull sides without add-on armour instantly. With add-on armour hull generally can sustain attack for 1 to 5 seconds, depending on angle of attack.
Due to armour being thick enough to protect from HMG, it will trigger fuse on any cannon shell in the game, unless it hits engine ventilation (which is extremely unlikely and bad on its own). As such, popular misconception of not using add-on armour to "increase the chance of over-penetration and move faster" should not be taken as a single truth. In fact, single APDSFS or APHE can annihilate Warrior easily by just scratching it, if it enters the vehicle at a bad angle.
Overall, add-on panels defend the sides and half of the front of the hull, with the frontal plate covering the driver. These panels protect from chemical ammunition, and add a bit of an edge against kinetic ammunition. The side panels also hide obvious weak spots on warrior's hull (hatches), forcing enemy to fire randomly. Side armour plates can block HESH and some weaker forms of chemical ammunition with about 130-160 mm of penetration power, the frontal plate can save from about 220 mm of chemical penetration power, saving the light tank from hull break. Unfortunately, since composite armour panel placement is not solid, sometimes shrapnel can penetrate stitches between them and destroy track, resulting in hull break.
As such, with Add-on armour, the Warrior can survive almost any machine gun fire, misplaced autocannon fire, close artillery miss, low-caliber SPAA fire, some chemical shells and the other things, that normally cause hull break or annihilate light tanks, so the Warrior can play much more boldly and harass enemy if they are alone.
In case if frontal panel somehow saved the vehicle from a frontal shot, but failed to completely nullify the attack, the Warrior will be very likely set on fire and have the engine broke, which may mean an impending knock-out if unable to retaliate, so keep that in mind. Keeping low ammo amount (about 30 out of 104 magazines) increases chance of survival against HEAT shells after hull break prevention.
If 120 mm HE hits the frontal NERA plate, explosion can still reach the turret and blast it off the tank, resulting in hull break. Avoid being hit by it at all costs.
The front-right side does not have complete armour protection because it's expected, that engine compartment takes the hit for the vehicle. In game, it cannot prevent hull break, caused by explosives even touching the track, so try to face the enemy with the left side, if possible. Engine deck can prevent hull break from HEAT and, sometimes, HESH.

The side plates are not invulnerable, and so, after being hit too hard, they will break off, much like explosive reaction armour. The protection quality of these armour plates is most notable when compared to facing the BMP-2 (when it gets destroyed immediately) and the Begleitpanzer (when it actually saves the vehicle from grazing shots and only then falls off).
Any AP based shot, like APHE, will go through composite lists unless it was a grazing shot. Because of this, it's advised to avoid directly attacking SPAA with 30mm guns, and other IFV, as those can destroy the Warrior even without special APDS ammo, and have guns with much higher rate of fire.
Here is the most unlikely and ridiculous example of add-on armour saving the Warrior's life. IT-1 ATGM has about 500 penetration power, which should destroy side armour of warrior at any angle, and even frontal plate with ease, however:
.jpg)
.jpg)
.jpg)
Since this particular edge of Armour plates is invulnerable, ATGM destroyed the entirety of Warrior Armour, but Warrior survived. As could be seen here, armour on warrior is extremely random. The sharper the angle of attack, the bigger the chance of miraculous survival.
Mobility
Mobility is adequate on vehicle's BR, it can move forward and backwards equally fast, but don't expect it to be climbing mountains like with the Vickers MBT in Arcade Battles. It will just slide down if the surface is too steep.
In Arcade Battles, it's generally driving at 46-54 km/h offroad in either direction without engine upgrades, regardless of additional armour. With mobility upgrades it may drive up to 60 km/h, but not very often. Speed of 81-83 km/h can be reached if the Warrior drove off the hill and keep driving forward, or on completely flat terrains, like roads in the American desert, though sometimes it just doesn't work again at the same spot.
Accidentally hitting something on max speed, especially explosive decorations, launches the Warrior up to 5 meters in the air, which is very entertaining, but almost never fazes the enemy.
| Mobility characteristic | |||
|---|---|---|---|
| Weight (tons) | Add-on Armour weight (tons) |
Max speed (km/h) | |
| 22.5 | 1.0 | 83 (AB) | |
| 75 (RB/SB) | |||
| Engine power (horsepower) | |||
| Mode | Stock | Upgraded | |
| Arcade | 852 | 1049 | |
| Realistic/Simulator | 486 | 550 | |
| Power-to-weight ratio (hp/ton) | |||
| Mode | Stock | Upgraded | Upgraded w/ add-on armour |
| Arcade | 37.87 | 46.62 | 44.63 |
| Realistic/Simulator | 21.60 | 24.44 | 23.40 |
- Adding armour does not decrease Warrior's hp/ton significantly, and it only reduces maximum climb angle by 2 degrees, so it should be used when unlocked without worries of mobility penalty.
- Despite having enough horsepower, cannot climb mountains.
Armaments
First of all, one needs to understand that both of the weapons on the Warrior are useful.
Main armament
The gun is very slow firing, but with APDS belt it can penetrate the sides of most medium tanks and SPGs. Basically, it's effective against medium tanks, but lacklustre against fast vehicles that have spaced armour. It can be used to hurt crew from over 1 km distance, but it's not very good at damaging enemy ammo racks, so it's best used to destroy engines, tracks and crew unless it's easier to hit.
Proper heavy tanks are normally not fazed by its fire at all, but for them there is the powerful MILAN launcher, which can penetrate them even from the front with its 580 mm penetration power, leaving them completely disabled.
In a perfect world, even in the worst situation, the Warrior can still use its 30 mm gun to de-track charging enemy tank and instantly destroy it with side shot or ATGM, but it's not very likely that the Warrior will live that long.
Also, in a worst case scenario, the 30 mm autocannon can be used to try and shoot down planes with it, but it will require skill with slow-firing SPAA (like the Crusader AA MK I), and any plane coming down at a high angle can't be engaged.
Not convinced? The main gun can still remove any trees and solid fences at any range, which is normally a nightmare for any other British ATGM vehicle.
| 30 mm L21A1 | |||||
|---|---|---|---|---|---|
| Capacity (Belt capacity) | Fire rate (shots/minute) |
Vertical guidance |
Horizontal guidance |
Stabilizer | |
| 222 (6) | 81 | -10°/+45° | ±180° | N/A | |
| Turret rotation speed (°/s) | |||||
| Mode | Stock | Upgraded | Prior + Full crew | Prior + Expert qualif. | Prior + Ace qualif. |
| Arcade | 57.1 | 79.06 | 96.0 | 106.16 | 112.94 |
| Realistic | 35.7 | 42.0 | 51.0 | 56.4 | 60.0 |
| Reloading rate (seconds) | |||||
| Stock | Prior + Full crew | Prior + Expert qualif. | Prior + Ace qualif. | ||
| 1.30 | 1.15 | 1.06 | 1.0 | ||
Ammunition
| Penetration statistics | |||||||
|---|---|---|---|---|---|---|---|
| Ammunition | Type of warhead |
Penetration in mm @ 90° | |||||
| 10m | 100m | 500m | 1000m | 1500m | 2000m | ||
| Default | AP-I/HEI-T* | 60 | 53 | 40 | 33 | 28 | 19 |
| 30x170 APDS-T | APDS | 110 | 101 | 95 | 69 | 52 | 41 |
Belt types
| Belts | Shell composition | Combat usage |
| Default | AP-I, HEI-T
(Armor Piercing Incendiary), (High-explosive incendiary-tracer) shells |
This belt can be used against other light tanks and certain lightly armoured medium tanks. However, it also includes anti-air round (HEI-T), which does increase damage to air targets but is useless against tanks at rank 5. The low rate of fire of Warrior doesn't compliment this dual belt. |
| 30x170 APDS-T | APDS (Armor piercing discarding sabot) shells |
This belt can be used against sides of most medium tanks of rank 5 and 6, and even some heavy tanks can be damaged by it. Performance of this belt deteriorates much slower than of AP-I belt, but it does less damage the more armour it had to penetrate, resulting in an inability to set off enemy ammo racks in 1 hit if it was behind any good armour. If used against planes, it can damage or rip off wings, or snipe out the pilot. |
Ammo racks
| Full ammo |
1st rack empty |
2nd rack empty |
3rd rack empty |
4th rack empty |
Visual discrepancy |
|---|---|---|---|---|---|
| XX | XX (+XX) | XX (+XX) | XX (+XX) | XX (+XX) |
Turret empty: 62 (+3)
Front empty: 33 (+32)
Additional armament
Warrior carries MILAN missiles as a secondary weapon.

The MILAN missile itself is launched at absurdly high speed in contrast to Swingfire missiles while retaining good control. This makes it very hard to dodge up to 700 m range, but harder to turn it into enemy cover, especially horizontally. However, it can be launched above small obstacles and flat hills, if the enemy is far away enough.
It can be used in general melee range, but cannot be fired point-blank (10 m or so), and if not careful it can overshoot (look at launcher itself in Third-person view to avoid this). It cannot be used for super-long range attack, as it's maximum range is just 2 km.
MILAN launcher can be upgraded to the MILAN 2, which has an absolutely insane 730 mm of armour penetration. Needless to say, it simply disintegrates or cripples the target tank that doesn't have chemical armour, unless the missile somehow hits the enemy gun barrel.
The Warrior also cannot be flanked, unlike normal ATGM launcher, since its weapons are turret based.
| 103 mm MILAN ATGM | ||||||
|---|---|---|---|---|---|---|
| Capacity | Vertical guidance |
Flight speed on launch (m/s) |
Max Flight speed (m/s) |
Range (m) | ||
| 8 | N/A | ~160 | 200 | 2,000 | ||
| 115 mm MILAN 2 ATGM | ||||||
| Capacity | Vertical guidance |
Flight speed on launch (m/s) |
Max Flight speed (m/s) |
Range (m) | ||
| 8 | N/A | ~200 | 200 | 2,000 | ||
- Despite being launched at their max speed, they are still very manoeuvrable, so they still can be curved behind some hills at targets ~500 meters away, and generally targets up to 800 meters can't dodge it.
Ammunition
| Penetration statistics | |||||||
|---|---|---|---|---|---|---|---|
| Ammunition | Type of warhead |
Penetration in mm @ 90° | |||||
| 10m | 100m | 500m | 1000m | 1500m | 2000m | ||
| MILAN | ATGM | 580 | 580 | 580 | 580 | 580 | 580 |
| MILAN 2 | ATGM | 730 | 730 | 730 | 730 | 730 | 730 |
| Shell details | ||||||||||
|---|---|---|---|---|---|---|---|---|---|---|
| Ammunition | Type of warhead |
Velocity in m/s |
Projectile Mass in kg |
Fuse delay
in m: |
Fuse sensitivity
in mm: |
Explosive Mass in g (TNT equivalent): |
Normalization At 30° from horizontal: |
Ricochet: | ||
| 0% | 50% | 100% | ||||||||
| MILAN | ATGM | 200 | 6.6 | 0.0 | 0.1 | 1,400 | +0° | 80° | 82° | 90° |
| MILAN | ATGM | 200 | 7.0 | 0.0 | 0.1 | 1,800 | +0° | 80° | 82° | 90° |
Ammo racks
| Full ammo |
1st rack empty |
2nd rack empty |
3rd rack empty |
Visual discrepancy |
|---|---|---|---|---|
| 8 | XX (+XX) | XX (+XX) | XX (+XX) |
Machine guns
The machine gun is kind of useless for Warrior, but it can still destroy weak fences, which normally slows any tank down if they hit them, and it makes much less noise than the main gun. For enemy marking purposes, Scouting should be used instead, as it doesn't reveal the vehicle.
| 7.62 mm L94A1 | ||||||
|---|---|---|---|---|---|---|
| Coaxial mount | ||||||
| Capacity (Belt capacity) | Fire rate (shots/minute) |
Vertical guidance |
Horizontal guidance | |||
| 2,000 (2,00) | 600 | N/A | N/A | |||
Usage in battles
Generally, Warrior needs to quickly get into the medium range of the expected enemy, then figure out its strategy for the current battle. While moving towards an objective, Warrior should keep a low profile and scout every enemy it can notice.
After looking around, Warrior either takes some hills or well protected hull-down position near to capture point to utilize ATGMs and scouting ability for medium range attacks and team support, or takes an aggressive approach and goes for stealthy flanks and close range combat. It's not rare to see Warrior try and destroy heavy tanks, which just don't expect the light tank to go at them.
If forced, Warrior can always use a smoke screen to disrupt enemy plans of taking it down, either baiting them to waste time looking for it, or using smoke screen, MILAN-2, scouting and add-on armour together to attack the enemy from the fog with little fear of being punished for it. For some reason enemy does not often reply to ATGM shots but instantly fires back at cannon fire, so use cannon sparingly during this.

In any mode, but especially in AB, mark the enemy with the "scout" ability, so they can be found whenever smoke is deployed. This must be done for two main reasons:
- Since the MILAN ATGM can instantly destroy or cripple anything, even seeing just the name of enemy and type of tank through smoke is good enough for the Warrior to have a chance for a hit. In realistic battles, it's less reliable, but the Warrior can still see where the enemy is. For light tanks, the 30 mm autocannon can work just fine (just don't do that against BMP; unless it already spotted and scouted the Warrior, it's not worth it).
- In Arcade Battles, If the "intelligence" reward is obtained for marking enemy that was or is invisible to teammates and then got destroyed, the player will get artillery support point and airstrike point. If the squadmates destroys the marked target, the player will get airstrike point regardless as a squad assist.
Due to this, in 9.0 arcade battle warrior can call in ATGM helicopters on very first minute of a fight, simply by marking 2 enemy vehicles and destroying someone with an almost undodgeable and unblockable missile, while the enemy cannot even request gunships to protect themselves from it. ATGM helicopter than can destroy 6 to 10 enemy tanks, significantly weakening the enemy team. As the game goes on, Warrior can join multiple air battles in a row as second attack helicopter or bomber, because it's a scout vehicle.
Since MILAN has relatively good controls and there is 8 missiles total, the Warrior can try and fire it above hills and guide it down on people, much like Swingfire and Striker. It's harder to aim at the enemy without a straight visual firing line, but if it hits anywhere important, they could be knocked out anyway. Since the Warrior is considered a scout vehicle, mark them and ping them on the map, even if a shot lands a hit.
In Arcade Battles (AB), it's best to fire the missile at tank's gunner, so in case if it didn't destroy the tank on its own, the Warrior can just circle around the enemy and use the main gun to destroy the engine, then proceed to incapacitate the crew. In Realistic battles (RB) even taking out cannon barrel or breach might be enough, as repairs in that mode take much more time, and field repair doesn't even guarantee, that gun won't just jam itself again or fire in a completely different direction.
As with all light tanks play style, be very wary of people that have any kind of explosive ammo, as the Warrior has the Hull Break mechanism on it and can be easily engaged. With Add-on armour, the Warrior can fight them directly, but the vehicle's turret, front and back are still a giant weak spot.
Usually, MBT's will carry AP ammo as their first shot, which may just over penetrate and maybe do almost nothing. So if there is an absolute must directly attack someone, attack them, SPGs or other non-Soviet light tanks.
There is also a trick related to the Warrior - if baiting an enemy that is looking towards the Warrior, pull the Warrior's rear end out of cover first. Since the rear has very little critical components outside of the MILAN missile stowage, usually being shot there doesn't do anything too drastic for the overall tank health. After being fired at, drive out of cover and fire back at them. This trick probably won't work twice, indicating you should make the most out of the opportunity you have at hand. Nobody likes to be shot with ATGMs and the second shot coming will most certainly be HE of some kind. This tactic may backfire if your IFV gets shot with APHE, or APDSFS will enter the vehicle at a bad angle, but those types of ammunition have the potential of instantly destroying Warrior regardless of the entry point.
Finally, the Warrior can also repair any allies, so if in cover and not busy - do help them.
Specific enemies worth noting
Any Soviet light tanks: Destroy it with ATGM, use scout ability to see when they are trying to leave their cover, use gun adjustment to never miss, generally never play around with them. BMP-1 will just hull break the Warrior, BMP-2 will just turn on full auto mode and unload half of its magazine into its target, even if it misses its ATGM, just to get rid of a threat and even add-on armour won't save the Warrior at that point. Oddly enough, the infamous Object 906 is probably the least dangerous of them, but it will still destroy the Warrior with proper shot placements. If the Warrior is spaded in modifications, just call artillery strike on them.
IS-7: Do not ever engage this thing frontally without MILAN 2 and add-on armour. It is also extremely risky to attack it on a narrow street. Fire at the right (their left) side, to disable its turret. The main goal in engaging this tank is to disable its engine with the 30 mm gun and then blow it up by destroying its ammo in back of a turret or just blowing it up by firing ATGM in the middle of it or into ammo rack, if there is a spare ATGM (the IS-7, as a threat to any BR below 8.0, should be prioritized with every missile in the Warrior's capacity). Even the many machine guns on the IS-7 can shred the Warrior apart.
Any tank with heavy machine guns: If possessing the add-on armour modification, simply avoid turning the rear towards them, otherwise the weak rear armour would be easily penetrated. Weaker machine guns of around 7.62 mm calibre can't penetrate the Warrior armour at all, and even 14,5 mm will have some problems penetrating the front of the hull and protected sides, so just destroy them by returning cannon fire and avoiding being hit in the turret. They'll never see it coming.
Counter-tactics
Just fire at its turret, preferably with explosives or high fire rate guns.
If it tries to spook away a threat by being ominous and peeking over hills, disable its ATGM camera (on "ears") with concentrated fire if a direct hit to the crew and modules is not possible. Keep in mind that must damage whole IFV really hard for ATGM repairs to take long (otherwise it may take less than rearm time, which is not good). If the missile is already homing towards a vehicle with no way to break visual, try to get outside of direct missile control range (which will make missile spiral crazily and possibly missing by a centimetre) or face it with the gun barrel in hopes that it would absorb the damage and not cripple any critical modules.
Never fire pure AP rounds to the back of this tank, since unless it hits one of the missile ammo racks there, it will just do nothing to it.
If the Warrior has the add-on armour package, do not underestimate it and use anything possible when engaging it, not just HMG. Warrior repairs and reloads fast enough to disable its adversaries, if it must, just set it on fire is not going to stop it. Low calibre machine guns are useless against hull from front, despite it having incomplete add-on armour protection.
In case Warrior destroyed your primary weapon, but you still have 12.7 mm machinegun, you can fire at it's ventilation to destroy it. It's very well hidden on the right-front side of the IFV (left for you, if facing it) behind a small gray shield, making it nearly unnoticeable. Firing at ventilation from the side is also possible, but it will do less than fatal damage.
The Warrior can be destroyed by a fighter jet. However, do not just strafe it directly, as it actually can fire back and may have armour. It's best to attack it from the top.
Pros and cons
Pros:
- Extremely powerful ATGM with 8 missiles
- Can stop pushes if manages to get to good cover
- Can survive a direct hit by a miracle and even brawl with MBT's if armour mod is installed
- The only British light tank beyond rank 1
- Has gunner thermal vision and commander / driver night vision
Cons:
- Can be destroyed by other light tanks easily, especially if situation awareness is not maintained
- Any properly landed turret shot will destroy the vehicle, with nearly no way to survive if it was a HE shell
- Many will be disheartened by the main gun's performance, especially in a duel with other light tanks
- Add-on armour does less than one may expect from it, it's not clear when the Warrior survived a hit by sheer luck or because of armour plates.
- Engine exhaust placement (front right corner of tank) means that hot exhaust fumes obscure gunners thermal vision when looking between approximately 45° and 80° to the right.
History
The FV510 infantry fighting vehicle was developed as part of a program to create a modern IFV for the British army at the end of the ’70s. The vehicle went into series production in 1986. The vehicle was equipped with 30 mm gun, fed by magazines of three shells each. This gun was designed to destroy lightly armoured vehicles with maximum accuracy. For the Desert Storm operation, the Warriors were equipped with Chobham passive armour – add-on armour plates that significantly improved the IFV’s defence in battle, allowing it to survive a hit from an RPG-7 grenade and shrapnel from high-calibre HE rounds. A little later, in 1990, the military decided to equip the Warrior with anti-tank weaponry – a 30 mm gun for these targets was clearly not enough. The roof of the turret was equipped with a launcher for the MILAN ATGM. The commander used a hatch to fire the ATGM, and it was reloaded through the upper hatch of the armoured vehicle’s infantry compartment. The FV510 Warrior is still in service with the British army and is the main IFV of the United Kingdom.
- From Devblog
Media
See also
Links to the articles on the War Thunder Wiki that you think will be useful for the reader, for example:
- reference to the series of the vehicles;
- links to approximate analogues of other nations and research trees.
External links
| Britain light tanks | |
|---|---|
| A13 | A13 Mk I · A13 Mk I (3rd R.T.R.) · A13 Mk II · A13 Mk II 1939 |
| A15 | Crusader II · Crusader "The Saint" · Crusader III |
| A17 | Tetrarch I |
| IFV | Warrior |
| Wheeled | Daimler Mk II · AEC Mk II · Fox · Vickers Mk.11 |
| Other | VFM5 |
| South Africa | |
| SARC | SARC MkIVa · SARC MkVI (2pdr) · SARC MkVI (6pdr) |
| Ratel | Ratel 90 · Ratel 20 |
| Rooikat | Rooikat Mk.1D · Rooikat 105 · Rooikat MTTD |
| Other | Concept 3 · Eland 90 Mk.7 |
| USA | Stuart I · Stuart III |
