|
|
| Line 1: |
Line 1: |
| − | {{DISPLAYTITLE:Bangerland}} | + | {{Specs-Card|code=p-47d_ussr}} |
| − | {{Userbox/Windows}} | + | {{About |
| − | | + | | about = premium fighter '''{{PAGENAME}}''' |
| − | {{Userbox | + | | usage = other versions |
| − | |id = [[File:WW Artillery logo.png|60px|none]]
| + | | link = P-47 (Family) |
| − | |id-background = red
| |
| − | |info = ATGM main, which likes his indirect strikes. Incoming artillery fire!
| |
| − | |info-font-size = 11
| |
| − | |border = red
| |
| | }} | | }} |
| | | | |
| − | {{Userbox/Favorite vehicle|uk_fv102_striker|game}}
| + | == Description == |
| − | {{Userbox/Favorite vehicle|ussr_is_7|rank}}
| + | <!-- ''In the description, the first part should be about the history of and the creation and combat usage of the aircraft, as well as its key features. In the second part, tell the reader about the aircraft in the game. Insert a screenshot of the vehicle, so that if the novice player does not remember the vehicle by name, he will immediately understand what kind of vehicle the article is talking about.'' --> |
| − | | + | [[File:GarageImage_P-47D-27_USSR.jpg|420px|thumb|left]] |
| − | | + | {{break}} |
| − | == Who am I? == | + | The '''{{Specs|name}}''' is a premium rank {{Specs|rank}} Russian fighter {{Battle-rating}}. It was introduced in [[Update 1.43]]. This aircraft is a Soviet lend-lease version of the iconic American [[P-47D-25]], with only minor differences including a camouflage colour scheme and Russian forged and welded FAB bombs weighed in kilograms instead of the American bombs AN-M series bombs weighed in pounds. |
| − | | |
| − | I'm a British ground forces main, registered my account at 2016, but really started playing in 2018. Mostly playing in AB, since I feel like vehicles there have most balanced stats game-wise there, if you forget about wallhack and aim assist up to 1km range. If not for those two facts, I'd never ever leave AB, lol. Actually, either of these options on their own would be fine, but together it's is a bit too much sometimes.
| |
| − | | |
| − | I do have some planes, but bombers that I used are very moody mistresses, they have gunners that either destroy every fighter in 360 degrees and on max range, or do nothing. Hurricane MK IIB/trop and Nimrod II so far left the best impression on me, and so I mostly prefer sea fighters over anything else.
| |
| − | | |
| − | ===Favorite ground vehicles so far===
| |
| − | | |
| − | British?
| |
| − | | |
| − | [[Avenger|A30 SP Avenger]] - It really lives up to it's name, whether you snipe with it, or drive it GTA style. Never fails to deliver your salt, even in uptier.
| |
| − | | |
| − | [[Tortoise|A39 Tortoise]] - It is fun to play as breakthrough tank, or just to be a giant "boss" tank for players to shoot at, preventing spawn camping. You really will love those instant karma moments, even if you get nothing out of it. Though Germans love to destroy it, and some players outright punch through the middle of it, sadly.
| |
| − | | |
| − | [[Falcon]] - It's more effective tank than most rank 5-6 tanks, especially if you know how to fire at tracks with auto cannons, forcing enemy to turn and get destroyed... And it's a good AA, lol. But with every patch Gaijin increases repair price for it in AB by 6k. Lately finally nerfed it from 22k to 14k. Why is it so expensive? I dunno, beats me. Be careful with trigger discipline, single belt rearms for a minute and then reloads for as long. You '''will''' be destroyed :D . French [[AMX-30 DCA]] is basically same thing, but hull has 230 mm armour which often deflects APHE point blank, but if it pens, the tank is toast.
| |
| − | | |
| − | [[Centurion Mk 1]] - After playing with other nation, I can see how it's alright. It can bounce enemy shot when cutting a corner, then fire back at them and go on with it's business. And it's not terribly overtiered, like the rest of them.
| |
| − | | |
| − | Radar SPAA in general - Since the lock-on update playing such SPAA became a bliss. As British main I just use [[Chieftain Marksman|Marksman]] right now, which can incinerate every light vehicle in 2km range on top of shredding anything that flies. It also generates hatemails like crazy, since people underestimate it due to it's snail speed and ridiculous size.
| |
| − | | |
| − | [[Warrior|All]] [[Swingfire|British]] [[Striker|ATGMs]] - That feeling when people just despair and give up in their own cover under ATGM rain is priceless. They launch up to 10 artys at once on you. It makes you feel special, even if you do die from it.
| |
| − | | |
| − | [[File:Striker LastStandStrike.jpg|thumb|oh god why]]
| |
| − | | |
| − | japan?
| |
| − | | |
| − | [[Chi-Ha Kai]] - the first tank in jap line that doesn't need HEAT to defeat something. It also has decent control. Can be used to steadily break enemy, at least in successive 1v1 duels. Massive rush will obliterate it. Actually, every tank after this one is mostly alright, though mostly its like this: glass cannon->tank that can actually bounce-> glass cannon -> tank that can actually bounce. Chi-to and Chi-to late are the most obvious successors of chi-ha kai and example of this rotation.
| |
| − | | |
| − | [[Chi-Ri II]] - Giant landship, easy to destroy, autoloader reload speed is not much better than godawful indestructible [[Cobra King]], but if you'll manage to get it into proper spot near to capture point, so that nobody can get past friendly snipers without going straight into your APHE kill-zone, your enemies will regret everything. Actually, even better, work with [[M4A3E2]] or similar tank and fire at enemy from behind it, once they fired their guns. That will work great on cluttered street, as nothing can destroy jumbo anyway, and you will punish them for not leaving earlier. Can destroy rank 1 HE heroes, Italian automobiles and bait opponents with secondary APHE gun. In AB, spaded chi-ri can even flank (what???) and destroy enemy's initial push on some maps before they realize where they're being shot from.
| |
| − | | |
| − | [[Ho-Ri Production]] - Probably even more awful tank than [[M4A3E2]], balanced only by the fact, that rank 4 and 5 have enough counters to it. Can bounce anything at range, can tank APHE from most tanks, is literally unstoppable when used properly, can survive being shot at by 6 vehicles at once multiple times and destroy some of them. Explodes to pure AP shot to transmission (French), ammo rack flanks (GE) and heavy SPG in general ([[jagdtiger]], etc), can be slowly deconstructed by HEAT tank, occasionally destroys itself, trying to blow up [[T-54 (1947)|T-54]].
| |
| − | | |
| − | === Hated ground vehicles so far ===
| |
| − | | |
| − | [[Conqueror|Conqueror MK2]] - God, this thing gets lit on fire even by random vehicles blowing up near to it's side, and explodes from random shots to the track. I even got destroyed by Centurion AVRE, that MISSED me. YEAH. I realize that this vehicle is great in RB and all, but why it is so flammable in AB is beyond me.
| |
| − | | |
| − | [[Caernarvon]] - I honestly don't understand what's good in this tank. Even [[FV4202]] was better for me. I guess have to fight Germans way too often to see it's good side in action.
| |
| − | | |
| − | [[Warrior]] - I love it, but I also hate it. Why [[BMP-1]] cannon shell can hull break warrior even when it hits add-on armor, and cannot hull break [[striker]]? Why [[BMP-2]] bullets can instantly destroy armour plates from over 1.5KM and instakill it? I got hit by ATGM from [[IT-1]] and lived somehow, losing all armour on my left side, but cannot survive BMP? How is that??? Also, Soviet light tanks now can survive hull break by being hit into engine or even ''radiator'', but Warrior seems to not be able to do that. Common sence is overrated, I guess.
| |
| − | | |
| − | [[Na-To]] - I feel like this tank is a failure on it's BR. Not only it's open topped again (after [[Ho-Ni III]]), but it reminds people of [[8,8 cm Flak 37 Sfl.|flakbus]], and so it will trigger every person in 2km range to attack you until this truck is annihilated, which happens a lot faster, because it doesn't have flakbus armour or spacious crew placement. One can even one-shot it with APHE, if they know how. You may also expect to use it in up-tier with APCR, but it's penetration is just not good enough for frontal shot. If to compare it to other vehicles at rank, [[90/53 M41M]] creates such a horror effect to anyone who ever was shot by it, it doesn't even need any protection, not to mention it's much more resistant to damage.
| |
| − | | |
| − | === Archnemesis ===
| |
| − | | |
| − | [[IS-4M]] - whenever I meet it, I don't live long enough to understand where to shoot it, lol. Appearantly, you just shoot it below turret into that giant triangle, and it either explodes, or you are just screwed.
| |
| − | | |
| − | [[Merkava Mk.1 (USA)]] - If you want to drive chemical ammo\light tank user mad - that's your vehicle of choice, as it's packed with fuel tanks and RHA screens. Turret is almost invulnerable to kinetic damage as well. Can be obliterated by APDSFS from the front, APHE to turret neck, or by shots from the side (rear is pretty much invulnerable to chem ammo too).
| |
| − | | |
| − | ==Relative camera controls for ATGM==
| |
| − | | |
| − | Okay, this is very seriously important for any british ATGM main, if you really want to '''destroy''' the opposition.
| |
| − | It fixes camera issues in melee range and when camping on steep hills.
| |
| − | | |
| − | You need to set "relative camera angle" for your aiming, by going to control-tank-camera control - "view in battle - ground (Y axis)".
| |
| − |
| |
| − | In new menu you need to activate "relative controls" and "keep value for disabled axis", then set buttons for "Increase value", "decrease value", "enable axis" and "reset axis value". For example i set them to NUM 7,9,8,4 respectively. The sensitivity is up to taste, but i took it to the extreme, as it's faster to do.
| |
| − | | |
| − | What it does: you use "decrease" and "increase" value to set a direction for camera (down or up basically), and on press of "activate axis" it detaches your camera from your reticle by a certain angle. You can make your camera look sky-high up, so when you actually aim in front of you, you can now truly aim for enemy, not just randomly fire missiles everywhere, enabling you full melee combat capabilities, allowing you to look behind ridges, while aiming, and fixing the problem on pictures below. Or you can fire upwards without looking at the back of your vehicle (though that's usually fixable by just pressing Z, but something like [[Type 60 ATM]] needs this feature.)
| |
| − | | |
| − | When you are done, you use "reset axis value" and "activate axis" to return to normal aiming mode.
| |
| − | | |
| − | It's also possible to do to horizontal axis, allowing to see people behind rocks as you turn missiles there, though it's only good for you in towns and mountains at specific spots.
| |
| − | | |
| − | Now only thing left is finding out if it's possible to ruin semi-auto aiming by triggering manual control by a button somehow. Though i doubt i'ts possible.
| |
| − | | |
| − | [[File:Before_camera_adjustment.jpg|240x240px]][[File:After_camera_adjustment.jpg|240x240px|center|after.]]
| |
| − | | |
| − | ==How to sneak up to enemy tanks in Arcade Ground Battle==
| |
| − | | |
| − | <!--A section for a potential article, since 99.99999999% of people I met are incapable of doing that, nor do they think it's possible-->
| |
| − | | |
| − | Arcade Battles provide a huge benefit to casual players - most notable, an ability to see enemy tanks through vegetation by seeing their "marks" and "aim assist", which tells where shells land up to 1KM away, and instant rangefinder hints any further away.
| |
| − | | |
| − | Due to this, many deem it impossible to do a surprise flank attack in Arcade mode. While this is mostly true for open plain maps, there are still ways to sneak up on enemy tanks, or to hit them out of seemingly nowhere, if one knows game mechanics and how to get around them.
| |
| − | | |
| − | ===Tank vision in Arcade mode===
| |
| − | | |
| − | ====General vision rules====
| |
| − | | |
| − | Main skill for detection is "keen vision" - it allows player tank to see enemy on their screen, when they enter specific ranges around them. While ability to see tank is important in realistic battles, it's nearly irrelevant in arcade battle, unless you are using very specific tanks.
| |
| − | | |
| − | What one really needs to know, is how far and through what enemy tank is visibly "marked", as it makes your presence obvious to everyone.
| |
| − | | |
| − | '''Firstly''', your tank gets marked, when enemy commander (cupola) or gunner have direct vision on your tank, and you are in their "keen vision" skill range, and light tanks have 30% bonus vision from a modification. If an enemy is using binoculars or sniper aim, their vision power is tripled.
| |
| − | | |
| − | The marking range starts with about 563 m and ends with about 1200 m for a normal tank and 1600 for scouts. Note that only a limited amount of players have "ace" tanks, so their vision will be less than maximal most of the times.
| |
| − | | |
| − | This does sound unfair, however, you only get marked if player '''actually looks at you''', and the closer you are to them, the harder it is for them to notice you.
| |
| − | | |
| − | <!-- Screenshots showcasing a fool not looking around, and some reminder to look around yourself, while at it.-->
| |
| − | | |
| − | Others '''will not''' start magically seeing you if one of their party noticed you. They only see you on the minimap, and only if their "radio communication" is high enough.
| |
| − | | |
| − | Trees and other vegetation do not prevent vision, '''but buildings, tall stone walls, rocks and terrain do'''. Do note, that '''you should stand as close to cover and as away from it's corners and hill tops''' as possible for obstacles to cover you from sight completely.
| |
| − | | |
| − | How far away? At the very least, far away enough, so that your tank isn't optically visible, so that people with no keen vision do not see you like this:
| |
| − | | |
| − | <!-- Screenshot of being detected while being visible by a random person with no vision skill-->
| |
| − | | |
| − | In the case if enemy has maximum keen vision, ace, and maybe even scout lenses, there are two things that they can see:
| |
| − | | |
| − | 1) They can see an enemy behind corner of a cover, with leverage of about 5-10 meters. This means, they can do "partial spot" even through a building block. This still allows you to use stone walls and buildings as a hiding spot.
| |
| − | | |
| − | <!-- Three screenshots - partial spot across map with absolute max keen vision, and 2 examples with a wall or corner. -->
| |
| − | | |
| − | 2) They can actually see above walls they are hiding behind. While this requires insanely high keen vision, this is still possible. In the case of certain missile tanks, they can even attack while being invisible.
| |
| − | | |
| − | <!-- A pair of screenshots as example?-->
| |
| − | | |
| − | To avoid getting marked, one can use a smoke screen. Generally smokes take 5 seconds to set in AB and start preventing marking, so wait before driving in or out. Rank VI tanks also have hull mounted aerosol smoke screen launchers, which set in 2 seconds, but you still have to wait. Smokes do not prevent you from being seen if the enemy tank is in front of yours.
| |
| − | | |
| − | <!-- three screenshots, showing vision with no smoke, with inactive smoke, and with active smoke-->
| |
| − | | |
| − | Note: Enemy can still '''see''' you normally, if your hull pokes out of smoke, even though you don't get marked, so avoid driving near to the smoked area edge.
| |
| − | | |
| − | '''Secondly''', if their keen vision is high enough and '''if you are in front of their driver''' (front of the hull), your tank might get highlighted on the minimap. In case if their keen vision is maxed out it also can mark you even through wall or a building, but only at a '''very''' close range (about 40 m).
| |
| − | | |
| − | Note: It also makes tanks visible by eye by "realistic battle" rules at great range. (line-of-movement detection)
| |
| − | | |
| − | '''Lastly''', a light tank can "[[Scouting|scout]]" you, making you indefinitely visible across entire map '''even through smoke screens and walls'''. The smoke and objects will still prevent aim assist from working.
| |
| − | | |
| − | <!-- Screenshot that shows scouting vision through smoke, if this was not showcased in previous group of screenshots. If it was, just show the icon of scouting, or make a cutout? -->
| |
| − | | |
| − | What does it mean for '''you''', as the flanker?
| |
| − | | |
| − | 1) If you are playing at a low rank or against people with no keen vision in general, you just have to be about 700-800 m away from an enemy to be unnoticed, unless they specifically look at you with binoculars or sniper scope. If you are standing 1.5 km away, you are invisible for most people, and even if not, they still have to stare directly at you with binoculars or sniper scope.
| |
| − | | |
| − | 2) You want to attack when nobody looks at you, meaning you need to attack not the capture point itself, but rather the enemy AROUND that capture point, which expects enemy attacking from the front. Plan your routine with that in mind. Even at rank V it's possible to get behind people, as long as you don't get in their way.
| |
| − | | |
| − | 3) You need to avoid open spots, and you want to go through terrain which has solid obstacles obscuring the sight - at rank V many people start levelling keen vision and there are a lot of dedicated snipers who will probably see you across the map by that point, so, on open maps like "single cap Mozdok," you can pretty much forget about stealth. On cluttered maps, you want to avoid long "corridors" and block enemy vision with building, as close to cover and away from corners (even at long range!), if possible.
| |
| − | | |
| − | 4) If '''you''' have maxed out keen vision you can attack or scout enemy through walls and over obstacles on some maps. This way you can either look into enemy movements, or try to use special weapons to attack them.
| |
| − | | |
| − | 5) Because of this, sometimes it's better to let enemy come to you, instead of running into them.
| |
| − | | |
| − | 6) Light tanks are the bane of a stealthy approach. Ironically, because of that they also give you the greatest offensive "stealth" option of all.
| |
| − | | |
| − | ====Radio communication and why it matters====
| |
| − | | |
| − | One of the overlooked crew skills is Radio communication. Why is it important for flanker in arcade battles?
| |
| − | | |
| − | It makes enemy tank visible on the minimap if someone else on your team sees them, but you only see them in 250-500 m around your own tank. | |
| − | | |
| − | This means, this skill directly affects flanking and stealth attacks, as you have to be close to an enemy to avoid being easily seen by them, but this skill can warn them of your presence via minimap, if someone spotted your tank. It also works the other way around - your snipers and "main push" help you to understand what is going on around you and where your targets are.
| |
| − | | |
| − | What is less known, however, is that whenever your team has aircraft in the sky, you can see '''everything'''. Which means, if you drive in between capture points or in the middle of the map while having maxed out radio communication, you basically have satellite support.
| |
| − | | |
| − | <!-- Obligatory example screenshot with broad explanations here -->
| |
| − | [[File:Radio communication AB example.jpg|thumb|600px|center|Power of maxed out radio communication.]] | |
| − | | |
| − | This allows you to judge and predict enemy movements, judge where they are looking to (generally in the direction they are moving to) and what they are doing, eventually stalking them down. All of this helps you to survive while being deep in the enemy territory. | |
| − | | |
| − | ===Flanking tactics for different types of tanks===
| |
| − | | |
| − | ====General combat tactics====
| |
| − | Most of the time players will meet medium tanks on the field.
| |
| − | | |
| − | While the medium tank is a very broad term, it generally means they have average speed (around 40 km/h), average gun (which is moderately effective), average armour, and a special quirk or two. Many medium tanks feel more like a light tank with a big gun instead. You will often face at least 3 such tanks during your flank attempts, and your goal is to annihilate enemy resistance before enemy heavy tanks or tank destroyers arrived.
| |
| − | | |
| − | As such, you need to find a tank, which is good at destroying medium tanks. The properties such perfect tank may have:
| |
| − | * Autoloader or multiple combat-capable weapons
| |
| − | * APHE ammunition or reliable HEAT counterpart
| |
| − | * Above average speed of 50+ km/h (should be faster than most Soviet medium tanks of the rank, at the very least)
| |
| − | * Frontal armour can survive Anti-air tank or light tank fire (just in case you got intercepted)
| |
| − | * In case if you do not like hiding and to fire on move using cruise control, look for a tank with stabiliser
| |
| − | | |
| − | '''Early game flank''':
| |
| − | | |
| − | After getting a tank of choice, start a battle.
| |
| − | | |
| − | [[File:General flanking example - map explanation.jpg|180px|thumb|right|In this example, we have a spacious map and so [[Type 60 ATM]] was chosen as a flank vehicle. It is slow, so the player decides to flank B, as medium tanks cannot intercept flank on that road in time.]] | |
| − | | |
| − | Firstly, at a start of the battle, you want to get '''behind''' capture point, at a point where enemy tanks would get and start fighting your troops (generally around cap point). Do note, that you '''do not''' want to get into trouble and alert their team of your presence too early, so use less obvious approach - a road that nobody uses, a path which is concealed by building or mountain, concealed river grounds, etc.
| |
| − | | |
| − | <!-- a screenshot with tank approaching middle of the map, while using buildings as cover on open map would be nice here? -->
| |
| − | | |
| − | Secondly, look at your map to guess where the enemy team is at. You can look at where your team's push is at, to roughly guess where enemy team push is at. If your team is near to the cap point, surely their team is as well. You do not really care about what their flankers and fast tanks are doing - only fight those if they are in your way.
| |
| − | | |
| − | Note: British medium and heavy tanks are generally extremely slow at most ranks, so you can't make a suggestion by looking at them. They are also often capable snipers, so if enemy [[Chieftain (Family)|chieftain]] is late to a battle, it may actually be there just in time to shoot at your tank. Mind your positioning and try to remain concealed towards tanks that are far away.
| |
| − | | |
| − | As soon as tanks converge on capture point, or when they start the actual battle for capture point, make your move:
| |
| − | | |
| − | 1) Get behind the enemy party, while trying to not get exposed to tanks that are not engaged with something else (Moving from spawn and such).
| |
| − | | |
| − | 2) Attack enemy. Annihilate the most observant players first - you do not want '''anyone''' to ask questions of sort "why is that guy firing to the left and not to the front?", especially if they have "scouting" ability. If you have scouting yourself - mark panicking enemies, which are trying to retreat - your teammates will likely destroy them the very moment they show up on their screen.
| |
| − | <gallery mode="packed-hover" heights="180px">
| |
| − | General flanking example - sneaking in.jpg|Type 60 ATM is climbing behind enemy lines towards plateau on the enemy side - the place nobody ever looks at, which has high defensive potential. Player looks at the enemy base entrance just in case if enemy flanker jumps out to stop them.
| |
| − | General flanking example - opening.jpg|After getting to high ground, Type 60 ATM scouts and attacks unsuspecting enemies, destroying light tank first, to avoid being scouted. Lorraine 40t panics and tries to run away.
| |
| − | General flanking example - reason for picking up special tanks.jpg|Leopard 1 figured out where the missiles came from and counterattacked. Duel like this can go either way, depending on your skill, but we have more weapons than them. Meanwhile, Lorraine 40t got sniped by our squadmate, because it was running around while being scouted.
| |
| − | </gallery>
| |
| − | 3) After taking down several tanks, look around you and decide your next move:
| |
| − | | |
| − | A) Disengage by returning to capture point through the enemy, to reunite with your team. Ram and push the last opponent out of cover, if you must.
| |
| − | | |
| − | '''OR'''
| |
| − | | |
| − | B) Go berserk and try to either escape towards next capture point or cut off and attack enemy reinforcements.<!-- I like this idea!!-->
| |
| − | <gallery mode="packed-hover" heights="200px">
| |
| − | General flanking example - Observation.jpg|Since opponents got destroyed, the player looks around. They see, that enemy captures C, and sees that enemy there have '''no idea''' of what just transpired on B because enemy AMX-13 got destroyed before it could warn anybody.
| |
| − | General flanking example - Flank another capture point.jpg|Since our anti-tank still has 2 more missiles, the player decides to Flank and protect C across the map. The enemy did not see it coming and didn't even try to dodge extremely slow missiles.
| |
| − | General_flanking_example_-_end_of_the_flank.jpg|Type 60 ATM ran out of ammo and leaves the plateau to rearm and repair. B capture point is completely cleaned, and we managed to do damage to the enemy army on the other end of the map. Double stealth flank success.
| |
| − | </gallery>
| |
| − | | |
| − | '''Late game''':
| |
| − | | |
| − | While later on, it becomes hard to flank enemy as a medium tank or tank destroyer, however, you still can do some mind games in urban and mountain environments, using corridors, unpopular streets and openings to suddenly attack enemy:
| |
| − | | |
| − | <!-- screenshots -->
| |
| − | | |
| − | Make sure you have high radio communication, to ensure you will be aware of an enemy approaching you, and what they are doing in general:
| |
| − | | |
| − | <!-- screenshot -->
| |
| − | | |
| − | Ultimately, the most devious of players can get behind enemy lines at a spot nobody ever looks at, sniping anyone who tries to go towards capture point, although that is often called out as borderline spawn camping.
| |
| − | | |
| − | ====Scouting based flank attacks====
| |
| | | | |
| − | While light tanks are generally considered weaker than medium tanks until BR 7.3 and thus are a rare sight, [[Scouting]] allows these tanks to do extremely mean "Stealthy" moves.
| + | The fighter does, however, retain the eight deadly 12.7 mm M2 Browning machine guns which this fighter is renowned for, easily ripping off wings and also setting fuel tanks ablaze. The fighter's overall good energy retention makes this an excellent Boom & Zoom fighter but is restricted by its slow initial climbing ability. To counter the slow climb, side climbing at the start is recommended if looking for an altitude advantage to make the most use out of Boom & Zoom. This fighter also doubles as a great ground attacker, mounting an impressive payload (1,250 kg total!), unfortunately, the US did not include HVAR rockets with the lend-lease package, thus they are not available for the Soviet version. |
| | | | |
| − | '''Wall sniping''': | + | == General info == |
| | + | === Flight performance === |
| | + | ''Describe how the aircraft behaves in the air. Speed, manoeuvrability, acceleration and allowable loads - these are the most important characteristics of the vehicle.'' |
| | | | |
| − | Note: This tactic requires buildings to be penetrable. '''Not every map allows this.'''. Only armour piercing ammunition can do this, as chemical ammunition explodes on impact with anything. You can do this even without scouting, but it's very hard.
| + | {| class="wikitable" style="text-align:center" |
| − | | |
| − | The tactic is about the same as an early rush of medium tank, but with a twist - while approaching frontline, do not hide and instead scout 3 enemy tanks, which are going towards penetrable buildings, then, when they least expect it, snipe them into their sides through a wall. That way they will not really be able to see you, even if you are near to them, while you are attacking them.
| |
| − | | |
| − | <!-- Screenshots, not necessarily with light tanks, but light tanks duking it out through wall would be more interesting, as it's their section. -->
| |
| − | | |
| − | You can also finish them off directly instead, since you know exactly where they are.
| |
| − | | |
| − | List of Maps, which may allow such a tactical move:
| |
| − | | |
| − | {| class="wikitable" | |
| | |- | | |- |
| − | ! Map !! Can penetrate buildings? (yes, no, only some) !! Exceptions | + | ! colspan="8" | Characteristics |
| | |- | | |- |
| − | | [[American Desert]] || Yes || Main building on C cap | + | ! colspan="8" | ''Stock'' |
| | |- | | |- |
| − | | [[Alaska]] || Yes || Some buildings are unpenetrable, mostly red brick houses to the west of the map. Some of them can still be destroyed | + | ! colspan="2" | Max Speed<br>(km/h at 9,144 m) |
| | + | ! rowspan="2" | Max altitude<br>(meters) |
| | + | ! colspan="2" | Turn time<br>(seconds) |
| | + | ! colspan="2" | Rate of climb<br>(meters/second) |
| | + | ! rowspan="2" | Take-off run<br>(meters) |
| | |- | | |- |
| − | | [[Wallonia]] || no || There are multitude of openings in between buildings everywhere, which you can use to a similar effect
| + | ! AB !! RB !! AB !! RB !! AB !! RB |
| | |- | | |- |
| − | | Japan || some || Only wooden buildings and constructions are penetrable (and destructible) | + | | 676 || 657 || {{Specs|ceiling}} || 26.2 || 27.2 || 7.3 || 7.3 || 600 |
| | |- | | |- |
| − | | [[Korea (Ground Forces)|Korea (38th parallel)]] || Yes || The radio towers may stop shells | + | ! colspan="8" | ''Upgraded'' |
| | |- | | |- |
| − | | [[Battle of Hurtgen Forest (Ground Forces)|Hurtgen forest]] || no || A lot of buildings have holes in the roof, so some ATGM carriers technically can fire through them. | + | ! colspan="2" | Max Speed<br>(km/h at 9,144 m) |
| | + | ! rowspan="2" | Max altitude<br>(meters) |
| | + | ! colspan="2" | Turn time<br>(seconds) |
| | + | ! colspan="2" | Rate of climb<br>(meters/second) |
| | + | ! rowspan="2" | Take-off run<br>(meters) |
| | |- | | |- |
| − | | [[Berlin (Ground Forces)|Berlin]] || Some || Certain damaged buildings around C collapse when shot, and so, they do not shield tanks from AP. Rest of them are very likely impenetrable
| + | ! AB !! RB !! AB !! RB !! AB !! RB |
| | |- | | |- |
| − | | Example || Example || Example | + | | 729 || 700 || {{Specs|ceiling}} || 23.8 || 25.0 || 15 || 10.6 || 600 |
| | |- | | |- |
| − | | Example || Example || Example
| |
| | |} | | |} |
| | | | |
| − | '''Smoke attack''':
| + | ==== Details ==== |
| − | | + | {| class="wikitable" style="text-align:center" |
| − | Important Note: this tactic may or may not work in presence of enemy scout tanks (depends if they are foolish enough to not scout you).
| + | |- |
| | + | ! colspan="5" | Features |
| | + | |- |
| | + | ! Combat flaps !! Take-off flaps !! Landing flaps !! Air brakes !! Arrestor gear |
| | + | |- |
| | + | | ✓ || ✓ || ✓ || X || X <!-- ✓ --> |
| | + | |- |
| | + | |} |
| | | | |
| − | Ultimate "stealth" attack - Scout 2 enemy tanks and deploy smoke right on top or in front of them. After 5 (2 at rank VI) seconds pass, they will not be able to see you, while you see them clearly. Generally, this move spooks anyone but boldest soviet players, and they will just look at the smoke screen, confused. Because of this, you don't even have to worry about instant retaliation.
| + | {| class="wikitable" style="text-align:center" |
| − | | |
| − | Select target (with middle mouse button) to see their tank's profile. Find out their side, and snipe it. Move around after each shot, to not get fired back at. If enemy tank rushes into the smoke to find and destroy you, sidestep it and fire at it's back, but never drive closer than 50 meters to it.
| |
| − | | |
| − | After 2 kills or about 16 seconds (generally, 2 light tank ATGM reloads at rank V are exactly as long) get away from the fight before smoke disappeared - do not get greedy, unless there is only one enemy left and you are committed to destroy them at any cost.
| |
| − | | |
| − | <!-- Screenshots -->
| |
| − | | |
| − | This way of attacking is extremely powerful, not even because your targets are unable to protect themselves, no matter what they are using, but because you can destroy anyone while being looked at by their entire team. Be aware, that this tactic is very "stealthy" and "subtle", and very experienced players will definitely try to shoot back at you if you fail to destroy them.
| |
| − | | |
| − | ====Sniper based tactics====
| |
| − | | |
| − | While maxed out keen vision allows seeing anyone across half of the map in Arcade battle (or even entire map for ace scouts), it is still possible to exploit special sniper positions to out-snipe those, who do have it. Those, who don't have it, and pay little attention, have even lesser chance of avoiding such moves in time.
| |
| − | | |
| − | '''Special sniper positions''':
| |
| − | | |
| − | While sniping itself is not really a "stealth flank", snipers live in their own dimension, where they can still flank other snipers and battlefield as a whole. Use special sniper spots which are not as obvious on the map at a first glance - some of them are even located in the middle of a battlefield.
| |
| − | | |
| − | These spots are:
| |
| − | * Away from the main battle line, which means you will not be seen on accident via binoculars or sniper scope
| |
| − | * Far enough or have enough cover for the enemy not to see you accidentally with 3rd person view (3PV)
| |
| − | * Probably require the use of ATGM, APDS or another high velocity round, as basic chemical warheads have a tendency to not fly where you want
| |
| − | | |
| − | Examples:
| |
| − | 1) Stand on the edge of the map in a spot, which is away from the frontline horizontally:
| |
| − | <!-- Mozdok single cap map sniper spot screenshot-->
| |
| − | | |
| − | 2) Use high ground, if necessary:
| |
| − | | |
| − | <!-- screenshot at eastern europe -->
| |
| − | | |
| − | You should also remember, that sniper scope vision is three times greater than third person vision, so at early levels, you can snipe low-level medium tanks like this, while they are moving towards the middle of the map like this.
| |
| − | | |
| − | 3) Hide in plain sight using caves instead of overused "out of bounds" spot:
| |
| − | <!-- El alamein north cave screenshot-->
| |
| − | | |
| − | '''Vertical ATGM''':
| |
| − | | |
| − | While vertical ATGM is harder to master, than the normal one, it allows for some absurd flanking and surprise attacks.
| |
| − | | |
| − | Stand behind houses, rocks and mountain ranges and fire at an enemy, who cannot even see you, using normal vision mechanics from Realistic battles, without using the arcade mode marks, to avoid getting spotted. Retreat to even less likely hiding spot to confuse the enemy even more.
| |
| − | | |
| − | Note: ATGM makes a lot of noise, so you are only concealed until you fire the first shot, but it may take forever for the enemy to figure out '''where exactly''' you are if you are careful.
| |
| − | | |
| − | Examples:
| |
| − | | |
| − | 1) Counter mountain campers:
| |
| − | <!-- El alamein mountain flank screenshot, or mozdok with countering A point snipers, at worst - counter Italy north sniper -->
| |
| − | | |
| − | And then take over the sniper spot they never though was useable:
| |
| − | <!-- Preferably continuation of El alamein screenshot, from the one from highest mountain there-->
| |
| − | | |
| − | 2) Make enemy question their safety:
| |
| − | <!-- Mozdok north ultraflank screenshot-->
| |
| − | | |
| − | 3) If bored of conventional sniping, fire over tall obstacles, when opponents move out of their cover:
| |
| − | <!-- Finland or American desert make great examples, but will probably need a series of screenshots, alternatively close range attacks from Italy B point (west team) or Sicily C point (south team) may suffice-->
| |
| − | | |
| − | ==Paranoia and conspiracy check corner==
| |
| − | | |
| − | ===Space for special MG penetration tables/graphs (if ever finished)===
| |
| − | | |
| − | Yes i am aware that different rank MG's and minor caliber changes of certain factions should and might be different on different ranks, but i digress for now, since difference seems insignificant to me ingame, as seen in 7.92.
| |
| − | | |
| − | Anyone is welcome to add info on different calibers, or add specific faction calibre (like french 15.00 or whatever)
| |
| − | | |
| − | HT: heavy tanks, HTD: heavy TD, as in Foch, ISU, and so on.
| |
| − | | |
| − | By heavy damage is implied, that it can destroy some module, but doesn't pen entire vehicle. (if ammo doesnt explode in 1 hit, specify that)
| |
| − | | |
| − | By destruction implied, that if it hits you, with it's ROF you are probably screwed.
| |
| − | | |
| − | '''low caliber SPAA and autocannons included to compare with french coax autocannon and check other abnormal dps stuff (pen*rof)''', '''do not add more of those'''
| |
| − | | |
| − | '''In case if you don't know if your LVEH can be penned by MG or not, just use armour protection analysis on your vehicle against BMP-2 ''AP-T belt'' and then compare it to numbers in table. That will give you the jist of it.'''
| |
| − | {| class="wikitable" | |
| − | |+General oversimplification table of damage for MG and other coaxials per caliber to light vehicle
| |
| − | !Caliber
| |
| − | !Presumable pen point-blank (against RHA, or whatever number bmp2 "protection analysis" check says)
| |
| − | !presumable pen at 100m (against RHA or whatever number bmp2 "protection analysis" check says)
| |
| − | !ROF
| |
| − | !Who uses:
| |
| − | !Tree removal (y/n)
| |
| − | !Stone wall removal (y/n)
| |
| − | !Damage to external armour
| |
| − | !ATGM intercept
| |
| − | time
| |
| − | | |
| − | (lol, yes)
| |
| − | !DPS to flat rear of TD (45 mm homogenous armor) (tested mostly on IT1)
| |
| − | !DPS/TTK to sloped LVeh (50-65 mm aluminium AA7017)
| |
| − | !Dps/TTK to angled sides of Lveh/armored turret (20-30mm~~ aluminium 7039)
| |
| − | !TTK to unangled/ unarmored LVeh (15mm in general, aluminium 7017)
| |
| | |- | | |- |
| − | |30mm warrior gun, APDS loadout | + | ! colspan="5" | Limits |
| − | |110
| |
| − | |101
| |
| − | |Very low
| |
| − | |Warrior
| |
| − | |Yes
| |
| − | |Yes
| |
| − | |ERA, doesn't seem to do much else
| |
| − | |
| |
| − | |Damages engine
| |
| − | |Heavy damage, 6 hits to destroy ammo
| |
| − | |Heavy damage, ~2 hits to destroy ammo
| |
| − | |Heavy damage
| |
| | |- | | |- |
| − | |~23cal AA only SPAA gun combo | + | ! rowspan="2" | Wing-break speed<br>(km/h) |
| − | |~46
| + | ! rowspan="2" | Gear limit<br>(km/h) |
| − | |~45
| + | ! rowspan="2" | Combat flaps<br>(km/h) |
| − | |Insane
| + | ! colspan="2" | Max Static G |
| − | |Non combat SPAA like ZSU-23-4, wirbelwind with no ap ammo and such
| |
| − | |yes | |
| − | |Yes
| |
| − | |Significant
| |
| − | | | |
| − | |Damages engine.
| |
| − | |appearantly deteriorates even permament armor to 0 in 3 seconds or so, resulting in destruction. RNG/bug/feature?
| |
| − | |Destruction
| |
| − | |RUN | |
| | |- | | |- |
| − | |20cal vulcan gun
| + | ! + !! - |
| − | |58
| |
| − | |55 (it got buffed i think, because how The 23 mm does less damage??)
| |
| − | |~infinity
| |
| − | |M163
| |
| − | |yes
| |
| − | |Yes
| |
| − | |It seems to not care.
| |
| − | |
| |
| − | |It shredded Vickers MBT from the front eventually, and it has 60 mm RHA, sooo, yeah.
| |
| − | |Instant death due to millions of ricochets all over the smallest weakspots. Hilarious.
| |
| − | |RUN
| |
| − | |RUN
| |
| | |- | | |- |
| − | |20mm Crusader AA cannons and such | + | | {{Specs|destruction|constructions}} || {{Specs|destruction|chassis}} || 520 || ~12 || ~5 |
| − | |41 | |
| − | |~39 | |
| − | |Heavy since twin guns.. | |
| − | |Most early autocannon tanks and such | |
| − | |yes | |
| − | |Yes | |
| − | |Seems to not damage 5mm plates | |
| − | | | |
| − | |Penetrated, despite it being statistically impossible, or Bypasses external armor (5mm) | |
| − | |Unknown | |
| − | |Destruction | |
| − | |Destruction | |
| | |- | | |- |
| − | |BMP2 30mm autocannon, AP-T load | + | |} |
| − | |64
| + | |
| − | |61
| + | {| class="wikitable" style="text-align:center" |
| − | |medium or insane
| |
| − | |Bmp2
| |
| − | |Y
| |
| − | |Y
| |
| − | |instant destruction
| |
| − | |
| |
| − | |Unknown, probably destruction
| |
| − | |AP-T seems to not penetrate ~60, for no reason. It seems having high ground may help.
| |
| − | |Destruction
| |
| − | |Destruction
| |
| − | |-
| |
| − | |20cal coax cannon
| |
| − | |47
| |
| − | |supposedly 34 (unverified source)
| |
| − | 44 , 31 up to 500m by ingame stats (nerfed lately)
| |
| − | |Heavy
| |
| − | |French rank 6, amx-30 (r5) and some top german MBTs | |
| − | |yes
| |
| − | |yes
| |
| − | |Unknown
| |
| − | |
| |
| − | |Unknown
| |
| − | |Can cause Destruction for unknown reason.
| |
| − | No damage to ~55mm of alloy7039, or just doesn't damage heavily sloped armor. (unlikely)
| |
| − | |Destruction, but no AOE damage, so it damages weakspot of LV with 30mm but nothing more so far. At least from french gun.
| |
| − | |Destruction, 1 sec max
| |
| | |- | | |- |
| − | |15.0 mm MG | + | ! colspan="4" | Optimal velocities |
| − | |36
| |
| − | |34 (ultra nerf down from 45 lol)
| |
| − | |unknown
| |
| − | |French HT and HTD
| |
| − | |unknown
| |
| − | |unknown
| |
| − | |unknown
| |
| − | |
| |
| − | |unknown
| |
| − | |unknown
| |
| − | |unknown
| |
| − | |unknown
| |
| | |- | | |- |
| − | |14.5 mm KPVT
| + | ! Ailerons<br>(km/h) |
| − | |45
| + | ! Rudder<br>(km/h) |
| − | |seems to be around ~26mm, but sometimes pen more.
| + | ! Elevators<br>(km/h) |
| − | 42 by ingame stats, but seems doubtful. (how da hell it's still so op when french one is nerfed??)
| + | ! Radiator<br>(km/h) |
| − | |low to Medium
| |
| − | |is7, is10m, soviet HTD rank 5
| |
| − | |yes
| |
| − | |unknown
| |
| − | |Unknown
| |
| − | |
| |
| − | |Unknown
| |
| − | |Does nothing to 60+mm, but either 38 or 44mm on warrior's alloy 7039 rear achieved destruction. assumed 50mm of AA7039 seems to hold off.
| |
| − | |Heavy damage, sets off ammo in 1 hit, can AOE from turret shots.
| |
| − | |Destruction
| |
| | |- | | |- |
| − | |12.7 mm DShK and such | + | | < 402 || < 420 || < 470 || > 335 |
| − | |29 | |
| − | |seems to be around ~26mm, but sometimes pen more. | |
| − | 27 by ingame stats
| |
| − | |low to Medium | |
| − | |HT and HTD , some MBTs of rank4+, | |
| − | |unknown | |
| − | |unknown | |
| − | |Unknown
| |
| − | |
| |
| − | |None
| |
| − | |None
| |
| − | |Heavy damage, sets off ammo in 1 hit, can AOE from turret shots.
| |
| − | |Destruction in 1 sec max
| |
| | |- | | |- |
| − | |12.7 mm M2HB USA edition | + | |} |
| − | |26
| |
| − | |25 by ingame stats, but seems to be around 26.
| |
| − | |low to Medium
| |
| − | |USA on rank2+, half of JPN vehicles on any BR
| |
| − | |yes? At least on direct hit on a small tree.
| |
| − | |unknown
| |
| − | |unknown
| |
| − | |
| |
| − | |None
| |
| − | |somehow did damage after 5 sec or fire from M103.
| |
| | | | |
| − | perhaps hit weakspot with ~30mm.
| + | {| class="wikitable" style="text-align:center" |
| − | |unknown | |
| − | |Destruction in 1 sec max
| |
| | |- | | |- |
| − | |8.00 | + | ! colspan="3" | Compressor (RB/SB) |
| − | |10
| |
| − | |9 by ingame stats (how even if 7.92 is better?)
| |
| − | |???
| |
| − | |Italy up to rank 2
| |
| − | |unknown
| |
| − | |unknown
| |
| − | |unknown
| |
| − | |
| |
| − | |unknown
| |
| − | |unknown
| |
| − | |unknown
| |
| − | |unknown
| |
| | |- | | |- |
| − | |7.92 | + | ! colspan="3" | Setting 1 |
| − | |13
| |
| − | |less than 13?
| |
| − | 12 by ingame stats
| |
| − | |Medium
| |
| − | |German tanks before rank 4, their HT and HTD past rank 4
| |
| − | |unknown
| |
| − | |unknown
| |
| − | |ERA only
| |
| − | |
| |
| − | |Unknown
| |
| − | |seems to do no damage
| |
| − | |Unknown, since nobody tries to use it on selected vehicles
| |
| − | |Resistable
| |
| | |- | | |- |
| − | |7.7
| + | ! Optimal altitude |
| − | |10
| + | ! 100% Engine power |
| − | |9 by ingame stats
| + | ! WEP Engine power |
| − | |Low
| |
| − | |Japanese rank 1-3
| |
| − | |No
| |
| − | |No
| |
| − | |unknown
| |
| − | |
| |
| − | |unknown
| |
| − | |unknown
| |
| − | |unknown
| |
| − | |useless
| |
| | |- | | |- |
| − | |7.62 | + | | 8,500 m || 2,000 hp || 2,300 hp |
| − | |10 | |
| − | |less than 13? | |
| − | 9 by ingame stats
| |
| − | |Low to medium, heavy on rank 6 | |
| − | |German medium vehicles rank4+, french before rank 6 and most british tanks use something similiar, most USSR mbts | |
| − | |No
| |
| − | |No
| |
| − | |ERA only
| |
| − | |
| |
| − | |No damage
| |
| − | |No damage
| |
| − | |Nonexistant/ignorable
| |
| − | |seems to be useless even point-blank vs ~13mm aluminium alloy
| |
| | |- | | |- |
| − | |7,50
| |
| − | |10
| |
| − | |9 by ingame stats
| |
| − | |unknown
| |
| − | |French at various ranks
| |
| − | |unknown
| |
| − | |unknown
| |
| − | |unknown
| |
| − | |
| |
| − | |unknown
| |
| − | |unknown
| |
| − | |unknown
| |
| − | |unknown
| |
| | |} | | |} |
| − | I gather that SPAA guns penetrate at least 7mm more than ingame tip says, at least for aluminium... And with highter ROF it may cause instakill even on vehicles, that are supposed to be permamently resistant to it, so probably MG does that as well. Perhaps there is some HP value in structures that i'm unaware of or sth. External armour seems to not faze them, anyway.
| |
| | | | |
| − | '''Also''' in my experience insanely high ROF of BMP2 allows to annihilate warrior through side add-on plates from over 2kilometers, which should be impossible, which only further increases mine suspicions. Even if we consider plates as dead after ~10 hits, this still seems fishy. The only time i survived BMP2 was when it was completely stock and fired on me at 20 degree angle in LowROF mode, and i executed them in 2 seconds (so 3 seconds TTK time from ZSU test is still relevant in my eyes). | + | === Survivability and armour === |
| | + | <!-- ''Examine the survivability of the aircraft. Note how vulnerable the structure is and how secure the pilot is, whether the fuel tanks are armoured, etc. Describe the armour, if there is any, and also mention the vulnerability of other critical aircraft systems.'' --> |
| | | | |
| − | After getting more proper specific info for all calibres (without oversimplifying it maybe, if someone can add info for rest nations, or even per-rank, if possible) i'd want to find a way to convert it into colourful graph or table.
| + | * 38 mm of bulletproof glass in cockpit |
| | + | * 9.5 mm steel under bulletproof glass in cockpit |
| | + | * 9.5 mm steel behind pilot's seat |
| | | | |
| − | For lols, we could also make similiar autocannon chart for MBT armour VS IFV/combat SPAA autoguns, since it's appearanly a problem for tanks on all ranks.
| + | == Armaments == |
| | + | === Offensive armament === |
| | + | <!-- ''Describe the offensive armament of the aircraft, if any. Describe how effective the cannons and machine guns are in a battle, and also what belts or drums are better to use. If there is no offensive weaponry, delete this subsection.'' --> |
| | + | {{main|Browning M2 (12.7 mm)}} |
| | | | |
| − | '''Conclusion for armor protection so far:''' | + | The '''''{{PAGENAME}}''''' is armed with: |
| | | | |
| − | AP-T (incindenary Armor piercing) ammo negates inclination armor modifiers, just like APHE of soviets, which makes it as good as APDS against angled armor, which is extremely unfair (lol).
| + | * 8 x 12.7 mm Browning M2 machine guns, wing-mounted (425 rpg = 3,400 total) |
| | | | |
| − | However, IAP seems to have much worse ricochets angle than APDS and such shells, so high ground negates it as long as you have 65mm total. APDS cannot pen much more at this angle either, because it has no modifiers, just huge raw numbers.
| + | === Suspended armament === |
| | + | <!-- ''Describe the aircraft's suspended armament: additional cannons under the wings, bombs, rockets and torpedoes. This section is especially important for bombers and attackers. If there is no suspended weaponry remove this subsection.'' --> |
| | + | {{main|FAB-250M43 (250 kg)|FAB-500 (500 kg)}} |
| | | | |
| − | This kind of explains how the hell soviets HMG destroy sloped turret of warrior in 1 hit, but sometimes cannot destroy Striker's hull even with BMP2 guns for example.
| + | The '''''{{PAGENAME}}''''' can be outfitted with the following ordnance: |
| | | | |
| − | The weirdness is further increased by fact that aluminium alloy has huge penalty to armor (which is not properly displayed in statistics, and goes all ways from 20% to 50%) and insane ROF of auto cannons and such, which convert 5% chance of pen into guaranteed kill.
| + | * Without load |
| | + | * 1 x 250 kg FAB-250M43 bomb (250 kg total) |
| | + | * 2 x 500 kg FAB-500 bombs (1,000 kg total) |
| | + | * 2 x 500 kg FAB-500 bombs + 1 x 250 kg FAB-250M43 bomb (1,250 kg total) |
| | | | |
| − | External plating often seems to be completely ignored whenever penetration of enemy ammo > armor of plate, or just gets destroyed in 5 hits at it. Doesn't even have to be angled for this at certain points. This explains how the hell BMP-2 deletes warrior from 2km range.Even if you nitpick and check side skirts from top and it says "6mm" it still makes no sence, since 44+6=50+angle because firing distance, that's already enough to stop bullets from 500m, but protection analysis says "34". I guess if you take 70% of both numbers that's going to be it. (because aluminium alloy i guess) That's all fun and all, but you still have RNG roll to get penned at ranges where armor is insignificantly better than penetration.Seems to be proved by panther D side (40+5) being penned by Crusader AAmk2, and striker armor being eventually destroyed by "shilka". Also most light vehicles have glaring weakspots with 10mm less armor (like this isn't enough, lol)
| + | == Usage in battles == |
| | + | <!-- ''Describe the tactics of playing in an aircraft, the features of using aircraft in a team and advice on tactics. Refrain from creating a "guide" - do not impose a single point of view, but instead, give the reader food for thought. Examine the most dangerous enemies and give recommendations on fighting them. If necessary, note the specifics of the game in different modes (AB, RB, SB).'' --> |
| | + | As with the normal P-47D-25, the D-27 can be used one of two modes, first as an excellent Boom & Zoom fighter, using its great energy retention and amazing armament against high flying bombers and fighters. Another option is as a fighter bomber, utilising the impressive payload and adequate diving characteristics of the P-47 (be aware of dropping order of the bombs, the 500 kg bombs drop first and then the 250 kg under the fuselage is dropped). The 500 kg bombs are able to make short work of any tank whether light or heavy in its tier, but the 250 kg bomb can only provide enough explosive power to destroy softer targets, like armoured cars and SPAA. The way both 500 kg bombs drop should either be used against a group of tanks (combined battles) or against large pillboxes. Other than that, the P-47 can be used in multiple roles, unfortunately, using bombs restricts flight to only staying at a low level where the P-47's engine is less effective. |
| | | | |
| − | As in, the protection analysis feature seems to like to ignore external plates for life, so it's safe to assume, that on random occasion bullets can just go through them anyway. They still protect from HESH and single cannon shots though.
| + | If you are using it as a high altitude fighter initially side climbing is recommended, as you gain a vast advantage over other enemies. The hit and run tactics work best for the P-47, singling out a lone fighter below you, diving towards them and a 2-second burst from the M2 Brownings will most likely destroy them. Always try to avoid a head-on engagement, as your engine is exposed from the front and most likely break down if something manages to hit it. If you are willing to engage a heavy bomber main targets should be the wings and elevators, as they are easy targets for the P-47. |
| | | | |
| − | High ground seems to help against MG and Autocannon in case of solid permament armor, however if in case of Striker transmission eats any bullets coming through LFP, in case of warrior the external shield (made of rolled homogenous armor, tons of NERA and even 38mm more aluminium, just saying) that is supposed to stop anything going for driver thought LFP will be ignored, resulting in instant death, since bullets will just pen it and explode the ammo rack through driver (because screw logic i guess).
| + | '''Simulator / EC''' |
| | | | |
| − | '''Required precise test of every MG type onto warrior's ventilation shield weakspot, specifically frontal protection plate and rear (on both the 38mm door and 44.4mm rest)''' to find out if it's all the same with 12mm, 14mm, 20mm coaxial, 7.62mm for this. External armor seems to be majorly useless against kinetic damage, so yeah.
| + | In Simulator / Enduring Confrontation, bulkier planes that suffer in AB & RB shine and that of course includes the P-47. Sitting at BR 3.7, the lowest BR for rank 3 EC, it can respawn infinitely which makes it a great learning platform for new EC players. In Sim, the P-47 has stable control handling, all-round unobstructed vision and fast speed, and it offers a wide range of additional armaments of bombs plus the original 8 x .50 cal, meaning it is an excellent multi-role aircraft. It can perform base-bombing, ground pounding, bomber intercepting and traditional BnZ fighting. |
| | | | |
| − | ////
| + | For base bombing, choose the maximum setup of 1 x 250 kg, and 2 x 500 kg bombs to maximise the damage. The fastest way to get to a base is to remain at tree-top level upon taking off. This way there is no need to climb so the P-47 can pick up quite some speed like that, even with the full bombload. It is also harder to be seen, since the P-47's dark colour will blend in with the ground for some maps. When approaching the base, check its position with the minimap to ensure it's the right target. When the base fills up the gunsight, pull up to around 500 m and then dive at the base at a rather shallow angle. When the gunsight slices past the furthest edge of the base, release all the bombs, bank to the direction of the nearest friendly airfield, descend back to tree-top level and fly back. If you are lucky, you might even catch some enemy bombers that just took-off from a nearby airfield. They will be some nice RP for you. Overall, base bombing is the safest way to get rewards. |
| | | | |
| − | Even if BRs allow different ranks of MGs to be used on you, simplified graph would look kind of like this:
| + | For ground pounding, you can choose to take the full bombload if you want. Use the bombs and rockets to take out pillboxes and tanks. The aiming method for bombs is pretty similar to base bombing, but there are differences for the 250 kg and 500 kg, as their drop are different and you want to adapt the aim to be more precise, because now the targets are much smaller. Dive at a shallow angle to approach the target, try to get as close as possible but avoid crashing into the ground. When the gunsight slices through and just above the target, drop the 500 kg bombs. When the target is at the center of the gunsight and fills up around 1/3 of it, release the 250 kg. The 8 MGs are perfect for killing trucks, AA guns and artilleries as they have plenty of ammo. However, constantly watch your surrounding, especially your high 6 for any incoming enemies. |
| | | | |
| − | '''Your vehicle's hull vulnerability to MG in your matchmaking''': | + | You want to be more careful when hunting bombers, since with the Sim control (whether it be mouse joystick or a real stick) the plane will manoeuvre much more gently, making itself a great target for the bomber's gunners. DO NOT follow behind a bomber's 6 unless you are sure that its tail gunners are unconscious. Chasing behind a bomber makes yourself pretty much stationary for the tail gunners, and you will be showered with bullets. The big radial engine of the P-47 will usually get damaged. Instead, before launching an attack, get an altitude advantage over the bomber by flying around 2 km above it. The bomber should only fill up about 1/6 of your gunsight. The best position for an attack is at the bomber's high 6 so you can adjust the lead much easier. Dive at the bomber, but not directly at it, try to predict where you two will crash by imagining yourself as a missile, that's where you should aim at (deflection shooting). To maximise the damage it is better to aim for their wings and engines, as the fuselage usually soaks up quite some bullets. Only fire when the bomber passes in front of your guns. This short window might seems inadequate to do anything, but the 8 MG on the P-47 are actually quite destructive, as sometimes it only takes one bullet to set the target aflame. |
| | | | |
| − | I want to do it through Colours if possible.
| + | As for dogfighting, because almost all aerial battles in Sim occurs at below 3,000 m, the P-47 can easily climb to this altitude and gather up lots of speed before engaging a battle. The tactic is similar to the RB one above. If, unfortunately, you find yourself being chased at your 6 and you don't know how to do any defensive manoeuvres, do a large, smooth turn towards the nearest friendly airfield to avoid bleeding too much speed. Then shallow-dive towards your airfield. The P-47 can quite easily outrun opponents like the A6M or Bf-109 E, but struggles to outrun Bf-109 F/G, FW-190 A or other P-47. Another way of disengaging is to do a sudden split-S to dodge under the chaser. Average Sim players will now try and see where you went, if not immediately losing track of you. You can then run for your airfield or shallow climb for another attack. |
| | | | |
| − | Black = instant death,
| + | '''Enemies worth noting:''' |
| | | | |
| − | red = only tankable by front, can still destroy your armor or damage fatal weakspots/turret/cupola and cause your death '''somehow''',
| + | * [[Me 264]]: This giant is one of the few bombers who get air spawns in Sim, so it usually flies higher than you think. On top of this, the Me 264 is armed with large calibre MG and cannons all over it, therefore tailing a 264 is basically suicide unless all of their gunners are knocked out. You can treat the 264 almost like a B-29 or B-17 as they are very similar in both design and defensive capabilities. It is best to head-on the 264 if you can as you can easily knock out the pilots due to its glazed nose while also taking minimal damage. However the bomber lacks a ventral turret on its belly, making it easy to deal damage from below, but be weary of the downwards facing rear 20 mm cannon near the tail. The safest way to attack is from a higher altitude, dive at an oblique angle and focus fire on the wings and nose. Never engage if you have no altitude advantage. |
| | | | |
| − | orange = Only tankable by front,
| + | * [[Bf 110 (Family)|Bf 110]], [[Ki-45 (Family)|Ki-45]], [[A-26 (Family)|A-26]]: As mentioned before, those twin engine aircraft are a big threat since their lack of manoeuvrability comparing to single engine fighters are minimised in Sim. They are usually armed with heavy guns & cannons in the nose, so an accurate burst will tear any plane apart, including the P-47. The P-47 manoeuvres rather sluggishly and you might get out-turned from even those heavy fighters, so engage them with either altitude or speed advantage to avoid being targeted. If they are not manoeuvring aggressively, aim for their wings or engines. If the fight is intense and you cannot smooth the aim, just burst anywhere as long as you hit them, the 12.7 mm bullets will damage their flight models quite a bit. |
| | | | |
| − | yellow = angled sides can tank it,
| + | === Manual Engine Control === |
| − | | + | {| class="wikitable" style="text-align:center" |
| − | green = only rear or not-so-obvious weakspot is endangered,
| + | |- |
| − | | + | ! colspan="7" | MEC elements |
| − | white/blue/idk = no threat.
| + | |- |
| − | | + | ! rowspan="2" | Mixer |
| − | Instead of faction names could use flags.
| + | ! rowspan="2" | Pitch |
| − | | + | ! colspan="3" | Radiator |
| − | {| class="wikitable" | + | ! rowspan="2" | Supercharger |
| − | |+Threat of MG/autocannon in CQC on your BR/rank | + | ! rowspan="2" | Turbocharger |
| − | !Nation | |
| − | !LT | |
| − | !TD | |
| − | !MT | |
| − | !HV | |
| − | !AA | |
| | |- | | |- |
| − | |French
| + | ! Oil !! Water !! Type |
| − | |
| |
| − | |
| |
| − | |
| |
| − | |
| |
| − | |
| |
| | |- | | |- |
| − | |USA | + | | Controllable || Controllable<br>Auto control available || Controllable<br>Not auto controlled || Controllable<br>Not auto controlled || Separate || Controllable<br>1 gear || Auto controlled |
| − | | | |
| − | | | |
| − | | | |
| − | | | |
| − | | | |
| | |- | | |- |
| − | |Japanese | + | |} |
| − | | | + | |
| − | |
| + | === Modules === |
| − | | | + | {| class="wikitable" |
| − | |
| + | ! Tier |
| − | | | + | ! colspan="2" | Flight performance |
| | + | ! Survivability |
| | + | ! colspan="2" | Weaponry |
| | |- | | |- |
| − | |USSR | + | | I |
| − | |
| + | | Fuselage repair |
| − | | | + | | Radiator |
| − | | | |
| | | | | | |
| | + | | Offensive 12 mm |
| | | | | | |
| | |- | | |- |
| − | |German | + | | II |
| − | |
| |
| − | |
| |
| − | |
| |
| | | | | | |
| | + | | Compressor |
| | + | | Airframe |
| | | | | | |
| | + | | FMBC mk.1 |
| | |- | | |- |
| − | |Italy | + | | III |
| − | |
| + | | Wings repair |
| − | | | + | | Engine |
| − | | | |
| | | | | | |
| | + | | New 12 mm MGs |
| | | | | | |
| | |- | | |- |
| − | |British | + | | IV |
| | | | | | |
| | + | | Engine injection |
| | + | | Cover |
| | | | | | |
| − | | | + | | FLBC mk.1 |
| − | |
| |
| − | |
| |
| − | |}
| |
| − | Possibly, we will want two of these per vehicle, if it will be known, that high ROF or focused fire of many vehicles even of low cal can delete your vehicle, or simply to show danger with/without weakspots in general (for example warrior wearing ADD-on armor is okay as long as you broadside and they fire on your hull, but they still can try to wreck your turret with HMG, so GG., as for without ADD-on armor... well... rip.) Perhaps i can use lighting icon to symbolize "likely crew incapacitation".
| |
| − | | |
| − | ===What certain shell types are like in-game (for real) ===
| |
| − | Section for conspiracy debunking.
| |
| − | Basically, you write what shell does in '''certain mode''' and how it '''really''' works in your '''experience''' (not in damage protection analysis).
| |
| − | | |
| − | Other people are welcome to write/correct their opinion, just add the signature near to your statement, so I won't erase it by accident later.
| |
| − | | |
| − | '''Ground vehicles'''
| |
| − | | |
| − | :'''Kinetic ammo''': Damages by hitting enemy vehicle or insides. Can go through objects, and sometimes even solid walls.
| |
| − | | |
| − | '''AP-I''': Ammo for practically all your MG's and base ammo for most autocannons.
| |
| − | | |
| − | AB: High ricochet chance, otherwise penetrates easily and then explodes? (or something) Extremely sloped armour destroys it.
| |
| − | | |
| − | RB:
| |
| − | | |
| − | '''AP (pure)''': Does not explode after pen and just goes onward, penetrating whatever is in the way. Causes wide armour spalling from entry point. Mostly used by brits (later shifted to high mass sniper APDS) and french (with massive 25kg shots then into APDSFS). SPG caliber pure shells can do scary damage even after hitting heavy armour. The higher the mass of the shell, the more absurd amount of spalling it causes when breaches armour.
| |
| − | | |
| − | AB: The weaker the armour it hits and the higher caliber it is itself, the more spalling it seems to do. For example, if 15 kilogram shell's penetration is two-three times the armour, for example after penning LFP, then it manages to penetrate and obliterate transmission and whatever it is behind, resulting in tank annihilation. (ex: lorraine 40t VS Ho-Ri production, if lorraine penetrates LFP of Ho-Ri, it is just a toast no matter what due to ammo racks and crew being destroyed, but mantlet shot is much less dangerous due to lesser spall.)
| |
| − | | |
| − | RB:
| |
| − | | |
| − | AP(CBC): Basically same thing, but has normalization buff (IE if you screw up the shot it may reduce impact angle by a bit).
| |
| − | | |
| − | AP(C): Same thing, but generally these shells are so awfully low quality, they barely penetrate even with a buff. Depends on situation, though.
| |
| − | | |
| − | AP(CBC) (soviet and certain italian tanks): Tend to have BS 10-40 degree normalization angle, which makes it lolpen anything, until it ricochet or fails. Main issue is that they have slightly less penetration than the others, sometimes leading to hilarious incidents, as RB Germans using [[KV-IB (Germany)]] against soviets and basically achieving god mode, as they cannot penetrate their own tanks.
| |
| − | | |
| − | '''AP(HE)''': Less spall damage, but has a bomb which ticks off if hits something of ~15mm thick depending on fuse type (effective armour, not just 15mm of something). In interface looks like '''orange''' explosion around the shell. Fuse length can be abused to make shell explode outside of tank, but only a few tanks can do that.
| |
| − | | |
| − | AB: Explodes a moment later, doing insane damage. Seems to be weak to "internal armour plates" such as RHA lists and such. After penetration, if fuse wasn't triggered, can penetrate anything in the interior as if it doesn't care. Once fuse is activated, it can ricochet back inside off even 5mm construction steel (as often can be seen to happen with light tanks) Shrapnel can be stopped by engine or fuel tank, but '''only''' if explodes into it.
| |
| − | | |
| − | RB:
| |
| − | | |
| − | '''APCR''': High penetration for lesser damage than pure AP. The spalling is more focused and copies shell trajectory.
| |
| − | | |
| − | AB: Bad against angled armour, but from long distance it may as well just fall flat on it and pen anyway, which is heavily helped by AB aim assist. SMH I don't see the 'weaker damage' part, as it sometimes one-shots heavy tanks. Though, it's certainly less than APHE due to focused AoE.
| |
| − | | |
| − | RB:
| |
| − | | |
| − | '''HVAP''': Replacement for APCR/APDS on certain vehicles, including, for example, [[BMP-2]] .
| |
| − | | |
| − | AB: '''Extreme''' intolerance of angled armour due to ricochets, but otherwise penetrates anything it can.
| |
| − | | |
| − | RB:
| |
| − | | |
| − | '''APDS''': High speed, High accuracy, High pen, '''no normalization'''. Practically does only damage in line it went in and out. Because of no normalization part, still skillful to use. Sometimes not much better than certain AP shells penetration-wise for same reason .
| |
| − | | |
| − | AB: Does less damage the more armour it had to penetrate with main "bullet". At top power high caliber APDS can spall and obliterate weaker vehicles to some extent. At bottom power level might need 5 shots to set off 1 shell in ammo rack. If shell hit tracks or optics and then hit hull, which it had not enough energy to penetrate, it may say "shell shattered". Yes, that can happen, as easily seen with [[warrior]]. So it's better to fire at weakspots or from favorable angle, not just aim at ammo rack/crew in general.
| |
| − | | |
| − | RB:
| |
| − | | |
| − | '''APDSFS''': Nearly no falloff, insane range, does BOTH spall and direct damage, near infinite normalization value. Can penetrate ANYTHING, as in, can lolpen multiple tanks(and all and any of their modules), a house (which normally looks unpennable) and few walls, until finally stopped. The absurdity of penetration power depends on it's quality (from early 360 pen apdsfs to ridiculous 780 penetration in endgame) and hidden stats (like material of shell or w/e).
| |
| − | | |
| − | It's easier to explain why and when it's OP by example - When you play on map with destructible houses (like [[American Desert]] is now), it's godlike - you can fire at scouting mark through 3 streets of houses and oneshot your enemy, and that pesky light tank, that was 50m away from it, just because it was on same line. On other maps, where not every house is destructible, [[Finland]] c cap for example, it's just good because it doesn't require you to aim.
| |
| − | | |
| − | AB: Outright hull breaks weak armour.
| |
| − | | |
| − | RB:
| |
| − | | |
| − | :'''Chemicals (BOMBS)''': Have fuses that explode, if hit ANYTHING. Can cause hullbreak.
| |
| − | | |
| − | Does specifically different type of damage, and so ''special armour types negate it better than kinetic ammo''. General examples: ERA (special plates on top of vehicle which dampen the hit a bit by exploding back into it or by other means, usually one time use), NERA (permanent composite armour, usually visible with X-ray), spaced armour (Random trash on top of tank, "side skirts" and double-layered armour).
| |
| − | | |
| − | RB: Generally have AOE, even if not supposed to, which is affected by "explosive mass". At least looks like it.
| |
| − | | |
| − | '''HE''': Explodes on hit. 360 degree AoE. As such, sometimes used to penetrate top/roof armour, which generally have laughable 20-40 mm lists covering them, compared to 100-300 mm. Can also be shot below the tank, at MG on top of commander's hatch, or even pushed into turret's ring, depending on enemy tank's oversights.
| |
| − | | |
| − | AB: Some vehicles are rigged to instantly explode if hit by it, even if it didn't penetrate. Hilarious.
| |
| − | | |
| − | RB:
| |
| − | | |
| − | '''HEFS''': Used by certain soviet top-rank tanks. Flies faster and at less obscure angle.
| |
| − | | |
| − | AB:
| |
| − | | |
| − | RB: If it doesn't outright terminate enemy tank, it's usually powerful enough to wreck it's gun and whatever else is caught in blast.
| |
| − | | |
| − | '''HESH''': Forces all affected armour, which is weaker than shell's pen to spall into tank. Like APDS, it's better if armour is MUCH weaker than the shell, but still exists. Does more pen, the more angled surface was (until it just ricochets). In any mode sometimes hitting track insides with it obliterates vehicles, but in RB its more likely.
| |
| − | Little spaced armour shields on front of vehicle (like [[M163]] has) and side skirts negate it due to low amount of armour being transformed into "projectiles" and main armour plate being unaffected by blast. Despite that, being '''actually''' hit by HESH to unprotected side near to ammo rack often ends in fiery explosion, so it's not to be ignored as a possibility. It also has capability of ruining super-angled turrets, if shot exactly to the weakspot.
| |
| − | | |
| − | AB: It seems to me that lack of "explosion" makes it weaker. But I digress, as [[Centurion Mk.5 AVRE|Centurion AVRE]] once obliterated [[Conqueror]] with a close miss.
| |
| − | | |
| − | RB: Trapshots become more reliable.
| |
| − | | |
| − | '''HEAT''': Flies towards target at a very particular angle, then blasts everything in front of impact zone like APDS. Least likely to hullbreak and least AoE. Due to high angle of attack, usually its wiser to look at 30 and 60 degree penetration, not 0 degree one.
| |
| − | | |
| − | '''HEATFS''': Same as above, but flies more directly and faster.
| |
| − | | |
| − | HEAT usually have line projectile pattern, similar to APDS, but, unlike one, it can be blocked or derailed.
| |
| − | | |
| − | '''ATGM''':Same as above, but you guide it yourself. Has enough power to oneshot tank, if pens (will ''very likely'' pen and almost impossible to ricochet if driven into tank on purpose).
| |
| − | | |
| − | AB: Kind of damage tank it hit, generally going forward from impact point. Can be blocked by fuel tanks and engines, radiators, armour lists, ETC, if they are huge enough. (As example, [[Swingfire]], which has virtually no armour, can tank all the ATGM's from BMP-1 with it's fuel tank and then wreck it for being a nuisance. Or not, because BMP also can catch ATGM with it's engine and radiators, preventing hull break.)
| |
| − | | |
| − | RB: Violently explodes, wrecking light tanks, even your own tank, if you want to. ATGM ammo rack is also more likely to toast everyone around you, if it got hit. Is often a subject to change, as in one patch it's possible to explode yourself, and is impossible in another.
| |
| − | | |
| − | === Hullbreak checks ===
| |
| − | | |
| − | Wanted to create this subsection to check if anything changes with new patch/sub patch, as every time light tanks begin to refuse to explode to a single ATGM for weirdest of reasons, then next patch gaijin adds tank which doesn't explode while sporting 15mm aluminium armour, then it again explodes to hull hit, but not engine hit, even to 150+ mm cannon, ETC.
| |
| − | | |
| − | Wouldn't need it, if [[Update 1.89 "Imperial Navy"]] didn't drop yet another uneven nerf. IDK, maybe they were just too bored to list every light tank at 8.0 BR, but it doesn't make me feel any better, that OBJ 906 and BMP 2 weren't mentioned.
| |
| − | | |
| − | I highly suggest that moral questions like "is this fair that BMP-2 does not have same hull break as BMP-1 while being literally the same tank" not being summoned here. But mentions of Hullbreaks on certain tanks with patch number next to it would be nice.
| |
| − | | |
| − | :::'''Types of hull break'''
| |
| − | | |
| − | '''Ammunition type''' hull break: Basically, vehicle can be rigged to explode if hit by certain ammunition, usually chemicals. [[Sturmpanzer II]] instantly explodes if HE hits it, even on non-pen. You may argue if it's also tied to caliber, but it's irrelevant, really - APDSFS also causes it to happen more often than other KIN shells, though that would be strange.
| |
| − | | |
| − | '''Calibre based''' hull break: Basically, vehicle is rigged to explode if certain caliber shell hits it. Rule is often matched with certain hit region (IE, hull, engine, ETC) and ammunition type (may need lesser caliber for CHEM or KIN). Example: [[M10 GMC|M10]] often explode if hit by high enough caliber KIN shell into engine. Or [[Striker]] is now mentioned to have hull break of 105 mm CHEM or 120 mm KIN, without any specifications of "Where to".
| |
| − | | |
| − | :::'''Regions affecting hull break'''
| |
| − | | |
| − | '''The hull itself''' - it either can or cannot be ruined. I didn't find evidence of different sides of armour having different hull break property/ caliber requirement, the only exception was [[warrior]] and it's ERA shield somehow magically stopping even ATGM (though it's so powerful it was usually meaningless.)
| |
| − | | |
| − | '''Engine''' - Usually acts as a stopping power for shells, as of late 7.3+ light tanks are not hull broken if HEAT/ATGM hits them straight after hull penetration, but sometimes it is a weakspot (mostly for WW2 tanks with KIN shells).
| |
| − | | |
| − | '''Cannon''' - Normally, it's a deterrent for any types of shells, but in case of [[8,8 cm Flak 37 Sfl.|flakbus]] if big enough shell hits the gun directly, whole truck just explodes to pieces, while even penning entire truck all the way with through with KE does no real damage.
| |
| − | | |
| − | '''Radiator''' - Lately stops light tank hull break if chemical warhead hits it after pen (mostly tested on HEAT-ATGM)
| |
| − | | |
| − | '''Transmission''' - No data.
| |
| − | | |
| − | ::'''Tanks, which are immune to hull break for some reason'''
| |
| − | | |
| − | Tank - invulnerability properties - patch
| |
| − | | |
| − | [[Type 60 SPRG (C)]] - immune to KE hull break unlike [[type 60 ATM]] - 1.89
| |
| − | | |
| − | ::'''Vulnerable tanks'''
| |
| − | :[[File:75 mm HE hullbreaks warrior by hitting the track.jpg|This is ricilous. I recommend everyone to check their own tanks|thumb]]
| |
| − | :
| |
| − | | |
| − | [[File:105 mm hesh hullbreaks through addon armour.jpg|thumb|It would seem ERA is useless as well now.]]
| |
| − | | |
| − | {| class="wikitable"
| |
| | |- | | |- |
| − | ! Name !! Hull break !! Engine break/protection !! Cannon/launcher break/protection !! Radiator break/protection !! Exceptions? !! patch? | + | ! colspan="6" |This is a premium vehicle: all modifications are unlocked on purchase |
| | |- | | |- |
| − | | Warrior || 75 mm HE, 105 mm HESH, 120 mm Any chem, NO KIN || Protection HEAT/HESH || No protection || N/A || ERA shields (HESH, but buggy) || 1.89
| |
| − | |-
| |
| − | | BMP 2 || 105 mm CHE || Protection || No protection || Protection || None? || 1.87
| |
| − | |-
| |
| − | | Striker || 105 mm any CHE on track, 120 mm KE, Artillery || No protection || Protection || N/A || No || 1.89
| |
| − | |-
| |
| − | | Name || Calibre and type || Protection/Break || Protection/Break || Protection/Break || yes/no (specify) || patch Number
| |
| | |} | | |} |
| | | | |
| − | ==links to remember== | + | === Pros and cons === |
| | + | <!-- ''Summarise and briefly evaluate the vehicle in terms of its characteristics and combat effectiveness. Mark its pros and cons in the bulleted list. Try not to use more than 6 points for each of the characteristics. Avoid using categorical definitions such as "bad", "good" and the like - use substitutions with softer forms such as "inadequate" and "effective".'' --> |
| | | | |
| − | '''Some random images''' left by wiki moderator to help me remember how to upload pictures: | + | '''Pros:''' |
| − | | |
| − | [[File:GarageImage_Hunter_F_1.jpg|The Hunter F 1 in the Garage.|left|thumb]]
| |
| − | | |
| − | http://wiki.warthunder.com/index.php?title=Hunter_F_1
| |
| − | | |
| − | <gallery>
| |
| − | File:FighterImage_HunterDev1.jpeg
| |
| − | File:FighterImage_HunterDev2.jpeg
| |
| − | File:FighterImage_HunterDev3.jpeg
| |
| − | File:FighterImage_HunterDev4.jpeg
| |
| − | File:FighterImage_HunterDev5.jpeg
| |
| − | File:FighterImage_HunterDev6.jpeg
| |
| − | File:FighterImage_HunterDev7.jpeg
| |
| − | </gallery>
| |
| − | | |
| − | Category tags for images:
| |
| − | <nowiki>[[Category:In-game screenshots]] [[Category:Garage images]] [[Category:Animated files]] [[Category:Ammo racks]] [[Category:Document images]] [[Category:Historical photos]]</nowiki>
| |
| − | | |
| − | Link to upload stuff : http://wiki.warthunder.com/index.php?title=Special:Upload .
| |
| − | | |
| − | Link to optics gallery: https://wiki.warthunder.com/Optics
| |
| − | | |
| − | ==Talk/comment section==
| |
| − | | |
| − | '''In case if you want to write exactly here:'''
| |
| − | | |
| − | @Bangerland, here are a couple of options for formatting images here on the wiki. You can check out options on Google for GIFs (although, I don't think the formatting is much different for them). You want to make sure when uploading images, that you don't upload copyrighted images (without permission). Feel free to load images you take from the game, public domain images or copyrighted images which you have received permission and annotate in the information section of the image posted.
| |
| − | | |
| − | | |
| − | Here is the link to upload images and GIFs: http://wiki.warthunder.com/index.php?title=Special:Upload
| |
| − | | |
| − | Also, this is your page, you can add, edit or remove data here as you would like. Good luck! - [[User:AN TRN 26|AN TRN 26]] ([[User talk:AN TRN 26|talk]]) 16:16, 21 December 2018 (UTC)
| |
| − | | |
| − | Does someone maybe know a way to use the marketplace thing without double authentication? Wanted to exchange some junk to get decals for fun, but this thing just wont let go... IDK why every company just assumes i have 2k$ phone, or have time to set up emulator, or even care about mine account's safety. It's really frustrating to me, because decal even costs like 0.13 points of whatever the currency is, and i could get 4 easily by dumping SU-85a, which i wasn't going to ever use anyway. If that's oficially and even unoficially not possible, at the very least some recommendation of easy to setup emulator would be nice. (bluestacks gave me headache previous time i tried to use it.) --[[User:U42773747|U42773747]] ([[User talk:U42773747|talk]]) 21:51, 24 April 2019 (UTC)
| |
| − | | |
| − | : Sorry, I don't have a recommendation. I was able to set up double authentication, but the market still would not let me purchase anything so I didn't pursue it any further. I have used Bluestacks and it seemed to be a resource hog and worked most of the time, but recently I have switched to MEmu (https://www.memuplay.com/) and that one seems to run a bit better and is fairly easy to get going, maybe that will help with the emulator portion. -- [[User:U64962917|U64962917]] ([[User talk:U64962917|talk]]) 01:30, 25 April 2019 (UTC)
| |
| − | | |
| − | ::You don't need a phone to enable 2 factor. You can turn on 2 factor by email.--[[User:U30585107|U30585107]] ([[User talk:U30585107|talk]]) 03:56, 25 April 2019 (UTC)
| |
| − | | |
| − | :::Thanks, i guess i was confused by unclear writing on the site and overall practice with this on internet. After logging in separately in actual browser managed to use marketplace. (in-game browser seems to be unstable with this) --[[User:U42773747|U42773747]] ([[User talk:U42773747|talk]]) 17:32, 25 April 2019 (UTC)
| |
| − | | |
| − | Another question - is there any way to learn exact magnification value on tank/gun? X-ray and stat-cards seem to not tell optics zoom on tanks. Would never tell [[ST-A1]] is a decent tank, but OH GOD THIS OPTIC HAS AT LEAST X12 MAGNIFICATION. I mean... Many rank 6-7 tanks wish they had optics this good, you can even see tanks from over 1km in detail with this. If not , maybe we should include optics as a detail on tank pages if possible? --[[User:U42773747|U42773747]] ([[User talk:U42773747|talk]]) 17:16, 27 April 2019 (UTC)
| |
| − | | |
| − | : I don't play tanks very often, so I don't know, Inceptor57 or one of the other mods may have more info on that. If there is enough information to write up on the optics (if there are really that many different ones/zoom levels) then it's possible a small section may be worth is. You can always work on mocking one up on your page and we can see where it goes. [[User:U64962917|U64962917]] ([[User talk:U64962917|talk]]) 18:03, 27 April 2019 (UTC)
| |
| − | | |
| − | :: Problem is, only few tanks display optics info. Like... uh. I only found it on newer tanks of rank 6 and leopard line, as example, you hover over one of 89-s numerous optics, on one of them you see "optics X2-X8 zoom". The warrior just says "Optics X8", challenger "optics X4-10". But even in rank 6 i look at many tanks and see nothing (like [[KPz-70]] data is omitted), and i have failed to find ones at rank 5 and below, except for [[Leopard I]]. I suspect those had to be filled by developers, but weren't in case of ''at least'' 90% of vehicles. And so, i don't have any solid information, only the subjective zoom impact info from comparing one to another. Well, because even default (minimal) gunner zoom is always different too, i have no clue what X1 even looks like. And some scopes seem to diffirentiate '''even by X0.3s''', as Leopard A1A1 suggests, which is mind boggling.
| |
| − | | |
| − | ::The difference is about like this (actual magnification extremely subjective, but the proportion i judged by "compass" on top of screen, which changes the distance between degrees with zoom magnification, so its still sort of true): Rank 1 tank has only X2 zoom as default (i suppose as things look closer than from 3PV) and X4 as second one (on press of Z), then you have rank 4 tanks with mostly X2-4 as default and about X4-5 as secondary, but you do get expections on tanks like [[M26 "D.C.Ariete"]] with X5 and X6. And so is with the many of the medium tanks, with X4 you barely see tanks at 1km range. Then you have sth like [[Object 120]], which has X4 as default and about X8 as secondary , or [[Ru 251]] with ~X7 and ~X8 , then you have something like German SPG [[Panzer IV/70(A)]] or rank 7 [[Challenger 2]] which is supposed to be "the ultimate hulldown tank", and these ones have ~X4-6 by default and about X10 as secondary zoom. There is also Leopard A1A1 (L/44) which has like X10.3 as default and X12 as secondary zoom. And finally you have something really rare like [[Leopard 2K]](and few other from those lineup), or rank 4 [[ST-A1]] with about X8 as default and X16+ on secondary zoom (and probably the entire japanese tank line after that one too, as their rank 6 premium has similiar scope). The damn default zoom is as good as than the last one of top tier "sniper tanks". And what is worse , only few tanks have this insane optic. And the difficulty of aiming is different too, as the marks on scope (which say the shell drop distance) also become bigger and have quite the distance from eachother on that scope, even with APDSFS, so you don't have to stare at your screen so hard. You know, i often questioned Leopard 1 driver's sanity, as they constantly go for cross-map snipes and hit me in SPG from 2km away on the move, when i barely even see them in sniper scope, but when you know their optics are like 4-8 times better than yours, it makes at least ''some'' sense.
| |
| − | | |
| − | :: I doubt a whole subsection would be needed to be created, because as much as i look, commander's binoculars seem to have same ~X6 increment on every vehicle, and cannot be zoomed, so you can't even make a big meaningfull table called "optics" to be filled like "gunners optics, Default, zoomed", "Commander optics, default, zoom". But i feel like adding lil table with optics of gunner to "main armament' subsection would be great. Here is an example: ("which ones" is there just in case Multi-turreted tanks have different zoom levels on different guns, though i failed to find one such example yet.)
| |
| − | | |
| − | {| class="wikitable sortable" style="text-align:center" width="100%"
| |
| − | ! colspan="3" | Optics (Xmagnification)
| |
| − | |-
| |
| − | !Which ones
| |
| − | !Default
| |
| − | ! Maximum (zoomed in)
| |
| − | |-
| |
| − | !Main Gun optics
| |
| − | |X4.3||X12
| |
| − | |-
| |
| − | |}
| |
| | | | |
| − | ::Even if that is too much, we have this default table explaining the guidance and stabilizer on the gun, and its fire rate (though without mentioning of autoloader, which ''also'' impacts things sometimes, like sudden knockout of loader not stopping/resetting the reload). And there are 2 empty slots after reload speed, which i always use in SPAA pages to say "rearm time", as those take forever and are on separate timers. We could appropriate those 2 slots to be like optics-> minimal zoom, maximal zoom instead? But problem is, table looks like it's supposed to be linked to gun page, not vehicle itself, or something. --[[User:U42773747|U42773747]] ([[User talk:U42773747|talk]]) 20:03, 27 April 2019 (UTC)
| + | * Excellent multi-role fighter in the Soviet tree |
| | + | * Outstanding payload (1,250 kg total!) |
| | + | * 4 x Browning M2's on each wing will make short work of any fighter/attacker |
| | + | * Plenty of ammo provides 33 seconds of sustained fire |
| | + | * Bubble canopy provides excellent view (SB) |
| | + | * Amazing energy retention makes it an excellent diver |
| | + | * Low repair cost |
| | | | |
| − | :::I like the looks of that table, something like that could be doable. Might be something to find a static marker/target in the trial yard and snap a screenshot of the target through the scope at each of its different settings and have those on the page for people to visually compare to, they don't have to be huge images, people can click on them (or it can be a composite of the images so one image has all magnifications side by side, that might be useful too. Might be good to have Inceptor57 weigh in on this, he is more of a tank guy than I am. [[User:U64962917|U64962917]] ([[User talk:U64962917|talk]]) 20:50, 27 April 2019 (UTC) | + | '''Cons:''' |
| | | | |
| − | :::: So, you want to add like a line into instructions, for people to compare or something like that? In a way of "If you can, check magnification of gunner's scope at ''This page'' and apply screenshots that match minimal and maximum zoom of this vehicle's optics here."? I feel like composite image might be hard to use, especially with wiki engine here. It will probably be better to have a lot of images you can scroll with those arrows. Like, make a page called "optics magnifications" and make a gallery of them, being commented like "X2" or "X4" "X8", "X8.8" (damn french RC car!), "X10", "X10,3" (damn leopard!) and such. For those vehicles, that have specified zoom, I could use enemy tank from test drive in AB mode, to use as a mark. Problem is, though, the vehicles may be different all the time for different factions/ranks. With AB rangefinder i always can make sure enemy stands at exactly 1km range, but ofcourse having only one same target for this would be better, to not get confused with different target sizes, but mine resources are kind of limited to what brits (and maybe japs) have, and the premium german test drives. Having a tree or building as a mark instead might be kind of... Counterintuitive? I have one ruined tank hull in mind (even with a tree in a way to have some comparsion) and can make sure it's 1km away via AB rangefinder, but for other people to drive that far and double check it, that would take forever. Anyhow, should i write to Inceptor57 about it directly or they might notice our discussion at their own time? --[[User:U42773747|U42773747]] ([[User talk:U42773747|talk]]) 21:33, 27 April 2019 (UTC)
| + | * Heavy fighter, sluggish and difficult to manoeuvre at slow speeds |
| | + | * Bad turning ability |
| | + | * Engine performance is worse in low altitudes |
| | + | * Worse performance when mounting bombs |
| | + | * Slow climbing |
| | + | * Larger than the average fighter |
| | + | * Bomb drop order makes it less viable for prolonged ground attacking |
| | | | |
| − | ::::: I think it is possible to data-mine the tank optics zoom. In a tank BLK file if you divide 74 by the "zoomOutFov" or "zoomInFov" field that gives you the default and zoomed in magnification (it has a load of decimal points after it but when you round it to 1 d.p it is nearly always accurate, sometimes you will be out by 0.1 x though). Not sure the significance of 74, presumably it is the FoV of a 1x zoom or something. I worked this out by taking the standard zoom of the Challenger 2 (stated as x 4 in game), then multiplying it by the "zoomOutFov" field in the challenger 2 blk file to get 74. If I then pick other tanks in game which have a zoom specified and divide 74 by the "zoomOutFov" & "zoomInFoV" fields in their files the number you get nearly always rounds to what the zoom level was stated at in game. --[[User:U13682523|U13682523]] ([[User talk:U13682523|talk]]) 12:32, 28 April 2019 (UTC)
| + | == History == |
| | + | ''Describe the history of the creation and combat usage of the aircraft in more detail than in the introduction. If the historical reference turns out to be too long, take it to a separate article, taking a link to the article about the vehicle and adding a block "/History" (example: <nowiki>https://wiki.warthunder.com/(Vehicle-name)/History</nowiki>) and add a link to it here using the <code>main</code> template. Be sure to reference text and sources by using <code><nowiki><ref></ref></nowiki></code>, as well as adding them at the end of the article with <code><nowiki><references /></nowiki></code>. This section may also include the vehicle's dev blog entry (if applicable) and the in-game encyclopedia description (under <code><nowiki>=== In-game description ===</nowiki></code>, also if applicable).'' |
| | | | |
| − | :::::: That's very useful. You mean the .BLK similiar to those that appear, when you access "skin customization"? I'm afraid i'd have to own the vehicle to get these still. Or am i mistaken and i can make them out of other files? Kind of curious what kind of optics Type 90 has. --[[User:U42773747|U42773747]] ([[User talk:U42773747|talk]]) 12:51, 28 April 2019 (UTC)
| + | == Media == |
| | + | ''Excellent additions to the article would be video guides, screenshots from the game, and photos.'' |
| | | | |
| − | ::::::: The type of BLK you get by data-mining (extracting the game files). Its the way flaps limits, optimal velocities, compressor settings and stuff like that are found out for aircraft pages.
| + | == See also == |
| | + | ''Links to the articles on the War Thunder Wiki that you think will be useful for the reader, for example:'' |
| | | | |
| − | :::::::: Understood. I will have to look into it in detail, when i'll have the time. --[[User:U42773747|U42773747]] ([[User talk:U42773747|talk]]) 14:07, 28 April 2019 (UTC)
| + | * ''reference to the series of the aircraft;'' |
| − | <!--'''https://wiki.warthunder.com/Help:Templates''' (Yes, they can be created and edited through the visual editor, but they can be tricky. Modifying an existing one could potentially impact hundreds of pages. What you are probably seeing is people working with parsers which pull existing data directly from a database (one which we do not have direct access to). Most of the parsers which have been found are in existing templates, several of which are massive if/then statements. Through the visual editor, you can add existing templates (if you know the name), for example on the page '''https://wiki.warthunder.com/Ju_87_D-3?veaction=edit''' at the top of the page is a "Notice" template. You can click on it, click the edit button and there is a section where you can modify the data or if you needed to add one of these to the page, click on the "Insert" at the top of the page, select "Template", type in the template name you need and look for it in the dropdown box. If you find the one you are looking for, select it and you should then have the option to add any pertinent info (in the case of the notice any redirect information to a disambiguation page. Conversely, the disambiguation notice in the standard editor looks like this:
| + | * ''links to approximate analogues of other nations and research trees.'' |
| | | | |
| − | {{Notice|''This page is about the aircraft '''{{PAGENAME}}'''. For other uses, see [[Ju_87_(Disambiguation)|Ju 87 (Disambiguation)]]''}}
| + | == External links == |
| | + | ''Paste links to sources and external resources, such as:'' |
| | | | |
| − | '''{{Notice}}''' is the template and what follows the pipe "|" is what is output on the screen in the notice bar. {{PAGENAME}} is another template which calls the actual name of the page, so here we have a template nested in a template, however it is after the pipe, if it was before the pipe it would not work. Some templates have room for up to 3 to 4 arguments which can make them a bit more complicated to work with (complicated, not impossible with a little patience). | + | * ''topic on the official game forum;'' |
| | + | * ''encyclopedia page on the aircraft;'' |
| | + | * ''other literature.'' |
| | | | |
| − | You can look at https://wiki.warthunder.com/User:U30585107 (BlastedRyan's user page) where there are some noted parsers and arguments which may help you, unfortunately, many of the arguments are in Russian (Cyrillic) and at this time do not have English equivalents, however you can use Google Translate to get a better idea of what they are. I hope this helps some. -->
| + | {{AirManufacturer Republic}} |
| | + | {{USSR fighters}} |
| | + | {{USSR premium aircraft}} |
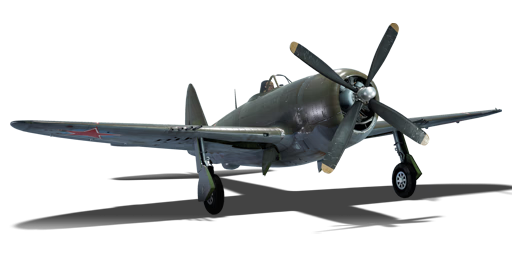
.jpg)
