Difference between pages "Ki-44-II hei (China)" and "F-100D"
CLOSE_RANGE (talk | contribs) (Fleshed out with content from the original Ki-44-II hei article) |
(Removed some garbage claim about the Sidewinder replacing the Sparrow in Vietnam. Replaced garage claim with factual information regarding the Sidewinder's overtaking the AIM-4 instead.) (Tag: Visual edit) |
||
| Line 1: | Line 1: | ||
| − | {{Specs-Card|code= | + | {{Specs-Card |
| − | + | |code=f-100d | |
| − | + | |cockpit=380321/1306449 | |
| − | | | ||
| − | |||
}} | }} | ||
| + | |||
== Description == | == Description == | ||
| − | <!-- ''In the description, the first part | + | <!--''In the description, the first part needs to be about the history of and the creation and combat usage of the aircraft, as well as its key features. In the second part, tell the reader about the aircraft in the game. Insert a screenshot of the vehicle. If the novice player does not remember the vehicle by name, he will immediately understand what kind of vehicle it is talking about.''--> |
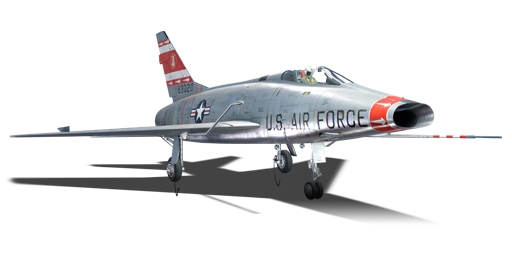
| − | [[File:GarageImage_{{PAGENAME}}.jpg|420px|thumb|left]] | + | [[File:GarageImage_{{PAGENAME}}.jpg|420px|thumb|left|]] |
{{break}} | {{break}} | ||
| − | The '''{{Specs|name}}''' is a rank {{Specs|rank}} | + | The '''{{Specs|name}}''' is a rank {{Specs|rank}} American jet fighter {{Battle-rating}}. It was introduced in [[Update 1.85 "Supersonic"]] and was one of the first three jets to feature guided air-to-air missiles, the other two being the [[MiG-19PT]] and the [[Javelin F.(A.W.) Mk.9]]. |
| − | The | + | The dog-fighting days of WW II were over and while there was air-to-air combat during the Korean and Vietnam Wars, it was nowhere the level of previous wars. Jets were becoming faster, electronics and avionics were making them more manoeuvrable and the fighters were able to carry extremely large amounts of ordnance. The {{PAGENAME}} was no exception to this as it was designed to be a ground attacker first and a fighter/interceptor as a secondary role. Visible changes to the shape of the fighter compared to earlier [[F-80A-5|F-80s]], [[F-84 (Family)|F-84s]] and [[F9F-2|F9Fs]] as the {{PAGENAME}} sported a more sleek and aerodynamic shape to it. |
| + | |||
| + | One noticeable difference is the deviation from the straight-wing aircraft, early on in development the {{PAGENAME}} was known as the ''45-Sabre'' (officially later it was dubbed ''Super Sabre'') due to its wings being swept back at a 45° angle. The fighter's elevators were also swept back to help increase the aerodynamics of the aircraft. Engine exhaust nozzle control, upgraded avionics and early computer systems worked together to make this the first US fighter which was able to fly faster than the speed of sound in level flight. Compared to earlier jet fighters, the {{PAGENAME}} may feel more like a race car as it has a great climb rate, accelerates well in a straight line and during a dive while maintaining a decent roll rate. Slats in the wings help with the already horrible turn time, especially when the fighter is loaded down with ordnance, as such, turning should be left to a minimum. | ||
| + | |||
| + | [[File:F-100 duckmcmallardson001.png|350px|thumb|left|Literally looking down the barrels of an oncoming '''{{PAGENAME}}'''.]] | ||
| + | |||
| + | Weapon loadout options allow the pilot to tailor the aircraft to their playstyle or even mix it up depending on the map they are flying. This fighter excels as a ground attack bomber utilizing up to 6,000 lbs of bombs, [[AGM-12B Bullpup|Bullpup]] rockets, [[FFAR Mighty Mouse|Mighty Mouse]] rockets or several combinations of the three. Whether you are into dropping and running or firing and forgetting, there are ordnance choices will fit the pilot's style. For those pilots who want to hunt fighters and bombers, The four nose mount 20 mm cannons and choice of [[AIM-9B]] Sidewinder air-to-air missiles will fit the bill. Centre-mounted cannons mean that convergence is not a factor and allows the pilot to set up for head-on attacks and being more successful against other fighters which may have to factor in convergence. The Sidewinders are also an intimidation factor as pilots with one on their tail must immediately focus on outmanoeuvring the missile, providing you with the opportunity to manoeuvre in and line up the kill-shot with your cannons if the missile does not make contact. The speed of the {{PAGENAME}} can come in handy when attacking bomber aircraft as Boom & Zoom tactics will help you avoid any defensive weapons allowing you to wreak havoc during an attacking dive. | ||
| + | |||
| + | If handled correctly, the {{PAGENAME}} can be a wrecking ball of destruction both in ground attacks and as an aircraft interceptor. Ordnance options are available for all play-styles and can be a tide-turner in a decisive match. | ||
== General info == | == General info == | ||
| − | === Flight | + | === Flight Performance === |
| − | <!--''Describe how the aircraft behaves in the air. | + | <!--''Describe how the aircraft behaves in the air. Maximum speed, manoeuvrability, speed and allowable loads - these are the most important characteristics of the vehicle.''--> |
| − | + | The F-100 during its initial development was outfitted with the then de-rated Pratt & Whitney XJ57-P-7 engine and was still able to achieve faster than the speed of sound. By the time the {{PAGENAME}} rolled off of the production line they were outfitted with the more powerful Pratt & Whitney J57P-21. It is this engine which turns the fighter into a hot rod. The {{PAGENAME}} is much like a ground-based dragster in that it has acceleration, it has a high top speed and is a horrible turner. | |
| − | + | The {{PAGENAME}} is aerodynamically fit with its sleek body and swept-back wings which coupled with its J57P-21 is a fantastic climber which continues to accelerate even without WEP engaged. This fighter will continue to accelerate in a flat run to the point of going over Mach 1 and even more quickly hits top speeds when in a dive. Climbing, diving and rolling are excellent capabilities of this fighter, however, this comes with having speed on your side as when flying slower, it has a more challenging time to manoeuvre without being a relatively easy target for others. The {{PAGENAME}} is not the greatest of turners even with leading-edge wing slats to help, manoeuvres like the Immelmann and Split-S are the most optimal when changing directions without attempting energy-bleeding manoeuvres like turning (unless that is what you are intending to do to cause an overshoot of someone following you). | |
| + | |||
| + | [[File:F-100 fulzy nyan001.png|350px|thumb|right|Bird's eye view of a '''{{PAGENAME}}''' after unloading on ground targets.]] | ||
| + | |||
| + | Flying at speeds close to Mach 1 or past can pose a challenge for pilots utilising the 3rd-person view as a condensation cloud forms around the aircraft and obscures your view (not an issue for those flying simulator-style from in the cockpit). While this can make targeting enemy aircraft a challenge, it just takes a little more work to line up the shot either with the cannons or air-to-air missiles. | ||
| + | |||
| + | Typically aircraft which pound ground targets fly slow to ensure they hit their targets with guns, rockets or bombs, however, the {{PAGENAME}} becomes difficult to get out of harms way when flying slow, so it requires the pilot to learn how to bomb and fire rockets at targets at higher speeds than what they may be used to with earlier aircraft. Terms like drop & run or fire & forget come into play as the {{PAGENAME}} descends towards a ground target at a good clip, dropping its bombs or firing its rockets and then boogieing out of the area to ensure the ground anti-aircraft fire nor any trailing fighters gain a targeting solution on you. Some pilots like to watch and make sure their ordnance hits the target, however, this can cost you your jet when someone takes advantage of your inattentiveness and gets the drop on you. Speed in and speed out is the key with the {{PAGENAME}}. | ||
{| class="wikitable" style="text-align:center" | {| class="wikitable" style="text-align:center" | ||
| − | + | ! rowspan="2" | Characteristics | |
| − | ! | + | ! colspan="2" | Max Speed<br>(km/h at 10,668 m) |
| − | + | ! rowspan="2" | Max altitude<br>(metres) | |
| − | |||
| − | |||
| − | ! colspan="2" | Max Speed<br>(km/h at | ||
| − | ! rowspan="2" | Max altitude<br>( | ||
! colspan="2" | Turn time<br>(seconds) | ! colspan="2" | Turn time<br>(seconds) | ||
| − | ! colspan="2" | Rate of climb<br>( | + | ! colspan="2" | Rate of climb<br>(metres/second) |
| − | ! rowspan="2" | Take-off run<br>( | + | ! rowspan="2" | Take-off run<br>(metres) |
|- | |- | ||
! AB !! RB !! AB !! RB !! AB !! RB | ! AB !! RB !! AB !! RB !! AB !! RB | ||
|- | |- | ||
| − | | | + | ! Stock |
| − | + | | 1,445 || 1,438 || rowspan="2" | {{Specs|ceiling}} || 40.6 || 41.5 || 61.4 || 54.6 || rowspan="2" | 1,400 | |
| − | |||
| − | |||
| − | |||
| − | |||
| − | |||
| − | |||
| − | |||
| − | |||
| − | |||
|- | |- | ||
| − | | | + | ! Upgraded |
| + | | 1,478 || 1,458 || 39.5 || 40.0 || 94.6 || 79.2 | ||
|- | |- | ||
|} | |} | ||
| − | ==== Details ==== | + | ====Details==== |
| + | [[File:F-100 rheinberg001.png|500px|thumb|right|'''{{PAGENAME}}''' at cruzing altitude on the watch for potential enemy fighters.]] | ||
{| class="wikitable" style="text-align:center" | {| class="wikitable" style="text-align:center" | ||
|- | |- | ||
| − | ! colspan=" | + | ! colspan="6" | Features |
|- | |- | ||
| − | ! Combat flaps !! Take-off flaps !! Landing flaps !! Air brakes !! Arrestor gear | + | ! Combat flaps !! Take-off flaps !! Landing flaps !! Air brakes !! Arrestor gear !! Drogue chute |
|- | |- | ||
| − | | ✓ || ✓ || ✓ || X || | + | | ✓ || ✓ || ✓ || ✓ || X || ✓ <!-- ✓ --> |
|- | |- | ||
|} | |} | ||
| Line 64: | Line 66: | ||
{| class="wikitable" style="text-align:center" | {| class="wikitable" style="text-align:center" | ||
|- | |- | ||
| − | ! colspan=" | + | ! colspan="7" | Limits |
|- | |- | ||
| − | ! rowspan="2" | | + | ! rowspan="2" | Wings (km/h) |
| − | ! rowspan="2" | Gear | + | ! rowspan="2" | Gear (km/h) |
| − | ! | + | ! colspan="3" | Flaps (km/h) |
! colspan="2" | Max Static G | ! colspan="2" | Max Static G | ||
|- | |- | ||
| − | ! + !! - | + | ! Combat !! Take-off !! Landing !! + !! - |
|- | |- | ||
| − | | {{Specs|destruction| | + | | {{Specs|destruction|body}} || {{Specs|destruction|gear}} || 620 || 620 || 435 || ~11 || ~4.5 |
|- | |- | ||
|} | |} | ||
| Line 79: | Line 81: | ||
{| class="wikitable" style="text-align:center" | {| class="wikitable" style="text-align:center" | ||
|- | |- | ||
| − | ! colspan="4" | Optimal velocities | + | ! colspan="4" | Optimal velocities (km/h) |
|- | |- | ||
| − | ! Ailerons | + | ! Ailerons !! Rudder !! Elevators !! Radiator |
| − | ! Rudder | ||
| − | ! Elevators | ||
| − | ! Radiator | ||
|- | |- | ||
| − | | < | + | | < 640 || < 540 || < 610 || N/A |
|- | |- | ||
|} | |} | ||
| + | ==== Engine performance ==== | ||
{| class="wikitable" style="text-align:center" | {| class="wikitable" style="text-align:center" | ||
|- | |- | ||
| − | ! colspan="3" | | + | ! colspan="3" | Engine |
| + | ! colspan="6" | Aircraft mass | ||
|- | |- | ||
| − | ! colspan="3" | | + | ! colspan="2" | Engine name || Number |
| + | ! colspan="3" | Empty mass || colspan="3" | Wing loading (full fuel) | ||
|- | |- | ||
| − | + | | colspan="2" | Pratt & Whitney J57P21 || 1 | |
| − | + | | colspan="3" | 9,551 kg || colspan="3" | 352 kg/m<sup>2</sup> | |
| − | |||
|- | |- | ||
| − | | | + | ! colspan="3" | Engine characteristics |
| + | ! colspan="5" | Mass with fuel (no weapons load) || rowspan="2" | Max Takeoff<br />Weight | ||
|- | |- | ||
| − | ! colspan=" | + | ! Weight (each) || colspan="2" | Type |
| + | ! 15m fuel || 20m fuel || 30m fuel || 45m fuel || 50m fuel | ||
|- | |- | ||
| − | + | | 900 kg || colspan="2" | Afterburning axial-flow turbojet | |
| − | + | | 10,618 kg || 10,968 kg || 11,669 kg || 12,719 kg || 13,069 kg || 16,689 kg | |
| − | |||
|- | |- | ||
| − | | | + | ! colspan="3" | {{Annotation|Maximum engine thrust @ 0 m (RB / SB)|The maximum thrust produced by each engine, while mounted in the aircraft. NOTE: Thrust varies significantly depending on speed & altitude.}} |
| + | ! colspan="6" | Thrust to weight ratio @ 0 m (100%) | ||
| + | |- | ||
| + | ! Condition || 100% || WEP | ||
| + | ! 15m fuel || 20m fuel || 30m fuel || 45m fuel || 50m fuel || MTOW | ||
| + | |- | ||
| + | | ''Stationary'' || 3,786 kgf || 5,810 kgf | ||
| + | | 0.55 || 0.53 || 0.50 || 0.46 || 0.44 || 0.35 | ||
| + | |- | ||
| + | | ''Optimal'' || 4,254 kgf<br />(1,200 km/h) || 7,978 kgf<br />(1,200 km/h) | ||
| + | | 0.75 || 0.73 || 0.68 || 0.63 || 0.61 || 0.48 | ||
|- | |- | ||
|} | |} | ||
| − | === Survivability and armour === | + | ===Survivability and armour=== |
| − | <!--''Examine the survivability of the aircraft. Note how vulnerable the structure is and how secure the pilot is, whether the fuel tanks are armoured | + | <!--''Examine the survivability of the aircraft. Note how vulnerable the structure is and how secure the pilot is, whether the fuel tanks are armoured. Describe the armour, if there is any, also mention the vulnerability of other critical aircraft systems.''--> |
| − | |||
| − | |||
| − | |||
| − | + | For post-war fighter jets wanted to take advantage of the newer jet technology and maximize both speed and ordnance carried. To keep up speed and maximize ordnance, something had to give and that came with pilot survivability. The idea is to be faster than the enemy which would make it really difficult for them to get a targeting solution on you. Though the {{PAGENAME}} does have protection for the pilot, it isn’t much and leaves the rest of the critical components virtually unprotected with armour. For the pilot, the back of the seat and headrest maintains a continuous piece of steel at 12.7 mm thick and the windscreen is rated at 64 mm bulletproof windscreen. Typically this type of protection is meant more for protection from defensive turret attacks from bombers rather than gun attacks from other aircraft. | |
| + | The {{PAGENAME}} is a relatively sturdy aircraft and can take a beating before critical components begin to fail. While the engine and the pilot are important to protect as much as possible (without the engine you don’t go and without the pilot…you don’t go…) the wings are another critical component which you must protect as hits to the wings can make flying very difficult or send you to the respawn point. If being tailed by another aircraft try to speed away because if you try to pull up, turn to the side or pull-down, you risk expositing increased surface area of the skin, giving the enemy pilot more to shoot at and a greater opportunity of taking out a wing. If possible, increase speed and sway back and forth, even some very shallow elevator dips up and down maybe enough to throw off the sighting of the enemy pilot and spray his bullets all around you without exposing very much surface area of the jet, however, if there is a missile launch, take evasive action to avoid the missile and worry about the guns later. | ||
== Armaments == | == Armaments == | ||
=== Offensive armament === | === Offensive armament === | ||
<!--''Describe the offensive armament of the aircraft, if any. Describe how effective the cannons and machine guns are in a battle, and also what belts or drums are better to use. If there is no offensive weaponry, delete this subsection.''--> | <!--''Describe the offensive armament of the aircraft, if any. Describe how effective the cannons and machine guns are in a battle, and also what belts or drums are better to use. If there is no offensive weaponry, delete this subsection.''--> | ||
| + | {{main|M39A1 (20 mm)}} | ||
| − | + | The '''''{{PAGENAME}}''''' is outfitted with: | |
| − | |||
| − | The '''''{{PAGENAME}}''''' is | ||
| − | * | + | * 4 x 20 mm M39A1 cannons 200 RPG (800 rounds total) |
| − | |||
| − | + | Early fighter aircraft utilized the wings of aircraft to mount machine guns and cannons, which was very effective especially aircraft like the P-47 which could outfit four guns in each wing for a total of eight. The downside is that for these guns to be effective, they had to have a convergence set to a specific distance, bullet hits before that distance and after became less effective, the pilots needed to make sure to hit the sweet spot. For the {{PAGENAME}}, convergence is non-existent as all four of its M39A 20 mm cannons are mounted on the underside of the fuselage, effectively able to decimate targets at extremely close range or snipe targets which maybe even 700 - 800 m, if not farther away, effectively almost any range (below 1000 m) is a sweet-spot for this fighter. | |
| + | The cannons are air-cooled and rarely overheat, typically with the 200 round limit for each gun, the pilot should want to make each shot count and not just hold down the firing trigger and spray away. Another bonus to having all four cannons being the same type and calibre is that the bullets will have the same drop rate, so after getting used to how they work, it is much easier to estimate where to target moving vehicles to ensure a connection with the bullets. With the four cannons grouping so tightly, only a few rounds are needed to blow off an enemy aircraft's wing, eliminate a critical component (engine, compressor, fuel tank, pilot...etc...) and even take out ground units to include up to light armoured vehicles. | ||
=== Suspended armament === | === Suspended armament === | ||
<!--''Describe the aircraft's suspended armament: additional cannons under the wings, bombs, rockets and torpedoes. This section is especially important for bombers and attackers. If there is no suspended weaponry remove this subsection.''--> | <!--''Describe the aircraft's suspended armament: additional cannons under the wings, bombs, rockets and torpedoes. This section is especially important for bombers and attackers. If there is no suspended weaponry remove this subsection.''--> | ||
| + | {{main|LDGP Mk 82 (500 lb)|M117 cone 45 (750 lb)|LDGP Mk 83 (1,000 lb)}} | ||
| + | {{main|FFAR Mighty Mouse|AGM-12B Bullpup|AIM-9B|AIM-9E}} | ||
| + | [[File:F-100 wp gaming001.jpg|500px|thumb|right|'''{{PAGENAME}}''' peeling away from the flight revealing the suspended ordnance it is carrying.]] | ||
| + | The '''''{{PAGENAME}}''''' can carry the following suspended ordnance: | ||
| + | |||
| + | * 6 x 500 lb LDGP Mk.82 bombs (3,000 lb total) | ||
| + | * 10 x 500 lb LDGP Mk.82 bombs (5,000 lb total) | ||
| + | * 8 x 750 lb M117 cone 45 bombs (6,000 lb total) | ||
| + | * 4 x 1,000 lb LDGP Mk.83 bombs (4,000 lb total) | ||
| + | * 76 x FFAR Mighty Mouse unguided rockets | ||
| + | * 4 x 750 lb M117 cone 45 bombs + 14 FFAR Mighty Mouse unguided rockets | ||
| + | * 2 x AGM-12B Bullpup rockets | ||
| + | * 2 x AGM-12B Bullpup rockets + 4 x 750 lb M117 cone 45 bombs | ||
| + | * 4 x AIM-9B Sidewinder air-to-air missiles | ||
| + | * 4 x AIM-9E Sidewinder air-to-air missiles | ||
| + | |||
| + | == Usage in battles == | ||
| + | <!--''Describe the tactics of playing in an aircraft, the features of using vehicles in a team and advice on tactics. Refrain from creating a "guide" - do not impose a single point of view, but give the reader food for thought. Examine the most dangerous enemies and give recommendations on fighting them. If necessary, note the specifics of the game in different modes (AB, RB, SB).''--> | ||
| + | [[File:F-100 tio pilin001.png|350px|thumb|right|'''{{PAGENAME}}''' caught in the cross-hairs of a MiG fighter.]] | ||
| − | + | The F-100 truly shines when in an up-tier situation. Unlike the F4 Phantom II or the MiG-21, the F-100 is equipped with leading-edge slats. This gives it a much higher angle of attack at low speeds, allowing the F-100 to out-turn both the F4 and the MiG-21. However, at lower battle ratings, the F-100D is best at [[Boom & Zoom]] tactics. When fighting at a lower battle rating, the F-100 has some bad flying characteristics at low speeds which includes flying like a rock with wings. At high speeds, the F-100 is a breeze to fly because of its all-flying tail and boosted controls. It has a massive angle of attack, so once you get on someone's tail, there's pretty much no escape. Best way to use the F-100D is to start climbing. 5,000 meters is usually a good altitude to climb to. Since you can out-climb most subsonic aircraft in the game, Boom & Zoom tactics should be used. Climb high, make a pass, then climb away. Be extremely careful to not bleed energy and don't turn when subsonic planes are around, they will be able to outmanoeuvre the F-100D. | |
| − | + | Against the F-100's biggest foe, the MiG-19, turning isn't a bad idea if you keep your energy up. You bleed a lot of speed in a turn, so extreme pulls aren't recommended. The MiG-19 will rip easily at high speeds, something the F-100 doesn't have a problem with. However, the MiG-19 accelerates faster than the F-100D at all speeds and altitudes so it can slip away easily. In the best-case scenario, bait the MiG-19 for a teammate, as the MiG-19 can't do much against two F-100s. | |
| − | + | Overall to get this bus to perform, it must be at high speeds. Keep your energy up. | |
| − | |||
| − | |||
| − | + | ;Ground attack | |
| − | + | The {{PAGENAME}} is no stranger to ground attack and can be effectively outfitted with just about anything (the LDGP Mk series kitchen sinks were not yet available) necessary to destroy ground targets both large and small. While bombers could deliver a massive amount of ordnance, they typically flew slow and high and were not always as precise as hoped for, therefore the USAF designated some of their fighter aircraft to also excel as low altitude precision bombers. | |
| − | |||
| − | + | The J57P21 engine was necessary for this aircraft to both get it to fighter altitude and also to carry a massive amount of ordnance. A fully researched version of the {{PAGENAME}} can carry an assortment of low-drag general-purpose bombs ranging from 500 lb, 750 lb and 1,000 lbs. Total maximum bomb weight is 6,000 lbs, the same amount carried by a single [[B-17E]] bomber, but the {{PAGENAME}} can heft this amount at almost 1,000 kph faster and at a lower more accurate altitude. Of course, the bomb size will be determined by which type of target will be in the crosshairs. For smaller targets the 500 and 750 lb bombs will work best, but if base bombing, the 1,000 lb bombs will give you the most bang for the buck. The only time to use the LDGP Mk.83 bomb against vehicles is when there is a significant number en masse. | |
| − | + | Not all targets will require the usage of bombs or on some maps, you may be fortunate enough to have several bombers working on ground targets, or ground targets may be spread out, this is where rockets begin to shine. The AGM-12B Bullpup is essentially a 250 lb bomb attached to a rocket motor and is spin-stabilized. The Bullpup can be quite precise as long as the pilot can maintain visual of the target as he will need to guide the Bullpup in, any break from the target (due to manoeuvring or avoiding incoming enemies) can cause the rocket to go awry and miss the target. If needed the {{PAGENAME}} must throttle back and deploy the speed brake to ensure the Bullpup hits the target before manoeuvring away. | |
| − | + | On the other hand, usage of the smaller [[FFAR Mighty Mouse]] unguided rockets can do a good amount of damage against ground and aerial targets, the one drawback – they are unguided. This means that once they are fired, they continue at their trajectory until they either hit something or run out of fuel and crash into the ground. The main counterpoint for the {{PAGENAME}} is the amount of these Mighty Mouse rockets it can carry, a total of 76. Rockets work best when they are fired in groups as this significantly increases chances that one or more rockets will hit their target. When going against aircraft it can induce a fear factor and cause the enemy pilot to take evasive manoeuvres to avoid an incoming salvo of rockets making them a much easier target to line up and reduce to small bits with the cannons. | |
| − | + | Of all the ordnance available, only one is set up to aid the fighter in air-to-air combat and that is the [[AIM-9B]] and [[AIM-9E]] Sidewinder missiles. The US Navy adopted the AIM-9 in 1956, with the Air Force adopting the missile to replace the troubled AIM-4 Falcon in 1964. The Sidewinder has an excellent reputation for locking onto an enemy and chasing it down, but don’t assume the missile will do all of the work. There will be times when the enemy pilot may be able to outmanoeuvre the missile and it is at this point where the attacking pilot will need to be ready to jump in and take the shot with cannons while the enemy fighter has spent all of its energy and advantages just to avoid the missile and are a relatively sitting duck in the sky. | |
=== Manual Engine Control === | === Manual Engine Control === | ||
| Line 170: | Line 195: | ||
! rowspan="2" | Turbocharger | ! rowspan="2" | Turbocharger | ||
|- | |- | ||
| − | ! Oil | + | ! Oil |
| + | ! Water | ||
| + | ! Type | ||
|- | |- | ||
| − | | | + | | Not controllable || rowspan="2" | Not controllable<br>Not auto controlled || rowspan="2" | Controllable<br>Auto control available || rowspan="2" | Not controllable<br>Auto control available || rowspan="2" | Separate || rowspan="2" | Not controllable<br>1 gear || rowspan="2" | Not controllable |
|- | |- | ||
|} | |} | ||
| − | === Modules === | + | ===Modules=== |
{| class="wikitable" | {| class="wikitable" | ||
| − | ! | + | ! Tier |
| − | ! colspan="2" | Flight performance | + | ! colspan="2" |Flight performance |
| − | ! | + | ! Survivability |
| − | ! colspan=" | + | ! colspan="3" |Weaponry |
|- | |- | ||
| I | | I | ||
| − | | Fuselage | + | | Fuselage Repair||Compressor |
| − | | | + | | |
| − | | | + | | ||M64||LAU-3A |
| − | | | ||
| − | | | ||
|- | |- | ||
| II | | II | ||
| − | | | + | | New Boosters|| |
| − | | | ||
| Airframe | | Airframe | ||
| − | | | + | | Offensive 20 mm||M64/2||AGM-12B Bullpup |
| − | | | ||
|- | |- | ||
| III | | III | ||
| − | | Wings repair | + | | Wings repair||Engine |
| − | | Engine | + | | |
| − | | | + | | ||M117||AIM-9B |
| − | | | ||
| − | | | ||
|- | |- | ||
| IV | | IV | ||
| − | | | + | | G-suit|| |
| − | | | ||
| Cover | | Cover | ||
| − | | | + | | New 20 mm cannons||M65|| AIM-9E |
| − | | | ||
|- | |- | ||
|} | |} | ||
=== Pros and cons === | === Pros and cons === | ||
| − | <!--'' | + | <!--''Summarize and briefly evaluate the vehicle in terms of its characteristics and combat effectiveness. Mark its pros and cons in the bulleted list. Try not to use more than 6 points for each of the characteristics. Avoid using categorical definitions such as "bad", "good" and the like - they have a substitution in the form of softer "inadequate", "effective".''--> |
'''Pros:''' | '''Pros:''' | ||
| − | * | + | * Excellent guns that have both high muzzle velocity, rate of fire, plenty of ammo (200 RPG), and pack a good punch with high-explosive shells. |
| − | + | * Can carry a wide array of suspended armaments of bombs, rockets and missiles. | |
| − | * | + | * Its air to air missiles(AIM-9B and E) have a longer reach than the missiles on the MiG-19PT |
| − | * | + | * Fast and out-accelerates both MiG-15 and MiG-17's |
| − | * | ||
| − | |||
'''Cons:''' | '''Cons:''' | ||
| − | * | + | * Thoroughly unmanoeuvrable at slow speeds, and does absolutely not lend itself to traditional turning dogfights |
| − | * | + | * Suffers from severe lockup past the Mach 1 mark |
| − | * | + | * Bleeds a lot of energy when trying to turn around at high speed |
| − | + | * While fast, it still accelerates a lot slower than [[MiG-19PT]] | |
| − | * | ||
== History == | == History == | ||
| − | <!--''Describe the history of the creation and combat usage of the aircraft in more detail than in the introduction. If the historical reference turns out to be too | + | <!--''Describe the history of the creation and combat usage of the aircraft in more detail than in the introduction. If the historical reference turns out to be too big, take it to a separate article, taking a link to an article about the vehicle and adding a block "/ History" (example: <nowiki>https://wiki.warthunder.com/(Vehicle-name)/History</nowiki>) and add a link to it here using the <code>main</code> template. Be sure to reference text and sources by using <code><nowiki><ref></nowiki></code>, as well as adding them at the end of the article.''--> |
| + | By the mid-50s, jet aircraft had become robust machines which had obtained sufficient combat experience for the next step into a fundamentally new age: the era of supersonic speed. Supersonic fighters were developed by both of the main opposing nations of the Cold War. In parallel with the development of the MIG-19 in the USSR, American aircraft designers were putting the finishing touches on their own design for a supersonic fighter. The F-100 Super Sabre entered serial production somewhat later than its Soviet counterpart, but it needed just as many improvements and upgrades. | ||
| − | The | + | The F-100’s main problems were its high failure rate and the shortcomings of its control systems. In addition, a fighter-bomber version was also being developed based on the Super Sabre: the F-100D, which featured an increased vertical and horizontal fin area and expanded capabilities with regard to suspended weaponry. In the end, it was the D version that became the most widespread modification of the single-seat Super Sabre thanks to its improved control and excellent combat abilities as either a fighter-bomber or pure fighter. In terms of suspended weaponry, the F-100D was able to carry over twenty extremely varied weapon load-outs, from traditional high-explosive bombs and rockets to air-to-air rockets and nuclear bombs. |
| − | + | ''- From [https://warthunder.com/en/news/5929-development-f-100d-super-sabre-the-new-era-en Devblog]'' | |
| − | + | == Media == | |
| + | <!--Excellent additions to the article would be video guides, screenshots from the game, and photos.--> | ||
| + | ;Images | ||
| + | <div><ul> | ||
| + | <li style="display: inline-block;"> [[File:F_100d_wallpaper_001.jpg|thumb|none|250px|]] </li> | ||
| + | <li style="display: inline-block;"> [[File:F_100d_wallpaper_002.jpg|thumb|none|250px|]] </li> | ||
| + | <li style="display: inline-block;"> [[File:F_100d_wallpaper_003.jpg|thumb|none|250px|]] </li> | ||
| + | <li style="display: inline-block;"> [[File:F_100d_wallpaper_004.jpg|thumb|none|250px|]] </li> | ||
| + | <li style="display: inline-block;"> [[File:F_100d_wallpaper_005.jpg|thumb|none|250px|]] </li> | ||
| + | <li style="display: inline-block;"> [[File:F_100d_wallpaper_006.jpg|thumb|none|250px|]] </li> | ||
| + | <li style="display: inline-block;"> [[File:F_100d_wallpaper_007.jpg|thumb|none|250px|]] </li> | ||
| + | </ul></div> | ||
| − | + | ;Videos | |
| − | '' | + | {{Youtube-gallery|XFKJSkrgA0w|'''The Shooting Range #133''' - ''Metal Beasts'' section at 00:32 discusses the F-100D.|r4iaAbCImj0|'''F-100D Super Sabre [CloudMaker!]''' - Jengar|udBJeO9aMbg|'''How To Grind The F100 In War Thunder''' - TheLoganatorz|fjqlRenNUAs|'''F-100 Super Sabre - Tips and Gameplay''' - WhooptieDo}} |
== See also == | == See also == | ||
| − | ''Links to the articles on the War Thunder Wiki that you think will be useful for the reader, for example:'' | + | <!--''Links to the articles on the War Thunder Wiki that you think will be useful for the reader, for example:'' |
* ''reference to the series of the aircraft;'' | * ''reference to the series of the aircraft;'' | ||
| − | * ''links to approximate analogues of other nations and research trees.'' | + | * ''links to approximate analogues of other nations and research trees.''--> |
| + | |||
| + | ;Related development | ||
| + | |||
| + | * North American [[F-86 (Family)|F-86]] Sabre | ||
| + | * North American [[FJ-4B|FJ-4]] Fury | ||
| + | |||
| + | ;Aircraft of comparable role, configuration and era | ||
| + | |||
| + | * Dassault [[Super_Mystere_B2|Super Mystere]] | ||
| + | * Mikoyan-Gurevich [[MiG-19PT|MiG-19]] | ||
== External links == | == External links == | ||
| − | ''Paste links to sources and external resources, such as:'' | + | <!--''Paste links to sources and external resources, such as:'' |
| + | * ''topic on the official game forum;'' | ||
| + | * ''encyclopedia page on aircraft;'' | ||
| + | * ''other literature.''--> | ||
| − | * | + | * [[wt:en/news/5929-development-f-100d-super-sabre-the-new-era-en|[Devblog<nowiki>]</nowiki> F-100D Super Sabre: The New Era]] |
| − | |||
| − | |||
| − | {{AirManufacturer | + | {{AirManufacturer NAA}} |
| − | {{ | + | {{USA jet aircrafts}} |
Revision as of 00:06, 1 April 2020
Contents
Description

The F-100D Super Sabre is a rank VI American jet fighter
with a battle rating of 9.3 (AB/RB) and 9.7 (SB). It was introduced in Update 1.85 "Supersonic" and was one of the first three jets to feature guided air-to-air missiles, the other two being the MiG-19PT and the Javelin F.(A.W.) Mk.9.
The dog-fighting days of WW II were over and while there was air-to-air combat during the Korean and Vietnam Wars, it was nowhere the level of previous wars. Jets were becoming faster, electronics and avionics were making them more manoeuvrable and the fighters were able to carry extremely large amounts of ordnance. The F-100D was no exception to this as it was designed to be a ground attacker first and a fighter/interceptor as a secondary role. Visible changes to the shape of the fighter compared to earlier F-80s, F-84s and F9Fs as the F-100D sported a more sleek and aerodynamic shape to it.
One noticeable difference is the deviation from the straight-wing aircraft, early on in development the F-100D was known as the 45-Sabre (officially later it was dubbed Super Sabre) due to its wings being swept back at a 45° angle. The fighter's elevators were also swept back to help increase the aerodynamics of the aircraft. Engine exhaust nozzle control, upgraded avionics and early computer systems worked together to make this the first US fighter which was able to fly faster than the speed of sound in level flight. Compared to earlier jet fighters, the F-100D may feel more like a race car as it has a great climb rate, accelerates well in a straight line and during a dive while maintaining a decent roll rate. Slats in the wings help with the already horrible turn time, especially when the fighter is loaded down with ordnance, as such, turning should be left to a minimum.

Weapon loadout options allow the pilot to tailor the aircraft to their playstyle or even mix it up depending on the map they are flying. This fighter excels as a ground attack bomber utilizing up to 6,000 lbs of bombs, Bullpup rockets, Mighty Mouse rockets or several combinations of the three. Whether you are into dropping and running or firing and forgetting, there are ordnance choices will fit the pilot's style. For those pilots who want to hunt fighters and bombers, The four nose mount 20 mm cannons and choice of AIM-9B Sidewinder air-to-air missiles will fit the bill. Centre-mounted cannons mean that convergence is not a factor and allows the pilot to set up for head-on attacks and being more successful against other fighters which may have to factor in convergence. The Sidewinders are also an intimidation factor as pilots with one on their tail must immediately focus on outmanoeuvring the missile, providing you with the opportunity to manoeuvre in and line up the kill-shot with your cannons if the missile does not make contact. The speed of the F-100D can come in handy when attacking bomber aircraft as Boom & Zoom tactics will help you avoid any defensive weapons allowing you to wreak havoc during an attacking dive.
If handled correctly, the F-100D can be a wrecking ball of destruction both in ground attacks and as an aircraft interceptor. Ordnance options are available for all play-styles and can be a tide-turner in a decisive match.
General info
Flight Performance
The F-100 during its initial development was outfitted with the then de-rated Pratt & Whitney XJ57-P-7 engine and was still able to achieve faster than the speed of sound. By the time the F-100D rolled off of the production line they were outfitted with the more powerful Pratt & Whitney J57P-21. It is this engine which turns the fighter into a hot rod. The F-100D is much like a ground-based dragster in that it has acceleration, it has a high top speed and is a horrible turner.
The F-100D is aerodynamically fit with its sleek body and swept-back wings which coupled with its J57P-21 is a fantastic climber which continues to accelerate even without WEP engaged. This fighter will continue to accelerate in a flat run to the point of going over Mach 1 and even more quickly hits top speeds when in a dive. Climbing, diving and rolling are excellent capabilities of this fighter, however, this comes with having speed on your side as when flying slower, it has a more challenging time to manoeuvre without being a relatively easy target for others. The F-100D is not the greatest of turners even with leading-edge wing slats to help, manoeuvres like the Immelmann and Split-S are the most optimal when changing directions without attempting energy-bleeding manoeuvres like turning (unless that is what you are intending to do to cause an overshoot of someone following you).

Flying at speeds close to Mach 1 or past can pose a challenge for pilots utilising the 3rd-person view as a condensation cloud forms around the aircraft and obscures your view (not an issue for those flying simulator-style from in the cockpit). While this can make targeting enemy aircraft a challenge, it just takes a little more work to line up the shot either with the cannons or air-to-air missiles.
Typically aircraft which pound ground targets fly slow to ensure they hit their targets with guns, rockets or bombs, however, the F-100D becomes difficult to get out of harms way when flying slow, so it requires the pilot to learn how to bomb and fire rockets at targets at higher speeds than what they may be used to with earlier aircraft. Terms like drop & run or fire & forget come into play as the F-100D descends towards a ground target at a good clip, dropping its bombs or firing its rockets and then boogieing out of the area to ensure the ground anti-aircraft fire nor any trailing fighters gain a targeting solution on you. Some pilots like to watch and make sure their ordnance hits the target, however, this can cost you your jet when someone takes advantage of your inattentiveness and gets the drop on you. Speed in and speed out is the key with the F-100D.
| Characteristics | Max Speed (km/h at 10,668 m) |
Max altitude (metres) |
Turn time (seconds) |
Rate of climb (metres/second) |
Take-off run (metres) | |||
|---|---|---|---|---|---|---|---|---|
| AB | RB | AB | RB | AB | RB | |||
| Stock | 1,445 | 1,438 | 14700 | 40.6 | 41.5 | 61.4 | 54.6 | 1,400 |
| Upgraded | 1,478 | 1,458 | 39.5 | 40.0 | 94.6 | 79.2 | ||
Details

| Features | |||||
|---|---|---|---|---|---|
| Combat flaps | Take-off flaps | Landing flaps | Air brakes | Arrestor gear | Drogue chute |
| ✓ | ✓ | ✓ | ✓ | X | ✓ |
| Limits | ||||||
|---|---|---|---|---|---|---|
| Wings (km/h) | Gear (km/h) | Flaps (km/h) | Max Static G | |||
| Combat | Take-off | Landing | + | - | ||
| 1361 | 447 | 620 | 620 | 435 | ~11 | ~4.5 |
| Optimal velocities (km/h) | |||
|---|---|---|---|
| Ailerons | Rudder | Elevators | Radiator |
| < 640 | < 540 | < 610 | N/A |
Engine performance
| Engine | Aircraft mass | |||||||
|---|---|---|---|---|---|---|---|---|
| Engine name | Number | Empty mass | Wing loading (full fuel) | |||||
| Pratt & Whitney J57P21 | 1 | 9,551 kg | 352 kg/m2 | |||||
| Engine characteristics | Mass with fuel (no weapons load) | Max Takeoff Weight | ||||||
| Weight (each) | Type | 15m fuel | 20m fuel | 30m fuel | 45m fuel | 50m fuel | ||
| 900 kg | Afterburning axial-flow turbojet | 10,618 kg | 10,968 kg | 11,669 kg | 12,719 kg | 13,069 kg | 16,689 kg | |
| Maximum engine thrust @ 0 m (RB / SB) | Thrust to weight ratio @ 0 m (100%) | |||||||
| Condition | 100% | WEP | 15m fuel | 20m fuel | 30m fuel | 45m fuel | 50m fuel | MTOW |
| Stationary | 3,786 kgf | 5,810 kgf | 0.55 | 0.53 | 0.50 | 0.46 | 0.44 | 0.35 |
| Optimal | 4,254 kgf (1,200 km/h) |
7,978 kgf (1,200 km/h) |
0.75 | 0.73 | 0.68 | 0.63 | 0.61 | 0.48 |
Survivability and armour
For post-war fighter jets wanted to take advantage of the newer jet technology and maximize both speed and ordnance carried. To keep up speed and maximize ordnance, something had to give and that came with pilot survivability. The idea is to be faster than the enemy which would make it really difficult for them to get a targeting solution on you. Though the F-100D does have protection for the pilot, it isn’t much and leaves the rest of the critical components virtually unprotected with armour. For the pilot, the back of the seat and headrest maintains a continuous piece of steel at 12.7 mm thick and the windscreen is rated at 64 mm bulletproof windscreen. Typically this type of protection is meant more for protection from defensive turret attacks from bombers rather than gun attacks from other aircraft.
The F-100D is a relatively sturdy aircraft and can take a beating before critical components begin to fail. While the engine and the pilot are important to protect as much as possible (without the engine you don’t go and without the pilot…you don’t go…) the wings are another critical component which you must protect as hits to the wings can make flying very difficult or send you to the respawn point. If being tailed by another aircraft try to speed away because if you try to pull up, turn to the side or pull-down, you risk expositing increased surface area of the skin, giving the enemy pilot more to shoot at and a greater opportunity of taking out a wing. If possible, increase speed and sway back and forth, even some very shallow elevator dips up and down maybe enough to throw off the sighting of the enemy pilot and spray his bullets all around you without exposing very much surface area of the jet, however, if there is a missile launch, take evasive action to avoid the missile and worry about the guns later.
Armaments
Offensive armament
The F-100D is outfitted with:
- 4 x 20 mm M39A1 cannons 200 RPG (800 rounds total)
Early fighter aircraft utilized the wings of aircraft to mount machine guns and cannons, which was very effective especially aircraft like the P-47 which could outfit four guns in each wing for a total of eight. The downside is that for these guns to be effective, they had to have a convergence set to a specific distance, bullet hits before that distance and after became less effective, the pilots needed to make sure to hit the sweet spot. For the F-100D, convergence is non-existent as all four of its M39A 20 mm cannons are mounted on the underside of the fuselage, effectively able to decimate targets at extremely close range or snipe targets which maybe even 700 - 800 m, if not farther away, effectively almost any range (below 1000 m) is a sweet-spot for this fighter.
The cannons are air-cooled and rarely overheat, typically with the 200 round limit for each gun, the pilot should want to make each shot count and not just hold down the firing trigger and spray away. Another bonus to having all four cannons being the same type and calibre is that the bullets will have the same drop rate, so after getting used to how they work, it is much easier to estimate where to target moving vehicles to ensure a connection with the bullets. With the four cannons grouping so tightly, only a few rounds are needed to blow off an enemy aircraft's wing, eliminate a critical component (engine, compressor, fuel tank, pilot...etc...) and even take out ground units to include up to light armoured vehicles.
Suspended armament

The F-100D can carry the following suspended ordnance:
- 6 x 500 lb LDGP Mk.82 bombs (3,000 lb total)
- 10 x 500 lb LDGP Mk.82 bombs (5,000 lb total)
- 8 x 750 lb M117 cone 45 bombs (6,000 lb total)
- 4 x 1,000 lb LDGP Mk.83 bombs (4,000 lb total)
- 76 x FFAR Mighty Mouse unguided rockets
- 4 x 750 lb M117 cone 45 bombs + 14 FFAR Mighty Mouse unguided rockets
- 2 x AGM-12B Bullpup rockets
- 2 x AGM-12B Bullpup rockets + 4 x 750 lb M117 cone 45 bombs
- 4 x AIM-9B Sidewinder air-to-air missiles
- 4 x AIM-9E Sidewinder air-to-air missiles
Usage in battles

The F-100 truly shines when in an up-tier situation. Unlike the F4 Phantom II or the MiG-21, the F-100 is equipped with leading-edge slats. This gives it a much higher angle of attack at low speeds, allowing the F-100 to out-turn both the F4 and the MiG-21. However, at lower battle ratings, the F-100D is best at Boom & Zoom tactics. When fighting at a lower battle rating, the F-100 has some bad flying characteristics at low speeds which includes flying like a rock with wings. At high speeds, the F-100 is a breeze to fly because of its all-flying tail and boosted controls. It has a massive angle of attack, so once you get on someone's tail, there's pretty much no escape. Best way to use the F-100D is to start climbing. 5,000 meters is usually a good altitude to climb to. Since you can out-climb most subsonic aircraft in the game, Boom & Zoom tactics should be used. Climb high, make a pass, then climb away. Be extremely careful to not bleed energy and don't turn when subsonic planes are around, they will be able to outmanoeuvre the F-100D.
Against the F-100's biggest foe, the MiG-19, turning isn't a bad idea if you keep your energy up. You bleed a lot of speed in a turn, so extreme pulls aren't recommended. The MiG-19 will rip easily at high speeds, something the F-100 doesn't have a problem with. However, the MiG-19 accelerates faster than the F-100D at all speeds and altitudes so it can slip away easily. In the best-case scenario, bait the MiG-19 for a teammate, as the MiG-19 can't do much against two F-100s.
Overall to get this bus to perform, it must be at high speeds. Keep your energy up.
- Ground attack
The F-100D is no stranger to ground attack and can be effectively outfitted with just about anything (the LDGP Mk series kitchen sinks were not yet available) necessary to destroy ground targets both large and small. While bombers could deliver a massive amount of ordnance, they typically flew slow and high and were not always as precise as hoped for, therefore the USAF designated some of their fighter aircraft to also excel as low altitude precision bombers.
The J57P21 engine was necessary for this aircraft to both get it to fighter altitude and also to carry a massive amount of ordnance. A fully researched version of the F-100D can carry an assortment of low-drag general-purpose bombs ranging from 500 lb, 750 lb and 1,000 lbs. Total maximum bomb weight is 6,000 lbs, the same amount carried by a single B-17E bomber, but the F-100D can heft this amount at almost 1,000 kph faster and at a lower more accurate altitude. Of course, the bomb size will be determined by which type of target will be in the crosshairs. For smaller targets the 500 and 750 lb bombs will work best, but if base bombing, the 1,000 lb bombs will give you the most bang for the buck. The only time to use the LDGP Mk.83 bomb against vehicles is when there is a significant number en masse.
Not all targets will require the usage of bombs or on some maps, you may be fortunate enough to have several bombers working on ground targets, or ground targets may be spread out, this is where rockets begin to shine. The AGM-12B Bullpup is essentially a 250 lb bomb attached to a rocket motor and is spin-stabilized. The Bullpup can be quite precise as long as the pilot can maintain visual of the target as he will need to guide the Bullpup in, any break from the target (due to manoeuvring or avoiding incoming enemies) can cause the rocket to go awry and miss the target. If needed the F-100D must throttle back and deploy the speed brake to ensure the Bullpup hits the target before manoeuvring away.
On the other hand, usage of the smaller FFAR Mighty Mouse unguided rockets can do a good amount of damage against ground and aerial targets, the one drawback – they are unguided. This means that once they are fired, they continue at their trajectory until they either hit something or run out of fuel and crash into the ground. The main counterpoint for the F-100D is the amount of these Mighty Mouse rockets it can carry, a total of 76. Rockets work best when they are fired in groups as this significantly increases chances that one or more rockets will hit their target. When going against aircraft it can induce a fear factor and cause the enemy pilot to take evasive manoeuvres to avoid an incoming salvo of rockets making them a much easier target to line up and reduce to small bits with the cannons.
Of all the ordnance available, only one is set up to aid the fighter in air-to-air combat and that is the AIM-9B and AIM-9E Sidewinder missiles. The US Navy adopted the AIM-9 in 1956, with the Air Force adopting the missile to replace the troubled AIM-4 Falcon in 1964. The Sidewinder has an excellent reputation for locking onto an enemy and chasing it down, but don’t assume the missile will do all of the work. There will be times when the enemy pilot may be able to outmanoeuvre the missile and it is at this point where the attacking pilot will need to be ready to jump in and take the shot with cannons while the enemy fighter has spent all of its energy and advantages just to avoid the missile and are a relatively sitting duck in the sky.
Manual Engine Control
| MEC elements | ||||||
|---|---|---|---|---|---|---|
| Mixer | Pitch | Radiator | Supercharger | Turbocharger | ||
| Oil | Water | Type | ||||
| Not controllable | Not controllable Not auto controlled |
Controllable Auto control available |
Not controllable Auto control available |
Separate | Not controllable 1 gear |
Not controllable |
Modules
| Tier | Flight performance | Survivability | Weaponry | |||
|---|---|---|---|---|---|---|
| I | Fuselage Repair | Compressor | M64 | LAU-3A | ||
| II | New Boosters | Airframe | Offensive 20 mm | M64/2 | AGM-12B Bullpup | |
| III | Wings repair | Engine | M117 | AIM-9B | ||
| IV | G-suit | Cover | New 20 mm cannons | M65 | AIM-9E | |
Pros and cons
Pros:
- Excellent guns that have both high muzzle velocity, rate of fire, plenty of ammo (200 RPG), and pack a good punch with high-explosive shells.
- Can carry a wide array of suspended armaments of bombs, rockets and missiles.
- Its air to air missiles(AIM-9B and E) have a longer reach than the missiles on the MiG-19PT
- Fast and out-accelerates both MiG-15 and MiG-17's
Cons:
- Thoroughly unmanoeuvrable at slow speeds, and does absolutely not lend itself to traditional turning dogfights
- Suffers from severe lockup past the Mach 1 mark
- Bleeds a lot of energy when trying to turn around at high speed
- While fast, it still accelerates a lot slower than MiG-19PT
History
By the mid-50s, jet aircraft had become robust machines which had obtained sufficient combat experience for the next step into a fundamentally new age: the era of supersonic speed. Supersonic fighters were developed by both of the main opposing nations of the Cold War. In parallel with the development of the MIG-19 in the USSR, American aircraft designers were putting the finishing touches on their own design for a supersonic fighter. The F-100 Super Sabre entered serial production somewhat later than its Soviet counterpart, but it needed just as many improvements and upgrades.
The F-100’s main problems were its high failure rate and the shortcomings of its control systems. In addition, a fighter-bomber version was also being developed based on the Super Sabre: the F-100D, which featured an increased vertical and horizontal fin area and expanded capabilities with regard to suspended weaponry. In the end, it was the D version that became the most widespread modification of the single-seat Super Sabre thanks to its improved control and excellent combat abilities as either a fighter-bomber or pure fighter. In terms of suspended weaponry, the F-100D was able to carry over twenty extremely varied weapon load-outs, from traditional high-explosive bombs and rockets to air-to-air rockets and nuclear bombs.
- From Devblog
Media
- Images


- Videos
See also
- Related development
- Aircraft of comparable role, configuration and era
- Dassault Super Mystere
- Mikoyan-Gurevich MiG-19
External links
| North American Aviation | |
|---|---|
| Fighters | |
| P-51A | P-51 |
| P-51C | P-51C-10 |
| P-51D | P-51D-5 · P-51D-10 · P-51D-20-NA · P-51D-30 |
| P-51H | P-51H-5-NA |
| Twin-engine fighters | F-82E |
| Jet fighters | F-86A-5 · F-86F-2 · F-86F-25 · F-86F-35 · F-100D |
| Strike aircraft | A-36 · PBJ-1H · PBJ-1J |
| FJ-4B · FJ-4B VMF-232 | |
| Bombers | B-25J-1 · B-25J-20 |
| Export/Licence | ▂B-25J-30 · ␗B-25J-30 |
| ▄Mustang Mk IA · F-6C-10-NA · ␗P-51D-20 · J26 David · J26 · P-51D-20-NA · ␗P-51K | |
| F-86F-30 ▅ · ␗F-86F-30 · F-86F-40 ▅ · F-86F-40 JASDF▅ · ␗F-86F-40 | |
| ◄F-86K · ▄F-86K (Italy) · ▄F-86K (France) | |
| ␗F-100A · ▄F-100D · ␗F-100F | |
| Captured | ▅P-51C-11-NT |
| Canadair Limited license-built the F-86 as the CL-13 for use in Canada and export to Europe. | |
| Fiat license-built the F-86K for the Italian Air Force though another 120 NAA built F-86Ks were also sold to the Italians. | |
| See Also | Mitsubishi Heavy Industries · Canadair Limited · Fiat Aviation |
| USA jet aircraft | |
|---|---|
| Fighters | |
| F-4 | F-4C Phantom II · F-4E Phantom II · F-4J Phantom II · F-4S Phantom II |
| F-5 | F-5A · F-5C · F-5E · F-20A |
| F-8 | F8U-2 · F-8E |
| F-80 | F-80A-5 · F-80C-10 |
| F-84 | F-84B-26 · F-84F · F-84G-21-RE |
| F-86 | F-86A-5 · F-86F-25 · F-86F-2 · F-86F-35 |
| F-89 | F-89B · F-89D |
| F-100 | F-100D |
| F-104 | F-104A · F-104C |
| F-14 | F-14A Early · F-14B |
| F-15 | F-15A |
| F-16 | F-16A · F-16A ADF · F-16C |
| F9F | F9F-2 · F9F-5 · F9F-8 |
| Other | P-59A · F2H-2 · F3D-1 · F3H-2 · F4D-1 · F11F-1 |
| Strike Aircraft | |
| FJ-4 | FJ-4B · FJ-4B VMF-232 |
| A-4 | A-4B · A-4E Early |
| A-6 | A-6E TRAM |
| A-7 | A-7D · A-7E · A-7K |
| AV-8 | AV-8A · AV-8C |
| A-10 | A-10A · A-10A Late |
| B-57 | B-57A · B-57B |
| F-105 | F-105D |
| F-111 | F-111A |
