Difference between pages "A6M5 Ko" and "Be-6"
(Edits.) |
m (→Media: added links to video guides) (Tag: Visual edit) |
||
| Line 1: | Line 1: | ||
| − | {{Specs-Card | + | {{Specs-Card|code=be_6}} |
| − | |code = | ||
| − | |||
| − | |||
| − | |||
| − | |||
| − | |||
| − | |||
| − | }} | ||
== Description == | == Description == | ||
| Line 13: | Line 5: | ||
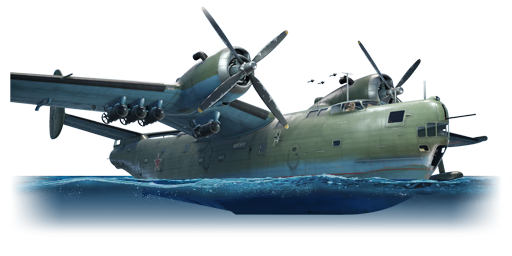
[[File:GarageImage_{{PAGENAME}}.jpg|420px|thumb|left]] | [[File:GarageImage_{{PAGENAME}}.jpg|420px|thumb|left]] | ||
{{break}} | {{break}} | ||
| − | The '''{{Specs|name}}''' is a | + | The '''{{Specs|name}}''' is a Rank {{Specs|rank}} gift Russian flying boat {{Battle-rating}}. This aircraft was introduced in [[Update 1.71 "New E.R.A"]]. It was discontinued after the 2018 Victory Day sales. |
== General info == | == General info == | ||
| + | === Flight Performance === | ||
| + | ''Describe how the aircraft behaves in the air. Speed, manoeuvrability, acceleration and allowable loads - these are the most important characteristics of the vehicle.'' | ||
| − | |||
{| class="wikitable" style="text-align:center" | {| class="wikitable" style="text-align:center" | ||
|- | |- | ||
| Line 24: | Line 17: | ||
! colspan="8" | ''Stock'' | ! colspan="8" | ''Stock'' | ||
|- | |- | ||
| − | ! colspan="2" | Max Speed<br>(km/h at | + | ! colspan="2" | Max Speed<br>(km/h at 2,135 m) |
! rowspan="2" | Max altitude<br>(meters) | ! rowspan="2" | Max altitude<br>(meters) | ||
! colspan="2" | Turn time<br>(seconds) | ! colspan="2" | Turn time<br>(seconds) | ||
| Line 37: | Line 30: | ||
! RB | ! RB | ||
|- | |- | ||
| − | | | + | |397||386|| {{Specs|ceiling}} ||29.1||30.1||7.2||7.1||1,000 |
|- | |- | ||
! colspan="8" | ''Upgraded'' | ! colspan="8" | ''Upgraded'' | ||
|- | |- | ||
| − | ! colspan="2" | Max Speed<br>(km/h at | + | ! colspan="2" | Max Speed<br>(km/h at 2,135 m) |
! rowspan="2" |Max altitude (meters) | ! rowspan="2" |Max altitude (meters) | ||
! colspan="2" | Turn time (seconds) | ! colspan="2" | Turn time (seconds) | ||
| Line 54: | Line 47: | ||
! RB | ! RB | ||
|- | |- | ||
| − | | | + | |441||418|| {{Specs|ceiling}} ||26.9||28.0||11.1||9.0||1,000 |
|- | |- | ||
|} | |} | ||
| Line 69: | Line 62: | ||
! Arrestor gear | ! Arrestor gear | ||
|- | |- | ||
| − | |✓ | + | | ✓ || ✓ || ✓ || X || X <!-- ✓ --> |
| − | |✓ | ||
| − | |✓ | ||
| − | | X ||✓ | ||
|- | |- | ||
|} | |} | ||
| Line 88: | Line 78: | ||
! - | ! - | ||
|- | |- | ||
| − | |{{Specs|разрушение|конструкции}} || {{Specs|разрушение|шасси}} || | + | | {{Specs|разрушение|конструкции}} || {{Specs|разрушение|шасси}} ||300|| ~5 || ~3 |
|- | |- | ||
|} | |} | ||
| Line 101: | Line 91: | ||
! Radiator<br>(km/h) | ! Radiator<br>(km/h) | ||
|- | |- | ||
| − | | < | + | | < 350 || < 350 || < 350 || < 300 |
|- | |- | ||
|} | |} | ||
| Line 115: | Line 105: | ||
! WEP Engine power | ! WEP Engine power | ||
|- | |- | ||
| − | | | + | | 1,300 m || 2,250 hp || 2,441 hp |
|- | |- | ||
<!--! colspan="3" | Setting 2 | <!--! colspan="3" | Setting 2 | ||
| Line 136: | Line 126: | ||
=== Survivability and armour === | === Survivability and armour === | ||
| − | + | <!-- Examine the survivability of the aircraft. Note how vulnerable the structure is and how secure the pilot is, whether the fuel tanks are armoured, etc. Describe the armour, if there is any, and also mention the vulnerability of other critical aircraft systems. --> | |
| + | |||
| + | * 8 mm steel - behind each pilot | ||
| + | * 10 mm steel - around tail guns | ||
| + | * 9.5 mm steel - between tail guns and gunners window | ||
| + | * 105 mm bulletproof glass - tail gunner's window | ||
== Armaments == | == Armaments == | ||
| − | === | + | === Suspended armament === |
| − | <!-- | + | <!--Describe the aircraft's suspended armament: additional cannons under the wings, bombs, rockets and torpedoes. This section is especially important for bombers and attackers. If there is no suspended weaponry remove this subsection.--> |
| − | {{main| | + | {{main|FAB-250M43 (250 kg)|FAB-500 (500 kg)|FAB-1500M-46 (1,500 kg)|45-36MAN}} |
| − | The '''''{{PAGENAME}}''''' | + | The '''''{{PAGENAME}}''''' can be outfitted with the following ordnance: |
| − | * | + | * 8 x 250 kg FAB-250M43 bombs |
| − | -- | + | * 2 x 450 mm 45-36MAN torpedoes |
| − | + | * 8 x 500 kg FAB-500 (welded) bombs | |
| − | + | * 2 x 1,500 kg FAB-1500M-46 bombs | |
| − | {{main| | + | |
| + | === Defensive armament === | ||
| + | <!--Defensive armament with turret machine guns or cannons, crewed by gunners. Examine the number of gunners and what belts or drums are better to use. If defensive weaponry is not available, remove this subsection.--> | ||
| + | {{main|NR-23 (23 mm)}} | ||
| + | |||
| + | The '''''{{PAGENAME}}''''' is defended by: | ||
| + | |||
| + | * 1 x 23 mm NR-23 cannon, nose turret (100 rpg) | ||
| + | * 2 x 23 mm NR-23 cannon, dorsal turret (250 rpg = 500 total) | ||
| + | * 2 x 23 mm NR-23 cannon, tail turret (225 rpg = 450 total) | ||
== Usage in battles == | == Usage in battles == | ||
| − | ''Describe the tactics of playing in an aircraft, the features of using vehicles in a team and advice on tactics. Refrain from creating a "guide" - do not impose a single point of view, but give the reader food for thought. Examine the most dangerous enemies and give recommendations on fighting them. If necessary, note the specifics of the game in different modes (AB, RB, SB).'' | + | <!--''Describe the tactics of playing in an aircraft, the features of using vehicles in a team and advice on tactics. Refrain from creating a "guide" - do not impose a single point of view, but instead give the reader food for thought. Examine the most dangerous enemies and give recommendations on fighting them. If necessary, note the specifics of the game in different modes (AB, RB, SB).''--> |
| + | |||
| + | The best payload for base bombing is the 4 x 500 kg option, allowing you to take out to bases (requiring 4 bombs each. The 2 x 1,500 option is rarely recommended (except maybe when airfield bombing) as both bombs drop at once, limiting you to once base or target, despite the increased bomb load. | ||
| + | |||
| + | A different approach is to select the airfield spawn (you spawn just above the runway) and the hug the ground, either attacking ground targets or bases (if there are any left). This has the advantage of meaning your team mates will be more likely to cover you (they don't have to climb up to your altitude), and makes you harder to spot for enemy aircraft. It also means enemy aircraft cannot get below you and exploit your blind spot. However you will likely be to slow to kill bases if there are any other bombers on your team (they will get their first). It is also not recommended to bomb the airfield at low altitude as you will be food for the AAA. | ||
| + | |||
| + | Keep a constant lookout and use your potent defensive armament to dispatch of attacking enemy aircraft as quickly as possible. | ||
===Manual Engine Control=== | ===Manual Engine Control=== | ||
| Line 169: | Line 179: | ||
! Type | ! Type | ||
|- | |- | ||
| − | | Controllable || rowspan="2" | | + | | Controllable || rowspan="2" | Controllable || rowspan="2" | Not controllable || rowspan="2" | Controllable || rowspan="2" |Combined|| rowspan="2" | Not controllable || rowspan="2" | Controllable |
|- | |- | ||
|} | |} | ||
| Line 184: | Line 194: | ||
| Radiator | | Radiator | ||
| | | | ||
| − | | | + | |Turret 23 mm |
| + | |T-18 | ||
|- | |- | ||
| II | | II | ||
| Line 191: | Line 202: | ||
| Airframe | | Airframe | ||
| | | | ||
| + | |KD-3 | ||
|- | |- | ||
| III | | III | ||
| Line 196: | Line 208: | ||
| Engine | | Engine | ||
| | | | ||
| − | | | + | |New 23 mm cannons (turret) |
| + | | | ||
|- | |- | ||
| IV | | IV | ||
| Line 203: | Line 216: | ||
| Cover | | Cover | ||
| | | | ||
| + | |BD-4 | ||
|- | |- | ||
|} | |} | ||
=== Pros and cons === | === Pros and cons === | ||
| − | + | <!-- Summarize and briefly evaluate the vehicle in terms of its characteristics and combat effectiveness. Mark its pros and cons in the bulleted list. Try not to use more than 6 points for each of the characteristics. Avoid using categorical definitions such as "bad", "good" and the like - they can be substituted with softer forms such as "inadequate" and "effective". --> | |
'''Pros:''' | '''Pros:''' | ||
| − | * | + | * Good, destructive defensive armament |
| + | * Good bomb load (can kill two bases in RB) | ||
| + | * Turns fairly well | ||
| + | * Has two pilots (less chance of them being killed) | ||
| + | * Can land on water | ||
| + | * Can take a reasonable amount of damage | ||
'''Cons:''' | '''Cons:''' | ||
| − | * | + | * Drops bombs in pairs halving number of targets you can hit (i.e. 8 bombs gives you 4 drops) |
| + | * Big target | ||
| + | * Engines are exposed and liable to be set on fire | ||
| + | * Turrets can not cover underneath | ||
| + | * Not the most stable of bombing platforms | ||
| + | * Lack of landing gear can make re-arming interesting on some maps (still possible but harder) | ||
| + | * Large control surfaces make big targets | ||
| + | * Fairly slow | ||
| + | * Very poor roll rate | ||
== History == | == History == | ||
| − | === | + | <!-- Describe the history of the creation and combat usage of the aircraft in more detail than in the introduction. If the historical reference turns out to be too big, take it to a separate article, taking a link to the article about the vehicle and adding a block "/ History" (example: https://wiki.warthunder.com/(Vehicle-name)/History) and add a link to it here using the main template. Be sure to reference text and sources by using <ref>, as well as adding them at the end of the article. This section may also include the vehicle's devblog entry (if applicable) and the ingame encyclopedia description (under === Encyclopedia Info ===, also if applicable). --> |
| − | + | The first prototype of the Be-6 flew in 1945, only a couple years after the initial plans for the new Soviet flying boat were laid down in 1943. Evaluation of the first prototype showed that the aircraft could be improved in some areas to achieve better performance. Thus, Beriev engineers equipped the following model, that would become the production version, with more powerful Shvetsov ASh-73 engines and changed the defensive armaments layout from six 12.7mm UBT machine guns to 23mm NR-23 cannons, followed by the reduction in turret count from 5 to 3. This improved variant had its maiden flight in 1951, with serial production following shortly after. | |
| − | + | After its introduction to service in 1951, the Be-6 was tasked with performing various roles fitted for a maritime aircraft, such as reconnaissance, sub-hunting, patrolling, transportation and mine-laying. The aircraft enjoyed a long service life thanks to the fact that significant changes within the Soviet navy, at least when float planes were concerned, were few and far between during the Cold War. However, the Be-6 didn’t only serve with the Soviet Union. The Chinese also received a number of Be-6s for their naval air force. The Be-6 remained in active military service with the Soviet Union until the late 1960’s, and up to the 1990’s with the Chinese Naval Air Force, thanks to modernization efforts. The Chinese changed, among other things, the powerplant of the Be-6 to the WJ-6 turboprop and redesignated the Be-6 to the Qing-6. A total of around 120 Be-6s were produced between 1949 - 1957. | |
| − | + | ''- From [[wt:en/news/4904-development-beriev-be-6-the-arctic-seagull-en|Devblog]]'' | |
| − | + | == Media == | |
| − | + | ''Excellent additions to the article would be video guides, screenshots from the game, and photos.'' | |
| − | |||
| − | |||
| − | |||
| − | |||
| − | |||
| − | |||
| − | |||
| − | |||
| − | |||
| − | + | {{Youtube-gallery|QnDCpUfDnqY||XjXVbMFA3Bg}} | |
| − | |||
| − | |||
== See also == | == See also == | ||
| Line 252: | Line 268: | ||
* ''encyclopedia page on the aircraft;'' | * ''encyclopedia page on the aircraft;'' | ||
* ''other literature.''--> | * ''other literature.''--> | ||
| − | |||
| − | + | * [https://warthunder.com/en/news/4904-development-beriev-be-6-the-arctic-seagull-en [Devblog<nowiki>]</nowiki> Beriev Be-6 - "The Arctic Seagull"] | |
| − | {{ | + | |
| + | {{USSR bombers}} | ||
Revision as of 01:22, 15 June 2019
Contents
Description

The Be-6 is a Rank IV gift Russian flying boat
with a battle rating of 5.0 (AB/RB) and 5.3 (SB). This aircraft was introduced in Update 1.71 "New E.R.A". It was discontinued after the 2018 Victory Day sales.
General info
Flight Performance
Describe how the aircraft behaves in the air. Speed, manoeuvrability, acceleration and allowable loads - these are the most important characteristics of the vehicle.
| Characteristics | |||||||
|---|---|---|---|---|---|---|---|
| Stock | |||||||
| Max Speed (km/h at 2,135 m) |
Max altitude (meters) |
Turn time (seconds) |
Rate of climb (meters/second) |
Take-off run (meters) | |||
| AB | RB | AB | RB | AB | RB | ||
| 397 | 386 | 6100 | 29.1 | 30.1 | 7.2 | 7.1 | 1,000 |
| Upgraded | |||||||
| Max Speed (km/h at 2,135 m) |
Max altitude (meters) | Turn time (seconds) | Rate of climb (meters/second) |
Take-off run (meters) | |||
| AB | RB | AB | RB | AB | RB | ||
| 441 | 418 | 6100 | 26.9 | 28.0 | 11.1 | 9.0 | 1,000 |
Details
| Features | ||||
|---|---|---|---|---|
| Combat flap | Take-off flap | Landing flap | Air brakes | Arrestor gear |
| ✓ | ✓ | ✓ | X | X |
| Limits | ||||
|---|---|---|---|---|
| Wing-break speed (km/h) |
Gear limit (km/h) |
Combat flap (km/h) |
Max Static G | |
| + | - | |||
| 0 | 450 | 300 | ~5 | ~3 |
| Optimal velocities | |||
|---|---|---|---|
| Ailerons (km/h) |
Rudder (km/h) |
Elevators (km/h) |
Radiator (km/h) |
| < 350 | < 350 | < 350 | < 300 |
| Compressor (RB/SB) | ||
|---|---|---|
| Setting 1 | ||
| Optimal altitude | 100% Engine power | WEP Engine power |
| 1,300 m | 2,250 hp | 2,441 hp |
Survivability and armour
- 8 mm steel - behind each pilot
- 10 mm steel - around tail guns
- 9.5 mm steel - between tail guns and gunners window
- 105 mm bulletproof glass - tail gunner's window
Armaments
Suspended armament
The Be-6 can be outfitted with the following ordnance:
- 8 x 250 kg FAB-250M43 bombs
- 2 x 450 mm 45-36MAN torpedoes
- 8 x 500 kg FAB-500 (welded) bombs
- 2 x 1,500 kg FAB-1500M-46 bombs
Defensive armament
The Be-6 is defended by:
- 1 x 23 mm NR-23 cannon, nose turret (100 rpg)
- 2 x 23 mm NR-23 cannon, dorsal turret (250 rpg = 500 total)
- 2 x 23 mm NR-23 cannon, tail turret (225 rpg = 450 total)
Usage in battles
The best payload for base bombing is the 4 x 500 kg option, allowing you to take out to bases (requiring 4 bombs each. The 2 x 1,500 option is rarely recommended (except maybe when airfield bombing) as both bombs drop at once, limiting you to once base or target, despite the increased bomb load.
A different approach is to select the airfield spawn (you spawn just above the runway) and the hug the ground, either attacking ground targets or bases (if there are any left). This has the advantage of meaning your team mates will be more likely to cover you (they don't have to climb up to your altitude), and makes you harder to spot for enemy aircraft. It also means enemy aircraft cannot get below you and exploit your blind spot. However you will likely be to slow to kill bases if there are any other bombers on your team (they will get their first). It is also not recommended to bomb the airfield at low altitude as you will be food for the AAA.
Keep a constant lookout and use your potent defensive armament to dispatch of attacking enemy aircraft as quickly as possible.
Manual Engine Control
| MEC elements | ||||||
|---|---|---|---|---|---|---|
| Mixer | Pitch | Radiator | Supercharger | Turbocharger | ||
| Oil | Water | Type | ||||
| Controllable | Controllable | Not controllable | Controllable | Combined | Not controllable | Controllable |
Modules
| Tier | Flight performance | Survivability | Weaponry | ||
|---|---|---|---|---|---|
| I | Fuselage Repair | Radiator | Turret 23 mm | T-18 | |
| II | Compressor | Airframe | KD-3 | ||
| III | Wings Repair | Engine | New 23 mm cannons (turret) | ||
| IV | Engine Injection | Cover | BD-4 | ||
Pros and cons
Pros:
- Good, destructive defensive armament
- Good bomb load (can kill two bases in RB)
- Turns fairly well
- Has two pilots (less chance of them being killed)
- Can land on water
- Can take a reasonable amount of damage
Cons:
- Drops bombs in pairs halving number of targets you can hit (i.e. 8 bombs gives you 4 drops)
- Big target
- Engines are exposed and liable to be set on fire
- Turrets can not cover underneath
- Not the most stable of bombing platforms
- Lack of landing gear can make re-arming interesting on some maps (still possible but harder)
- Large control surfaces make big targets
- Fairly slow
- Very poor roll rate
History
The first prototype of the Be-6 flew in 1945, only a couple years after the initial plans for the new Soviet flying boat were laid down in 1943. Evaluation of the first prototype showed that the aircraft could be improved in some areas to achieve better performance. Thus, Beriev engineers equipped the following model, that would become the production version, with more powerful Shvetsov ASh-73 engines and changed the defensive armaments layout from six 12.7mm UBT machine guns to 23mm NR-23 cannons, followed by the reduction in turret count from 5 to 3. This improved variant had its maiden flight in 1951, with serial production following shortly after.
After its introduction to service in 1951, the Be-6 was tasked with performing various roles fitted for a maritime aircraft, such as reconnaissance, sub-hunting, patrolling, transportation and mine-laying. The aircraft enjoyed a long service life thanks to the fact that significant changes within the Soviet navy, at least when float planes were concerned, were few and far between during the Cold War. However, the Be-6 didn’t only serve with the Soviet Union. The Chinese also received a number of Be-6s for their naval air force. The Be-6 remained in active military service with the Soviet Union until the late 1960’s, and up to the 1990’s with the Chinese Naval Air Force, thanks to modernization efforts. The Chinese changed, among other things, the powerplant of the Be-6 to the WJ-6 turboprop and redesignated the Be-6 to the Qing-6. A total of around 120 Be-6s were produced between 1949 - 1957.
- From Devblog
Media
Excellent additions to the article would be video guides, screenshots from the game, and photos.
See also
Links to the articles on the War Thunder Wiki that you think will be useful for the reader, for example:
- reference to the series of the aircraft;
- links to approximate analogues of other nations and research trees.
External links
| USSR bombers | |
|---|---|
| SB and Ar | SB 2M-100 · SB 2M-103 · SB 2M-103 MV-3 · SB 2M-103U · SB 2M-103U MV-3 · SB 2M-105 · Ar-2 |
| Yer-2 (petrol) | Yer-2 (M-105) · Yer-2 (M-105) TAT · Yer-2 (M-105R) TAT · Yer-2 (M-105R) LU |
| Yer-2 (diesel) | Yer-2 (ACh-30B) (e) · Yer-2 (ACh-30B) (l) |
| Tu | Tu-2 · Tu-2S · Tu-2S-44 · Tu-2S-59 · Tu-4 |
| Pe | Pe-2-1 · Pe-2-31 · Pe-2-83 · Pe-2-110 · Pe-2-205 · Pe-2-359 · Pe-8 |
| IL | DB-3B · IL-4 |
| Po | Po-2 · Po-2M |
| Other | MBR-2-M-34 · TB-3M-17-32 · Yak-4 · Be-6 |
| Lend-Lease | ▂PBY-5A Catalina · ▂Hampden TB Mk I · ▂A-20G-30 · ▂B-25J-30 |
