Difference between pages "Type 60 ATM" and "Pz.Kpfw. Churchill (Germany)"

From War Thunder Wiki
(Difference between pages)
Jump to: navigation, search
(Edits, modified gallery format to free up some space in the text)
 
(Updated template w/ new design, Added navigation templates)
 
Line 1: Line 1:
{{Specs-Card|code=jp_type_60_atm}}
+
{{Specs-Card|code=germ_infanterie_kampfpanzer_churchill}}
  
 
== Description ==
 
== Description ==
<!--''In the description, the first part needs to be about the history of the creation and combat usage of the vehicle, as well as its key features. In the second part, tell the reader about the ground vehicle in the game. Insert the screenshot of the vehicle. If the novice player does not remember the vehicle by name, they will immediately understand what kind of vehicle it is talking about.''-->
+
<!--In the description, the first part should be about the history of the creation and combat usage of the vehicle, as well as its key features. In the second part, tell the reader about the ground vehicle in the game. Insert a screenshot of the vehicle, so that if the novice player does not remember the vehicle by name, he will immediately understand what kind of vehicle the article is talking about.-->
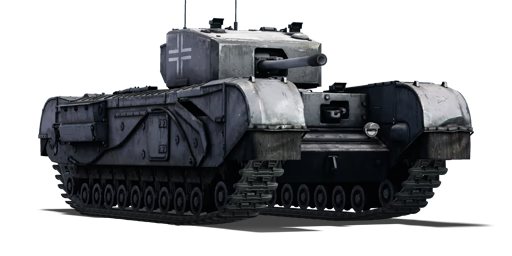
[[File:GarageImage_{{PAGENAME}}.jpg|420px|thumb|left]]
+
The '''{{PAGENAME}}''' is a rank {{Specs|rank}} premium German heavy tank {{Battle-rating}}. This vehicle was introduced in [[Update 1.55 "Royal Armour"]].
{{Break}}
 
The '''{{Specs|name}}''' is a rank {{Specs|rank}} Japanese tank destroyers {{Battle-rating}}. It was introduced in [[Update 1.67 "Assault"]].
 
  
This is the lowest battle rated non-premium vehicle to have ATGM in the game, the closest second being [[BMP-1]], though Japanese have to grind through entire rank 4 on 6.3-7.0 BR to access it.
+
The Pz.Kpfw. Churchill is a German captured [[Churchill Mk III]] in the German tech tree, it has virtually no differences to its British tech-tree counterpart, other than being painted grey (with the same tone as the Panzer IV and Panzer III).
 +
 
 +
The Pz.Kpfw. Churchill is one of the best heavy tanks in rank III, sporting heavy frontal armour, a 6 pounder gun that is suitable for its rank, and 30 smoke grenades that are fired separately from the roof, great for covering great areas with smoke. The Churchill also has great gun depression and turret traverse, meaning it can fire at different targets very efficiently.
 +
 
 +
This vehicle has a few weaknesses which are important to be aware of before charging into battle. First is low acceleration with a maximum speed of only 24.9 km/h, so it’s merely jogging speed as opposed to charging. The tank is also very bulky, difficult to manoeuvre, and is also a large target.  Combine those weaknesses with thin roof armour and this tank becomes the perfect prey for fighter-bombers and rocket attacks. The side armour is not as strong as it’s frontal armour, meaning it is vulnerable to flanking.
  
 
== General info ==
 
== General info ==
 
=== Survivability and armour ===
 
=== Survivability and armour ===
<!--''Describe armour protection. Note the most well protected and key weak areas. Appreciate the layout of modules as well as the number and location of crew members. Is the level of armour protection sufficient, is the placement of modules helpful for survival in combat?''
+
<!--Describe armour protection. Note the most well protected and key weak areas. Appreciate the layout of modules as well as the number and location of crew members. Is the level of armour protection sufficient, is the placement of modules helpful for survival in combat?
 
 
''If necessary use a visual template to indicate the most secure and weak zones of the armour.''-->
 
While armour of Type 60 hull can handle some direct MG fire, and maybe even unfocused 12.7 mm, it's roof armour is nonexistent. Every fighter in the game will try and succeed to strafe Type 60 ATM, and there is no saving from them.


Hull is just exactly low enough to use every other hull-down position, that any normal tank would fail to use. As an example, one can use solid concrete roadblocks, building leftovers, solid construction details, random sized rocks, destroyed gas cisterns, destroyed tank hulls and so on as a protective cover. Here, only the launchers will be exposed.


Launchers themselves seem to be irrelevant to the tank, and though they can be "broken" they seem to be able to fire even when they are completely destroyed. Loaded ATGM also seems to be resistant to attempts of setting them off (as tested in AB). It is worth noting that Soviets can still load HE shells and just explode an entire tank by hitting the launcher, but not every one of them carries these shells. Some high calibre HESH shells are also able to send spall down from the launcher into the Type 60 on a good hit.
 
<!-- Their behaviour after the changes to RB gun damage mechanics are yet to be tested-->


Being hit to the hull is strictly forbidden, as the compartment is not made with damage control in mind. In AB it can sustain a hit to the upper part of the hull, but once type 60 is penetrated, it goes down very easily. This is especially true if a fighter is going kamikaze and rams the tank.
 
  
'''Armour type:'''
+
If necessary use a visual template to indicate the most secure and weak zones of the armour.-->
  
* Rolled homogeneous armour
+
There are very few enemies which can successfully penetrate the Churchill, the [[M10 GMC|M10]] and the [[Achilles]] can quickly take care of this vehicle even at long ranges! Other tanks like the [[Jagdpanzer IV]], the [[Jagdpanzer 38(t)]], and the [[Dicker Max]] can also make quick work of the Churchill, but only in arcade battles, as in realistic battles, they all belong in the same tree.
* Cast homogeneous armour (Machine gun port, Cupola)


{| class="wikitable"
 
|-
 
! Armour !! Front (Slope angle) !! Sides !! Rear !! Roof
 
|-
 
| Hull || 20 mm (35-43°) ''Front glacis'' <br> 20 mm (30°) ''Lower glacis'' <br> 20 mm (7-65°) ''Machine gun port'' || 12.7 mm || 20 mm (1°) || 10 mm <br> 20 mm ''Driver's hatches''
 
|-
 
| Missile platform || N/A || 10 mm || N/A || 10 mm
 
|-
 
! Armour !! Sides !! Roof
 
|-
 
| Cupola || 20 mm || 10 mm
 
|-
 
|}
 
'''Notes:'''


* Suspension wheels and tracks are both 15 mm thick, while torsion bar chassis is 12 mm thick.
 
* Belly armour is 10 mm thick.


=== Mobility ===
 
=== Mobility ===
<!--''Write about the mobility of the ground vehicle. Estimate the specific power and maneuverability as well as the maximum speed forward and backward.''-->
+
''Write about the mobility of the ground vehicle. Estimate the specific power and manoeuvrability, as well as the maximum speed forwards and backwards.''
{| class="wikitable" style="text-align:center"
 
|-
 
! colspan="3" | Mobility characteristic
 
|-
 
! Weight (tons)
 
! colspan="1" | Add-on Armour<br>weight (tons)
 
! colspan="1" | Max speed (km/h)
 
|-
 
| rowspan="2" | 12.0 || colspan="1" rowspan="2" | N/A || colspan="1" | 42 (AB)
 
|-
 
|38 (RB/SB)
 
|-
 
! colspan="3" | Engine power (horsepower)
 
|-
 
! colspan="1" | Mode
 
!Stock
 
!Upgraded
 
|-
 
|''Arcade''
 
|312
 
|___
 
|-
 
|''Realistic/Simulator''
 
|195
 
|___
 
|-
 
! colspan="3" | Power-to-weight ratio (hp/ton)
 
|-
 
! colspan="1" | Mode
 
!Stock
 
!Upgraded
 
|-
 
|''Arcade''
 
|26.00
 
|__.__
 
|-
 
|''Realistic/Simulator''
 
|16.25
 
|__.__
 
|-
 
|}


== Armaments ==
 
== Armaments ==
 
=== Main armament ===
 
=== Main armament ===
<!--''Give the reader information about the characteristics of the main gun. Assess its effectiveness in a battle based on the reloading speed, ballistics and the power of shells. Do not forget about the flexibility of the fire, that is how quickly the cannon can be aimed at the target, open fire on it and aim at another enemy. Add a link to the main article on the gun: <code><nowiki>{{main|Name of the weapon}}</nowiki></code>. Describe in general terms the ammunition available for the main gun. Give advice on how to use them and how to fill the ammunition storage.''-->
+
''Give the reader information about the characteristics of the main gun. Assess its effectiveness in a battle based on the reloading speed, ballistics and the power of shells. Do not forget about the flexibility of the fire, that is how quickly the cannon can be aimed at the target, open fire on it and aim at another enemy. Add a link to the main article on the gun: <code><nowiki>{{main|Name of the weapon}}</nowiki></code>. Describe in general terms the ammunition available for the main gun. Give advice on how to use them and how to fill the ammunition storage.''
 
 
The vehicle has two type 64 ATGMs loaded at once, with 4 reserves being stored in the hull. They can be launched at about a 30-degree arc in front of the hull. Only one missile can be controlled at once.


You have the main camera leading indicator, which directs initial launch and guides missiles in AB, and you have 2 separate targeting indicators for each launcher, which show the reload times and try to show how far missiles will fly initially in Close Quarters Combat (CQC), though they're extremely inaccurate and should only be used for range estimation and to see if the missile can be launched at all.


Sniper optics are only directed forward, so if you want to look at something in the distance while you guide the missile, you have to first turn your entire hull towards them.


Type 64 missiles are on the same trigger, the vehicle always attempts to fire the right missile first. The only way to fire left missile first is in CQC by turning your main aiming reticle to the left just enough for right launcher reticle to go offline, but not in the dead zone of left launcher yet. The left-to-right shot, however convenient, is impossible to make if the right launcher is loaded. This makes CQC firing training extremely complex and unforgiving.


Missiles have about 500 mm of penetration at flat angle, which is enough to penetrate anything at a battle rating of 6 to 8. While it's penetration is nothing to be amazed of, it has 4.5 kilograms of explosive mass, which compensates for its low projectile "health" and allows it to do fatal damage even with 30 mm penetration left. It's technically possible to even destroy [[T-64B]] with a good hit. Like with any HEAT based projectile, fuel tanks can stop it, if they are huge enough, and engines and radiators also can prevent hull break.


The missiles act very differently in either game mode, and so the vehicle cannot be treated same in AB as in RB, which further increases training difficulty.


Due to extremely limited firing arc, if one wants to forcefully launch missile behind enemy cover it is recommended to stand with hull towards the enemy behind cover and use left launcher to fire right (L-R) or right launcher to fire left (R-L), but since L-R shot is by default overridden by R-R shot, it is also recommended to practice it a lot, or to not attack enemy from the left, if possible. As for vertical attacks, it depends on game mode a lot.


It is also rather easy to just sidestep the missile, which most of BR ~8.0 light tanks will do, unless they do not notice ATGM somehow, or are too busy fighting something else.
 
  
'''In RB''', missile has about 40 km/h initial speed and missile won't respond to your commands until it flies at least 50-80 meters away, and should be treated as a rocket until that point. Even past this point, the missile is rather slow on taking commands with about of 0.8-sec delay and prefers to keep its initial vertical course, so it's better to launch it properly, to begin with. To steer it around, user must press buttons assigned for tank movements (the vertical controls are inversed with W being "down" and S being "up"). The longer the range, the easier it is to control the missile.
+
=== Additional armament ===
 
+
''Some tanks are armed with several guns in one or more turrets. Evaluate the additional weaponry and give advice on its use. Describe the ammunition available for additional weaponry. Give advice on about how to use them and how to fill the ammunition storage. If there is no additional weaponry remove this subsection.''
Ironically, lower speed allows it to be launched onto tanks which are almost ramming Type 60, with the dead zone being just 6 meters, if operator aims at the ground below the vehicle. Basically, this means it can one-shot T64 or tanks with an even lower profile, like IT-1, while being at a gunpoint. On '''flat ground''', to hit targets at ~40 meters one should aim about 1/3 the range between tanks. To hit targets at ~80 meters one should aim 1/2 the range between tanks, as ATGM accelerates by that point.


'''Examples of aiming at close range in RB:'''
 
<gallery mode="packed-hover">
 
File:Type 60 atm point blank shot RB.jpg|Dead zone shot for RB. Note how low all of targeting reticles are aimed. Remember, some tanks will explode so hard, they might destroy yours as well, so try deal with them before this kind of attack becomes necessary.
 
File:Type 60 ATM dead zone range RB.jpg|The exact minimal range for ATGM when fighting low-profile tanks.
 
File:Type 60 atm melee left-left shot RB.jpg|This is the closest range shot you can pull off without using [[Media:CameraAdjustment_Settings_for_ATGM.jpg|camera manipulation]]. Range is about 30 m.
 
File:Type 60 atm 50 m shot RB.jpg|50 m straight shot. Check how both main and launcher's targeting reticle is aimed.
 
File:Type 60 atm 50m shot RB angling showcase.jpg|While it's possible to calculate exact missile deviation on side shots, it's easier to just use your 12 mm MG to guess angle and launcher's reticle to guess range.
 
</gallery>


To hit targets in cover far away, the operator must be very good at judging distances, because input lag and missile attitude with it sometimes returning to the initial course makes dropping missiles hard down rather challenging. As for tanks which stand in open or with minimal cover, this brings no problems, as over distance you have plenty of time to correct course.  


'''In AB''', Missile has full 89 km/h initial speed (also max speed) and responds to SACLOS manual input (mouse movements, not the targeting reticle itself) almost immediately (with real dead zone being unclear), so it can be somewhat curved around even during launch sequence, which allows the operator to push it even further behind houses. But due to its speed, the launch dead zone is extended to 11 m, so one cannot let enemy too close to themselves. Past initial launch dead zone, the operator should always aim about 1\2 toward the enemy tank.


'''Examples of aiming at close range in AB''':
 
<gallery mode="packed-hover">
 
File:Type 60 atm dead zone range AB.jpg|Dead zone range for type 60 ATM in AB. Remember that you have to aim exactly at the bottom of your tank to make it work.
 
File:Type 60 atm forward 50 m shot AB.jpg|You should remember that in AB guidance system activates earlier, and aim accordingly. Though, it's less of an issue, since missile obeys your commands almost immideately in AB.
 
File:AB indirect melee range L-R shot setup.jpg|30 m indirect shot at T-64. Missiles in AB are obeying manual input from the get-go, but you still have to launch them carefully to not make them hit a wall, so even hull placement is important. It's also best to use further launcher, if possible.
 
File:AB indirect melee range L-R shot correction.jpg|Since in AB missile obeys manual input immediately, type 60 ATM operator drags missile to the right to avoid hitting t-64s fuel tank, and the result is tank annihilation. It is worth noting, that such shots require immense amount of practice to reliably hit, though they are still less risky than going out of cover and trying to duke it out with other tank directly.
 
</gallery>


Long range sniping isn't much different from RB, you just have to aim at the enemy with your mouse instead of manually curving missile. You also can move while guiding it, though it is still hard to do on a move, so you might want to rely on other ways of aiming.


To attack an enemy on move you have to use aim assist, as sniper scope is locked to launcher's firing arc and vehicle lacks stabilizer, so your missile may go anywhere it wants to otherwise. Due to missile overall low speed (currently the lowest one in the game) and "aim assist" option (right mouse button) as long as the enemy is in tank's sights, one can treat the missile as a sort of dumb third-generation missile. The point is, missile is so slow, that tank is almost unable to hit the ground or a wall with it on accident, which means that you can even launch it forward and follow it, and if anyone dares to drive in the open near to you, you can just hold right mouse button to make missile destroy them on its own, while you focus on driving and dodging enemy shots. It's still best to not drive around recklessly and rely on a missile that much, as it is still '''very''' slow and it still requires you to see enemy tank (which means, they also can see you) and it will not avoid any obstacles on away, so you still have to correct it sometimes.


Overall, if one uses aim assist, you should keep in mind how it works - it always aims for the centre of the tank, and it lags behind the moving vehicle. To avoid hitting fuel tanks or missing moving tank, you can adjust it without breaking the tracking. After holding down the aim assist button, move your mouse a bit up, to let missile hit enemy just below the gun barrel, but high enough to not hit their tracks, and, if target moves to the left or right, move the mouse to the left or right to make missile track them properly. After that, wait for about 10 to 13 seconds for it to hit enemy, unless they realize what's coming for them and sidestep the missile, or to hit a random obstacle on a way towards them. Having maxed out "keen vision" and "improved optics" allows you to do this at any range indefinitely, as it's impossible to avoid being detected by you at missile's effective range.


{| class="wikitable" style="text-align:center"
 
|-
 
! colspan="6" | 120 mm Type 64 MAT ATGM
 
|-
 
! colspan="2" rowspan="1" style="width:5em" |Capacity
 
! rowspan="1" | Fire rate <br> (shots/minute)
 
! rowspan="1" | Vertical <br> guidance
 
! rowspan="1" | Horizontal <br> guidance
 
! rowspan="1" | Stabilizer
 
|-
 
| colspan="2" | 6 || 3 || N/A || N/A || N/A
 
|-
 
! colspan="6" | Turret rotation speed (°/s)
 
|-
 
! style="width:4em" |Mode
 
! style="width:4em" |Stock
 
! style="width:4em" |Upgraded
 
! style="width:4em" |Prior + Full crew
 
! style="width:4em" |Prior + Expert qualif.
 
! style="width:4em" |Prior + Ace qualif.
 
|-
 
| ''Arcade'' || 25.9 ||N/A|| __.__ || __.__ || __.__
 
|-
 
| ''Realistic'' || 17.5 ||N/A|| __.__ || __.__ || __.__
 
|-
 
! colspan="4" | Reloading rate (seconds)
 
|-
 
! colspan="1" style="width:4em" |Stock
 
! colspan="1" style="width:4em" |Prior + Full crew
 
! colspan="1" style="width:4em" |Prior + Expert qualif.
 
! colspan="1" style="width:4em" |Prior + Ace qualif.
 
|-
 
| 13.0 || __.__ || __.__ || __.__
 
|-
 
|}


===== Ammunition =====
 
{| class="wikitable sortable" style="text-align:center" width="100%"
 
! colspan="8" | Penetration statistics
 
|-
 
! rowspan="2" data-sort-type="text" | Ammunition
 
! rowspan="2" class="unsortable" | Type of <br /> warhead
 
! colspan="6" | '''Penetration''' '''''in mm''''' '''@ 0° Angle of Attack'''
 
|-
 
! 10 m
 
! 100 m
 
! 500 m
 
! 1,000 m
 
! 1,500 m
 
! 2,000 m
 
|-
 
| Type 64 || ATGM || 500 || 500 || 500 || 500 || 500 || 500
 
|-
 
|}
 
{| class="wikitable sortable" style="text-align:center" width="100%"
 
! colspan="12" | Shell details
 
|-
 
! rowspan="2" data-sort-type="text" | Ammunition
 
! rowspan="2" class="unsortable" | Type of <br /> warhead
 
! rowspan="2" |Maximum Velocity <br /> in m/s
 
! rowspan="2" |Projectile<br />Mass in kg
 
! rowspan="2" | Range (m)
 
! rowspan="2" | ''Fuse delay''
 
''in m:''
 
! rowspan="2" | ''Fuse sensitivity''
 
''in mm:''
 
! rowspan="2" | ''Explosive Mass in g<br /> (TNT equivalent):''
 
! rowspan="2" | ''Normalization At 30° <br> from horizontal:''
 
! colspan="3" | ''Ricochet:''
 
|-
 
! 0%
 
! 50%
 
! 100%
 
|-
 
| Type 64 || ATGM || 85 || 16 || 1,800 || 0.0 || 0.1 || 4,550 || +0° || 80° || 82° || 90°
 
|-
 
|}
 
'''Notes:'''


* Flight characteristics heavily depend on the mode you play in.
 
* While stat card states the max range is 1,800 m, in reality, it is less due to the missile losing fuel making course corrections. The resulting effective range is closer to 1,600 m.
 
* In AB, rearm takes about 40 seconds once launcher is empty and no partial rearm can be done on capture point. Rearm only happens for one launcher at once, which means full rearm will take you 80 seconds. Launcher still reloads during rearm, so you can fire away immediately, after it's done.


===== [[Ammo racks|Ammo racks]] =====
 
{| class="wikitable sortable" style="text-align:center"
 
|-
 
! class="wikitable unsortable" |Full<br /> ammo
 
! class="wikitable unsortable" |1st<br />  rack empty
 
! class="wikitable unsortable" |2nd<br />  rack empty
 
! class="wikitable unsortable" |3rd<br />  rack empty
 
! class="wikitable unsortable" |4th<br />  rack empty
 
! class="wikitable unsortable" |5th<br />  rack empty
 
! class="wikitable unsortable" |6th<br />  rack empty
 
! class="wikitable unsortable" |Visual<br /> discrepancy
 
|-
 
|| '''6''' || XX&nbsp;''(X+)'' || &nbsp;''(+)'' || &nbsp;''(+)'' || &nbsp;''(+)'' || &nbsp;''(+)'' || &nbsp;''(+)'' || style="text-align:left" | no
 
|-
 
|}


=== Machine guns ===
 
=== Machine guns ===
<!--''Offensive and anti-aircraft machine guns not only allow you to fight some aircraft, but also are effective against lightly armoured vehicles. Evaluate machine guns and give recommendations on its use.''-->
+
''Offensive and anti-aircraft machine guns not only allow you to fight some aircraft but also are effective against lightly armoured vehicles. Evaluate machine guns and give recommendations on its use.''
{{main|M2HB (12.7 mm)|M1919A4 (7.62 mm)}}
 
  
The Type 60 ATM comes equipped with a coaxial 12.7mm M2HB Browning machine gun and a smaller 7.62mm Browning machine gun.  
+
== Usage in battles ==
 +
<!--Describe the tactics of playing in the vehicle, the features of using vehicles in the team and advice on tactics. Refrain from creating a "guide" - do not impose a single point of view but instead give the reader food for thought. Describe the most dangerous enemies and give recommendations on fighting them. If necessary, note the specifics of the game in different modes (AB, RB, SB).-->
 +
Like it’s British counterpart, the Churchill can be used as a very efficient brawler with its excellent turret traverse and gun depression, combined with its heavy frontal armour. Though in urban environments, you should be careful in case someone tries to flank your weak side and rear armour.
  
The 7.62mm, while useless against conventional tanks, can sometimes come in handy for clearing some debris and can convince some BR 6.7 open top HEAT SPG to leave you alone. The 12.7 mm machine gun serves a similar purpose, but it also can destroy some light tanks, though something like [[AMX-13]] will resist its fire from the front.
+
If you are not in an up-tiered situation, you can effectively enter a battle and absorb all the enemy rounds which could’ve been fired at your weaker teammates and either engage the enemy with your 57 mm cannon or let your teammates return fire. Companion vehicles such as the [[Pz.IV F2|Panzer IV F2]], "[[8,8 cm Flak 37 Sfl.|Flakbus]]" and other German vehicles possess superior firepower compared to the other country vehicles in rank III (Except for other special TD’s, such as the American [[M10 GMC|M10]] and British [[Achilles]]) and can in most cases hold their own.
 
 
Both of MGs are only able to fire at planes that try to strafe your vehicle directly, which is not very likely, so in case if an attacker is present on the field, the vehicle should just run behind some hills and hope the pilot isn't after it.


{| class="wikitable" style="text-align:center"
 
|-
 
! colspan="7" | [[M2HB (12.7 mm)|12.7 mm M2HB]]
 
|-
 
! colspan="7" | ''Pintle mount''
 
|-
 
! colspan="4" rowspan="1" style="width:5em" |Capacity (Belt capacity)
 
! rowspan="1" | Fire rate <br> (shots/minute)
 
! rowspan="1" | Vertical <br> guidance
 
! rowspan="1" | Horizontal <br> guidance
 
|-
 
| colspan="4" | 2,500 (200) || 577 || -5°/+25° || ±45°
 
|-
 
|}
 
{| class="wikitable" style="text-align:center"
 
|-
 
! colspan="7" | [[M1919A4 (7.62 mm)|7.62 mm M1919A4]]
 
|-
 
! colspan="7" | ''Coaxial mount''
 
|-
 
! colspan="4" rowspan="1" style="width:5em" |Capacity (Belt capacity)
 
! rowspan="1" | Fire rate <br> (shots/minute)
 
! rowspan="1" | Vertical <br> guidance
 
! rowspan="1" | Horizontal <br> guidance
 
|-
 
| colspan="4" | 3,000 (250) || 500 || ±22° || ±22°
 
|-
 
|}


== Usage in the battles ==
 
The Type 60 ATM struggles in close quarters and is unsuited for direct urban combat. When playing the Type 60 ATGM consider all your flanking routes and hull-down positions as your high damage potential can be most effectively harnessed in these environments. Avoid all major sight-lines, and pick your targets carefully. The cover is your best friend, finding positions, where you can scout enemy vehicles for your team, can often be more beneficial than attempting to destroy enemy tanks yourself.


To get most out of the tank, one should find a hulldown position with a sight onto capture point, to scout everyone, who is open for allied snipers, and then pick off pinned down opponents, forcing them to choose between being destroyed by ATGM or your allies.


As one example, on [[Alaska]] map Type 60 ATM can use concrete blocks and rubbish to the east of B point to become resistant to enemy fire while being able to fire clean shots at both A and B points with little fear of being directly attacked back.


The Type 60 ATM often plays out as a support vehicle instead of a tank destroyer, though in AB it can also do some moral damage, as it's presence alone forces enemy to change plans, as soon as they realize it can destroy them without even showing up on a field or doing elaborate artillery tricks, unlike [[Type 60 SPRG (C)]]. You shouldn't let this to get to your head, though, as you are most likely '''unable''' to stop massive coordinated push.


As example, experienced type 60 ATM user can entrench itself on river of [[Berlin (Ground Forces)|Berlin]] map, making people who see ATGM for the first time to lose any will to attack B point at all, and seriously stalling the rest, although this requires meticulous training in CQC launch techniques, as combat range there can quickly reach 20 meters, and ground isn't exactly even, often resulting in misses. Still, in AB the fear alone may stall enemy long enough for a vehicle to rearm, and damage done to the launcher is completely irrelevant in that mode.


The Type 60 ATM's biggest threats in battle are many. Avoid directly fighting all vehicles at all costs to prevent dying - almost every shell at your BR will destroy Type 60 with ease. The vehicle will often face enemy frontally when you fire missiles, and that's where the 3 of your crew are crammed together, 2 of which are the gunner and driver.


As soon as the enemy tries to drop artillery on you, it's best to leave the position, as tank might explode in one hit. As such, always keep plan B in your head.


Try to use scouting to know the very moment your opponent drives out to attack your tank and try to blast them away with ATGM. If the direct confrontation with a light tank is inevitable - fire 12.7 MG at its sides as well and hope it penetrates them.


=== Pros and cons ===
 
=== Pros and cons ===
 +
<!--Summarise and briefly evaluate the vehicle in terms of its characteristics and combat effectiveness. Mark its pros and cons in a bulleted list. Try not to use more than 6 points for each of the characteristics. Avoid using categorical definitions such as "bad", "good" and the like - use substitutions with softer forms such as "inadequate" and "effective".-->
 
'''Pros:'''
 
'''Pros:'''
  
* Good missile manoeuvrability
+
* Long, tough hull is easily angled
* Type 64 ATGM's provide exceptional firepower
+
* 90 mm turret armour is effective at medium & long range
* Upwards facing launchers can allow the vehicle to fire behind cover, although setup is often required
+
* Large tracks can absorb shells fired at the side
* Has scouting
+
* Fast turret traverse; easy to engage people without turning
 +
* 57 mm gun reloads quickly with good penetration
 +
* Premium tank earns more rewards after a match
 +
* Fewer enemies that can kill you in RB and SB, as you are in the German tree
 +
* Slow speed makes it easy to hit enemies after a shortstop
 +
* 30 individually fired smoke grenades, great for covering points and areas with smoke
  
 
'''Cons:'''
 
'''Cons:'''
  
* Very limited main ammunition (even more so than [[Type 60 SPRG (C)|SPRG]] version)
+
* Large target; easily spotted by bombers/fighter-bombers
* Slow missile speed, to a point it can be sidestepped by many tanks
+
* Very poor speed, both forward and backward
* Need a visual target for an accurate hit, otherwise it heavily relies on operator skill to hit anything at all
+
* Unangled armour fares poorly at close ranges
* Cannot be partially rearmed on capture point in AB, forcing it to completely empty the ammunition
+
* Lack of camouflage; only Urban grey and Winter camo
* Can't move while the missile flies to the target in RB
+
* Machine gun port is only 50 mm
* Missiles have input lag in RB, which makes them unreliable at times
+
* Roof armour is very thin
* Need a certain range for effective hit (maximum 1600 m for long range, at least 10 m at close range, at least 100 m for a guidance system to start in RB)
+
* Engine mostly affected when hit from the side or turret
* Very long reload after each missile is fired
+
* Large tracks are vulnerable to damage
* Highly visible, very distinct profile, with the sore Japanese green camouflage and obvious launchers
 
* Little to no armour, most shells immediately destroy this vehicle
 
* Limited maximum speed to 38 kph along with mediocre mobility


== History ==
 
== History ==
''Describe the history of the creation and combat usage of the ground vehicle in more detail than in the introduction. If the historical reference turns out to be too big, take it to a separate article, taking a link to an article about the vehicle and adding a block "/historical reference" (example: https://wiki.warthunder.com/Name-vehicles/historical reference) and add a link to it here using the <code>main</code> template. Be sure to include links to sources at the end of the article.''
+
''Describe the history of the creation and combat usage of the ground vehicle in more detail than in the introduction. If the historical reference turns out to be too long, take it to a separate article, taking a link to the article about the vehicle and adding a block "/ History" (example: <nowiki>https://wiki.warthunder.com/(Vehicle-name)/History</nowiki>) and add a link to it here using the <code>main</code> template. Be sure to reference text and sources by using <code><nowiki><ref></nowiki></code>, as well as adding them at the end of the article. This section may also include the vehicle's dev blog entry (if applicable) and the in-game encyclopedia description (under <code><nowiki>=== In-game description ===</nowiki></code>, also if applicable).''
  
 
== Media ==
 
== Media ==
''An excellent addition to the article will be video guides, as well as screenshots from the game and photos.''
+
''Excellent additions to the article would be video guides, screenshots from the game, and photos.''
  
== Read also ==
+
== See also ==
<!--''Links to the articles on the War Thunder Wiki that you think will be useful for the reader,''-->
+
''Links to the articles on the War Thunder Wiki that you think will be useful for the reader, for example:''
* [http://warthunder.com/en/news/4585-development-type-60-atm-death-on-a-wire-en/ [Devblog<nowiki>]</nowiki> Type 60 ATM: Death on a Wire]
+
* ''reference to the series of the vehicles;''
 +
* ''links to approximate analogues of other nations and research trees.''
  
== Sources ==
+
== External links ==
 
''Paste links to sources and external resources, such as:''
 
''Paste links to sources and external resources, such as:''
 
 
* ''topic on the official game forum;''
 
* ''topic on the official game forum;''
 +
* ''encyclopedia page on the tank;''
 
* ''other literature.''
 
* ''other literature.''
  
{{Japan tank destroyers}}
+
{{Germany heavy tanks}}
 +
{{Germany premium ground vehicles}}

Revision as of 04:38, 5 July 2019

Rank VI Israel | Premium | Golden Eagles
Merkava Mk.2D Pack
▀Pz.Kpfw. Churchill
germ_infanterie_kampfpanzer_churchill.png
▀Pz.Kpfw. Churchill
AB RB SB
4.0 4.0 4.3
Purchase:1 750 Specs-Card-Eagle.png
Show in game

Description

The Pz.Kpfw. Churchill (Germany) is a rank III premium German heavy tank with a battle rating of 4.0 (AB/RB) and 4.3 (SB). This vehicle was introduced in Update 1.55 "Royal Armour".

The Pz.Kpfw. Churchill is a German captured Churchill Mk III in the German tech tree, it has virtually no differences to its British tech-tree counterpart, other than being painted grey (with the same tone as the Panzer IV and Panzer III).

The Pz.Kpfw. Churchill is one of the best heavy tanks in rank III, sporting heavy frontal armour, a 6 pounder gun that is suitable for its rank, and 30 smoke grenades that are fired separately from the roof, great for covering great areas with smoke. The Churchill also has great gun depression and turret traverse, meaning it can fire at different targets very efficiently.

This vehicle has a few weaknesses which are important to be aware of before charging into battle. First is low acceleration with a maximum speed of only 24.9 km/h, so it’s merely jogging speed as opposed to charging. The tank is also very bulky, difficult to manoeuvre, and is also a large target. Combine those weaknesses with thin roof armour and this tank becomes the perfect prey for fighter-bombers and rocket attacks. The side armour is not as strong as it’s frontal armour, meaning it is vulnerable to flanking.

General info

Survivability and armour

There are very few enemies which can successfully penetrate the Churchill, the M10 and the Achilles can quickly take care of this vehicle even at long ranges! Other tanks like the Jagdpanzer IV, the Jagdpanzer 38(t), and the Dicker Max can also make quick work of the Churchill, but only in arcade battles, as in realistic battles, they all belong in the same tree.

Mobility

Write about the mobility of the ground vehicle. Estimate the specific power and manoeuvrability, as well as the maximum speed forwards and backwards.

Armaments

Main armament

Give the reader information about the characteristics of the main gun. Assess its effectiveness in a battle based on the reloading speed, ballistics and the power of shells. Do not forget about the flexibility of the fire, that is how quickly the cannon can be aimed at the target, open fire on it and aim at another enemy. Add a link to the main article on the gun: {{main|Name of the weapon}}. Describe in general terms the ammunition available for the main gun. Give advice on how to use them and how to fill the ammunition storage.

Additional armament

Some tanks are armed with several guns in one or more turrets. Evaluate the additional weaponry and give advice on its use. Describe the ammunition available for additional weaponry. Give advice on about how to use them and how to fill the ammunition storage. If there is no additional weaponry remove this subsection.

Machine guns

Offensive and anti-aircraft machine guns not only allow you to fight some aircraft but also are effective against lightly armoured vehicles. Evaluate machine guns and give recommendations on its use.

Usage in battles

Like it’s British counterpart, the Churchill can be used as a very efficient brawler with its excellent turret traverse and gun depression, combined with its heavy frontal armour. Though in urban environments, you should be careful in case someone tries to flank your weak side and rear armour.

If you are not in an up-tiered situation, you can effectively enter a battle and absorb all the enemy rounds which could’ve been fired at your weaker teammates and either engage the enemy with your 57 mm cannon or let your teammates return fire. Companion vehicles such as the Panzer IV F2, "Flakbus" and other German vehicles possess superior firepower compared to the other country vehicles in rank III (Except for other special TD’s, such as the American M10 and British Achilles) and can in most cases hold their own.

Pros and cons

Pros:

  • Long, tough hull is easily angled
  • 90 mm turret armour is effective at medium & long range
  • Large tracks can absorb shells fired at the side
  • Fast turret traverse; easy to engage people without turning
  • 57 mm gun reloads quickly with good penetration
  • Premium tank earns more rewards after a match
  • Fewer enemies that can kill you in RB and SB, as you are in the German tree
  • Slow speed makes it easy to hit enemies after a shortstop
  • 30 individually fired smoke grenades, great for covering points and areas with smoke

Cons:

  • Large target; easily spotted by bombers/fighter-bombers
  • Very poor speed, both forward and backward
  • Unangled armour fares poorly at close ranges
  • Lack of camouflage; only Urban grey and Winter camo
  • Machine gun port is only 50 mm
  • Roof armour is very thin
  • Engine mostly affected when hit from the side or turret
  • Large tracks are vulnerable to damage

History

Describe the history of the creation and combat usage of the ground vehicle in more detail than in the introduction. If the historical reference turns out to be too long, take it to a separate article, taking a link to the article about the vehicle and adding a block "/ History" (example: https://wiki.warthunder.com/(Vehicle-name)/History) and add a link to it here using the main template. Be sure to reference text and sources by using <ref>, as well as adding them at the end of the article. This section may also include the vehicle's dev blog entry (if applicable) and the in-game encyclopedia description (under === In-game description ===, also if applicable).

Media

Excellent additions to the article would be video guides, screenshots from the game, and photos.

See also

Links to the articles on the War Thunder Wiki that you think will be useful for the reader, for example:

  • reference to the series of the vehicles;
  • links to approximate analogues of other nations and research trees.

External links

Paste links to sources and external resources, such as:

  • topic on the official game forum;
  • encyclopedia page on the tank;
  • other literature.


Germany heavy tanks
Tiger 1 (Henschel)  Tiger H1 · Tiger E · ␠Tiger
Tiger 1 (Porsche)  VK 45.01 (P) · Pz.Bef.Wg.VI P
Tiger 2  Tiger II (P) · Tiger II (H) · Tiger II (H) Sla.16 · Tiger II (10.5 cm Kw.K)
Super heavy tanks  Maus · E-100
Trophies 
Great Britain  ▀Pz.Kpfw. Churchill
USSR  ▀KV-IB · ▀KW I C 756 (r) · ▀KW II 754 (r)

Germany premium ground vehicles
Light tanks  Pz.II C (DAK) · Pz.Sfl.Ic · Pz.Sp.Wg.P204(f) KwK · Sd.Kfz. 140/1 · Sd.Kfz.234/1 · Ru 251 · SPz 12-3 LGS · TAM 2IP
Medium tanks  Nb.Fz. · Pz.III N · Pz.Bef.Wg.IV J · ▀M4 748 (a) · ▀T 34 747 (r) · Ersatz M10
  mKPz M47 G · Turm III · Leopard A1A1 (L/44) · Leopard 2 (PzBtl 123)
Heavy tanks  ▀Pz.Kpfw. Churchill · ▀KV-IB · ▀KW I C 756 (r) · ▀KW II 754 (r)
  VK 45.01 (P) · ␠Tiger · Pz.Bef.Wg.VI P · Tiger II (H) Sla.16
Tank destroyers  Sd.Kfz.234/3 · Sd.Kfz.234/4 · Sd.Kfz.251/10 · Sd.Kfz.251/22 · 15 cm Pz.W.42
  Brummbär · Panzer IV/70(A) · VFW · Bfw. Jagdpanther G1 · Elefant · 38 cm Sturmmörser