Difference between pages "Z.1007 bis serie 3" and "LS 3"
(→History) (Tag: Visual edit) |
m (Edits.) |
||
| Line 1: | Line 1: | ||
| − | {{Specs-Card|code= | + | {{Specs-Card|code=germ_ls_class}} |
| − | |||
| − | |||
| − | |||
| − | |||
| − | }} | ||
== Description == | == Description == | ||
| − | <!-- ''In the description, | + | <!--''In the first part of the description, cover the history of the ship’s creation and military application. In the second part, tell the reader about using this ship in the game. Add a screenshot. If a beginner player has a hard time remembering vehicles by name, a picture will help them understand which ship is being discussed.''--> |
[[File:GarageImage_{{PAGENAME}}.jpg|420px|thumb|left]] | [[File:GarageImage_{{PAGENAME}}.jpg|420px|thumb|left]] | ||
{{break}} | {{break}} | ||
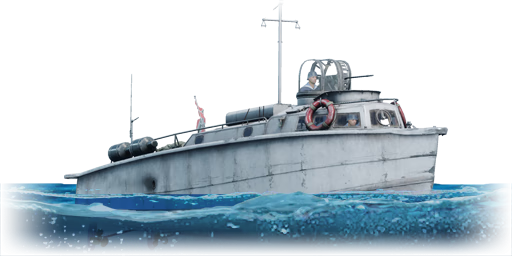
| − | The '''{{Specs|name}}''' is a rank {{Specs|rank}} | + | The '''{{Specs|name}}''' is a reserve rank {{Specs|rank}} German destroyer {{Battle-rating}}. It was introduced in [[Update 1.79 "Project X"]] as part of the fleet closed beta test. |
== General info == | == General info == | ||
| − | |||
| − | |||
| − | |||
| − | |||
| − | |||
| − | |||
| − | |||
| − | |||
| − | |||
| − | |||
| − | |||
| − | |||
| − | |||
| − | |||
| − | |||
| − | |||
| − | |||
| − | |||
| − | |||
| − | |||
| − | |||
| − | |||
| − | |||
| − | |||
| − | |||
| − | |||
| − | |||
| − | |||
| − | |||
| − | |||
| − | |||
| − | |||
| − | |||
| − | |||
| − | |||
| − | |||
| − | |||
| − | |||
| − | |||
| − | |||
| − | |||
| − | |||
| − | |||
| − | |||
| − | |||
| − | |||
| − | |||
| − | |||
| − | |||
| − | |||
| − | |||
| − | |||
| − | |||
| − | |||
| − | |||
| − | |||
| − | |||
| − | |||
| − | |||
| − | |||
| − | |||
| − | |||
| − | |||
| − | |||
| − | |||
| − | |||
| − | |||
| − | |||
| − | |||
| − | |||
| − | |||
| − | |||
| − | |||
| − | |||
| − | |||
| − | |||
| − | |||
| − | |||
| − | |||
| − | |||
| − | |||
| − | |||
| − | |||
| − | |||
| − | |||
| − | |||
| − | |||
| − | |||
| − | |||
| − | |||
| − | |||
| − | |||
| − | |||
| − | |||
| − | |||
| − | |||
| − | |||
| − | |||
| − | |||
| − | |||
| − | |||
=== Survivability and armour === | === Survivability and armour === | ||
| − | '' | + | ''Talk about the vehicle's armour. Note the most well-defended and most vulnerable zones, e.g. the ammo magazine. Evaluate the composition of components and assemblies responsible for movement and manoeuvrability. Evaluate the survivability of the primary and secondary armament separately. Don't forget to mention the size of the crew, which plays an important role in fleet mechanics. Tips for preserving survivability should be saved for the "Use in battle" section.'' |
| − | + | ''If necessary, use a graphic template to show the most well-protected or most vulnerable points in the armour.'' | |
| − | |||
| − | |||
| − | |||
| − | + | === Mobility === | |
| + | ''Write about the ship’s mobility. Evaluate its power and manoeuvrability, rudder rerouting speed, stopping speed at full tilt, with its maximum forward speed and reverse speed.'' | ||
| − | + | == Armament == | |
| − | + | === Primary armament === | |
| − | + | <!--''Provide information about the characteristics of the primary armament. Evaluate their efficacy in battle based on their reload speed, ballistics and the capacity of their shells. Add a link to the main article about the weapon: <code><nowiki>{{main|Weapon name (calibre)}}</nowiki></code>.'' | |
| − | + | ''Broadly describe the ammunition available for the primary armament, and provide recommendations on how to use it and which ammunition to choose.''--> | |
| − | + | {{main|MG 151/15 (15 mm)}} | |
| − | |||
| − | |||
| − | |||
| − | |||
| − | |||
| − | |||
| − | |||
| − | + | * One 15 mm MG 151/15 cannon (1200 rounds) | |
| − | + | The 15 mm MG 151/15 can be deadly in proper hands. It has an insane fire rate of 750 rates per minute, which means it can take small boats and aircrafts in its BR in seconds. However, this cannon overheats easily, so never keep firing for too long. Like the AN/M2 MG, this gun has large belt capacity and long reloading time. | |
| − | |||
| − | + | === Torpedo armament === | |
| + | <!--''Many ships are armed with torpedo launchers, and for some vessels such as boats, torpedoes are an extremely important means of defeating an opponent. Evaluate the position of the torpedo launchers, discuss the ammunition available, firing specifics such as dead zones, features of the torpedoes themselves, etc.'' | ||
| + | ''If there is no torpedo armament, remove this section.''--> | ||
| + | {{main|LT 1A/1}} | ||
| − | * | + | * Two 450 mm LT 1A/1 torpedoes |
| − | |||
| − | |||
== Usage in battles == | == Usage in battles == | ||
| − | ''Describe the | + | <!--''Describe the technique of using this ship, the characteristics of her use in a team and tips on strategy. Abstain from writing an entire guide – don’t get try to provide a single point of view, but give the reader food for thought. Talk about the most dangerous opponents for this vehicle and provide recommendations on fighting them. If necessary, note the specifics of playing with this vehicle in various modes (AB, RB, SB).''--> |
| + | The LS3 is one of the better reserve vessels, with a fairly flexible main armament, providing a 360-degree firing arc without any elevation limitations owing to its elevated position. While it only possesses a single gun, it is capable of hitting well above its weight class when used correctly. Because of its small size and similarly small crew complement, it is recommended to not engage in direct confrontations against large surface combatants, especially at range. Its single autocannon is difficult to land hits at moving targets at range, and its small size makes medium calibre AA guns incredibly deadly against the LS 3. Vessels like the 80 ft Nasty and later R-boats are to be avoided due to the presence of a large autocannon. | ||
| + | |||
| + | What it lacks in the protection area it makes up in mobility. The LS 3 is second to only the G-5 in terms of speed. This in tandem with its incredibly tight turning circle and slim profile, makes the LS 3 very well suited for flanking capture points. Use its speed to sneak in to capture points and rush at vessels that may be occupying it. Its high top speed also makes it useful to rush cap points at the beginning of a match. That being said, be careful not to overextend, or you will find yourself overwhelmed very quickly. Instead, use its superior speed to be the first to reach a capture point, and hide behind an island, selectively engaging enemies that come into the line of sight or attempt to contest the point. | ||
| − | + | Trigger discipline is absolutely necessary when sailing the LS 3, as the gun can overheat to offset its high ammo capacity. Avoid firing in more than 2-second bursts when engaging at the effective range, and be sure to watch the gun heat when engaging at close range. In the event of an overheat, you will have to load the gun again, costing time which is crucial in the knife fights this vessel is best suited for. To maximize the chance of a kill in a single burst, be sure to rake up and down the entire length of an enemy vessel if it shows its broadside. This is advisable in any PT boat, but especially to the LS 3 due to the gun overheating. Use universal belts for the high explosive rounds. | |
| − | |||
| − | |||
| − | |||
| − | |||
| − | |||
| − | |||
| − | |||
| − | |||
| − | |||
| − | |||
| − | |||
| − | |||
| − | |||
| − | |||
| − | |||
| − | |||
| − | |||
| − | + | To take advantage of the vessel’s short beam, engage head-on when possible, and tack to port and starboard erratically to throw off aim. This also helps with aiming as you no longer have to worry about having to compensate for the movement of your own vessel. Avoid firing while broadside, as this, unnecessarily exposes the entire side of the vessel and your crew, and the lack of additional guns makes such a manoeuvre pointless. | |
| − | |||
| − | |||
| − | |||
| − | |||
| − | |||
| − | |||
| − | |||
| − | |||
| − | |||
| − | |||
| − | |||
| − | |||
| − | |||
| − | |||
| − | |||
| − | |||
| − | |||
| − | |||
| − | |||
| − | |||
| − | |||
| − | |||
| − | |||
| − | |||
| − | |||
| − | |||
| − | |||
| − | |||
| − | |||
| − | |||
| − | |||
| − | |||
| − | |||
| − | |||
| − | |||
| − | === Pros and cons === | + | === Pros and cons === |
| − | '' | + | <!--''Summarize and briefly evaluate the vehicle in terms of its characteristics and combat effectiveness. Mark its pros and cons in the bulleted list. Try not to use more than 6 points for each of the characteristics. Avoid using categorical definitions such as "bad", "good" and the like - they have a substitution in the form of softer "inadequate", "effective".''--> |
'''Pros:''' | '''Pros:''' | ||
| − | * | + | * Decently powerful MG 151 cannon |
| + | * High top speed can make it difficult to lead and destroy | ||
| + | * Very good manoeuvrability, can change direction quickly | ||
| + | * High ammo capacity, able to outlast contemporaries in a firefight with good trigger discipline | ||
| + | * Relatively high rate of fire | ||
'''Cons:''' | '''Cons:''' | ||
| − | * | + | * Gun is capable of overheating, limits the usefulness of high ammo capacity |
| + | * Very fragile, incredibly vulnerable to 37 mm and 40 mm fire | ||
| + | * Elevated gun position makes it vulnerable to damage | ||
| + | * Single gun eliminates almost all offensive capability if disabled | ||
| + | * Long reload time | ||
| + | * Low ammo count overall; limited to two magazines | ||
== History == | == History == | ||
| − | + | ''Describe the history of the creation and combat usage of the ship in more detail than in the introduction. If the historical reference turns out to be too big, take it to a separate article, taking a link to an article about the vehicle and adding a block "/ History" (example: <nowiki>https://wiki.warthunder.com/(Vehicle-name)/History</nowiki>) and add a link to it here using the <code>main</code> template. Be sure to reference text and sources by using <code><nowiki><ref></nowiki></code>, as well as adding them at the end of the article.'' | |
== Media == | == Media == | ||
| − | '' | + | ''An excellent addition to the article will be video guides, as well as screenshots from the game and photos.'' |
== See also == | == See also == | ||
''Links to the articles on the War Thunder Wiki that you think will be useful for the reader, for example:'' | ''Links to the articles on the War Thunder Wiki that you think will be useful for the reader, for example:'' | ||
| − | * ''reference to the series of the | + | * ''reference to the series of the ship;'' |
* ''links to approximate analogues of other nations and research trees.'' | * ''links to approximate analogues of other nations and research trees.'' | ||
| Line 233: | Line 78: | ||
* ''topic on the official game forum;'' | * ''topic on the official game forum;'' | ||
| − | * ''encyclopedia page on | + | * ''encyclopedia page on ship;'' |
* ''other literature.'' | * ''other literature.'' | ||
| − | {{ | + | {{Germany boats}} |
Revision as of 10:51, 28 September 2019
Contents
Description

The LS 3 is a reserve rank I German destroyer
with a battle rating of 1.0 (AB/RB/SB). It was introduced in Update 1.79 "Project X" as part of the fleet closed beta test.
General info
Survivability and armour
Talk about the vehicle's armour. Note the most well-defended and most vulnerable zones, e.g. the ammo magazine. Evaluate the composition of components and assemblies responsible for movement and manoeuvrability. Evaluate the survivability of the primary and secondary armament separately. Don't forget to mention the size of the crew, which plays an important role in fleet mechanics. Tips for preserving survivability should be saved for the "Use in battle" section.
If necessary, use a graphic template to show the most well-protected or most vulnerable points in the armour.
Mobility
Write about the ship’s mobility. Evaluate its power and manoeuvrability, rudder rerouting speed, stopping speed at full tilt, with its maximum forward speed and reverse speed.
Armament
Primary armament
- One 15 mm MG 151/15 cannon (1200 rounds)
The 15 mm MG 151/15 can be deadly in proper hands. It has an insane fire rate of 750 rates per minute, which means it can take small boats and aircrafts in its BR in seconds. However, this cannon overheats easily, so never keep firing for too long. Like the AN/M2 MG, this gun has large belt capacity and long reloading time.
Torpedo armament
- Two 450 mm LT 1A/1 torpedoes
Usage in battles
The LS3 is one of the better reserve vessels, with a fairly flexible main armament, providing a 360-degree firing arc without any elevation limitations owing to its elevated position. While it only possesses a single gun, it is capable of hitting well above its weight class when used correctly. Because of its small size and similarly small crew complement, it is recommended to not engage in direct confrontations against large surface combatants, especially at range. Its single autocannon is difficult to land hits at moving targets at range, and its small size makes medium calibre AA guns incredibly deadly against the LS 3. Vessels like the 80 ft Nasty and later R-boats are to be avoided due to the presence of a large autocannon.
What it lacks in the protection area it makes up in mobility. The LS 3 is second to only the G-5 in terms of speed. This in tandem with its incredibly tight turning circle and slim profile, makes the LS 3 very well suited for flanking capture points. Use its speed to sneak in to capture points and rush at vessels that may be occupying it. Its high top speed also makes it useful to rush cap points at the beginning of a match. That being said, be careful not to overextend, or you will find yourself overwhelmed very quickly. Instead, use its superior speed to be the first to reach a capture point, and hide behind an island, selectively engaging enemies that come into the line of sight or attempt to contest the point.
Trigger discipline is absolutely necessary when sailing the LS 3, as the gun can overheat to offset its high ammo capacity. Avoid firing in more than 2-second bursts when engaging at the effective range, and be sure to watch the gun heat when engaging at close range. In the event of an overheat, you will have to load the gun again, costing time which is crucial in the knife fights this vessel is best suited for. To maximize the chance of a kill in a single burst, be sure to rake up and down the entire length of an enemy vessel if it shows its broadside. This is advisable in any PT boat, but especially to the LS 3 due to the gun overheating. Use universal belts for the high explosive rounds.
To take advantage of the vessel’s short beam, engage head-on when possible, and tack to port and starboard erratically to throw off aim. This also helps with aiming as you no longer have to worry about having to compensate for the movement of your own vessel. Avoid firing while broadside, as this, unnecessarily exposes the entire side of the vessel and your crew, and the lack of additional guns makes such a manoeuvre pointless.
Pros and cons
Pros:
- Decently powerful MG 151 cannon
- High top speed can make it difficult to lead and destroy
- Very good manoeuvrability, can change direction quickly
- High ammo capacity, able to outlast contemporaries in a firefight with good trigger discipline
- Relatively high rate of fire
Cons:
- Gun is capable of overheating, limits the usefulness of high ammo capacity
- Very fragile, incredibly vulnerable to 37 mm and 40 mm fire
- Elevated gun position makes it vulnerable to damage
- Single gun eliminates almost all offensive capability if disabled
- Long reload time
- Low ammo count overall; limited to two magazines
History
Describe the history of the creation and combat usage of the ship in more detail than in the introduction. If the historical reference turns out to be too big, take it to a separate article, taking a link to an article about the vehicle and adding a block "/ History" (example: https://wiki.warthunder.com/(Vehicle-name)/History) and add a link to it here using the main template. Be sure to reference text and sources by using <ref>, as well as adding them at the end of the article.
Media
An excellent addition to the article will be video guides, as well as screenshots from the game and photos.
See also
Links to the articles on the War Thunder Wiki that you think will be useful for the reader, for example:
- reference to the series of the ship;
- links to approximate analogues of other nations and research trees.
External links
Paste links to sources and external resources, such as:
- topic on the official game forum;
- encyclopedia page on ship;
- other literature.
| Germany boats | |
|---|---|
| Motor torpedo boats | LS 3 · LS 4 Esau · KM-5 · VS-10 |
| S-38 · S-38b · S-100 · S-100 (1944) · S-204 Lang · S-701 | |
| R-301 | |
| V-990 | |
| Jaguar · Hugin · Pfeil | |
| Motor gun boats | R-41 · R-130 · Krischan der Große |
| Motor torpedo gun boats | Albatros · Bussard · MZ1 · Pr. 206 |
| Minelayers | VS-8 |
