Difference between pages "T-64A (1971)" and "Ki-44-I 34"
CobraKingII (talk | contribs) (→General info) (Tag: Visual edit) |
(→Pros and cons) (Tag: Visual edit) |
||
| Line 1: | Line 1: | ||
| − | {{Specs-Card|code= | + | {{Specs-Card |
| + | |code=ki_44_1_ep | ||
| + | |store=9264 | ||
| + | }} | ||
| + | {{About | ||
| + | | about = Japanese fighter '''{{PAGENAME}}''' | ||
| + | | usage = other variants | ||
| + | | link = Ki-44 (Family) | ||
| + | }} | ||
== Description == | == Description == | ||
| − | <!-- ''In the description, the first part should be about the history of the creation and combat usage of the | + | <!-- ''In the description, the first part should be about the history of and the creation and combat usage of the aircraft, as well as its key features. In the second part, tell the reader about the aircraft in the game. Insert a screenshot of the vehicle, so that if the novice player does not remember the vehicle by name, he will immediately understand what kind of vehicle the article is talking about.'' --> |
| − | [[File: | + | [[File:GarageImage_{{PAGENAME}}.jpg|420px|thumb|left]] |
{{Break}} | {{Break}} | ||
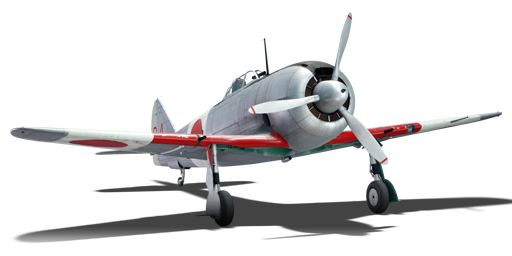
| − | The '''{{Specs|name}}''' is a rank {{Specs|rank}} | + | The '''{{Specs|name}}''' is a premium rank {{Specs|rank}} Japanese fighter {{Battle-rating}}. It was introduced in [[Update "Starfighters"]]. |
| − | |||
| − | |||
| − | |||
| − | |||
| − | |||
| − | |||
== General info == | == General info == | ||
| − | === | + | === Flight performance === |
| − | <!-- ''Describe | + | <!-- ''Describe how the aircraft behaves in the air. Speed, manoeuvrability, acceleration and allowable loads - these are the most important characteristics of the vehicle.'' --> |
| − | '' | + | ''Describe how the aircraft behaves in the air. Speed, manoeuvrability, acceleration and allowable loads - these are the most important characteristics of the vehicle.'' |
| − | |||
| − | |||
| − | |||
| − | |||
| − | {| class="wikitable" | + | {| class="wikitable" style="text-align:center" width="70%" |
| − | | | + | ! rowspan="2" | Characteristics |
| − | ! | + | ! colspan="2" | Max Speed<br>(km/h at 6,000 m) |
| + | ! rowspan="2" | Max altitude<br>(metres) | ||
| + | ! colspan="2" | Turn time<br>(seconds) | ||
| + | ! colspan="2" | Rate of climb<br>(metres/second) | ||
| + | ! rowspan="2" | Take-off run<br>(metres) | ||
|- | |- | ||
| − | + | ! AB !! RB !! AB !! RB !! AB !! RB | |
|- | |- | ||
| − | | | + | ! Stock |
| + | | 539 || 523 || rowspan="2" | {{Specs|ceiling}} || 17.3 || 17.8 || 18.6 || 18.6 || rowspan="2" | 190 | ||
|- | |- | ||
| − | + | ! Upgraded | |
| − | + | | 578 || 558 || 15.7 || 16.5 || 25.1 || 21.6 | |
| − | |||
| − | |||
| − | |||
| − | | | ||
| − | |||
| − | |||
|- | |- | ||
|} | |} | ||
| − | |||
| − | |||
| − | |||
| − | |||
| − | |||
| − | |||
| − | |||
| − | |||
| − | |||
| − | |||
| − | |||
| − | |||
| − | |||
| − | |||
| − | |||
| − | |||
| − | |||
| − | |||
| − | |||
| − | |||
| − | |||
| − | |||
| − | |||
| − | |||
| − | |||
| − | {| class="wikitable" style="text-align:center" width=" | + | ==== Details ==== |
| − | + | {| class="wikitable" style="text-align:center" width="50%" | |
| − | |||
|- | |- | ||
| − | ! | + | ! colspan="5" | Features |
| − | |||
| − | |||
|- | |- | ||
| − | ! | + | ! Combat flaps !! Take-off flaps !! Landing flaps !! Air brakes !! Arrestor gear |
| − | |||
|- | |- | ||
| − | + | | ✓ || ✓ || ✓ || X || X <!-- ✓ --> | |
| − | | | ||
|- | |- | ||
|} | |} | ||
| − | + | {| class="wikitable" style="text-align:center" width="50%" | |
| − | {| class="wikitable | ||
| − | |||
| − | |||
| − | |||
| − | |||
| − | |||
| − | |||
| − | |||
| − | |||
| − | |||
| − | |||
| − | |||
|- | |- | ||
| − | | | + | ! colspan="7" | Limits |
|- | |- | ||
| − | | | + | ! rowspan="2" | Wings (km/h) |
| + | ! rowspan="2" | Gear (km/h) | ||
| + | ! colspan="3" | Flaps (km/h) | ||
| + | ! colspan="2" | Max Static G | ||
|- | |- | ||
| − | + | ! Combat !! Take-off !! Landing !! + !! - | |
|- | |- | ||
| − | | | + | | {{Specs|destruction|body}} || {{Specs|destruction|gear}} || 400 || 400 || 250 || ~12 || ~8 |
|- | |- | ||
|} | |} | ||
| − | {| class="wikitable | + | |
| − | + | {| class="wikitable" style="text-align:center" | |
| − | |||
| − | |||
| − | |||
| − | |||
| − | |||
| − | |||
| − | |||
| − | |||
| − | |||
| − | |||
| − | |||
|- | |- | ||
| − | | | + | ! colspan="4" | Optimal velocities (km/h) |
|- | |- | ||
| − | + | ! Ailerons !! Rudder !! Elevators !! Radiator | |
|- | |- | ||
| − | | | + | | < 400 || < 400 || < 450 || > 316 |
| − | |||
| − | |||
| − | |||
| − | |||
| − | |||
| − | |||
|- | |- | ||
|} | |} | ||
| − | === | + | === Survivability and armour === |
| − | + | <!-- ''Examine the survivability of the aircraft. Note how vulnerable the structure is and how secure the pilot is, whether the fuel tanks are armoured, etc. Describe the armour, if there is any, and also mention the vulnerability of other critical aircraft systems.'' --> | |
| − | + | ||
| − | + | * No armour | |
| − | + | * Non-self-sealing fuel tanks (1 in each wing root, and one behind the oil cooling system) | |
| − | + | ||
| − | + | == Armaments == | |
| − | + | === Offensive armament === | |
| − | + | <!-- ''Describe the offensive armament of the aircraft, if any. Describe how effective the cannons and machine guns are in a battle, and also what belts or drums are better to use. If there is no offensive weaponry, delete this subsection.'' --> | |
| − | + | {{main|Ho-103 (12.7 mm)|Type 89 (7.7 mm)}} | |
| − | + | ||
| − | ! | + | The '''''{{PAGENAME}}''''' is armed with: |
| − | |||
| − | |||
| − | |||
| − | |||
| − | |||
| − | |||
| − | * | + | * 2 x 12.7 mm Ho-103 machine guns, wing-mounted (250 rpg = 500 total) |
| + | * 2 x 7.7 mm Type 89 machine guns, nose-mounted (500 rpg = 1,000 total) | ||
| − | + | == Usage in battles == | |
| − | + | <!-- ''Describe the tactics of playing in the aircraft, the features of using aircraft in a team and advice on tactics. Refrain from creating a "guide" - do not impose a single point of view, but instead, give the reader food for thought. Examine the most dangerous enemies and give recommendations on fighting them. If necessary, note the specifics of the game in different modes (AB, RB, SB).'' --> | |
| − | + | ''Describe the tactics of playing in the aircraft, the features of using aircraft in a team and advice on tactics. Refrain from creating a "guide" - do not impose a single point of view, but instead, give the reader food for thought. Examine the most dangerous enemies and give recommendations on fighting them. If necessary, note the specifics of the game in different modes (AB, RB, SB).'' | |
| − | |||
| − | |||
| − | |||
| − | |||
| − | |||
| − | |||
| − | |||
| − | |||
| − | |||
| − | |||
| − | |||
| − | |||
| − | |||
| − | + | * In simulator, the Ki-44 is a decent fighter that can do traditional dogfights, some bomber-hunting and some ground pounding. It has great all-round visibility, especially to the sides and the rear thanks to its clear teardrop canopy. However there are lots of thick frames at the front which can get very annoying and obstruct the target in a chase, delaying the pilot's reaction. The glass on the canopy's sides also tend to create dizzying reflections when the sun is near, reducing the visibility a lot. The over-the-nose visibility is average. The wing position (in front of the canopy) means that you cannot see anything at your low 11, 12, 1, 2 'o clock so you have to fly past the target area and look towards 3, 4, 5, 7, 8, 9 'o clock where there is nothing to obstruct your view. | |
| − | + | * The handling is good in general. During a take off the Ki-44 feels nose-heavy without any flaps deployed therefore after retracting the gears and flaps you need to pitch up a bit until the plane picks up some speed. Only elevator trim is available, so when the stick is at its deadzone, the Ki-44 will roll and yaw to the left side. Therefore you always need to pull the stick to the right which can get a bit annoying. It has excellent climb rate of around 14m/s at 400 kph, with 100% throttle and no MEC. This means that it can get to an ideal altitude of around 3000m very quickly. In a dive it easily accelerates to around 550 kph while still having responsive controls, however it does not retain the speed well after leveling out. Note that its engine will overheat unbelievably fast. With WEP it heats up to >243° within 15 seconds. Thus you must utilise the WEP only when you have to, for example in a zoom climb or a high yoyo. The good news is, the engine can cool down quick enough for another 15-second WEP. | |
| − | + | * While being more of a BnZ fighter, the Ki-44 also performs excellent at turn fighting - with the appropriate opponent, of course. Except a few dedicated turn fighters, the Ki-44 can out-turn and get on most opponents' tail with combat flaps deployed. Note: do not turn with Spitfires or Zeros, you will never out-turn them. If you see a plane with a streamlined inline engine and large, elliptical wings (Spitfire) or something with rounded wingtips and stabiliser tips, a radial engine and a pointy tail (A6M), try some defensive manoeuvres like barrel rolls or disengage by diving towards a nearby friendly airfield. | |
| + | * The Ki-44 has a lovely low stall-speed of around 160 kph and is also very controllable when getting out of a stall. However the handling gets very sluggish when slower than 200 kph so make sure that there is no one behind you. | ||
| + | * When intercepting planes, it is crucial to know what the target is. If it is a bomber/attacker with decent defensive firepower, great turret coverage, or robust protection, then you might want to disengage after some attempts if you don't want to die. From the hard-hitting M2 Browning to the fast-firing MG 15, any gun can critically damage the Ki-44 especially on the engine, fuel tanks, and pilot which can always lead to a later crash. Before attacking try to get an altitude advantage and perform deflection shots. To maximise the damage aim for their wings and engines, as the fuselage usually soaks up lots of bullets. Only fire when the bomber passes in front of your guns. This short window might seem inadequate to do anything... and it usually is, unfortunately. The slow velocity, light projectiles and low one-second burst mass usually guarantee no critical damage. However sometimes it only takes one bullet to set the target aflame, if you are lucky. | ||
| + | * B-25, Ju 88, IL-2, etc: These aircraft have either powerful defensive guns, for example the B-25, or wide gun coverage such as the Ju 88. The most threatening one, the B-25, is fairly easy to distinguish. It has a short and wide fuselage, twin radial engine hanging under the wings and a H-tail. Focus your fire on the engines and constantly swing sideways to avoid getting hit. A few hits from the M2 Browning is a guaranteed death. The Ju 88, on the other hand, has great underside gun coverage so attacking from below isn't a very good option. Try engaging from the sides and concentrate the fire on the front half of it, as that is where all the vital components are located. Again, never engage any of these if you have no altitude advantage. Pin them on the map and leave them to teammates with more powerful firepower. | ||
| + | * A6M, Spitfire, etc: If you see them on your tail try outrunning them by diving at around -40 degrees. The Ki-44 still remains responsive handling at 600 km/h, but its speed retention is poor, meaning it will start to lose speed quickly and the enemy might catch up. If you are near a friendly airfield, great. If not, then hope for the best and run towards the friendly side. Don't forget to pitch up and down a little to mess up their aim, the early Spitfires and A6M only have a 60-round drum per cannon which will run out fairly fast. The leftover 7.7 mm machine guns will not be as destructive. | ||
| + | * F4U, F6F, P-47, etc: these planes are a huge threat to the Ki-44 as they have superior firepower, speed, dive acceleration and robust airframes. Their 12.7mm MGs can easily tear you apart or simply pilot-snipe you even when they are far away, as the M2 Brownings have great velocity and trajectory. They can also sey you aflame easily. The F4U has a long cylindrical nose and the iconic inverted gull wing. The P-47 has a huge, jug-like fuselage, bubble canopy and elliptical trailing edge that usually have invasion stripes painted on them. The F6F, on the other hand, might get confused with other planes as it looks rather average. Anyways, start a turnfight whenever you see these stubby planes. | ||
| + | === Manual Engine Control === | ||
{| class="wikitable" style="text-align:center" | {| class="wikitable" style="text-align:center" | ||
|- | |- | ||
| − | ! colspan=" | + | ! colspan="7" | MEC elements |
| + | |- | ||
| + | ! rowspan="2" | Mixer | ||
| + | ! rowspan="2" | Pitch | ||
| + | ! colspan="3" | Radiator | ||
| + | ! rowspan="2" | Supercharger | ||
| + | ! rowspan="2" | Turbocharger | ||
|- | |- | ||
| − | ! | + | ! Oil !! Water !! Type |
| − | ! | ||
| − | ! | ||
| − | ! | ||
| − | ! | ||
|- | |- | ||
| − | | | + | | Controllable || Controllable<br>Not auto controlled || Controllable<br>Not auto controlled || Controllable<br>Not auto controlled || Separate || Not controllable<br>1 gear || Not controllable |
|- | |- | ||
|} | |} | ||
| − | |||
| − | |||
| − | |||
| − | |||
| − | |||
| − | |||
| − | |||
| − | |||
| − | |||
| − | |||
| − | |||
=== Modules === | === Modules === | ||
{| class="wikitable" | {| class="wikitable" | ||
! Tier | ! Tier | ||
| − | ! colspan="2" | | + | ! colspan="2" | Flight performance |
| − | ! | + | ! Survivability |
| − | ! | + | ! Weaponry |
|- | |- | ||
| I | | I | ||
| − | | | + | | Fuselage repair |
| + | | Radiator | ||
| | | | ||
| − | | | + | | Offensive 7 mm |
| − | |||
| − | |||
| − | |||
|- | |- | ||
| II | | II | ||
| − | |||
| − | |||
| − | |||
| − | |||
| − | |||
| | | | ||
| + | | Compressor | ||
| + | | Airframe | ||
| + | | New 7 mm MGs | ||
|- | |- | ||
| III | | III | ||
| − | | | + | | Wings repair |
| + | | Engine | ||
| | | | ||
| − | | | + | | Offensive 12 mm |
| − | | | + | |- |
| − | | | + | | IV |
| | | | ||
| + | | Engine injection | ||
| + | | Cover | ||
| + | | New 12 mm MGs | ||
|- | |- | ||
| − | | | + | ! colspan="5" | This is a premium vehicle: all modifications are unlocked on purchase |
| − | |||
| − | |||
| − | |||
| − | |||
| − | |||
| − | |||
|- | |- | ||
|} | |} | ||
=== Pros and cons === | === Pros and cons === | ||
| − | <!-- ''Summarise and briefly evaluate the vehicle in terms of its characteristics and combat effectiveness. Mark its pros and cons in | + | <!-- ''Summarise and briefly evaluate the vehicle in terms of its characteristics and combat effectiveness. Mark its pros and cons in the bulleted list. Try not to use more than 6 points for each of the characteristics. Avoid using categorical definitions such as "bad", "good" and the like - use substitutions with softer forms such as "inadequate" and "effective".'' --> |
| + | ''Summarise and briefly evaluate the vehicle in terms of its characteristics and combat effectiveness. Mark its pros and cons in the bulleted list. Try not to use more than 6 points for each of the characteristics. Avoid using categorical definitions such as "bad", "good" and the like - use substitutions with softer forms such as "inadequate" and "effective".'' | ||
'''Pros:''' | '''Pros:''' | ||
| − | * | + | * Incredibly fast, leaves virtually any plane it faces in the dust at any altitude |
| − | + | * Climb rate is better than most equivalent aircraft, at more than 25 m/s spaded | |
| − | * | + | * Excellent acceleration |
| − | + | * Superior agility against other aircraft like F4U | |
| − | + | * Extremely low stall speed | |
| − | * | + | * Has an excellent roll rate and decent turn time (utilise combat flaps for tighter manoeuvring) |
| − | * | + | * Adequate armament for the rank |
| − | * | + | * Good cockpit visibility in simulator |
| − | * | ||
| − | |||
| − | * | ||
| − | * | ||
'''Cons:''' | '''Cons:''' | ||
| − | * | + | * Engine feels like a plasma reactor, you will overheat within a minute and a half with WEP, using 100% doesn't cool it down quickly enough |
| − | * | + | * Very fragile with next to no protection. Will get shredded / set on fire easily, especially by any plane with M2 Brownings (eg F6F) |
| − | + | * Has Instructor issues. Rudder and ailerons are very unstable if the plane is banked or at low speed | |
| − | + | * Flaps cause the nose to pitch down hard if used below 150-200 km/h in a steep climb | |
| − | + | ||
| − | + | * | |
| − | * | ||
| − | * | ||
| − | * | ||
== History == | == History == | ||
| − | ''Describe the history of the creation and combat usage of the vehicle in more detail than in the introduction. If the historical reference turns out to be too long, take it to a separate article, taking a link to the article about the vehicle and adding a block "/History" (example: <nowiki>https://wiki.warthunder.com/(Vehicle-name)/History</nowiki>) and add a link to it here using the <code>main</code> template. Be sure to reference text and sources by using <code><nowiki><ref></ref></nowiki></code>, as well as adding them at the end of the article with <code><nowiki><references /></nowiki></code>. This section may also include the vehicle's dev blog entry (if applicable) and the in-game encyclopedia description (under <code><nowiki>=== In-game description ===</nowiki></code>, also if applicable).'' | + | <!-- ''Describe the history of the creation and combat usage of the aircraft in more detail than in the introduction. If the historical reference turns out to be too long, take it to a separate article, taking a link to the article about the vehicle and adding a block "/History" (example: <nowiki>https://wiki.warthunder.com/(Vehicle-name)/History</nowiki>) and add a link to it here using the <code>main</code> template. Be sure to reference text and sources by using <code><nowiki><ref></ref></nowiki></code>, as well as adding them at the end of the article with <code><nowiki><references /></nowiki></code>. This section may also include the vehicle's dev blog entry (if applicable) and the in-game encyclopedia description (under <code><nowiki>=== In-game description ===</nowiki></code>, also if applicable).'' --> |
| + | ''Describe the history of the creation and combat usage of the aircraft in more detail than in the introduction. If the historical reference turns out to be too long, take it to a separate article, taking a link to the article about the vehicle and adding a block "/History" (example: <nowiki>https://wiki.warthunder.com/(Vehicle-name)/History</nowiki>) and add a link to it here using the <code>main</code> template. Be sure to reference text and sources by using <code><nowiki><ref></ref></nowiki></code>, as well as adding them at the end of the article with <code><nowiki><references /></nowiki></code>. This section may also include the vehicle's dev blog entry (if applicable) and the in-game encyclopedia description (under <code><nowiki>=== In-game description ===</nowiki></code>, also if applicable).'' | ||
== Media == | == Media == | ||
| − | <!--Excellent additions to the article would be video guides, screenshots from the game, and photos.--> | + | <!-- ''Excellent additions to the article would be video guides, screenshots from the game, and photos.'' --> |
| − | + | ''Excellent additions to the article would be video guides, screenshots from the game, and photos.'' | |
== See also == | == See also == | ||
| + | <!-- ''Links to the articles on the War Thunder Wiki that you think will be useful for the reader, for example:'' | ||
| + | * ''reference to the series of the aircraft;'' | ||
| + | * ''links to approximate analogues of other nations and research trees.'' --> | ||
''Links to the articles on the War Thunder Wiki that you think will be useful for the reader, for example:'' | ''Links to the articles on the War Thunder Wiki that you think will be useful for the reader, for example:'' | ||
| − | * ''reference to the series of the | + | * ''reference to the series of the aircraft;'' |
* ''links to approximate analogues of other nations and research trees.'' | * ''links to approximate analogues of other nations and research trees.'' | ||
| Line 287: | Line 199: | ||
<!-- ''Paste links to sources and external resources, such as:'' | <!-- ''Paste links to sources and external resources, such as:'' | ||
* ''topic on the official game forum;'' | * ''topic on the official game forum;'' | ||
| − | * ''encyclopedia page on the | + | * ''encyclopedia page on the aircraft;'' |
* ''other literature.'' --> | * ''other literature.'' --> | ||
| + | ''Paste links to sources and external resources, such as:'' | ||
| − | * | + | * ''topic on the official game forum;'' |
| + | * ''encyclopedia page on the aircraft;'' | ||
| + | * ''other literature.'' | ||
| − | {{ | + | {{AirManufacturer Nakajima}} |
| + | {{Japan fighters}} | ||
| + | {{Japan premium aircraft}} | ||
Revision as of 02:42, 15 August 2020
Contents
| This page is about the Japanese fighter Ki-44-I 34. For other variants, see Ki-44 (Family). |
Description

The Ki-44-I 34 Shoki is a premium rank II Japanese fighter
with a battle rating of 2.7 (AB/RB) and 2.3 (SB). It was introduced in Update "Starfighters".
General info
Flight performance
Describe how the aircraft behaves in the air. Speed, manoeuvrability, acceleration and allowable loads - these are the most important characteristics of the vehicle.
| Characteristics | Max Speed (km/h at 6,000 m) |
Max altitude (metres) |
Turn time (seconds) |
Rate of climb (metres/second) |
Take-off run (metres) | |||
|---|---|---|---|---|---|---|---|---|
| AB | RB | AB | RB | AB | RB | |||
| Stock | 539 | 523 | 9800 | 17.3 | 17.8 | 18.6 | 18.6 | 190 |
| Upgraded | 578 | 558 | 15.7 | 16.5 | 25.1 | 21.6 | ||
Details
| Features | ||||
|---|---|---|---|---|
| Combat flaps | Take-off flaps | Landing flaps | Air brakes | Arrestor gear |
| ✓ | ✓ | ✓ | X | X |
| Limits | ||||||
|---|---|---|---|---|---|---|
| Wings (km/h) | Gear (km/h) | Flaps (km/h) | Max Static G | |||
| Combat | Take-off | Landing | + | - | ||
| 850 | 250 | 400 | 400 | 250 | ~12 | ~8 |
| Optimal velocities (km/h) | |||
|---|---|---|---|
| Ailerons | Rudder | Elevators | Radiator |
| < 400 | < 400 | < 450 | > 316 |
Survivability and armour
- No armour
- Non-self-sealing fuel tanks (1 in each wing root, and one behind the oil cooling system)
Armaments
Offensive armament
The Ki-44-I 34 is armed with:
- 2 x 12.7 mm Ho-103 machine guns, wing-mounted (250 rpg = 500 total)
- 2 x 7.7 mm Type 89 machine guns, nose-mounted (500 rpg = 1,000 total)
Usage in battles
Describe the tactics of playing in the aircraft, the features of using aircraft in a team and advice on tactics. Refrain from creating a "guide" - do not impose a single point of view, but instead, give the reader food for thought. Examine the most dangerous enemies and give recommendations on fighting them. If necessary, note the specifics of the game in different modes (AB, RB, SB).
- In simulator, the Ki-44 is a decent fighter that can do traditional dogfights, some bomber-hunting and some ground pounding. It has great all-round visibility, especially to the sides and the rear thanks to its clear teardrop canopy. However there are lots of thick frames at the front which can get very annoying and obstruct the target in a chase, delaying the pilot's reaction. The glass on the canopy's sides also tend to create dizzying reflections when the sun is near, reducing the visibility a lot. The over-the-nose visibility is average. The wing position (in front of the canopy) means that you cannot see anything at your low 11, 12, 1, 2 'o clock so you have to fly past the target area and look towards 3, 4, 5, 7, 8, 9 'o clock where there is nothing to obstruct your view.
- The handling is good in general. During a take off the Ki-44 feels nose-heavy without any flaps deployed therefore after retracting the gears and flaps you need to pitch up a bit until the plane picks up some speed. Only elevator trim is available, so when the stick is at its deadzone, the Ki-44 will roll and yaw to the left side. Therefore you always need to pull the stick to the right which can get a bit annoying. It has excellent climb rate of around 14m/s at 400 kph, with 100% throttle and no MEC. This means that it can get to an ideal altitude of around 3000m very quickly. In a dive it easily accelerates to around 550 kph while still having responsive controls, however it does not retain the speed well after leveling out. Note that its engine will overheat unbelievably fast. With WEP it heats up to >243° within 15 seconds. Thus you must utilise the WEP only when you have to, for example in a zoom climb or a high yoyo. The good news is, the engine can cool down quick enough for another 15-second WEP.
- While being more of a BnZ fighter, the Ki-44 also performs excellent at turn fighting - with the appropriate opponent, of course. Except a few dedicated turn fighters, the Ki-44 can out-turn and get on most opponents' tail with combat flaps deployed. Note: do not turn with Spitfires or Zeros, you will never out-turn them. If you see a plane with a streamlined inline engine and large, elliptical wings (Spitfire) or something with rounded wingtips and stabiliser tips, a radial engine and a pointy tail (A6M), try some defensive manoeuvres like barrel rolls or disengage by diving towards a nearby friendly airfield.
- The Ki-44 has a lovely low stall-speed of around 160 kph and is also very controllable when getting out of a stall. However the handling gets very sluggish when slower than 200 kph so make sure that there is no one behind you.
- When intercepting planes, it is crucial to know what the target is. If it is a bomber/attacker with decent defensive firepower, great turret coverage, or robust protection, then you might want to disengage after some attempts if you don't want to die. From the hard-hitting M2 Browning to the fast-firing MG 15, any gun can critically damage the Ki-44 especially on the engine, fuel tanks, and pilot which can always lead to a later crash. Before attacking try to get an altitude advantage and perform deflection shots. To maximise the damage aim for their wings and engines, as the fuselage usually soaks up lots of bullets. Only fire when the bomber passes in front of your guns. This short window might seem inadequate to do anything... and it usually is, unfortunately. The slow velocity, light projectiles and low one-second burst mass usually guarantee no critical damage. However sometimes it only takes one bullet to set the target aflame, if you are lucky.
- B-25, Ju 88, IL-2, etc: These aircraft have either powerful defensive guns, for example the B-25, or wide gun coverage such as the Ju 88. The most threatening one, the B-25, is fairly easy to distinguish. It has a short and wide fuselage, twin radial engine hanging under the wings and a H-tail. Focus your fire on the engines and constantly swing sideways to avoid getting hit. A few hits from the M2 Browning is a guaranteed death. The Ju 88, on the other hand, has great underside gun coverage so attacking from below isn't a very good option. Try engaging from the sides and concentrate the fire on the front half of it, as that is where all the vital components are located. Again, never engage any of these if you have no altitude advantage. Pin them on the map and leave them to teammates with more powerful firepower.
- A6M, Spitfire, etc: If you see them on your tail try outrunning them by diving at around -40 degrees. The Ki-44 still remains responsive handling at 600 km/h, but its speed retention is poor, meaning it will start to lose speed quickly and the enemy might catch up. If you are near a friendly airfield, great. If not, then hope for the best and run towards the friendly side. Don't forget to pitch up and down a little to mess up their aim, the early Spitfires and A6M only have a 60-round drum per cannon which will run out fairly fast. The leftover 7.7 mm machine guns will not be as destructive.
- F4U, F6F, P-47, etc: these planes are a huge threat to the Ki-44 as they have superior firepower, speed, dive acceleration and robust airframes. Their 12.7mm MGs can easily tear you apart or simply pilot-snipe you even when they are far away, as the M2 Brownings have great velocity and trajectory. They can also sey you aflame easily. The F4U has a long cylindrical nose and the iconic inverted gull wing. The P-47 has a huge, jug-like fuselage, bubble canopy and elliptical trailing edge that usually have invasion stripes painted on them. The F6F, on the other hand, might get confused with other planes as it looks rather average. Anyways, start a turnfight whenever you see these stubby planes.
Manual Engine Control
| MEC elements | ||||||
|---|---|---|---|---|---|---|
| Mixer | Pitch | Radiator | Supercharger | Turbocharger | ||
| Oil | Water | Type | ||||
| Controllable | Controllable Not auto controlled |
Controllable Not auto controlled |
Controllable Not auto controlled |
Separate | Not controllable 1 gear |
Not controllable |
Modules
| Tier | Flight performance | Survivability | Weaponry | |
|---|---|---|---|---|
| I | Fuselage repair | Radiator | Offensive 7 mm | |
| II | Compressor | Airframe | New 7 mm MGs | |
| III | Wings repair | Engine | Offensive 12 mm | |
| IV | Engine injection | Cover | New 12 mm MGs | |
| This is a premium vehicle: all modifications are unlocked on purchase | ||||
Pros and cons
Summarise and briefly evaluate the vehicle in terms of its characteristics and combat effectiveness. Mark its pros and cons in the bulleted list. Try not to use more than 6 points for each of the characteristics. Avoid using categorical definitions such as "bad", "good" and the like - use substitutions with softer forms such as "inadequate" and "effective".
Pros:
- Incredibly fast, leaves virtually any plane it faces in the dust at any altitude
- Climb rate is better than most equivalent aircraft, at more than 25 m/s spaded
- Excellent acceleration
- Superior agility against other aircraft like F4U
- Extremely low stall speed
- Has an excellent roll rate and decent turn time (utilise combat flaps for tighter manoeuvring)
- Adequate armament for the rank
- Good cockpit visibility in simulator
Cons:
- Engine feels like a plasma reactor, you will overheat within a minute and a half with WEP, using 100% doesn't cool it down quickly enough
- Very fragile with next to no protection. Will get shredded / set on fire easily, especially by any plane with M2 Brownings (eg F6F)
- Has Instructor issues. Rudder and ailerons are very unstable if the plane is banked or at low speed
- Flaps cause the nose to pitch down hard if used below 150-200 km/h in a steep climb
History
Describe the history of the creation and combat usage of the aircraft in more detail than in the introduction. If the historical reference turns out to be too long, take it to a separate article, taking a link to the article about the vehicle and adding a block "/History" (example: https://wiki.warthunder.com/(Vehicle-name)/History) and add a link to it here using the main template. Be sure to reference text and sources by using <ref></ref>, as well as adding them at the end of the article with <references />. This section may also include the vehicle's dev blog entry (if applicable) and the in-game encyclopedia description (under === In-game description ===, also if applicable).
Media
Excellent additions to the article would be video guides, screenshots from the game, and photos.
See also
Links to the articles on the War Thunder Wiki that you think will be useful for the reader, for example:
- reference to the series of the aircraft;
- links to approximate analogues of other nations and research trees.
External links
Paste links to sources and external resources, such as:
- topic on the official game forum;
- encyclopedia page on the aircraft;
- other literature.
| Nakajima Aircraft Company (中島飛行機株式会社 ) | |
|---|---|
| Fighters | Ki-27 otsu · Ki-27 otsu Tachiarai |
| Ki-43-I · Ki-43-II · Ki-43-III otsu | |
| Ki-44-I · Ki-44-I 34 · Ki-44-II otsu · Ki-44-II hei | |
| Ki-84 ko · Ki-84 otsu · Ki-84 hei | |
| Ki-87 | |
| Hydroplanes | A6M2-N* |
| Interceptors | J1N1 · J5N1 |
| Bombers | B5N2 |
| B6N1 Model 11 · B6N2 Model 12 · B6N2a Model 12Ko | |
| G5N1 · G8N1 | |
| Ki-49-I · Ki-49-IIa · Ki-49-IIb · Ki-49-IIb/L | |
| Recon | E8N2 |
| Jet Fighters | Kikka |
| Captured | ␗Ki-27 otsu · ▃Ki-43-II · ␗Ki-43-III ko · ␗Ki-44-II hei · ␗Ki-84 ko |
| *Refit of the Mitsubishi A6M2 mod. 11 | |
| See also | Fuji Heavy Industries (1957-2017) |
| Japan fighters | |
|---|---|
| Navy | |
| Carrier-based fighter | |
| A5M | A5M4 · Hagiri's A5M4 |
| A6M | A6M2 mod. 11 · A6M2 · A6M3 · A6M3 mod. 22 · A6M3 mod. 22Ko · A6M5 · A6M5 Ko · A6M5 otsu · A6M5 Hei · A6M6c |
| A7He | A7He1* |
| A7M | A7M1 (NK9H) · A7M2 |
| Land-based Fighter | |
| J2M | J2M2 · J2M3 · J2M4 Kai · J2M5 · J2M5 (30 mm) |
| J6K | J6K1 |
| J7W | J7W1 |
| N1K-J | N1K1-Ja · N1K2-J · N1K2-Ja |
| Fighter seaplane | |
| N1K | N1K1 |
| A6M-N | A6M2-N |
| Army | |
| Ki-10 | Ki-10-I · Ki-10-I C · Ki-10-II · Ki-10-II C |
| Ki-27 | Ki-27 otsu · Ki-27 otsu Tachiarai |
| Ki-43 | Ki-43-I · Ki-43-II · Ki-43-III otsu |
| Ki-44 | Ki-44-I · Ki-44-I 34 · Ki-44-II otsu · Ki-44-II hei |
| Ki-61 | Ki-61-I ko · Ki-61-I otsu · Ki-61-I hei · Tada's Ki-61-I hei · Ki-61-I tei · Ki-61-II Otsu Kai |
| Ki-84 | Ki-84 ko · Ki-84 otsu · Ki-84 hei |
| Ki-87 | Ki-87 |
| Ki-94 | Ki-94-II |
| Ki-100 | Ki-100 · Ki-100-II |
| Other countries | ▅F4U-1A · ▅P-51C-11-NT · ▅Bf 109 E-7 · ▅Fw 190 A-5 |
| *Imported designation of the He 112 (A6M was in development - A7M would take A7 designation after the cancelation of the A7He) | |
| Japan premium aircraft | |
|---|---|
| Fighters | Hagiri's A5M4 · A7He1 · Ki-27 otsu Tachiarai |
| Ki-44-II otsu · ▅Bf 109 E-7 · ▅F4U-1A · Ki-100-II · Ki-44-I 34 | |
| ▅Fw 190 A-5 · A7M1 (NK9H) · Tada's Ki-61-I hei · ▅P-51C-11-NT | |
| J2M4 Kai · A6M5 Ko · A6M6c · J2M5 · Ki-87 · J6K1 | |
| Twin-engine fighters | Ki-96 |
| Jet fighters | F-86F-40 JASDF▅ · T-2 Early · F-4EJ ADTW |
| Bombers | Ki-21-I hei · Ki-48-II otsu · H8K3 · B7A2 (Homare 23) · ▅B-17E |
