Difference between pages "Stirling B Mk I" and "M19A1"
(→Pros and cons: expanded section) (Tag: Visual edit) |
Colok76286 (talk | contribs) (→See also: Added vehicles) |
||
| Line 1: | Line 1: | ||
| − | {{Specs-Card|code= | + | {{Specs-Card|code=us_m19}} |
| − | |||
| − | |||
| − | |||
| − | |||
| − | }} | ||
== Description == | == Description == | ||
| − | <!-- ''In the description, the first part | + | <!--''In the description, the first part needs to be about the history of the creation and combat usage of the vehicle, as well as its key features. In the second part, tell the reader about the ground vehicle in the game. Insert the screenshot of the vehicle. If the novice player does not remember the vehicle by name, they will immediately understand what kind of vehicle it is talking about.''--> |
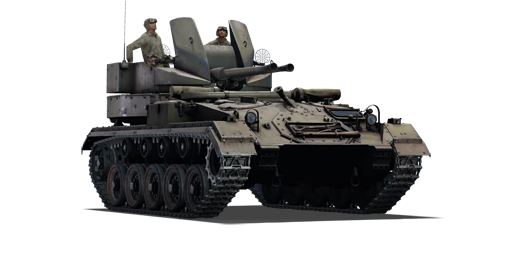
| − | [[File: | + | [[File:GarageImage_M19.jpg|420px|thumb|left]] |
{{break}} | {{break}} | ||
| − | The '''{{Specs|name}}''' is a rank {{Specs|rank}} | + | The '''{{Specs|name}}''' is a rank {{Specs|rank}} American Self-Propelled Anti-Aircraft (SPAA) gun {{Battle-rating}}. It is one of the first American vehicles to be released with the American ground tree in [[Update 1.45 "Steel Generals"]]. Armed with a dual-mounted Bofors 40 mm gun system, the M19 provides a substantial firepower upgrade over the standard .50 calibre machine guns and 37 mm autocannon used in its predecessors [[M16 MGMC|M16 MGMC]] and [[M15A1 CGMC|M15 CGMC]]. |
| − | The | + | The M19 TGMC is a '''S'''elf '''P'''ropelled '''A'''nti-'''A'''ir vehicle. Not much more to say. Stay behind and close to allies, but outside the enemies view-range and with a clear line of sight to the horizon for low aircraft. |
== General info == | == General info == | ||
| − | === | + | === Survivability and armour === |
| − | <!-- ''Describe | + | <!--''Describe armour protection. Note the most well protected and key weak areas. Appreciate the layout of modules as well as the number and location of crew members. Is the level of armour protection sufficient, is the placement of modules helpful for survival in combat?'' |
| − | + | ||
| + | ''If necessary use a visual template to indicate the most secure and weak zones of the armour.''--> | ||
| + | '''Armour type:''' | ||
| − | + | *Rolled homogeneous armour | |
| − | {| class="wikitable" | + | {| class="wikitable" |
| − | |||
| − | |||
| − | |||
| − | |||
| − | |||
| − | |||
|- | |- | ||
| − | ! | + | ! Armour !! Front (Slope armour) !! Sides !! Rear !! Roof |
|- | |- | ||
| − | + | | Hull || 12.7 mm (59°) || 12.7 mm || 12.7 mm || 12.7 mm | |
| − | | | ||
|- | |- | ||
| − | + | | Turret || 12.7 mm || 8 mm || 8 mm || N/A | |
| − | | | ||
|- | |- | ||
|} | |} | ||
| + | '''Notes:''' | ||
| + | |||
| + | * Suspension wheels and tracks are 10 mm thick. | ||
| + | |||
| + | === Mobility === | ||
| + | <!-- ''Write about the mobility of the ground vehicle. Estimate the specific power and manoeuvrability, as well as the maximum speed forwards and backwards.'' --> | ||
| + | |||
| + | {{tankMobility|abMinHp= 420|rbMinHp= 262|<!--AoAweight=(optional) -->}} | ||
| + | |||
| + | == Armaments == | ||
| + | <!--''Give the reader information about the characteristics of the main gun. Assess its effectiveness in a battle based on the reloading speed, ballistics and the power of shells. Do not forget about the flexibilty of the fire, that is how quickly the cannon can be aimed at the target, open fire on it and aim at another enemy. Add a link to the main article on the gun: <code><nowiki>{{main|Name of the weapon}}</nowiki></code>. Describe in general terms the ammunition available for the main gun. Give advice on how to use them and how to fill the ammunition storage.''--> | ||
| + | {{main|Bofors (40 mm)}} | ||
| − | + | {| class="wikitable" style="text-align:center" | |
| − | {| class="wikitable" style="text-align:center" | + | |- |
| + | ! colspan="6" | [[Bofors (40 mm)|40 mm Bofors]] (x2) | ||
|- | |- | ||
| − | ! colspan=" | + | ! colspan="2" rowspan="1" style="width:5em" |Capacity (Belt capacity each) |
| + | ! rowspan="1" | Fire rate <br> (shots/minute) | ||
| + | ! rowspan="1" | Vertical <br> guidance | ||
| + | ! rowspan="1" | Horizontal <br> guidance | ||
| + | ! rowspan="1" | Stabilizer | ||
|- | |- | ||
| − | + | | colspan="2" | 352 (8) || 120 || -5°/+85° || ±180° || N/A | |
|- | |- | ||
| − | | | + | ! colspan="6" | Turret rotation speed (°/s) |
|- | |- | ||
| − | | | + | ! style="width:4em" |Mode |
| − | + | ! style="width:4em" |Stock | |
| − | + | ! style="width:4em" |Upgraded | |
| + | ! style="width:4em" |Prior + Full crew | ||
| + | ! style="width:4em" |Prior + Expert qualif. | ||
| + | ! style="width:4em" |Prior + Ace qualif. | ||
| + | |- | ||
| + | | ''Arcade'' || 23.8 || 32.9 || 40.0 || 44.2 || 47.0 | ||
|- | |- | ||
| − | + | | ''Realistic'' || 23.8 || 28.0 || 34.0 || 37.6 || 40.0 | |
|- | |- | ||
| − | + | ! colspan="4" | Reloading rate (seconds) | |
| − | |||
| − | ! colspan=" | ||
| − | |||
|- | |- | ||
| − | ! | + | ! colspan="1" style="width:4em" |Stock |
| + | ! colspan="1" style="width:4em" |Prior + Full crew | ||
| + | ! colspan="1" style="width:4em" |Prior + Expert qualif. | ||
| + | ! colspan="1" style="width:4em" |Prior + Ace qualif. | ||
|- | |- | ||
| − | | | + | | 0.65 || 0.58 || 0.53 || 0.50 |
|- | |- | ||
|} | |} | ||
| − | {| class="wikitable" style="text-align:center" | + | === Ammunition === |
| + | {| class="wikitable sortable" style="text-align:center" width="100%" | ||
| + | ! colspan="8" | Penetration statistics | ||
|- | |- | ||
| − | ! colspan=" | + | ! rowspan="2" data-sort-type="text" | Ammunition |
| + | ! rowspan="2" class="unsortable" | Type of <br /> warhead | ||
| + | ! colspan="6" | '''Penetration''' '''''in mm''''' '''@ 90°''' | ||
|- | |- | ||
| − | ! | + | ! 10m |
| + | ! 100m | ||
| + | ! 500m | ||
| + | ! 1000m | ||
| + | ! 1500m | ||
| + | ! 2000m | ||
|- | |- | ||
| − | | | + | | Mk.II || HEFI-T* || 3 || 3 || 3 || 3 || 3 || 3 |
|- | |- | ||
| + | | M81A1 || AP-T || 76 || 74 || 62 || 45 || 33 || 24 | ||
| + | |- | ||
|} | |} | ||
| − | + | {| class="wikitable sortable" style="text-align:center" width="100%" | |
| − | {| class="wikitable" style="text-align:center" | + | ! colspan="11" | Shell details |
|- | |- | ||
| − | ! colspan="3" | | + | ! rowspan="2" data-sort-type="text" | Ammunition |
| + | ! rowspan="2" class="unsortable" | Type of <br /> warhead | ||
| + | ! rowspan="2" |Velocity <br /> in m/s | ||
| + | ! rowspan="2" |Projectile<br />Mass in kg | ||
| + | ! rowspan="2" | ''Fuse delay'' | ||
| + | ''in m:'' | ||
| + | ! rowspan="2" | ''Fuse sensitivity'' | ||
| + | ''in mm:'' | ||
| + | ! rowspan="2" | ''Explosive Mass in g<br /> (TNT equivalent):'' | ||
| + | ! rowspan="2" | ''Normalization At 30° <br> from horizontal:'' | ||
| + | ! colspan="3" | ''Ricochet:'' | ||
|- | |- | ||
| − | ! | + | ! 0% |
| + | ! 50% | ||
| + | ! 100% | ||
|- | |- | ||
| − | + | | Mk.II || HEFI-T* || 874 || 0.86 || 0.2 || 0.1 || 63 || +0° || 79° || 80° || 81° | |
| − | |||
| − | |||
|- | |- | ||
| − | | | + | | M81A1 || AP-T || 874 || 0.88 || N/A || N/A || N/A || -1° || 47° || 60° || 65° |
|- | |- | ||
| − | + | |} | |
| + | |||
| + | ===Belt types=== | ||
| + | {| class="wikitable" | ||
| + | | '''Belts''' || '''Shell composition''' || '''Combat usage''' | ||
|- | |- | ||
| − | + | | align="left" |''Default'' || align="left" | '''AP-T''' / '''HEFI-T*''' || align="left" | These work fine, a hit on an aircraft means certain instant disassembly for it and still is able to hurt ground vehicles, especially if it is side into the side of a enemy tank. These seem like a good "I don't know what I will run into" belt. | |
| − | |||
| − | |||
|- | |- | ||
| − | | | + | | align="left" |''Mk.II'' || align="left" | '''HEFI-T*''' || align="left" | These mean certain bad news for aircraft, what should be used for AA work. |
|- | |- | ||
| + | | align="left" |''M81A1'' || align="left" | '''AP-T''' || align="left" | These are the worst belts against airplanes, however their higher penetration values mean that you can damage ground vehicles. Flanking and shooting into a tank's sides or rear should do good, however aiming for the cannon barrel and tracks also work as well. | ||
|} | |} | ||
| − | === | + | === [[Ammo racks|Ammo racks]] === |
| − | + | {| class="wikitable sortable" style="text-align:center" | |
| − | |||
| − | |||
| − | |||
| − | |||
| − | |||
| − | |||
| − | |||
| − | |||
| − | |||
| − | |||
| − | |||
| − | |||
| − | |||
| − | |||
| − | |||
| − | |||
| − | |||
| − | |||
| − | |||
| − | |||
| − | |||
| − | |||
| − | |||
| − | |||
| − | |||
| − | |||
| − | |||
| − | |||
| − | |||
| − | |||
| − | |||
| − | |||
| − | |||
| − | |||
| − | |||
| − | |||
| − | |||
| − | |||
| − | |||
| − | |||
| − | |||
| − | |||
| − | |||
| − | |||
| − | |||
| − | |||
| − | |||
| − | |||
| − | |||
| − | |||
| − | |||
| − | |||
| − | |||
| − | |||
| − | {| class="wikitable" style="text-align:center" | ||
| − | |||
| − | |||
| − | |||
| − | |||
| − | |||
| − | |||
| − | |||
| − | |||
|- | |- | ||
| − | ! | + | ! class="wikitable unsortable" |Ammo<br />Part |
| − | ! | + | ! class="wikitable unsortable" |Full<br /> ammo |
| − | ! | + | ! class="wikitable unsortable" |1st<br /> rack empty |
| + | ! class="wikitable unsortable" |2nd<br /> rack empty | ||
| + | ! class="wikitable unsortable" |3rd<br /> rack empty | ||
| + | ! class="wikitable unsortable" |4th<br /> rack empty | ||
| + | ! class="wikitable unsortable" |5th<br /> rack empty | ||
| + | ! class="wikitable unsortable" |6th<br /> rack empty | ||
| + | ! class="wikitable unsortable" |7th<br /> rack empty | ||
| + | ! class="wikitable unsortable" |8th<br /> rack empty | ||
| + | ! class="wikitable unsortable" |9th<br /> rack empty | ||
| + | ! class="wikitable unsortable" |10th<br /> rack empty | ||
| + | ! class="wikitable unsortable" |11th<br /> rack empty | ||
| + | ! class="wikitable unsortable" |Visual<br /> discrepancy | ||
|- | |- | ||
| − | | | + | | style="text-align:right" | ''Magazines''<br />''Rounds'' || '''44'''<br>'''352'''|| 22 ''(+22)''<br>176 ''(+176)'' || 20 ''(+24)''<br>160 ''(+192)'' || 18 ''(+26)''<br>144 ''(+208)'' || 16 ''(+28)''<br>128 ''(+224)'' || 14 ''(+30)''<br>112 ''(+240)'' || 12 ''(+32)''<br>96 ''(+256)'' || 10 ''(+34)''<br>80 ''(+272)'' || 8 ''(+36)''<br>64 ''(+288)'' || 6 ''(+38)''<br>48 ''(+304)'' || 4 ''(+40)''<br>32 ''(+320)'' || 2 ''(+42)''<br>16 ''(+336)'' || style="text-align:left" | Yes |
|- | |- | ||
|} | |} | ||
| + | [[File:Ammoracks_M19.png|right|thumbnail|300px|[[Ammo racks|Ammo racks]] of the M19.]] | ||
| + | Notes: | ||
| + | * There are 8 rounds loaded into each magazine. The second row merely translate the number of magazine into the number of rounds. | ||
| + | |||
| + | == Usage in the battles == | ||
| + | <!--''Describe the tactics of playing in the vehicle, the features of using vehicles in the team and advice on tactics. Refrain from creating a "guide" - do not impose a single point of view but give the reader food for thought. Describe the most dangerous enemies and give recommendations on fighting them. If necessary, note the specifics of the game in different modes (AB, RB, SB).''--> | ||
| + | With the Dual 40 mm Bofors the M19 has an excellent weapon against [[:Category:Bombers|bombers]] and [[:Category:Attackers|armoured attackers]]. The ammo is limited though, so reserve the fire for certain hits. Against fighters, the same tactic should be applied. | ||
| + | Compared to certain other SPAAs ([[ZSU-37]], [[Wirbelwind]], [[M13 MGMC|Multiple Gun Motor Carriage M13]], etc.), the M19 cannot be used as effectively in an anti-vehicle role, so stay behind your allies and watch the skies for enemy aircraft. If contact with ground targets is inevitable however, aiming for a targets' cannon barrel or tracks is a valid option. If flanking is available, take the opportunity and load some shells into their sides or rear. However be very careful, your crew members are exposed to machine gun fire and can easily be knocked out. This is a problem especially if it's coming from enemy aircraft, as they can also easily kill your crew. So take caution if using the M19 in an anti-vehicle role. | ||
===Modules=== | ===Modules=== | ||
{| class="wikitable" | {| class="wikitable" | ||
| − | ! | + | !Tier |
| − | ! colspan="2" | | + | ! colspan="2" | Mobility |
| − | ! | + | ! Protection |
| − | ! colspan="2" | | + | ! colspan="2" | Firepower |
|- | |- | ||
| I | | I | ||
| − | | | + | | Tracks |
| − | |||
| − | |||
| | | | ||
| − | | | + | | Parts |
| + | | Mk.II | ||
| + | | Horizontal Drive | ||
|- | |- | ||
| II | | II | ||
| − | | | + | | Suspension |
| − | | | + | | Brake System |
| − | | | + | | FPE |
| − | | | + | | M81A1 |
| − | | | + | | Adjustment of Fire |
|- | |- | ||
| III | | III | ||
| − | | | + | | Filters |
| − | |||
| | | | ||
| + | | Crew Replenishment | ||
| + | | Elevation Mechanism | ||
| | | | ||
| − | |||
|- | |- | ||
| − | | IV | + | |IV |
| + | | Transmission | ||
| + | | Engine | ||
| | | | ||
| − | | | + | | Artillery Support |
| − | |||
| − | |||
| | | | ||
|- | |- | ||
| Line 209: | Line 200: | ||
=== Pros and cons === | === Pros and cons === | ||
| − | <!-- '' | + | <!--''Summarize and briefly evaluate the vehicle in terms of its characteristics and combat effectiveness. Mark its pros and cons in a bulleted list. Do not use more than 6 points for each of the characteristics. Avoid using categorical definitions such as "bad", "good" and the like - they have a substitution in the form of softer "inadequate", "effective".''--> |
| − | |||
'''Pros:''' | '''Pros:''' | ||
| − | * | + | * Heavy anti-air firepower |
| − | * | + | * Powerful 40 mm HE shells, can decimate/critically damage aircraft |
| + | * Good mobility | ||
'''Cons:''' | '''Cons:''' | ||
| − | * | + | * Open top, exposing loaders and gunners |
| − | * | + | * Compared to other SPAA at the same rank, poor anti-vehicle performance |
| − | * | + | * Little armour |
| − | + | * Decreased mobility off-road | |
| − | |||
| − | * | ||
| − | |||
| − | |||
| − | |||
== History == | == History == | ||
| − | ''Describe the history of the creation and combat usage of the | + | <!--''Describe the history of the creation and combat usage of the ground vehicle in more detail than in the introduction. If the historical reference turns out to be too big, take it to a separate article, taking a link to an article about the vehicle and adding a block "/historical reference" (example: https://wiki.warthunder.com/Name-vehicles/historical reference) and add a link to it here using the <code>main</code> template. Be sure to include links to sources at the end of the article.''--> |
| + | ===Development=== | ||
| + | The development of this vehicle began from the T65 project. The T65 was classified as the ''40 mm Gun Motor Carriage T65'' and was based off the chassis of the [[M5A1|M5 Stuart]] as requested by US Army Armored Force for a light anti-aircraft vehicle. The T65 was a successful vehicle and went on for about 1,000 units produced, however, it stopped because the production line for the Stuart chassis was phased out as well. As a replacement, the Armored Force peered into the new light tank entering production, the [[M24|M24 Chaffee]], as the basis of their new light anti-aircraft vehicle. This project was called the ''T65E1'' and was being developed at the same time with the M24 (still in development as the T24). The layout for the T65E1 on the new chassis was similar to the one used with Stuart's chassis, with the gun turret at the rear and engine at the middle, and only a few changes were made like changing the original vertical gun shield into an angular one. | ||
| + | |||
| + | The T65E1 was accepted in May 1944 and designated as the '''Twin Gun Motor Carriage M19'''. An order of 904 of these vehicles was sent to Cadillac, but production didn't start until August and the factory was only able to make 285 units before the war ended due to diversion in parts to creating full M24 Chaffees. An upgrade made during its production life was designated the '''M19A1''' and had an auxiliary engine and generator to operate the 40 mm cannons in case the main engine is disabled, plus an extra compartment to hold two spare barrels for the gun should they be damaged or overheated. | ||
| + | |||
| + | ===Combat usage=== | ||
| + | The M19 TGMCs that were produced were sent to Europe and used by the US Army. However, by the time the M19 was available for use, the German Luftwaffe had been decimated by the Allied air superiority, thus the M19 use as an anti-aircraft gun has been diminished greatly. The M19, like its many anti-aircraft vehicle designs made before it, found great service as an assault gun, where its 40 mm twin cannons can deliver much more firepower than its predecessors with either only .50 calibre machine guns ([[M16 MGMC|M16 MGMC]]), or a 37 mm autocannon ([[M15A1 CGMC|M15 CGMC]]). The M19 was never exported to America's allies in the Lend-Lease Act, and not even after the war with the Military Aid Program. Despite that, the M19 still saw use in America up to the Korean War for nearly the same purposes it was given for in World War II as a ground support weapon. It was used as a defensive turret against charging North Korean and Chinese forces when they try to overrun infantry positions, to which it served with devastating effect. Its effect against enemy aircraft is dubious during the war. | ||
| + | |||
| + | When the M24 Chaffee and its chassis derivatives were finally phased out of service in 1956 for newer tanks in production, the M19 was no exception. However, the M19 40 mm turrets were removed from the chassis and was simply put onto the next light tank chassis that was to take over the role the M24 Chaffee was built for. This light tank was the [[M41A1|M41 Walker Bulldog]] and the M19 turret-mounted chassis was named the [[M42|M42 Duster]]. | ||
| + | |||
| + | === In-game description === | ||
| + | "Combat experience in 1941-1942 showed that the troops needed a mobile anti-aircraft system capable of escorting mechanized columns and protecting against enemy aircraft. Development of the new vehicle began in 1942. The first prototype of the T65 self-propelled artillery piece was created using the M5A1 light tank chassis, though it was replaced during trials with the M24 light tank's more modern version. | ||
| + | |||
| + | The hull's nose section was home to the transmission and the driver's compartment, in which the driver (left) and commander (right) were located. The roof of the driver's compartment had hatches and periscopes, while the engine was located in the center section. The battle compartment was in the rear section, on the roof of which was an open-air turret system mounted in the front with two electrically fired 40 mm Bofors automatic cannons. The turret was rotated using a manually operated electrohydraulic actuator. Ammunition included high-explosive and incendiary rounds, while the crew was armed with two 11.43 mm Thompson submachine guns and four 7.62 mm carbines. | ||
| + | |||
| + | By September 1945 Cadillac and Masse-Harris had produced 285 (300 by other calculations) units, and by the end of 1945 they had begun to join tank divisions. They saw combat in the Korean War from 1950 to 1953. The primary goal of the M19 was to fight off land targets, something they were good at through the entire campaign, and they remained in the US army until 1956." | ||
== Media == | == Media == | ||
| − | ''Excellent additions to the article would be video guides, screenshots from the game, and photos.'' | + | <!-- ''Excellent additions to the article would be video guides, screenshots from the game, and photos.'' --> |
| + | ;Skins | ||
| + | * [http://live.warthunder.com/feed/camouflages/?q=%23m19 Skins and camouflages for the {{PAGENAME}} on live.warthunder.com.] | ||
| + | ;Videos | ||
| + | {{Youtube-gallery|Vf4Ty9grnEg|'''{{PAGENAME}} Tank Review''' - ''NUSensei''|4ZWGcJAhe78|'''How to destroy tanks with low penetrating shells?''' - ''HowToPlay1337''}} | ||
== See also == | == See also == | ||
| − | ''Links to the articles on the War Thunder Wiki that you think will be useful for the reader, for example:'' | + | <!-- ''Links to the articles on the War Thunder Wiki that you think will be useful for the reader, for example:'' |
| + | * ''reference to the series of the vehicles;'' | ||
| + | * ''links to approximate analogues of other nations and research trees.'' --> | ||
| + | ;Vehicles equipped with the same chassis | ||
| + | * [[M24 (Family)]] | ||
| − | + | ;Other vehicles of similar configuration and role | |
| − | * | + | * [[M42 Duster (Family)]] |
== External links == | == External links == | ||
| − | ''Paste links to sources and external resources, such as:'' | + | <!-- ''Paste links to sources and external resources, such as:'' |
| + | * ''topic on the official game forum;'' | ||
| + | * ''encyclopedia page on the tank;'' | ||
| + | * ''other literature.'' --> | ||
| − | * | + | * [[wt:en/devblog/current/694|[Development] Steel Generals: M19]] |
| − | * | + | * [[wt:en/devblog/current/724|[Development] Developers about the M19]] |
| − | |||
| − | {{ | + | {{USA anti-aircraft vehicles}} |
| − | |||
Revision as of 15:16, 8 August 2020
Contents
Description

The Twin Gun Motor Carriage M19A1 is a rank III American Self-Propelled Anti-Aircraft (SPAA) gun
with a battle rating of 4.7 (AB) and 4.0 (RB/SB). It is one of the first American vehicles to be released with the American ground tree in Update 1.45 "Steel Generals". Armed with a dual-mounted Bofors 40 mm gun system, the M19 provides a substantial firepower upgrade over the standard .50 calibre machine guns and 37 mm autocannon used in its predecessors M16 MGMC and M15 CGMC.
The M19 TGMC is a Self Propelled Anti-Air vehicle. Not much more to say. Stay behind and close to allies, but outside the enemies view-range and with a clear line of sight to the horizon for low aircraft.
General info
Survivability and armour
Armour type:
- Rolled homogeneous armour
| Armour | Front (Slope armour) | Sides | Rear | Roof |
|---|---|---|---|---|
| Hull | 12.7 mm (59°) | 12.7 mm | 12.7 mm | 12.7 mm |
| Turret | 12.7 mm | 8 mm | 8 mm | N/A |
Notes:
- Suspension wheels and tracks are 10 mm thick.
Mobility
| Game Mode | Max Speed (km/h) | Weight (tons) | Engine power (horsepower) | Power-to-weight ratio (hp/ton) | |||
|---|---|---|---|---|---|---|---|
| Forward | Reverse | Stock | Upgraded | Stock | Upgraded | ||
| Arcade | 62 | 26 | 18.7 | 420 | 565 | 22.46 | 30.21 |
| Realistic | 57 | 24 | 262 | 296 | 14.01 | 15.83 | |
Armaments
| 40 mm Bofors (x2) | |||||
|---|---|---|---|---|---|
| Capacity (Belt capacity each) | Fire rate (shots/minute) |
Vertical guidance |
Horizontal guidance |
Stabilizer | |
| 352 (8) | 120 | -5°/+85° | ±180° | N/A | |
| Turret rotation speed (°/s) | |||||
| Mode | Stock | Upgraded | Prior + Full crew | Prior + Expert qualif. | Prior + Ace qualif. |
| Arcade | 23.8 | 32.9 | 40.0 | 44.2 | 47.0 |
| Realistic | 23.8 | 28.0 | 34.0 | 37.6 | 40.0 |
| Reloading rate (seconds) | |||||
| Stock | Prior + Full crew | Prior + Expert qualif. | Prior + Ace qualif. | ||
| 0.65 | 0.58 | 0.53 | 0.50 | ||
Ammunition
| Penetration statistics | |||||||
|---|---|---|---|---|---|---|---|
| Ammunition | Type of warhead |
Penetration in mm @ 90° | |||||
| 10m | 100m | 500m | 1000m | 1500m | 2000m | ||
| Mk.II | HEFI-T* | 3 | 3 | 3 | 3 | 3 | 3 |
| M81A1 | AP-T | 76 | 74 | 62 | 45 | 33 | 24 |
| Shell details | ||||||||||
|---|---|---|---|---|---|---|---|---|---|---|
| Ammunition | Type of warhead |
Velocity in m/s |
Projectile Mass in kg |
Fuse delay
in m: |
Fuse sensitivity
in mm: |
Explosive Mass in g (TNT equivalent): |
Normalization At 30° from horizontal: |
Ricochet: | ||
| 0% | 50% | 100% | ||||||||
| Mk.II | HEFI-T* | 874 | 0.86 | 0.2 | 0.1 | 63 | +0° | 79° | 80° | 81° |
| M81A1 | AP-T | 874 | 0.88 | N/A | N/A | N/A | -1° | 47° | 60° | 65° |
Belt types
| Belts | Shell composition | Combat usage |
| Default | AP-T / HEFI-T* | These work fine, a hit on an aircraft means certain instant disassembly for it and still is able to hurt ground vehicles, especially if it is side into the side of a enemy tank. These seem like a good "I don't know what I will run into" belt. |
| Mk.II | HEFI-T* | These mean certain bad news for aircraft, what should be used for AA work. |
| M81A1 | AP-T | These are the worst belts against airplanes, however their higher penetration values mean that you can damage ground vehicles. Flanking and shooting into a tank's sides or rear should do good, however aiming for the cannon barrel and tracks also work as well. |
Ammo racks
| Ammo Part |
Full ammo |
1st rack empty |
2nd rack empty |
3rd rack empty |
4th rack empty |
5th rack empty |
6th rack empty |
7th rack empty |
8th rack empty |
9th rack empty |
10th rack empty |
11th rack empty |
Visual discrepancy |
|---|---|---|---|---|---|---|---|---|---|---|---|---|---|
| Magazines Rounds |
44 352 |
22 (+22) 176 (+176) |
20 (+24) 160 (+192) |
18 (+26) 144 (+208) |
16 (+28) 128 (+224) |
14 (+30) 112 (+240) |
12 (+32) 96 (+256) |
10 (+34) 80 (+272) |
8 (+36) 64 (+288) |
6 (+38) 48 (+304) |
4 (+40) 32 (+320) |
2 (+42) 16 (+336) |
Yes |

Notes:
- There are 8 rounds loaded into each magazine. The second row merely translate the number of magazine into the number of rounds.
Usage in the battles
With the Dual 40 mm Bofors the M19 has an excellent weapon against bombers and armoured attackers. The ammo is limited though, so reserve the fire for certain hits. Against fighters, the same tactic should be applied.
Compared to certain other SPAAs (ZSU-37, Wirbelwind, Multiple Gun Motor Carriage M13, etc.), the M19 cannot be used as effectively in an anti-vehicle role, so stay behind your allies and watch the skies for enemy aircraft. If contact with ground targets is inevitable however, aiming for a targets' cannon barrel or tracks is a valid option. If flanking is available, take the opportunity and load some shells into their sides or rear. However be very careful, your crew members are exposed to machine gun fire and can easily be knocked out. This is a problem especially if it's coming from enemy aircraft, as they can also easily kill your crew. So take caution if using the M19 in an anti-vehicle role.
Modules
| Tier | Mobility | Protection | Firepower | ||
|---|---|---|---|---|---|
| I | Tracks | Parts | Mk.II | Horizontal Drive | |
| II | Suspension | Brake System | FPE | M81A1 | Adjustment of Fire |
| III | Filters | Crew Replenishment | Elevation Mechanism | ||
| IV | Transmission | Engine | Artillery Support | ||
Pros and cons
Pros:
- Heavy anti-air firepower
- Powerful 40 mm HE shells, can decimate/critically damage aircraft
- Good mobility
Cons:
- Open top, exposing loaders and gunners
- Compared to other SPAA at the same rank, poor anti-vehicle performance
- Little armour
- Decreased mobility off-road
History
Development
The development of this vehicle began from the T65 project. The T65 was classified as the 40 mm Gun Motor Carriage T65 and was based off the chassis of the M5 Stuart as requested by US Army Armored Force for a light anti-aircraft vehicle. The T65 was a successful vehicle and went on for about 1,000 units produced, however, it stopped because the production line for the Stuart chassis was phased out as well. As a replacement, the Armored Force peered into the new light tank entering production, the M24 Chaffee, as the basis of their new light anti-aircraft vehicle. This project was called the T65E1 and was being developed at the same time with the M24 (still in development as the T24). The layout for the T65E1 on the new chassis was similar to the one used with Stuart's chassis, with the gun turret at the rear and engine at the middle, and only a few changes were made like changing the original vertical gun shield into an angular one.
The T65E1 was accepted in May 1944 and designated as the Twin Gun Motor Carriage M19. An order of 904 of these vehicles was sent to Cadillac, but production didn't start until August and the factory was only able to make 285 units before the war ended due to diversion in parts to creating full M24 Chaffees. An upgrade made during its production life was designated the M19A1 and had an auxiliary engine and generator to operate the 40 mm cannons in case the main engine is disabled, plus an extra compartment to hold two spare barrels for the gun should they be damaged or overheated.
Combat usage
The M19 TGMCs that were produced were sent to Europe and used by the US Army. However, by the time the M19 was available for use, the German Luftwaffe had been decimated by the Allied air superiority, thus the M19 use as an anti-aircraft gun has been diminished greatly. The M19, like its many anti-aircraft vehicle designs made before it, found great service as an assault gun, where its 40 mm twin cannons can deliver much more firepower than its predecessors with either only .50 calibre machine guns (M16 MGMC), or a 37 mm autocannon (M15 CGMC). The M19 was never exported to America's allies in the Lend-Lease Act, and not even after the war with the Military Aid Program. Despite that, the M19 still saw use in America up to the Korean War for nearly the same purposes it was given for in World War II as a ground support weapon. It was used as a defensive turret against charging North Korean and Chinese forces when they try to overrun infantry positions, to which it served with devastating effect. Its effect against enemy aircraft is dubious during the war.
When the M24 Chaffee and its chassis derivatives were finally phased out of service in 1956 for newer tanks in production, the M19 was no exception. However, the M19 40 mm turrets were removed from the chassis and was simply put onto the next light tank chassis that was to take over the role the M24 Chaffee was built for. This light tank was the M41 Walker Bulldog and the M19 turret-mounted chassis was named the M42 Duster.
In-game description
"Combat experience in 1941-1942 showed that the troops needed a mobile anti-aircraft system capable of escorting mechanized columns and protecting against enemy aircraft. Development of the new vehicle began in 1942. The first prototype of the T65 self-propelled artillery piece was created using the M5A1 light tank chassis, though it was replaced during trials with the M24 light tank's more modern version.
The hull's nose section was home to the transmission and the driver's compartment, in which the driver (left) and commander (right) were located. The roof of the driver's compartment had hatches and periscopes, while the engine was located in the center section. The battle compartment was in the rear section, on the roof of which was an open-air turret system mounted in the front with two electrically fired 40 mm Bofors automatic cannons. The turret was rotated using a manually operated electrohydraulic actuator. Ammunition included high-explosive and incendiary rounds, while the crew was armed with two 11.43 mm Thompson submachine guns and four 7.62 mm carbines.
By September 1945 Cadillac and Masse-Harris had produced 285 (300 by other calculations) units, and by the end of 1945 they had begun to join tank divisions. They saw combat in the Korean War from 1950 to 1953. The primary goal of the M19 was to fight off land targets, something they were good at through the entire campaign, and they remained in the US army until 1956."
Media
- Skins
- Videos
See also
- Vehicles equipped with the same chassis
- Other vehicles of similar configuration and role
External links
| USA anti-aircraft vehicles | |
|---|---|
| M3 Half-track derivatives | M13 MGMC · M15 CGMC · M16 MGMC |
| M24 derivative | M19A1 |
| M41 derivative | M42 |
| Radar SPAAG | M163 · M247 |
| Missile SPAA | Imp.Chaparral · LAV-AD · XM975 |
