Difference between pages "M41A1" and "T-64A (1971)"
(Updated) |
CobraKingII (talk | contribs) (→General info) (Tag: Visual edit) |
||
| Line 1: | Line 1: | ||
| − | {{Specs-Card|code= | + | {{Specs-Card|code=ussr_t_64a_1971}} |
| − | |||
| − | |||
| − | |||
| − | |||
| − | }} | ||
== Description == | == Description == | ||
<!-- ''In the description, the first part should be about the history of the creation and combat usage of the vehicle, as well as its key features. In the second part, tell the reader about the ground vehicle in the game. Insert a screenshot of the vehicle, so that if the novice player does not remember the vehicle by name, he will immediately understand what kind of vehicle the article is talking about.'' --> | <!-- ''In the description, the first part should be about the history of the creation and combat usage of the vehicle, as well as its key features. In the second part, tell the reader about the ground vehicle in the game. Insert a screenshot of the vehicle, so that if the novice player does not remember the vehicle by name, he will immediately understand what kind of vehicle the article is talking about.'' --> | ||
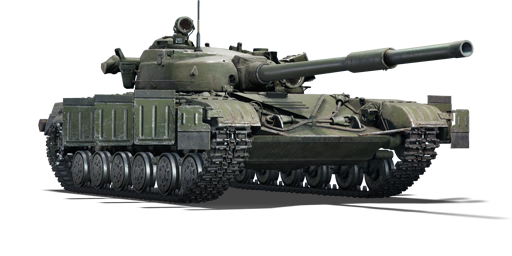
| − | [[File: | + | [[File:GarageImage_T-64A(1971).jpg|420px|thumb|left]] |
{{Break}} | {{Break}} | ||
| − | The '''{{Specs|name}}''' is a rank {{Specs|rank}} | + | The '''{{Specs|name}}''' is a rank {{Specs|rank}} Soviet medium tank {{Battle-rating}}. It was introduced in [[Update 1.71 "New E.R.A."]]. The T-64A should primarily be played defensively, utilising terrain for cover and pushing carefully. It has good firepower, but mediocre armour, average mobility and a near non-existent reverse speed. The T-64A can be played as a sniper with one of the highest velocity rounds in game at 1800 m/s. Brawling should be avoided, as many of the vehicles it will face will easily penetrate its hull armour. Most vehicles it will face have better mobility, so it's important to be aware of flankers. |
| + | |||
| + | The T-64A presents a design that is reminiscent of some Soviet tanks seen in the contemporary period. The tank's overall color scheme presents a default camouflage of the same glorious dark olive green seen on nearly all other prior Soviet tanks. | ||
| + | |||
| + | Compared to all other Soviet medium tanks prior, the T-64A's suspension system uses multiple small wheels and rollers rather than the huge wheels. While this allowed better flotation, it does leave more of the side hull vulnerable to attack straight at without worry of hitting the tracks or suspension. This is at least partial reasoning for the prominent 'flaps' seen on each side of the vehicle - these help protect the sides against HEAT ammunition, causing a harmless explosion before the rounds reach the actual side armour. | ||
| + | |||
| + | Two long tubes extend from the back of the T-64A. One is on the turret, which is the container housing the snorkelling gear for the tank in deep wading procedures. The other on the turret is the familiar log that comes nearly standard with Soviet/Russian vehicle, used for removing the vehicle if it gets stuck in mud or other nasty terrain attributes. | ||
== General info == | == General info == | ||
| Line 17: | Line 18: | ||
'''Armour type:''' | '''Armour type:''' | ||
| − | * | + | * Spaced armour (Hull front, Turret front) |
| − | * | + | * Cast homogeneous armour |
| + | * Rolled homogeneous armour (Turret) | ||
{| class="wikitable" | {| class="wikitable" | ||
| Line 24: | Line 26: | ||
! Armour !! Front (Slope angle) !! Sides !! Rear !! Roof | ! Armour !! Front (Slope angle) !! Sides !! Rear !! Roof | ||
|- | |- | ||
| − | | Hull || | + | | Hull || 80* mm (68°) ''Front glacis'' <br> 80 mm (61°) ''Lower glacis'' || 85 mm ''Front'' <br> 70 mm ''Rear'' <br. 20 mm (33°) ''Bottom'' || 20 mm (8-55°) ''Top'' <br> 45 mm ''Center'' <br> 20 mm (18-58°) ''Bottom'' || 30 mm ''Front'' <br> 20 mm ''Engine deck'' |
| + | |- | ||
| + | | Turret || 50-330 mm (0-80°) || 65-180* mm (2-49°) || 65 mm (2-72°) || 40-140 mm | ||
| + | |- | ||
| + | | Cupola || colspan="3" | 100 mm | ||
| + | |40 mm | ||
| + | |- | ||
| + | ! Composite armour* !! Front !! Sides !! Rear !! Roof | ||
| + | |- | ||
| + | | Hull || 320 mm ''Kinetic'' <br> 450 mm ''Chemical'' || N/A || N/A || N/A | ||
| + | |- | ||
| + | | Turret || 400 mm ''Kinetic'' <br> 450 mm ''Chemical'' || 400 mm ''Kinetic'' <br> 450 mm ''Chemical'' || N/A || N/A | ||
|- | |- | ||
| − | |||
|} | |} | ||
'''Notes:''' | '''Notes:''' | ||
| − | * Suspension wheels, | + | * Suspension wheels are 20 mm thick, torsion bars are 10 mm thick, and tracks are 30 mm thick. |
| − | * | + | * The side flaps on the hull side gives spaced protection against HEAT rounds, allowing one to angle the hull slightly while protecting the vulnerable side hull. |
| − | * A | + | * Belly armour is 20 mm thick. |
| + | * A 5 mm RHA plate separates the engine from the crew compartment | ||
| + | * A log providing 100 mm thickness in wood. | ||
| + | * The snorkel tube on the turret rear provide 4 mm of structural steel. | ||
| + | * Hull roof armour at front and turret base is rated to be 30 mm effective against HE | ||
| + | * Hull spaced armour configuration is 80 mm RHA + 105 mm Textolite + 20 mm RHA. | ||
| + | * Turret spaced armour configuration is 150-180 mm CHA + 150 mm HHRA + 32 mm RHA. | ||
| − | + | The T-64A has composite armour over most of its upper front glacis and turret, although it has some obvious weak points - it has no LFP composite armour, the driver's port is not reinforced and there are some small sections of the turret that are easily penetrable. Unfortunately, though, many vehicles the T-64A will encounter have ammunition that can easily overmatch the UFP composite and often will simply punch straight through - it's best to avoid exposing the hull at all. HEAT ammunition is finicky as T-64A was built around protection specifications against shaped charges, the composite armour is 450 mm effective when against HEAT warheads and there are side flaps on the side hull to prevent even the chance of hitting the T-64A weaker side armour on the first try, although these side flaps are one-time use only so prolonged combat may have sheared these off already. Try to avoid aiming for the turret as it is the most protected area of the tank with a good portion covered by composite, leading to the need of massive amount of penetration to consider the turret a viable target, like the HOT missiles. | |
| − | + | In a situation where the T-64A decides to hull-down and present as little of the front plate as possible, the best option is to attempt to disable the vehicle's gun - the mantlet is destroyed easily and combined with the sub-par reverse speed, this may provide enough time to push forward or around the vehicle and get a clear shot on the hull. Where possible, try to land the shot centre-mass below the turret which often causes an ammunition detonation. | |
=== Mobility === | === Mobility === | ||
<!-- ''Write about the mobility of the ground vehicle. Estimate the specific power and manoeuvrability, as well as the maximum speed forwards and backwards.'' --> | <!-- ''Write about the mobility of the ground vehicle. Estimate the specific power and manoeuvrability, as well as the maximum speed forwards and backwards.'' --> | ||
| − | {{tankMobility|abMinHp= | + | {{tankMobility|abMinHp= 1,085|rbMinHp= 619}} |
== Armaments == | == Armaments == | ||
=== Main armament === | === Main armament === | ||
<!-- ''Give the reader information about the characteristics of the main gun. Assess its effectiveness in a battle based on the reloading speed, ballistics and the power of shells. Do not forget about the flexibility of the fire, that is how quickly the cannon can be aimed at the target, open fire on it and aim at another enemy. Add a link to the main article on the gun: <code><nowiki>{{main|Name of the weapon}}</nowiki></code>. Describe in general terms the ammunition available for the main gun. Give advice on how to use them and how to fill the ammunition storage.'' --> | <!-- ''Give the reader information about the characteristics of the main gun. Assess its effectiveness in a battle based on the reloading speed, ballistics and the power of shells. Do not forget about the flexibility of the fire, that is how quickly the cannon can be aimed at the target, open fire on it and aim at another enemy. Add a link to the main article on the gun: <code><nowiki>{{main|Name of the weapon}}</nowiki></code>. Describe in general terms the ammunition available for the main gun. Give advice on how to use them and how to fill the ammunition storage.'' --> | ||
| − | {{main| | + | {{main|2A26 (125 mm)}} |
{| class="wikitable" style="text-align:center" width="100%" | {| class="wikitable" style="text-align:center" width="100%" | ||
|- | |- | ||
| − | ! colspan="5" | [[ | + | ! colspan="5" | [[2A26 (125 mm)|125 mm 2A26]] || colspan="5" | Turret rotation speed (°/s) || colspan="4" | Reloading rate (seconds) |
|- | |- | ||
! Mode !! Capacity !! Vertical !! Horizontal !! Stabilizer | ! Mode !! Capacity !! Vertical !! Horizontal !! Stabilizer | ||
| Line 57: | Line 75: | ||
|- | |- | ||
! ''Arcade'' | ! ''Arcade'' | ||
| − | | rowspan="2" | | + | | rowspan="2" | 37 || rowspan="2" | -6°/+14° || rowspan="2" | ±180° || rowspan="2" | Two-plane || 19.0 || 26.35 || 32.00 || 35.39 || 37.65 || rowspan="2" | 7.10 || rowspan="2" | 7.10 || rowspan="2" | 7.10 || rowspan="2" | 7.10 |
|- | |- | ||
! ''Realistic'' | ! ''Realistic'' | ||
| − | | | + | | 11.90 || 14.00 || 17.00 || 18.80 || 20.00 |
|- | |- | ||
|} | |} | ||
| Line 74: | Line 92: | ||
! 10 m !! 100 m !! 500 m !! 1,000 m !! 1,500 m !! 2,000 m | ! 10 m !! 100 m !! 500 m !! 1,000 m !! 1,500 m !! 2,000 m | ||
|- | |- | ||
| − | | | + | | 3BK12M || HEATFS || 440 || 440 || 440 || 440 || 440 || 440 |
|- | |- | ||
| − | | | + | | 3BM9 || APFSDS || 321 || 317 || 303 || 285 || 268 || 249 |
|- | |- | ||
| − | | | + | | 3BM15 || APFSDS || 440 || 430 || 420 || 410 || 405 || 400 |
|- | |- | ||
| − | | | + | | 3BM22 || APFSDS || 425 || 420 || 415 || 405 || 393 || 380 |
| + | |- | ||
| + | | 3OF19 || HE || 35 || 35 || 35 || 35 || 35 || 35 | ||
| + | |- | ||
| + | | 3OF26 || HE || 42 || 42 || 42 || 42 || 42 || 42 | ||
|- | |- | ||
|} | |} | ||
| Line 97: | Line 119: | ||
! 0% !! 50% !! 100% | ! 0% !! 50% !! 100% | ||
|- | |- | ||
| − | | | + | | 3BK12M || HEATFS || 905 || 19.0 || N/A || 0.1 || 2,526 || 65° || 72° || 77° |
|- | |- | ||
| − | | | + | | 3BM9 || APFSDS || 1,800 || 3.6 || N/A || N/A || N/A || 72° || 76° || 78° |
|- | |- | ||
| − | | | + | | 3BM15 || APFSDS || 1,780 || 3.88 || N/A || N/A || N/A || 76° || 77° || 80° |
|- | |- | ||
| − | | | + | | 3BM22 || APFSDS || 1,760 || 4.83 || N/A || N/A || N/A || 76° || 77° || 80° |
|- | |- | ||
| − | | | + | | 3OF19 || HE || 850 || 23.2 || 0.1 || 0.1 || 3,150 || 79° || 80° || 81° |
| − | |||
| − | |||
|- | |- | ||
| − | + | | 3OF26 || HE || 850 || 23.0 || 0.1 || 0.1 || 5,239 || 79° || 80° || 81° | |
| − | |||
| − | |||
| − | |||
| − | |||
| − | |||
| − | |||
| − | | | ||
| − | | | ||
|- | |- | ||
|} | |} | ||
| Line 126: | Line 138: | ||
|- | |- | ||
! Full<br>ammo | ! Full<br>ammo | ||
| + | ! Ammo<br>part | ||
! 1st<br>rack empty | ! 1st<br>rack empty | ||
! 2nd<br>rack empty | ! 2nd<br>rack empty | ||
! 3rd<br>rack empty | ! 3rd<br>rack empty | ||
| + | ! 4th<br>rack empty | ||
| + | ! 5th<br>rack empty* | ||
! Visual<br>discrepancy | ! Visual<br>discrepancy | ||
|- | |- | ||
| − | | ''' | + | || '''37''' || style="text-align:right" | ''Projectiles''<br />''Propellants'' || 37 ''(+0)''<br />37 ''(+0)'' || 36 ''(+1)''<br />36 ''(+1)'' || 33 ''(+4)''<br />29 ''(+8)'' || 29 ''(+8)''<br />29 ''(+8)'' || 1 ''(+36)''<br />1 ''(+36)'' || no |
|- | |- | ||
|} | |} | ||
| + | The {{PAGENAME}} main ammo rack consists of a mechanized carousel at the bottom of the turret. Such ammo stowage carries 28 propellants and projectiles. | ||
| + | Notes: | ||
| − | + | * The 5th Rack is the carousel at the bottom of the turret; it serves as First-Stage ammo stowage. | |
| − | |||
| − | |||
| − | {| class="wikitable" style="text-align:center" | + | <!--==== [[Optics]] ==== |
| + | {| class="wikitable" style="text-align:center" | ||
| + | ! colspan="3" | {{PAGENAME}} Optics | ||
|- | |- | ||
| − | ! | + | ! |
| + | ! Default magnification | ||
| + | ! Maximum magnification | ||
|- | |- | ||
| − | ! | + | ! Main Gun optics |
| + | | x7.3 || x8.0 | ||
|- | |- | ||
| − | | | + | ! Comparable optics |
| + | | colspan="2" | ___ | ||
|- | |- | ||
|} | |} | ||
| − | {| class="wikitable" style="text-align:center | + | --> |
| + | |||
| + | === Machine guns === | ||
| + | <!-- ''Offensive and anti-aircraft machine guns not only allow you to fight some aircraft but also are effective against lightly armoured vehicles. Evaluate machine guns and give recommendations on its use.'' --> | ||
| + | {{main|PKT (7.62 mm)}} | ||
| + | |||
| + | {| class="wikitable" style="text-align:center" | ||
|- | |- | ||
| − | ! colspan="5" | [[ | + | ! colspan="5" | [[PKT (7.62 mm)|7.62 mm PKT]] |
|- | |- | ||
| − | ! Mount | + | ! Mount |
| + | ! Capacity<br>(Belt capacity) | ||
| + | ! Rate of fire<br>(shots/minute) | ||
| + | ! Vertical<br>guidance | ||
| + | ! Horizontal<br>guidance | ||
|- | |- | ||
| − | | Coaxial || | + | | Coaxial || 2,000 (250) || 700 || N/A || N/A |
|- | |- | ||
|} | |} | ||
| Line 160: | Line 191: | ||
== Usage in battles == | == Usage in battles == | ||
<!-- ''Describe the tactics of playing in the vehicle, the features of using vehicles in the team and advice on tactics. Refrain from creating a "guide" - do not impose a single point of view but instead give the reader food for thought. Describe the most dangerous enemies and give recommendations on fighting them. If necessary, note the specifics of the game in different modes (AB, RB, SB).'' --> | <!-- ''Describe the tactics of playing in the vehicle, the features of using vehicles in the team and advice on tactics. Refrain from creating a "guide" - do not impose a single point of view but instead give the reader food for thought. Describe the most dangerous enemies and give recommendations on fighting them. If necessary, note the specifics of the game in different modes (AB, RB, SB).'' --> | ||
| − | + | It's key to keep the weaknesses of the T-64A in mind for the best performance of the vehicle. The 125mm gun is extremely powerful and will comfortably perform even against newer and better protected opponents, but in almost every other aspect the vehicle is lacking. Where possible, avoid exposing the hull at all - the easiest way to do so is to use a small defilade or terrain deformity. Sit back, be patient and allow the enemy to expose their weak spots. Most vehicles are faster than the T-64A, so expect hostile tanks to find their way to objectives significantly faster than you will. | |
| − | + | Finally, remember that your reverse speed is abysmal - whenever possible avoid situations that will force you to reverse - and if you do have to move back, where possible try to traverse the entire hull and move back with the full speed of your forwards gears. | |
| − | + | When facing common enemy tanks: | |
| − | |||
| − | + | * [[MBT-70]]/[[KPz-70]] - When facing the MBT-70/Kpz-70, the best place to shoot is the left turret cheek as this will knock out commander and gunner. | |
| − | + | * [[Chieftain Mk 10]] - If hull down, shoot for cannon breech or gun barrel. | |
| − | |||
=== Modules === | === Modules === | ||
| Line 183: | Line 212: | ||
| Parts | | Parts | ||
| Horizontal Drive | | Horizontal Drive | ||
| − | | | + | | 3BK12M |
| − | | | + | | 3OF26 |
|- | |- | ||
| II | | II | ||
| Line 191: | Line 220: | ||
| FPE | | FPE | ||
| Adjustment of Fire | | Adjustment of Fire | ||
| − | | | + | | 3BM15 |
| − | | | + | | |
|- | |- | ||
| III | | III | ||
| Line 199: | Line 228: | ||
| Crew Replenishment | | Crew Replenishment | ||
| Elevation Mechanism | | Elevation Mechanism | ||
| − | |||
| NVD | | NVD | ||
| + | | | ||
|- | |- | ||
| IV | | IV | ||
| Transmission | | Transmission | ||
| Engine | | Engine | ||
| − | | | + | | ESS |
| Artillery Support | | Artillery Support | ||
| − | | | + | | 3BM22 |
| − | | | + | | Rangefinder |
|- | |- | ||
|} | |} | ||
| Line 217: | Line 246: | ||
'''Pros:''' | '''Pros:''' | ||
| − | * | + | * Acceptable speed going forward. |
| − | * | + | * Turret cheeks are often surprisingly well protected. |
| − | * | + | * Vehicle is fitted with a surgically precise and devastatingly effective 125 mm gun. Well placed shots can do a lot of damage. |
| − | * | + | * Engine [[Smoke screen|smoke generating system]], covers friendly tanks behind the vehicle. |
| − | * | + | * Side flaps protect the tank from side attacks with chemical energy rounds (once a flap gets hit it will fall off). |
| − | + | * Decent reload; 7.1s no matter what because of the auto-loader system. | |
| − | + | * Good HE shell, can be a little finnicky. | |
| − | * | + | * Very low profile compared to its contemporaries, much harder to spot and hit. |
| − | * Good | + | * One of the fastest rounds in game (1800 m/s), easy to aim. |
| − | * . | + | * Stock APFSDS shell with reasonable effectiveness. |
| − | * | + | * Tier 4 modification present the upgraded APFSDS shell with 440mm of penetration, will go through almost anything in game |
| − | + | * Can be very hard to destroy in hull-down positions. | |
| − | * | ||
| − | * | ||
| − | * | ||
| − | |||
'''Cons:''' | '''Cons:''' | ||
| − | * | + | * Slow horizontal turret traverse. |
| − | * | + | * Any penetrating side shot is very likely to detonate ammunition. |
| − | * | + | * Abysmally slow reverse (-4 km/h). |
| − | * | + | * Weak lower glacis, can be penetrated by almost any round it encounters. |
| − | * | + | * Frontal penetration can easily disable 2 of the 3-man crew, leading to a crew knockout. |
| − | + | * Sub-par gun depression (-6°). | |
| − | * | + | * No anti-air capability. |
| − | + | * Angling the tank causes the weak side armour to be exposed. | |
| − | * No | + | * Hull armour flaps are easily penetrated by kinetic munitions when angled. |
| − | * | ||
| − | * | ||
| − | |||
== History == | == History == | ||
| − | + | ''Describe the history of the creation and combat usage of the vehicle in more detail than in the introduction. If the historical reference turns out to be too long, take it to a separate article, taking a link to the article about the vehicle and adding a block "/History" (example: <nowiki>https://wiki.warthunder.com/(Vehicle-name)/History</nowiki>) and add a link to it here using the <code>main</code> template. Be sure to reference text and sources by using <code><nowiki><ref></ref></nowiki></code>, as well as adding them at the end of the article with <code><nowiki><references /></nowiki></code>. This section may also include the vehicle's dev blog entry (if applicable) and the in-game encyclopedia description (under <code><nowiki>=== In-game description ===</nowiki></code>, also if applicable).'' | |
| − | |||
| − | |||
| − | |||
| − | |||
| − | |||
| − | |||
| − | |||
| − | |||
| − | |||
| − | |||
| − | |||
| − | |||
| − | |||
| − | |||
| − | |||
| − | |||
| − | |||
| − | |||
| − | |||
| − | |||
| − | |||
| − | |||
== Media == | == Media == | ||
| − | <!-- | + | <!--Excellent additions to the article would be video guides, screenshots from the game, and photos.--> |
| − | + | {{Youtube-gallery|xI8p0KZbcG0|'''The Shooting Range #65''' - ''Pages of History'' section at 00:27 discusses the T-64A.|POgsyKommVk|'''T-64A versus MBT-70''' - ''War Thunder Official Channel''}} | |
| − | |||
| − | |||
| − | |||
| − | |||
== See also == | == See also == | ||
''Links to the articles on the War Thunder Wiki that you think will be useful for the reader, for example:'' | ''Links to the articles on the War Thunder Wiki that you think will be useful for the reader, for example:'' | ||
| + | |||
* ''reference to the series of the vehicles;'' | * ''reference to the series of the vehicles;'' | ||
* ''links to approximate analogues of other nations and research trees.'' | * ''links to approximate analogues of other nations and research trees.'' | ||
| Line 293: | Line 290: | ||
* ''other literature.'' --> | * ''other literature.'' --> | ||
| − | * [[wt:en/news/ | + | * [[wt:en/news/4906-development-t-64a-the-pioneer-of-a-new-era-en|[Devblog] T-64A - The Pioneer of a New Era]] |
| − | {{ | + | {{USSR medium tanks}} |
Revision as of 18:27, 5 August 2020
Contents
Description
.jpg)
The T-64A (1971) is a rank VI Soviet medium tank
with a battle rating of 9.3 (AB/RB/SB). It was introduced in Update 1.71 "New E.R.A.". The T-64A should primarily be played defensively, utilising terrain for cover and pushing carefully. It has good firepower, but mediocre armour, average mobility and a near non-existent reverse speed. The T-64A can be played as a sniper with one of the highest velocity rounds in game at 1800 m/s. Brawling should be avoided, as many of the vehicles it will face will easily penetrate its hull armour. Most vehicles it will face have better mobility, so it's important to be aware of flankers.
The T-64A presents a design that is reminiscent of some Soviet tanks seen in the contemporary period. The tank's overall color scheme presents a default camouflage of the same glorious dark olive green seen on nearly all other prior Soviet tanks.
Compared to all other Soviet medium tanks prior, the T-64A's suspension system uses multiple small wheels and rollers rather than the huge wheels. While this allowed better flotation, it does leave more of the side hull vulnerable to attack straight at without worry of hitting the tracks or suspension. This is at least partial reasoning for the prominent 'flaps' seen on each side of the vehicle - these help protect the sides against HEAT ammunition, causing a harmless explosion before the rounds reach the actual side armour.
Two long tubes extend from the back of the T-64A. One is on the turret, which is the container housing the snorkelling gear for the tank in deep wading procedures. The other on the turret is the familiar log that comes nearly standard with Soviet/Russian vehicle, used for removing the vehicle if it gets stuck in mud or other nasty terrain attributes.
General info
Survivability and armour
Armour type:
- Spaced armour (Hull front, Turret front)
- Cast homogeneous armour
- Rolled homogeneous armour (Turret)
| Armour | Front (Slope angle) | Sides | Rear | Roof |
|---|---|---|---|---|
| Hull | 80* mm (68°) Front glacis 80 mm (61°) Lower glacis |
85 mm Front 70 mm Rear <br. 20 mm (33°) Bottom |
20 mm (8-55°) Top 45 mm Center 20 mm (18-58°) Bottom |
30 mm Front 20 mm Engine deck |
| Turret | 50-330 mm (0-80°) | 65-180* mm (2-49°) | 65 mm (2-72°) | 40-140 mm |
| Cupola | 100 mm | 40 mm | ||
| Composite armour* | Front | Sides | Rear | Roof |
| Hull | 320 mm Kinetic 450 mm Chemical |
N/A | N/A | N/A |
| Turret | 400 mm Kinetic 450 mm Chemical |
400 mm Kinetic 450 mm Chemical |
N/A | N/A |
Notes:
- Suspension wheels are 20 mm thick, torsion bars are 10 mm thick, and tracks are 30 mm thick.
- The side flaps on the hull side gives spaced protection against HEAT rounds, allowing one to angle the hull slightly while protecting the vulnerable side hull.
- Belly armour is 20 mm thick.
- A 5 mm RHA plate separates the engine from the crew compartment
- A log providing 100 mm thickness in wood.
- The snorkel tube on the turret rear provide 4 mm of structural steel.
- Hull roof armour at front and turret base is rated to be 30 mm effective against HE
- Hull spaced armour configuration is 80 mm RHA + 105 mm Textolite + 20 mm RHA.
- Turret spaced armour configuration is 150-180 mm CHA + 150 mm HHRA + 32 mm RHA.
The T-64A has composite armour over most of its upper front glacis and turret, although it has some obvious weak points - it has no LFP composite armour, the driver's port is not reinforced and there are some small sections of the turret that are easily penetrable. Unfortunately, though, many vehicles the T-64A will encounter have ammunition that can easily overmatch the UFP composite and often will simply punch straight through - it's best to avoid exposing the hull at all. HEAT ammunition is finicky as T-64A was built around protection specifications against shaped charges, the composite armour is 450 mm effective when against HEAT warheads and there are side flaps on the side hull to prevent even the chance of hitting the T-64A weaker side armour on the first try, although these side flaps are one-time use only so prolonged combat may have sheared these off already. Try to avoid aiming for the turret as it is the most protected area of the tank with a good portion covered by composite, leading to the need of massive amount of penetration to consider the turret a viable target, like the HOT missiles.
In a situation where the T-64A decides to hull-down and present as little of the front plate as possible, the best option is to attempt to disable the vehicle's gun - the mantlet is destroyed easily and combined with the sub-par reverse speed, this may provide enough time to push forward or around the vehicle and get a clear shot on the hull. Where possible, try to land the shot centre-mass below the turret which often causes an ammunition detonation.
Mobility
| Game Mode | Max Speed (km/h) | Weight (tons) | Engine power (horsepower) | Power-to-weight ratio (hp/ton) | |||
|---|---|---|---|---|---|---|---|
| Forward | Reverse | Stock | Upgraded | Stock | Upgraded | ||
| Arcade | 68 | 5 | 38 | 1,085 | 1,336 | 28.55 | 35.16 |
| Realistic | 61 | 5 | 619 | 700 | 16.29 | 18.42 | |
Armaments
Main armament
| 125 mm 2A26 | Turret rotation speed (°/s) | Reloading rate (seconds) | |||||||||||
|---|---|---|---|---|---|---|---|---|---|---|---|---|---|
| Mode | Capacity | Vertical | Horizontal | Stabilizer | Stock | Upgraded | Full | Expert | Aced | Stock | Full | Expert | Aced |
| Arcade | 37 | -6°/+14° | ±180° | Two-plane | 19.0 | 26.35 | 32.00 | 35.39 | 37.65 | 7.10 | 7.10 | 7.10 | 7.10 |
| Realistic | 11.90 | 14.00 | 17.00 | 18.80 | 20.00 | ||||||||
Ammunition
| Penetration statistics | |||||||
|---|---|---|---|---|---|---|---|
| Ammunition | Type of warhead |
Penetration @ 0° Angle of Attack (mm) | |||||
| 10 m | 100 m | 500 m | 1,000 m | 1,500 m | 2,000 m | ||
| 3BK12M | HEATFS | 440 | 440 | 440 | 440 | 440 | 440 |
| 3BM9 | APFSDS | 321 | 317 | 303 | 285 | 268 | 249 |
| 3BM15 | APFSDS | 440 | 430 | 420 | 410 | 405 | 400 |
| 3BM22 | APFSDS | 425 | 420 | 415 | 405 | 393 | 380 |
| 3OF19 | HE | 35 | 35 | 35 | 35 | 35 | 35 |
| 3OF26 | HE | 42 | 42 | 42 | 42 | 42 | 42 |
| Shell details | |||||||||
|---|---|---|---|---|---|---|---|---|---|
| Ammunition | Type of warhead |
Velocity (m/s) |
Projectile Mass (kg) |
Fuse delay (m) |
Fuse sensitivity (mm) |
Explosive Mass (TNT equivalent) (g) |
Ricochet | ||
| 0% | 50% | 100% | |||||||
| 3BK12M | HEATFS | 905 | 19.0 | N/A | 0.1 | 2,526 | 65° | 72° | 77° |
| 3BM9 | APFSDS | 1,800 | 3.6 | N/A | N/A | N/A | 72° | 76° | 78° |
| 3BM15 | APFSDS | 1,780 | 3.88 | N/A | N/A | N/A | 76° | 77° | 80° |
| 3BM22 | APFSDS | 1,760 | 4.83 | N/A | N/A | N/A | 76° | 77° | 80° |
| 3OF19 | HE | 850 | 23.2 | 0.1 | 0.1 | 3,150 | 79° | 80° | 81° |
| 3OF26 | HE | 850 | 23.0 | 0.1 | 0.1 | 5,239 | 79° | 80° | 81° |
Ammo racks
.png)
| Full ammo |
Ammo part |
1st rack empty |
2nd rack empty |
3rd rack empty |
4th rack empty |
5th rack empty* |
Visual discrepancy |
|---|---|---|---|---|---|---|---|
| 37 | Projectiles Propellants |
37 (+0) 37 (+0) |
36 (+1) 36 (+1) |
33 (+4) 29 (+8) |
29 (+8) 29 (+8) |
1 (+36) 1 (+36) |
no |
The T-64A (1971) main ammo rack consists of a mechanized carousel at the bottom of the turret. Such ammo stowage carries 28 propellants and projectiles. Notes:
- The 5th Rack is the carousel at the bottom of the turret; it serves as First-Stage ammo stowage.
Machine guns
| 7.62 mm PKT | ||||
|---|---|---|---|---|
| Mount | Capacity (Belt capacity) |
Rate of fire (shots/minute) |
Vertical guidance |
Horizontal guidance |
| Coaxial | 2,000 (250) | 700 | N/A | N/A |
Usage in battles
It's key to keep the weaknesses of the T-64A in mind for the best performance of the vehicle. The 125mm gun is extremely powerful and will comfortably perform even against newer and better protected opponents, but in almost every other aspect the vehicle is lacking. Where possible, avoid exposing the hull at all - the easiest way to do so is to use a small defilade or terrain deformity. Sit back, be patient and allow the enemy to expose their weak spots. Most vehicles are faster than the T-64A, so expect hostile tanks to find their way to objectives significantly faster than you will.
Finally, remember that your reverse speed is abysmal - whenever possible avoid situations that will force you to reverse - and if you do have to move back, where possible try to traverse the entire hull and move back with the full speed of your forwards gears.
When facing common enemy tanks:
- MBT-70/KPz-70 - When facing the MBT-70/Kpz-70, the best place to shoot is the left turret cheek as this will knock out commander and gunner.
- Chieftain Mk 10 - If hull down, shoot for cannon breech or gun barrel.
Modules
| Tier | Mobility | Protection | Firepower | |||
|---|---|---|---|---|---|---|
| I | Tracks | Parts | Horizontal Drive | 3BK12M | 3OF26 | |
| II | Suspension | Brake System | FPE | Adjustment of Fire | 3BM15 | |
| III | Filters | Crew Replenishment | Elevation Mechanism | NVD | ||
| IV | Transmission | Engine | ESS | Artillery Support | 3BM22 | Rangefinder |
Pros and cons
Pros:
- Acceptable speed going forward.
- Turret cheeks are often surprisingly well protected.
- Vehicle is fitted with a surgically precise and devastatingly effective 125 mm gun. Well placed shots can do a lot of damage.
- Engine smoke generating system, covers friendly tanks behind the vehicle.
- Side flaps protect the tank from side attacks with chemical energy rounds (once a flap gets hit it will fall off).
- Decent reload; 7.1s no matter what because of the auto-loader system.
- Good HE shell, can be a little finnicky.
- Very low profile compared to its contemporaries, much harder to spot and hit.
- One of the fastest rounds in game (1800 m/s), easy to aim.
- Stock APFSDS shell with reasonable effectiveness.
- Tier 4 modification present the upgraded APFSDS shell with 440mm of penetration, will go through almost anything in game
- Can be very hard to destroy in hull-down positions.
Cons:
- Slow horizontal turret traverse.
- Any penetrating side shot is very likely to detonate ammunition.
- Abysmally slow reverse (-4 km/h).
- Weak lower glacis, can be penetrated by almost any round it encounters.
- Frontal penetration can easily disable 2 of the 3-man crew, leading to a crew knockout.
- Sub-par gun depression (-6°).
- No anti-air capability.
- Angling the tank causes the weak side armour to be exposed.
- Hull armour flaps are easily penetrated by kinetic munitions when angled.
History
Describe the history of the creation and combat usage of the vehicle in more detail than in the introduction. If the historical reference turns out to be too long, take it to a separate article, taking a link to the article about the vehicle and adding a block "/History" (example: https://wiki.warthunder.com/(Vehicle-name)/History) and add a link to it here using the main template. Be sure to reference text and sources by using <ref></ref>, as well as adding them at the end of the article with <references />. This section may also include the vehicle's dev blog entry (if applicable) and the in-game encyclopedia description (under === In-game description ===, also if applicable).
Media
See also
Links to the articles on the War Thunder Wiki that you think will be useful for the reader, for example:
- reference to the series of the vehicles;
- links to approximate analogues of other nations and research trees.
External links
| USSR medium tanks | |
|---|---|
| T-28 | T-28 (1938) · T-28 · T-28E |
| T-34-76 | T-34 (Prototype) · T-34 (1940) · T-34 (1941) · T-34 (1st Gv.T.Br.) · T-34 (1942) · T-34E STZ · T-34E |
| T-34-57 | T-34-57 · T-34-57 (1943) |
| T-34-85 | T-34-85 (D-5T) · T-34-85 · T-34-85E |
| T-34-100 | T-34-100 |
| T-44 | T-44 · T-44-100 · T-44-122 |
| T-54 | T-54 (1947) · T-54 (1949) · T-54 (1951) |
| T-55 | TO-55 · T-55A · T-55AM-1 · T-55AMD-1 |
| T-62 | T-62 · T-62M-1 |
| T-64 | Object 435 · T-64A (1971) · T-64B |
| T-72 | T-72A · T-72AV (TURMS-T) · T-72B · T-72B (1989) · T-72B3 · T-72M2 Moderna |
| T-80 | T-80B · T-80U · T-80UD · T-80UK · T-80UM2 · T-80BVM · Object 292 |
| T-90 | Т-90А · T-90M |
| Trophies/Lend-Lease | |
| Germany | ▂T-III · ▂T-V |
| Great Britain | ▂МК-IX "Valentine" |
| USA | ▂M3 Medium · ▂M4A2 |
