Difference between pages "T-64B" and "T-72A"
Colok76286 (talk | contribs) (→Mobility: Updated to new mobility template) |
Colok76286 (talk | contribs) (→Mobility: Updated to new mobility template) |
||
| Line 1: | Line 1: | ||
| − | {{Specs-Card|code= | + | {{Specs-Card|code=ussr_t_72a}} |
== Description == | == Description == | ||
| − | <!-- | + | <!--In the description, the first part should be about the history of the creation and combat usage of the vehicle, as well as its key features. In the second part, tell the reader about the ground vehicle in the game. Insert a screenshot of the vehicle, so that if the novice player does not remember the vehicle by name, he will immediately understand what kind of vehicle the article is talking about.--> |
| − | [[File: | + | [[File:GarageImage {{PAGENAME}}.jpg|420px|thumb|left]] |
| − | {{ | + | {{Break}} |
| − | The '''{{ | + | The '''{{Specs|name}}''' is a rank {{Specs|rank}} Soviet medium tank {{Battle-rating}}. It was introduced in [[Update 1.85 "Supersonic"]]. |
| − | |||
| − | |||
| − | |||
| − | |||
== General info == | == General info == | ||
=== Survivability and armour === | === Survivability and armour === | ||
| − | <!-- | + | <!--Describe armour protection. Note the most well protected and key weak areas. Appreciate the layout of modules as well as the number and location of crew members. Is the level of armour protection sufficient, is the placement of modules helpful for survival in combat? |
| − | |||
| − | |||
| − | |||
| − | |||
| − | |||
| − | |||
| − | |||
| − | |||
| − | |||
| − | |||
| − | |||
| − | |||
| − | |||
| − | |||
| − | |||
| − | |||
| − | |||
| − | |||
| − | |||
| − | |||
| − | |||
| − | |||
| − | |||
| − | |||
| − | |||
| − | |||
| − | |||
| − | |||
| − | |||
| − | + | If necessary use a visual template to indicate the most secure and weak zones of the armour.--> | |
| − | |||
| − | |||
| − | |||
| − | |||
| − | |||
| − | |||
| − | |||
| − | + | The T-72A's hull armour is practically the same as the T-64A's; textolite middle sandwiched between two RHA plates. The difference is that the T-72As upper glacis is angled at one degree further back than that of the T-64A and the use of Quartz core instead of Hard Hardness Rolled Armor (HHR) in the turret. Like the T-64 and T-80 line, the T-72A has a carousel-type autoloader centred under the turret. This means that a penetrating hit to the centre of the tank has a high chance of leading to an ammunition detonation and subsequent launch of the turret. This is however slightly less likely to happen with the T-72As type of autoloader, where the charges are stored horizontally (as "=") in comparison to the T-64/-80 type, where the charge sits vertically and is easier to hit. | |
| − | + | Spare ammunition not inside the 22 round carousel is however spread more randomly around the fighting compartment. Therefore, bringing only 23 rounds (for 1 in the gun and 22 in the carousel) limits the chance of the spare ammo detonating in the case of i.e. a turret hit. There are two diesel tank ammo racks within the tank - one to the right of the driver and one between the engine and fighting compartment (with some loose ammo above it). It doesn't take much to realize that like most Soviet MBTs, the T-72A is rather explosive if extra ammo is taken, so great care is needed when showing the hull. The driver should also be aware of having only 3 crew members; if one is knocked out they should be sure to return to an objective point as soon as possible to get a new one. | |
| − | |||
| − | |||
| − | |||
| − | |||
=== Mobility === | === Mobility === | ||
<!-- ''Write about the mobility of the ground vehicle. Estimate the specific power and manoeuvrability, as well as the maximum speed forwards and backwards.'' --> | <!-- ''Write about the mobility of the ground vehicle. Estimate the specific power and manoeuvrability, as well as the maximum speed forwards and backwards.'' --> | ||
| − | {{tankMobility|abMinHp= | + | {{tankMobility|abMinHp= 1209|rbMinHp= 690|AoAweight= 0.8}} |
== Armaments == | == Armaments == | ||
=== Main armament === | === Main armament === | ||
| − | <!-- | + | <!--Give the reader information about the characteristics of the main gun. Assess its effectiveness in a battle based on the reloading speed, ballistics and the power of shells. Do not forget about the flexibility of the fire, that is how quickly the cannon can be aimed at the target, open fire on it and aim at another enemy. Add a link to the main article on the gun: <code><nowiki>{{main|Name of the weapon}}</nowiki></code>. Describe in general terms the ammunition available for the main gun. Give advice on how to use them and how to fill the ammunition storage.--> |
| − | {{main|2A46M | + | {{main|2A46M (125 mm)}} |
| − | {| class="wikitable" style="text-align:center" | + | {| class="wikitable" style="text-align:center" |
| − | + | ! colspan="6" |[[2A46M (125 mm)|125 mm 2A46M]] | |
| − | ! colspan="6" | [[2A46M | ||
|- | |- | ||
| − | ! colspan="3" rowspan="1 | + | ! colspan="3" rowspan="1" |Capacity |
| − | ! rowspan="1" | Vertical <br> guidance | + | ! rowspan="1" |Vertical<br>guidance |
| − | ! rowspan="1" | Horizontal <br> guidance | + | ! rowspan="1" |Horizontal<br>guidance |
| − | ! rowspan="1" | Stabilizer | + | ! rowspan="1" |Stabilizer |
|- | |- | ||
| − | | colspan="3" | | + | | colspan="3" | 44 || -6°/+13° || ±180° || Two-plane |
|- | |- | ||
| − | ! colspan="6" | Turret rotation speed (°/s) | + | ! colspan="6" |Turret rotation speed (°/s) |
|- | |- | ||
! style="width:4em" |Mode | ! style="width:4em" |Mode | ||
| Line 91: | Line 46: | ||
! style="width:4em" |Prior + Ace qualif. | ! style="width:4em" |Prior + Ace qualif. | ||
|- | |- | ||
| − | | ''Arcade'' | | + | |''Arcade'' |
| + | | 19.0 || 26.35 || 32.0 || 35.4 || __.__ | ||
|- | |- | ||
| − | | ''Realistic'' | | + | |''Realistic'' |
| + | | 11.9 || 14.0 || 17.0 || 18.8 || __.__ | ||
|- | |- | ||
| − | ! colspan="4" | Reloading rate (seconds) | + | ! colspan="4" |Reloading rate (seconds) |
|- | |- | ||
| − | ! colspan="1 | + | ! colspan="1" |Stock |
| − | ! colspan="1 | + | ! colspan="1" |Prior + Full crew |
| − | ! colspan="1 | + | ! colspan="1" |Prior + Expert qualif. |
| − | ! colspan="1 | + | ! colspan="1" |Prior + Ace qualif. |
|- | |- | ||
| − | | 7.10 || 7.10 || 7.10 || 7.10 | + | | 7.10 || 7.10 || 7.10 || 7.10 |
|- | |- | ||
|} | |} | ||
| − | ===== Ammunition ===== | + | ===== Ammunition===== |
{| class="wikitable sortable" style="text-align:center" width="100%" | {| class="wikitable sortable" style="text-align:center" width="100%" | ||
! colspan="8" | Penetration statistics | ! colspan="8" | Penetration statistics | ||
| Line 112: | Line 69: | ||
! rowspan="2" data-sort-type="text" | Ammunition | ! rowspan="2" data-sort-type="text" | Ammunition | ||
! rowspan="2" class="unsortable" | Type of <br /> warhead | ! rowspan="2" class="unsortable" | Type of <br /> warhead | ||
| − | ! colspan="6" | '''Penetration''' '''''in mm''''' '''@ | + | ! colspan="6" | '''Penetration''' '''''in mm''''' '''@ 90°''' |
|- | |- | ||
! 10m | ! 10m | ||
| Line 121: | Line 78: | ||
! 2000m | ! 2000m | ||
|- | |- | ||
| − | | | + | | 3BM9 || APFSDS || 321 || 317 || 303 || 285 || 268 || 249 |
|- | |- | ||
| − | | 3BM22 || APFSDS ||425||420||415||405||393||380 | + | | 3BM22 || APFSDS || 425 || 420 || 415 || 405 || 393 || 380 |
| − | |- | + | |- |
| − | | | + | | 3BM15 || APFSDS || 440 || 430 || 420 || 410 || 405 || 400 |
| + | |- | ||
| + | | 3BK12M || HEATFS || 440 || 440 || 440 || 440 || 440 || 440 | ||
| + | |- | ||
| + | | 3OF26 || HE || 42 || 42 || 42 || 42 || 42 || 42 | ||
|- | |- | ||
| − | |||
| − | |||
| − | |||
| − | |||
|} | |} | ||
{| class="wikitable sortable" style="text-align:center" width="100%" | {| class="wikitable sortable" style="text-align:center" width="100%" | ||
| Line 151: | Line 108: | ||
! 100% | ! 100% | ||
|- | |- | ||
| − | | | + | | 3BM9 || APFSDS || 1,800 || 3.6 || N/A || N/A || N/A || +1.5° || 72° || 73° || 75° |
|- | |- | ||
| − | | 3BM22 || APFSDS || 1,760 || 4.83 || N/A || N/A || N/A || | + | | 3BM22 || APFSDS || 1,760 || 4.83 || N/A || N/A || N/A || +1.5° || 76° || 77° || 78° |
| − | |||
| − | |||
|- | |- | ||
| − | | | + | | 3BM15 || APFSDS || 1,780 || 3.88 || N/A || N/A || N/A || +1.5° || 76° || 77° || 78° |
| − | |||
| − | |||
| − | | | ||
| − | | | ||
| − | |||
| − | |||
| − | |||
|- | |- | ||
| − | + | | 3BK12M || HEATFS || 905 || 19 || 0.0 || 0.1 || 2,530 || +0° || 65° || 72° || 75° | |
| − | |||
| − | |||
| − | |||
| − | |||
|- | |- | ||
| − | || | + | | 3OF26 || HE || 850 || 23 || 0.1 || 0.1 || 5,240 || +0° || 79° || 80° || 81° |
|- | |- | ||
|} | |} | ||
| − | |||
| − | |||
=== Machine guns === | === Machine guns === | ||
| − | <!-- | + | <!--Offensive and anti-aircraft machine guns not only allow you to fight some aircraft but also are effective against lightly armoured vehicles. Evaluate machine guns and give recommendations on its use.--> |
{{main|NSVT (12.7 mm)|PKT (7.62 mm)}} | {{main|NSVT (12.7 mm)|PKT (7.62 mm)}} | ||
{| class="wikitable" style="text-align:center" | {| class="wikitable" style="text-align:center" | ||
|- | |- | ||
| − | ! colspan="7" | [[NSVT (12.7 mm)|12.7 mm NSVT]] | + | ! colspan="7" |[[NSVT (12.7 mm)|12.7 mm NSVT]] |
|- | |- | ||
| − | ! colspan="7" | ''Pintle mount'' | + | ! colspan="7" |''Pintle mount'' |
|- | |- | ||
| − | ! colspan="4" rowspan="1 | + | ! colspan="4" rowspan="1" |Capacity (Belt capacity) |
| − | ! rowspan="1" | Fire rate <br> (shots/minute) | + | ! rowspan="1" |Fire rate<br>(shots/minute) |
| − | ! rowspan="1" | Vertical <br> guidance | + | ! rowspan="1" |Vertical<br>guidance |
| − | ! rowspan="1" | Horizontal <br> guidance | + | ! rowspan="1" |Horizontal<br>guidance |
|- | |- | ||
| colspan="4" | 300 (150) || 700 || -10°/+60° || ±180° | | colspan="4" | 300 (150) || 700 || -10°/+60° || ±180° | ||
| Line 198: | Line 140: | ||
{| class="wikitable" style="text-align:center" | {| class="wikitable" style="text-align:center" | ||
|- | |- | ||
| − | ! colspan="7" | [[PKT (7.62 mm)|7.62 mm PKT]] | + | ! colspan="7" |[[PKT (7.62 mm)|7.62 mm PKT]] |
|- | |- | ||
| − | ! colspan="7" | ''Coaxial mount'' | + | ! colspan="7" |''Coaxial mount'' |
|- | |- | ||
| − | ! colspan="4" rowspan="1 | + | ! colspan="4" rowspan="1" |Capacity (Belt capacity) |
| − | ! rowspan="1" | Fire rate <br> (shots/minute) | + | ! rowspan="1" |Fire rate<br>(shots/minute) |
| − | ! rowspan="1" | Vertical <br> guidance | + | ! rowspan="1" |Vertical<br>guidance |
| − | ! rowspan="1" | Horizontal <br> guidance | + | ! rowspan="1" |Horizontal<br>guidance |
|- | |- | ||
| colspan="4" | 1,250 (250) || 700 || N/A || N/A | | colspan="4" | 1,250 (250) || 700 || N/A || N/A | ||
| Line 212: | Line 154: | ||
== Usage in battles == | == Usage in battles == | ||
| − | <!-- | + | <!--Describe the tactics of playing in the vehicle, the features of using vehicles in the team and advice on tactics. Refrain from creating a "guide" - do not impose a single point of view but instead give the reader food for thought. Describe the most dangerous enemies and give recommendations on fighting them. If necessary, note the specifics of the game in different modes (AB, RB, SB).--> |
| − | |||
| − | The T- | + | The T-72A play-style is near identical to the T-64A (and with that, Soviet MBTs from here on). One of the key differences between the two vehicles is the T-72A's stronger armour. The quartz core composed turret will also bounce many shots and can even eat up some of the strongest ATGMs. In terms of armament, the T-72A boasts the very powerful and accurate [[2A46M (125 mm)|2A46M]] that Soviet high-rank tankers will quickly become familiar and fall in love with. Make sure to research the 3BM15 sabot rounds as soon as you can (after Parts and FPE of course), as the stock round has mediocre penetration for a sabot. |
| − | + | === Pros and cons === | |
| + | <!--Summarise and briefly evaluate the vehicle in terms of its characteristics and combat effectiveness. Mark its pros and cons in a bulleted list. Try not to use more than 6 points for each of the characteristics. Avoid using categorical definitions such as "bad", "good" and the like - use substitutions with softer forms such as "inadequate" and "effective".--> | ||
| − | ''' | + | '''Pros:''' |
| − | + | * Mounts the same powerful 125 mm 2A46 gun as on the T-64 and T-80 (though an earlier version) | |
| + | * Low profile, small target compared to other countries' main battle tanks | ||
| + | * Early unlocked laser rangefinder makes sniping long distances easier | ||
| + | * Due to thick frontal armour and correct angling, able to deflect most rounds from counterpart tanks of other countries | ||
| + | * Very accurate gun due to the high muzzle velocity of the APFSDS rounds, very effective long-range sniper | ||
| + | * Autoloader continues working even if fighting a fire or replacing a crew member, ready to use upon the fire being extinguished or the gunner having been replaced | ||
| − | ''' | + | '''Cons:''' |
| − | + | * Ammo carousel means your first stage rounds all are centred below the turret; can be easily detonated through a hit to the hull | |
| + | * Very slow reverse speed and traverse speed, a problem in situations where you cannot back away from an attacking enemy | ||
| + | * 3-man crew makes tank able to be knocked out easier; once one crewmember is knocked out, you have to be very careful not to get hit again | ||
| + | * Gun depression inadequate for most hull-down situations, e.g. sniping from a hill or down a valley | ||
| + | * Not very good stock APFSDS shell with around only 320 mm of penetration at close ranges | ||
| + | * Its 2A46 125 mm gun is an early type; the stock ammunition is lacklustre and it cannot fire ATGMs like the T-64B, T-80B, and T-80U | ||
| + | * Glacis armour is not reliable until the addon armour plate is unlocked (a tier IV modification) | ||
| − | < | + | == History == |
| + | <!--Describe the history of the creation and combat usage of the ground vehicle in more detail than in the introduction. If the historical reference turns out to be too long, take it to a separate article, taking a link to the article about the vehicle and adding a block "/ History" (example: <nowiki>https://wiki.warthunder.com/(Vehicle-name)/History</nowiki>) and add a link to it here using the <code>main</code> template. Be sure to reference text and sources by using <code><nowiki><ref></nowiki></code>, as well as adding them at the end of the article. This section may also include the vehicle's dev blog entry (if applicable) and the in-game encyclopedia description (under <code><nowiki>=== In-game description ===</nowiki></code>, also if applicable).--> | ||
| − | + | Development of the T-72 began shortly after the production of the T-64 highlighted several problems which negatively impacted production rates. Among these problems was an unreliable engine, which couldn’t be produced at the high rates needed for a smooth production of the T-64 to take place. | |
| − | + | In response, the Uralvagonzavod plant began working on a modified version of the T-64, which would use a more reliable and readily available engine, in order to provide the army with a tank fit for mass-production. Apart from this, changes were also made to the armor layout, in order to simplify production and decrease costs. This work resulted in the creation of the Object 172. | |
| − | + | Development of the Object 172 continued, and after some trials, the vehicle entered service with the Soviet Army in August 1973, receiving its official designation T-72. Shortly afterwards, the vehicle was permitted for mass production, following the issuing of an official decree in 1974. | |
| − | + | The T-72 was also heavily exported to and produced by nations of the Warsaw Pact as well as other countries worldwide, although these vehicles received certain downgrades compared to native Soviet models. Despite this, the T-72 quickly became one of the most widely used tanks in the world, participating in more conflicts than a single devblog could ever cover. | |
| − | + | Since production began in 1974, over 20,000 T-72 tanks were built across several modifications in the Soviet Union/Russia alone, with production of more modern variants still ongoing today, even in other countries as well. | |
| − | |||
| − | |||
| − | |||
| − | |||
| − | |||
| − | |||
| − | |||
| − | |||
| − | |||
| − | |||
| − | |||
| − | |||
| − | |||
| − | |||
| − | |||
| − | |||
| − | |||
| − | |||
| − | |||
| − | |||
| − | |||
| − | |||
| − | |||
| − | |||
| − | |||
| − | |||
| − | |||
| − | |||
| − | + | ''- From [https://warthunder.com/en/news/5945-development-t-72a-the-globetrotter-en Devblog]'' | |
| − | |||
== Media == | == Media == | ||
''An excellent addition to the article will be video guides, as well as screenshots from the game and photos.'' | ''An excellent addition to the article will be video guides, as well as screenshots from the game and photos.'' | ||
| − | |||
| − | |||
== See also == | == See also == | ||
| Line 284: | Line 207: | ||
<!--''Paste links to sources and external resources, such as:'' | <!--''Paste links to sources and external resources, such as:'' | ||
* ''topic on the official game forum;'' | * ''topic on the official game forum;'' | ||
| − | * ''encyclopedia page on tank;''--> | + | * ''encyclopedia page on tank;'' |
| + | * ''other literature.''--> | ||
| − | * [ | + | * [[wt:en/news/5945-development-t-72a-the-globetrotter-en|[Devblog<nowiki>]</nowiki> T-72A: The Globetrotter]] |
| − | |||
{{USSR medium tanks}} | {{USSR medium tanks}} | ||
| − | |||
Revision as of 16:59, 11 March 2020
Contents
Description

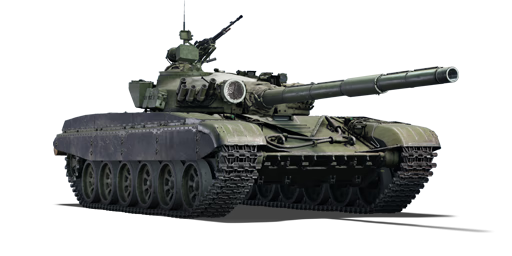
The T-72A is a rank VI Soviet medium tank
with a battle rating of 9.3 (AB/RB/SB). It was introduced in Update 1.85 "Supersonic".
General info
Survivability and armour
The T-72A's hull armour is practically the same as the T-64A's; textolite middle sandwiched between two RHA plates. The difference is that the T-72As upper glacis is angled at one degree further back than that of the T-64A and the use of Quartz core instead of Hard Hardness Rolled Armor (HHR) in the turret. Like the T-64 and T-80 line, the T-72A has a carousel-type autoloader centred under the turret. This means that a penetrating hit to the centre of the tank has a high chance of leading to an ammunition detonation and subsequent launch of the turret. This is however slightly less likely to happen with the T-72As type of autoloader, where the charges are stored horizontally (as "=") in comparison to the T-64/-80 type, where the charge sits vertically and is easier to hit.
Spare ammunition not inside the 22 round carousel is however spread more randomly around the fighting compartment. Therefore, bringing only 23 rounds (for 1 in the gun and 22 in the carousel) limits the chance of the spare ammo detonating in the case of i.e. a turret hit. There are two diesel tank ammo racks within the tank - one to the right of the driver and one between the engine and fighting compartment (with some loose ammo above it). It doesn't take much to realize that like most Soviet MBTs, the T-72A is rather explosive if extra ammo is taken, so great care is needed when showing the hull. The driver should also be aware of having only 3 crew members; if one is knocked out they should be sure to return to an objective point as soon as possible to get a new one.
Mobility
| Game Mode | Max Speed (km/h) | Weight (tons) | Engine power (horsepower) | Power-to-weight ratio (hp/ton) | ||||
|---|---|---|---|---|---|---|---|---|
| Forward | Reverse | Stock | AoA | Stock | Upgraded | Stock | Upgraded | |
| Arcade | 67 | 5 | 40.2 | 0.8 | 1209 | 1,488 | 30.07 | 36.29 |
| Realistic | 60 | 5 | 690 | 780 | 17.16 | 19.02 | ||
Armaments
Main armament
| 125 mm 2A46M | |||||
|---|---|---|---|---|---|
| Capacity | Vertical guidance |
Horizontal guidance |
Stabilizer | ||
| 44 | -6°/+13° | ±180° | Two-plane | ||
| Turret rotation speed (°/s) | |||||
| Mode | Stock | Upgraded | Prior + Full crew | Prior + Expert qualif. | Prior + Ace qualif. |
| Arcade | 19.0 | 26.35 | 32.0 | 35.4 | __.__ |
| Realistic | 11.9 | 14.0 | 17.0 | 18.8 | __.__ |
| Reloading rate (seconds) | |||||
| Stock | Prior + Full crew | Prior + Expert qualif. | Prior + Ace qualif. | ||
| 7.10 | 7.10 | 7.10 | 7.10 | ||
Ammunition
| Penetration statistics | |||||||
|---|---|---|---|---|---|---|---|
| Ammunition | Type of warhead |
Penetration in mm @ 90° | |||||
| 10m | 100m | 500m | 1000m | 1500m | 2000m | ||
| 3BM9 | APFSDS | 321 | 317 | 303 | 285 | 268 | 249 |
| 3BM22 | APFSDS | 425 | 420 | 415 | 405 | 393 | 380 |
| 3BM15 | APFSDS | 440 | 430 | 420 | 410 | 405 | 400 |
| 3BK12M | HEATFS | 440 | 440 | 440 | 440 | 440 | 440 |
| 3OF26 | HE | 42 | 42 | 42 | 42 | 42 | 42 |
| Shell details | ||||||||||
|---|---|---|---|---|---|---|---|---|---|---|
| Ammunition | Type of warhead |
Velocity in m/s |
Projectile Mass in kg |
Fuse delay
in m: |
Fuse sensitivity
in mm: |
Explosive Mass in g (TNT equivalent): |
Normalization At 30° from horizontal: |
Ricochet: | ||
| 0% | 50% | 100% | ||||||||
| 3BM9 | APFSDS | 1,800 | 3.6 | N/A | N/A | N/A | +1.5° | 72° | 73° | 75° |
| 3BM22 | APFSDS | 1,760 | 4.83 | N/A | N/A | N/A | +1.5° | 76° | 77° | 78° |
| 3BM15 | APFSDS | 1,780 | 3.88 | N/A | N/A | N/A | +1.5° | 76° | 77° | 78° |
| 3BK12M | HEATFS | 905 | 19 | 0.0 | 0.1 | 2,530 | +0° | 65° | 72° | 75° |
| 3OF26 | HE | 850 | 23 | 0.1 | 0.1 | 5,240 | +0° | 79° | 80° | 81° |
Machine guns
| 12.7 mm NSVT | ||||||
|---|---|---|---|---|---|---|
| Pintle mount | ||||||
| Capacity (Belt capacity) | Fire rate (shots/minute) |
Vertical guidance |
Horizontal guidance | |||
| 300 (150) | 700 | -10°/+60° | ±180° | |||
| 7.62 mm PKT | ||||||
|---|---|---|---|---|---|---|
| Coaxial mount | ||||||
| Capacity (Belt capacity) | Fire rate (shots/minute) |
Vertical guidance |
Horizontal guidance | |||
| 1,250 (250) | 700 | N/A | N/A | |||
Usage in battles
The T-72A play-style is near identical to the T-64A (and with that, Soviet MBTs from here on). One of the key differences between the two vehicles is the T-72A's stronger armour. The quartz core composed turret will also bounce many shots and can even eat up some of the strongest ATGMs. In terms of armament, the T-72A boasts the very powerful and accurate 2A46M that Soviet high-rank tankers will quickly become familiar and fall in love with. Make sure to research the 3BM15 sabot rounds as soon as you can (after Parts and FPE of course), as the stock round has mediocre penetration for a sabot.
Pros and cons
Pros:
- Mounts the same powerful 125 mm 2A46 gun as on the T-64 and T-80 (though an earlier version)
- Low profile, small target compared to other countries' main battle tanks
- Early unlocked laser rangefinder makes sniping long distances easier
- Due to thick frontal armour and correct angling, able to deflect most rounds from counterpart tanks of other countries
- Very accurate gun due to the high muzzle velocity of the APFSDS rounds, very effective long-range sniper
- Autoloader continues working even if fighting a fire or replacing a crew member, ready to use upon the fire being extinguished or the gunner having been replaced
Cons:
- Ammo carousel means your first stage rounds all are centred below the turret; can be easily detonated through a hit to the hull
- Very slow reverse speed and traverse speed, a problem in situations where you cannot back away from an attacking enemy
- 3-man crew makes tank able to be knocked out easier; once one crewmember is knocked out, you have to be very careful not to get hit again
- Gun depression inadequate for most hull-down situations, e.g. sniping from a hill or down a valley
- Not very good stock APFSDS shell with around only 320 mm of penetration at close ranges
- Its 2A46 125 mm gun is an early type; the stock ammunition is lacklustre and it cannot fire ATGMs like the T-64B, T-80B, and T-80U
- Glacis armour is not reliable until the addon armour plate is unlocked (a tier IV modification)
History
Development of the T-72 began shortly after the production of the T-64 highlighted several problems which negatively impacted production rates. Among these problems was an unreliable engine, which couldn’t be produced at the high rates needed for a smooth production of the T-64 to take place.
In response, the Uralvagonzavod plant began working on a modified version of the T-64, which would use a more reliable and readily available engine, in order to provide the army with a tank fit for mass-production. Apart from this, changes were also made to the armor layout, in order to simplify production and decrease costs. This work resulted in the creation of the Object 172.
Development of the Object 172 continued, and after some trials, the vehicle entered service with the Soviet Army in August 1973, receiving its official designation T-72. Shortly afterwards, the vehicle was permitted for mass production, following the issuing of an official decree in 1974.
The T-72 was also heavily exported to and produced by nations of the Warsaw Pact as well as other countries worldwide, although these vehicles received certain downgrades compared to native Soviet models. Despite this, the T-72 quickly became one of the most widely used tanks in the world, participating in more conflicts than a single devblog could ever cover.
Since production began in 1974, over 20,000 T-72 tanks were built across several modifications in the Soviet Union/Russia alone, with production of more modern variants still ongoing today, even in other countries as well.
- From Devblog
Media
An excellent addition to the article will be video guides, as well as screenshots from the game and photos.
See also
Links to the articles on the War Thunder Wiki that you think will be useful for the reader, for example:
- reference to the series of the vehicles;
- links to approximate analogues of other nations and research trees.
External links
| USSR medium tanks | |
|---|---|
| T-28 | T-28 (1938) · T-28 · T-28E |
| T-34-76 | T-34 (Prototype) · T-34 (1940) · T-34 (1941) · T-34 (1st Gv.T.Br.) · T-34 (1942) · T-34E STZ · T-34E |
| T-34-57 | T-34-57 · T-34-57 (1943) |
| T-34-85 | T-34-85 (D-5T) · T-34-85 · T-34-85E |
| T-34-100 | T-34-100 |
| T-44 | T-44 · T-44-100 · T-44-122 |
| T-54 | T-54 (1947) · T-54 (1949) · T-54 (1951) |
| T-55 | TO-55 · T-55A · T-55AM-1 · T-55AMD-1 |
| T-62 | T-62 · T-62M-1 |
| T-64 | Object 435 · T-64A (1971) · T-64B |
| T-72 | T-72A · T-72AV (TURMS-T) · T-72B · T-72B (1989) · T-72B3 · T-72M2 Moderna |
| T-80 | T-80B · T-80U · T-80UD · T-80UK · T-80UM2 · T-80BVM · Object 292 |
| T-90 | Т-90А · T-90M |
| Trophies/Lend-Lease | |
| Germany | ▂T-III · ▂T-V |
| Great Britain | ▂МК-IX "Valentine" |
| USA | ▂M3 Medium · ▂M4A2 |
