Difference between pages "T-34-85" and "Night Vision Devices"
Colok76286 (talk | contribs) (→Media: Added video) |
Colok76286 (talk | contribs) (→Ground vehicles: Moved subsections to correct place) |
||
| Line 1: | Line 1: | ||
| − | {{ | + | {{DISPLAYTITLE:Night Vision Devices}} |
| − | |||
| − | |||
| − | |||
| − | |||
| − | }} | ||
| − | == | + | ==Introduction== |
| − | |||
| − | |||
| − | |||
| − | |||
| − | + | [[Update 1.91 "Night Vision"]] added Night Vision Devices (NVDs) to a number of high tier tanks and helicopters. These devices provide a significant advantage in the now more common night battles. Two types of night vision devices were added, image intensifiers and thermal imaging systems. In addition infrared (IR) searchlights were added to tanks which historically had them. | |
| − | + | Night vision devices are usually unlocked as tier 3 - 4 modifications, however, some tanks or helicopters have them access to them at tier 1 - 2. In addition, some tanks have the option to upgrade their image intensifier to a thermal imager, by unlocking a second modification (on some tanks the thermal imager is included with the original modification). | |
| − | + | Tanks and helicopters can have different night vision devices for different crew members, for example, the gunners' sight may have a thermal imager, while the commander's (or in the case of helicopters the pilot's) view may have image intensifiers, and the driver's view a less powerful image intensifier. They can only be used from their designated views, for example, the tank commander's night vision system can only be used in binoculars, the driver's night vision is only used from driver seat or third person view and gunner view is only used from sniper seat. | |
| − | |||
| − | |||
| − | + | ===Controls=== | |
| − | |||
| − | + | {| class="wikitable" style="text-align:center" | |
| − | + | ! colspan="3" | Night Vision Controls | |
| − | |||
| − | {| class="wikitable" | ||
|- | |- | ||
| − | ! | + | ! Control name |
| + | ! Default Keybind<br />(PC keyboard & mouse) | ||
| + | ! Description | ||
|- | |- | ||
| − | | | + | | Night Vision Mode || ??? || Toggles between standard view and image intensifier / thermal view |
|- | |- | ||
| − | | | + | | IR Spotlight || ??? || Toggles the IR searchlight on and off |
|- | |- | ||
| − | + | | Changing the colour scheme of the thermal sight || ??? || Toggles the thermal sight between White Hot and Black Hot modes | |
|- | |- | ||
| − | |||
|} | |} | ||
| − | |||
| − | + | {{Notice|Images in this article were created at night with the weather set to "Blind" so represent the operation of Night Vision devices under worst-case conditions (or close to it).}} | |
| − | + | ||
| + | ==Image Intensifiers== | ||
| + | The most basic type of night vision device is an image intensifier. These devices work by amplifying the light which enters the sensor, as well as converting some light from the infrared spectrum into visible light. When image intensifiers are activated the screen picks up a green hue and you are generally able to see much further. Image intensifiers suffer from noise interference; this appears as a form of TV static over the screen; it is quite noticeable on early image intensifiers however more advanced systems (generally found on newer tanks) are less susceptible and the effect is much less noticeable, leading to them proving much clearer images. | ||
| + | |||
| + | {{Notice|Image intensifiers can only be used a night.|!}} | ||
| + | |||
| + | ==Factors affecting performance== | ||
| + | |||
| + | There are a number of characteristics which affect the performance of image intensifiers, these are the resolution, the light multiplication factor, and the susceptibility to noise. While individually some of these elements may have only a small impact on image quality, newer image intensifiers will have improvements to most or all of them, providing much better image quality. | ||
| − | + | ===Resolution=== | |
| + | Different image intensifiers are capable of producing images at different resolutions. The higher the resolution that an image intensifier is capable of outputting, the clearer the final image will be. The image intensifiers on tanks in-game typically have a resolution of 800 x 600 or 1600 x 1200, the difference between these resolutions is minimal and is often only noticeable when looking at long-range targets. | ||
| − | + | Below is an example of looking at a T-80U, located approximately 1.25 km away from the player, using an 800 x 600 intensifier and a 1600 x 1200 intensifier (all other stats are equal). Notice how the distant tank is slightly clearer and the barrel is visible with the higher resolution image intensifier. | |
| − | |||
| − | {{ | + | {{Notice|Click on an image to open it in full screen and get a better view}} |
| − | == | + | <gallery mode="packed" heights=200> |
| − | + | File:NightVision Low Res.jpg|A [[T-80U]] seen through an 800 x 600 image intensifier. | |
| − | + | File:NightVision High Res.jpg|A [[T-80U]] seen through an 1600 x 1200 image intensifier. | |
| − | + | </gallery> | |
| − | {| class="wikitable" style="text-align:center" | + | ===Light Multiplier=== |
| + | The light multiplier of an image intensifier determines by how much it will amplify the available light. Image intensifiers with a higher multiplier will produce a brighter image with more details visible. At present there is not a massive difference between the most and least powerful image intensifiers on tanks, however, it is noticeable, more so when an IR searchlight is in use. | ||
| + | |||
| + | The images below show the view of a target from a [[T-80U]] through the main gunsight (light multiplier of 9.0) and the driver's periscope (light multiplier 5.0), the target is being illuminated with an IR searchlight. Notice how the image through the gunsight is generally brighter and details like the grass and bushes are much more visible (there is obviously a zoom difference, but you can see that more is visible regardless). | ||
| + | |||
| + | {{Notice|Click on an image to open it in full screen and get a better view}} | ||
| + | |||
| + | <gallery mode="packed" heights=200> | ||
| + | File:NightVision 5.0 Mult.jpg|A [[Maus]] seen through an image intensifier with a 5.0 multiplier. | ||
| + | File:NightVision 9.0 Mult.jpg|A [[Maus]] seen through an image intensifier with a 9.0 multiplier. | ||
| + | </gallery> | ||
| + | |||
| + | ===Noise=== | ||
| + | In-game image intensifiers are subject to noise. This presents itself as something resembling TV static covering the screen. Due to a difference in optics, sensors and associated circuitry, more advanced image intensifiers suffer much less from this issue and provide a much clearer image, whereas older and more rudimentary electronics are more susceptible to injecting noise on the final image. The images below show the same view when using an image intensifier with a high noise level and a low noise level (all other stats are equal). Notice how the high noise level sight looks slightly fuzzy and has a sort of static effect over the image, while the low noise one is relatively clear. | ||
| + | |||
| + | {{Notice|Click on an image to open it in full screen and get a better view}} | ||
| + | |||
| + | <gallery mode="packed" heights=200> | ||
| + | File:NightVision high noise.jpg|A [[Maus]] seen through an image intensifier with a high amount of noise. | ||
| + | File:NightVision low noise.jpg|A [[Maus]] seen through an image intensifier with a low amount of noise. | ||
| + | </gallery> | ||
| + | |||
| + | ==Infrared Spotlights== | ||
| + | [[File:IR Searchlight OnOff Compare.jpg|thumb|500px|right|The effect of turning on an IR searchlight on visibility]] | ||
| + | In addition to image intensifiers, some tanks are fitted with Infrared searchlights. Infrared (IR) searchlights are like regular searchlights, but they emit light on the infrared spectrum instead of the visible light spectrum; this means that the light they produce cannot normally be seen. However, as image intensifiers use light from the infrared spectrum and convert it to visible light, so IR searchlights can be seen through image intensifiers. | ||
| + | |||
| + | When activated an IR search not be visible unless you are looking through an image intensifier. If you are looking through an image intensifier then the area where the light is pointing will be brightly illuminated. The effect of an IR searchlight can be seen in the image to the right. | ||
| + | |||
| + | While IR searchlights obviously make seeing targets a lot easier in poor conditions their use does have a major drawback: any other players using image intensifiers can also see the light from your searchlight. As seen in the images below, by activating your IR searchlight you will immediately give your position away to any enemy players who are using an image intensifier. Other players on the ground will see the area where your light is pointing lit up, and the light itself will appear as a bright spot on the screen. Likewise, a helicopter will see the area lit up, and even though they may not be in a position to see the light itself, due the spread of the beam the lit-up area will form a sort of triangle with the tip pointing towards the source. | ||
| + | |||
| + | <gallery mode="packed" heights=200> | ||
| + | File:Tank with IR light off.jpg|A tank is hiding in the bushes, without it's light on it can not be seen. | ||
| + | File:Tank with IR light on.jpg|The same tank has now turned it's IR searchlight on, it's position is now fairly obvious. | ||
| + | File:Tank with IR ligh on from air.jpg|The same tank viewed from the air (as if by a helicopter), again it's position is obvious. | ||
| + | </gallery> | ||
| + | |||
| + | ===Factors affecting performance=== | ||
| + | The main differentiating characteristics between different IR searchlights is their maximum range, and how wide the beam is. The maximum range is the furthest distance at which the IR searchlight can still illuminate objects. The beamwidth is measured in degrees and determines how wide the beam is, it can be seen in the image below. | ||
| + | |||
| + | Some IR searchlights are also slightly more or less powerful (brighter) than others, but at present, the difference between those currently in-game is so small it is not worth talking about. | ||
| + | |||
| + | [[File:IR Searchlight Beam.jpg|thumb|800px|left|A top-down view of a tank with its IR searchlight on, showing the beam width.]]{{Break}} | ||
| + | |||
| + | ==Thermal Imagers== | ||
| + | Thermal imagers are more advanced than image intensifiers; they use the infrared radiation emitted by objects to produce images showing temperature. Anything which is warmer than the background will stand out clearly on thermal imaging cameras. In game thermal imagers are usually only available for the gunner's sight. When a thermal sight is activated the colour scheme of the screen will change significantly to one of the two thermal imagining modes available, white hot and black hot. In white hot mode the terrain will appear as dark grey and thermal signatures (vehicles, fires, projectiles, etc.) will appear somewhere between lighter grey and bright white, depending on their temperature. In black hot mode the terrain will be be light grey and thermal signatures will show as between darker grey and black depending on temperature. Thermal imagers allow for targets to easily be spotted at very long range. | ||
| + | |||
| + | The two thermal modes can be seen in the images below. Notice how the engine compartment of the Abrams is much hotter than the rest of the tank. Also notice how a tank hiding in the bushes, which would normally be hard to see can easily be seen with thermal imaging. | ||
| + | |||
| + | {{Notice|Thermal imagers, can be used both at night and in the day to improve visibility.|!}} | ||
| + | |||
| + | <gallery mode="packed" heights=200> | ||
| + | File:Thermal Vision White Hot.jpg|White hot thermal imaging. | ||
| + | File:Thermal Vision Black Hot.jpg|Black hot thermal imaging. | ||
| + | </gallery> | ||
| + | |||
| + | ===Factors affecting performance=== | ||
| + | Like image intensifiers, thermal imagers can only produce an output of a certain resolution, this resolution is the main differentiating factor between thermal sights on different vehicles. Most thermal imagers in game have a fairly low resolution leading to somewhat blurry and less detailed images, however some have higher resolutions, proving clearer images. | ||
| + | |||
| + | The images below show the same view through a 500 x 300 thermal imager (the lowest resolution in game) and a 1200 x 800 thermal imager (the highest resolution in game). Notice how the higher resolution imager produce a noticeably less blurry and more detailed image. This effect is more pronounced at longer ranges. | ||
| + | |||
| + | {{Notice|Click on an image to open it in full screen and get a better view}} | ||
| + | <gallery mode="packed" heights=200> | ||
| + | File:Thermal Vision Low Res.jpg|A [[T-80U]] seen through an 500 x 300 thermal imager. | ||
| + | File:Thermal Vision High Res.jpg|A [[T-80U]] seen through an 1200 x 800 thermal imager. | ||
| + | </gallery> | ||
| + | |||
| + | ==List of vehicles with Night Vision Devices== | ||
| + | ''As of v.1.99.1.39'' | ||
| + | ===Ground vehicles=== | ||
| + | ====USA==== | ||
| + | {| class="wikitable sortable" style="text-align:center" | ||
| + | |- | ||
| + | ! rowspan="2" | Vehicle !! rowspan="2" | Country !! colspan="2" | Commander !! colspan="2" | Gunner !! colspan="2" | Driver !! rowspan="2" | Infrared<br>Searchlight | ||
| + | |- | ||
| + | ! Infrared !! Thermal !! Infrared !! Thermal !! Infrared !! Thermal | ||
| + | |- | ||
| + | | {{Specs-Link|us_adats_bradley}} || [[File:USA_flag.png|40px|link=]] || {{Tick}} || {{Cross}} || {{Cross}} || {{Tick}} || {{Tick}} || {{Cross}} || {{Cross}} | ||
| + | |- | ||
| + | | {{Specs-Link|us_hstv_l}} || [[File:USA_flag.png|40px|link=]] || {{Cross}} || {{Tick}} || {{Cross}} || {{Tick}} || {{Tick}} || {{Cross}} || {{Cross}} | ||
| + | |- | ||
| + | | {{Specs-Link|us_m1_ip_abrams}} || [[File:USA_flag.png|40px|link=]] || {{Tick}} || {{Cross}} || {{Cross}} || {{Tick}} || {{Tick}} || {{Cross}} || {{Cross}} | ||
| + | |- | ||
| + | | {{Specs-Link|us_m1_abrams}} || [[File:USA_flag.png|40px|link=]] || {{Tick}} || {{Cross}} || {{Cross}} || {{Tick}} || {{Tick}} || {{Cross}} || {{Cross}} | ||
| + | |- | ||
| + | | {{Specs-Link|us_m1a1_abrams}} || [[File:USA_flag.png|40px|link=]] || {{Tick}} || {{Cross}} || {{Cross}} || {{Tick}} || {{Tick}} || {{Cross}} || {{Cross}} | ||
| + | |- | ||
| + | | {{Specs-Link|us_m1a2_abrams}} || [[File:USA_flag.png|40px|link=]] || {{Cross}} || {{Tick}} || {{Cross}} || {{Tick}} || {{Tick}} || {{Cross}} || {{Cross}} | ||
| + | |- | ||
| + | | {{Specs-Link|us_m3_bradley}} || [[File:USA_flag.png|40px|link=]] || {{Tick}} || {{Cross}} || {{Cross}} || {{Tick}} || {{Tick}} || {{Cross}} || {{Cross}} | ||
| + | |- | ||
| + | | {{Specs-Link|us_m41_walker_bulldog}} || [[File:USA_flag.png|40px|link=]] || {{Cross}} || {{Cross}} || {{Cross}} || {{Cross}} || {{Tick}} || {{Cross}} || {{Cross}} | ||
| + | |- | ||
| + | | {{Specs-Link|us_m42_duster}} || [[File:USA_flag.png|40px|link=]] || {{Cross}} || {{Cross}} || {{Cross}} || {{Cross}} || {{Tick}} || {{Cross}} || {{Cross}} | ||
| + | |- | ||
| + | | {{Specs-Link|us_m47_patton_II}} || [[File:USA_flag.png|40px|link=]] || {{Cross}} || {{Cross}} || {{Cross}} || {{Cross}} || {{Tick}} || {{Cross}} || {{Cross}} | ||
| + | |- | ||
| + | | {{Specs-Link|us_m48a1_patton_III}} || [[File:USA_flag.png|40px|link=]] || {{Cross}} || {{Cross}} || {{Cross}} || {{Cross}} || {{Tick}} || {{Cross}} || {{Cross}} | ||
| + | |- | ||
| + | | {{Specs-Link|us_m60}} || [[File:USA_flag.png|40px|link=]] || {{Tick}} || {{Cross}} || {{Tick}} || {{Cross}} || {{Tick}} || {{Cross}} || {{Cross}} | ||
| + | |- | ||
| + | | {{Specs-Link|us_m60a3_slep}} || [[File:USA_flag.png|40px|link=]] || {{Tick}} || {{Cross}} || {{Cross}} || {{Tick}} || {{Tick}} || {{Cross}} || {{Cross}} | ||
| + | |- | ||
| + | | {{Specs-Link|us_m60a1}} || [[File:USA_flag.png|40px|link=]] || {{Tick}} || {{Cross}} || {{Tick}} || {{Cross}} || {{Tick}} || {{Cross}} || {{Cross}} | ||
| + | |- | ||
| + | | {{Specs-Link|us_m60a1_rise_passive_era}} || [[File:USA_flag.png|40px|link=]] || {{Tick}} || {{Cross}} || {{Tick}} || {{Cross}} || {{Tick}} || {{Cross}} || {{Cross}} | ||
| + | |- | ||
| + | | {{Specs-Link|us_m60a2}} || [[File:USA_flag.png|40px|link=]] || {{Tick}} || {{Cross}} || {{Tick}} || {{Cross}} || {{Tick}} || {{Cross}} || {{Tick}} | ||
| + | |- | ||
| + | | {{Specs-Link|us_m60a3_tts}} || [[File:USA_flag.png|40px|link=]] || {{Tick}} || {{Cross}} || {{Cross}} || {{Tick}} || {{Tick}} || {{Cross}} || {{Cross}} | ||
| + | |- | ||
| + | | {{Specs-Link|us_m103}} || [[File:USA_flag.png|40px|link=]] || {{Cross}} || {{Cross}} || {{Cross}} || {{Cross}} || {{Tick}} || {{Cross}} || {{Cross}} | ||
| + | |- | ||
| + | | {{Specs-Link|us_m163_vulcan}} || [[File:USA_flag.png|40px|link=]] || {{Cross}} || {{Cross}} || {{Tick}} || {{Cross}} || {{Tick}} || {{Cross}} || {{Cross}} | ||
| + | |- | ||
| + | | {{Specs-Link|us_m247}} || [[File:USA_flag.png|40px|link=]] || {{Tick}} || {{Cross}} || {{Tick}} || {{Cross}} || {{Tick}} || {{Cross}} || {{Cross}} | ||
| + | |- | ||
| + | | {{Specs-Link|us_m551}} || [[File:USA_flag.png|40px|link=]] || {{Tick}} || {{Cross}} || {{Tick}} || {{Cross}} || {{Tick}} || {{Cross}} || {{Cross}} | ||
| + | |- | ||
| + | | {{Specs-Link|us_m901_itv}} || [[File:USA_flag.png|40px|link=]] || {{Tick}} || {{Cross}} || {{Cross}} || {{Tick}} || {{Tick}} || {{Cross}} || {{Cross}} | ||
| + | |- | ||
| + | | {{Specs-Link|us_magach_3}} || [[File:USA_flag.png|40px|link=]] || {{Cross}} || {{Cross}} || {{Cross}} || {{Cross}} || {{Tick}} || {{Cross}} || {{Cross}} | ||
| + | |- | ||
| + | | {{Specs-Link|us_mbt_70}} || [[File:USA_flag.png|40px|link=]] || {{Tick}} || {{Cross}} || {{Tick}} || {{Cross}} || {{Tick}} || {{Cross}} || {{Tick}} | ||
| + | |- | ||
| + | | {{Specs-Link|us_merkava_mk_1}} || [[File:USA_flag.png|40px|link=]] || {{Tick}} || {{Cross}} || {{Tick}} || {{Cross}} || {{Tick}} || {{Cross}} || {{Cross}} | ||
| + | |- | ||
| + | | {{Specs-Link|us_merkava_mk_2b_late}} || [[File:USA_flag.png|40px|link=]] || {{Tick}} || {{Cross}} || {{Cross}} || {{Tick}} || {{Tick}} || {{Cross}} || {{Cross}} | ||
| + | |- | ||
| + | | {{Specs-Link|us_t54e1}} || [[File:USA_flag.png|40px|link=]] || {{Cross}} || {{Cross}} || {{Cross}} || {{Cross}} || {{Tick}} || {{Cross}} || {{Cross}} | ||
| + | |- | ||
| + | | {{Specs-Link|us_t92}} || [[File:USA_flag.png|40px|link=]] || {{Cross}} || {{Cross}} || {{Cross}} || {{Cross}} || {{Tick}} || {{Cross}} || {{Cross}} | ||
| + | |- | ||
| + | | {{Specs-Link|us_t95e1}} || [[File:USA_flag.png|40px|link=]] || {{Cross}} || {{Cross}} || {{Cross}} || {{Cross}} || {{Tick}} || {{Cross}} || {{Cross}} | ||
| + | |- | ||
| + | | {{Specs-Link|us_xm1_chrysler}} || [[File:USA_flag.png|40px|link=]] || {{Tick}} || {{Cross}} || {{Cross}} || {{Tick}} || {{Tick}} || {{Cross}} || {{Cross}} | ||
| + | |- | ||
| + | | {{Specs-Link|us_xm1_gm}} || [[File:USA_flag.png|40px|link=]] || {{Tick}} || {{Cross}} || {{Cross}} || {{Tick}} || {{Tick}} || {{Cross}} || {{Cross}} | ||
| + | |- | ||
| + | | {{Specs-Link|us_xm_803}} || [[File:USA_flag.png|40px|link=]] || {{Tick}} || {{Cross}} || {{Tick}} || {{Cross}} || {{Tick}} || {{Cross}} || {{Tick}} | ||
| + | |- | ||
| + | |} | ||
| + | ====Germany==== | ||
| + | {| class="wikitable sortable" style="text-align:center" | ||
| + | |- | ||
| + | ! rowspan="2" | Vehicle !! rowspan="2" | Country !! colspan="2" | Commander !! colspan="2" | Gunner !! colspan="2" | Driver !! rowspan="2" | Infrared<br>Searchlight | ||
| + | |- | ||
| + | ! Infrared !! Thermal !! Infrared !! Thermal !! Infrared !! Thermal | ||
| + | |- | ||
| + | | {{Specs-Link|germ_begleitpanzer_57}} || [[File:Germany_flag.png|40px|link=]] || {{Tick}} || {{Cross}} || {{Cross}} || {{Tick}} || {{Tick}} || {{Cross}} || {{Cross}} | ||
| + | |- | ||
| + | | {{Specs-Link|germ_kanonenjagdpanzer}} || [[File:Germany_flag.png|40px|link=]] || {{Tick}} || {{Cross}} || {{Tick}} || {{Cross}} || {{Tick}} || {{Cross}} || {{Cross}} | ||
| + | |- | ||
| + | | {{Specs-Link|germ_kpz_70}} || [[File:Germany_flag.png|40px|link=]] || {{Tick}} || {{Cross}} || {{Tick}} || {{Cross}} || {{Tick}} || {{Cross}} || {{Tick}} | ||
| + | |- | ||
| + | | {{Specs-Link|germ_le_kpz_m41}} || [[File:Germany_flag.png|40px|link=]] || {{Cross}} || {{Cross}} || {{Cross}} || {{Cross}} || {{Tick}} || {{Cross}} || {{Cross}} | ||
| + | |- | ||
| + | | {{Specs-Link|germ_leopard_2a4}} || [[File:Germany_flag.png|40px|link=]] || {{Tick}} || {{Cross}} || {{Cross}} || {{Tick}} || {{Tick}} || {{Cross}} || {{Cross}} | ||
| + | |- | ||
| + | | {{Specs-Link|germ_leopard_2a5}} || [[File:Germany_flag.png|40px|link=]] || {{Cross}} || {{Tick}} || {{Cross}} || {{Tick}} || {{Tick}} || {{Cross}} || {{Cross}} | ||
| + | |- | ||
| + | | {{Specs-Link|germ_leopard_2k}} || [[File:Germany_flag.png|40px|link=]] || {{Tick}} || {{Cross}} || {{Tick}} || {{Cross}} || {{Tick}} || {{Cross}} || {{Cross}} | ||
| + | |- | ||
| + | | {{Specs-Link|germ_leopard_I_a1}} || [[File:Germany_flag.png|40px|link=]] || {{Tick}} || {{Cross}} || {{Tick}} || {{Cross}} || {{Tick}} || {{Cross}} || {{Cross}} | ||
| + | |- | ||
| + | | {{Specs-Link|germ_leopard_a1a1_120}} || [[File:Germany_flag.png|40px|link=]] || {{Tick}} || {{Cross}} || {{Cross}} || {{Tick}} || {{Tick}} || {{Cross}} || {{Cross}} | ||
| + | |- | ||
| + | | {{Specs-Link|germ_leopard_I}} || [[File:Germany_flag.png|40px|link=]] || {{Tick}} || {{Cross}} || {{Tick}} || {{Cross}} || {{Tick}} || {{Cross}} || {{Tick}} | ||
| + | |- | ||
| + | | {{Specs-Link|germ_mkpz_super_m48}} || [[File:Germany_flag.png|40px|link=]] || {{Cross}} || {{Tick}} || {{Cross}} || {{Tick}} || {{Tick}} || {{Cross}} || {{Tick}} | ||
| + | |- | ||
| + | | {{Specs-Link|germ_mkpz_m48a2c}} || [[File:Germany_flag.png|40px|link=]] || {{Tick}} || {{Cross}} || {{Tick}} || {{Cross}} || {{Tick}} || {{Cross}} || {{Tick}} | ||
| + | |- | ||
| + | | {{Specs-Link|germ_mkpz_m48a2ga2}} || [[File:Germany_flag.png|40px|link=]] || {{Tick}} || {{Cross}} || {{Tick}} || {{Cross}} || {{Tick}} || {{Cross}} || {{Tick}} | ||
| + | |- | ||
| + | | {{Specs-Link|germ_mkpz_m47}} || [[File:Germany_flag.png|40px|link=]] || {{Cross}} || {{Cross}} || {{Cross}} || {{Cross}} || {{Tick}} || {{Cross}} || {{Cross}} | ||
| + | |- | ||
| + | | {{Specs-Link|germ_panther_II}} || [[File:Germany_flag.png|40px|link=]] || {{Tick}} || {{Cross}} || {{Cross}} || {{Cross}} || {{Tick}} || {{Cross}} || {{Tick}} | ||
| + | |- | ||
| + | | {{Specs-Link|germ_radpanzer_90}} || [[File:Germany_flag.png|40px|link=]] || {{Tick}} || {{Cross}} || {{Tick}} || {{Cross}} || {{Tick}} || {{Cross}} || {{Cross}} | ||
| + | |- | ||
| + | | {{Specs-Link|germ_raketenjagdpanzer_2_hot}} || [[File:Germany_flag.png|40px|link=]] || {{Tick}} || {{Cross}} || {{Tick}} || {{Cross}} || {{Tick}} || {{Cross}} || {{Cross}} | ||
| + | |- | ||
| + | | {{Specs-Link|germ_bmp_1_ddr}} || [[File:Germany_flag.png|40px|link=]] || {{Tick}} || {{Cross}} || {{Tick}} || {{Cross}} || {{Tick}} || {{Cross}} || {{Tick}} | ||
| + | |- | ||
| + | | {{Specs-Link|germ_thyssen_henschel_tam}} || [[File:Germany_flag.png|40px|link=]] || {{Cross}} || {{Cross}} || {{Cross}} || {{Cross}} || {{Tick}} || {{Cross}} || {{Cross}} | ||
| + | |- | ||
| + | | {{Specs-Link|germ_vt_1_2}} || [[File:Germany_flag.png|40px|link=]] || {{Tick}} || {{Cross}} || {{Tick}} || {{Cross}} || {{Tick}} || {{Cross}} || {{Cross}} | ||
| + | |- | ||
| + | |} | ||
| + | ====USSR==== | ||
| + | {| class="wikitable sortable" style="text-align:center" | ||
| + | |- | ||
| + | ! rowspan="2" | Vehicle !! rowspan="2" | Country !! colspan="2" | Commander !! colspan="2" | Gunner !! colspan="2" | Driver !! rowspan="2" | Infrared<br>Searchlight | ||
| + | |- | ||
| + | ! Infrared !! Thermal !! Infrared !! Thermal !! Infrared !! Thermal | ||
| + | |- | ||
| + | | {{Specs-Link|ussr_asu_57}} || [[File:USSR_flag.png|40px|link=]] || {{Cross}} || {{Cross}} || {{Cross}} || {{Cross}} || {{Tick}} || {{Cross}} || {{Cross}} | ||
| + | |- | ||
| + | | {{Specs-Link|ussr_asu_85}} || [[File:USSR_flag.png|40px|link=]] || {{Tick}} || {{Cross}} || {{Tick}} || {{Cross}} || {{Tick}} || {{Cross}} || {{Tick}} | ||
| + | |- | ||
| + | | {{Specs-Link|ussr_bmp_1}} || [[File:USSR_flag.png|40px|link=]] || {{Tick}} || {{Cross}} || {{Tick}} || {{Cross}} || {{Tick}} || {{Cross}} || {{Tick}} | ||
| + | |- | ||
| + | | {{Specs-Link|ussr_bmp_2}} || [[File:USSR_flag.png|40px|link=]] || {{Tick}} || {{Cross}} || {{Tick}} || {{Cross}} || {{Tick}} || {{Cross}} || {{Tick}} | ||
| + | |- | ||
| + | | {{Specs-Link|ussr_bmp_2m}} || [[File:USSR_flag.png|40px|link=]] || {{Tick}} || {{Cross}} || {{Cross}} || {{Tick}} || {{Tick}} || {{Cross}} || {{Tick}} | ||
| + | |- | ||
| + | | {{Specs-Link|ussr_bmp_3}} || [[File:USSR_flag.png|40px|link=]] || {{Tick}} || {{Tick}} || {{Tick}} || {{Tick}} || {{Tick}} || {{Cross}} || {{Tick}} | ||
| + | |- | ||
| + | | {{Specs-Link|ussr_it_1}} || [[File:USSR_flag.png|40px|link=]] || {{Tick}} || {{Cross}} || {{Tick}} || {{Cross}} || {{Tick}} || {{Cross}} || {{Tick}} | ||
| + | |- | ||
| + | | {{Specs-Link|ussr_9p157}} || [[File:USSR_flag.png|40px|link=]] || {{Cross}} || {{Tick}} || {{Cross}} || {{Tick}} || {{Tick}} || {{Cross}} || {{Cross}} | ||
| + | |- | ||
| + | | {{Specs-Link|ussr_object_120}} || [[File:USSR_flag.png|40px|link=]] || {{Tick}} || {{Cross}} || {{Tick}} || {{Cross}} || {{Tick}} || {{Cross}} || {{Tick}} | ||
| + | |- | ||
| + | | {{Specs-Link|ussr_object_279}} || [[File:USSR_flag.png|40px|link=]] || {{Tick}} || {{Cross}} || {{Tick}} || {{Cross}} || {{Tick}} || {{Cross}} || {{Tick}} | ||
| + | |- | ||
| + | | {{Specs-Link|ussr_object_685}} || [[File:USSR_flag.png|40px|link=]] || {{Tick}} || {{Cross}} || {{Tick}} || {{Cross}} || {{Tick}} || {{Cross}} || {{Tick}} | ||
| + | |- | ||
| + | | {{Specs-Link|ussr_object_906}} || [[File:USSR_flag.png|40px|link=]] || {{Tick}} || {{Cross}} || {{Tick}} || {{Cross}} || {{Tick}} || {{Cross}} || {{Tick}} | ||
| + | |- | ||
| + | | {{Specs-Link|ussr_pt_76b}} || [[File:USSR_flag.png|40px|link=]] || {{Cross}} || {{Cross}} || {{Cross}} || {{Cross}} || {{Tick}} || {{Cross}} || {{Cross}} | ||
| + | |- | ||
| + | | {{Specs-Link|ussr_9p149}} || [[File:USSR_flag.png|40px|link=]] || {{Tick}} || {{Cross}} || {{Cross}} || {{Tick}} || {{Tick}} || {{Cross}} || {{Cross}} | ||
| + | |- | ||
| + | | {{Specs-Link|ussr_su_122_54}} || [[File:USSR_flag.png|40px|link=]] || {{Cross}} || {{Cross}} || {{Cross}} || {{Cross}} || {{Tick}} || {{Cross}} || {{Cross}} | ||
| + | |- | ||
| + | | {{Specs-Link|ussr_t_10m}} || [[File:USSR_flag.png|40px|link=]] || {{Tick}} || {{Cross}} || {{Tick}} || {{Cross}} || {{Tick}} || {{Cross}} || {{Tick}} | ||
| + | |- | ||
| + | | {{Specs-Link|ussr_t_55a}} || [[File:USSR_flag.png|40px|link=]] || {{Tick}} || {{Cross}} || {{Tick}} || {{Cross}} || {{Tick}} || {{Cross}} || {{Tick}} | ||
| + | |- | ||
| + | | {{Specs-Link|ussr_t_55_am}} || [[File:USSR_flag.png|40px|link=]] || {{Tick}} || {{Cross}} || {{Tick}} || {{Cross}} || {{Tick}} || {{Cross}} || {{Tick}} | ||
| + | |- | ||
| + | | {{Specs-Link|ussr_t_62}} || [[File:USSR_flag.png|40px|link=]] || {{Tick}} || {{Cross}} || {{Tick}} || {{Cross}} || {{Tick}} || {{Cross}} || {{Tick}} | ||
| + | |- | ||
| + | | {{Specs-Link|ussr_t_62m1}} || [[File:USSR_flag.png|40px|link=]] || {{Tick}} || {{Cross}} || {{Tick}} || {{Cross}} || {{Tick}} || {{Cross}} || {{Tick}} | ||
| + | |- | ||
| + | | {{Specs-Link|ussr_t_64a_1971}} || [[File:USSR_flag.png|40px|link=]] || {{Tick}} || {{Cross}} || {{Tick}} || {{Cross}} || {{Tick}} || {{Cross}} || {{Tick}} | ||
| + | |- | ||
| + | | {{Specs-Link|ussr_t_64_b_1984}} || [[File:USSR_flag.png|40px|link=]] || {{Tick}} || {{Cross}} || {{Tick}} || {{Cross}} || {{Tick}} || {{Cross}} || {{Tick}} | ||
| + | |- | ||
| + | | {{Specs-Link|ussr_t_72a}} || [[File:USSR_flag.png|40px|link=]] || {{Tick}} || {{Cross}} || {{Tick}} || {{Cross}} || {{Tick}} || {{Cross}} || {{Tick}} | ||
| + | |- | ||
| + | | {{Specs-Link|ussr_t_72b}} || [[File:USSR_flag.png|40px|link=]] || {{Tick}} || {{Cross}} || {{Tick}} || {{Cross}} || {{Tick}} || {{Cross}} || {{Tick}} | ||
| + | |- | ||
| + | | {{Specs-Link|ussr_t_80b}} || [[File:USSR_flag.png|40px|link=]] || {{Tick}} || {{Cross}} || {{Tick}} || {{Tick}} || {{Tick}} || {{Cross}} || {{Tick}} | ||
| + | |- | ||
| + | | {{Specs-Link|ussr_t_80u}} || [[File:USSR_flag.png|40px|link=]] || {{Tick}} || {{Cross}} || {{Tick}} || {{Tick}} || {{Tick}} || {{Cross}} || {{Tick}} | ||
| + | |- | ||
| + | | {{Specs-Link|ussr_zprk_2s6}} || [[File:USSR_flag.png|40px|link=]] || {{Tick}} || {{Cross}} || {{Cross}} || {{Tick}} || {{Tick}} || {{Cross}} || {{Tick}} | ||
| + | |- | ||
| + | | {{Specs-Link|ussr_zsu_23_4}} || [[File:USSR_flag.png|40px|link=]] || {{Tick}} || {{Cross}} || {{Cross}} || {{Cross}} || {{Tick}} || {{Cross}} || {{Tick}} | ||
| + | |- | ||
| + | |} | ||
| + | ====Britain==== | ||
| + | {| class="wikitable sortable" style="text-align:center" | ||
| + | |- | ||
| + | ! rowspan="2" | Vehicle !! rowspan="2" | Country !! colspan="2" | Commander !! colspan="2" | Gunner !! colspan="2" | Driver !! rowspan="2" | Infrared<br>Searchlight | ||
| + | |- | ||
| + | ! Infrared !! Thermal !! Infrared !! Thermal !! Infrared !! Thermal | ||
| + | |- | ||
| + | | {{Specs-Link|uk_centurion_mk_10}} || [[File:Britain_flag.png|40px|link=]] || {{Tick}} || {{Cross}} || {{Tick}} || {{Cross}} || {{Tick}} || {{Cross}} || {{Cross}} | ||
| + | |- | ||
| + | | {{Specs-Link|uk_challenger_II}} || [[File:Britain_flag.png|40px|link=]] || {{Tick}} || {{Cross}} || {{Cross}} || {{Tick}} || {{Tick}} || {{Cross}} || {{Cross}} | ||
| + | |- | ||
| + | | {{Specs-Link|uk_challenger_2_dorchester}} || [[File:Britain_flag.png|40px|link=]] || {{Tick}} || {{Cross}} || {{Cross}} || {{Tick}} || {{Tick}} || {{Cross}} || {{Cross}} | ||
| + | |- | ||
| + | | {{Specs-Link|uk_challenger_1}} || [[File:Britain_flag.png|40px|link=]] || {{Tick}} || {{Cross}} || {{Cross}} || {{Tick}} || {{Tick}} || {{Cross}} || {{Cross}} | ||
| + | |- | ||
| + | | {{Specs-Link|uk_challenger_mk_3}} || [[File:Britain_flag.png|40px|link=]] || {{Tick}} || {{Cross}} || {{Cross}} || {{Tick}} || {{Tick}} || {{Cross}} || {{Cross}} | ||
| + | |- | ||
| + | | {{Specs-Link|uk_chieftain_marksman}} || [[File:Britain_flag.png|40px|link=]] || {{Cross}} || {{Cross}} || {{Cross}} || {{Cross}} || {{Tick}} || {{Cross}} || {{Cross}} | ||
| + | |- | ||
| + | | {{Specs-Link|uk_chieftain_mk_3}} || [[File:Britain_flag.png|40px|link=]] || {{Tick}} || {{Cross}} || {{Tick}} || {{Cross}} || {{Tick}} || {{Cross}} || {{Tick}} | ||
| + | |- | ||
| + | | {{Specs-Link|uk_chieftain_mk_5}} || [[File:Britain_flag.png|40px|link=]] || {{Tick}} || {{Cross}} || {{Tick}} || {{Cross}} || {{Tick}} || {{Cross}} || {{Tick}} | ||
| + | |- | ||
| + | | {{Specs-Link|uk_chieftain_mk_10}} || [[File:Britain_flag.png|40px|link=]] || {{Tick}} || {{Cross}} || {{Tick}} || {{Cross}} || {{Tick}} || {{Cross}} || {{Tick}} | ||
| + | |- | ||
| + | | {{Specs-Link|uk_falcon}} || [[File:Britain_flag.png|40px|link=]] || {{Cross}} || {{Cross}} || {{Cross}} || {{Cross}} || {{Tick}} || {{Cross}} || {{Cross}} | ||
| + | |- | ||
| + | | {{Specs-Link|uk_rooikat_105_td}} || [[File:Britain_flag.png|40px|link=]] || {{Tick}} || {{Cross}} || {{Cross}} || {{Tick}} || {{Tick}} || {{Cross}} || {{Cross}} | ||
| + | |- | ||
| + | | {{Specs-Link|uk_rooikat_76}} || [[File:Britain_flag.png|40px|link=]] || {{Tick}} || {{Cross}} || {{Tick}} || {{Cross}} || {{Tick}} || {{Cross}} || {{Cross}} | ||
| + | |- | ||
| + | | {{Specs-Link|uk_centurion_shot_kal_d}} || [[File:Britain_flag.png|40px|link=]] || {{Cross}} || {{Cross}} || {{Cross}} || {{Cross}} || {{Tick}} || {{Cross}} || {{Cross}} | ||
| + | |- | ||
| + | | {{Specs-Link|uk_stormer_hvm}} || [[File:Britain_flag.png|40px|link=]] || {{Tick}} || {{Cross}} || {{Cross}} || {{Tick}} || {{Tick}} || {{Cross}} || {{Cross}} | ||
| + | |- | ||
| + | | {{Specs-Link|uk_fv102_striker}} || [[File:Britain_flag.png|40px|link=]] || {{Tick}} || {{Cross}} || {{Cross}} || {{Tick}} || {{Tick}} || {{Cross}} || {{Cross}} | ||
| + | |- | ||
| + | | {{Specs-Link|uk_fv438_swingfire}} || [[File:Britain_flag.png|40px|link=]] || {{Cross}} || {{Cross}} || {{Cross}} || {{Cross}} || {{Tick}} || {{Cross}} || {{Cross}} | ||
| + | |- | ||
| + | | {{Specs-Link|uk_vickers_mbt_mk_1}} || [[File:Britain_flag.png|40px|link=]] || {{Cross}} || {{Cross}} || {{Cross}} || {{Cross}} || {{Tick}} || {{Cross}} || {{Cross}} | ||
| + | |- | ||
| + | | {{Specs-Link|uk_vickers_mk7}} || [[File:Britain_flag.png|40px|link=]] || {{Tick}} || {{Cross}} || {{Cross}} || {{Tick}} || {{Tick}} || {{Cross}} || {{Cross}} | ||
| + | |- | ||
| + | | {{Specs-Link|uk_fv510_isv}} || [[File:Britain_flag.png|40px|link=]] || {{Tick}} || {{Cross}} || {{Cross}} || {{Tick}} || {{Tick}} || {{Cross}} || {{Cross}} | ||
| + | |- | ||
| + | |} | ||
| + | ====Japan==== | ||
| + | {| class="wikitable sortable" style="text-align:center" | ||
| + | |- | ||
| + | ! rowspan="2" | Vehicle !! rowspan="2" | Country !! colspan="2" | Commander !! colspan="2" | Gunner !! colspan="2" | Driver !! rowspan="2" | Infrared<br>Searchlight | ||
| + | |- | ||
| + | ! Infrared !! Thermal !! Infrared !! Thermal !! Infrared !! Thermal | ||
| + | |- | ||
| + | | {{Specs-Link|jp_m41_walker_bulldog}} || [[File:Japan_flag.png|40px|link=]] || {{Cross}} || {{Cross}} || {{Cross}} || {{Cross}} || {{Tick}} || {{Cross}} || {{Cross}} | ||
| + | |- | ||
| + | | {{Specs-Link|jp_m42_duster}} || [[File:Japan_flag.png|40px|link=]] || {{Cross}} || {{Cross}} || {{Cross}} || {{Cross}} || {{Tick}} || {{Cross}} || {{Cross}} | ||
| + | |- | ||
| + | | {{Specs-Link|jp_type_16}} || [[File:Japan_flag.png|40px|link=]] || {{Cross}} || {{Tick}} || {{Cross}} || {{Tick}} || {{Tick}} || {{Cross}} || {{Cross}} | ||
|- | |- | ||
| − | + | | {{Specs-Link|jp_type_61}} || [[File:Japan_flag.png|40px|link=]] || {{Cross}} || {{Cross}} || {{Cross}} || {{Cross}} || {{Tick}} || {{Cross}} || {{Cross}} | |
|- | |- | ||
| − | + | | {{Specs-Link|jp_type_74}} || [[File:Japan_flag.png|40px|link=]] || {{Tick}} || {{Cross}} || {{Tick}} || {{Cross}} || {{Tick}} || {{Cross}} || {{Tick}} | |
| − | |||
| − | |||
|- | |- | ||
| − | | | + | | {{Specs-Link|jp_type_74_mod_g_kai}} || [[File:Japan_flag.png|40px|link=]] || {{Tick}} || {{Cross}} || {{Cross}} || {{Tick}} || {{Tick}} || {{Cross}} || {{Cross}} |
|- | |- | ||
| − | + | | {{Specs-Link|jp_type_75_mlrs}} || [[File:Japan_flag.png|40px|link=]] || {{Cross}} || {{Cross}} || {{Cross}} || {{Cross}} || {{Tick}} || {{Cross}} || {{Cross}} | |
|- | |- | ||
| − | + | | {{Specs-Link|jp_type_75}} || [[File:Japan_flag.png|40px|link=]] || {{Cross}} || {{Cross}} || {{Cross}} || {{Cross}} || {{Tick}} || {{Cross}} || {{Cross}} | |
| − | |||
| − | |||
| − | |||
| − | |||
| − | |||
|- | |- | ||
| − | | | + | | {{Specs-Link|jp_type_87}} || [[File:Japan_flag.png|40px|link=]] || {{Cross}} || {{Cross}} || {{Cross}} || {{Cross}} || {{Tick}} || {{Cross}} || {{Tick}} |
|- | |- | ||
| − | | | + | | {{Specs-Link|jp_type_89}} || [[File:Japan_flag.png|40px|link=]] || {{Tick}} || {{Cross}} || {{Cross}} || {{Tick}} || {{Tick}} || {{Cross}} || {{Cross}} |
|- | |- | ||
| − | + | | {{Specs-Link|jp_type_90}} || [[File:Japan_flag.png|40px|link=]] || {{Tick}} || {{Cross}} || {{Cross}} || {{Tick}} || {{Tick}} || {{Cross}} || {{Cross}} | |
|- | |- | ||
| − | + | | {{Specs-Link|jp_type_90b}} || [[File:Japan_flag.png|40px|link=]] || {{Tick}} || {{Cross}} || {{Cross}} || {{Tick}} || {{Tick}} || {{Cross}} || {{Cross}} | |
| − | |||
| − | |||
| − | |||
|- | |- | ||
| − | | | + | | {{Specs-Link|jp_type_93}} || [[File:Japan_flag.png|40px|link=]] || {{Cross}} || {{Tick}} || {{Cross}} || {{Tick}} || {{Tick}} || {{Cross}} || {{Cross}} |
|- | |- | ||
|} | |} | ||
| − | + | ====China==== | |
| − | + | {| class="wikitable sortable" style="text-align:center" | |
| − | {| class="wikitable sortable" style="text-align:center" | + | |- |
| − | ! colspan=" | + | ! rowspan="2" | Vehicle !! rowspan="2" | Country !! colspan="2" | Commander !! colspan="2" | Gunner !! colspan="2" | Driver !! rowspan="2" | Infrared<br>Searchlight |
| + | |- | ||
| + | ! Infrared !! Thermal !! Infrared !! Thermal !! Infrared !! Thermal | ||
| + | |- | ||
| + | | {{Specs-Link|cn_cm11}} || [[File:China_flag.png|40px|link=]] || {{Tick}} || {{Cross}} || {{Cross}} || {{Tick}} || {{Tick}} || {{Cross}} || {{Cross}} | ||
| + | |- | ||
| + | | {{Specs-Link|cn_m42_duster}} || [[File:China_flag.png|40px|link=]] || {{Cross}} || {{Cross}} || {{Cross}} || {{Cross}} || {{Tick}} || {{Cross}} || {{Cross}} | ||
| + | |- | ||
| + | | {{Specs-Link|cn_m48a1_patton_III}} || [[File:China_flag.png|40px|link=]] || {{Cross}} || {{Cross}} || {{Cross}} || {{Cross}} || {{Tick}} || {{Cross}} || {{Cross}} | ||
| + | |- | ||
| + | | {{Specs-Link|cn_m60a3_tts}} || [[File:China_flag.png|40px|link=]] || {{Tick}} || {{Cross}} || {{Cross}} || {{Tick}} || {{Tick}} || {{Cross}} || {{Cross}} | ||
| + | |- | ||
| + | | {{Specs-Link|cn_m113a1_tow}} || [[File:China_flag.png|40px|link=]] || {{Tick}} || {{Cross}} || {{Tick}} || {{Cross}} || {{Tick}} || {{Cross}} || {{Cross}} | ||
| + | |- | ||
| + | | {{Specs-Link|cn_pt_76}} || [[File:China_flag.png|40px|link=]] || {{Cross}} || {{Cross}} || {{Cross}} || {{Cross}} || {{Tick}} || {{Cross}} || {{Cross}} | ||
| + | |- | ||
| + | | {{Specs-Link|cn_t_62}} || [[File:China_flag.png|40px|link=]] || {{Tick}} || {{Cross}} || {{Tick}} || {{Cross}} || {{Tick}} || {{Cross}} || {{Tick}} | ||
| + | |- | ||
| + | | {{Specs-Link|cn_type_69_2g}} || [[File:China_flag.png|40px|link=]] || {{Tick}} || {{Cross}} || {{Tick}} || {{Cross}} || {{Tick}} || {{Cross}} || {{Cross}} | ||
| + | |- | ||
| + | | {{Specs-Link|cn_type_69}} || [[File:China_flag.png|40px|link=]] || {{Tick}} || {{Cross}} || {{Tick}} || {{Cross}} || {{Tick}} || {{Cross}} || {{Tick}} | ||
|- | |- | ||
| − | + | | {{Specs-Link|cn_type_86}} || [[File:China_flag.png|40px|link=]] || {{Tick}} || {{Cross}} || {{Tick}} || {{Cross}} || {{Tick}} || {{Cross}} || {{Tick}} | |
| − | |||
| − | |||
|- | |- | ||
| − | + | | {{Specs-Link|cn_type_59d}} || [[File:China_flag.png|40px|link=]] || {{Tick}} || {{Cross}} || {{Cross}} || {{Tick}} || {{Tick}} || {{Cross}} || {{Cross}} | |
| − | |||
| − | |||
| − | |||
| − | |||
| − | |||
|- | |- | ||
| − | | | + | | {{Specs-Link|cn_ztz_96}} || [[File:China_flag.png|40px|link=]] || {{Tick}} || {{Cross}} || {{Tick}} || {{Cross}} || {{Tick}} || {{Cross}} || {{Cross}} |
| − | | | ||
| − | |||
|- | |- | ||
| − | | | + | | {{Specs-Link|cn_ztz_96a}} || [[File:China_flag.png|40px|link=]] || {{Tick}} || {{Cross}} || {{Cross}} || {{Tick}} || {{Tick}} || {{Cross}} || {{Cross}} |
| − | | | ||
| − | |||
|- | |- | ||
|} | |} | ||
| − | {| class="wikitable sortable" style="text-align:center" | + | ====Italy==== |
| − | ! colspan=" | + | {| class="wikitable sortable" style="text-align:center" |
| + | |- | ||
| + | ! rowspan="2" | Vehicle !! rowspan="2" | Country !! colspan="2" | Commander !! colspan="2" | Gunner !! colspan="2" | Driver !! rowspan="2" | Infrared<br>Searchlight | ||
| + | |- | ||
| + | ! Infrared !! Thermal !! Infrared !! Thermal !! Infrared !! Thermal | ||
| + | |- | ||
| + | | {{Specs-Link|it_c1_ariete}} || [[File:Italy_flag.png|40px|link=]] || {{Cross}} || {{Tick}} || {{Cross}} || {{Tick}} || {{Tick}} || {{Cross}} || {{Cross}} | ||
| + | |- | ||
| + | | {{Specs-Link|it_c1_ariete_preserie}} || [[File:Italy_flag.png|40px|link=]] || {{Tick}} || {{Cross}} || {{Cross}} || {{Tick}} || {{Tick}} || {{Cross}} || {{Cross}} | ||
| + | |- | ||
| + | | {{Specs-Link|it_c1_ariete_pso}} || [[File:Italy_flag.png|40px|link=]] || {{Cross}} || {{Tick}} || {{Cross}} || {{Tick}} || {{Tick}} || {{Cross}} || {{Cross}} | ||
| + | |- | ||
| + | | {{Specs-Link|it_fiat_6616_cockerill}} || [[File:Italy_flag.png|40px|link=]] || {{Cross}} || {{Cross}} || {{Tick}} || {{Cross}} || {{Cross}} || {{Cross}} || {{Cross}} | ||
|- | |- | ||
| − | + | | {{Specs-Link|it_aubl_74_60_70m}} || [[File:Italy_flag.png|40px|link=]] || {{Cross}} || {{Cross}} || {{Tick}} || {{Cross}} || {{Cross}} || {{Cross}} || {{Cross}} | |
| − | |||
| − | |||
| − | |||
| − | |||
| − | |||
| − | |||
| − | |||
| − | |||
| − | |||
|- | |- | ||
| − | + | | {{Specs-Link|it_b1_centauro}} || [[File:Italy_flag.png|40px|link=]] || {{Tick}} || {{Cross}} || {{Cross}} || {{Tick}} || {{Tick}} || {{Cross}} || {{Cross}} | |
| − | |||
| − | |||
|- | |- | ||
| − | | | + | | {{Specs-Link|it_centauro_mgs_120}} || [[File:Italy_flag.png|40px|link=]] || {{Cross}} || {{Tick}} || {{Cross}} || {{Tick}} || {{Tick}} || {{Cross}} || {{Cross}} |
| − | | | ||
| − | | | ||
|- | |- | ||
| − | | | + | | {{Specs-Link|it_b1_centauro_romor}} || [[File:Italy_flag.png|40px|link=]] || {{Tick}} || {{Cross}} || {{Cross}} || {{Tick}} || {{Tick}} || {{Cross}} || {{Cross}} |
| − | |- | + | |- |
| − | | | + | | {{Specs-Link|it_m47_105}} || [[File:Italy_flag.png|40px|link=]] || {{Cross}} || {{Cross}} || {{Cross}} || {{Cross}} || {{Tick}} || {{Cross}} || {{Cross}} |
| + | |- | ||
| + | | {{Specs-Link|it_m60a1_ariete}} || [[File:Italy_flag.png|40px|link=]] || {{Tick}} || {{Cross}} || {{Tick}} || {{Cross}} || {{Tick}} || {{Cross}} || {{Cross}} | ||
| + | |- | ||
| + | | {{Specs-Link|it_m113a1_tow}} || [[File:Italy_flag.png|40px|link=]] || {{Tick}} || {{Cross}} || {{Tick}} || {{Cross}} || {{Tick}} || {{Cross}} || {{Cross}} | ||
| + | |- | ||
| + | | {{Specs-Link|it_of_40_mk_1}} || [[File:Italy_flag.png|40px|link=]] || {{Tick}} || {{Cross}} || {{Tick}} || {{Cross}} || {{Tick}} || {{Cross}} || {{Cross}} | ||
| + | |- | ||
| + | | {{Specs-Link|it_of_40_mk_2a}} || [[File:Italy_flag.png|40px|link=]] || {{Tick}} || {{Cross}} || {{Tick}} || {{Cross}} || {{Tick}} || {{Cross}} || {{Cross}} | ||
| + | |- | ||
| + | | {{Specs-Link|it_of_40_mtca}} || [[File:Italy_flag.png|40px|link=]] || {{Tick}} || {{Cross}} || {{Tick}} || {{Cross}} || {{Tick}} || {{Cross}} || {{Cross}} | ||
| + | |- | ||
| + | | {{Specs-Link|it_otomatic}} || [[File:Italy_flag.png|40px|link=]] || {{Tick}} || {{Cross}} || {{Cross}} || {{Tick}} || {{Tick}} || {{Cross}} || {{Cross}} | ||
|- | |- | ||
|} | |} | ||
| − | + | ====France==== | |
| − | ===== | ||
| − | |||
{| class="wikitable sortable" style="text-align:center" | {| class="wikitable sortable" style="text-align:center" | ||
|- | |- | ||
| − | ! | + | ! rowspan="2" | Vehicle !! rowspan="2" | Country !! colspan="2" | Commander !! colspan="2" | Gunner !! colspan="2" | Driver !! rowspan="2" | Infrared<br>Searchlight |
| − | ! | + | |- |
| − | ! | + | ! Infrared !! Thermal !! Infrared !! Thermal !! Infrared !! Thermal |
| − | ! | + | |- |
| − | ! | + | | {{Specs-Link|fr_amx_10rc}} || [[File:France_flag.png|40px|link=]] || {{Tick}} || {{Cross}} || {{Cross}} || {{Tick}} || {{Tick}} || {{Cross}} || {{Cross}} |
| − | ! | + | |- |
| − | ! | + | | {{Specs-Link|fr_amx_30}} || [[File:France_flag.png|40px|link=]] || {{Tick}} || {{Cross}} || {{Tick}} || {{Cross}} || {{Tick}} || {{Cross}} || {{Cross}} |
| − | + | |- | |
| + | | {{Specs-Link|fr_amx_30_1972}} || [[File:France_flag.png|40px|link=]] || {{Tick}} || {{Cross}} || {{Tick}} || {{Cross}} || {{Tick}} || {{Cross}} || {{Cross}} | ||
| + | |- | ||
| + | | {{Specs-Link|fr_amx_30_ACRA}} || [[File:France_flag.png|40px|link=]] || {{Tick}} || {{Cross}} || {{Tick}} || {{Cross}} || {{Tick}} || {{Cross}} || {{Cross}} | ||
| + | |- | ||
| + | | {{Specs-Link|fr_amx_30_super}} || [[File:France_flag.png|40px|link=]] || {{Tick}} || {{Cross}} || {{Cross}} || {{Tick}} || {{Tick}} || {{Cross}} || {{Cross}} | ||
| + | |- | ||
| + | | {{Specs-Link|fr_amx_30_b2}} || [[File:France_flag.png|40px|link=]] || {{Tick}} || {{Cross}} || {{Cross}} || {{Tick}} || {{Tick}} || {{Cross}} || {{Cross}} | ||
| + | |- | ||
| + | | {{Specs-Link|fr_amx_30_b2_brenus}} || [[File:France_flag.png|40px|link=]] || {{Tick}} || {{Cross}} || {{Cross}} || {{Tick}} || {{Tick}} || {{Cross}} || {{Cross}} | ||
| + | |- | ||
| + | | {{Specs-Link|fr_amx_32}} || [[File:France_flag.png|40px|link=]] || {{Tick}} || {{Cross}} || {{Cross}} || {{Tick}} || {{Tick}} || {{Cross}} || {{Cross}} | ||
| + | |- | ||
| + | | {{Specs-Link|fr_amx_40}} || [[File:France_flag.png|40px|link=]] || {{Tick}} || {{Cross}} || {{Cross}} || {{Tick}} || {{Tick}} || {{Cross}} || {{Cross}} | ||
|- | |- | ||
| − | || | + | | {{Specs-Link|fr_leclerc_s1}} || [[File:France_flag.png|40px|link=]] || {{Cross}} || {{Tick}} || {{Cross}} || {{Tick}} || {{Tick}} || {{Cross}} || {{Cross}} |
|- | |- | ||
|} | |} | ||
| − | + | ====Sweden==== | |
| − | + | {| class="wikitable sortable" style="text-align:center" | |
| − | + | |- | |
| − | === | + | ! rowspan="2" | Vehicle !! rowspan="2" | Country !! colspan="2" | Commander !! colspan="2" | Gunner !! colspan="2" | Driver !! rowspan="2" | Infrared<br>Searchlight |
| − | + | |- | |
| − | {{ | + | ! Infrared !! Thermal !! Infrared !! Thermal !! Infrared !! Thermal |
| − | + | |- | |
| − | {| | + | | {{Specs-Link|sw_cv_90105_tml}} || [[File:Sweden_flag.png|40px|link=]] || {{Cross}} || {{Tick}} || {{Cross}} || {{Tick}} || {{Tick}} || {{Cross}} || {{Cross}} |
| + | |- | ||
| + | | {{Specs-Link|sw_cv_90120}} || [[File:Sweden_flag.png|40px|link=]] || {{Cross}} || {{Tick}} || {{Cross}} || {{Tick}} || {{Tick}} || {{Cross}} || {{Cross}} | ||
| + | |- | ||
| + | | {{Specs-Link|sw_lvkv_90c}} || [[File:Sweden_flag.png|40px|link=]] || {{Tick}} || {{Cross}} || {{Cross}} || {{Tick}} || {{Tick}} || {{Cross}} || {{Cross}} | ||
| + | |- | ||
| + | | {{Specs-Link|sw_pvrbv_551}} || [[File:Sweden_flag.png|40px|link=]] || {{Tick}} || {{Cross}} || {{Tick}} || {{Cross}} || {{Tick}} || {{Cross}} || {{Cross}} | ||
| + | |- | ||
| + | | {{Specs-Link|sw_strf_90c}} || [[File:Sweden_flag.png|40px|link=]] || {{Tick}} || {{Cross}} || {{Cross}} || {{Tick}} || {{Tick}} || {{Cross}} || {{Cross}} | ||
| + | |- | ||
| + | | {{Specs-Link|sw_strf_9056}} || [[File:Sweden_flag.png|40px|link=]] || {{Cross}} || {{Tick}} || {{Cross}} || {{Tick}} || {{Tick}} || {{Cross}} || {{Cross}} | ||
| + | |- | ||
| + | | {{Specs-Link|sw_strv_101}} || [[File:Sweden_flag.png|40px|link=]] || {{Tick}} || {{Cross}} || {{Tick}} || {{Cross}} || {{Tick}} || {{Cross}} || {{Cross}} | ||
| + | |- | ||
| + | | {{Specs-Link|sw_strv_103a}} || [[File:Sweden_flag.png|40px|link=]] || {{Tick}} || {{Cross}} || {{Tick}} || {{Cross}} || {{Tick}} || {{Cross}} || {{Cross}} | ||
| + | |- | ||
| + | | {{Specs-Link|sw_strv_103c}} || [[File:Sweden_flag.png|40px|link=]] || {{Tick}} || {{Cross}} || {{Tick}} || {{Cross}} || {{Tick}} || {{Cross}} || {{Cross}} | ||
|- | |- | ||
| − | + | | {{Specs-Link|sw_strv_121}} || [[File:Sweden_flag.png|40px|link=]] || {{Tick}} || {{Cross}} || {{Cross}} || {{Tick}} || {{Tick}} || {{Cross}} || {{Cross}} | |
|- | |- | ||
| − | + | | {{Specs-Link|sw_strv_122}} || [[File:Sweden_flag.png|40px|link=]] || {{Cross}} || {{Tick}} || {{Cross}} || {{Tick}} || {{Tick}} || {{Cross}} || {{Cross}} | |
|- | |- | ||
| − | + | | {{Specs-Link|sw_strv_103_0}} || [[File:Sweden_flag.png|40px|link=]] || {{Tick}} || {{Cross}} || {{Tick}} || {{Cross}} || {{Tick}} || {{Cross}} || {{Cross}} | |
| − | |||
| − | |||
| − | |||
|- | |- | ||
| − | | | + | | {{Specs-Link|sw_udes_33}} || [[File:Sweden_flag.png|40px|link=]] || {{Tick}} || {{Cross}} || {{Tick}} || {{Cross}} || {{Tick}} || {{Cross}} || {{Cross}} |
|- | |- | ||
|} | |} | ||
| − | == | + | ===Helicopters=== |
| − | + | {| class="wikitable sortable" style="text-align:center" | |
| − | + | |- | |
| − | + | ! rowspan="2" | Vehicle !! rowspan="2" | Country !! Pilot !! Gunner !! colspan="2" | Gunsight | |
| − | + | |- | |
| − | + | ! Infrared !! Infrared !! Infrared !! Thermal | |
| − | + | |- | |
| − | + | | {{Specs-Link|a_129_a}} || [[File:{{#unit:a_129_a|country}}_flag.png|40px|link=]] || [[File:Icon GreenCheckmark.png|link=]] || [[File:Icon GreenCheckmark.png|link=]] || [[File:Icon RedXCross.png|link=]] || [[File:Icon GreenCheckmark.png|link=]] | |
| − | + | |- | |
| − | + | | {{Specs-Link|ah_1f}} || [[File:{{#unit:ah_1f|country}}_flag.png|40px|link=]] || [[File:Icon GreenCheckmark.png|link=]] || [[File:Icon GreenCheckmark.png|link=]] || [[File:Icon RedXCross.png|link=]] || [[File:Icon GreenCheckmark.png|link=]] | |
| − | [[ | + | |- |
| − | + | | {{Specs-Link|ah_1g}} || [[File:{{#unit:ah_1g|country}}_flag.png|40px|link=]] || [[File:Icon GreenCheckmark.png|link=]] || [[File:Icon GreenCheckmark.png|link=]] || [[File:Icon RedXCross.png|link=]] || [[File:Icon RedXCross.png|link=]] | |
| − | + | |- | |
| − | + | | {{Specs-Link|ah_1s_late}} || [[File:{{#unit:ah_1s_late|country}}_flag.png|40px|link=]] || [[File:Icon GreenCheckmark.png|link=]] || [[File:Icon GreenCheckmark.png|link=]] || [[File:Icon RedXCross.png|link=]] || [[File:Icon GreenCheckmark.png|link=]] | |
| − | + | |- | |
| − | + | | {{Specs-Link|ah_1s_early}} || [[File:{{#unit:ah_1s_early|country}}_flag.png|40px|link=]] || [[File:Icon GreenCheckmark.png|link=]] || [[File:Icon GreenCheckmark.png|link=]] || [[File:Icon RedXCross.png|link=]] || [[File:Icon RedXCross.png|link=]] | |
| − | [[ | + | |- |
| − | + | | {{Specs-Link|ah_1s}} || [[File:{{#unit:ah_1s|country}}_flag.png|40px|link=]] || [[File:Icon GreenCheckmark.png|link=]] || [[File:Icon GreenCheckmark.png|link=]] || [[File:Icon RedXCross.png|link=]] || [[File:Icon GreenCheckmark.png|link=]] | |
| − | + | |- | |
| − | + | | {{Specs-Link|ah_1z}} || [[File:{{#unit:ah_1z|country}}_flag.png|40px|link=]] || [[File:Icon GreenCheckmark.png|link=]] || [[File:Icon GreenCheckmark.png|link=]] || [[File:Icon RedXCross.png|link=]] || [[File:Icon GreenCheckmark.png|link=]] | |
| − | [[ | + | |- |
| − | + | | {{Specs-Link|ah_64a}} || [[File:{{#unit:ah_64a|country}}_flag.png|40px|link=]] || [[File:Icon GreenCheckmark.png|link=]] || [[File:Icon GreenCheckmark.png|link=]] || [[File:Icon GreenCheckmark.png|link=]] || [[File:Icon GreenCheckmark.png|link=]] | |
| − | + | |- | |
| − | + | | {{Specs-Link|ah_64a_peten}} || [[File:{{#unit:ah_64a_peten|country}}_flag.png|40px|link=]] || [[File:Icon GreenCheckmark.png|link=]] || [[File:Icon GreenCheckmark.png|link=]] || [[File:Icon GreenCheckmark.png|link=]] || [[File:Icon GreenCheckmark.png|link=]] | |
| − | [[ | + | |- |
| − | + | | {{Specs-Link|ah_64d}} || [[File:{{#unit:ah_64d|country}}_flag.png|40px|link=]] || [[File:Icon GreenCheckmark.png|link=]] || [[File:Icon GreenCheckmark.png|link=]] || [[File:Icon GreenCheckmark.png|link=]] || [[File:Icon GreenCheckmark.png|link=]] | |
| − | + | |- | |
| − | + | | {{Specs-Link|ah_64d_japan}} || [[File:{{#unit:ah_64d_japan|country}}_flag.png|40px|link=]] || [[File:Icon GreenCheckmark.png|link=]] || [[File:Icon GreenCheckmark.png|link=]] || [[File:Icon GreenCheckmark.png|link=]] || [[File:Icon GreenCheckmark.png|link=]] | |
| − | [[ | + | |- |
| − | + | | {{Specs-Link|ah_mk1}} || [[File:{{#unit:ah_mk1|country}}_flag.png|40px|link=]] || [[File:Icon GreenCheckmark.png|link=]] || [[File:Icon GreenCheckmark.png|link=]] || [[File:Icon GreenCheckmark.png|link=]] || [[File:Icon GreenCheckmark.png|link=]] | |
| − | + | |- | |
| − | + | | {{Specs-Link|bo_105cb2}} || [[File:{{#unit:bo_105cb2|country}}_flag.png|40px|link=]] || [[File:Icon GreenCheckmark.png|link=]] || [[File:Icon GreenCheckmark.png|link=]] || [[File:Icon RedXCross.png|link=]] || [[File:Icon RedXCross.png|link=]] | |
| − | === | + | |- |
| − | {| | + | | {{Specs-Link|bo_105pah1}} || [[File:{{#unit:bo_105pah1|country}}_flag.png|40px|link=]] || [[File:Icon GreenCheckmark.png|link=]] || [[File:Icon GreenCheckmark.png|link=]] || [[File:Icon RedXCross.png|link=]] || [[File:Icon RedXCross.png|link=]] |
| − | + | |- | |
| − | + | | {{Specs-Link|bo_105pah1_a1}} || [[File:{{#unit:bo_105pah1_a1|country}}_flag.png|40px|link=]] || [[File:Icon GreenCheckmark.png|link=]] || [[File:Icon GreenCheckmark.png|link=]] || [[File:Icon RedXCross.png|link=]] || [[File:Icon RedXCross.png|link=]] | |
| − | + | |- | |
| − | + | | {{Specs-Link|tiger_had_france}} || [[File:{{#unit:tiger_had_france|country}}_flag.png|40px|link=]] || [[File:Icon GreenCheckmark.png|link=]] || [[File:Icon GreenCheckmark.png|link=]] || [[File:Icon GreenCheckmark.png|link=]] || [[File:Icon GreenCheckmark.png|link=]] | |
| + | |- | ||
| + | | {{Specs-Link|tiger_hap_france}} || [[File:{{#unit:tiger_hap_france|country}}_flag.png|40px|link=]] || [[File:Icon GreenCheckmark.png|link=]] || [[File:Icon GreenCheckmark.png|link=]] || [[File:Icon GreenCheckmark.png|link=]] || [[File:Icon GreenCheckmark.png|link=]] | ||
| + | |- | ||
| + | | {{Specs-Link|tiger_uht}} || [[File:{{#unit:tiger_uht|country}}_flag.png|40px|link=]] || [[File:Icon GreenCheckmark.png|link=]] || [[File:Icon GreenCheckmark.png|link=]] || [[File:Icon GreenCheckmark.png|link=]] || [[File:Icon GreenCheckmark.png|link=]] | ||
| + | |- | ||
| + | | {{Specs-Link|g_lynx}} || [[File:{{#unit:g_lynx|country}}_flag.png|40px|link=]] || [[File:Icon GreenCheckmark.png|link=]] || [[File:Icon GreenCheckmark.png|link=]] || [[File:Icon RedXCross.png|link=]] || [[File:Icon GreenCheckmark.png|link=]] | ||
| + | |- | ||
| + | | {{Specs-Link|h_34}} || [[File:{{#unit:h_34|country}}_flag.png|40px|link=]] || [[File:Icon GreenCheckmark.png|link=]] || [[File:Icon GreenCheckmark.png|link=]] || [[File:Icon RedXCross.png|link=]] || [[File:Icon RedXCross.png|link=]] | ||
| + | |- | ||
| + | | {{Specs-Link|h_34_france}} || [[File:{{#unit:h_34_france|country}}_flag.png|40px|link=]] || [[File:Icon GreenCheckmark.png|link=]] || [[File:Icon GreenCheckmark.png|link=]] || [[File:Icon RedXCross.png|link=]] || [[File:Icon RedXCross.png|link=]] | ||
| + | |- | ||
| + | | {{Specs-Link|iar_316b}} || [[File:{{#unit:iar_316b|country}}_flag.png|40px|link=]] || [[File:Icon GreenCheckmark.png|link=]] || [[File:Icon GreenCheckmark.png|link=]] || [[File:Icon RedXCross.png|link=]] || [[File:Icon RedXCross.png|link=]] | ||
| + | |- | ||
| + | | {{Specs-Link|ka_29}} || [[File:{{#unit:ka_29|country}}_flag.png|40px|link=]] || [[File:Icon GreenCheckmark.png|link=]] || [[File:Icon GreenCheckmark.png|link=]] || [[File:Icon RedXCross.png|link=]] || [[File:Icon RedXCross.png|link=]] | ||
| + | |- | ||
| + | | {{Specs-Link|ka_50}} || [[File:{{#unit:ka_50|country}}_flag.png|40px|link=]] || [[File:Icon GreenCheckmark.png|link=]] || [[File:Icon GreenCheckmark.png|link=]] || [[File:Icon RedXCross.png|link=]] || [[File:Icon RedXCross.png|link=]] | ||
| + | |- | ||
| + | | {{Specs-Link|ka_52}} || [[File:{{#unit:ka_52|country}}_flag.png|40px|link=]] || [[File:Icon GreenCheckmark.png|link=]] || [[File:Icon GreenCheckmark.png|link=]] || [[File:Icon RedXCross.png|link=]] || [[File:Icon GreenCheckmark.png|link=]] | ||
| + | |- | ||
| + | | {{Specs-Link|lynx_ah_mk1}} || [[File:{{#unit:lynx_ah_mk1|country}}_flag.png|40px|link=]] || [[File:Icon GreenCheckmark.png|link=]] || [[File:Icon GreenCheckmark.png|link=]] || [[File:Icon RedXCross.png|link=]] || [[File:Icon GreenCheckmark.png|link=]] | ||
| + | |- | ||
| + | | {{Specs-Link|mi_4av}} || [[File:{{#unit:mi_4av|country}}_flag.png|40px|link=]] || [[File:Icon GreenCheckmark.png|link=]] || [[File:Icon GreenCheckmark.png|link=]] || [[File:Icon RedXCross.png|link=]] || [[File:Icon RedXCross.png|link=]] | ||
| + | |- | ||
| + | | {{Specs-Link|mi_24a}} || [[File:{{#unit:mi_24a|country}}_flag.png|40px|link=]] || [[File:Icon GreenCheckmark.png|link=]] || [[File:Icon GreenCheckmark.png|link=]] || [[File:Icon RedXCross.png|link=]] || [[File:Icon RedXCross.png|link=]] | ||
| + | |- | ||
| + | | {{Specs-Link|mi_24d}} || [[File:{{#unit:mi_24d|country}}_flag.png|40px|link=]] || [[File:Icon GreenCheckmark.png|link=]] || [[File:Icon GreenCheckmark.png|link=]] || [[File:Icon RedXCross.png|link=]] || [[File:Icon RedXCross.png|link=]] | ||
| + | |- | ||
| + | | {{Specs-Link|mi_24p}} || [[File:{{#unit:mi_24p|country}}_flag.png|40px|link=]] || [[File:Icon GreenCheckmark.png|link=]] || [[File:Icon GreenCheckmark.png|link=]] || [[File:Icon RedXCross.png|link=]] || [[File:Icon RedXCross.png|link=]] | ||
| + | |- | ||
| + | | {{Specs-Link|mi_24p_german}} || [[File:{{#unit:mi_24p_german|country}}_flag.png|40px|link=]] || [[File:Icon GreenCheckmark.png|link=]] || [[File:Icon GreenCheckmark.png|link=]] || [[File:Icon RedXCross.png|link=]] || [[File:Icon RedXCross.png|link=]] | ||
| + | |- | ||
| + | | {{Specs-Link|mi_24p_german_hfs80}} || [[File:{{#unit:mi_24p_german_hfs80|country}}_flag.png|40px|link=]] || [[File:Icon GreenCheckmark.png|link=]] || [[File:Icon GreenCheckmark.png|link=]] || [[File:Icon RedXCross.png|link=]] || [[File:Icon RedXCross.png|link=]] | ||
| + | |- | ||
| + | | {{Specs-Link|mi_24v}} || [[File:{{#unit:mi_24v|country}}_flag.png|40px|link=]] || [[File:Icon GreenCheckmark.png|link=]] || [[File:Icon GreenCheckmark.png|link=]] || [[File:Icon RedXCross.png|link=]] || [[File:Icon RedXCross.png|link=]] | ||
| + | |- | ||
| + | | {{Specs-Link|mi_28n}} || [[File:{{#unit:mi_28n|country}}_flag.png|40px|link=]] || [[File:Icon GreenCheckmark.png|link=]] || [[File:Icon GreenCheckmark.png|link=]] || [[File:Icon RedXCross.png|link=]] || [[File:Icon GreenCheckmark.png|link=]] | ||
| + | |- | ||
| + | | {{Specs-Link|mi_35m}} || [[File:{{#unit:mi_35m|country}}_flag.png|40px|link=]] || [[File:Icon GreenCheckmark.png|link=]] || [[File:Icon GreenCheckmark.png|link=]] || [[File:Icon RedXCross.png|link=]] || [[File:Icon GreenCheckmark.png|link=]] | ||
| + | |- | ||
| + | | {{Specs-Link|sa_313b_france}} || [[File:{{#unit:sa_313b_france|country}}_flag.png|40px|link=]] || [[File:Icon GreenCheckmark.png|link=]] || [[File:Icon GreenCheckmark.png|link=]] || [[File:Icon RedXCross.png|link=]] || [[File:Icon RedXCross.png|link=]] | ||
| + | |- | ||
| + | | {{Specs-Link|sa_313b}} || [[File:{{#unit:sa_313b|country}}_flag.png|40px|link=]] || [[File:Icon GreenCheckmark.png|link=]] || [[File:Icon GreenCheckmark.png|link=]] || [[File:Icon RedXCross.png|link=]] || [[File:Icon RedXCross.png|link=]] | ||
| + | |- | ||
| + | | {{Specs-Link|sa_316b}} || [[File:{{#unit:sa_316b|country}}_flag.png|40px|link=]] || [[File:Icon GreenCheckmark.png|link=]] || [[File:Icon GreenCheckmark.png|link=]] || [[File:Icon RedXCross.png|link=]] || [[File:Icon RedXCross.png|link=]] | ||
| + | |- | ||
| + | | {{Specs-Link|sa_341f}} || [[File:{{#unit:sa_341f|country}}_flag.png|40px|link=]] || [[File:Icon GreenCheckmark.png|link=]] || [[File:Icon GreenCheckmark.png|link=]] || [[File:Icon RedXCross.png|link=]] || [[File:Icon GreenCheckmark.png|link=]] | ||
| + | |- | ||
| + | | {{Specs-Link|sa_342m}} || [[File:{{#unit:sa_342m|country}}_flag.png|40px|link=]] || [[File:Icon GreenCheckmark.png|link=]] || [[File:Icon GreenCheckmark.png|link=]] || [[File:Icon RedXCross.png|link=]] || [[File:Icon GreenCheckmark.png|link=]] | ||
| + | |- | ||
| + | | {{Specs-Link|scout_ah_mk1}} || [[File:{{#unit:scout_ah_mk1|country}}_flag.png|40px|link=]] || [[File:Icon GreenCheckmark.png|link=]] || [[File:Icon GreenCheckmark.png|link=]] || [[File:Icon RedXCross.png|link=]] || [[File:Icon RedXCross.png|link=]] | ||
| + | |- | ||
| + | | {{Specs-Link|uh_1b}} || [[File:{{#unit:uh_1b|country}}_flag.png|40px|link=]] || [[File:Icon GreenCheckmark.png|link=]] || [[File:Icon GreenCheckmark.png|link=]] || [[File:Icon RedXCross.png|link=]] || [[File:Icon RedXCross.png|link=]] | ||
| + | |- | ||
| + | | {{Specs-Link|uh_1b_japan}} || [[File:{{#unit:uh_1b_japan|country}}_flag.png|40px|link=]] || [[File:Icon GreenCheckmark.png|link=]] || [[File:Icon GreenCheckmark.png|link=]] || [[File:Icon RedXCross.png|link=]] || [[File:Icon RedXCross.png|link=]] | ||
|- | |- | ||
| − | | | + | | {{Specs-Link|uh_1c}} || [[File:{{#unit:uh_1c|country}}_flag.png|40px|link=]] || [[File:Icon GreenCheckmark.png|link=]] || [[File:Icon GreenCheckmark.png|link=]] || [[File:Icon RedXCross.png|link=]] || [[File:Icon RedXCross.png|link=]] |
| − | | | ||
| − | | | ||
| − | | | ||
| − | | | ||
| − | | | ||
|- | |- | ||
| − | | | + | | {{Specs-Link|uh_1c_xm_30}} || [[File:{{#unit:uh_1c_xm_30|country}}_flag.png|40px|link=]] || [[File:Icon GreenCheckmark.png|link=]] || [[File:Icon GreenCheckmark.png|link=]] || [[File:Icon RedXCross.png|link=]] || [[File:Icon RedXCross.png|link=]] |
| − | | | ||
| − | | | ||
| − | | | ||
| − | | | ||
| − | | | ||
|- | |- | ||
| − | | | + | | {{Specs-Link|uh_1d}} || [[File:{{#unit:uh_1d|country}}_flag.png|40px|link=]] || [[File:Icon GreenCheckmark.png|link=]] || [[File:Icon GreenCheckmark.png|link=]] || [[File:Icon RedXCross.png|link=]] || [[File:Icon RedXCross.png|link=]] |
| − | | | ||
| − | | | ||
| − | | | ||
| − | | | ||
| − | | | ||
|- | |- | ||
| − | | | + | | {{Specs-Link|wasp_has_mk1}} || [[File:{{#unit:wasp_has_mk1|country}}_flag.png|40px|link=]] || [[File:Icon GreenCheckmark.png|link=]] || [[File:Icon GreenCheckmark.png|link=]] || [[File:Icon RedXCross.png|link=]] || [[File:Icon RedXCross.png|link=]] |
| − | | | ||
| − | | | ||
| − | | | ||
| − | | | ||
| − | | | ||
|- | |- | ||
|} | |} | ||
| − | |||
| − | |||
| − | |||
| − | |||
| − | |||
| − | |||
| − | |||
| − | |||
| − | |||
| − | |||
| − | |||
| − | |||
| − | |||
| − | |||
| − | |||
| − | |||
| − | |||
| − | |||
| − | |||
| − | |||
| − | |||
| − | |||
| − | |||
| − | |||
| − | |||
| − | |||
| − | |||
| − | |||
| − | |||
| − | |||
| − | |||
| − | |||
| − | |||
| − | |||
| − | |||
| − | |||
| − | |||
| − | |||
| − | |||
| − | |||
| − | |||
| − | |||
| − | |||
| − | |||
| − | |||
| − | |||
| − | |||
| − | |||
| − | |||
| − | |||
| − | |||
| − | |||
| − | |||
| − | |||
| − | |||
| − | |||
== Media == | == Media == | ||
| − | <!-- | + | <!--Excellent additions to the article would be video guides, screenshots from the game, and photos.--> |
| − | + | {{Youtube-gallery|E941IRtmZdE|'''The Shooting Range #165''' - ''Pages of History'' section at 05:30 discusses the development of night vision systems.|aFj2LOWdj5o|'''The Shooting Range #165''' - ''Tactics & Strategy'' section at 09:00 discusses the night battles.}} | |
| − | |||
| − | {{Youtube-gallery| | ||
| − | |||
| − | |||
| − | |||
| − | |||
| − | |||
| − | '' | ||
| − | |||
| − | |||
| − | == External | + | ==External Links== |
| − | |||
| − | |||
| − | |||
| − | |||
| − | |||
| − | |||
| − | |||
| − | |||
| − | + | * [https://warthunder.com/en/news/6336-development-night-vision-devices-and-thermal-sights-en [Devblog<nowiki>]</nowiki> Night Vision Devices and Thermal Sights] | |
| − | < | ||
| − | + | [[Category:Game mechanics]] | |
Revision as of 16:04, 15 August 2020
Contents
Introduction
Update 1.91 "Night Vision" added Night Vision Devices (NVDs) to a number of high tier tanks and helicopters. These devices provide a significant advantage in the now more common night battles. Two types of night vision devices were added, image intensifiers and thermal imaging systems. In addition infrared (IR) searchlights were added to tanks which historically had them.
Night vision devices are usually unlocked as tier 3 - 4 modifications, however, some tanks or helicopters have them access to them at tier 1 - 2. In addition, some tanks have the option to upgrade their image intensifier to a thermal imager, by unlocking a second modification (on some tanks the thermal imager is included with the original modification).
Tanks and helicopters can have different night vision devices for different crew members, for example, the gunners' sight may have a thermal imager, while the commander's (or in the case of helicopters the pilot's) view may have image intensifiers, and the driver's view a less powerful image intensifier. They can only be used from their designated views, for example, the tank commander's night vision system can only be used in binoculars, the driver's night vision is only used from driver seat or third person view and gunner view is only used from sniper seat.
Controls
| Night Vision Controls | ||
|---|---|---|
| Control name | Default Keybind (PC keyboard & mouse) |
Description |
| Night Vision Mode | ??? | Toggles between standard view and image intensifier / thermal view |
| IR Spotlight | ??? | Toggles the IR searchlight on and off |
| Changing the colour scheme of the thermal sight | ??? | Toggles the thermal sight between White Hot and Black Hot modes |
| Images in this article were created at night with the weather set to "Blind" so represent the operation of Night Vision devices under worst-case conditions (or close to it). |
Image Intensifiers
The most basic type of night vision device is an image intensifier. These devices work by amplifying the light which enters the sensor, as well as converting some light from the infrared spectrum into visible light. When image intensifiers are activated the screen picks up a green hue and you are generally able to see much further. Image intensifiers suffer from noise interference; this appears as a form of TV static over the screen; it is quite noticeable on early image intensifiers however more advanced systems (generally found on newer tanks) are less susceptible and the effect is much less noticeable, leading to them proving much clearer images.
| Image intensifiers can only be used a night. |
Factors affecting performance
There are a number of characteristics which affect the performance of image intensifiers, these are the resolution, the light multiplication factor, and the susceptibility to noise. While individually some of these elements may have only a small impact on image quality, newer image intensifiers will have improvements to most or all of them, providing much better image quality.
Resolution
Different image intensifiers are capable of producing images at different resolutions. The higher the resolution that an image intensifier is capable of outputting, the clearer the final image will be. The image intensifiers on tanks in-game typically have a resolution of 800 x 600 or 1600 x 1200, the difference between these resolutions is minimal and is often only noticeable when looking at long-range targets.
Below is an example of looking at a T-80U, located approximately 1.25 km away from the player, using an 800 x 600 intensifier and a 1600 x 1200 intensifier (all other stats are equal). Notice how the distant tank is slightly clearer and the barrel is visible with the higher resolution image intensifier.
| Click on an image to open it in full screen and get a better view |
A T-80U seen through an 800 x 600 image intensifier.
A T-80U seen through an 1600 x 1200 image intensifier.


Light Multiplier
The light multiplier of an image intensifier determines by how much it will amplify the available light. Image intensifiers with a higher multiplier will produce a brighter image with more details visible. At present there is not a massive difference between the most and least powerful image intensifiers on tanks, however, it is noticeable, more so when an IR searchlight is in use.
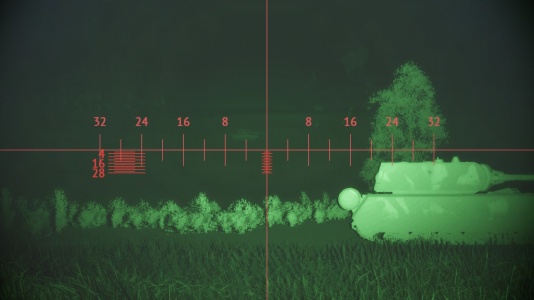
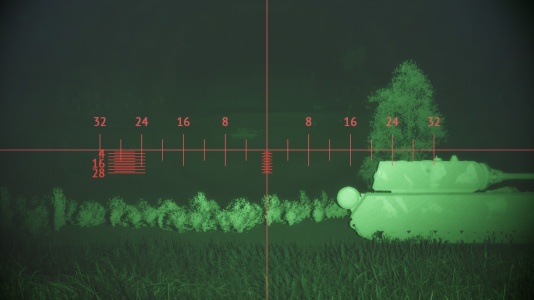
The images below show the view of a target from a T-80U through the main gunsight (light multiplier of 9.0) and the driver's periscope (light multiplier 5.0), the target is being illuminated with an IR searchlight. Notice how the image through the gunsight is generally brighter and details like the grass and bushes are much more visible (there is obviously a zoom difference, but you can see that more is visible regardless).
| Click on an image to open it in full screen and get a better view |
A Maus seen through an image intensifier with a 5.0 multiplier.
A Maus seen through an image intensifier with a 9.0 multiplier.


Noise
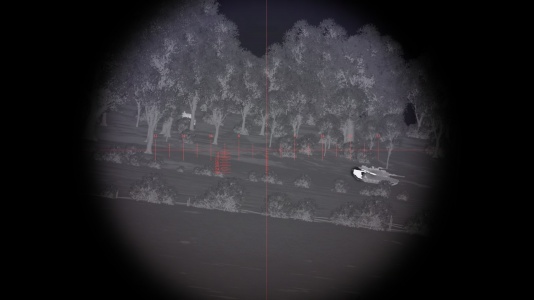
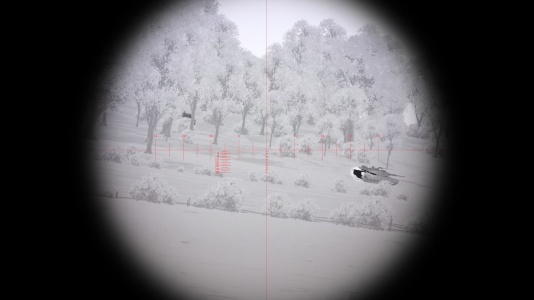
In-game image intensifiers are subject to noise. This presents itself as something resembling TV static covering the screen. Due to a difference in optics, sensors and associated circuitry, more advanced image intensifiers suffer much less from this issue and provide a much clearer image, whereas older and more rudimentary electronics are more susceptible to injecting noise on the final image. The images below show the same view when using an image intensifier with a high noise level and a low noise level (all other stats are equal). Notice how the high noise level sight looks slightly fuzzy and has a sort of static effect over the image, while the low noise one is relatively clear.
| Click on an image to open it in full screen and get a better view |
A Maus seen through an image intensifier with a high amount of noise.
A Maus seen through an image intensifier with a low amount of noise.


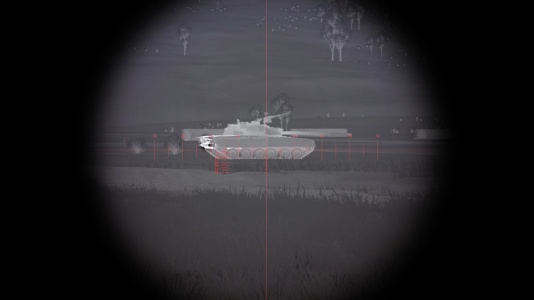
Infrared Spotlights

In addition to image intensifiers, some tanks are fitted with Infrared searchlights. Infrared (IR) searchlights are like regular searchlights, but they emit light on the infrared spectrum instead of the visible light spectrum; this means that the light they produce cannot normally be seen. However, as image intensifiers use light from the infrared spectrum and convert it to visible light, so IR searchlights can be seen through image intensifiers.
When activated an IR search not be visible unless you are looking through an image intensifier. If you are looking through an image intensifier then the area where the light is pointing will be brightly illuminated. The effect of an IR searchlight can be seen in the image to the right.
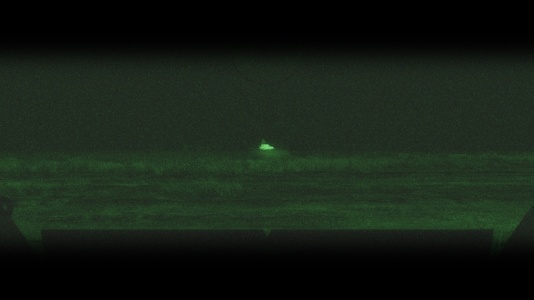
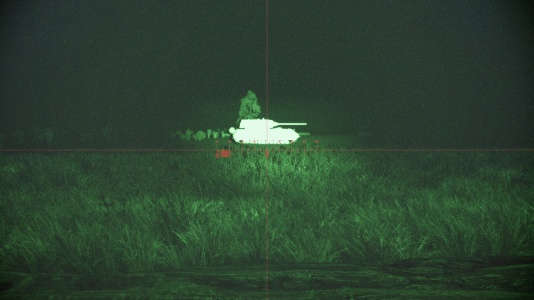
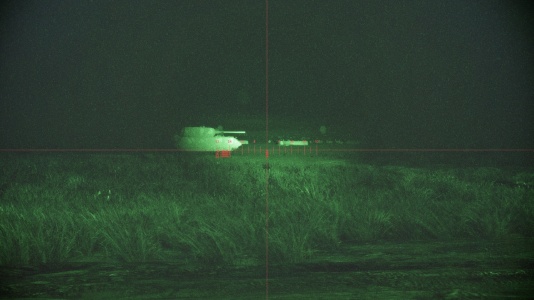
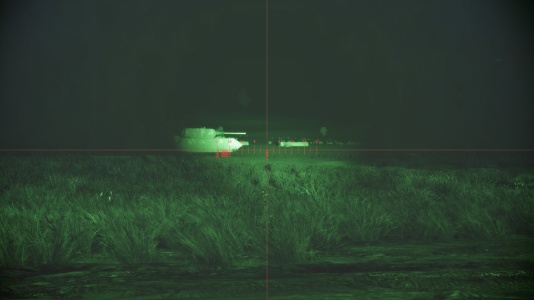
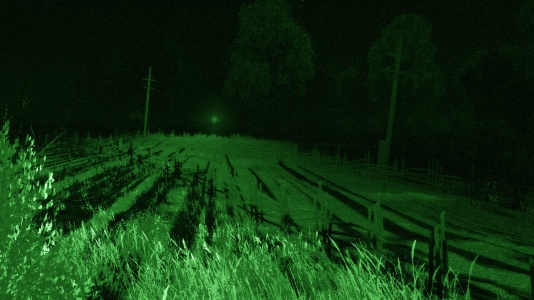
While IR searchlights obviously make seeing targets a lot easier in poor conditions their use does have a major drawback: any other players using image intensifiers can also see the light from your searchlight. As seen in the images below, by activating your IR searchlight you will immediately give your position away to any enemy players who are using an image intensifier. Other players on the ground will see the area where your light is pointing lit up, and the light itself will appear as a bright spot on the screen. Likewise, a helicopter will see the area lit up, and even though they may not be in a position to see the light itself, due the spread of the beam the lit-up area will form a sort of triangle with the tip pointing towards the source.
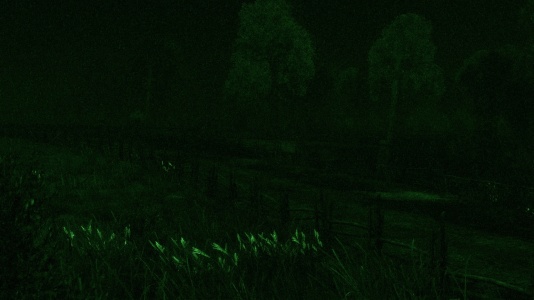
A tank is hiding in the bushes, without it's light on it can not be seen.
The same tank has now turned it's IR searchlight on, it's position is now fairly obvious.
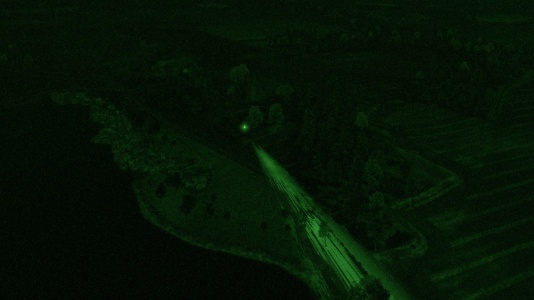
The same tank viewed from the air (as if by a helicopter), again it's position is obvious.


Factors affecting performance
The main differentiating characteristics between different IR searchlights is their maximum range, and how wide the beam is. The maximum range is the furthest distance at which the IR searchlight can still illuminate objects. The beamwidth is measured in degrees and determines how wide the beam is, it can be seen in the image below.
Some IR searchlights are also slightly more or less powerful (brighter) than others, but at present, the difference between those currently in-game is so small it is not worth talking about.

Thermal Imagers
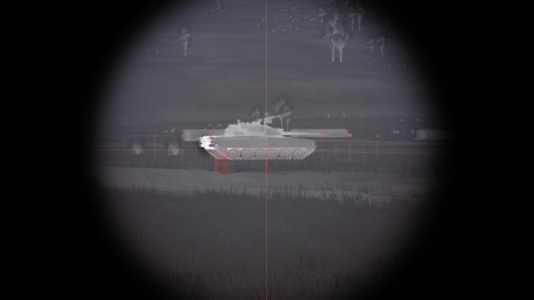
Thermal imagers are more advanced than image intensifiers; they use the infrared radiation emitted by objects to produce images showing temperature. Anything which is warmer than the background will stand out clearly on thermal imaging cameras. In game thermal imagers are usually only available for the gunner's sight. When a thermal sight is activated the colour scheme of the screen will change significantly to one of the two thermal imagining modes available, white hot and black hot. In white hot mode the terrain will appear as dark grey and thermal signatures (vehicles, fires, projectiles, etc.) will appear somewhere between lighter grey and bright white, depending on their temperature. In black hot mode the terrain will be be light grey and thermal signatures will show as between darker grey and black depending on temperature. Thermal imagers allow for targets to easily be spotted at very long range.
The two thermal modes can be seen in the images below. Notice how the engine compartment of the Abrams is much hotter than the rest of the tank. Also notice how a tank hiding in the bushes, which would normally be hard to see can easily be seen with thermal imaging.
| Thermal imagers, can be used both at night and in the day to improve visibility. |
White hot thermal imaging.
Black hot thermal imaging.


Factors affecting performance
Like image intensifiers, thermal imagers can only produce an output of a certain resolution, this resolution is the main differentiating factor between thermal sights on different vehicles. Most thermal imagers in game have a fairly low resolution leading to somewhat blurry and less detailed images, however some have higher resolutions, proving clearer images.
The images below show the same view through a 500 x 300 thermal imager (the lowest resolution in game) and a 1200 x 800 thermal imager (the highest resolution in game). Notice how the higher resolution imager produce a noticeably less blurry and more detailed image. This effect is more pronounced at longer ranges.
| Click on an image to open it in full screen and get a better view |
A T-80U seen through an 500 x 300 thermal imager.
A T-80U seen through an 1200 x 800 thermal imager.


List of vehicles with Night Vision Devices
As of v.1.99.1.39
Ground vehicles
USA
| Vehicle | Country | Commander | Gunner | Driver | Infrared Searchlight | |||
|---|---|---|---|---|---|---|---|---|
| Infrared | Thermal | Infrared | Thermal | Infrared | Thermal | |||
| ADATS | |
|
|
|
|
|
|
|
| HSTV-L | |
|
|
|
|
|
|
|
| IPM1 | |
|
|
|
|
|
|
|
| M1 Abrams | |
|
|
|
|
|
|
|
| M1A1 | |
|
|
|
|
|
|
|
| M1A2 Abrams | |
|
|
|
|
|
|
|
| M3 Bradley | |
|
|
|
|
|
|
|
| M41A1 | |
|
|
|
|
|
|
|
| M42 | |
|
|
|
|
|
|
|
| M47 | |
|
|
|
|
|
|
|
| M48A1 | |
|
|
|
|
|
|
|
| M60 | |
|
|
|
|
|
|
|
| M60 AMBT | |
|
|
|
|
|
|
|
| M60A1 (AOS) | |
|
|
|
|
|
|
|
| M60A1 RISE (P) | |
|
|
|
|
|
|
|
| M60A2 | |
|
|
|
|
|
|
|
| M60A3 TTS | |
|
|
|
|
|
|
|
| M103 | |
|
|
|
|
|
|
|
| M163 | |
|
|
|
|
|
|
|
| M247 | |
|
|
|
|
|
|
|
| M551 | |
|
|
|
|
|
|
|
| M901 | |
|
|
|
|
|
|
|
| ▃Magach 3 (ERA) | |
|
|
|
|
|
|
|
| MBT-70 | |
|
|
|
|
|
|
|
| ▃Merkava Mk.1 | |
|
|
|
|
|
|
|
| ▃Merkava Mk.2B | |
|
|
|
|
|
|
|
| T54E1 | |
|
|
|
|
|
|
|
| T92 | |
|
|
|
|
|
|
|
| T95E1 | |
|
|
|
|
|
|
|
| XM1 (Chrysler) | |
|
|
|
|
|
|
|
| XM1 (GM) | |
|
|
|
|
|
|
|
| XM803 | |
|
|
|
|
|
|
|
Germany
| Vehicle | Country | Commander | Gunner | Driver | Infrared Searchlight | |||
|---|---|---|---|---|---|---|---|---|
| Infrared | Thermal | Infrared | Thermal | Infrared | Thermal | |||
| Begleitpanzer 57 | |
|
|
|
|
|
|
|
| JPz 4-5 | |
|
|
|
|
|
|
|
| KPz-70 | |
|
|
|
|
|
|
|
| leKPz M41 | |
|
|
|
|
|
|
|
| Leopard 2A4 | |
|
|
|
|
|
|
|
| Leopard 2A5 | |
|
|
|
|
|
|
|
| Leopard 2K | |
|
|
|
|
|
|
|
| Leopard A1A1 | |
|
|
|
|
|
|
|
| Leopard A1A1 (L/44) | |
|
|
|
|
|
|
|
| Leopard I | |
|
|
|
|
|
|
|
| M48 Super | |
|
|
|
|
|
|
|
| M48A2 C | |
|
|
|
|
|
|
|
| M48A2 G A2 | |
|
|
|
|
|
|
|
| mKPz M47 G | |
|
|
|
|
|
|
|
| Panther II | |
|
|
|
|
|
|
|
| Radkampfwagen 90 | |
|
|
|
|
|
|
|
| RakJPz 2 (HOT) | |
|
|
|
|
|
|
|
| SPz BMP-1 | |
|
|
|
|
|
|
|
| TAM | |
|
|
|
|
|
|
|
| VT1-2 | |
|
|
|
|
|
|
|
USSR
| Vehicle | Country | Commander | Gunner | Driver | Infrared Searchlight | |||
|---|---|---|---|---|---|---|---|---|
| Infrared | Thermal | Infrared | Thermal | Infrared | Thermal | |||
| ASU-57 | |
|
|
|
|
|
|
|
| ASU-85 | |
|
|
|
|
|
|
|
| BMP-1 | |
|
|
|
|
|
|
|
| BMP-2 | |
|
|
|
|
|
|
|
| BMP-2M | |
|
|
|
|
|
|
|
| BMP-3 | |
|
|
|
|
|
|
|
| IT-1 | |
|
|
|
|
|
|
|
| Khrizantema-S | |
|
|
|
|
|
|
|
| Object 120 | |
|
|
|
|
|
|
|
| Object 279 | |
|
|
|
|
|
|
|
| Object 685 | |
|
|
|
|
|
|
|
| Object 906 | |
|
|
|
|
|
|
|
| PT-76B | |
|
|
|
|
|
|
|
| Shturm-S | |
|
|
|
|
|
|
|
| SU-122-54 | |
|
|
|
|
|
|
|
| T-10M | |
|
|
|
|
|
|
|
| T-55A | |
|
|
|
|
|
|
|
| T-55AM-1 | |
|
|
|
|
|
|
|
| T-62 | |
|
|
|
|
|
|
|
| T-62M-1 | |
|
|
|
|
|
|
|
| T-64A (1971) | |
|
|
|
|
|
|
|
| T-64B | |
|
|
|
|
|
|
|
| T-72A | |
|
|
|
|
|
|
|
| T-72B | |
|
|
|
|
|
|
|
| T-80B | |
|
|
|
|
|
|
|
| T-80U | |
|
|
|
|
|
|
|
| 2S6 | |
|
|
|
|
|
|
|
| ZSU-23-4 | |
|
|
|
|
|
|
|
Britain
| Vehicle | Country | Commander | Gunner | Driver | Infrared Searchlight | |||
|---|---|---|---|---|---|---|---|---|
| Infrared | Thermal | Infrared | Thermal | Infrared | Thermal | |||
| Centurion Mk 10 | |
|
|
|
|
|
|
|
| Challenger 2 | |
|
|
|
|
|
|
|
| Challenger 2 (2F) | |
|
|
|
|
|
|
|
| Challenger Mk.2 | |
|
|
|
|
|
|
|
| Challenger Mk.3 | |
|
|
|
|
|
|
|
| Chieftain Marksman | |
|
|
|
|
|
|
|
| Chieftain Mk 3 | |
|
|
|
|
|
|
|
| Chieftain Mk 5 | |
|
|
|
|
|
|
|
| Chieftain Mk 10 | |
|
|
|
|
|
|
|
| Falcon | |
|
|
|
|
|
|
|
| Rooikat 105 | |
|
|
|
|
|
|
|
| Rooikat Mk.1D | |
|
|
|
|
|
|
|
| ▄Sho't Kal Dalet | |
|
|
|
|
|
|
|
| Stormer HVM | |
|
|
|
|
|
|
|
| Striker | |
|
|
|
|
|
|
|
| Swingfire | |
|
|
|
|
|
|
|
| Vickers Mk.1 | |
|
|
|
|
|
|
|
| Vickers Mk.7 | |
|
|
|
|
|
|
|
| Warrior | |
|
|
|
|
|
|
|
Japan
| Vehicle | Country | Commander | Gunner | Driver | Infrared Searchlight | |||
|---|---|---|---|---|---|---|---|---|
| Infrared | Thermal | Infrared | Thermal | Infrared | Thermal | |||
| ▅M41A1 | |
|
|
|
|
|
|
|
| ▅M42 | |
|
|
|
|
|
|
|
| Type 16 | |
|
|
|
|
|
|
|
| Type 61 | |
|
|
|
|
|
|
|
| Type 74 (E) | |
|
|
|
|
|
|
|
| Type 74 (G) | |
|
|
|
|
|
|
|
| Type 75 MLRS | |
|
|
|
|
|
|
|
| Type 75 SPH | |
|
|
|
|
|
|
|
| Type 87 | |
|
|
|
|
|
|
|
| Type 89 | |
|
|
|
|
|
|
|
| Type 90 | |
|
|
|
|
|
|
|
| Type 90 (B) | |
|
|
|
|
|
|
|
| Type 93 | |
|
|
|
|
|
|
|
China
| Vehicle | Country | Commander | Gunner | Driver | Infrared Searchlight | |||
|---|---|---|---|---|---|---|---|---|
| Infrared | Thermal | Infrared | Thermal | Infrared | Thermal | |||
| CM11 | |
|
|
|
|
|
|
|
| ␗M42 | |
|
|
|
|
|
|
|
| ␗M48A1 | |
|
|
|
|
|
|
|
| ␗M60A3 TTS | |
|
|
|
|
|
|
|
| ␗M113A1 (TOW) | |
|
|
|
|
|
|
|
| ␗PT-76 | |
|
|
|
|
|
|
|
| Т-62 №545 | |
|
|
|
|
|
|
|
| T-69 II G | |
|
|
|
|
|
|
|
| Type 69 | |
|
|
|
|
|
|
|
| ZBD86 | |
|
|
|
|
|
|
|
| ZTZ59D1 | |
|
|
|
|
|
|
|
| ZTZ96 | |
|
|
|
|
|
|
|
| ZTZ96A | |
|
|
|
|
|
|
|
Italy
| Vehicle | Country | Commander | Gunner | Driver | Infrared Searchlight | |||
|---|---|---|---|---|---|---|---|---|
| Infrared | Thermal | Infrared | Thermal | Infrared | Thermal | |||
| Ariete | |
|
|
|
|
|
|
|
| Ariete (P) | |
|
|
|
|
|
|
|
| Ariete PSO | |
|
|
|
|
|
|
|
| AUBL/74 | |
|
|
|
|
|
|
|
| AUBL/74 HVG | |
|
|
|
|
|
|
|
| Centauro I 105 | |
|
|
|
|
|
|
|
| Centauro I 120 | |
|
|
|
|
|
|
|
| Centauro I 105 R | |
|
|
|
|
|
|
|
| M47 (105/55) | |
|
|
|
|
|
|
|
| M60A1 "D.C.Ariete" | |
|
|
|
|
|
|
|
| M113A1 (TOW) | |
|
|
|
|
|
|
|
| OF-40 | |
|
|
|
|
|
|
|
| OF-40 Mk.2A | |
|
|
|
|
|
|
|
| OF-40 (MTCA) | |
|
|
|
|
|
|
|
| OTOMATIC | |
|
|
|
|
|
|
|
France
| Vehicle | Country | Commander | Gunner | Driver | Infrared Searchlight | |||
|---|---|---|---|---|---|---|---|---|
| Infrared | Thermal | Infrared | Thermal | Infrared | Thermal | |||
| AMX-10RC | |
|
|
|
|
|
|
|
| AMX-30 | |
|
|
|
|
|
|
|
| AMX-30 (1972) | |
|
|
|
|
|
|
|
| AMX-30 ACRA | |
|
|
|
|
|
|
|
| AMX-30 Super | |
|
|
|
|
|
|
|
| AMX-30B2 | |
|
|
|
|
|
|
|
| AMX-30B2 BRENUS | |
|
|
|
|
|
|
|
| AMX-32 | |
|
|
|
|
|
|
|
| AMX-40 | |
|
|
|
|
|
|
|
| Leclerc | |
|
|
|
|
|
|
|
Sweden
| Vehicle | Country | Commander | Gunner | Driver | Infrared Searchlight | |||
|---|---|---|---|---|---|---|---|---|
| Infrared | Thermal | Infrared | Thermal | Infrared | Thermal | |||
| CV 90105 | |
|
|
|
|
|
|
|
| CV 90120 | |
|
|
|
|
|
|
|
| Lvkv 9040C | |
|
|
|
|
|
|
|
| Pvrbv 551 | |
|
|
|
|
|
|
|
| Strf 9040C | |
|
|
|
|
|
|
|
| Strf 9040 BILL | |
|
|
|
|
|
|
|
| Strv 101 | |
|
|
|
|
|
|
|
| Strv 103A | |
|
|
|
|
|
|
|
| Strv 103С | |
|
|
|
|
|
|
|
| Strv 121 | |
|
|
|
|
|
|
|
| Strv 122A | |
|
|
|
|
|
|
|
| Strv 103-0 | |
|
|
|
|
|
|
|
| UDES 33 | |
|
|
|
|
|
|
|
Helicopters
| Vehicle | Country | Pilot | Gunner | Gunsight | |
|---|---|---|---|---|---|
| Infrared | Infrared | Infrared | Thermal | ||
| A-129 International (p) | |
|
|
|
|
| AH-1F | |
|
|
|
|
| AH-1G | |
|
|
|
|
| AH-1S | |
|
|
|
|
| ▅AH-1E | |
|
|
|
|
| AH-1S Kisarazu | |
|
|
|
|
| AH-1Z | |
|
|
|
|
| AH-64A | |
|
|
|
|
| ▃AH-64A Peten | |
|
|
|
|
| AH-64D | |
|
|
|
|
| AH-64DJP | |
|
|
|
|
| AH Mk.1 Apache | |
|
|
|
|
| BO 105 CB-2 | |
|
|
|
|
| BO 105 PAH-1 | |
|
|
|
|
| BO 105 PAH-1A1 | |
|
|
|
|
| EC-665 Tiger HAD | |
|
|
|
|
| EC-665 Tiger HAP | |
|
|
|
|
| EC-665 Tiger UHT | |
|
|
|
|
| G-LYNX | |
|
|
|
|
| H-34 | |
|
|
|
|
| ▄H-34 | |
|
|
|
|
| IAR 316B | |
|
|
|
|
| Ka-29 | |
|
|
|
|
| Ka-50 | |
|
|
|
|
| Ka-52 | |
|
|
|
|
| Lynx AH.Mk.1 | |
|
|
|
|
| Mi-4AV | |
|
|
|
|
| Mi-24A | |
|
|
|
|
| ▂Mi-24D | |
|
|
|
|
| Mi-24P | |
|
|
|
|
| ◊Mi-24P | |
|
|
|
|
| ◄Mi-24P HFS 80 | |
|
|
|
|
| Mi-24V | |
|
|
|
|
| Mi-28N | |
|
|
|
|
| Mi-35M | |
|
|
|
|
| SA 313B Alouette II | |
|
|
|
|
| ◄SA 313B Alouette II | |
|
|
|
|
| SA 316B Alouette III | |
|
|
|
|
| SA.341F Gazelle | |
|
|
|
|
| SA.342M Gazelle | |
|
|
|
|
| Scout AH.Mk.1 | |
|
|
|
|
| UH-1B | |
|
|
|
|
| ▅UH-1B | |
|
|
|
|
| UH-1C | |
|
|
|
|
| UH-1C XM-30 | |
|
|
|
|
| ◄UH-1D | |
|
|
|
|
| Wasp HAS.Mk.1 | |
|
|
|
|
