Difference between pages "Stormer HVM" and "Swift F.7"
Inceptor57 (talk | contribs) m |
(Edits.) |
||
| Line 1: | Line 1: | ||
| − | {{Specs-Card|code= | + | {{Specs-Card|code=swift_f7}} |
| + | {{About | ||
| + | | about = British jet fighter '''{{PAGENAME}}''' | ||
| + | | usage = the other version | ||
| + | | link = Swift F.1 | ||
| + | }} | ||
== Description == | == Description == | ||
| − | <!--In the description, the first part should be about the history of the creation and combat usage of the | + | <!-- ''In the description, the first part should be about the history of and the creation and combat usage of the aircraft, as well as its key features. In the second part, tell the reader about the aircraft in the game. Insert a screenshot of the vehicle, so that if the novice player does not remember the vehicle by name, he will immediately understand what kind of vehicle the article is talking about.'' --> |
| − | + | [[File:GarageImage_{{PAGENAME}}.jpg|420px|thumb|left]] | |
| − | [[File: | ||
{{break}} | {{break}} | ||
| − | The '''{{Specs|name}}''' is a rank {{Specs|rank}} British | + | The '''{{Specs|name}}''' is a rank {{Specs|rank}} British jet fighter {{Battle-rating}}. It was introduced in [[Update 1.91 "Night Vision"]]. |
== General info == | == General info == | ||
| − | === | + | === Flight performance === |
| − | + | ''Describe how the aircraft behaves in the air. Speed, manoeuvrability, acceleration and allowable loads - these are the most important characteristics of the vehicle.'' | |
| − | |||
| − | |||
| − | |||
| − | |||
| − | |||
| − | |||
| − | |||
| − | |||
| − | |||
| − | |||
| − | |||
| − | |||
| − | |||
| − | |||
| − | |||
| − | |||
| − | |||
| − | |||
| − | |||
| − | |||
| − | |||
| − | |||
| − | |||
| − | |||
| − | |||
| − | |||
| − | |||
| − | |||
| − | |||
| − | |||
| − | |||
| − | |||
| − | |||
| − | |||
| − | |||
| − | |||
| − | |||
| − | |||
| − | |||
| − | |||
| − | |||
| − | |||
| − | |||
| − | |||
| − | |||
| − | |||
| − | |||
| − | |||
| − | |||
| − | |||
| − | |||
| − | |||
| − | |||
| − | |||
| − | |||
| − | |||
| − | |||
| − | |||
| − | |||
| − | |||
| − | |||
| − | |||
{| class="wikitable" style="text-align:center" | {| class="wikitable" style="text-align:center" | ||
| − | |||
|- | |- | ||
| − | + | ! colspan="8" | Characteristics | |
| − | |||
| − | ! colspan=" | ||
|- | |- | ||
| − | ! colspan=" | + | ! colspan="8" | ''Stock'' |
| − | |||
| − | |||
|- | |- | ||
| − | ! | + | ! colspan="2" | Max Speed<br>(km/h at 3,048 m) |
| − | ! | + | ! rowspan="2" | Max altitude<br>(meters) |
| − | ! | + | ! colspan="2" | Turn time<br>(seconds) |
| + | ! colspan="2" | Rate of climb<br>(meters/second) | ||
| + | ! rowspan="2" | Take-off run<br>(meters) | ||
|- | |- | ||
| − | ! | + | ! AB !! RB !! AB !! RB !! AB !! RB |
| − | |||
|- | |- | ||
| − | + | | 980 || 977 || {{Specs|ceiling}} || 26.5 || 27.0 || 15.5 || 11 || 850 | |
| − | | | ||
|- | |- | ||
| − | ! | + | ! colspan="8" | ''Upgraded'' |
| − | | | + | |- |
| + | ! colspan="2" | Max Speed<br>(km/h at 3,048 m) | ||
| + | ! rowspan="2" | Max altitude<br>(meters) | ||
| + | ! colspan="2" | Turn time<br>(seconds) | ||
| + | ! colspan="2" | Rate of climb<br>(meters/second) | ||
| + | ! rowspan="2" | Take-off run<br>(meters) | ||
| + | |- | ||
| + | ! AB !! RB !! AB !! RB !! AB !! RB | ||
| + | |- | ||
| + | | ??? || 985 || {{Specs|ceiling}} || ??.? || 25.0 || ??.? || 28 || 850 | ||
|- | |- | ||
|} | |} | ||
| − | + | ==== Details ==== | |
| + | {| class="wikitable" style="text-align:center" | ||
| + | |- | ||
| + | ! colspan="5" | Features | ||
| + | |- | ||
| + | ! Combat flaps !! Take-off flaps !! Landing flaps !! Air brakes !! Arrestor gear | ||
| + | |- | ||
| + | | X || ✓ || ✓ || X || X <!-- ✓ --> | ||
| + | |- | ||
| + | |} | ||
| − | + | {| class="wikitable" style="text-align:center" | |
| + | |- | ||
| + | ! colspan="5" | Limits | ||
| + | |- | ||
| + | ! rowspan="2" | Wing-break speed<br>(km/h) | ||
| + | ! rowspan="2" | Gear limit<br>(km/h) | ||
| + | ! rowspan="2" | Combat flaps<br>(km/h) | ||
| + | ! colspan="2" | Max Static G | ||
| + | |- | ||
| + | ! + !! - | ||
| + | |- | ||
| + | | {{Specs|destruction|constructions}} || {{Specs|destruction|chassis}} || 1,060 || ~9 || ~5 | ||
| + | |- | ||
| + | |} | ||
| − | + | {| class="wikitable" style="text-align:center" | |
| − | + | |- | |
| − | + | ! colspan="4" | Optimal velocities | |
| − | + | |- | |
| − | + | ! Ailerons<br>(km/h) | |
| − | + | ! Rudder<br>(km/h) | |
| − | + | ! Elevators<br>(km/h) | |
| − | + | ! Radiator<br>(km/h) | |
| − | + | |- | |
| − | + | | < 850 || < 600 || < 600 || N/A | |
| − | + | |- | |
| − | + | |} | |
| − | |||
{| class="wikitable" style="text-align:center" | {| class="wikitable" style="text-align:center" | ||
| − | |||
|- | |- | ||
| − | ! | + | ! colspan="3" | Compressor (RB/SB) |
| − | |||
| − | |||
| − | |||
| − | |||
|- | |- | ||
| − | | | + | ! colspan="3" | Setting 1 |
|- | |- | ||
| − | ! | + | ! Optimal altitude |
| + | ! 100% Engine power | ||
| + | ! WEP Engine power | ||
|- | |- | ||
| − | + | | 0 m || 3,190 kgf || 3,828 kgf | |
| − | |||
| − | |||
| − | |||
| − | |||
| − | | | ||
| − | | | ||
|- | |- | ||
|} | |} | ||
| − | == | + | === Survivability and armour === |
| − | '' | + | ''Examine the survivability of the aircraft. Note how vulnerable the structure is and how secure the pilot is, whether the fuel tanks are armoured, etc. Describe the armour, if there is any, and also mention the vulnerability of other critical aircraft systems.'' |
| + | |||
| + | == Armaments == | ||
| + | === Offensive armament === | ||
| + | <!-- ''Describe the offensive armament of the aircraft, if any. Describe how effective the cannons and machine guns are in a battle, and also what belts or drums are better to use. If there is no offensive weaponry, delete this subsection.'' --> | ||
| + | {{main|ADEN (30 mm)}} | ||
| + | |||
| + | The '''''{{PAGENAME}}''''' is armed with: | ||
| + | |||
| + | * 2 x 30 mm ADEN cannons, nose-mounted at right side (135 + 185 = 320 total) | ||
| − | + | === Suspended armaments === | |
| + | {{main|Fireflash}} | ||
| − | + | The '''''{{PAGENAME}}''' can be outfitted with the following ordnance: | |
| − | + | 2 x Fireflash air-to-air missiles | |
| − | + | == Usage in battles == | |
| + | ''Describe the tactics of playing in the aircraft, the features of using aircraft in a team and advice on tactics. Refrain from creating a "guide" - do not impose a single point of view, but instead, give the reader food for thought. Examine the most dangerous enemies and give recommendations on fighting them. If necessary, note the specifics of the game in different modes (AB, RB, SB).'' | ||
| − | ===Modules=== | + | === Modules === |
{| class="wikitable" | {| class="wikitable" | ||
! Tier | ! Tier | ||
| − | ! colspan="2"| | + | ! colspan="2" | Flight performance |
| − | ! | + | ! Survivability |
| − | ! | + | ! Weaponry |
|- | |- | ||
| I | | I | ||
| − | | | + | | Fuselage repair |
| − | | | + | | |
| − | | | + | | |
| + | | Offensive 30 mm | ||
|- | |- | ||
| II | | II | ||
| − | | | + | | New boosters |
| − | | | + | | Compressor |
| − | | | + | | Airframe |
| + | | | ||
|- | |- | ||
| III | | III | ||
| − | | | + | | Wings repair |
| − | | | + | | Engine |
| − | | | + | | |
| + | | New 30 mm cannons | ||
|- | |- | ||
| IV | | IV | ||
| − | | | + | | G-suit |
| − | | | + | | |
| − | | | + | | Cover |
| + | | | ||
|- | |- | ||
|} | |} | ||
| − | ===Pros and cons=== | + | === Pros and cons === |
| − | + | ''Summarise and briefly evaluate the vehicle in terms of its characteristics and combat effectiveness. Mark its pros and cons in the bulleted list. Try not to use more than 6 points for each of the characteristics. Avoid using categorical definitions such as "bad", "good" and the like - use substitutions with softer forms such as "inadequate" and "effective".'' | |
'''Pros:''' | '''Pros:''' | ||
| − | + | ||
| − | + | * | |
| − | |||
| − | |||
| − | * | ||
'''Cons:''' | '''Cons:''' | ||
| − | + | ||
| − | + | * | |
| − | |||
| − | |||
| − | |||
| − | |||
| − | |||
| − | * | ||
== History == | == History == | ||
| − | <!--Describe the history of the creation and combat usage of the | + | <!-- ''Describe the history of the creation and combat usage of the aircraft in more detail than in the introduction. If the historical reference turns out to be too long, take it to a separate article, taking a link to the article about the vehicle and adding a block "/History" (example: <nowiki>https://wiki.warthunder.com/(Vehicle-name)/History</nowiki>) and add a link to it here using the <code>main</code> template. Be sure to reference text and sources by using <code><nowiki><ref></ref></nowiki></code>, as well as adding them at the end of the article with <code><nowiki><references /></nowiki></code>. This section may also include the vehicle's dev blog entry (if applicable) and the in-game encyclopedia description (under <code><nowiki>=== In-game description ===</nowiki></code>, also if applicable).'' --> |
| − | In the | + | In the years following the end of WW2, Great Britain focused their efforts on rebuilding their nation from the devastation caused by the war as the British government didn't consider a new war possible in the following ten years. Under these circumstances, developing new military technology wasn't considered a priority in most cases. |
| − | + | As a result, Great Britain found itself lagging behind in military aviation at the start of the 1950s by the outbreak of the Korean War. This prompted the RAF to hastily look for a new fighter aircraft to put into service, even if it meant taking into consideration an interim design. | |
| − | ''- From [[wt:en/news/ | + | One of the designs that sparked the RAF's interest was a new swept-wing aircraft developed by the Supermarine company - the Type 510. Being in essence just a modified Supermarine Attacker, development of this design continued, eventually maturing into the Type 541. |
| + | |||
| + | Soon, the Type 541 received the highest development priority and was hastily rushed through testing and into production as the Supermarine Swift. In fact, production was so rushed that it began before necessary design changes could even be applied from the results of the test flights conducted with the Type 541 prototypes. | ||
| + | |||
| + | Nonetheless, the Supermarine Swift F.1 entered service with the RAF in February 1954, followed shortly afterwards by the F.2 variant. However, many of the aircraft's teething problems weren't resolved as a result of being rushed into production. This resulted in a number of accidents happening early on involving the Swift , leading to the aircraft being grounded for a time. | ||
| + | |||
| + | Newer modifications were developed, which addressed most of the known issues. However, it was a case of too little too late for the Swift, as it quickly became replaced by the Hawker Hunter. In the end, just under 200 Supermarine Swifts were produced out of the close to 500 planned aircraft. The Swift was phased out of active service relatively quickly after its introduction, with the last fighter models being withdrawn by the RAF in the mid to late 1950s. | ||
| + | |||
| + | ''- From [[wt:en/news/6342-development-supermarine-swift-banking-on-success-en|Devblog]]'' | ||
== Media == | == Media == | ||
| − | ''Excellent additions to the article would be video guides, screenshots from the game, and photos.'' | + | <!--''Excellent additions to the article would be video guides, screenshots from the game, and photos.''--> |
| + | ;Videos | ||
| + | {{Youtube-gallery|PoLoEYfa4ec|'''Quick Look - Supermarine Swift F7''' - ''WhooptieDo''|kLUvhT1l14w|'''Is The Supermarine Swift F.7 Worth your time?''' - ''DEFYN''|9AxBBRIYdEE|'''SWIFT F1/F7 Montage - War Thunder''' - ''Professional Thunder''|bBeNjjWfoyQ|'''The Fireflashes Are The Most Fun You'll Have With Missiles''' - ''Spit_flyer''}} | ||
== See also == | == See also == | ||
| − | ''Links to the articles on the War Thunder Wiki that you think will be useful for the reader, for example:'' | + | <!-- ''Links to the articles on the War Thunder Wiki that you think will be useful for the reader, for example:'' |
| − | * ''reference to the series of the | + | * ''reference to the series of the aircraft;'' |
| − | * ''links to approximate analogues of other nations and research trees.'' | + | * ''links to approximate analogues of other nations and research trees.'' --> |
| + | |||
| + | ;Related development | ||
| + | * Supermarine [[Swift F.1]] | ||
| + | * Supermarine [[Attacker FB 1|Attacker]] | ||
| + | |||
| + | ;Aircraft of comparable role, configuration and era | ||
| + | * North American [[F-86 (Family)| F-86]] Sabre | ||
| + | * Dassault [[M.D.450B Ouragan]] | ||
| + | * de Havilland [[Venom FB.4|Venom]] | ||
| + | * Grumman [[F9F (Family)|F9F]] Cougar | ||
| + | * Hawker [[Hunter F.1|Hunter]] | ||
| + | * Mikoyan-Gurevich [[MiG-17 (Family)|MiG-17]] | ||
| + | * Saab [[J29D]] Tunnan | ||
== External links == | == External links == | ||
| − | <!--Paste links to sources and external resources, such as: | + | <!-- ''Paste links to sources and external resources, such as:'' |
* ''topic on the official game forum;'' | * ''topic on the official game forum;'' | ||
| − | * ''encyclopedia page on the | + | * ''encyclopedia page on the aircraft;'' |
| − | * ''other literature.''--> | + | * ''other literature.'' --> |
| − | * [[wt:en/news/ | + | |
| + | * [[wt:en/news/6342-development-supermarine-swift-banking-on-success-en|[Development<nowiki>]</nowiki> Supermarine Swift: Banking on Success]] | ||
| − | {{Britain | + | {{Britain jet aircraft}} |
Revision as of 16:59, 13 November 2019
Contents
| This page is about the British jet fighter Swift F.7. For the other version, see Swift F.1. |
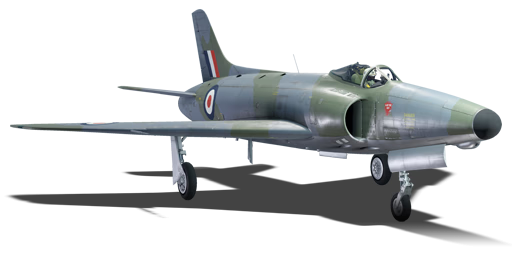
Description

The Swift F.7 is a rank V British jet fighter
with a battle rating of 8.7 (AB/RB/SB). It was introduced in Update 1.91 "Night Vision".
General info
Flight performance
Describe how the aircraft behaves in the air. Speed, manoeuvrability, acceleration and allowable loads - these are the most important characteristics of the vehicle.
| Characteristics | |||||||
|---|---|---|---|---|---|---|---|
| Stock | |||||||
| Max Speed (km/h at 3,048 m) |
Max altitude (meters) |
Turn time (seconds) |
Rate of climb (meters/second) |
Take-off run (meters) | |||
| AB | RB | AB | RB | AB | RB | ||
| 980 | 977 | 12192 | 26.5 | 27.0 | 15.5 | 11 | 850 |
| Upgraded | |||||||
| Max Speed (km/h at 3,048 m) |
Max altitude (meters) |
Turn time (seconds) |
Rate of climb (meters/second) |
Take-off run (meters) | |||
| AB | RB | AB | RB | AB | RB | ||
| ??? | 985 | 12192 | ??.? | 25.0 | ??.? | 28 | 850 |
Details
| Features | ||||
|---|---|---|---|---|
| Combat flaps | Take-off flaps | Landing flaps | Air brakes | Arrestor gear |
| X | ✓ | ✓ | X | X |
| Limits | ||||
|---|---|---|---|---|
| Wing-break speed (km/h) |
Gear limit (km/h) |
Combat flaps (km/h) |
Max Static G | |
| + | - | |||
| 1,060 | ~9 | ~5 | ||
| Optimal velocities | |||
|---|---|---|---|
| Ailerons (km/h) |
Rudder (km/h) |
Elevators (km/h) |
Radiator (km/h) |
| < 850 | < 600 | < 600 | N/A |
| Compressor (RB/SB) | ||
|---|---|---|
| Setting 1 | ||
| Optimal altitude | 100% Engine power | WEP Engine power |
| 0 m | 3,190 kgf | 3,828 kgf |
Survivability and armour
Examine the survivability of the aircraft. Note how vulnerable the structure is and how secure the pilot is, whether the fuel tanks are armoured, etc. Describe the armour, if there is any, and also mention the vulnerability of other critical aircraft systems.
Armaments
Offensive armament
The Swift F.7 is armed with:
- 2 x 30 mm ADEN cannons, nose-mounted at right side (135 + 185 = 320 total)
Suspended armaments
The Swift F.7 can be outfitted with the following ordnance:
2 x Fireflash air-to-air missiles
Usage in battles
Describe the tactics of playing in the aircraft, the features of using aircraft in a team and advice on tactics. Refrain from creating a "guide" - do not impose a single point of view, but instead, give the reader food for thought. Examine the most dangerous enemies and give recommendations on fighting them. If necessary, note the specifics of the game in different modes (AB, RB, SB).
Modules
| Tier | Flight performance | Survivability | Weaponry | |
|---|---|---|---|---|
| I | Fuselage repair | Offensive 30 mm | ||
| II | New boosters | Compressor | Airframe | |
| III | Wings repair | Engine | New 30 mm cannons | |
| IV | G-suit | Cover | ||
Pros and cons
Summarise and briefly evaluate the vehicle in terms of its characteristics and combat effectiveness. Mark its pros and cons in the bulleted list. Try not to use more than 6 points for each of the characteristics. Avoid using categorical definitions such as "bad", "good" and the like - use substitutions with softer forms such as "inadequate" and "effective".
Pros:
Cons:
History
In the years following the end of WW2, Great Britain focused their efforts on rebuilding their nation from the devastation caused by the war as the British government didn't consider a new war possible in the following ten years. Under these circumstances, developing new military technology wasn't considered a priority in most cases.
As a result, Great Britain found itself lagging behind in military aviation at the start of the 1950s by the outbreak of the Korean War. This prompted the RAF to hastily look for a new fighter aircraft to put into service, even if it meant taking into consideration an interim design.
One of the designs that sparked the RAF's interest was a new swept-wing aircraft developed by the Supermarine company - the Type 510. Being in essence just a modified Supermarine Attacker, development of this design continued, eventually maturing into the Type 541.
Soon, the Type 541 received the highest development priority and was hastily rushed through testing and into production as the Supermarine Swift. In fact, production was so rushed that it began before necessary design changes could even be applied from the results of the test flights conducted with the Type 541 prototypes.
Nonetheless, the Supermarine Swift F.1 entered service with the RAF in February 1954, followed shortly afterwards by the F.2 variant. However, many of the aircraft's teething problems weren't resolved as a result of being rushed into production. This resulted in a number of accidents happening early on involving the Swift , leading to the aircraft being grounded for a time.
Newer modifications were developed, which addressed most of the known issues. However, it was a case of too little too late for the Swift, as it quickly became replaced by the Hawker Hunter. In the end, just under 200 Supermarine Swifts were produced out of the close to 500 planned aircraft. The Swift was phased out of active service relatively quickly after its introduction, with the last fighter models being withdrawn by the RAF in the mid to late 1950s.
- From Devblog
Media
- Videos
See also
- Related development
- Aircraft of comparable role, configuration and era
- North American F-86 Sabre
- Dassault M.D.450B Ouragan
- de Havilland Venom
- Grumman F9F Cougar
- Hawker Hunter
- Mikoyan-Gurevich MiG-17
- Saab J29D Tunnan
External links
| Britain jet aircraft | |
|---|---|
| Blackburn | Buccaneer S.1 · Buccaneer S.2 · Buccaneer S.2B |
| British Aerospace | Harrier GR.7 · Sea Harrier FRS.1 (e) · Sea Harrier FRS.1 |
| British Aircraft Corporation | Strikemaster Mk.88 |
| English Electric | Canberra B Mk 2 · Canberra B (I) Mk 6 · Lightning F.6 · Lightning F.53 |
| Gloster | Meteor F Mk 3 · Sea Meteor F Mk 3 · Meteor F Mk 4 G.41F · Meteor F Mk 4 G.41G · Meteor F Mk 8 G.41K · Meteor F Mk.8 Reaper |
| Javelin F.(A.W.) Mk.9 | |
| de Havilland | Vampire F.B.5 · Venom FB.4 · Sea Venom FAW 20 · Sea Vixen F.A.W. Mk.2 |
| Hawker | Sea Hawk FGA.6 · Hunter F.1 · Hunter F.6 · Hunter FGA.9 · Harrier GR.1 · Harrier GR.3 |
| Panavia | Tornado GR.1 · Tornado F.3 |
| SEPECAT | Jaguar GR.1 · Jaguar GR.1A · Jaguar IS |
| Supermarine | Attacker FB 1 · Attacker FB.2 · Scimitar F Mk.1 · Swift F.1 · Swift F.7 |
| Foreign | Phantom FG.1 (USA) · Phantom FGR.2 (USA) · F-4J(UK) Phantom II (USA) |
| JAS39C (Sweden) | |
