Difference between pages "T95" and "Ikv 103"
Colok76286 (talk | contribs) (→Mobility: Updated to new, sleek profile table) |
(Updated page template) |
||
| Line 1: | Line 1: | ||
| − | {{Specs-Card|code= | + | {{Specs-Card|code=sw_ikv_103}} |
== Description == | == Description == | ||
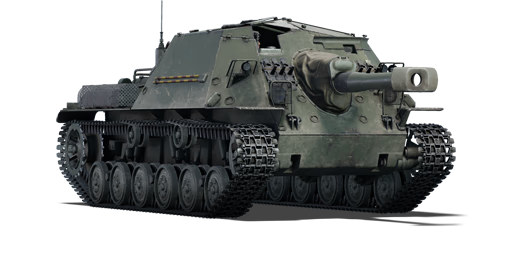
| − | <!--''In the description, the first part | + | <!-- ''In the description, the first part should be about the history of the creation and combat usage of the vehicle, as well as its key features. In the second part, tell the reader about the ground vehicle in the game. Insert a screenshot of the vehicle, so that if the novice player does not remember the vehicle by name, he will immediately understand what kind of vehicle the article is talking about.'' --> |
| − | [[File: | + | [[File:GarageImage_{{PAGENAME}}.jpg|420px|thumb|left]] |
| − | {{ | + | {{Break}} |
| − | The '''{{Specs|name}}''' is a rank {{Specs|rank}} | + | The '''{{Specs|name}}''' is a rank {{Specs|rank}} Swedish tank destroyer {{Battle-rating}}. It was introduced in [[Update 1.97 "Viking Fury"]]. |
| − | |||
| − | |||
| − | |||
| − | |||
| − | |||
| − | |||
| − | |||
| − | |||
| − | |||
| − | |||
| − | |||
| − | |||
| − | |||
| − | |||
| − | |||
== General info == | == General info == | ||
=== Survivability and armour === | === Survivability and armour === | ||
| − | <!--''Describe armour protection. Note the most well protected and key weak areas. Appreciate the layout of modules as well as the number and location of crew members. Is the level of armour protection sufficient, is the placement of modules helpful for survival in combat? | + | <!-- ''Describe armour protection. Note the most well protected and key weak areas. Appreciate the layout of modules as well as the number and location of crew members. Is the level of armour protection sufficient, is the placement of modules helpful for survival in combat? If necessary use a visual template to indicate the most secure and weak zones of the armour.'' --> |
| − | + | The armour of the Ikv 103 is between 18.5 mm to 5 mm of thickness. This armour shouldn't be considered as survivable since every round you face will most likely penetrate and destroy most of what's left inside the tank. The thin side-armour has the occasional ability to result in overpenetration, but any frontal attack usually has enough force to activate most shell fuses. The tank is also incredibly weak against chemical rounds and aerial attacks due to the hull break featured on the vehicle. It is heavily recommended to avoid any form of damage since even artillery fire has the possibility of guaranteed destruction. Due to this low survivability, taking the maximum amount of ammunition isn't something to frown upon. Thanks to the short length of the round, as well as compact storage, ammunition explosions are quite rare. | |
| − | |||
| − | |||
| − | |||
| − | |||
| − | |||
| − | |||
| − | |||
| − | |||
| − | |||
| − | |||
| − | |||
| − | |||
| − | |||
| − | |||
| − | |||
| − | |||
=== Mobility === | === Mobility === | ||
<!-- ''Write about the mobility of the ground vehicle. Estimate the specific power and manoeuvrability, as well as the maximum speed forwards and backwards.'' --> | <!-- ''Write about the mobility of the ground vehicle. Estimate the specific power and manoeuvrability, as well as the maximum speed forwards and backwards.'' --> | ||
| − | {{tankMobility|abMinHp= | + | {{tankMobility|abMinHp=190|rbMinHp=133}} |
| + | |||
| + | The Ikv 103 sports a good engine with a fairly high RPM giving it a lot of torque for climbing a lot of obstacles and average terrain. Although the top speed never exceeds 50 km/h, the Ikv 103 cruises comfortably around 40-45 km/h on a straight line and 25-35 km/h on uneven terrain, depending on the driving level and modules unlocked, no matter the surface below it. The vehicle finds no issue traversing snowy and sandy terrain thanks to the low weight and good track surface, but struggles in deep waters due to the low chassis it sports. The reverse rate of the Ikv 103 is also quite good at 11 km/h. Even if this speed can't hold a candle to the regular speed the 103 has, the reverse rate is still enough to safely peek over hills and reverse back into cover before getting fired upon. | ||
== Armaments == | == Armaments == | ||
| − | |||
=== Main armament === | === Main armament === | ||
| − | <!--''Give the reader information about the characteristics of the main gun. Assess its effectiveness in a battle based on the reloading speed, ballistics and the power of shells. Do not forget about the | + | <!-- ''Give the reader information about the characteristics of the main gun. Assess its effectiveness in a battle based on the reloading speed, ballistics and the power of shells. Do not forget about the flexibility of the fire, that is how quickly the cannon can be aimed at the target, open fire on it and aim at another enemy. Add a link to the main article on the gun: <code><nowiki>{{main|Name of the weapon}}</nowiki></code>. Describe in general terms the ammunition available for the main gun. Give advice on how to use them and how to fill the ammunition storage.'' --> |
| − | {{main| | + | {{main|kan Ikv (105 mm)}} |
| + | |||
| + | The Ikv 103 is outfitted with a 105 mm cannon firing heavy shells with a reload of 10-13 seconds depending on crew qualifications. This cannon is unusually short for its calibre, firing heavy shells with low-velocity. Although the early psgr m/49 lacks significant penetration and post-penetration damage, the later slpsgr m/65 HEAT-FS round packs up to 400 mm of penetration, easily penetrating anything it sees with devastating results. This later shell features a higher velocity than the previous round, as well as more explosive filler making the post-penetration much deadlier than before. The gun is aimed manually without the help of electrical equipment, resulting in a slow traverse rate. At maximum, the gun traverses at 8° per second, resulting in many deaths at closer ranges. This makes the gun most effective at medium ranges, where the traverse is ideal, and the shell velocity isn't crucial. It should be noted that the incredible gun depression allows the Ikv 103 to fire from extreme angles allowing it to safely engage targets without the risk of overexposing the tank, something which becomes incredibly useful to increase the vehicles survivability. | ||
| − | {| class="wikitable" style="text-align:center | + | {| class="wikitable" style="text-align:center" width="100%" |
| − | |||
| − | |||
| − | |||
| − | |||
| − | |||
| − | |||
| − | |||
| − | |||
| − | |||
| − | |||
| − | |||
| − | |||
| − | |||
| − | |||
| − | |||
| − | |||
| − | |||
| − | |||
| − | |||
| − | |||
|- | |- | ||
| − | + | ! colspan="5" | [[kan Ikv (105 mm)|105 mm kan Ikv]] || colspan="5" | Turret rotation speed (°/s) || colspan="4" | Reloading rate (seconds) | |
|- | |- | ||
| − | ! | + | ! Mode !! Capacity !! Vertical !! Horizontal !! Stabilizer |
| + | ! Stock !! Upgraded !! Full !! Expert !! Aced | ||
| + | ! Stock !! Full !! Expert !! Aced | ||
|- | |- | ||
| − | ! | + | ! ''Arcade'' |
| − | + | | rowspan="2" | 24 || rowspan="2" | -16°/+20° || rowspan="2" | ±10° || rowspan="2" | N/A || __.__ || __.__ || __.__ || __.__ || __.__ || rowspan="2" | _.__ || rowspan="2" | _.__ || rowspan="2" | _.__ || rowspan="2" | _.__ | |
| − | |||
| − | |||
|- | |- | ||
| − | | | + | ! ''Realistic'' |
| + | | __.__ || __.__ || __.__ || __.__ || __.__ | ||
|- | |- | ||
|} | |} | ||
| − | + | ==== Ammunition ==== | |
{| class="wikitable sortable" style="text-align:center" width="100%" | {| class="wikitable sortable" style="text-align:center" width="100%" | ||
! colspan="8" | Penetration statistics | ! colspan="8" | Penetration statistics | ||
|- | |- | ||
! rowspan="2" data-sort-type="text" | Ammunition | ! rowspan="2" data-sort-type="text" | Ammunition | ||
| − | ! rowspan="2 | + | ! rowspan="2" | Type of<br>warhead |
| − | ! colspan="6" | '''Penetration | + | ! colspan="6" | '''Penetration @ 0° Angle of Attack (mm)''' |
|- | |- | ||
| − | ! | + | ! 10 m !! 100 m !! 500 m !! 1,000 m !! 1,500 m !! 2,000 m |
| − | ! | ||
| − | ! | ||
| − | ! | ||
| − | ! | ||
| − | ! | ||
|- | |- | ||
| − | | | + | | psgr m/49 || HEAT || 240 || 240 || 240 || 240 || 240 || 240 |
|- | |- | ||
| − | | | + | | sgr m/34 LT || HE || 23 || 23 || 23 || 23 || 23 || 23 |
|- | |- | ||
| − | | | + | | slpsgr m/65 || HEATFS || 400 || 400 || 400 || 400 || 400 || 400 |
| − | |||
| − | |||
|- | |- | ||
|} | |} | ||
{| class="wikitable sortable" style="text-align:center" width="100%" | {| class="wikitable sortable" style="text-align:center" width="100%" | ||
| − | ! colspan=" | + | ! colspan="10" | Shell details |
|- | |- | ||
! rowspan="2" data-sort-type="text" | Ammunition | ! rowspan="2" data-sort-type="text" | Ammunition | ||
| − | ! rowspan="2 | + | ! rowspan="2" | Type of<br>warhead |
| − | ! rowspan="2" |Velocity <br | + | ! rowspan="2" | Velocity<br>(m/s) |
| − | ! rowspan="2" |Projectile<br | + | ! rowspan="2" | Projectile<br>Mass (kg) |
| − | ! rowspan="2" | | + | ! rowspan="2" | Fuse delay<br>(m) |
| − | + | ! rowspan="2" | Fuse sensitivity<br>(mm) | |
| − | ! rowspan="2" | | + | ! rowspan="2" | Explosive Mass<br>(TNT equivalent) (g) |
| − | + | ! colspan="3" | Ricochet | |
| − | ! rowspan="2" | | ||
| − | |||
| − | ! colspan="3" | | ||
|- | |- | ||
| − | ! 0% | + | ! 0% !! 50% !! 100% |
| − | ! 50% | ||
| − | ! 100% | ||
|- | |- | ||
| − | | | + | | psgr m/49 || HEAT || 418 || 10.25 || N/A || 0.1 || 1,610 || 62° || 69° || 73° |
|- | |- | ||
| − | | | + | | sgr m/34 LT || HE || 400 || 11.67 || 0.1 || 0.1 || 1,820 || 79° || 80° || 81° |
|- | |- | ||
| − | | | + | | slpsgr m/65 || HEATFS || 530 || 10.50 || N/A || 0.1 || 1,270 || 65° || 72° || 77° |
|- | |- | ||
| − | | | + | |} |
| + | {| class="wikitable" style="text-align:center" | ||
| + | ! colspan="7" | Smoke shell characteristics | ||
| + | |- | ||
| + | ! Ammunition | ||
| + | ! Velocity<br>(m/s) | ||
| + | ! Projectile<br>Mass (kg) | ||
| + | ! Screen radius<br>(m) | ||
| + | ! Screen deploy time<br>(s) | ||
| + | ! Screen hold time<br>(s) | ||
| + | ! Explosive Mass<br>(TNT equivalent) (g) | ||
| + | |- | ||
| + | | rökgr m/49 || 359 || 14.7 || 20 || 5 || 25 || 50 | ||
|- | |- | ||
|} | |} | ||
| − | ==== | + | ==== [[Ammo racks]] ==== |
| − | + | <!-- [[File:Ammoracks_{{PAGENAME}}.png|right|thumb|x250px|[[Ammo racks]] of the {{PAGENAME}}]] --> | |
| − | + | {| class="wikitable" style="text-align:center" | |
| − | |||
| − | |||
| − | |||
| − | |||
| − | |||
| − | |||
| − | |||
| − | |||
| − | |||
| − | |||
| − | |||
| − | |||
| − | |||
| − | [[File: | ||
| − | {| class="wikitable | ||
|- | |- | ||
| − | ! | + | ! Full<br>ammo |
| − | ! | + | ! 1st<br>rack empty |
| − | + | ! 2nd<br>rack empty | |
| − | ! | + | ! 3rd<br>rack empty |
| − | ! | + | ! 4th<br>rack empty |
| − | ! | + | ! 5th<br>rack empty |
| − | ! | + | ! 6th<br>rack empty |
| − | ! | + | ! Visual<br>discrepancy |
| − | |||
| − | |||
| − | |||
| − | |||
| − | ! | ||
|- | |- | ||
| − | | ''' | + | | '''24''' || __ ''(+__)'' || __ ''(+__)'' || __ ''(+__)'' || __ ''(+__)'' || __ ''(+__)'' || __ ''(+__)'' || __ |
|- | |- | ||
|} | |} | ||
| − | + | == Usage in battles == | |
| + | <!-- ''Describe the tactics of playing in the vehicle, the features of using vehicles in the team and advice on tactics. Refrain from creating a "guide" - do not impose a single point of view but instead give the reader food for thought. Describe the most dangerous enemies and give recommendations on fighting them. If necessary, note the specifics of the game in different modes (AB, RB, SB).'' --> | ||
| + | The Ikv 103 is a nimble vehicle with a small silhouette compared to its peers. The lightweight and powerful gun set it apart from other vehicles at the battle rating. The general playstyle can be compared to the Jpz 4-5 found in the German tech tree. This playstyle is a more aggressive spin on tank destroying than usual, where the vehicle has to make use of positioning rather than frontal survivability. The Ikv 103 can't use common sniping locations very effectively since any form of enemy retaliation will destroy the vehicle completely. Instead, the 103 needs to drive full speed to various locations where enemies are unlikely to expect danger. Although this playstyle requires a lot of map knowledge, the reward is quite high for a successful flank, thanks to the devastating cannon the Ikv 103 carries. Thanks to the light vehicle weight and strong engine, the Ikv 103 is also able to climb a lot of obstacles, something that helps a lot when fighting on bad terrain. However, maps that lack terrain entirely cripple the 103's performance quite significantly, since the tank cannot hide, resulting in a lot of face-to-face engagements, which the Ikv 103 almost always lose. | ||
| − | + | === Modules === | |
| − | + | {| class="wikitable" | |
| − | === | + | ! Tier |
| − | + | ! colspan="2" | Mobility | |
| − | + | ! Protection | |
| − | + | ! colspan="2" | Firepower | |
| − | |||
|- | |- | ||
| − | + | | I | |
| + | | Tracks | ||
| + | | | ||
| + | | Parts | ||
| + | | Horizontal Drive | ||
| + | | | ||
|- | |- | ||
| − | + | | II | |
| + | | Suspension | ||
| + | | Brake System | ||
| + | | FPE | ||
| + | | Adjustment of Fire | ||
| + | | | ||
|- | |- | ||
| − | + | | III | |
| − | + | | Filters | |
| − | + | | | |
| − | + | | Crew Replenishment | |
| + | | Elevation Mechanism | ||
| + | | rökgr m/49 | ||
|- | |- | ||
| − | | | + | | IV |
| + | | Transmission | ||
| + | | Engine | ||
| + | | | ||
| + | | slpsgr m/65 | ||
| + | | | ||
|- | |- | ||
|} | |} | ||
| − | == | + | === Pros and cons === |
| − | <!--'' | + | <!-- ''Summarise and briefly evaluate the vehicle in terms of its characteristics and combat effectiveness. Mark its pros and cons in a bulleted list. Try not to use more than 6 points for each of the characteristics. Avoid using categorical definitions such as "bad", "good" and the like - use substitutions with softer forms such as "inadequate" and "effective".'' --> |
| − | |||
| − | + | '''Pros:''' | |
| − | + | * Excellent HEAT round for its rank, able to penetrate the upper glacis plate of the Tiger II | |
| + | * Above average mobility, able to secure crucial positions or even flank the enemy | ||
| + | * Neutral steering | ||
| + | * Able to hull-break light vehicles | ||
| + | * Small silhouette | ||
| + | * Incredible gun depression | ||
| − | + | '''Cons:''' | |
| − | |||
| − | |||
| − | |||
| − | |||
| − | |||
| − | + | * Poor armour, sides able to be penetrated by heavy machine guns, and even rifle-calibre bullets behind the tracks | |
| − | + | * Has hull-break | |
| − | + | * No MG to destroy light fences that can fuse your HEAT shells | |
| − | + | * Slow gun traverse, makes aiming in CQB or moving target harder | |
| − | + | * Vehicle reverses slightly when firing, forcing you to reacquire range of target after every shot | |
| − | |||
| − | |||
| − | |||
| − | |||
| − | |||
| − | |||
| − | |||
| − | |||
| − | |||
| − | |||
| − | |||
| − | |||
| − | |||
| − | |||
| − | |||
| − | |||
| − | |||
| − | |||
| − | |||
| − | |||
| − | * | ||
| − | |||
| − | * | ||
| − | |||
| − | |||
| − | |||
| − | * | ||
| − | |||
| − | |||
| − | |||
| − | |||
| − | |||
| − | |||
| − | |||
| − | |||
| − | |||
| − | * | ||
| − | |||
| − | |||
| − | |||
| − | |||
| − | |||
| − | |||
| − | |||
| − | |||
| − | |||
| − | |||
| − | |||
| − | |||
| − | |||
| − | |||
| − | |||
| − | |||
| − | |||
| − | |||
| − | |||
| − | |||
| − | |||
| − | |||
| − | |||
| − | |||
| − | |||
| − | |||
| − | |||
| − | |||
| − | |||
| − | |||
| − | |||
| − | |||
| − | |||
| − | |||
| − | |||
| − | |||
== History == | == History == | ||
| − | <!--''Describe the history of the creation and combat usage of the | + | <!-- ''Describe the history of the creation and combat usage of the vehicle in more detail than in the introduction. If the historical reference turns out to be too long, take it to a separate article, taking a link to the article about the vehicle and adding a block "/History" (example: <nowiki>https://wiki.warthunder.com/(Vehicle-name)/History</nowiki>) and add a link to it here using the <code>main</code> template. Be sure to reference text and sources by using <code><nowiki><ref></ref></nowiki></code>, as well as adding them at the end of the article with <code><nowiki><references /></nowiki></code>. This section may also include the vehicle's dev blog entry (if applicable) and the in-game encyclopedia description (under <code><nowiki>=== In-game description ===</nowiki></code>, also if applicable).'' --> |
| − | === | ||
| − | |||
| − | The | + | The [[Ikv 72|Infanterikanonvagn 72]] was a project started in 1949 by Sweden for an assault gun. The intended role of this vehicle was to support the infantry in the attack, replacing towed artillery guns. The design was to be small, and of light weight, around 6 tons. This was to reduce costs so a larger amount could be produced. The first prototype from Landsverk, completed in 1950, was armed only with three machine guns. This was insufficient, and it was re-armed with a 75 mm cannon, the same gun from the [[Strv m/42 EH|Strv m/42]]. It was a small, lightly armoured vehicle, with a casemate superstructure housing the 75 mm gun. It had a crew of 4, and it was open topped. Starting in 1956, the Ikv 72 was upgraded to the Ikv 102 standard. This upgrade added an armoured roof for the crew compartment and a 105 mm gun replaced the 75 mm gun. The Ikv 102, in turn, was upgraded to the Ikv 103 standard. The Ikv 103 featured an improved engine, the Volvo B42 engine. The air intake was moved to grills on the rear of the vehicle, instead of through the crew compartment. |
| − | + | === [[wt:en/news/6600-development-ikv-103-heat-mortar-en|Devblog]] === | |
| + | In 1949, the procurement division of the Swedish army placed an order for the development of a light assault self-propelled gun to substitute the [[Sav m/43 (1946)|Sav m/43]] SPG. Three companies took on the work: AB Landsverk took on the development of the platform, Volvo was responsible for the powertrain, and Bofors for the armament. In fact, three versions of the vehicle for different purposes were planned at first: one with a 75 mm cannon, a machine-gun-equipped modification, and also a special one that was intended for the deployment of specific weaponry, such as flamethrowers and rocket launchers. Thus, a light (merely eight tonnes in all), tracked infantry-support vehicle was produced, with an open cabin and bulletproof armour. | ||
| − | + | In 1952, a cannon-equipped version, under the designation the Ikv 72 (short for "infanterikanonvagn", meaning "cannon-equipped infantry-support vehicle" in Swedish), was put into service. A little later, the SPG's were re-equipped with 105 mm howitzers and the cabin was retrofitted with a roof, which could protect the crew from bullets and shrapnel. This modification received the designation Ikv 102. Meanwhile, the Swedish army ordered another series of the vehicle with an upgraded chassis to allow installation of a new air-cooled engine, while the gun and the armour remained the same as the Ikv 102's. This new version was designated Ikv 103. The Ikv 102 and 103 SPGs remained in use by the Swedish army until the mid-1970s, when they were replaced with the [[Ikv 91]] SPG. | |
| − | == | + | == Media == |
| − | + | <!-- ''Excellent additions to the article would be video guides, screenshots from the game, and photos.'' --> | |
| + | {{Youtube-gallery|YdRN17QiW1M|"400mm PEN HEAT" - "PhlyDaily"}} | ||
| − | + | == See also == | |
| + | ''Links to the articles on the War Thunder Wiki that you think will be useful for the reader, for example:'' | ||
| + | * ''reference to the series of the vehicles;'' | ||
| + | * ''links to approximate analogues of other nations and research trees.'' | ||
| − | == | + | == External links == |
| − | + | <!-- ''Paste links to sources and external resources, such as:'' | |
| − | + | * ''topic on the official game forum;'' | |
| − | + | * ''encyclopedia page on the tank;'' | |
| − | + | * ''other literature.'' --> | |
| − | + | * [[wt:en/news/6600-development-ikv-103-heat-mortar-en|[Devblog] Ikv 103: HEAT mortar]] | |
| − | |||
| − | *[ | ||
| − | |||
| − | |||
| − | |||
| − | === | + | === Bibliography === |
| − | |||
| − | + | ** GlobalSecurity.org. (n.d.). Infanterikanonvagn 72 / 102 / 103. GlobalSecurity.org. https://www.globalsecurity.org/military/world/europe/ikv-72.htm | |
| − | + | ** Infanterikanonvagn 72. (2020, May 14). In ''Wikipedia''. https://en.wikipedia.org/w/index.php?title=Infanterikanonvagn_72&oldid=956568359 | |
| − | |||
| − | |||
| − | |||
| − | |||
| − | |||
| − | == | ||
| − | |||
| − | |||
| − | |||
| − | {{ | + | {{Sweden tank destroyers}} |
Revision as of 09:58, 29 July 2020
Contents
Description

The Infanterikanonvagn 103 is a rank III Swedish tank destroyer
with a battle rating of 4.0 (AB/RB/SB). It was introduced in Update 1.97 "Viking Fury".
General info
Survivability and armour
The armour of the Ikv 103 is between 18.5 mm to 5 mm of thickness. This armour shouldn't be considered as survivable since every round you face will most likely penetrate and destroy most of what's left inside the tank. The thin side-armour has the occasional ability to result in overpenetration, but any frontal attack usually has enough force to activate most shell fuses. The tank is also incredibly weak against chemical rounds and aerial attacks due to the hull break featured on the vehicle. It is heavily recommended to avoid any form of damage since even artillery fire has the possibility of guaranteed destruction. Due to this low survivability, taking the maximum amount of ammunition isn't something to frown upon. Thanks to the short length of the round, as well as compact storage, ammunition explosions are quite rare.
Mobility
| Game Mode | Max Speed (km/h) | Weight (tons) | Engine power (horsepower) | Power-to-weight ratio (hp/ton) | |||
|---|---|---|---|---|---|---|---|
| Forward | Reverse | Stock | Upgraded | Stock | Upgraded | ||
| Arcade | 58 | 12 | 8.8 | 190 | 286 | 21.59 | 32.5 |
| Realistic | 53 | 12 | 133 | 150 | 15.11 | 17.05 | |
The Ikv 103 sports a good engine with a fairly high RPM giving it a lot of torque for climbing a lot of obstacles and average terrain. Although the top speed never exceeds 50 km/h, the Ikv 103 cruises comfortably around 40-45 km/h on a straight line and 25-35 km/h on uneven terrain, depending on the driving level and modules unlocked, no matter the surface below it. The vehicle finds no issue traversing snowy and sandy terrain thanks to the low weight and good track surface, but struggles in deep waters due to the low chassis it sports. The reverse rate of the Ikv 103 is also quite good at 11 km/h. Even if this speed can't hold a candle to the regular speed the 103 has, the reverse rate is still enough to safely peek over hills and reverse back into cover before getting fired upon.
Armaments
Main armament
The Ikv 103 is outfitted with a 105 mm cannon firing heavy shells with a reload of 10-13 seconds depending on crew qualifications. This cannon is unusually short for its calibre, firing heavy shells with low-velocity. Although the early psgr m/49 lacks significant penetration and post-penetration damage, the later slpsgr m/65 HEAT-FS round packs up to 400 mm of penetration, easily penetrating anything it sees with devastating results. This later shell features a higher velocity than the previous round, as well as more explosive filler making the post-penetration much deadlier than before. The gun is aimed manually without the help of electrical equipment, resulting in a slow traverse rate. At maximum, the gun traverses at 8° per second, resulting in many deaths at closer ranges. This makes the gun most effective at medium ranges, where the traverse is ideal, and the shell velocity isn't crucial. It should be noted that the incredible gun depression allows the Ikv 103 to fire from extreme angles allowing it to safely engage targets without the risk of overexposing the tank, something which becomes incredibly useful to increase the vehicles survivability.
| 105 mm kan Ikv | Turret rotation speed (°/s) | Reloading rate (seconds) | |||||||||||
|---|---|---|---|---|---|---|---|---|---|---|---|---|---|
| Mode | Capacity | Vertical | Horizontal | Stabilizer | Stock | Upgraded | Full | Expert | Aced | Stock | Full | Expert | Aced |
| Arcade | 24 | -16°/+20° | ±10° | N/A | __.__ | __.__ | __.__ | __.__ | __.__ | _.__ | _.__ | _.__ | _.__ |
| Realistic | __.__ | __.__ | __.__ | __.__ | __.__ | ||||||||
Ammunition
| Penetration statistics | |||||||
|---|---|---|---|---|---|---|---|
| Ammunition | Type of warhead |
Penetration @ 0° Angle of Attack (mm) | |||||
| 10 m | 100 m | 500 m | 1,000 m | 1,500 m | 2,000 m | ||
| psgr m/49 | HEAT | 240 | 240 | 240 | 240 | 240 | 240 |
| sgr m/34 LT | HE | 23 | 23 | 23 | 23 | 23 | 23 |
| slpsgr m/65 | HEATFS | 400 | 400 | 400 | 400 | 400 | 400 |
| Shell details | |||||||||
|---|---|---|---|---|---|---|---|---|---|
| Ammunition | Type of warhead |
Velocity (m/s) |
Projectile Mass (kg) |
Fuse delay (m) |
Fuse sensitivity (mm) |
Explosive Mass (TNT equivalent) (g) |
Ricochet | ||
| 0% | 50% | 100% | |||||||
| psgr m/49 | HEAT | 418 | 10.25 | N/A | 0.1 | 1,610 | 62° | 69° | 73° |
| sgr m/34 LT | HE | 400 | 11.67 | 0.1 | 0.1 | 1,820 | 79° | 80° | 81° |
| slpsgr m/65 | HEATFS | 530 | 10.50 | N/A | 0.1 | 1,270 | 65° | 72° | 77° |
| Smoke shell characteristics | ||||||
|---|---|---|---|---|---|---|
| Ammunition | Velocity (m/s) |
Projectile Mass (kg) |
Screen radius (m) |
Screen deploy time (s) |
Screen hold time (s) |
Explosive Mass (TNT equivalent) (g) |
| rökgr m/49 | 359 | 14.7 | 20 | 5 | 25 | 50 |
Ammo racks
| Full ammo |
1st rack empty |
2nd rack empty |
3rd rack empty |
4th rack empty |
5th rack empty |
6th rack empty |
Visual discrepancy |
|---|---|---|---|---|---|---|---|
| 24 | __ (+__) | __ (+__) | __ (+__) | __ (+__) | __ (+__) | __ (+__) | __ |
Usage in battles
The Ikv 103 is a nimble vehicle with a small silhouette compared to its peers. The lightweight and powerful gun set it apart from other vehicles at the battle rating. The general playstyle can be compared to the Jpz 4-5 found in the German tech tree. This playstyle is a more aggressive spin on tank destroying than usual, where the vehicle has to make use of positioning rather than frontal survivability. The Ikv 103 can't use common sniping locations very effectively since any form of enemy retaliation will destroy the vehicle completely. Instead, the 103 needs to drive full speed to various locations where enemies are unlikely to expect danger. Although this playstyle requires a lot of map knowledge, the reward is quite high for a successful flank, thanks to the devastating cannon the Ikv 103 carries. Thanks to the light vehicle weight and strong engine, the Ikv 103 is also able to climb a lot of obstacles, something that helps a lot when fighting on bad terrain. However, maps that lack terrain entirely cripple the 103's performance quite significantly, since the tank cannot hide, resulting in a lot of face-to-face engagements, which the Ikv 103 almost always lose.
Modules
| Tier | Mobility | Protection | Firepower | ||
|---|---|---|---|---|---|
| I | Tracks | Parts | Horizontal Drive | ||
| II | Suspension | Brake System | FPE | Adjustment of Fire | |
| III | Filters | Crew Replenishment | Elevation Mechanism | rökgr m/49 | |
| IV | Transmission | Engine | slpsgr m/65 | ||
Pros and cons
Pros:
- Excellent HEAT round for its rank, able to penetrate the upper glacis plate of the Tiger II
- Above average mobility, able to secure crucial positions or even flank the enemy
- Neutral steering
- Able to hull-break light vehicles
- Small silhouette
- Incredible gun depression
Cons:
- Poor armour, sides able to be penetrated by heavy machine guns, and even rifle-calibre bullets behind the tracks
- Has hull-break
- No MG to destroy light fences that can fuse your HEAT shells
- Slow gun traverse, makes aiming in CQB or moving target harder
- Vehicle reverses slightly when firing, forcing you to reacquire range of target after every shot
History
The Infanterikanonvagn 72 was a project started in 1949 by Sweden for an assault gun. The intended role of this vehicle was to support the infantry in the attack, replacing towed artillery guns. The design was to be small, and of light weight, around 6 tons. This was to reduce costs so a larger amount could be produced. The first prototype from Landsverk, completed in 1950, was armed only with three machine guns. This was insufficient, and it was re-armed with a 75 mm cannon, the same gun from the Strv m/42. It was a small, lightly armoured vehicle, with a casemate superstructure housing the 75 mm gun. It had a crew of 4, and it was open topped. Starting in 1956, the Ikv 72 was upgraded to the Ikv 102 standard. This upgrade added an armoured roof for the crew compartment and a 105 mm gun replaced the 75 mm gun. The Ikv 102, in turn, was upgraded to the Ikv 103 standard. The Ikv 103 featured an improved engine, the Volvo B42 engine. The air intake was moved to grills on the rear of the vehicle, instead of through the crew compartment.
Devblog
In 1949, the procurement division of the Swedish army placed an order for the development of a light assault self-propelled gun to substitute the Sav m/43 SPG. Three companies took on the work: AB Landsverk took on the development of the platform, Volvo was responsible for the powertrain, and Bofors for the armament. In fact, three versions of the vehicle for different purposes were planned at first: one with a 75 mm cannon, a machine-gun-equipped modification, and also a special one that was intended for the deployment of specific weaponry, such as flamethrowers and rocket launchers. Thus, a light (merely eight tonnes in all), tracked infantry-support vehicle was produced, with an open cabin and bulletproof armour.
In 1952, a cannon-equipped version, under the designation the Ikv 72 (short for "infanterikanonvagn", meaning "cannon-equipped infantry-support vehicle" in Swedish), was put into service. A little later, the SPG's were re-equipped with 105 mm howitzers and the cabin was retrofitted with a roof, which could protect the crew from bullets and shrapnel. This modification received the designation Ikv 102. Meanwhile, the Swedish army ordered another series of the vehicle with an upgraded chassis to allow installation of a new air-cooled engine, while the gun and the armour remained the same as the Ikv 102's. This new version was designated Ikv 103. The Ikv 102 and 103 SPGs remained in use by the Swedish army until the mid-1970s, when they were replaced with the Ikv 91 SPG.
Media
See also
Links to the articles on the War Thunder Wiki that you think will be useful for the reader, for example:
- reference to the series of the vehicles;
- links to approximate analogues of other nations and research trees.
External links
Bibliography
- GlobalSecurity.org. (n.d.). Infanterikanonvagn 72 / 102 / 103. GlobalSecurity.org. https://www.globalsecurity.org/military/world/europe/ikv-72.htm
- Infanterikanonvagn 72. (2020, May 14). In Wikipedia. https://en.wikipedia.org/w/index.php?title=Infanterikanonvagn_72&oldid=956568359
| Sweden tank destroyers | |
|---|---|
| Strv m/41 derivatives | Spj fm/43-44 · Sav m/43 (1944) · Sav m/43 (1946) · Pvkv II · Pvkv III |
| Ikv 72/103 | Ikv 72 · Ikv 103 |
| Pvkv m/43 | Pvkv m/43 (1946) · Pvkv m/43 (1963) |
| ATGM | UDES 33 · Pbv 302 (BILL) · Pvrbv 551 |
| Other | SAV 20.12.48 · Bkan 1C |
| Norway | VIDAR |
