Difference between pages "M18 "Black Cat"" and "Phòng không T-34"
(Edits) |
(→Main armament: Edits) |
||
| Line 1: | Line 1: | ||
| − | {{Specs-Card | + | {{Specs-Card|code=cn_type_65_aa}} |
| − | |code = | ||
| − | }} | ||
{{About | {{About | ||
| − | | about = | + | | about = Chinese SPAA '''{{PAGENAME}}''' |
| − | | usage = the | + | | other |
| − | | link = | + | | usage-1 = gift vehicle in the Russian tree |
| + | | link-1 = Phòng không T-34 (USSR) | ||
| + | | usage-2 = other vehicles using the T-34 chassis | ||
| + | | link-2 = T-34 (Family) | ||
}} | }} | ||
== Description == | == Description == | ||
| − | <!--In the description, the first part should be about the history of the creation and combat usage of the vehicle, as well as its key features. In the second part, tell the reader about the ground vehicle in the game. Insert a screenshot of the vehicle, so that if the novice player does not remember the vehicle by name, he will immediately understand what kind of vehicle the article is talking about.--> | + | <!-- ''In the description, the first part should be about the history of the creation and combat usage of the vehicle, as well as its key features. In the second part, tell the reader about the ground vehicle in the game. Insert a screenshot of the vehicle, so that if the novice player does not remember the vehicle by name, he will immediately understand what kind of vehicle the article is talking about.'' --> |
| − | [[File: | + | [[File:GarageImage_{{PAGENAME}}.jpg|420px|thumb|left]] |
| − | {{ | + | {{Break}} |
| − | The '''{{Specs|name}}''' is a | + | The '''{{Specs|name}}''' is a rank {{Specs|rank}} Chinese SPAA {{Battle-rating}}. It was introduced in [[Update 1.91 "Night Vision"]]. |
| − | The | + | The {{PAGENAME}} is a Chinese and North Vietnamese SPAAG created during the mid-'60s and used in the Vietnam war. It is based on a T-34-85 hull from the Soviet Union, with an open-top box turret that mounts dual 37 mm [[Type 65 (37 mm)|Type 65]] cannons from the Chinese. |
| − | + | It's likely that the NVA improvised this build during the Vietnam War, since North Vietnam invested heavily in anti-air weaponry to combat the US air support. | |
| − | + | In-game it's easily recognized because of the box-shaped and open turret on a T-34-85 hull and lacking the single 85 mm main armament, it also has a higher profile than a regular T-34-85. | |
== General info == | == General info == | ||
=== Survivability and armour === | === Survivability and armour === | ||
| − | <!--Describe armour protection. Note the most well protected and key weak areas. Appreciate the layout of modules as well as the number and location of crew members. Is the level of armour protection sufficient, is the placement of modules helpful for survival in combat? | + | <!-- ''Describe armour protection. Note the most well protected and key weak areas. Appreciate the layout of modules as well as the number and location of crew members. Is the level of armour protection sufficient, is the placement of modules helpful for survival in combat? If necessary use a visual template to indicate the most secure and weak zones of the armour.'' --> |
| − | + | The armour of {{PAGENAME}} turret is an easy target to penetrate with it consisting of only 15mm all-around armour it makes it easy to disable with most type of shells that it might face and machine guns are a danger for it too with the 12.7 mm calibre able to penetrate that thin armour even smaller machine guns can disable the turret. Mainly because the front of the turret got gaps for the gunner and commander where the bullets can easily find its way in and damage the crew. With is being an open-top SPAA makes it as many other open SPAA making it a tasty snack for aircraft machineguns and cannons. One of the drawbacks with the {{PAGENAME}} is that 80% of its crew sits in the turret, 2 of them looking up from the turret making them extremely vulnerable to machinegun fire. | |
| − | If necessary use a visual template to indicate the most secure and weak zones of the armour.--> | ||
| − | |||
| − | |||
| − | |||
| − | |||
| − | |||
| − | { | ||
| − | |||
| − | |||
| − | |||
| − | |||
| − | |||
| − | |||
| − | |||
| − | |||
| − | |||
| − | + | The hull is better armoured like a T-34-85 and its strongest armour is the front hull armour, It's missing the hull-mounted machine gun that there is on the T-34-85 making it have an exposed hole on the front left hull when facing it, it's a trap shot location so it would be best to try angle the tank to remove the open machinegun port for easy access for enemy Shells. | |
| − | |||
| − | |||
| − | |||
=== Mobility === | === Mobility === | ||
<!-- ''Write about the mobility of the ground vehicle. Estimate the specific power and manoeuvrability, as well as the maximum speed forwards and backwards.'' --> | <!-- ''Write about the mobility of the ground vehicle. Estimate the specific power and manoeuvrability, as well as the maximum speed forwards and backwards.'' --> | ||
| − | {{tankMobility|abMinHp= | + | {{tankMobility|abMinHp= 710|rbMinHp= 442}} |
| + | |||
| + | Mobility of the {{PAGENAME}} is good at its battle rating, easy to manoeuvre at off-road and on-road. It got similar mobility characteristic as the Russian T-34-85 with an engine that creates 500 hp at 1800 RPM giving it a top speed of 55 km/h (34 mph). | ||
== Armaments == | == Armaments == | ||
=== Main armament === | === Main armament === | ||
| − | <!--''Give the reader information about the characteristics of the main gun. Assess its effectiveness in a battle based on the reloading speed, ballistics and the power of shells. Do not forget about the flexibility of the fire, that is how quickly the cannon can be aimed at the target, open fire on it and aim at another enemy. Add a link to the main article on the gun: <code><nowiki>{{main|Name of the weapon}}</nowiki></code>. Describe in general terms the ammunition available for the main gun. Give advice on how to use them and how to fill the ammunition storage.''--> | + | <!-- ''Give the reader information about the characteristics of the main gun. Assess its effectiveness in a battle based on the reloading speed, ballistics and the power of shells. Do not forget about the flexibility of the fire, that is how quickly the cannon can be aimed at the target, open fire on it and aim at another enemy. Add a link to the main article on the gun: <code><nowiki>{{main|Name of the weapon}}</nowiki></code>. Describe in general terms the ammunition available for the main gun. Give advice on how to use them and how to fill the ammunition storage.'' --> |
| − | {{main| | + | {{main|Type 65 (37 mm)}} |
| − | + | ||
| + | The {{PAGENAME}} has a pair of decent 37 mm autocannons. The full AP belt is great at both anti-tank and anti-air roles. For AT duty, it is capable of penetrating almost all light tanks and SPAAs frontally, such as the [[M24|M24 Chaffee]], [[M41A1]], etc, most medium tanks from the side like the [[M4A1]]/[[M4A2|2]], [[Panther A]]/[[Panther D|D]], [[Comet]], and some TDs from the side like the [[Panzer IV/70(V)]]. Upon penetration, the shells create quite a bit of shrapnel which makes wiping out crew very easy. It also works great against planes, especially when shooting those attacking you from head-on. The AP shell can easily go through the engine or armour plates and knock out the pilot. One shell is also enough to instantly snap off the wing spar, destroying the plane. Of course, the full HE belt is recommended for dedicated AA duty. Its large calibre plus the 34 g TNT makes the {{PAGENAME}} a lethal threat to almost all planes. Even if the shell hits an unimportant part (eg. wingtip), it can still blow off parts of the plane while the AP will over-penetrate without doing much damage. | ||
| + | |||
| + | The HVAP belt can become handy when you are facing targets whose armour thickness is right between 71-102 mm, for example the Comet, the sides of the [[Tiger H1]], and the [[M4A3E2]]. However there are only 2 HVAP in a 5-shell clip thus careful aiming must be applied when firing the first and the fourth shell (they are the HVAP). | ||
| + | |||
| + | Note, when shooting distant targets (tanks 300 m away, or planes around 750 m away) you want to slow down the fire, as the {{PAGENAME}} shakes violently in a continuous spray, therefore greatly reducing its accuracy. However the accuracy is very good when firing single shells and waiting for the guns to stabilise before the next shot. | ||
| + | |||
{| class="wikitable" style="text-align:center" width="100%" | {| class="wikitable" style="text-align:center" width="100%" | ||
|- | |- | ||
| − | ! colspan=" | + | ! colspan="6" | [[Type 65 (37 mm)|37 mm Type 65]] (x2) || colspan="5" | Turret rotation speed (°/s) || colspan="4" | Reloading rate (seconds) |
|- | |- | ||
| − | ! Mode !! Capacity !! Vertical !! Horizontal !! Stabilizer | + | ! Mode !! Capacity (Belt) !! Fire rate !! Vertical !! Horizontal !! Stabilizer |
! Stock !! Upgraded !! Full !! Expert !! Aced | ! Stock !! Upgraded !! Full !! Expert !! Aced | ||
! Stock !! Full !! Expert !! Aced | ! Stock !! Full !! Expert !! Aced | ||
|- | |- | ||
! ''Arcade'' | ! ''Arcade'' | ||
| − | | rowspan="2" | | + | | rowspan="2" | 390 (5) || rowspan="2" | 160 || rowspan="2" | -5°/+85° || rowspan="2" | ±180° || rowspan="2" | N/A || 52.8 || __.__ || __.__ || __.__ || __.__ || rowspan="2" | 1.3 || rowspan="2" | _.__ || rowspan="2" | _.__ || rowspan="2" | _.__ |
|- | |- | ||
! ''Realistic'' | ! ''Realistic'' | ||
| − | | | + | | 35.7 || __.__ || __.__ || __.__ || __.__ |
|- | |- | ||
|} | |} | ||
| − | + | ||
| − | {| class="wikitable sortable" style="text-align:center | + | ==== Ammunition ==== |
| + | {| class="wikitable sortable" width="100%" style="text-align:center" | ||
! colspan="8" | Penetration statistics | ! colspan="8" | Penetration statistics | ||
|- | |- | ||
! rowspan="2" data-sort-type="text" | Ammunition | ! rowspan="2" data-sort-type="text" | Ammunition | ||
| − | ! rowspan="2 | + | ! rowspan="2" | Type of<br>warhead |
| − | ! colspan="6" | '''Penetration | + | ! colspan="6" | '''Penetration @ 90° (mm)''' |
| + | |- | ||
| + | ! 10 m !! 100 m !! 500 m !! 1,000 m !! 1,500 m !! 2,000 m | ||
|- | |- | ||
| − | + | | BR-167 || AP-T || 71 || 68 || 57 || 46 || 37 || 30 | |
| − | |||
| − | |||
| − | |||
| − | |||
| − | |||
|- | |- | ||
| − | | | + | | BR-167P || HVAP-T || 102 || 95 || 80 || 59 || 35 || 28 |
|- | |- | ||
| − | | | + | | UO-167 || HEFI-T || 3 || 3 || 3 || 3 || 3 || 3 |
| − | |||
| − | |||
| − | |- | ||
| − | |||
|- | |- | ||
|} | |} | ||
| − | {| class="wikitable sortable" style="text-align:center | + | {| class="wikitable sortable" width="100%" style="text-align:center" |
! colspan="11" | Shell details | ! colspan="11" | Shell details | ||
|- | |- | ||
! rowspan="2" data-sort-type="text" | Ammunition | ! rowspan="2" data-sort-type="text" | Ammunition | ||
| − | ! rowspan="2 | + | ! rowspan="2" | Type of<br>warhead |
| − | ! rowspan="2" |Velocity <br | + | ! rowspan="2" | Velocity<br>(m/s) |
| − | ! rowspan="2" |Projectile<br | + | ! rowspan="2" | Projectile<br>Mass (kg) |
| − | ! rowspan="2" | | + | ! rowspan="2" | Fuse delay<br>(m) |
| − | + | ! rowspan="2" | Fuse sensitivity<br>(mm) | |
| − | ! rowspan="2" | | + | ! rowspan="2" | Explosive Mass<br>(TNT equivalent) (g) |
| − | + | ! rowspan="2" | Normalisation at 30°<br>from horizontal | |
| − | ! rowspan="2" | | + | ! colspan="3" | Ricochet |
| − | ! rowspan="2" | | ||
| − | ! colspan="3" | | ||
|- | |- | ||
| − | ! 0% | + | ! 0% !! 50% !! 100% |
| − | ! 50% | ||
| − | ! 100% | ||
|- | |- | ||
| − | | | + | | BR-167 || AP-T || 880 || 0.76 || N/A || N/A || N/A || -1.0° || 47° || 60° || 65° |
|- | |- | ||
| − | | | + | | BR-167P || HVAP-T || 960 || 0.62 || N/A || N/A || N/A || +1.5° || 66° || 70° || 72° |
| − | |||
| − | |||
| − | |||
| − | | | ||
|- | |- | ||
| − | | | + | | UO-167 || HEFI-T || 866 || 0.735 || 0.2 || 0.1 || 34 || +0.0° || 79° || 80° || 81° |
| − | |||
| − | |||
| − | |- | ||
| − | |||
| − | |||
| − | |||
| − | |||
| − | |||
| − | |||
| − | |||
| − | | | ||
| − | | | ||
|- | |- | ||
|} | |} | ||
| − | + | ==== [[Ammo racks]] ==== | |
| − | [[File: | + | [[File:Ammoracks_{{PAGENAME}}.png|right|thumb|x250px|[[Ammo racks]] of the {{PAGENAME}}]] |
{| class="wikitable" style="text-align:center" | {| class="wikitable" style="text-align:center" | ||
|- | |- | ||
| Line 146: | Line 110: | ||
! 2nd<br>rack empty | ! 2nd<br>rack empty | ||
! 3rd<br>rack empty | ! 3rd<br>rack empty | ||
| − | |||
| − | |||
! Visual<br>discrepancy | ! Visual<br>discrepancy | ||
|- | |- | ||
| − | | ''' | + | | '''390''' || ?? ''(+??)'' || ?? ''(+??)'' || ?? ''(+??)'' || ?? |
|- | |- | ||
|} | |} | ||
| − | + | ==== [[Optics]] ==== | |
| − | |||
| − | |||
| − | |||
| − | === | ||
| − | |||
| − | |||
| − | |||
{| class="wikitable" style="text-align:center" | {| class="wikitable" style="text-align:center" | ||
| + | ! colspan="3" | {{PAGENAME}} Optics | ||
|- | |- | ||
| − | ! | + | ! |
| + | ! Default magnification | ||
| + | ! Maximum magnification | ||
|- | |- | ||
| − | ! | + | ! Main Gun optics |
| + | | X3.8 || X4.0 | ||
|- | |- | ||
| − | ! | + | ! Comparable optics |
| − | + | | colspan="2" | ??? | |
| − | |||
| − | |||
| − | |||
| − | | colspan=" | ||
|- | |- | ||
|} | |} | ||
== Usage in battles == | == Usage in battles == | ||
| − | <!--Describe the tactics of playing in the vehicle, the features of using vehicles in the team and advice on tactics. Refrain from creating a "guide" - do not impose a single point of view but instead give the reader food for thought. Describe the most dangerous enemies and give recommendations on fighting them. If necessary, note the specifics of the game in different modes (AB, RB, SB).--> | + | <!-- ''Describe the tactics of playing in the vehicle, the features of using vehicles in the team and advice on tactics. Refrain from creating a "guide" - do not impose a single point of view but instead give the reader food for thought. Describe the most dangerous enemies and give recommendations on fighting them. If necessary, note the specifics of the game in different modes (AB, RB, SB).'' --> |
| − | + | ||
| − | The | + | The {{PAGENAME}} is an excellent self-propelled anti-air tank, but its slow dual 37 mm guns make it hard to hit fast low flying targets if you are not a good shot with SPAA. Its mobility and speed combined with the fast turret rotation make it a deadly opponent for the enemy if ambushed or flanked. |
| + | |||
| + | The {{PAGENAME}} is an excellent self-propelled anti-air tank, but also a great tank for ambushes on the enemy side and rear armour. Be aware that all the tanks and aircraft it will oppose are deadly opponents to it, the exposed crew makes it an easy target from both air and ground. | ||
| − | + | One way to tactically use the {{PAGENAME}} is to stay behind the main force and cover them from possible air threats or light flanking tanks. Its dual 37 mm will make quick work of the air and lighter tanks that you will face. Another way is when enemy players are distracted by your teams player you can use your speed and manoeuvrability to flank around and hit them from the side or rear with AP-T or HVAP-T rounds.They will deal with most side armour. Flanking might not work as well in Arcade Battle as in Realistic or Simulator Battle. | |
| − | + | Some players might find this tank hard to hit aerial targets, since the {{PAGENAME}} 's guns have rather slow fire rate and velocity. A good tactic is to find a place that is not too far away from the frontline (planes usually go for the crowded frontline) but also not too close to it (easier to get shot by tanks), so you can fully concentrate on planes and not worry about tanks. The place should have a hard cover that is wide and tall enough to hide from strafing aircraft. Then just wait til the enemy begins to spawn in planes. You want to hold fire and let them close in to around 1 km from you. If their target appears to be a teammate near you, then utilise your head-on techniques as this is a slanted head-on. Even if you did not hit you will still get their attention. Most ground pounders in ground RB will do loops / high yoyos a lot (dive at a target, pull up vertically, dive again). If you see a plane pulling up, climbing to its peak, aim carefully but hold fire. When it reaches the peak and begins to slowly fall down, spray shells at it, because that is when the plane has the slowest speed, making it an easier target. If you lured a plane into diving on you, aim slightly above it (usually aim near the cockpit) and fire continuously, there is a good chance of hitting and crippling it. Head-on is the most effective yet most risky way to get kills. Overall, for the {{PAGENAME}}, do not fire until the target is around 1 km or closer. | |
| − | ''' | + | '''Enemies worth noting:''' |
| + | |||
| + | * [[Wirbelwind]]: This SPAA is equipped with four fast-firing 20 mm autocannons, allowing it to fire a dense barrage of shells in a matter of seconds. This means that the [[Wirbelwind]] can quickly knock out all 4 crew in the {{PAGENAME}}'s turret, making it defenseless. Plus the [[Wirbelwind]] has a more stable chassis that wobbles less in a brake, meaning that in a sudden encounter the [[Wirbelwind]] is more likely to stabilise its guns and fire first. Therefore, if you know a [[Wirbelwind]] is somewhere near, be very alert and try to spot it before it spots you. Aim at the turret to disable its gunner first. Note: your firing speed depends on the distance, as the {{PAGENAME}} shakes violently when firing. So if you are face to face with the enemy, fire continuously. If it is more than 200 m away, only fire in short bursts or even single shots to avoid missing due to the shake. Wait for the guns to stabilise before firing the next salvo. | ||
| − | |||
=== Modules === | === Modules === | ||
{| class="wikitable" | {| class="wikitable" | ||
| Line 197: | Line 155: | ||
|- | |- | ||
|I | |I | ||
| − | |Tracks | + | |Tracks |
| + | | | ||
|Parts | |Parts | ||
| − | |Horizontal Drive | + | |UO-167 |
| + | |Horizontal Drive | ||
|- | |- | ||
|II | |II | ||
| − | |Suspension | + | |Suspension |
| + | |Brake System | ||
|FPE | |FPE | ||
| − | | | + | |BR-167 |
| + | |Adjustment of Fire | ||
|- | |- | ||
|III | |III | ||
| − | |Filters | + | |Filters |
| + | | | ||
|Crew Replenishment | |Crew Replenishment | ||
| − | | | + | |BR-167P |
| + | |Elevation Mechanism | ||
|- | |- | ||
|IV | |IV | ||
| − | |Transmission | + | |Transmission |
| + | |Engine | ||
| | | | ||
| − | | | + | |Artillery Support |
| | | | ||
| − | |||
| − | |||
| − | |||
|} | |} | ||
=== Pros and cons === | === Pros and cons === | ||
| − | <!--Summarise and briefly evaluate the vehicle in terms of its characteristics and combat effectiveness. Mark its pros and cons in a bulleted list. Try not to use more than 6 points for each of the characteristics. Avoid using categorical definitions such as "bad", "good" and the like - use substitutions with softer forms such as "inadequate" and "effective".-->'''Pros:''' | + | <!-- ''Summarise and briefly evaluate the vehicle in terms of its characteristics and combat effectiveness. Mark its pros and cons in a bulleted list. Try not to use more than 6 points for each of the characteristics. Avoid using categorical definitions such as "bad", "good" and the like - use substitutions with softer forms such as "inadequate" and "effective".'' --> |
| + | |||
| + | '''Pros:''' | ||
| + | |||
| + | * Destructive damage upon hitting an aircraft | ||
| + | * Fast turret rotation of more than 40°/sec allows it to deal with agile targets easily | ||
| + | * Powerful engine / weight ratio | ||
| + | * Has a crew of 6, can replace unconscious ones multiple times which increases survivability. | ||
| + | * Good gun elevation of 85°, crucial for an SPAA | ||
| + | * Multiple belt types allows flexible gameplay: full HE belt for anti-air. Full AP belt can penetrate common tanks' side, eg. [[M4]], [[Panther A]]/D, [[Chi-Ri II|Chi-Ri]]. HVAP belt (mixed with HE) for side of heavy targets up close, like [[Tiger H1]]/E, [[Ho-Ri Production|Ho-Ri]], [[Ferdinand]]. | ||
| − | |||
| − | |||
| − | |||
| − | |||
| − | |||
'''Cons:''' | '''Cons:''' | ||
| − | * | + | * Open turret exposes 4 crew directly to enemy fire. Very vulnerable to top attacks. |
| − | * | + | * High profile makes it easier to be seen & hit |
| − | * | + | * Below-average gun depression of -5° combined with the high mount makes it useless in hilly terrains |
| − | * | + | * Guns are super unstable during continuous fire. Can only fire short bursts to maintain accuracy. The [[Wirbelwind]] and [[Ostwind II]] (also twin 37mm), in comparison, are way more stable. |
| − | * | + | * Thin turret armour of 15mm is prone to be penetrated by heavy MG/shrapnel. SPAA like [[Wirbelwind]] and [[M16 MGMC|M16]] can easily disable all turret crew |
| − | |||
| − | |||
| − | |||
== History == | == History == | ||
| − | <!--Describe the history of the creation and combat usage of the | + | <!-- ''Describe the history of the creation and combat usage of the vehicle in more detail than in the introduction. If the historical reference turns out to be too long, take it to a separate article, taking a link to the article about the vehicle and adding a block "/History" (example: <nowiki>https://wiki.warthunder.com/(Vehicle-name)/History</nowiki>) and add a link to it here using the <code>main</code> template. Be sure to reference text and sources by using <code><nowiki><ref></ref></nowiki></code>, as well as adding them at the end of the article with <code><nowiki><references /></nowiki></code>. This section may also include the vehicle's dev blog entry (if applicable) and the in-game encyclopedia description (under <code><nowiki>=== In-game description ===</nowiki></code>, also if applicable).'' --> |
| − | + | The ''Type 65 Self Propelled Anti Aircraft Gun'' is a bit of an enigma, as no official documentation exists concerning its design or construction. Even today, almost half a century after the type first became known, little is known about it - so perhaps it is best to first focus on what little is known about this unique T-34-based SPAAG. | |
| − | The | ||
| − | + | During the 1972 Spring-Summer Offensive of the Vietnam War, a single example of a SPAAG was captured by the 4th Infantry Regiment of the Army of the Republic of Vietnam on August 13th 1972. This vehicle was subsequently transferred to the United States military, who eventually shipped it to the Aberdeen Proving Ground for technical evaluation. After testing was concluded, the vehicle was put on display at the Aberdeen Proving Ground, where it stood until the early 2010s when it was transferred along with the rest of the collection to the Air Defence Artillery Museum in Fort Sill, Oklahoma. | |
| − | |||
| − | + | Evaluation of this single example showed that it consisted of a T-34-85 chassis which was made at UTZ 183 (Uralsky Tankovij Zavod) in the USSR sometime between 1944 and 1947, featuring a number of modifications. The most important one concerned the removal of the turret, with a solid reinforced steel slab being bolted onto the turret aperture on top of which a twin AA gun was mounted. Other modifications included the removal of the hull-mounted 7.62 mm machine gun, and the removal of part of the engine top deck to allow the gun turret to freely rotate. | |
| − | |||
| − | + | The most common designations applied to this vehicle refer to the gun used: a Chinese-built copy of the Soviet M1939 (61-K). NORINCO of China copied this design, originally building it as the Type 55 (most likely after the year it was first constructed); later on a twin mount was designed around the same gun, which was put into production as the Type 65. As mounted on the tank, the Type 65 gun mount was surrounded by a box-like open-topped structure composed of 16-mm thick armour plates, large enough to house both the gun and a crew of five. Similar in concept to the US-built [[M42|M42 Duster]], the vehicle lacked any advanced aiming system or power-assisted gun traverse or elevation, making it less efficient in use against low-flying high-speed jets, but still deadly to slower attackers and helicopters. | |
| − | + | The lack of any official documentation, combined with the use of a Chinese-built AA gun, soon led to speculation in the US Military that this vehicle was a Chinese-built dedicated SPAAG. As such, the vehicle commonly became known as the ''Type 63 SPAAG'', this name first appearing in the 1987 publication ''A Compendium of Armaments and Military Hardware'' by Christopher Chant, after the assumption that the ''Type 63'' was a variant of the ''Type 65'' specifically built for use on this SPAAG. However, more recently the vehicle has become known as the Type 65 - or Type 63/65 - after the NORINCO-built gun. | |
| − | |||
| − | + | With the lifting of the US embargo on North Vietnam in 1994, new information about the Vietnam War from (formerly North) Vietnamese sources finally became available, and visitors to the Vietnam People's Air Force Museum in Hanoi noticed a photograph on display which gives an entirely different turn to the Type 65's story. This singular photograph, ''three SPAAG's moving to the front'', shows three tank-mounted anti-aircraft guns, one mounted on a T-34-85, the two others on the chassis of an SU-76. The nature of their construction seems to indicate that they - and the captured Type 65 - were in fact locally-built improvised vehicles, combining the hulls of discarded or damaged tanks with AA guns to increase the number of available anti-aircraft guns for use against US forces, the Hanoi-displayed picture showing a T-34-85 hull with a 57mm S-60 AA gun rather than the Type 65 used on the captured vehicle. | |
| − | + | As such, it can be concluded that the Type 65 was in fact an improvised locally-built SPAAG, possibly an attempt at creating a cheap alternative to the more advanced [[ZSU-57-2|Soviet ZSU-57-2]], using the hulls of T-34-85s that had been delivered to North Vietnam in 1965. | |
| − | |||
== Media == | == Media == | ||
| − | + | ''Excellent additions to the article would be video guides, screenshots from the game, and photos.'' | |
| − | |||
== See also == | == See also == | ||
| Line 273: | Line 230: | ||
== External links == | == External links == | ||
| − | + | ''Paste links to sources and external resources, such as:'' | |
| + | |||
* ''topic on the official game forum;'' | * ''topic on the official game forum;'' | ||
* ''encyclopedia page on the tank;'' | * ''encyclopedia page on the tank;'' | ||
| − | * ''other literature.'' | + | * ''other literature.'' |
| − | |||
| − | |||
| − | |||
| − | {{ | + | {{China anti-aircraft vehicles}} |
| − | |||
Revision as of 09:18, 8 July 2020
Contents
| This page is about the Chinese SPAA Phòng không T-34. For gift vehicle in the Russian tree, see Phòng không T-34 (USSR). For other vehicles using the T-34 chassis, see T-34 (Family). |
Description

The Xe tăng phòng không 37 mm is a rank IV Chinese SPAA
with a battle rating of 5.7 (AB) and 5.0 (RB/SB). It was introduced in Update 1.91 "Night Vision".
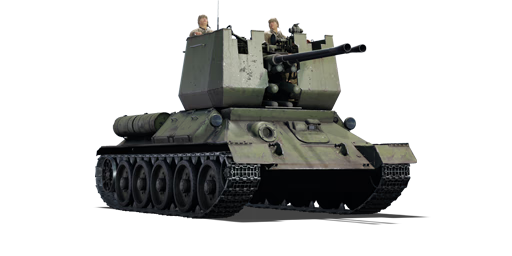
The Phòng không T-34 is a Chinese and North Vietnamese SPAAG created during the mid-'60s and used in the Vietnam war. It is based on a T-34-85 hull from the Soviet Union, with an open-top box turret that mounts dual 37 mm Type 65 cannons from the Chinese.
It's likely that the NVA improvised this build during the Vietnam War, since North Vietnam invested heavily in anti-air weaponry to combat the US air support.
In-game it's easily recognized because of the box-shaped and open turret on a T-34-85 hull and lacking the single 85 mm main armament, it also has a higher profile than a regular T-34-85.
General info
Survivability and armour
The armour of Phòng không T-34 turret is an easy target to penetrate with it consisting of only 15mm all-around armour it makes it easy to disable with most type of shells that it might face and machine guns are a danger for it too with the 12.7 mm calibre able to penetrate that thin armour even smaller machine guns can disable the turret. Mainly because the front of the turret got gaps for the gunner and commander where the bullets can easily find its way in and damage the crew. With is being an open-top SPAA makes it as many other open SPAA making it a tasty snack for aircraft machineguns and cannons. One of the drawbacks with the Phòng không T-34 is that 80% of its crew sits in the turret, 2 of them looking up from the turret making them extremely vulnerable to machinegun fire.
The hull is better armoured like a T-34-85 and its strongest armour is the front hull armour, It's missing the hull-mounted machine gun that there is on the T-34-85 making it have an exposed hole on the front left hull when facing it, it's a trap shot location so it would be best to try angle the tank to remove the open machinegun port for easy access for enemy Shells.
Mobility
| Game Mode | Max Speed (km/h) | Weight (tons) | Engine power (horsepower) | Power-to-weight ratio (hp/ton) | |||
|---|---|---|---|---|---|---|---|
| Forward | Reverse | Stock | Upgraded | Stock | Upgraded | ||
| Arcade | 60 | 10 | 24.9 | 710 | 954 | 28.51 | 38.31 |
| Realistic | 55 | 9 | 442 | 500 | 17.75 | 20.08 | |
Mobility of the Phòng không T-34 is good at its battle rating, easy to manoeuvre at off-road and on-road. It got similar mobility characteristic as the Russian T-34-85 with an engine that creates 500 hp at 1800 RPM giving it a top speed of 55 km/h (34 mph).
Armaments
Main armament
The Phòng không T-34 has a pair of decent 37 mm autocannons. The full AP belt is great at both anti-tank and anti-air roles. For AT duty, it is capable of penetrating almost all light tanks and SPAAs frontally, such as the M24 Chaffee, M41A1, etc, most medium tanks from the side like the M4A1/2, Panther A/D, Comet, and some TDs from the side like the Panzer IV/70(V). Upon penetration, the shells create quite a bit of shrapnel which makes wiping out crew very easy. It also works great against planes, especially when shooting those attacking you from head-on. The AP shell can easily go through the engine or armour plates and knock out the pilot. One shell is also enough to instantly snap off the wing spar, destroying the plane. Of course, the full HE belt is recommended for dedicated AA duty. Its large calibre plus the 34 g TNT makes the Phòng không T-34 a lethal threat to almost all planes. Even if the shell hits an unimportant part (eg. wingtip), it can still blow off parts of the plane while the AP will over-penetrate without doing much damage.
The HVAP belt can become handy when you are facing targets whose armour thickness is right between 71-102 mm, for example the Comet, the sides of the Tiger H1, and the M4A3E2. However there are only 2 HVAP in a 5-shell clip thus careful aiming must be applied when firing the first and the fourth shell (they are the HVAP).
Note, when shooting distant targets (tanks 300 m away, or planes around 750 m away) you want to slow down the fire, as the Phòng không T-34 shakes violently in a continuous spray, therefore greatly reducing its accuracy. However the accuracy is very good when firing single shells and waiting for the guns to stabilise before the next shot.
| 37 mm Type 65 (x2) | Turret rotation speed (°/s) | Reloading rate (seconds) | ||||||||||||
|---|---|---|---|---|---|---|---|---|---|---|---|---|---|---|
| Mode | Capacity (Belt) | Fire rate | Vertical | Horizontal | Stabilizer | Stock | Upgraded | Full | Expert | Aced | Stock | Full | Expert | Aced |
| Arcade | 390 (5) | 160 | -5°/+85° | ±180° | N/A | 52.8 | __.__ | __.__ | __.__ | __.__ | 1.3 | _.__ | _.__ | _.__ |
| Realistic | 35.7 | __.__ | __.__ | __.__ | __.__ | |||||||||
Ammunition
| Penetration statistics | |||||||
|---|---|---|---|---|---|---|---|
| Ammunition | Type of warhead |
Penetration @ 90° (mm) | |||||
| 10 m | 100 m | 500 m | 1,000 m | 1,500 m | 2,000 m | ||
| BR-167 | AP-T | 71 | 68 | 57 | 46 | 37 | 30 |
| BR-167P | HVAP-T | 102 | 95 | 80 | 59 | 35 | 28 |
| UO-167 | HEFI-T | 3 | 3 | 3 | 3 | 3 | 3 |
| Shell details | ||||||||||
|---|---|---|---|---|---|---|---|---|---|---|
| Ammunition | Type of warhead |
Velocity (m/s) |
Projectile Mass (kg) |
Fuse delay (m) |
Fuse sensitivity (mm) |
Explosive Mass (TNT equivalent) (g) |
Normalisation at 30° from horizontal |
Ricochet | ||
| 0% | 50% | 100% | ||||||||
| BR-167 | AP-T | 880 | 0.76 | N/A | N/A | N/A | -1.0° | 47° | 60° | 65° |
| BR-167P | HVAP-T | 960 | 0.62 | N/A | N/A | N/A | +1.5° | 66° | 70° | 72° |
| UO-167 | HEFI-T | 866 | 0.735 | 0.2 | 0.1 | 34 | +0.0° | 79° | 80° | 81° |
Ammo racks

| Full ammo |
1st rack empty |
2nd rack empty |
3rd rack empty |
Visual discrepancy |
|---|---|---|---|---|
| 390 | ?? (+??) | ?? (+??) | ?? (+??) | ?? |
Optics
| Phòng không T-34 Optics | ||
|---|---|---|
| Default magnification | Maximum magnification | |
| Main Gun optics | X3.8 | X4.0 |
| Comparable optics | ??? | |
Usage in battles
The Phòng không T-34 is an excellent self-propelled anti-air tank, but its slow dual 37 mm guns make it hard to hit fast low flying targets if you are not a good shot with SPAA. Its mobility and speed combined with the fast turret rotation make it a deadly opponent for the enemy if ambushed or flanked.
The Phòng không T-34 is an excellent self-propelled anti-air tank, but also a great tank for ambushes on the enemy side and rear armour. Be aware that all the tanks and aircraft it will oppose are deadly opponents to it, the exposed crew makes it an easy target from both air and ground.
One way to tactically use the Phòng không T-34 is to stay behind the main force and cover them from possible air threats or light flanking tanks. Its dual 37 mm will make quick work of the air and lighter tanks that you will face. Another way is when enemy players are distracted by your teams player you can use your speed and manoeuvrability to flank around and hit them from the side or rear with AP-T or HVAP-T rounds.They will deal with most side armour. Flanking might not work as well in Arcade Battle as in Realistic or Simulator Battle.
Some players might find this tank hard to hit aerial targets, since the Phòng không T-34 's guns have rather slow fire rate and velocity. A good tactic is to find a place that is not too far away from the frontline (planes usually go for the crowded frontline) but also not too close to it (easier to get shot by tanks), so you can fully concentrate on planes and not worry about tanks. The place should have a hard cover that is wide and tall enough to hide from strafing aircraft. Then just wait til the enemy begins to spawn in planes. You want to hold fire and let them close in to around 1 km from you. If their target appears to be a teammate near you, then utilise your head-on techniques as this is a slanted head-on. Even if you did not hit you will still get their attention. Most ground pounders in ground RB will do loops / high yoyos a lot (dive at a target, pull up vertically, dive again). If you see a plane pulling up, climbing to its peak, aim carefully but hold fire. When it reaches the peak and begins to slowly fall down, spray shells at it, because that is when the plane has the slowest speed, making it an easier target. If you lured a plane into diving on you, aim slightly above it (usually aim near the cockpit) and fire continuously, there is a good chance of hitting and crippling it. Head-on is the most effective yet most risky way to get kills. Overall, for the Phòng không T-34, do not fire until the target is around 1 km or closer.
Enemies worth noting:
- Wirbelwind: This SPAA is equipped with four fast-firing 20 mm autocannons, allowing it to fire a dense barrage of shells in a matter of seconds. This means that the Wirbelwind can quickly knock out all 4 crew in the Phòng không T-34's turret, making it defenseless. Plus the Wirbelwind has a more stable chassis that wobbles less in a brake, meaning that in a sudden encounter the Wirbelwind is more likely to stabilise its guns and fire first. Therefore, if you know a Wirbelwind is somewhere near, be very alert and try to spot it before it spots you. Aim at the turret to disable its gunner first. Note: your firing speed depends on the distance, as the Phòng không T-34 shakes violently when firing. So if you are face to face with the enemy, fire continuously. If it is more than 200 m away, only fire in short bursts or even single shots to avoid missing due to the shake. Wait for the guns to stabilise before firing the next salvo.
Modules
| Tier | Mobility | Protection | Firepower | ||
|---|---|---|---|---|---|
| I | Tracks | Parts | UO-167 | Horizontal Drive | |
| II | Suspension | Brake System | FPE | BR-167 | Adjustment of Fire |
| III | Filters | Crew Replenishment | BR-167P | Elevation Mechanism | |
| IV | Transmission | Engine | Artillery Support | ||
Pros and cons
Pros:
- Destructive damage upon hitting an aircraft
- Fast turret rotation of more than 40°/sec allows it to deal with agile targets easily
- Powerful engine / weight ratio
- Has a crew of 6, can replace unconscious ones multiple times which increases survivability.
- Good gun elevation of 85°, crucial for an SPAA
- Multiple belt types allows flexible gameplay: full HE belt for anti-air. Full AP belt can penetrate common tanks' side, eg. M4, Panther A/D, Chi-Ri. HVAP belt (mixed with HE) for side of heavy targets up close, like Tiger H1/E, Ho-Ri, Ferdinand.
Cons:
- Open turret exposes 4 crew directly to enemy fire. Very vulnerable to top attacks.
- High profile makes it easier to be seen & hit
- Below-average gun depression of -5° combined with the high mount makes it useless in hilly terrains
- Guns are super unstable during continuous fire. Can only fire short bursts to maintain accuracy. The Wirbelwind and Ostwind II (also twin 37mm), in comparison, are way more stable.
- Thin turret armour of 15mm is prone to be penetrated by heavy MG/shrapnel. SPAA like Wirbelwind and M16 can easily disable all turret crew
History
The Type 65 Self Propelled Anti Aircraft Gun is a bit of an enigma, as no official documentation exists concerning its design or construction. Even today, almost half a century after the type first became known, little is known about it - so perhaps it is best to first focus on what little is known about this unique T-34-based SPAAG.
During the 1972 Spring-Summer Offensive of the Vietnam War, a single example of a SPAAG was captured by the 4th Infantry Regiment of the Army of the Republic of Vietnam on August 13th 1972. This vehicle was subsequently transferred to the United States military, who eventually shipped it to the Aberdeen Proving Ground for technical evaluation. After testing was concluded, the vehicle was put on display at the Aberdeen Proving Ground, where it stood until the early 2010s when it was transferred along with the rest of the collection to the Air Defence Artillery Museum in Fort Sill, Oklahoma.
Evaluation of this single example showed that it consisted of a T-34-85 chassis which was made at UTZ 183 (Uralsky Tankovij Zavod) in the USSR sometime between 1944 and 1947, featuring a number of modifications. The most important one concerned the removal of the turret, with a solid reinforced steel slab being bolted onto the turret aperture on top of which a twin AA gun was mounted. Other modifications included the removal of the hull-mounted 7.62 mm machine gun, and the removal of part of the engine top deck to allow the gun turret to freely rotate.
The most common designations applied to this vehicle refer to the gun used: a Chinese-built copy of the Soviet M1939 (61-K). NORINCO of China copied this design, originally building it as the Type 55 (most likely after the year it was first constructed); later on a twin mount was designed around the same gun, which was put into production as the Type 65. As mounted on the tank, the Type 65 gun mount was surrounded by a box-like open-topped structure composed of 16-mm thick armour plates, large enough to house both the gun and a crew of five. Similar in concept to the US-built M42 Duster, the vehicle lacked any advanced aiming system or power-assisted gun traverse or elevation, making it less efficient in use against low-flying high-speed jets, but still deadly to slower attackers and helicopters.
The lack of any official documentation, combined with the use of a Chinese-built AA gun, soon led to speculation in the US Military that this vehicle was a Chinese-built dedicated SPAAG. As such, the vehicle commonly became known as the Type 63 SPAAG, this name first appearing in the 1987 publication A Compendium of Armaments and Military Hardware by Christopher Chant, after the assumption that the Type 63 was a variant of the Type 65 specifically built for use on this SPAAG. However, more recently the vehicle has become known as the Type 65 - or Type 63/65 - after the NORINCO-built gun.
With the lifting of the US embargo on North Vietnam in 1994, new information about the Vietnam War from (formerly North) Vietnamese sources finally became available, and visitors to the Vietnam People's Air Force Museum in Hanoi noticed a photograph on display which gives an entirely different turn to the Type 65's story. This singular photograph, three SPAAG's moving to the front, shows three tank-mounted anti-aircraft guns, one mounted on a T-34-85, the two others on the chassis of an SU-76. The nature of their construction seems to indicate that they - and the captured Type 65 - were in fact locally-built improvised vehicles, combining the hulls of discarded or damaged tanks with AA guns to increase the number of available anti-aircraft guns for use against US forces, the Hanoi-displayed picture showing a T-34-85 hull with a 57mm S-60 AA gun rather than the Type 65 used on the captured vehicle.
As such, it can be concluded that the Type 65 was in fact an improvised locally-built SPAAG, possibly an attempt at creating a cheap alternative to the more advanced Soviet ZSU-57-2, using the hulls of T-34-85s that had been delivered to North Vietnam in 1965.
Media
Excellent additions to the article would be video guides, screenshots from the game, and photos.
See also
Links to the articles on the War Thunder Wiki that you think will be useful for the reader, for example:
- reference to the series of the vehicles;
- links to approximate analogues of other nations and research trees.
External links
Paste links to sources and external resources, such as:
- topic on the official game forum;
- encyclopedia page on the tank;
- other literature.
| China anti-aircraft vehicles | |
|---|---|
| Radar SPAAG | PGZ09 |
| Gun and Missile SPAAG | PGZ04A |
| Other | ZSD63/PG87 · WZ305 |
| Germany | ␗Sd.Kfz.222 |
| North Vietnam | Phòng không T-34 |
| USA | CCKW 353 (M45) · ␗M42 |
| USSR | Tor-M1 |
